Written By: Dean Shali
Fact Checked By: Sabré Cook
Reviewed By: Tamara Warren
If the wheel lug torque is improperly tightened then it can affect your braking performance, steering performance, tires and wheel safety every single mile you drive from there.
Because, when your vehicles moves, then the thousands of pounds of force literally travel through 4-small contact patches where tires meet the road.
But, if the wheel lug nut even slightly under-tightened or over-tightened then it can slowly create the serious problems such as: wheel vibrations, warped brake rotors, damaged wheel studs, uneven tire wear, loses steering feel and in extreme conditions: it can completely separate the wheel as well.
Now-a-days, modern vehicles are engineered with the extremely precise torque specifications as wheel clamping force directly affects braking stability, suspension balance, tire performance and overall driving safety as well.
That’s why, professional technicians never ever just relies on “Guessing Tightness” instead of that they uses calibrated torque wrenches to apply the exact pressure measured in foot-pounds or Newton-Meters.
So, if you have done services such as: tire rotations, brake repairs, seasonal tire swaps or wheel installations where impact wrenches are used in carelessly, then even really expensive alloy wheel can crack or deform if lug nuts are tightened unevenly.
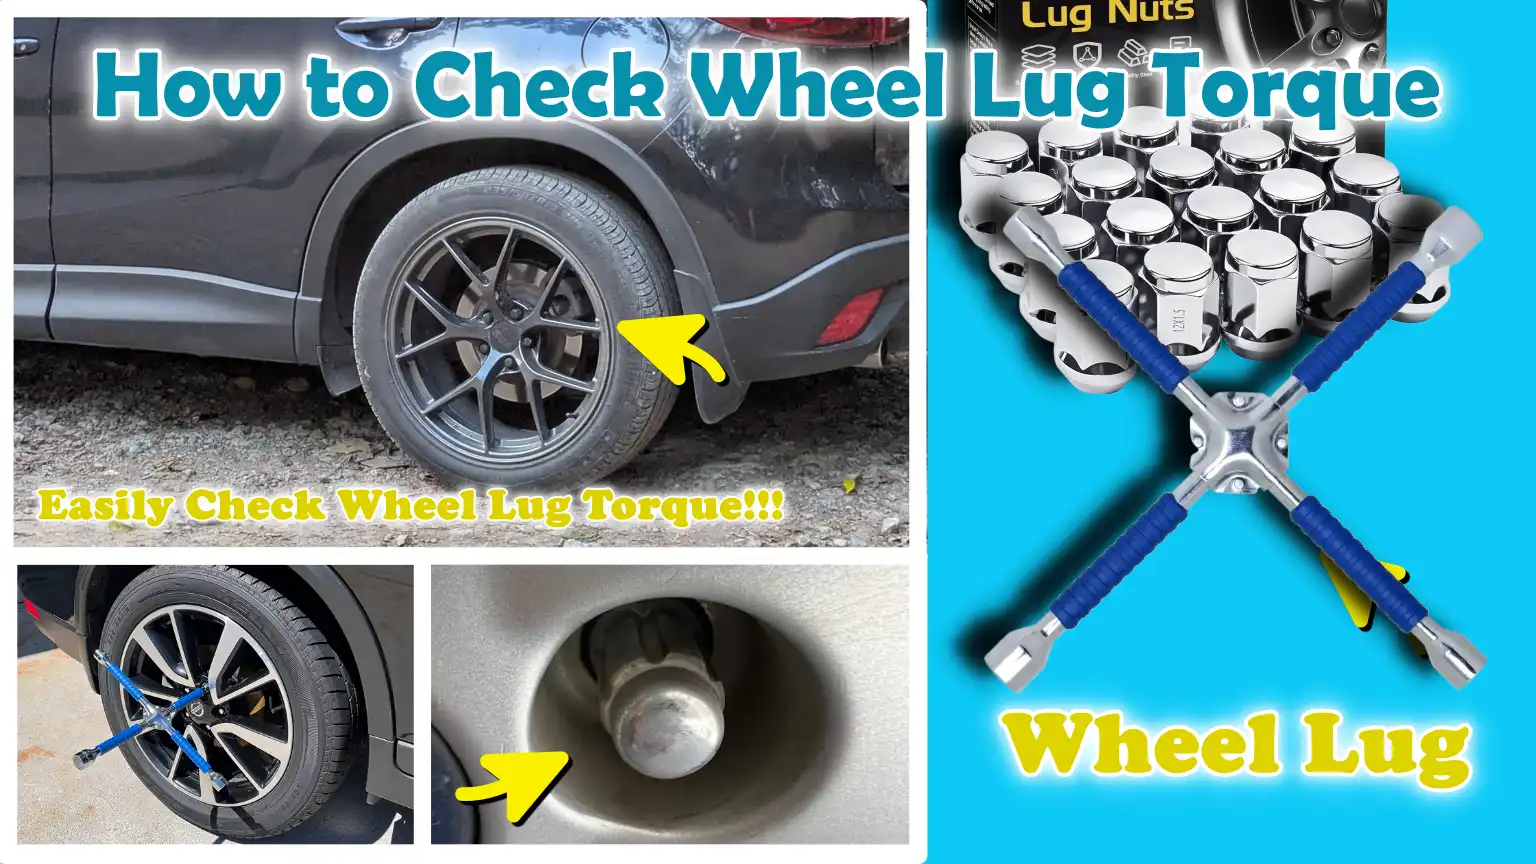
Which is the reason, that we have come up with this specific guide about How to Check Wheel Lug Torque so that you can use torque wrench and securely fastened the wheel.
So, What is Wheel Lug Torque?
1. Definition of Wheel Lug Torque
Wheel lug torque is the precise rotational force applied to tighten each lug nut securing a wheel, ensuring that the wheel remains firmly attached to the vehicle’s hub.
This force is typically measured in foot-pounds (ft-lbs) or Newton-meters (Nm), standard units used in automotive engineering to quantify mechanical tightness.
Simply put, torque is not merely “tightness”; it is a controlled pressure that generates the exact amount of clamping force required between the wheel and the hub.
It is this clamping force that securely holds the wheel in place, even while the vehicle is in motion, turning, braking, or carrying a load.
Without the correct torque, the wheel’s attachment becomes either too loose or subjected to excessive stress, potentially leading to serious mechanical and safety issues over time.
2. Why Do Manufacturers Specify Torque Settings?
Vehicle manufacturers specify precise torque values because every vehicle is designed based on meticulous calculations that account for factors such as weight, wheel design, stud strength, hub material and braking force requirements.
A small passenger car, a heavy SUV and a pickup truck, each places a different type of load and stress on its wheels, and, consequently, each requires distinct torque levels.
The type of wheel also matters, as steel wheels and alloy wheels react differently to the expansion caused by stress and heat.
Furthermore, the size and grade of the wheel studs determine the maximum force they can safely withstand before stretching or fracturing.
Factory-specified torque specifications are rigorously tested under controlled conditions to ensure that the wheel remains securely attached and that no components sustain damage.
Adhering to these specifications is paramount, as even a slight deviation can compromise safety margins, impact braking stability and accelerate long-term wear on the wheel and suspension components.
3. What Happens If Lug Nuts Are Too Loose?
When lug nuts are not tightened to the correct torque, the wheel fails to seat firmly against the hub surface; consequently, every time the vehicle accelerates, brakes, or turns, the wheel experiences slight movement.
This movement often induces wheel vibration and steering instability, particularly at high speeds.
Over time, this repetitive movement can cause the wheel studs to loosen further, resulting in an uneven distribution of pressure across the wheel’s mounting surface.
As the situation deteriorates, the studs may become damaged or stretched, thereby diminishing their ability to maintain proper tension.
In severe cases, continuing to drive with loose lug nuts can cause the wheel to detach completely from the vehicle, one of the most dangerous mechanical failures a motorist can face on the road.
4. What Happens If Lug Nuts Are Overtightened?
When lug nuts are tightened beyond the standards specified by the manufacturer, the resulting excessive pressure places significant strain on both the wheel studs and the wheel itself.
This can cause the studs to stretch permanently or result in damaged threads, making it difficult to loosen or tighten them in the future.
Overtightening can also warp the brake rotors; due to uneven pressure, the wheel fails to seat properly against the rotor hub, often leading to vibrations when braking.
Alloy wheels are particularly susceptible to this type of damage, as excessive torque (tightening force) can cause cracks to form around the lug holes, thereby compromising the structural integrity of the wheel.
Furthermore, overtightened lug nuts can make roadside tire changes extremely difficult, as loosening them may require considerable physical strength or specialized tools, a situation that heightens the risk of personal injury or further damage during emergency situations.
Signs Shows a Potential Problem with Your Wheel Lug Torque
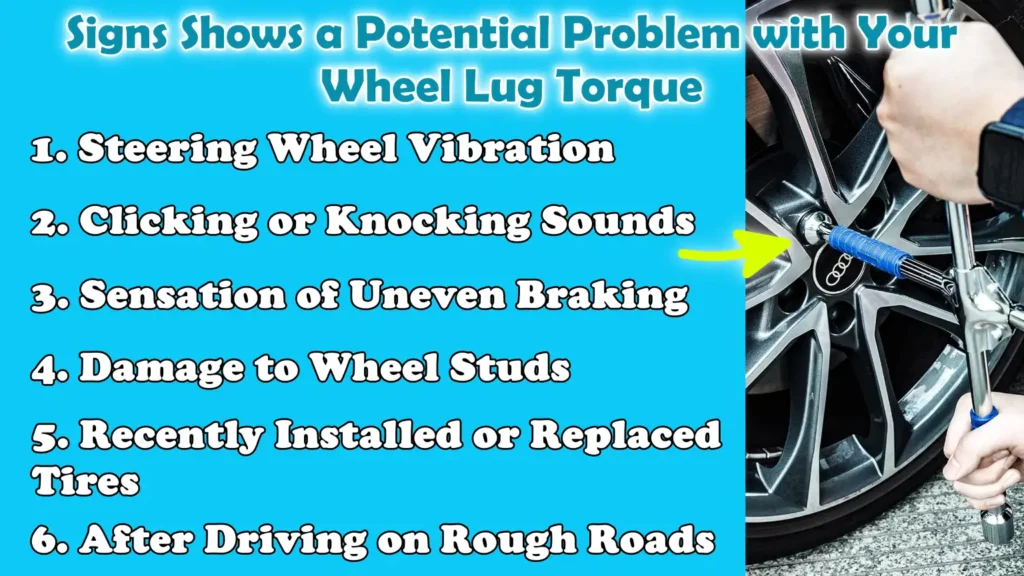
1. Steering Wheel Vibration
One of the earliest and most noticeable signs of incorrect wheel lug torque is vibration in the steering wheel, particularly when driving at moderate to high speeds.
This occurs because the wheel fails to seat evenly and securely against the wheel hub due to the uneven or insufficient clamping force applied by the lug nuts.
Even a slight imbalance in torque can create minute movement between the wheel and the hub surface; these movements translate into vibrations that travel through the suspension and steering systems.
Over time, these vibrations can manifest as a jerky sensation in the steering wheel, a pulsating feeling felt through the floorboard, or a general sense of instability while driving straight on smooth roads.
Although vibrations can also be caused by tire imbalance, incorrect lug torque is often overlooked, and if left uncorrected, it can quietly exacerbate the problem.
2. Clicking or Knocking Sounds
Clicking, knocking, or faint tapping sounds emanating from the wheels while driving or turning can be another strong indication of incorrect lug torque.
These sounds typically occur when the wheel shifts slightly relative to the hub because the lug nuts are unable to hold it firmly in place.
Every time the vehicle changes direction, accelerates, or brakes, the wheel may shift just enough to create a metallic clinking sound between the mounting surfaces.
These sounds are often more distinctly audible at low speeds or when making sharp turns.
Many drivers mistake this for a suspension issue, but loose or uneven torque on the wheel lug nuts is a common and primary cause; immediate inspection is required to prevent further loosening or damage.
3. Sensation of Uneven Braking
Incorrect wheel lug torque can also affect the feel of the braking system during everyday driving.
When a wheel is not mounted evenly, it can cause a slight alteration in how the brake rotor seats against the hub surface.
This can lead to uneven contact with the brake pads, resulting in sensations of pulsation, jerking, or fluctuations in braking pressure while bringing the vehicle to a stop.
In more severe cases, the driver may feel vibrations in the steering wheel when applying the brakes, or the vehicle may feel as though it is pulling slightly to one side.
As braking performance relies heavily on the stable alignment of the wheels, even a slight discrepancy in torque can gradually compromise the smoothness of the stopping process and, overall, impact vehicle control.
4. Damage to Wheel Studs
Wheel studs are designed to withstand a very specific amount of tension and incorrect lug torque can gradually damage them, even if no external signs are initially visible.
If the lug nuts are too loose, the repeated shifting and movement of the wheel can cause the studs to stretch or weaken, thereby diminishing their structural integrity over time.
Conversely, if the lug nuts are overtightened, excessive pressure is exerted on the studs, which can cause them to suffer permanent deformation.
In either scenario, the metal becomes compromised, increasing the risk of a stud fracturing under the load of the wheel.
Damaged studs also result in an uneven tightening process; Consequently, if they are not replaced immediately, future torque checks cannot be considered reliable or safe.
5. Recently Installed or Replaced Tires
Problems related to incorrect wheel lug torque are often observed following the installation of new tires, tire rotations, brake servicing, or wheel replacements.
During these procedures, wheels are frequently removed and then reinstalled; if proper tightening methods are not followed, the lug nuts may not be tightened uniformly or according to the correct specifications.
In many instances, impact tools are used without a final torque verification, thereby increasing the risk of the nuts being either overtightened or left loose.
This is why many manufacturers recommend re-checking the lug torque after driving a short distance following tire service; this precaution is essential because the wheel may occasionally loosen slightly as it settles into its proper seating, particularly if it was not tightened correctly during installation.
6. After Driving on Rough Roads
Driving on rough roads, over potholes, on gravel surfaces, or across uneven terrain can cause wheel lug torque to gradually decrease over time.
Due to constant vibrations and shocks, the wheel may shift slightly from its position, specially if the lug nuts were not tightened securely or were already close to the minimum required torque level.
Such road conditions place additional stress on the wheel hub assembly, which can lead to a gradual reduction in clamping force.
Checking the wheel lug torque after driving on such roads is a prudent measure; this is because detecting any looseness in a timely manner can prevent further damage to the wheel studs and brake components.
Tools
| Tools | Why It Is Needed | How to Use It |
|---|---|---|
| Torque Wrench | This ensures that every lug nut is tightened precisely according to the manufacturer’s specifications, thereby preventing under- or over-tightening, conditions that can lead to wheel vibration, stud damage, or wheel failure. | Set the required torque value on the wrench, attach the correct socket and gradually tighten each lug nut until the tool signals that the correct torque has been achieved. |
| Beam Type Torque Wrench | This aids in confirming torque levels visually, making it a useful tool for easy verification and for learning the correct tightening force. | Grip the handle and, while tightening the lug nut, observe the pointer to see how it aligns with the required torque value on the scale. |
| Click Type Torque Wrench | This prevents over-tightening by providing both audible and tactile warnings once the correct torque is reached. | Tighten the lug nut until you hear and feel a distinct “click,” then stop immediately without applying any further force. |
| Digital Torque Wrench | This offers high precision and minimizes the potential for human error during wheel installation or inspection. | Set the required torque value on the screen, tighten the lug nut and stop once the display confirms that the target value has been reached. |
| Correct Socket Size | This prevents lug nuts from becoming rounded (stripped) by applying consistent force during both tightening and loosening operations. | Select a socket size that matches the lug nut, attach it to the torque wrench and ensure it is properly seated before applying torque. |
| Breaker Bar (Optional) | This tool is used to loosen excessively tight or seized lug nuts before commencing a torque check. | Attach the correct socket to the breaker bar and apply steady force to loosen the lug nuts before using the torque wrench. |
| Wheel Chocks | These enhance safety by preventing the vehicle from rolling while torque is being applied to the wheels. | Before loosening or tightening the lug nuts, firmly place wheel chocks either behind or in front of the wheels resting on the ground. |
| Vehicle Owner’s Manual | This provides precise torque specifications and outlines the correct tightening sequence for securely mounting the wheels. | Before using the torque wrench, consult the owner’s manual or the label located on the door jamb to determine the correct torque value. |
How Torque Wrenches Work
1. Understanding Torque Measurement
A torque wrench is a precision instrument designed to apply a specific amount of rotational force to a bolt or lug nut.
In this context, it ensures that every wheel remains securely attached with the correct tension.
This force is measured because every vehicle’s wheel system is engineered to operate within a safe tightening range.
When you tighten a lug nut, you are not merely “tightening” it; rather, you are slightly stretching the wheel stud to create a clamping force that holds the wheel firmly against the hub.
A torque wrench helps accomplish this process in a controlled manner, rather than relying on guesswork.
This is crucial because even a slight variation in force can impact how securely the wheel remains attached while driving, braking and cornering.
Without this controlled measurement, it is easy to either under-tighten the wheel, potentially causing it to loosen, or over-tighten it, potentially damaging the studs and the wheel itself.
2. The Difference Between ft-lbs and Nm
Torque is measured in two common units: foot-pounds (ft-lbs) and Newton-meters (Nm).
Foot-pounds are primarily used in the United States and represent the amount of force applied at the end of a one-foot-long lever.
Newton-meters are more widely used in international vehicle specifications and are based on the metric system.
Both units measure the same physical concept, namely, rotational force, but they utilize different scales.
For example, a torque setting specified as 100 ft-lbs is not equivalent to 100 Nm, even though both represent wheel-tightening force.
Most modern torque wrenches offer the convenience of switching between these units or include conversion charts.
Understanding this distinction is crucial, as using the incorrect unit can prevent the wheel from being tightened properly, potentially leaving the wheel unsafe or leading to premature wear and damage to wheel components over time.
3. Why Calibration Is Essential
Calibration is the process used to ensure that a torque wrench accurately measures and applies force in accordance with its specified values.
Over time, the accuracy of a torque wrench can diminish due to repeated use, accidental drops, or wear on its internal springs.
If a wrench is not properly calibrated, it may apply a force that is either greater or lesser than the value displayed on its scale or digital readout.
This can be dangerous in the context of wheels, as even a minor error can compromise the tightness of the lug nuts.
For instance, a torque wrench that provides a correct reading but applies excessive force could gradually over-stretch the wheel studs beyond their safe limit; conversely, inaccurate readings could result in the wheels remaining loose.
Professionals regularly calibrate their torque wrenches to maintain their accuracy; similarly, general users are advised to periodically check their wrench’s calibration to ensure that wheel torque settings remain safe and precise.
4. Common Mistakes Associated with Torque Wrenches
One of the most common mistakes is using a torque wrench as a standard tool for loosening nuts; this can damage its internal mechanisms and compromise its accuracy.
Another common error is failing to reset the torque wrench to its lowest setting after use.
Over time, the internal spring can weaken, thereby compromising the accuracy of its calibration.
Many people apply torque too rapidly, rather than tightening slowly and steadily, which can result in inaccurate readings and uneven clamping force.
Some users stop tightening the moment they feel initial resistance, without waiting for an audible click or digital confirmation; consequently, the wheels remain loose.
Another common error is using an incorrect torque setting or disregarding the manufacturer’s instructions; this can place excessive stress on the wheel studs or fail to ensure that the wheel is securely fastened.
Avoiding these mistakes is crucial, as the accuracy of a torque wrench directly impacts wheel safety, tire performance and the vehicle’s long-term reliability.
How to Find the Correct Wheel Lug Torque Specifications
1. Consult the Owner’s Manual
The most reliable and accurate source for wheel lug torque specifications is the vehicle’s owner’s manual, provided by the manufacturer.
This manual contains factory-verified data specifically tailored to your vehicle’s model, engine type and wheel setup.
Manufacturers determine torque values based on several factors such as: wheel stud strength, hub material, vehicle weight and braking force, which is why these figures are not universal across all vehicles.
When consulting the manual, you will typically find a dedicated section for wheels and tires, where the precise torque value is clearly listed in foot-pounds or Newton-meters.
Utilizing this information ensures that the wheels are tightened exactly as intended by the engineers, thereby maintaining proper clamping force, consistent braking performance and long-term wheel durability.
2. Check the Sticker Inside the Driver’s Door
Another common and quick method for obtaining wheel lug torque specifications is to check the sticker located inside the driver-side door frame.
This label is often referred to as the “Vehicle Information” or “Tire Information” sticker.
It contains essential details such as tire pressure, tire size and, depending on the manufacturer, wheel torque specifications.
While not all vehicles feature torque values on this specific sticker, many newer models do provide this information to give drivers immediate access to necessary data.
This is particularly useful when you are changing a tire or find yourself in an emergency situation where the owner’s manual is not immediately available.
The information provided on this sticker is applied by the manufacturer themselves, meaning it is factory-approved and can be relied upon.
3. Manufacturer’s Service Information
For the most detailed and technical information, professional mechanics often consult the manufacturer’s service information systems.
These systems contain official repair databases or service manuals that specify precise torque settings for every component of the vehicle, including the wheel lug nuts.
This resource is particularly crucial because it often incorporates variations based on trim levels, wheel types, or updated technical service bulletins that may not be present in the printed owner’s manual.
Authorized service centers and repair shops utilize this information to strictly adhere to factory safety standards.
It is considered one of the most accurate sources, as it is continuously updated by the vehicle manufacturer based on testing, engineering modifications and real-world performance data.
4. OEM vs Aftermarket Wheel Torque Specifications
It is essential to understand the distinction between OEM wheels and aftermarket wheels, as torque specifications can vary depending on the wheel’s design and materials.
OEM wheels, manufactured by the Original Equipment Manufacturer (OEM), are specifically designed and tested for that particular vehicle; therefore, their torque values are directly provided by the manufacturer and must be strictly followed.
Conversely, aftermarket wheels are produced by third-party companies and may feature different materials, lug seat designs, or thicknesses, which can slightly influence the correct procedure for applying torque.
In some instances, aftermarket wheel manufacturers may provide their own torque recommendations that differ from the values specified by the factory.
For this reason, whenever available, it is always essential to consult both the vehicle manufacturer’s guidelines and the wheel manufacturer’s instructions.
Using incorrect torque specifications for aftermarket wheels can lead to uneven clamping force, damage to the wheel, or a decline in safety performance over time.
How to Check Wheel Lug Torque – Perfect Guide
1. Park the Vehicle on Level Ground
The first and most crucial step in checking wheel lug torque is to park the vehicle on a completely level and stable surface.
Level ground ensures that the vehicle’s weight is distributed evenly across all wheels, preventing any movement or pressure imbalance while you are working.
If the ground is uneven, the wheel may tilt slightly, which could compromise the accuracy of the lug nut tightening process.
A stable position also minimizes the risk of the vehicle suddenly rolling or shifting during this procedure, a critical factor for both safety and accurate torque measurement.
2. Engage the Parking Brake
Once the vehicle is properly parked, it is essential to fully engage the parking brake to lock the wheels in place.
This step is vital because it prevents the vehicle from inadvertently shifting while you are applying force to the lug nuts.
In many vehicles, the parking brake primarily secures the rear wheels; nevertheless, it is crucial to ensure that the vehicle remains completely stationary.
This added stability guarantees that the applied torque is focused entirely on tightening the lug nuts, rather than on counteracting any movement of the vehicle.
3. Allow the Wheels to Cool Down
Wheel lug torque should always be checked when the wheels are cool, rather than immediately after driving.
After driving, the brake rotors, hubs and wheel components can become extremely hot due to friction and continuous operation.
Heat causes metal to expand slightly; consequently, checking the torque immediately may yield inaccurate tightening results.
Once the wheels have cooled down, the metal returns to its normal dimensions, allowing for a more accurate torque reading.
This step helps prevent improper tightening, ensuring that the lug nuts do not subsequently loosen or become overtightened, a risk that arises due to temperature fluctuations in the wheels during normal driving.
4. Properly Set the Torque Wrench
Before applying torque, it is essential to set the torque wrench to the precise specification recommended by the vehicle manufacturer.
This value is typically found in the owner’s manual or on the vehicle’s information label.
Setting the correct torque ensures that each lug nut receives the exact amount of force required to securely fasten the wheel.
If the setting is too low, the wheel may loosen over time; conversely, if it is too high, it can damage the wheel studs or the wheel itself.
The proper setup of the wrench serves as a solid foundation for accurate wheel torque verification.
5. Attach the Correct Socket
Using the correct socket size is crucial, as lug nuts are designed to specific dimensions that require a precise fit.
A loose or ill-fitting socket can round off the edges of the lug nut, making it difficult, or even impossible, to remove in the future.
A proper fit ensures that the torque force is applied evenly across the entire surface of the lug nut without slipping or damaging the metal.
This also maintains consistent tightening force across all wheels, which is vital for balance and stability.
6. Tighten the Lug Nuts in a Star Pattern
Lug nuts should always be tightened in a star or criss-cross pattern, rather than in a circular sequence.
This method ensures that the pressure on the wheel hub is distributed evenly as the wheel seats itself in place.
Tightening in a single direction prevents the wheel from seating properly against the hub, which can lead to wheel misalignment or vibrations while driving.
The star pattern gradually balances the wheel against the hub, ensuring that it seats perfectly and securely, without creating any pressure points that could compromise long-term safety and performance.
7. Listen for a ‘Click’ or Look for Digital Confirmation
When using a click-type torque wrench, you will hear, and often feel, a distinct ‘click’ once the correct torque level has been reached.
This signal indicates that you should immediately stop applying force to avoid overtightening.
With a digital torque wrench, the precise torque value is displayed on the screen and an audible signal or alert is often provided once the target is achieved.
Both methods are designed to ensure accuracy and prevent human error, the most common cause of incorrect torque application on wheel lug nuts.
8. Repeat This Process for Every Lug Nut
It is crucial to check each lug nut on the wheel individually; even if one or two nuts appear to be tightened correctly, there may still be discrepancies in the tightening force applied to the others.
Repeating this process for every lug nut ensures that the tightening force is distributed uniformly across the entire wheel assembly.
This balance is vital, as the wheels are subjected to constant stress during driving, braking and cornering.
If even a single lug nut is not tightened to the correct torque specification, the overall stability of the wheel assembly could be compromised.
9. Re-Check All Wheels
After completing the torque check on one wheel, the same procedure should be repeated for all the remaining wheels.
A final re-check ensures that no lug nut was overlooked or left improperly tightened during this process.
This step is particularly crucial when tires have been replaced or rotated, or when brake service has been performed, situations that often require the removal of multiple wheels.
A thorough final inspection ensures uniform torque across all wheels, thereby enhancing driving safety, minimizing vibrations and helping to prevent long-term mechanical issues.
The Correct Method for Tightening Wheel Lugs
1. 4-Lug Pattern
For a 4-lug wheel, a simple cross-pattern, or diagonal tightening method, is employed to ensure that the wheel seats properly against the hub.
When there are only four lug nuts, tightening them in a direct circular sequence results in an uneven distribution of pressure, which can cause the wheel to sit slightly askew before it is fully secured.
Instead, the correct procedure involves tightening one lug nut, then tightening the lug nut located directly opposite it diagonally and continuing this crisscross sequence.
This maintains uniform pressure across the wheel’s surface, avoiding excessive force at any single point, and allows the wheel to sit perfectly flush against the hub surface.
Tightening in this balanced manner is crucial, as even a slight imbalance in pressure can subsequently lead to vibrations or brake pulsation.
2. 5-Lug Pattern
For a 5-lug wheel, a star-shaped tightening pattern is required; because the number of lug nuts is odd, unlike in a 4-lug system, no two nuts are positioned directly opposite one another.
In this scenario, the tightening sequence typically traces the shape of a star or a pentagon across the wheel.
This method ensures that pressure is applied to each lug nut in a balanced progression, preventing any single section of the wheel from being tightened more than the others.
As 5-lug systems are commonly found on passenger cars and SUVs, adhering to the correct sequence is essential for ensuring the wheel seats properly.
If, instead, the lug nuts are tightened in a circular sequence, the wheel will fail to seat correctly against the hub; Over time, this can lead to issues such as vibration, uneven brake wear, or the gradual loosening of lug nuts.
3. 6-Lug Pattern
For a 6-lug wheel, a direct, opposing cross pattern is employed; this is because, for every lug nut, there is another nut situated directly opposite it on the other side of the wheel’s center.
This arrangement makes it easier to maintain uniform tightening pressure.
The correct procedure involves tightening one lug nut, then tightening the lug nut located directly opposite it and continuing this alternating, cross-wise sequence until all six nuts are uniformly tightened.
This pattern is utilized particularly in trucks and heavy-duty vehicles, where the wheels are subjected to significant loads and torque stresses.
Adhering to the correct sequence ensures that the wheel is securely fastened to the hub with uniform pressure, a critical factor for supporting heavy loads and maintaining stability during braking and acceleration.
4. How Star-Shaped Patterns Prevent Wheel Distortion
Star-shaped, or crisscross, tightening patterns are utilized because they distribute the tightening pressure uniformly across the entire surface of the wheel, rather than allowing the pressure to concentrate in a single area.
When lug nuts are tightened in a circular sequence, one section of the wheel seats firmly against the hub while another section remains loose, resulting in uneven pressure distribution across the hub’s surface.
This imbalance can lead to rotor distortion, commonly referred to as “brake warping”, as well as wheel vibration and uneven tire wear.
The star pattern works by gradually drawing the wheel into a flat and stable position against the hub, thereby ensuring that pressure is applied equally from all sides.
This balanced force is crucial because wheels are designed to operate within very precise tolerances; consequently, over time, a failure to tighten them with uniform pressure can lead to gradual damage to both the wheels and the braking components.
Know, Suggested Range for Wheel Lug Torque
Wheel lug torque specifications are not uniform across all vehicles, as manufacturers design each wheel system based on the vehicle’s weight, load-carrying capacity, wheel size and stud strength.
Using the correct torque range is crucial, as it ensures that the wheel remains sufficiently tight for safety while driving, yet not so overtightened that it causes damage to the studs, the wheel itself, or brake components.
Even a slight deviation in torque can impact how securely the wheel performs under stress, particularly during braking, cornering and high-speed highway driving.
Understanding general torque ranges provides drivers with a rough estimate; however, precise specifications should always be verified against the vehicle’s owner’s manual or the manufacturer’s instructions.
1. Passenger Cars
Passenger cars are generally lighter in weight; consequently, they require less torque compared to larger vehicles.
Most passenger cars fall within a moderate torque range, as their wheel studs and hubs are designed to withstand lower load pressures.
If the torque is insufficient, the wheels may loosen over time, specially after driving on rough terrain or following tire service.
Conversely, excessive torque can cause studs to stretch or damage alloy wheels, a common concern in modern cars, which frequently utilize alloy wheels for fuel efficiency and improved handling.
2. SUVs
SUVs are heavier than passenger cars; therefore, they require higher torque to ensure that the wheels remain securely fastened, even amidst the increased load and road stresses inherent to these vehicles.
As SUVs often carry a higher number of passengers, heavier cargo and sometimes the weight of a towed load, their wheel studs are designed to withstand greater clamping force (tightening strength).
Incorrect torque in an SUV can lead to significant vehicle vibration, particularly at high speeds, as the increased weight places greater stress on the wheel assembly.
Proper torque ensures vehicle stability, specially during braking and cornering.
3. Pickup Trucks
Among vehicles operating on public roads, pickup trucks generally require the highest torque values, as they are designed for hauling heavy loads, towing and navigating rugged terrain.
Although their wheel studs and hubs are typically more robust, they still require precise torque settings to maintain safety under stress.
If the torque on a pickup truck is too low, the risk of a wheel shifting or coming loose while carrying heavy cargo increases significantly.
Conversely, if the torque is excessive, it can weaken the studs or make tire removal extremely difficult in the future, a particularly major challenge in roadside emergency situations.
4. Aluminum Wheels vs Steel Wheels
Due to the inherent properties of their respective materials, aluminum and steel wheels react differently to torque.
Aluminum wheels are lighter and are widely used in modern vehicles; however, they are more sensitive to overtightening, as excessive torque can cause cracks or deformation in the lug hole areas.
Steel wheels are more durable and resilient under stress, though they are heavier and are typically found on commercial or utility vehicles.
Proper torque is essential for both types of wheels; However, aluminum wheels typically require more careful tightening, within specified limits, to prevent long-term damage.
The correct torque ensures that both types of wheels remain firmly attached to the hub, without any misalignment or imbalance.
Recommended Wheel Lug Torque Range Table
| Vehicle Type | Typical Torque Range (ft-lbs) | Typical Torque Range (Nm) | Key Reason for Range |
|---|---|---|---|
| Passenger Cars | 70 to 100 ft-lbs | 95 to 135 Nm | Light vehicle; small wheel studs. |
| SUVs | 80 to 120 ft-lbs | 110 to 165 Nm | Higher vehicle mass and load capacity. |
| Pickup Trucks | 90 to 150 ft-lbs | 120 to 200 Nm | Heavy loads, towing capacity, robust hubs. |
| Aluminum Wheels | 70 to 110 ft-lbs | 95 to 150 Nm | Sensitive material; risk of breakage if overtightened. |
| Steel Wheels | 80 to 130 ft-lbs | 110 to 175 Nm | Robust structure; typically used for heavy-duty applications. |
So, When Should You Re-Check Wheel Lug Torque?
Wheel lug torque is not something to be checked just once and then forgotten.
Even if the wheels were initially tightened correctly, actual driving conditions such as: vibration, temperature fluctuations, road shocks and the settling of metal components, as it can gradually affect how securely the lug nuts hold the wheel over time.
This is why re-checking the torque at the appropriate time is a crucial safety measure; it helps prevent loose wheels, vibrations, uneven brake wear and long-term damage to the wheel studs or hubs.
Many drivers skip this step, but professionals adopt it as a standard safety protocol following any wheel-related service or replacement.
1. After Tire Installation
After installing new tires, wheel lug torque should always be re-checked, as the wheels are removed from the hubs and then re-mounted.
During installation, even slight variations in tightening pressure or tool usage can impact the final torque balance.
As the vehicle begins to move, the wheel and hub surfaces naturally settle under the influence of load and heat, which can cause a slight shift in the initial tightness of the lug nuts.
Re-checking the torque ensures that all lug nuts remain uniformly tightened and that no nuts have loosened during the initial period of driving.
2. After Tire Rotation
Tire rotation involves removing wheels from their specific positions on the vehicle and re-mounting them in different locations to ensure even tire wear.
As every wheel is removed and re-installed during this process, it is essential to subsequently re-check the torque applied during the rotation.
Even if wheels are installed correctly, slight variations in tightening force may occur across different lug locations during the installation process.
Re-checking the torque after rotation ensures that all wheels are uniformly secured and properly balanced, thereby maintaining smooth drivability and consistent tire performance.
3. After Brake Service
During brake service, it is often necessary to remove the wheels to access components such as brake pads, rotors, or calipers.
Following such procedures, the wheel lug torque must be re-checked with great care, as the wheels are being reinstalled after mechanical work.
Even a slight misalignment during reinstallation can affect how the wheel seats against the hub, which may subsequently impact braking smoothness and vibration levels.
As brake systems rely heavily on the stable positioning of the wheels, ensuring proper torque after brake service is critical for the safe and reliable stopping of the vehicle.
4. After Driving 50 to 100 Miles
One of the most critical times to re-check wheel lug torque is approximately 50 to 100 miles after a wheel has been removed or installed.
During the initial miles of driving, the wheel assembly is subjected to thermal cycling, road stresses and vibrations, which cause its components to settle into their proper positions.
As a result of this settling process, the initial torque applied during installation may decrease slightly or its distribution may shift.
Re-checking the torque at this stage ensures that all lug nuts remain within the specified limits and do not loosen after the initial period of driving.
5. Changing Tires According to the Season
The process of changing tires seasonally such as: swapping between summer and winter tires, involves removing and remounting the wheels at least twice a year.
Every time this procedure is performed, it is essential to re-check the wheel lug torque, as the repeated mounting of wheels increases the likelihood of slight variations in their tightness.
Fluctuations in ambient temperature can also affect the expansion and contraction of metal components, which, over time, may slightly influence how securely the wheel assembly remains fastened.
Re-checking the torque after a seasonal change ensures that the wheels remain securely fastened despite variations in environmental conditions and usage patterns; this maintains vehicle stability and minimizes the risk of a wheel suddenly loosening and detaching during daily driving.
Common Mistakes When Checking Lug Torque
Wheel lug torque may appear simple on the surface, but minor errors committed during this process can lead to serious safety issues such as: wheel vibration, uneven braking, damaged studs and even a wheel coming loose and detaching while driving.
Most of these problems do not manifest immediately; rather, they develop gradually over time because the wheel was not initially tightened or checked correctly.
Understanding these common mistakes helps drivers avoid hidden hazards that could compromise vehicle safety, tire longevity and overall driving stability.
1. Relying Solely on an Impact Wrench
One of the most common mistakes is relying entirely on an impact wrench to tighten wheel lug nuts.
Impact tools are designed for speed, not precision; they can easily overtighten lug nuts, or tighten them unevenly, without the user even realizing it.
The force applied by an impact wrench is not controlled in the same way as it is with a torque wrench; this means the final tightness level can vary significantly from one lug nut to another.
This uneven force can stretch the wheel studs, damage the threads and create uneven clamping pressure across the entire wheel.
Over time, this can lead to vibrations, braking-related issues and difficulties in removing the wheels during maintenance.
2. Not Using a Torque Wrench
Failing to use a torque wrench at all is another serious error, as it eliminates precision from the entire tightening process.
Without a torque wrench, lug nuts are tightened merely by “feel”, a method that is completely unreliable, as every individual applies a different amount of force.
What might feel “quite tight” to you could, in reality, be significantly looser or tighter than the manufacturer’s specifications.
This lack of precision can compromise wheel safety and accelerate the wear and tear of critical vehicle components.
A torque wrench ensures that an equal amount of force is applied to every lug nut, a requirement for balanced wheel performance and longevity.
3. Tightening Lug Nuts in a Circular Sequence
Tightening lug nuts in a circular sequence, rather than using a star or cross pattern, as it can result in uneven pressure on the wheel as it seats against the hub.
When one side is fully tightened before the other, the wheel may tilt slightly or shift out of position, even if all lug nuts are subsequently tightened.
This uneven seating creates stress on the wheel and brake rotor, potentially leading to vibrations, brake pulsation and deformation over time.
A proper star pattern ensures that the wheel seats evenly against the hub surface on all sides, thereby minimizing stress and enhancing stability.
4. Improperly Applying Lubricant to Lug Threads
Applying lubricant to wheel lug threads without adhering to the manufacturer’s guidelines is a common error that can significantly alter torque accuracy.
Lubrication reduces friction, meaning that a specific torque setting can generate a clamping force far greater than intended.
Consequently, even if the torque wrench is set correctly, the wheel may end up being overtightened.
In some instances, manufacturers establish torque specifications based on dry threads; therefore, applying grease or anti-seize compounds can result in inaccurate readings.
If lubrication is required, specific guidelines should always be followed to avoid altering the intended torque value.
5. Using Incorrect Torque Specifications
Using incorrect torque values is one of the most dangerous mistakes, as it directly impacts how securely the wheel is attached to the vehicle.
Different vehicles, wheel sizes and materials require specific torque settings and using a generic value can lead to serious problems.
Insufficient torque can cause the wheel to loosen over time, while excessive torque can damage wheel studs, warp brake rotors, or even cause cracks in alloy wheels.
Even minor discrepancies in torque can pose long-term safety risks; for this reason, the manufacturer’s instructions must always be followed with absolute precision.
6. Checking Torque on a Raised Vehicle
Checking or tightening wheel lug torque while the vehicle is still raised on a jack is another common mistake.
When a vehicle is not resting on the ground, its suspension does not bear its normal load, which can cause a slight shift in how the wheel seats against the hub.
This can result in inaccurate torque readings, as the wheel assembly is not fully settled in its driving position.
For the most accurate results, the final torque check should always be performed when the vehicle is resting on the ground, ensuring that the wheel assembly is under its normal operating load and pressure.
This guarantees that the lug nuts are tightened under actual driving conditions, thereby enhancing both safety and consistency.
Should You Tighten Lug Nuts While the Wheel Is Off the Ground?
1. Partial Tightening vs Final Torquing
When a wheel is lifted off the ground, the lug nuts are typically only partially tightened, rather than being fully tightened (applying the final torque).
This initial tightening is generally performed to hold the wheel in place so that it does not shift or wobble while the vehicle is being lowered.
At this stage, the goal is not to reach the precise torque specification, but rather to ensure that the wheel is properly seated against the hub and that all lug nuts have begun to tighten uniformly.
Partial tightening helps to properly align the wheel, but it does not guarantee a precise clamping force, as the wheel has not yet been subjected to normal driving loads.
Once the vehicle has been lowered, the final torque must always be applied to meet the manufacturer’s exact specifications.
2. Why Final Torquing Must Be Performed on the Ground
The final torque should be applied to the wheel’s lug nuts only when the vehicle is resting on the ground, as this allows the full weight of the vehicle to naturally settle onto the wheels.
When a car is supported by jack stands, its suspension is extended and the wheel may not sit perfectly flush against the hub.
Once the vehicle is lowered, the suspension compresses under the normal load, allowing the wheel to align properly with the hub surface.
This ensures that the clamping force applied by the lug nuts is uniform and accurate.
If the final torque is applied while the wheel is still off the ground, the wheel may shift slightly when the vehicle is subsequently lowered; this can alter the tension on the lug nuts, potentially resulting in uneven tightening or inaccurate torque readings.
3. Safety Considerations
Safety is a primary reason why final torquing should not be performed while the wheel is suspended in the air.
Compared to a vehicle resting fully on its tires, a raised vehicle possesses limited stability; applying high torque forces to the vehicle while it is elevated increases the risk of it shifting or becoming unbalanced.
There is also a greater likelihood that, while suspended, the wheel may not be perfectly aligned with the hub, thereby preventing proper tightening.
Furthermore, once the vehicle is lowered, even a minor shift in the wheel’s position can slightly alter the tension that was previously applied.
This is why professionals always perform the final torque check only when the vehicle is resting on the ground; by doing so, they ensure that the wheel remains secure and firmly seated during operation.
Adopting this method enhances accuracy, improves safety and minimizes the risk of the wheel loosening or vibrating during daily driving.
Can You Check Lug Torque Without a Torque Wrench?
1. Why is this not recommended?
Checking wheel lug torque without a torque wrench is not recommended, as a torque wrench is the only tool designed to apply and measure the precise tightening force required.
Tightening lug nuts requires a very specific amount of clamping force, which vehicle engineers calculate based on the wheel size, stud strength and vehicle weight.
Without a torque wrench, there is no accurate way to measure this force, meaning the tightening process becomes based on guesswork rather than precision.
Human judgment varies from person to person and what might feel “tight enough” could actually be significantly lower or higher than the correct specifications.
This lack of precision can compromise the safety of the wheel assembly, even if the wheel initially appears secure.
2. Emergency Situations
In emergency situations such as: being stranded roadside after changing a tire, it is not always possible to immediately access a torque wrench.
In such cases, people sometimes use common tools, such as a standard wrench or tire iron, to tighten the lug nuts just enough to safely drive the vehicle to a repair center.
While this may be acceptable as a temporary measure, it is not a reliable method for verifying torque.
The wheel should always be properly re-checked and tightened using a torque wrench as soon as possible to ensure that the correct clamping force has been applied.
This step is crucial because temporary tightening does not guarantee long-term safety or stability under actual driving conditions.
3. The Risks of Estimating Tightness
Estimating the tightness of lug nuts without a torque wrench carries several serious risks, as incorrect force often goes undetected until problems begin to manifest while driving.
If the lug nuts are too loose, the wheel may gradually shift against the hub, leading to vibrations, uneven tire wear and, in extreme cases, the wheel detaching completely from the vehicle.
Conversely, if they are overtightened, the wheel studs may stretch or become damaged and the brake rotors may warp due to uneven pressure.
If excessive force is applied, alloy wheels also run the risk of developing cracks around the lug holes.
Another hidden risk is uneven tightening, where some lug nuts are tighter than others, which creates an imbalance that compromises both braking performance and steering stability.
Over time, these issues can escalate into costly repairs or create unsafe driving conditions; for this reason, relying solely on guesswork rather than measuring precise torque is never a safe option.
Difference Between Wheel Lug Torque for Alloy Wheels vs Steel Wheels
1. Why Alloy Wheels Require Greater Attention
Controlling lug torque is crucial for alloy wheels because they are constructed from materials that are lighter and more delicate than those used in steel wheels.
These wheels are designed to enhance a vehicle’s performance, fuel efficiency and handling; however, their composition makes them more susceptible to damage caused by uneven or excessive tightening forces.
When lug nuts are tightened, the force is applied directly to the wheel’s mounting points; if this force is not applied uniformly or in accordance with the correct specifications, it can exert undue stress on the material surrounding the lug holes.
Unlike steel, alloy does not deform easily; consequently, even minor errors in applying torque can compromise the structural integrity of the wheel over time.
This is why manufacturers often specify a precise torque range for vehicles equipped with alloy wheels and emphasize the use of a properly calibrated torque wrench.
2. Differences in Thermal Expansion
Alloy wheels and steel wheels react differently to heat, a factor that influences how lug torque is maintained over time.
During driving, heat generated by the brakes transfers into the wheel hub assembly, causing slight thermal expansion in both types of wheels.
However, alloy wheels typically expand and contract more rapidly than their steel counterparts because they conduct heat differently.
This difference in thermal response can affect how tight the lug nuts feel after the vehicle has been driven.
If the torque is not set correctly, these natural cycles of thermal expansion and contraction can gradually loosen the wheel assembly or subject it to uneven pressure.
Steel wheels, on the other hand, are more resilient to fluctuations in heat and pressure; consequently, they carry a slightly lower risk of damage even in the event of minor torque discrepancies, though, for safety reasons, it remains essential to tighten them correctly as well.
3. Risk of Cracking or Warping
The most serious risk associated with applying incorrect torque to alloy wheels is cracking or warping around the lug nut seating areas.
Because alloy materials are less ductile than steel, they are less capable of withstanding excessive force.
Overtightening can concentrate pressure in specific areas, gradually weakening the metal, particularly around the lug holes, where the stress is highest.
Over time, this can lead to hairline cracks that may not be immediately visible but can propagate under the stresses of driving, thereby creating a risk of wheel failure.
Steel wheels are less prone to cracking, as their greater ductility allows them to absorb higher stress levels without sustaining permanent damage; however, if the torque is inconsistent or applied incorrectly, they too can warp.
In both instances, applying the correct torque is critical; nevertheless, maintaining long-term safety and structural integrity requires greater care and precision when dealing with alloy wheels.
Read More:
- How to Install Directional Tires Properly
- How to Identify Directional Tires Correctly
- How to Choose Tires for Snow Driving
- How to Choose Tires for Wet Roads
- How to Check Tire Load Rating
- How to Store Tires Properly Long Term
- How to Prevent Tire Dry Rot
- How to Fix Tire Bulge Issue
- How to Inspect Tire Inner Sidewall Damage
- How to Fix TPMS Sensor Not Detected
- How to Relearn TPMS Without Scan Tool
- How to Reset Tire Pressure Monitoring System Manually
- How to Check Tire Pressure Sensor Battery
- How to Seal Bead Leak in Tire
- How to Use Tire Plug Kit Correctly
- How to Repair Tubeless Tire Puncture
- How to Locate a Nail in a Tire
- How to Fix Slow Tire Air Leak
- How to Detect Tire Sidewall Damage
- How to Check Tire Tread Depth at Home
- How to Bleed ABS System Properly
- How to Replace Rusted Brake Lines
- How to Inspect Brake Lines for Rust
- How to Flush Contaminated Brake Fluid
How to Ensure Safety When Checking Wheel Lug Torque
Plus, there’s study that shows that torque must be applied in a controlled and measurable way so that you can ensure that the wheel stays securely attached under all driving conditions, so without having proper torque measurement, even correctly fitted wheels can develop really unsafe clamping force levels that can increase the risk of loosening, vibration or wheel separation over the period of time and usage.[¹]
1. Wear Gloves and Eye Protection
When checking wheel lug torque, wearing gloves and eye protection is an essential safety precaution that many people tend to overlook.
Gloves help improve your grip on tools such as: torque wrenches and sockets, thereby reducing the risk of slippage while applying force.
They also protect your hands from the sharp edges of wheels, brake components and lug nuts, which may be covered in rust or grime.
Eye protection is equally crucial, as dust, rust particles, or small metal fragments can fall or fly out while loosening or tightening lug nuts.
Even if the task seems simple, the combination of applied force and contact with metal can cause small debris to dislodge suddenly; therefore, protecting your hands and eyes during this process significantly reduces the risk of injury.
2. Use the Correct Jacking Points
For safety when working around wheels, it is critical to use the vehicle’s designated jacking points.
Every vehicle is designed with specific reinforced areas on the chassis where a jack should be positioned; using an incorrect location can damage the vehicle’s body structure or render the vehicle unstable.
If the vehicle slips or falls while being lifted, it can result in serious injury and damage to the wheel assembly.
Using the correct jacking points ensures that the vehicle remains stable while the wheels are being inspected or serviced.
Even when merely checking torque, or if the wheel is lifted or adjusted even slightly, stability is paramount to prevent any movement that could compromise both safety and accuracy.
3. Never Use Damaged Lug Nuts
When checking or applying wheel torque, one should never use damaged lug nuts, as they may break under pressure or fail to provide uniform clamping force.
A lug nut that is rounded off, cracked, or has damaged threads cannot properly grip the wheel stud, thereby compromising its ability to maintain the correct clamping force.
When torque is applied to a damaged lug nut, it may slip or sustain further damage, making it difficult to tighten it securely.
In some instances, this can also damage the threads of the wheel stud, further increasing repair costs.
Replacing damaged lug nuts before checking torque ensures that every joint can safely withstand the required force without the risk of sudden failure.
4. Replace Rusted or Stretched Wheel Studs
Wheel studs showing signs of rust, wear and tear, or stretching should be replaced immediately, as they are critical for securely holding the wheel in place.
Rust can weaken the metal surface, reducing the structural integrity of the stud and increasing the likelihood of it breaking under torque pressure.
Stretched studs are even more dangerous, as they have been subjected to stress beyond their normal elastic limit; this means they can no longer return to their original structural form and strength.
When torque is applied to a compromised stud, it fails to maintain the proper tension, causing the wheel to gradually loosen.
In severe cases, a weakened stud may even snap under load, particularly during hard braking or while driving on rough terrain.
Replacing these components ensures that the torque applied to the wheel rests upon a robust and reliable foundation, thereby maintaining safety and stability over the long term.
Conclusion – How to Check Wheel Lug Torque
At last, it is true that wheel is only as safe as the torque holding it in place, so even if it looks perfectly secure from the outside but the torque is what actually makes the final decision.
Whenever a wheel is installed, rotated, or serviced, the manner in which the lug nuts are tightened directly impacts how securely the wheel is fastened to the hub.
If the torque is insufficient, the wheel may gradually loosen during normal driving conditions such as: braking, cornering, or facing road bumps.
Conversely, if the torque is excessive, it can lead to damaged wheel studs, warped brake components, or even cracks in alloy wheels.
What makes this issue even more critical is that these problems often develop gradually and remain undetected until they begin to adversely affect driving comfort or safety.
Understanding the correct procedure for checking wheel lug torque helps prevent these hidden hazards from escalating into serious mechanical failures.
Using the appropriate tools, adhering to the manufacturer’s specifications and following the correct tightening sequence ensure that every wheel remains uniformly secure and properly balanced.
Simple practices such as: re-checking the torque after a tire change, avoiding guesswork and utilizing a calibrated torque wrench, as it can significantly reduce the likelihood of wheel-related issues.
Now, if you still have questions left in mind, just comment that damn question below.
Frequently Asked Questions
FAQ 1: What is wheel lug torque and why is it important?
Answer: Wheel lug torque refers to the precise amount of force applied to tighten the lug nuts that secure your wheels to the vehicle. It is measured in foot-pounds or Newton-meters and ensures that the wheel is securely fastened to the hub. This is crucial because the correct torque keeps the wheel stable while driving, braking and turning. If the torque is too low, the wheel may loosen over time. If it is too high, it can damage the wheel studs or brake rotors, or even cause cracks in alloy wheels. Proper torque is essential for safe and stable driving.
FAQ 2: How can I tell if my wheel lug torque is incorrect?
Answer: There are several warning signs that may indicate incorrect wheel lug torque. You might feel vibrations in the steering wheel, hear clicking or rattling sounds coming from the wheels, or notice uneven braking performance. In some cases, the vehicle may feel unstable at high speeds. If the lug nuts are too loose or overtightened, you may also observe abnormal tire wear or experience difficulty removing the wheels during servicing. These signs should be investigated immediately to prevent further damage.
FAQ 3: What is the best tool for checking wheel lug torque?
Answer: The best tool for checking wheel lug torque is a torque wrench. It allows you to apply the precise amount of force recommended by the vehicle manufacturer. Click-type torque wrenches are commonly used because they provide a distinct signal once the correct torque level has been reached. Digital torque wrenches are also highly accurate and easy to read. Using only a standard wrench or an impact tool is not recommended, as these tools do not accurately measure torque.
FAQ 4: How often should I check the wheel lug torque?
Answer: Wheel lug torque should be checked whenever the wheels have been removed or reinstalled. This includes tire changes, tire rotations, brake work, or seasonal tire swaps. It is also good practice to re-check the torque after driving approximately 50 to 100 miles following any work involving the wheels. Regular checks help ensure that the lug nuts have not loosened due to vibration, heat, or road conditions.
FAQ 5: Can I check lug torque without a torque wrench?
Answer: It is not advisable to check wheel lug torque without a torque wrench, as there is no accurate way to measure the tightening force applied by hand. Estimating the tightening force can lead to serious problems, such as loose wheels or over-tightened studs. In emergency situations, you may temporarily tighten the lug nuts to reach a repair shop; however, you should always subsequently verify the correct torque using a torque wrench.
FAQ 6: What happens if the lug nuts are over-tightened?
Answer: If lug nuts are over-tightened, they can stretch or damage the wheel studs, causing them to weaken over time. Over-tightening can also warp the brake rotors, leading to vibrations when braking. In some cases, excessive pressure can even cause cracks to form around the lug holes in alloy wheels. This can make removing tires extremely difficult in the future, specially during a roadside emergency.
FAQ 7: What happens if the lug nuts are too loose?
Answer: If the lug nuts are excessively loose, the wheel cannot sit securely on the hub. This can lead to issues such as vibration, steering instability and uneven tire wear. Over time, while driving, the wheel may gradually shift out of position, thereby increasing the stress on the studs. In severe cases, a loose wheel could completely detach from the vehicle, a situation that is extremely dangerous.
References:
[1] Lug Nut Tightness Reliability: Application of Torque-Angle Signature Analysis for Installation / Auditing Studies
https://saemobilus.sae.org/papers/lug-nut-tightness-reliability-application-torque-angle-signature-analysis-installation-auditing-studies-2014-01-0070

Hello Folks, Dean Shali here to help you out to solve the problems with your lovely vehicle, as i have lots of experience and knowledge about automotive industry as i woks directly with the customers and repair vehicles and i love to help the people to keep their cars safe and running smoothly.