Written By: Dean Shali
Fact Checked By: Sabré Cook
Reviewed By: Tamara Warren
Just observe that if you have to refill air again and again or pressure drops continues to surprise you then the issue may be deeper than you think.
Basically, Tire Bead is the edge of the tire that actually presses tightly against the wheel rim in terms to create an airtight seal.
So, when this seal is actually disturbed by the dirt, rust, corrosion or improper installation, then air begins to escape slowly, sometimes so slowly that even drivers do not notice at all until the tire pressure drops to an unsafe level.
And, we all knows that even with the small drop in the pressure can literally change how a car actually handles, specially at the higher speeds or during the sudden stops as well.
But, the real problem is that bead leaks are commonly misdiagnosed and that ultimately lead people to rely on temporary fixes that does not solves the root cause in any means.
So, in this guide you’ll learn How to Seal Bead Leak in Tire so that you can prevent it from happening again and helps you to drive way more safer than ever.
Understand, What is a Tire Bead Leak?
1. Definition of the Tire Bead and How It Forms a Seal with the Rim
The tire bead is the inner edge of the tire that fits tightly against the wheel rim to create an airtight seal.
This component is designed to contain the high-pressure air inside the tire, preventing it from escaping.
The bead itself is constructed from strong steel wires encased in a layer of rubber; this structure allows it to exert significant pressure against the rim’s surface when the tire is inflated.
When everything is clean, smooth and properly seated, the bead and rim combine to form an excellent seal that retains the air inside the tire while driving, ensuring a stable and safe driving experience.
However, even a small amount of dirt, rust, wear, or damage on the rim can compromise this seal, causing air to leak slowly from the tire.
2. What is the Difference Between a Bead Leak, a Puncture and a Valve Leak?
A bead leak differs from other common tire problems because it is not caused by a hole in the tire’s tread (the contact surface) or sidewall.
A puncture occurs when a sharp object such as: a nail or screw, pierces the tire’s rubber, creating a direct escape route for the air.
A valve leak occurs when the tire’s valve stem becomes damaged or worn, allowing air to escape through the valve mechanism.
In contrast, a bead leak occurs at the interface where the tire and rim meet; it is not caused by a hole in the main body of the tire.
Consequently, detecting a bead leak can be somewhat challenging, as there is no visible external damage on the tire’s surface and the air loss tends to be gradual and continuous rather than sudden.
3. How Does Air Escape from the Bead Area?
Air escapes from the bead area when the airtight seal formed between the tire and the rim becomes compromised.
This can occur due to rust on the metal rim, the accumulation of dirt, or a slight distortion in the wheel; these factors prevent the tire and rim surfaces from adhering completely to one another.
Even minute punctures or cracks, invisible to the naked eye, as it can serve as conduits through which the pressurized air inside the tire gradually leaks out.
In many instances, this leakage becomes more apparent when the vehicle remains stationary for extended periods, or when fluctuations in temperature cause the tire material to expand and contract.
Over time, this gradual loss of air leads to a steady decline in tire pressure; if left unaddressed, this issue can adversely affect the vehicle’s fuel efficiency (mileage), tire wear and overall driving safety.
Know, Common Causes of Bead Leaks
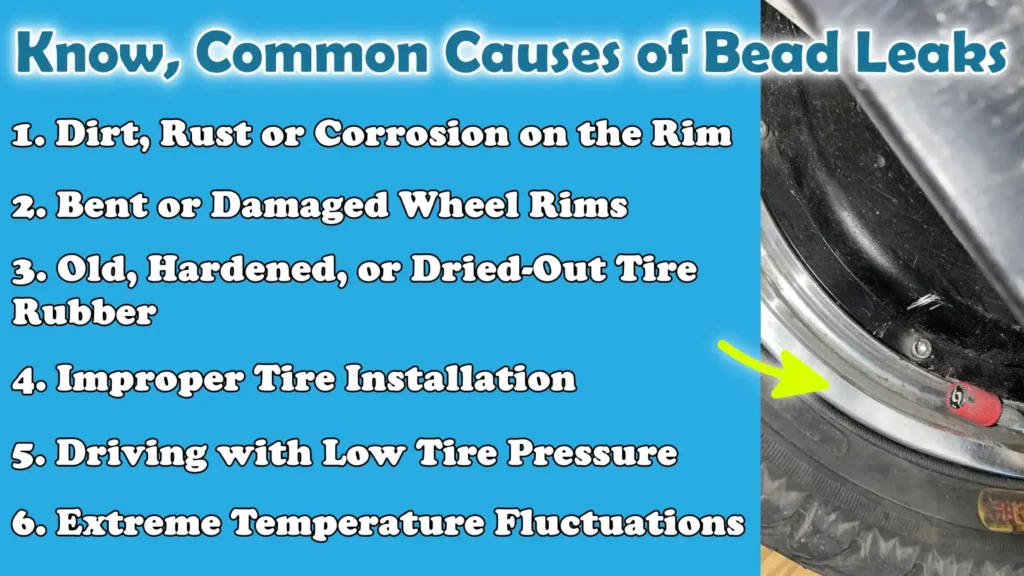
1. Dirt, Rust or Corrosion on the Rim
The most common cause of a bead leak is the presence of dirt, rust, or corrosion on the wheel rim where the tire seals.
Over time, exposure to moisture, road salt, or prolonged weathering can cause rust to form on the metal rim.
This rust creates a rough and uneven surface, preventing the tire bead from seating perfectly against the rim.
Small particles of dirt or sand trapped between the tire and the rim can also compromise the airtight seal.
When this occurs, air begins to leak out slowly through tiny crevices, often without any visible damage to the tire itself.
2. Bent or Damaged Wheel Rims
A bent or slightly damaged wheel rim can also cause a bead leak, as it prevents the tire from seating uniformly around its entire circumference.
Such damage often results from hitting potholes, driving over speed bumps at high speeds, or striking other road obstructions.
When a rim loses its perfectly round shape, the tire cannot maintain consistent pressure against it, creating weak spots through which air can escape.
Even a minor bend, one that may not be easily visible, as it can be sufficient to compromise the seal and lead to a persistent air leak over time.
3. Old, Hardened, or Dried-Out Tire Rubber
Tires naturally age over time and the rubber in the bead area can become hard, dried-out, or less pliable.
When this happens, the tire loses its ability to form a strong, airtight seal against the rim.
This issue is particularly common in older tires that have been exposed to heat, sunlight and prolonged use.
As the rubber hardens, it becomes less capable of conforming to the surface of the rim, leading to the formation of tiny cracks through which air can escape.
This type of problem often develops gradually, meaning the driver may not detect it until the tire pressure begins to drop consistently.
4. Improper Tire Installation
Improper tire installation is another major cause of bead leaks.
If a tire is not mounted correctly onto the rim, the bead will not seat uniformly when inflated.
Sometimes the tire is not properly aligned, or the bead has not fully settled into its groove prior to inflation.
Such improper seating creates weak points in the seal, allowing air to escape.
In many cases, the problem becomes apparent immediately after installation; however, it often becomes more evident a few days later, when the tire pressure begins to drop.
5. Driving with Low Tire Pressure
Consistently driving with low tire pressure can also lead to bead leak issues over time.
When a tire is underinflated, it cannot maintain the necessary internal pressure required to keep the bead firmly seated against the rim.
This can result in slight movement between the tire and the rim while driving, causing the seal to gradually weaken.
Furthermore, low pressure causes excessive flexing of the tire sidewalls, placing strain on the bead area and increasing the risk of air leaks in the long run.
6. Extreme Temperature Fluctuations
Extreme fluctuations in temperature can affect both the tire rubber and the metal rim, potentially leading to bead leak issues.
When temperatures drop, the air inside the tire contracts, resulting in a decrease in pressure; Conversely, when the temperature rises significantly, all these components expand.
Due to this repeated contraction and expansion, the tire bead may shift slightly from its position on the rim surface.
Over time, this constant stress can weaken the seal, particularly if minor imperfections, such as dust, dirt, or rust, are already present.
This is precisely why bead leaks are frequently observed during seasonal transitions.
Know About Common Signs of a Tire Bead Leak
1. Gradual Air Loss from the Tire Over Time
One of the most common signs of a bead leak is the gradual loss of air from the tire, even when no external damage is visible.
Unlike sudden punctures, this type of leak occurs slowly; consequently, the tire may appear normal at first.
However, after a few hours or days, the tire pressure begins to drop as air escapes through the tiny gap between the tire bead and the rim.
This slow leakage of air is often difficult to detect initially, which is why many drivers only notice it when the tire feels softer than usual while driving or during a routine inspection.
2. The Need for Frequent Tire Inflation
Another clear indication of a bead leak is the need to frequently reinflate the tire.
If you find yourself having to add air to your tires every few days, or several times a week, it typically signifies a persistent air leak somewhere within the system.
In cases of bead leaks, air escapes slowly but continuously, preventing the tire from maintaining pressure for any extended period.
This pattern deviates from normal tire behavior and serves as a strong warning that the seal between the tire and the rim is not functioning correctly.
3. Appearance of Bubbles During a Soapy Water Test
A simple and effective method for confirming a bead leak is the soapy water test.
When soapy water is sprayed along the edge of the tire where it meets the rim, the escaping air creates small bubbles at the site of the leak.
If bubbles appear around the bead area, it clearly indicates that air is leaking from the seal between the tire and the rim.
This method is widely used because it can be easily performed at home and helps pinpoint the exact location of a leak without the need for any specialized equipment.
4. Uneven Tire Pressure Compared to Other Tires
Another indication of a bead leak is uneven tire pressure in a specific tire compared to the others on the vehicle.
If a particular tire consistently shows low pressure, even after being inflated to the correct level, it signals that air is escaping from that specific tire.
In most cases, drivers may notice while driving that one corner of the vehicle feels slightly different, perhaps exhibiting reduced stability or uneven handling.
This imbalance often serves as a strong clue that the tire is experiencing a slow air leak; the cause is typically an issue related to the bead seal, rather than a puncture or a valve problem.
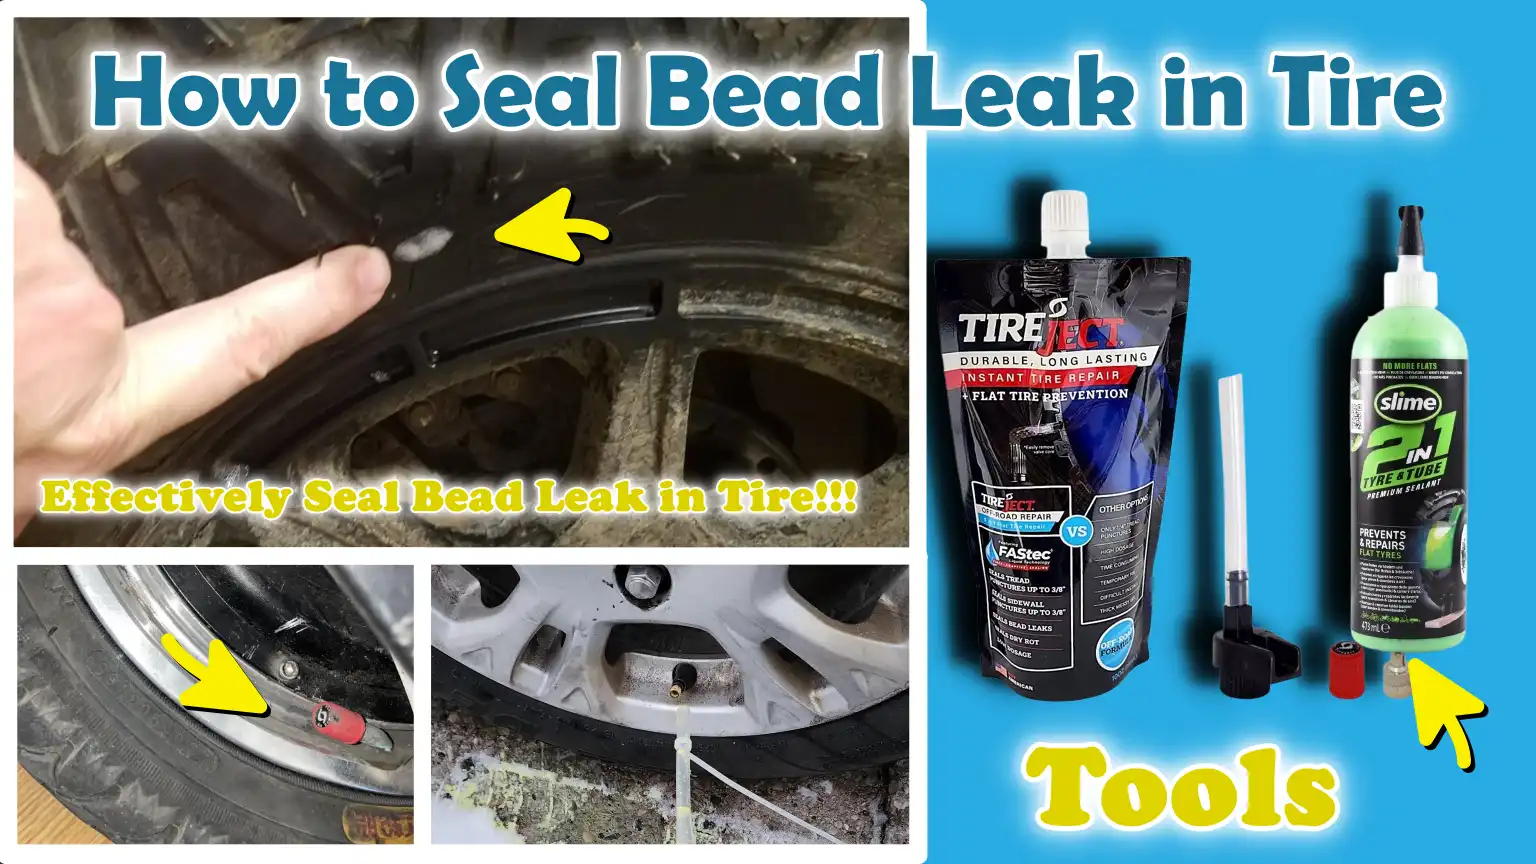
Tools
| Tools | Why It Is Needed | How to Use It |
|---|---|---|
| Tire Jack and Lug Wrench | To access the tire’s bead area, it is essential to safely remove the tire from the vehicle. | First, slightly loosen the lug nuts; then, use a jack to lift the vehicle, completely remove the nuts and pull the wheel off. |
| Valve Core Tool | This allows all the air to escape from the tire quickly, enabling you to work on it safely. | Insert it into the valve stem and turn it anti-clockwise to extract the valve core and completely deflate the tire. |
| Tire Bead Breaker – Manual or Machine | Loosening the tire is necessary so that you can clean and repair the bead-sealing area. | Apply pressure or force to the side of the tire until the seal between the tire and the rim breaks. |
| Air Compressor | After cleaning and sealing, this step is crucial for reinflating the tire and properly seating the bead back into place. | Connect an air hose to the valve and continue inflating until the bead firmly seats back into its position. |
| Soapy Water Spray Bottle | This is used to detect air leaks; it creates bubbles at the specific point where air is escaping. | Spray it around the tire’s bead area and observe for the formation of bubbles; these bubbles indicate the location of the leak. |
| Tire Sealant or Bead Sealer | This helps to stop air leaks from the bead area, either permanently or temporarily. | Before reseating the tire, apply this evenly around the rim flange to create an airtight seal. |
| Wire Brush or Sandpaper | This removes rust, dirt and corrosion particles from the rim, ensuring that the tire can seal properly. | Before applying the sealant, rub the rim’s bead-seating area until it becomes clean and smooth. |
| Clean Cloth or Rag | This is used to wipe away dust, grease and residual debris from the rim and tire. | After brushing, wipe the rim clean to ensure that its surface is completely clean and dry. |
| Safety Gloves and Goggles | This protects you from dirt, sharp edges and accidental overspray or debris. | Put these on before beginning any repair work and keep them on throughout the entire process. |
How to Ensure Safety Before Starting Work
1. Park the Vehicle On a Level and Stable Surface
Before commencing any work on a tire bead leak, the first and most critical step is to park the vehicle on a level and stable surface.
This ensures that when the vehicle is lifted using a jack, it does not roll or slide.
A stable surface also helps maintain the jack’s balance, thereby reducing the risk of the vehicle falling or tipping over during repairs.
Working on uneven ground can render the entire process unsafe and difficult to control; therefore, a level surface is essential for both safety and precision.
2. Use Wheel Chocks to Prevent the Vehicle from Moving
Wheel chocks are small yet vital safety devices placed against the tires that are not being lifted.
Their purpose is to ensure that the vehicle does not roll forward or backward while you are working.
Even if the vehicle is parked, it may still shift slightly due to inclines, vibrations, or sudden jolts.
By firmly placing chocks against the tires, you add an extra layer of safety, ensuring that the vehicle remains completely stationary.
This step becomes even more critical when you are using a jack to lift a specific section of the vehicle.
3. Never Work on an Inflated Tire
Attempting to perform repair work on a tire that still retains air pressure can be extremely dangerous.
Compressed air generates immense force within the tire; if the tire bead (edge) suddenly dislodges from its seat, the tire may move unpredictably or even cause injury to the person working on it.
Therefore, before attempting to dislodge the bead from its seat or separate it from the rim, it is absolutely essential to completely deflate the tire, that is, to let all the air out.
A fully deflated tire is much safer, allowing you to perform your task with ease and without the risk of sudden pressure release.
4. Wear Appropriate Safety Gear
To ensure your safety while repairing a tire, it is crucial to wear appropriate safety gear.
Safety gloves help protect your hands from the sharp edges of the rim, rough surfaces and dirt.
Safety glasses shield your eyes from dust, rust particles, or sudden splashes of cleaning solutions such as: soapy water or sealants.
Even though repairing a tire bead leak may seem like a simple task, minor accidents can happen at any time; therefore, wearing the right safety gear ensures that the entire repair process remains safe and controlled from start to finish.
How to Seal Bead Leak in Tire – Useful & Effective Process
1. Remove the Wheel
The first step in fixing a bead leak is to safely remove the wheel from the vehicle so that you can gain full access to the tire and rim assembly.
To begin, slightly loosen the lug nuts while the vehicle is still resting on the ground, as it is easier and safer to break their tight grip at this stage.
Next, using a jack, slowly and safely lift the vehicle until the tire clears the ground.
Once the vehicle is stable, completely remove the lug nuts and detach the wheel.
This step is crucial, as attempting to work on the tire while it remains mounted on the vehicle makes it difficult to properly clean and repair the bead area.
2. Fully Deflate the Tire
After removing the wheel, the next step is to completely deflate the tire.
This is typically accomplished by removing the valve core, which allows the air to escape quickly and safely.
Ensuring that the tire is fully deflated is essential, as it eliminates internal pressure, making it easier and safer to separate the tire from the rim.
If even a small amount of air remains, it can create resistance and make the bead-breaking process more difficult or hazardous.
3. Break the Bead
Breaking the bead involves separating the edge of the tire from the rim to gain access to the sealing surface.
This task can be performed using a specialized bead breaker tool or, depending on available equipment, through manual methods.
The objective is to gently push the tire away from the rim without causing damage to any of the surfaces.
Once the bead is broken, the tire is no longer firmly attached to the rim, allowing you to inspect and clean the specific area where the air leak is occurring.
4. Inspect the Bead and Rim
Once the bead has separated, carefully inspect both the tire bead and the surface of the rim.
Look closely for signs of rust, accumulated dirt, wear, cracks, or any other visible damage.
These are the most common causes of air leaks.
This step is crucial, as it helps identify exactly why the seal failed.
Without a proper inspection, you may fail to pinpoint the root cause and the leak could recur even after repairs.
5. Thoroughly Clean the Rim
Once you have identified the problematic areas, it is essential to thoroughly clean the rim to restore a smooth sealing surface.
Use a wire brush or sandpaper to remove rust, corrosion and caked-on dirt from the rim’s edge.
The cleaner and smoother the surface, the better the tire bead will seal against it.
After scrubbing, wipe the area with a clean cloth to remove any loose particles.
A thoroughly cleaned rim is vital for creating a strong and long-lasting airtight seal.
6. Apply Bead Sealer
After cleaning, apply bead sealer evenly around the rim where it will come into contact with the tire.
Bead sealer is a specialized compound designed to fill microscopic pores and enhance the seal between the tire and the rim.
It works by creating a flexible layer that prevents air from escaping through tiny imperfections that might not be easily visible.
Apply a thin, uniform layer to cover the entire contact area of the bead, ensuring that it does not accumulate excessively in any single spot.
This step helps ensure that a strong and reliable seal is formed once the tire is remounted.
7. Reseat the Tire Bead
After applying the sealant, place the tire back onto the rim and begin inflating it using an air compressor.
As the tire fills with air, the bead will gradually be pushed outward and settle into its correct position against the rim.
You may hear a distinct “pop” sound, indicating that the bead has seated properly.
This step is crucial as it re-establishes an airtight seal between the tire and the rim.
8. Check for Leaks
Once the tire is fully inflated and properly seated, it is essential to verify that the seal is functioning correctly.
Spray soapy water around the bead area and carefully observe whether any bubbles form.
If bubbles appear, it indicates that air is still escaping from that spot and the seal has not yet been fully restored.
If no bubbles form, it means the bead leak has been successfully sealed and the tire is holding air properly.
9. Remount the Wheel
The final step is to securely remount the wheel onto the vehicle.
Place the wheel onto the hub and initially tighten the lug nuts by hand to ensure they are properly aligned.
Then, slowly lower the vehicle and firmly tighten the lug nuts in a cross pattern to ensure that the pressure is distributed evenly.
Proper tightening ensures that the wheel is secure and safe for driving.
Once this task is complete, the repair process is finished; provided the bead has sealed correctly, the tire’s air pressure should remain consistent.
Know, Other Treatment for Bead Leaks
1. Use of Tire Sealant – Temporary Solution
Tire sealant is a quick and temporary method to slow down or stop air leakage from a bead leak without removing the tire.
It is a liquid compound that is injected through the valve stem and, as the tire rotates, it spreads throughout the interior of the tire.
As the tire spins, the sealant fills the tiny cracks between the tire bead and the rim, the very spots where air is escaping.
This method is useful in emergency situations or when you need a quick fix to safely reach a repair shop.
However, it is crucial to understand that sealant does not address underlying issues such as rust, debris, or rim damage; therefore, it does not resolve the root cause of the problem.
Over time, if the internal issue is not properly repaired, the leak may recur.
2. Re-seating the Tire Without Removing It
Another alternative method involves attempting to re-seat the tire bead without completely detaching the tire from the wheel.
This process entails completely deflating the tire and then re-inflating it using an air compressor, thereby allowing the bead to snap back into its correct position against the rim.
Sometimes, a bead leak occurs simply because the tire was not seated correctly or had shifted slightly due to low air pressure.
In such cases, re-inflating the tire can help restore an airtight seal.
This method is often employed when both the rim and the tire are still in good condition and there is no significant rust, debris, or damage on the sealing surface.
3. Professional Repair at a Tire Shop
Professional repair at a tire shop is the most reliable and long-lasting solution for bead leaks, particularly when the problem cannot be easily resolved at home.
Tire technicians use specialized machinery to safely dismount the tire bead, thoroughly clean the rim and inspect both the tire and the wheel for any hidden damage.
They can also detect rim distortions or corrosion that may not be visible during a standard visual inspection.
In many cases, they utilize industrial-grade bead sealers and high-pressure equipment to ensure a completely airtight seal.
This option is highly recommended when the leak is recurrent or when safety is a concern, as professionals can guarantee a repair that is far more precise and durable than temporary solutions.
So, When Should You Replace a Tire Instead of Repairing It?
1. Severe Rim Damage or Warping
In some cases, a bead leak cannot be properly repaired because the wheel rim itself is severely damaged or warped.
When the rim is no longer perfectly round, the tire cannot form a strong, uniform seal around it.
This type of damage typically occurs when a vehicle strikes a deep pothole or a curb at high speed.
If the rim is significantly warped, no amount of cleaning or sealing can fully restore an airtight connection, as the structural integrity of the surface has been compromised.
In such situations, replacing the rim is often the safest and most reliable solution to ensure proper tire performance and driving stability.
2. Cracks in the Tire Bead
Cracks or structural damage to the tire bead are another clear indication that the tire should be replaced rather than repaired.
The bead area is designed to be strong and flexible, allowing it to work in conjunction with the rim to safely contain air pressure.
However, over time or due to improper installation, this area may develop cracks or structural damage.
Once the bead is cracked, it can no longer form a proper seal, even if sealants are applied or the area is cleaned.
Continuing to use such a tire can lead to recurring air leaks and increased safety risks, particularly when driving at high speeds or carrying heavy loads.
3. Excessive Rust
When a rim becomes heavily rusted, specially in the area where it contacts the tire bead, creating a proper airtight seal becomes extremely difficult.
Light surface rust can usually be cleaned off; However, deep or widespread rust often degrades the metal surface of the rim, rendering it rough and uneven.
Consequently, the tire bead is unable to seat properly against the rim.
In severe cases, even after cleaning, the surface remains so compromised that it can no longer effectively retain air.
When rust reaches this stage, replacing the rim is often a more effective solution than pursuing repeated repairs, as repairs typically offer only temporary relief.
4. Old or Worn-Out Tires
Tires have a finite lifespan; over time, the rubber naturally hardens, weakens and loses its elasticity.
When a tire becomes excessively old or worn, its bead section fails to form a proper seal with the rim, even if the rest of the tire appears to be in good condition.
Symptoms of tire aging include drying of the rubber, reduced grip, frequent air loss and visible wear along the edges.
In such situations, repairing a bead leak is not a sustainable solution, as the tire material itself is no longer reliable.
Replacing the tire enhances safety, improves air retention capabilities and ensures a more consistent and stable driving experience.
Estimated, Cost of Fixing a Bead Leak
1. DIY Cost
Fixing a bead leak yourself is typically the most economical option, as it primarily requires only basic tools and a few supplies.
A typical DIY setup might include items such as a valve core tool, a wire brush or sandpaper for cleaning, soapy water to detect the leak and a bead sealer compound.
In most cases, these items are either already available at home or can be purchased at a significantly lower cost compared to professional services.
The main advantage of DIY repair is not just the monetary savings, but also the ability to fix minor bead leaks immediately without waiting for an appointment at a workshop.
However, the success of this method depends heavily on proper cleaning and correct application, as even a minor error can cause the leak to recur.
2. Professional Repair Cost
Professional tire shops typically charge based on labor, the tools used and the condition of the tire and rim.
Having a bead leak fixed at a workshop is generally more expensive than the DIY approach, but it offers the benefit of expert inspection and specialized tools.
Technicians can identify hidden issues such as: rim damage, deep-seated rust, or improper tire seating, that an average person might overlook.
Costs can vary depending on the location, tire size and the severity of the leak; however, in most cases, it remains a significantly more affordable option compared to replacing the entire tire or wheel assembly.
Another advantage is that the repair is more durable, significantly reducing the likelihood of the problem recurring.
3. Cost Comparison – Repair vs Replacement
When comparing repair versus replacement, the decision often depends on the condition of both the tire and the rim.
Repairing a bead leak is generally quite affordable and serves as an ideal solution when the damage is minor such as: slight corrosion or a minor issue with the seal.
Provided that the structural integrity of the tire remains intact, it can be safely used even after the repair.
Conversely, replacing the tire becomes necessary when the rim sustains severe damage, suffers from deep-seated corrosion, or when the tire has aged to the point where it can no longer properly maintain air pressure.
Although replacing a tire entails a higher cost, it offers an opportunity for a fresh start in terms of both safety and performance.
In the long run, replacing a tire can sometimes prove more cost-effective than opting for repeated repairs, as it helps avoid recurring malfunctions and mitigates the risks associated with unsafe driving conditions.
How to Prevent Bead Leaks in the Future?
Not only this, there’s research on tire durability that shows that the bead region is actually one of the most stress-sensitive parts of a tire, as with the repeated loading, pressure fluctuations and road impact it gradually weakens the bead structure over the period of time, so that’s why bead leaks often develop in older or frequently used tires, even without visible damage, so it shows that the importance of early detection and then proper sealing techniques before any structural fatigue leads to the permanent failure during journey.[¹]
1. Keep the Rim Clean and Rust-Free
The most effective way to prevent bead leaks is to keep the wheel rim clean and free from rust or corrosion.
The tire bead relies on a smooth, clean metal surface to form a strong, airtight seal.
When dirt, mud, road salt, or moisture remain on the rim for extended periods, rust gradually begins to form, rendering the surface rough and uneven.
This surface irregularity compromises the seal between the tire and the rim, allowing air to slowly escape over time.
Regular cleaning with plain water, followed by proper drying, significantly reduces the likelihood of rust formation and helps maintain a strong seal for the long term.
2. Maintain Correct Tire Pressure
Maintaining the correct air pressure in your tires is crucial for preventing bead leaks.
When tire pressure is too low, the tire does not press firmly enough against the rim, thereby weakening the seal at the bead area.
Over time, this can lead to the formation of tiny gaps, allowing air to leak out gradually.
Proper inflation ensures that the tire bead remains firmly seated against the rim, minimizing movement and stress on the seal while driving.
Regularly checking your tire pressure, specially before long journeys, helps maintain stability and prevents unnecessary strain on the sealing surfaces.
3. Regular Tire Inspections
Regular inspections of your tires play a vital role in the early detection and prevention of bead leaks.
By regularly inspecting your tires, you can identify early warning signs such as: gradual air loss, uneven pressure, or the accumulation of dirt and rust around the rim.
Detecting these issues early allows you to rectify them before they escalate into serious leaks.
Inspections also ensure that the tire is properly seated on the rim and that there are no hidden defects compromising the sealing surface.
This simple habit can significantly enhance both tire safety and longevity.
4. Avoid Driving Over Potholes and Rough Terrain
Driving habits also have a profound impact on the integrity of the tire bead seal.
Striking potholes, sharp road edges, or rough surfaces at high speeds can bend or damage the rim, thereby compromising the tire’s seating area.
Over time, even minor impacts can weaken the seal between the tire and the rim, increasing the risk of bead leaks.
Driving smoothly and cautiously protects both the tire and the rim from unnecessary stress.
Whenever possible, try to avoid poor-quality roads, and slow down when traversing rough sections, as doing so significantly reduces the likelihood of future sealing-related issues.
Read More:
- How to Use Tire Plug Kit Correctly
- How to Repair Tubeless Tire Puncture
- How to Locate a Nail in a Tire
- How to Fix Slow Tire Air Leak
- How to Detect Tire Sidewall Damage
- How to Check Tire Tread Depth at Home
- How to Bleed ABS System Properly
- How to Replace Rusted Brake Lines
- How to Inspect Brake Lines for Rust
- How to Flush Contaminated Brake Fluid
- How to Check Brake Fluid Contamination Level
- How to Fix Brake Bias Issues
- How to Test Brake Proportioning Valve
- How to Replace a Brake Light Switch
- How to Diagnose Brake Light Switch Failure
- How to Fix Intermittent ABS Activation
- How to Clean ABS Wheel Speed Sensor
- How to Diagnose ABS Sensor Wiring Issues
- How to Test Electronic Brake Module (EBCM)
- How to Fix Parking Brake Dragging
- How to Adjust Parking Brake Cable
- How to Check Parking Brake Cable Tension
- How to Fix Brakes Dragging While Driving
- How to Diagnose Brake Dragging Issue
- How to Fix Internal Master Cylinder Leak
Know, Common Mistakes About Seal Bead Leak in Tire to Avoid Them
1. Failure to Properly Clean the Rim
One of the most common mistakes made during bead leak repair is failing to properly clean the rim.
The tire bead can only form a strong, airtight seal if the rim surface is smooth, clean and free of rust or debris.
If old rust, mud, or dirt remains on the rim, it creates tiny voids through which air continues to escape, even after the seal has been applied.
Many people assume that the sealant will fix everything; however, in reality, without a clean surface, even the best sealant cannot function effectively.
Proper cleaning is not optional; it is the foundation of a successful repair.
2. Using Too Much Sealant
Another mistake is applying an excessive amount of bead sealant in the hope that it will permanently fix the leak.
Sealant is designed to fill minor imperfections, not to compensate for severe damage or poor surface preparation.
When applied in excess, it can create an uneven layer between the tire and the rim, which actually prevents the bead from seating properly.
In some cases, excessive sealant can even degrade over time, leaving behind a sticky residue inside the wheel.
Applying a thin, uniform layer of sealant is always more effective than applying an excessive amount.
3. Overlooking Rim Damage
Many attempts to repair bead leaks fail because the root cause such as: a damaged rim, is overlooked.
A bent or cracked rim can never form a strong, airtight seal, no matter how thoroughly you clean it or how much sealant you apply.
Some forms of damage are not immediately visible at first glance; Small cracks or structural weaknesses in the rim can also become a persistent source of air leaks.
Ignoring these issues often leads to recurring leakage problems and renders repair attempts futile.
Before attempting to fix a bead leak, it is always essential to thoroughly inspect the condition of the rim.
4. Failure to Maintain Proper Tire Air Pressure
Failing to maintain proper tire air pressure is another major mistake that can trigger or exacerbate bead leak issues.
If the tire is underinflated, it fails to exert sufficient pressure against the rim; this compromises the bead seal, allowing air to escape.
Conversely, overinflating the tire can place excessive pressure on the bead area and create stress at weak points, particularly if the rim or tire is already in poor condition.
Maintaining the correct tire pressure, in accordance with the manufacturer’s instructions, is crucial to ensure that the bead seals properly and to ensure a safe and stable driving experience.
Conclusion – How to Seal Bead Leak in Tire
Even, with a small air leakage at the rim area that can literally affect the way your entire vehicle actually performs on the road.
And, unlike a puncture, which is easily visible, a bead leak often originates gradually at the interface where the tire meets the rim, resulting in a slow yet steady decline in air pressure over time.
This gradual loss of pressure can adversely affect fuel efficiency, tire longevity, braking distance and overall vehicle stability, and often, the driver remains unaware of it until much later.
What makes this problem even more critical is that if the seal between the tire and the rim becomes compromised, even an otherwise perfectly sound tire cannot function correctly.
Fortunately, if the proper procedures are followed, ranging from thorough inspection and cleaning to the application of correct sealing techniques, most bead leaks can be detected and repaired.
However, a successful resolution to the problem hinges on addressing the root cause of the leak, rather than merely treating its symptoms.
Dirt, rust, rim damage, or improper seating, rectifying these underlying issues is essential to ensure the repair is durable and long-lasting.
Temporary measures, such as sealants or emergency inflation kits, can offer immediate relief in critical situations, but they cannot serve as a permanent substitute for a proper, airtight seal between the tire and the rim.
Ultimately, understanding how a bead leak functions and how it originates provides drivers with a distinct advantage in maintaining a safe and reliable vehicle.
Regular inspections, maintaining proper tire pressure and adopting careful driving habits all play a pivotal role in preventing this issue before it even begins.
Now, you can comment down below your queries for more information.
Frequently Asked Questions
FAQ 1: What is a tire bead leak and why does it happen?
Answer: A tire bead leak occurs when air escapes not through a puncture in the rubber itself, but from the area where the tire meets the wheel rim. This seal is supposed to be completely airtight; however, if there is dirt, rust, wear and tear, or minor damage on the rim or the tire bead, this seal can be compromised. This can also happen if the tire was not mounted correctly or if the rim is bent. The air loss is usually slow, making it difficult to detect initially.
FAQ 2: How do I know if my tire has a bead leak?
Answer: You can identify a bead leak if your tire is consistently losing air, even if there are no visible nails or cuts on it. A common sign is that you have to refill the air frequently, sometimes as often as every few days. Another easy way to check is to apply soapy water to the edge of the tire where it meets the rim. If bubbles appear, it indicates that air is escaping from that spot, confirming the presence of a bead leak.
FAQ 3: Is it dangerous to drive with a bead leak?
Answer: Driving with a bead leak can become unsafe over time, as it causes the tire pressure to drop gradually. Low tire pressure affects vehicle handling, increases braking distances and can lead to uneven tire wear. In some cases, if the pressure drops too significantly while driving, the risk of a tire blowout increases. Therefore, rather than continuing to drive without addressing the issue, it is best to have the bead leak repaired immediately as soon as it is detected.
FAQ 4: Can I fix a bead leak at home?
Answer: Yes, in many cases, provided the problem is minor, a bead leak can be fixed right at home. This typically involves removing the wheel, thoroughly cleaning the rim and applying a ‘bead sealer’ before remounting the tire. However, the success of this method depends on the condition of the rim and the tire. If the rim is heavily rusted, bent, or significantly damaged, you may need to seek professional assistance for a safe and long-lasting solution.
FAQ 5: Will tire sealant fix a bead leak permanently?
Answer: Tire sealant can help stop air leaks for a while, but it is not a definitive solution. It works by filling the tiny gaps between the tire and the rim, which can be helpful in emergency situations or for short-term use. However, it does not address underlying issues such as rust, dirt, or rim damage; therefore, the leak may recur over time. It is best utilized as a temporary measure until a proper repair can be performed.
FAQ 6: What is the most common cause of a bead leak?
Answer: The most common cause of a bead leak is the presence of rust or corrosion (metal degradation) on the wheel rim at the point where the tire makes contact to form a seal. This creates an uneven surface, preventing the tire from establishing a proper airtight seal. Dirt and debris can also exacerbate this issue. This problem is more prevalent in older vehicles or on wheels that are frequently exposed to moisture and adverse weather conditions.
FAQ 7: How much does it cost to fix a bead leak?
Answer: The cost of fixing a bead leak depends on whether you perform the repair yourself or take it to a professional. DIY repairs are generally less expensive, as they primarily require only a few basic tools and a small amount of sealant. Having repairs performed by a professional costs more, but it involves a comprehensive inspection, cleaning and proper sealing using specialized tools. If the rim or tire is damaged beyond repair, replacing it entirely can be significantly more expensive than simply repairing it.
FAQ 8: Can a bent rim bead cause a leak?
Answer: Yes, a bent rim bead is a common cause of leaks, as it prevents the tire from seating and sealing properly. Even a slight bend in the rim can create a gap, allowing air to escape. This type of damage is often caused by driving over potholes or on rough roads. If the rim is severely bent, it may be necessary to repair or replace the rim to completely resolve the leak.
References:
[1] Fatigue Life Prediction of Radial Tire Bead Using a Maximum Strain Energy Density Range Method
https://www.mdpi.com/2076-3417/11/12/5477

Hello Folks, Dean Shali here to help you out to solve the problems with your lovely vehicle, as i have lots of experience and knowledge about automotive industry as i woks directly with the customers and repair vehicles and i love to help the people to keep their cars safe and running smoothly.