Written By: Dean Shali
Fact Checked By: Sabré Cook
Reviewed By: Tamara Warren
The rust inside the brake line does not stay small always, as it slowly spreads out until pressure can no longer hold upto it.
So, there’s hidden network of small metallic tubes that is known as brake lines, so that works whenever you press the brake pedal.
As well as, these lines actually caries hydraulic brake fluid under the high pressure from the master cylinder to each wheel and even a tiny weakness in this system can literally affect your entire stopping power as well.
Plus, the problem is that the brake lines are usually made of steel material, which means that they are naturally vulnerable to the corrosion specially when they are exposed to the moisture, road salt, dirt and as time goes by.
Additionally, according to the automotive safety studies: the rust-related brake line failure is literally one of the leading causes of having sudden hydraulic brake loss in older vehicles that often develops slowly and silently over the years.
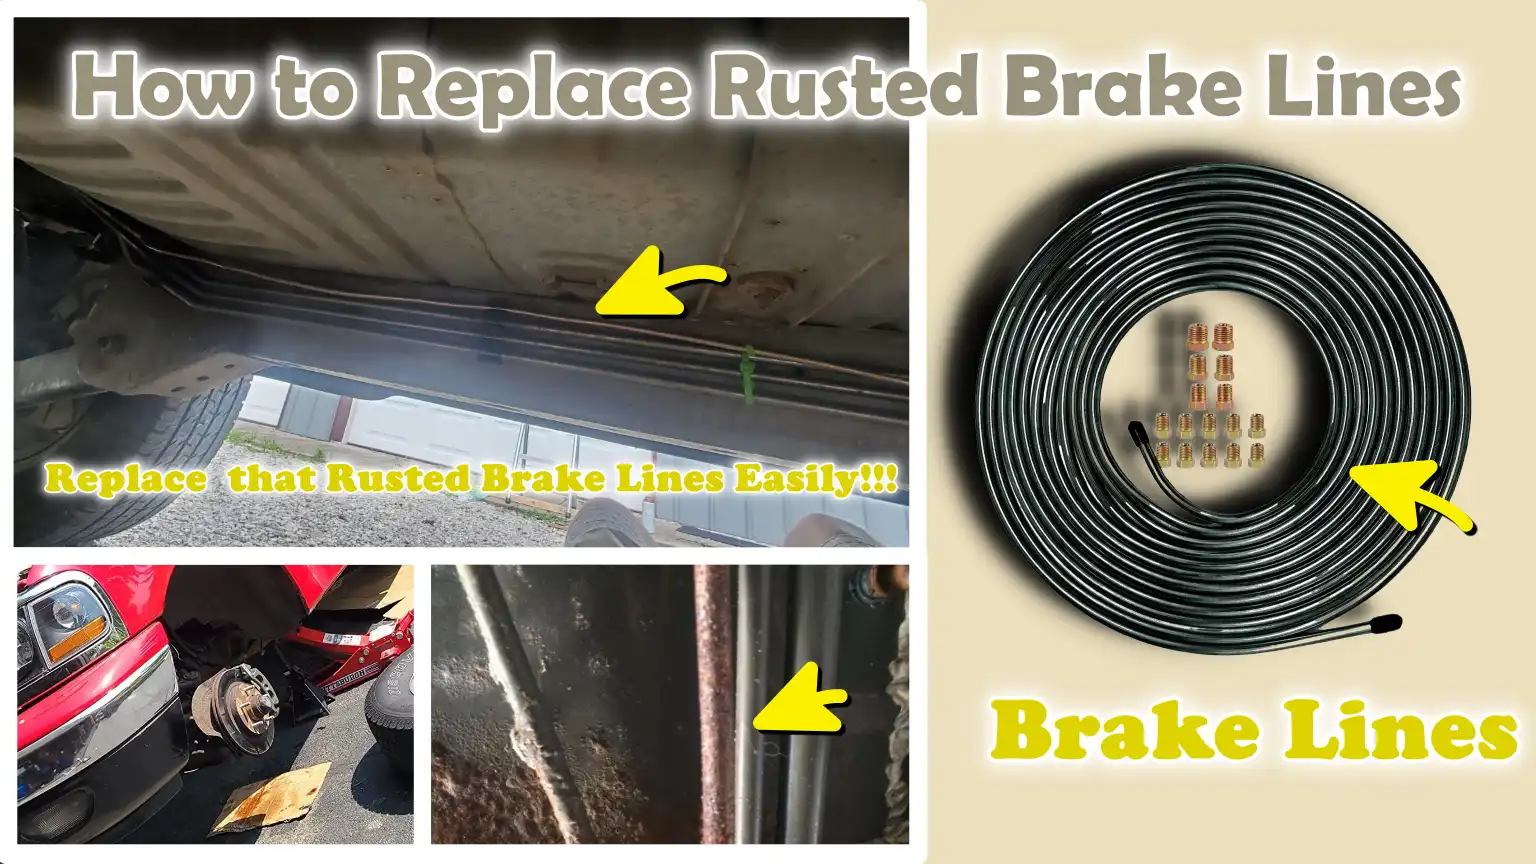
Which is why, in this guide you’ll learn How to Replace Rusted Brake Lines so that you can restore full braking integrity before a hidden problem turns into a real-life-threatening-failure on the journey.
Now, Understand About the Brake Lines and Rust
1. What is the Function of Brake Lines in a Hydraulic Braking System?
Brake lines are tubes that transport brake fluid from the master cylinder to each wheel, enabling your car to slow down or come to a stop when you press the brake pedal.
When you press the pedal, it generates hydraulic pressure; this pressure travels through the brake fluid contained within the lines, thereby activating the brake calipers or wheel cylinders.
These components then press the brake pads or shoes against the rotating parts of the wheel assembly, effectively reducing the vehicle’s speed.
The fundamental principle at work here is that brake fluid is incompressible, meaning that even a slight amount of pressure from your foot is efficiently converted into immense stopping power.
For this reason, brake lines must remain completely sealed and structurally sound at all times.
Even a minor leak, crack, or weak spot can compromise the pressure and directly impact your vehicle’s ability to stop, a fact that establishes these lines as one of the most critical safety components in any vehicle.
2. Why Does Rust Form?
Rust forms on brake lines primarily because they are constructed from metal and are constantly exposed to the harsh environment found beneath the vehicle.
Rain, humidity and the moisture faced in puddles create an ideal environment for rust formation, particularly when moisture remains trapped around the lines for extended periods.
In many regions, the road salt applied during the winter months exacerbates this issue, as salt accelerates the chemical reactions responsible for the rusting process.
Over time, dust, dirt and debris accumulate on the brake lines, trapping moisture against the metal surface and causing rust to spread even more rapidly.
Age is also a significant factor, as years of use cause protective layers to wear away, leaving the underlying metal exposed.
Temperature fluctuations also play a role, as repeated cycles of heating and cooling can weaken the surface, thereby increasing its susceptibility to rust.
This process typically begins as surface rust but can gradually eat away at the metal from the inside out, compromising its structural integrity and reducing its thickness.
3. Types of Brake Lines
Brake lines are manufactured using various materials, each offering a distinct level of corrosion resistance and durability.
Traditional steel brake lines are robust and widely utilized; however, if not properly protected, they are the most vulnerable to rusting.
Coated steel lines feature a protective outer layer, often composed of substances such as zinc or polymers, that helps slow down the corrosion process and extends the lifespan of the lines.
Stainless steel brake lines offer superior resistance to corrosion due to their chemical composition, making them an excellent choice for longevity, although they may come at a slightly higher cost.
Copper-nickel brake lines are currently gaining significant popularity due to their combination of flexibility and exceptional corrosion resistance; this makes them easier to install and significantly reduces the likelihood of them rusting over time.
Choosing the right material can make a substantial difference in how long your brake lines last and how effectively they perform under demanding conditions.
4. Why Rusted Brake Lines Should Never Be Ignored
Rusted brake lines should never be ignored, as they directly jeopardize your vehicle’s ability to stop safely and reliably.
As rust eats away at the metal, it compromises the structural integrity of the brake lines, causing them to thin out and increasing the likelihood of them snapping or bursting under pressure.
When this occurs, brake fluid may leak; and as the braking system relies entirely on hydraulic pressure, even a minor leak can lead to a drastic reduction in braking performance.
In severe cases, a line may fail completely, resulting in sudden brake failure while the vehicle is in motion.
What makes this even more dangerous is that rust often develops gradually and out of sight, meaning drivers may remain unaware of the problem until it reaches a critical stage.
Early warning signs such as: a spongy brake pedal, visible fluid spots beneath the vehicle, or clearly visible rust, should always be taken seriously.
Timely replacement of rusted brake lines is not merely a routine maintenance task; it is a crucial step toward ensuring consistent, reliable and safe braking every time you drive.
Take Safety Precautions Before Starting Work
1. The Importance of Working on a Stable, Elevated Vehicle
Before beginning the task of replacing brake lines, the vehicle must be raised in such a way that it remains completely stable and secure, as you will be working underneath it for an extended period.
If the car is not properly supported, it could shift, tilt, or fall without warning, particularly when you are exerting force to loosen tight or rusted fittings.
The ground surface is also a critical factor, as lifting equipment can sink into or slip on soft or uneven terrain.
A stable setup ensures that the vehicle’s weight is evenly distributed and prevents sudden movements.
This is not merely a matter of convenience, but a vital measure to prevent serious injury and to ensure that you can work with full control and concentration.
2. Using the Correct Jack Stands – Never Rely Solely on the Jack
A hydraulic jack is designed to lift a vehicle, not to securely hold it in a fixed position for an extended period.
Once the car has been raised, it must be supported by jack stands of appropriate capacity, placed at the specific lifting points recommended by the manufacturer.
Jack stands provide solid mechanical support that does not rely on hydraulic pressure, pressure that can diminish or leak over time.
Relying solely on a jack is dangerous, as even a slight drop in pressure or a minor slip could cause the vehicle to fall suddenly.
The use of jack stands ensures that while you are working underneath the vehicle, it remains at a fixed height and in a stable position, thereby significantly reducing the risk of accidents.
3. Awareness Regarding Brake Fluid Safety and Toxicity
Brake fluid plays a critical role in the braking system; However, this is also a chemical that must be handled with extreme caution.
Most brake fluids are ‘hygroscopic’, meaning they absorb moisture from the air.
This property can make them harmful when they come into contact with skin, eyes, or painted surfaces.
Brake fluid can damage a vehicle’s paintwork by stripping away its protective layer and prolonged contact with the skin can cause irritation.
It is harmful if swallowed; therefore, it should always be kept away from food, beverages and food preparation areas.
Proper maintenance involves using clean containers, preventing contamination and disposing of used fluid in accordance with environmental guidelines.
Understanding these risks helps prevent both personal injury and damage to the vehicle.
4. Wearing Gloves and Eye Protection
Wearing Personal Protective Equipment (PPE) is crucial when working on a brake system, as you may face sharp metal edges, pressurized components and chemical fluids.
Gloves protect your hands from cuts, scrapes and direct contact with brake fluid, while also improving your grip when handling tools and parts.
Eye protection is equally important, as rust, dust, or fine particles of fluid can easily become airborne when loosening fittings or disconnecting lines.
Even a single drop of brake fluid or a stray particle can cause severe irritation or injury to the eyes.
By wearing the appropriate safety gear, you can work with confidence and minimize the risk of preventable accidents.
5. Depressurizing the Brake System
Before removing any brake line, it is essential to depressurize the brake system to prevent the sudden expulsion of fluid and to ensure that the work can be performed more safely and easily.
When the brake pedal is depressed, pressure builds up within the lines; if a connection is opened while this pressure is still present, brake fluid may spurt out forcefully.
This not only creates a mess but also increases the risk of the fluid coming into contact with the skin and eyes.
To alleviate this pressure, it is standard practice to ensure that the vehicle’s engine is turned off; subsequently, the brake pedal is slowly depressed a few times to release the accumulated pressure within the system.
This step minimizes the likelihood of a sudden, forceful surge of fluid and facilitates the controlled disconnection of brake line components.
Tools
| Tools | Why It Is Needed | How to Use It Properly |
|---|---|---|
| Brake Line Tubing – Pre-Flared or Roll Tubing | This is the new line that replaces the rusted line and safely conveys brake fluid under pressure. Using the correct material ensures a longer lifespan and prevents future corrosion. | Carefully measure the length of the old line. If you are using pre-flared lines, verify their size and fittings. If you are using coiled tubing, cut it to the correct length and create the flares before installation. Install it in the exact same manner as the original line to prevent any damage. |
| Brake Line Flaring Tool | This tool creates precise flares at the ends of brake lines, ensuring they seal tightly and do not leak under pressure. If the flare is not formed correctly, brake failure may occur. | Insert the cut tubing into the tool, clamp it securely and create the appropriate type of flare (depending on the vehicle: either a double flare or a bubble flare). Before installation, ensure that the flare is smooth, uniform and free of any cracks. |
| Line Wrench Set | This tool is designed to grip brake line fittings without rounding off (damaging) their corners. Standard wrenches can easily damage fittings made of softer metals. | Seat the wrench fully onto the fitting and apply even pressure. Apply force slowly and in a controlled manner, specially on rusted joints, to avoid stripping the nut. |
| Tube Cutter | This tool cuts brake tubing cleanly without crushing it or distorting its shape. A clean cut is essential for creating a proper flare. | Position the cutter around the tube, tighten it slightly and rotate it around the line. Continue tightening it gradually until the cut is complete. Do not rush, as applying excessive pressure can deform the tubing. |
| Tube Bending Tool | This tool allows you to bend brake lines easily without kinking or flattening them. Kinking or flattening can restrict fluid flow. | Insert the tube into the bending tool and slowly bend it to the desired angle. Follow the contours of the original line to ensure proper routing and clearance. |
| Brake Fluid – Correct Type | This transmits pressure throughout the entire brake system. Using the correct type of fluid ensures that the system functions properly and that the seals do not deteriorate. | Consult your vehicle’s owner’s manual to identify the correct type of fluid (e.g., DOT 3 or DOT 4). Fill the reservoir and use this fluid during the bleeding process. Always use clean, fresh fluid and keep it free from any contaminants. |
| Jack, Jack Stands, Wheel Chocks | These lift and stabilize the vehicle, allowing you to work underneath it safely and without risk (eliminating the danger of the vehicle falling). | Lift the vehicle using a jack, then place jack stands at the designated support points. Use wheel chocks to secure the tires and prevent the vehicle from rolling. Never work underneath a vehicle that is supported solely by a jack. |
| Penetrating Oil | This helps loosen rusted and seized fittings by breaking down the rust, making them easier and safer to remove. | Spray directly onto rusted fittings and let it sit for a few minutes. In cases of heavy rust, apply it multiple times. This reduces the risk of the fittings breaking or becoming damaged. |
| Brake Bleeder Kit | Once connected, it purges air from the brake system, a crucial step in ensuring strong and reliable braking performance. | Connect the kit to the brake bleeder valve and follow the bleeding procedure. This may involve pumping the brake pedal or utilizing a vacuum or pressure system until all air bubbles are completely eliminated. |
How to Identify and Inspect Rusted Brake Lines
1. Identifying Visible Rust or Wet Spots
The first step in detecting rusted brake lines is to carefully look for visible signs of damage on the metal tubing.
Rust often begins as a light brown or orange layer on the surface, but over time, it can become flaky, rough and deeply pitted, a sign that the underlying metal is already weakening.
An important point to note is that even small patches of heavy rust can reduce the thickness of the brake line, increasing the likelihood of it failing under pressure.
In addition to rust, you should also check for wet or oily spots, which may indicate that brake fluid is leaking through small cracks or pinholes in the brake line.
Brake fluid typically appears slightly glossy or damp and can attract dust, resulting in the formation of dark, sticky patches.
If you observe both rust and moisture in the same area, it is a definitive sign that the line is no longer safe and has likely already compromised.
2. Inspecting the Undercarriage, Wheel Wells and Frame Rails
Brake lines run along the underside of the vehicle, meaning they are constantly exposed to water, dust, salt and road debris.
The most common areas for rust formation are along the chassis, inside the wheel wells and near the frame rails, as these locations tend to trap moisture and dirt.
In many vehicles, brake lines are clipped to the frame or routed through tight spaces; this not only makes them difficult to inspect visually but also increases the likelihood of moisture remaining in contact with the metal surfaces.
Inspecting the wheel wells is particularly important, as they are directly exposed to water and debris kicked up from the road, which increases the risk of corrosion.
When examining these areas, it is crucial to pay special attention to sections where the line bends or passes through brackets, as corrosion often begins at these hidden or high-stress points.
A thorough inspection of the entire underbody helps ensure that no damaged components go unnoticed.
3. Tracing Brake Lines from the Master Cylinder to the Wheels
To properly inspect brake lines, it is essential to understand their entire routing and follow them from start to finish.
Brake lines originate at the master cylinder, typically located within the engine bay and run along the vehicle’s underbody to reach each individual wheel.
By carefully examining these lines one by one, you can identify any weak spots, accumulated corrosion, or deteriorated sections along the way.
This systematic approach prevents you from overlooking hidden areas, particularly at points where the lines branch off or connect to other components, such as junction blocks or flexible hoses.
Carefully observing the entire route also provides you with a solid understanding of the system’s layout, which proves invaluable when the time comes to replace the lines.
A comprehensive inspection ensures that every part of the system has been examined and that no hidden corrosion remains undetected.
4. Deciding Whether to Replace the Entire Line or Just a Section
After inspecting all the brake lines, the next step is to determine whether only a small section needs to be replaced or if the entire line requires replacement.
If the corrosion is confined to a small, clearly visible section and the rest of the line remains in good condition, you may be able to resolve the issue simply by replacing that specific section.
However, if the rust is extensive, or if the metal appears thin, flaky, or severely deteriorated, it is generally safer to replace the entire line.
It is also crucial to remember that rust often spreads from the inside out, even if it is not fully visible from the exterior.
As brake lines operate under immense pressure, any weakened section could rupture suddenly; in such cases, erring on the side of caution is the best approach.
If there is any doubt, the decision to replace the entire line guarantees long-term safety, reliability and consistently strong braking performance.
How to Remove the Old, Rusted Brake Lines
1. Spraying Penetrating Oil on Fittings and Loosening Them
Before attempting to remove any brake line, it is essential to apply penetrating oil to all fittings, as rust creates a strong bond between metal parts, making them extremely difficult to loosen.
Penetrating oil works by seeping into the tiny crevices between the threads and breaking down the rust, thereby reducing the force required to turn the fittings.
In many cases, a single application of oil is not sufficient, specially if the rust is severe; therefore, the best approach is to spray the fittings and let them sit for a few minutes, or to repeat this process several times.
This step is crucial, as applying force to dry, rusted fittings can cause them to snap or strip their threads, making the repair job even more difficult and time-consuming.
Taking the time to properly loosen the fittings helps protect surrounding components and makes the removal process significantly easier and safer.
2. Carefully Disconnecting Brake Line Connections
Exercising caution when disconnecting brake line connections is vital, as these components are often made of soft metal and can be easily damaged.
Using the correct type of wrench and applying steady, controlled pressure helps prevent sudden slips or accidental damage.
Brake lines are part of a sealed hydraulic system; therefore, once a connection is opened, brake fluid will begin to leak out.
It is essential to be prepared for this; place a container or rag underneath to catch the fluid and keep the workspace clean and tidy.
Another crucial point is to avoid twisting or bending the line while loosening a fitting, as this can weaken the metal or cause it to crack.
Working slowly and in a controlled manner is the best way to safely detach each component without causing further complications.
3. Removing Clips and Retainers Attached to the Chassis
Brake lines are securely fastened to the vehicle using clips and retainers; these hold them in place and protect them from the vibrations and movement that occur during driving.
These clips are typically mounted on the chassis, frame rails, or underbody panels and they must be carefully removed to free the brake line.
Over time, due to rust or corrosion, these clips can become brittle and fragile; consequently, applying excessive force to them may cause them to snap or damage their mounting points.
Gently prying them open or using the appropriate tools for removal helps prevent unnecessary damage.
It is also essential to remember the original locations of the clips, as the new brake line must be routed along the same path and secured in the same manner to ensure it receives proper support and protection.
4. Handling Severely Rusted or Seized Fittings
In some instances, brake line fittings may be so severely corroded that they fail to loosen even after the application of penetrating oil.
This occurs because rust can completely seize the threads of the fittings, rendering standard removal methods ineffective.
When dealing with seized fittings, patience is paramount; applying a little more penetrating oil or gently rocking the fitting back and forth is sometimes sufficient to break the bond.
However, if the fitting still refuses to budge, it may be necessary to cut the brake line close to the fitting in order to remove it safely.
This approach helps protect other components such as: the brake hose, caliper, or junction block, from damage that could result from applying excessive force.
Understanding when to stop applying force and when to resort to an alternative method helps prevent further damage and streamlines the entire repair process.
5. Tips for Preventing Damage to Brake Line Nuts
Brake line nuts are particularly susceptible to damage, as they are prone to corrosion and are often made of a softer metal than the tools used to loosen them.
A nut becomes damaged, or “rounded off”, when its edges become rounded, making it difficult or impossible to get a proper grip on it.
To avoid this, it is crucial to use a properly sized “line wrench”; unlike a standard “open-end wrench,” a line wrench grips a larger surface area of the nut, providing a more secure hold and significantly reducing the risk of slippage.
Rather than applying sudden, forceful jerks, applying steady and consistent pressure offers better control and minimizes the stress placed on the nut.
If you face significant resistance while attempting to loosen a nut, it is far better to stop and reapply penetrating oil than to attempt to force it open.
Keeping the wrench perfectly aligned with the fitting and ensuring it is seated correctly on the nut before attempting to turn it, plays a vital role in preventing damage.
By observing these precautions, you can safeguard the fittings and ensure that the removal process is completed without any complications.
How to Measure and Prepare New Brake Lines
1. Matching the Length and Routing of the Original Line
The first step in preparing new brake lines is to match the length and routing of the original line as precisely as possible.
This is because braking systems are designed to operate along specific paths that avoid heat, movement and sharp edges.
The old brake line serves as the best reference; therefore, it should be removed carefully and laid out straight to measure its full length, including all its bends and curves.
Even minor discrepancies in length can cause problems, such as placing strain on fittings or interfering with moving components like suspension parts.
Correct routing is also critical, as brake lines are positioned in areas that shield them from road debris, vibrations and heat generated by the engine or exhaust system.
Following the original routing ensures that the new line operates safely and lasts for a long time without any unnecessary wear, tear, or damage.
2. Cutting and Bending the New Brake Tubing
Once the correct length has been determined, it is necessary to cut the new brake tubing and shape it to match the original design.
A clean, straight cut is essential, as jagged or crimped ends can lead to poor connections and leaks.
After cutting, the tubing must be carefully bent to replicate the original curves, ensuring that no sharp angles or kinks are formed.
A kinked brake line restricts fluid flow, which can reduce braking efficiency and create uneven pressure within the system.
Smooth, gradual bends allow the brake fluid to flow freely and help maintain consistent pressure throughout the entire system.
Devoting sufficient time to this stage ensures that the new line not only fits correctly but also functions exactly as intended, even under high-pressure conditions.
3. Creating the Correct Type of Flare – Double Flare or Bubble Flare, Depending on the Vehicle
Brake lines do not simply connect using straight ends; they require specifically shaped flares that create a robust seal between the tubing and the fittings.
The two most common types are the double flare and the bubble flare and for safety reasons, using the correct type is absolutely essential.
The double flare is designed to provide extra strength and resistance against cracking, which is why it is commonly used in many vehicles.
The bubble flare features a rounded profile and is utilized in specific systems where this particular design is required to achieve a proper seal.
The flare must be perfectly smooth and uniform, free of any cracks or defects; even the slightest imperfection can lead to leaks once the system is pressurized.
This step is one of the most critical in the entire process; if the flare is not formed correctly, the safety of the entire braking system could be compromised.
4. Ensuring Correct Fittings and Thread Compatibility
Before installing a new brake line, it is crucial to verify that the fittings and threads match the original system precisely.
Brake line fittings are designed to specific thread sizes and profiles; even a slight mismatch can prevent the formation of a proper seal or cause damage to the connection point.
Using incorrect fittings can result in leaks, damaged threads, or a complete system failure under pressure.
It is vital to compare the new fittings against the old ones and ensure that they tighten smoothly and without any resistance.
The threads should engage easily and tighten securely without requiring excessive force.
Ensuring proper compatibility not only eliminates installation-related issues but also guarantees that the braking system remains sealed and reliable during operation.
How to Install the New Brake Lines
1. Routing the New Line Along the Original Path
When installing a new brake line, it is crucial to follow the exact routing of the original line, as the vehicle was specifically designed this way to protect the line from heat, vibration and potential damage.
Brake lines are typically routed away from hot components such as: the exhaust system and moving parts, such as suspension arms and steering linkages.
If the new line is routed incorrectly, it may rub against metal components, leading to gradual wear over time, or it may be exposed to heat, which can compromise the structural integrity of its material.
Following the original path also ensures that the line’s length and flexibility are appropriate, allowing it to withstand vibrations and vehicle movements without excessive tension.
This step helps maintain both the safety and the longevity of the braking system.
2. Securing with Clips and Brackets
Brake lines must be securely fastened to the vehicle using clips and brackets to ensure they remain in place and do not shift while the vehicle is in motion.
These supports prevent the line from vibrating, a phenomenon that can lead to material fatigue and, ultimately, cracks or leaks.
They also prevent the line from hanging loosely, thereby avoiding contact with sharp edges or moving parts.
When installing a new line, it is essential to utilize the same mounting points as the original line and to ensure that each clip holds the line firmly without compressing it.
Proper securing maintains the correct positioning of the line and protects it from long-term wear caused by constant vibration and varying road conditions.
3. Tightening Fittings to the Correct Torque
The fittings connecting brake lines to other components must be tightened in strict accordance with precise specifications to ensure a robust and leak-free joint.
If a fitting is too loose, brake fluid may seep out, leading to a loss of hydraulic pressure and adversely affecting braking performance.
Conversely, if a fitting is overtightened, its threads may become stripped or its flared end may become deformed, conditions that can also result in leaks.
Applying the correct torque ensures that the joint remains secure without sustaining any damage.
It is essential to tighten fittings gradually and uniformly, ensuring that they remain properly aligned throughout the entire tightening process.
Fittings tightened to the correct torque are critical for maintaining consistent pressure within the braking system.
4. Ensuring No Kinks or Sharp Bends in the Line
Brake lines must remain smooth and round along their entire length to allow brake fluid to flow under pressure without obstruction.
Any kink or sharp bend in the line can impede this flow, potentially leading to uneven braking or reduced stopping power.
Bends also compromise the structural integrity of the tubing, increasing the likelihood of it rupturing or failing over time.
During installation, every bend should be smooth and gradual, conforming to the natural contours of the original line.
After installation, it is crucial to inspect the entire line to ensure that no sections have become flattened and that no excessively sharp angles have been formed.
Keeping the line free of kinks and smooth ensures proper fluid flow and guarantees the longevity of the braking system.
How to Reconnect the Brake System
1. Connecting Lines to Calipers, ABS Module, or Master Cylinder
After installing the new brake lines and routing them correctly, the next step is to reconnect them to the main components of the braking system.
These include the brake calipers located at the wheels, the ABS module (if equipped) and the master cylinder situated in the engine bay.
Each of these components plays a critical role in regulating and distributing hydraulic pressure; therefore, the connections must be precise and secure.
When attaching the lines, it is essential to initially tighten the fittings by hand to ensure they are properly aligned and to prevent cross-threading.
Once aligned correctly, they can be carefully tightened to establish a robust seal.
These connections must be clean and free of any dirt or debris, as even a tiny particle of grit can compromise the sealing surface.
Proper connections ensure that brake fluid circulates smoothly through the system without any leaks or loss of pressure.
2. Double-Checking All Connection Points
Once all the lines have been connected, it is absolutely crucial to go back and double-check every single connection point to ensure that nothing has been overlooked or left loose.
Brake systems operate under extremely high pressure; therefore, if even a single fitting remains slightly loose, fluid leakage can occur, leading to compromised braking performance.
Every connection must be inspected to verify that it is fully seated and properly tightened.
It is also essential to check for any cross-threaded fittings, as this can damage the threads and prevent a proper seal from forming.
Taking the time to double-check everything allows for the early detection of minor errors before they escalate into major safety hazards.
This step serves as a final verification, ensuring that the system has been assembled correctly and is ready for the next stage.
3. Checking for Proper Alignment and Sealing
In addition to verifying tightness, the alignment of every brake line and connection must be carefully inspected to ensure a proper seal.
Brake lines should be perfectly straight and connect easily without any force; misalignment can exert undue stress on the fittings, potentially leading to leaks over time.
The flared ends of the brake lines must seat evenly against the mating surfaces to create a robust seal capable of withstanding hydraulic pressure.
If any gaps, uneven contact, or obvious misalignment are observed, it indicates an issue that must be rectified before the system is put into operation.
Proper alignment not only prevents leaks but also helps maintain uniform pressure throughout the entire braking system.
Ensuring a complete seal at every joint is crucial for safe and reliable braking performance.
How to Do Brake System Bleeding
1. Why is bleeding necessary after replacing a brake line?
After replacing a brake line, air enters the system because the hydraulic circuit has been opened.
It is crucial to completely purge this air before safely operating the vehicle.
The brake system relies on the principle that brake fluid is incompressible, ensuring that the pressure applied to the brake pedal is transmitted directly to the wheels.
However, air is easily compressible; if even a small amount of air becomes trapped inside the lines, it absorbs the pressure, causing the brake pedal to feel soft or spongy.
This reduces braking force and increases the distance required to bring the vehicle to a stop.
In more severe cases, this can lead to a complete or partial loss of braking capability.
Bleeding expels this trapped air and re-establishes the robust hydraulic connection necessary for reliable braking performance.
2. Easy Brake Bleeding Procedure – Manual, Pressure or Vacuum Method
During the bleeding process, fresh brake fluid is circulated through the system, while air is allowed to escape through specific points known as “bleeder valves.”
In the manual method, one person depresses the brake pedal while a second person opens and closes the bleeder valves to expel the air and old fluid.
The pressure method utilizes a device that pushes fluid into the system from the master cylinder reservoir, whereas the vacuum method employs suction to draw the fluid and air out through the bleeder valves.
All of these methods share a common objective: to flush fluid through the lines until air bubbles are no longer visible.
During this process, it is crucial to keep the brake fluid reservoir filled; if it runs dry, additional air may enter the system, rendering all previous efforts futile.
3. The Correct Bleeding Sequence for Front and Rear Wheels
To ensure that all air is effectively expelled from the system, the bleeding procedure must be performed in a specific sequence.
In most vehicles, the correct sequence begins with the wheel located farthest from the master cylinder and gradually progresses toward the wheel closest to it.
Typically, this involves starting with the rear wheels and then moving toward the front wheels.
The rationale behind this sequence is that air tends to accumulate in the longest sections of the brake lines; therefore, purging air from the farthest points first facilitates a more thorough cleansing of the system.
Adhering to the correct sequence also ensures that air does not re-enter sections of the system that have already been bled.
4. Ensuring No Air Remains in the System
The primary objective of bleeding is to ensure that no air remains trapped anywhere within the brake lines or components.
This can be verified by observing the fluid flowing from the bleeder valve; it should flow smoothly and be free of any bubbles.
When the brake pedal is depressed, it should feel firm and consistent, rather than sinking or feeling soft.
If the pedal still feels spongy (soft), it indicates that air remains present in the system and the bleeding process must be repeated.
It is essential to allocate sufficient time for this stage, as even a small amount of residual air can compromise braking performance.
A fully bled system ensures that hydraulic pressure is delivered consistently and instantly, providing the driver with complete control and confidence when braking.
How to Test the Braking System Correctly
1. Checking Pedal Firmness
After bleeding the system (removing air), the first and most critical check is to assess the feel of the brake pedal, as this directly indicates how effectively pressure is being transmitted through the brake lines.
When you depress the pedal, it should feel firm and steady; it should not gradually sink toward the floorboard.
A firm pedal is a sign that brake fluid is flowing without any air obstructions and that the system is properly sealed.
If the pedal feels soft or spongy, or if it continues to sink even under constant pressure, it typically means that air is trapped inside the system or that there is a leak somewhere.
This step is crucial because the pedal feel is often the earliest and most reliable indicator of whether or not the brake system is functioning correctly.
2. Checking for Pressure Leaks
Once the pedal feels firm, the next step is to check the entire brake system for leaks while it is under pressure.
This is accomplished by depressing and holding the brake pedal while carefully inspecting all connection points, fittings and newly installed brake lines.
Signs of brake fluid leakage may manifest as wet spots around fittings, small droplets, or shiny streaks.
Even a very minor leak can compromise hydraulic pressure over time and potentially lead to brake failure.
It is essential to inspect not only the visible sections but also the specific points where the lines connect to components such as calipers or junction blocks.
If any signs of fluid leakage are detected, the issue must be immediately rectified before the vehicle is driven.
3. Conducting a Low-Speed Test Drive
After confirming that there are no visible leaks and that the brake pedal feels firm, the system should be tested in a controlled, low-speed environment.
This allows you to safely evaluate how the brakes perform under actual driving conditions without incurring any unnecessary risks.
During this test, the vehicle should come to a stop smoothly and uniformly, without pulling to one side, emitting any strange noises, or requiring excessive force on the pedal.
A low-speed test helps ensure that brake pressure is being distributed correctly to all wheels and that the system is functioning exactly as intended.
It is essential to start slowly and gradually increase the braking force to verify that everything is operating correctly.
4. Re-checking Fluid Levels After the Test
Following the test drive, it is crucial to re-check the brake fluid level in the reservoir, as the system may settle slightly after initial use.
As any residual air is fully purged and the fluid begins to flow through the new lines, the fluid level may drop slightly.
Maintaining the correct fluid level is paramount; if the level drops too low, air can re-enter the system, which could negatively impact braking performance.
The fluid should be clean, maintained at the recommended level and free from any contaminants.
This final inspection ensures that the system remains stable and ready for normal driving conditions, thereby completing the replacement process with full confidence and safety.
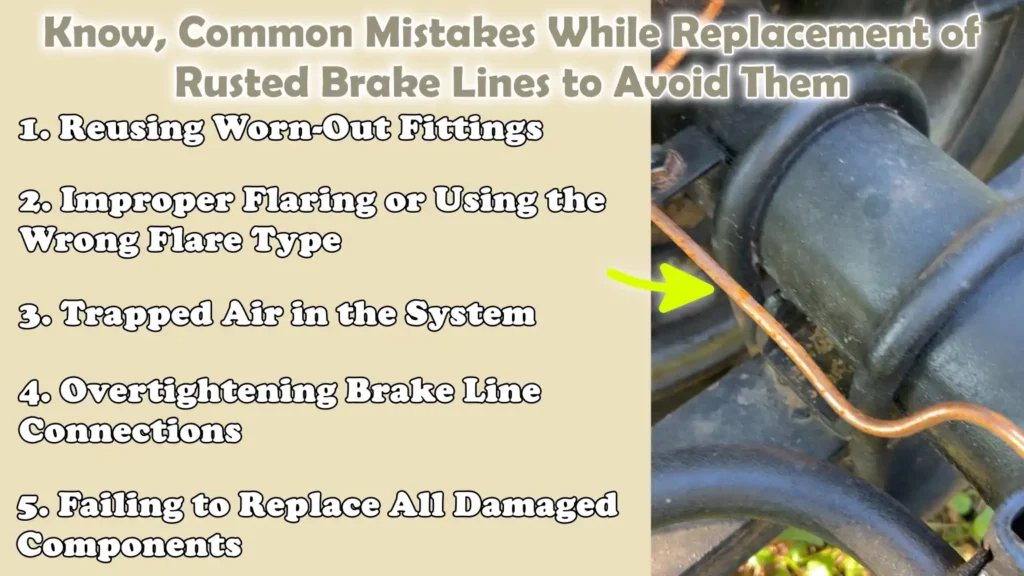
Know, Common Mistakes While Replacement of Rusted Brake Lines to Avoid Them
Plus, there’s research from the NIST and NHTSA that shows that corrosion can develop not only on the brake lines but it can also possibly develop inside the critical components such as: ABS valves, as these systems actually relies on the precise fluid control, any contamination or corrosion can literally reduce the braking efficiency, that’s why it really becomes important to maintain the clean, corrosion-free brake lines and replacement of damaged sections before they affect the entire system as well.[¹]
1. Reusing Worn-Out Fittings
Reusing old or damaged fittings is a common mistake that can lead to leaks and poor sealing within the brake system.
Brake line fittings are designed to create a robust seal even under high pressure; therefore, minor imperfections such as: worn threads, corrosion, or deformation, as it can prevent them from sealing properly.
Over time, corrosion can weaken the metal, increasing the risk of the fitting failing when retightened.
Using compromised fittings may seem like a way to save time or money, but it significantly increases the risk of brake fluid leaks and pressure loss.
Replacing worn or questionable fittings with new, correct ones guarantees a secure connection and long-term durability.
2. Improper Flaring or Using the Wrong Flare Type
Creating a proper flare on the brake line is the most critical step in the entire process and errors made at this stage can directly lead to system failure.
If the flare is uneven, cracked, or improperly formed, it will not seal correctly against the fitting, potentially causing brake fluid to leak under pressure.
Using the wrong type of flare such as: using a “double flare” where a “bubble flare” is required, as it can also result in an improper interface and a weak seal.
A proper flare should be smooth, centered and free of defects to ensure it can withstand the high pressures present within the braking system.
Taking the time to create a correct flare ensures a strong and leak-free connection.
3. Trapped Air in the System
The presence of air within the brake system is a serious issue because, unlike brake fluid, which is designed to efficiently transmit hydraulic pressure, air compresses easily.
If air remains trapped in the system following installation, the brake pedal will feel soft or spongy and the vehicle will not stop as quickly as expected.
This can result in increased stopping distances and a reduction in overall control during braking.
In some instances, trapped air can even lead to a sudden loss of braking power under repeated use.
To purge all air from the system and restore firmness to the pedal, it is essential to properly ‘bleed’ the system.
Skipping this step, or performing it hastily, as it can render the system unsafe, even if every other aspect of the work has been executed correctly.
4. Overtightening Brake Line Connections
Overtightening brake line connections can be just as detrimental as leaving them too loose.
When a fitting is tightened beyond its specified limit, its threads may become stripped, or the flared end of the brake line may become crushed; this weakens the seal rather than improving it.
This damage may not be immediately apparent, but when the system comes under pressure, it can lead to leaks.
Proper tightening requires controlled force to ensure that the connection is secure without being subjected to excessive stress.
Understanding that applying excessive force does not improve the seal helps prevent unnecessary damage and preserves the structural integrity of the connection.
5. Failing to Replace All Damaged Components
Another common mistake is replacing only the section of the brake line that appears most visibly damaged, while leaving other compromised sections intact.
Rust and corrosion often extend beyond the area that is immediately visible; A brake line may appear to be in good condition externally, yet be worn thin or weakened from the inside.
If only a single section is replaced, the remaining compromised components may fail shortly thereafter, potentially necessitating repeated repairs and increasing safety risks.
It is often safer to replace the entire line, or all defective sections, to ensure uniform strength and reliability throughout the entire system.
This comprehensive approach to repair helps prevent future malfunctions and ensures that the braking system continues to operate safely over the long term.
Read More:
- How to Inspect Brake Lines for Rust
- How to Flush Contaminated Brake Fluid
- How to Check Brake Fluid Contamination Level
- How to Fix Brake Bias Issues
- How to Test Brake Proportioning Valve
- How to Replace a Brake Light Switch
- How to Diagnose Brake Light Switch Failure
- How to Fix Intermittent ABS Activation
- How to Clean ABS Wheel Speed Sensor
- How to Diagnose ABS Sensor Wiring Issues
- How to Test Electronic Brake Module (EBCM)
- How to Fix Parking Brake Dragging
- How to Adjust Parking Brake Cable
- How to Check Parking Brake Cable Tension
- How to Fix Brakes Dragging While Driving
- How to Diagnose Brake Dragging Issue
- How to Fix Internal Master Cylinder Leak
Know, Estimated Cost and Time Interval
1. DIY vs Professional Repair Comparison
Replacing rusted brake lines can be undertaken as a do-it-yourself (DIY) project at home or entrusted to a professional; the primary differences lie in cost, tools and experience.
Performing the repair yourself (DIY) is typically far more economical, as you only have to pay for parts and basic tools and common items such as brake tubing, fittings and fluid are relatively inexpensive.
However, this task demands meticulous attention to detail, proper flaring techniques, correct brake bleeding procedures and a solid understanding of the braking system.
Mistakes can lead to leaks or brake failure, posing a serious safety risk.
Professional repair entails higher costs due to labor, specialized tools and expert supervision; however, it offers greater precision and safety, particularly for complex systems involving ABS modules.
For beginners, or for vehicles with severe corrosion or hard-to-find parts, professional repair is often the safer option, while experienced individuals may opt for DIY repair to save money.
2. Typical Time Required for a Complete Replacement
The time required to replace brake lines depends on the condition of the vehicle and the number of lines being replaced, although a complete replacement typically takes several hours.
An individual with the necessary experience and tools may take approximately four to six hours to complete the job, whereas beginners may require significantly more time to carefully measure, bend and flare the new lines.
The process often takes longer if the fittings are heavily corroded and difficult to remove, as this can significantly slow down the pace of work.
Bleeding the brake system and conducting post-repair inspections also add to the total time required.
It is crucial not to rush this process, as, when working on critical safety-related systems such as brakes, priority is given to precision rather than speed.
3. Factors Influencing Cost
Several factors influence the total cost of replacing rusted brake lines and understanding them aids in planning the repair.
The type of vehicle plays a significant role, as larger vehicles or those with more complex braking systems require more materials and labor.
The severity of the rust also impacts the cost; heavily corroded systems may necessitate replacing the entire line rather than merely performing a partial repair, potentially requiring additional fittings and clips.
The choice of materials is another key factor; standard steel lines are inexpensive but highly susceptible to rust, whereas materials such as copper-nickel or stainless steel, though more costly, are more durable and long-lasting.
The availability of parts can also affect the cost, particularly when specialized fittings or pre-fabricated lines are not readily available.
Overall, these factors collectively determine the total expense and scope of the repair work.
When You Should Go to the Professional Mechanic
1. Excessive Frame Rust or Difficulty Accessing Lines
If the vehicle’s frame is heavily rusted, or if the brake lines run through very tight and hard-to-reach spaces, it is often safer to seek professional assistance.
Excessive rust not only compromises the structural integrity of the brake lines themselves but can also weaken the mounting points and clips that hold the lines in place.
In some cases, the surrounding metal may be so severely corroded that it can no longer provide a sturdy anchor for installing new lines.
Lines that are difficult to access, particularly those running over the fuel tank, inside the sub-frame, or behind large components, often require specialized tools and, at times, the partial disassembly of the vehicle.
Professionals possess the necessary tools and expertise to handle these situations without causing further damage; conversely, attempting such repairs without proper access can result in an incomplete or unsafe repair.
2. The Complexity of ABS-Equipped Systems
Modern vehicles are often equipped with Anti-lock Braking Systems (ABS), which add another layer of complexity to both the brake line layout and the bleeding process.
These systems feature an ABS module, containing valves and sensors, that regulates brake pressure while the vehicle is in motion.
When brake lines connected to this module are replaced, specific procedures or diagnostic tools may be required to effectively purge any air trapped within the system.
In some instances, it is necessary to electronically activate the ABS unit during the bleeding process to ensure that all internal passages are thoroughly cleared.
Without the proper tools or technical knowledge, air can remain trapped within the system, thereby negatively impacting brake performance.
Professional technicians are trained to handle these systems and utilize the correct tools to ensure that the braking system functions properly.
3. Lack of Proper Flaring or Bleeding Tools
Replacing brake lines requires specialized tools such as: a ‘flaring tool’ to create strong, leak-proof joints and a proper ‘bleeding setup’ to purge air from the system.
Without these tools, achieving the precision necessary for safe braking becomes extremely difficult.
Makeshift methods often result in improperly formed flares (joints), poor seals, or incomplete bleeding, all of which can lead to leaks in the brake lines or a spongy brake pedal feel.
Professional repair shops utilize high-quality tools that consistently deliver uniform and reliable results; furthermore, they ensure that every connection is capable of withstanding the immense pressure present within the braking system.
If you do not possess these tools, it is best to entrust this task to someone who has all the necessary equipment at their disposal.
4. Safety Concerns During Installation
The braking system is one of the most critical safety components of any vehicle and any error made during its installation can directly jeopardize the vehicle’s ability to stop.
If you have any doubts regarding how to safely lift the vehicle, handle brake fluid, properly tighten fittings, or complete the bleeding process, it is prudent to seek the assistance of a professional.
Even minor errors such as: leaving a fitting loose or allowing air to become trapped within the system, as it can compromise brake performance or lead to sudden brake failure.
Professionals adhere to proven methods and safety standards to ensure that the system operates reliably under all circumstances.
In situations where safety is of paramount concern, seeking professional assistance helps mitigate risks and ensures that the repair work is completed correctly.
Conclusion – How to Replace Rusted Brake Lines
Now, you have clearly understood that strong braking does not only come from the force alone, as it actually comes from a proper system that is clean, properly sealed and well-maintained as well.
Brake lines serve to transmit hydraulic pressure, enabling your car to come to a halt; even the slightest weakness in this system can significantly compromise braking performance.
Rust may initially appear to be a slow and minor issue, but over time, it eats away at the metal, diminishing its structural integrity and potentially leading to sudden leaks or complete brake failure.
What makes this problem even more critical is that it often develops silently, without any obvious warning signs, until the damage becomes extensive.
By understanding how brake lines function, how rust forms and how to properly replace compromised components, you take control of one of your vehicle’s most vital safety systems.
Every step of this process, from careful inspection to proper installation and thorough bleeding (air removal), plays a crucial role in restoring full braking power.
Precision and patience matter more than speed, as even a minor error can impact how pressure flows through the system.
When executed correctly, replacing brake lines not only resolves the immediate issue but also prevents future problems and extends the lifespan of your braking system.
This guide is designed to provide you with clear and practical information, enabling you to make informed decisions, whether you choose to tackle this task yourself or seek the assistance of a professional.
Its objective is simple yet vital: to ensure that every time you depress the brake pedal, your vehicle responds exactly as it should.
As well as, you can comment for more info.
Frequently Asked Questions
FAQ 1: What are the common signs of rusted brake lines?
Answer: Rusted brake lines often provide warning signs before failing completely, yet many people overlook them. One of the most common signs is visible rust on the metal lines located underneath the vehicle, specially if it appears flaky or pitted. Another clear indicator is a brake pedal that feels soft or spongy; this can occur when a line is weakening or developing a leak. You may also notice small puddles or wet spots underneath your car, which could be caused by brake fluid leaking from a compromised line. In some cases, braking performance may feel inconsistent or sluggish. These symptoms generally indicate that the brake lines have already deteriorated and require immediate inspection.
FAQ 2: Is it safe to drive with rusted brake lines?
Answer: Driving with rusted brake lines is unsafe, as these lines are responsible for delivering the hydraulic pressure necessary to bring your vehicle to a stop. As rust weakens the metal, small pinholes can form in the line, or it may even burst under pressure. This can lead to a sudden and complete loss of braking capability, a highly dangerous situation while driving. Even if the brakes appear to be functioning correctly at the moment, the condition can deteriorate rapidly and without warning. To avoid serious hazards, it is always best to have rusted brake lines repaired or replaced immediately upon discovery.
FAQ 3: Can I replace just a small section of a brake line?
Answer: In some cases, it is possible to replace only the damaged section of a brake line, provided that the remainder of the line is in good condition. However, this depends on the extent of the rust. Rust often affects a much larger area than what is visible on the exterior of the line, including the interior of the tubing. If visible signs of corrosion are evident in multiple areas, or if the metal appears compromised, it is generally safer to replace the entire line. While minor repairs may offer a temporary reprieve, replacing the entire line ensures greater safety and reliability in the long run.
FAQ 4: How long do brake lines typically last?
Answer: Brake lines can last for many years, often exceeding ten, though their lifespan depends heavily on driving conditions and the environment. Vehicles exposed to moisture, road salt and dirt are at a higher risk of accelerated corrosion. In regions with dry climates, brake lines tend to last longer due to the reduced risk of rust formation. Regular inspections are crucial, as brake lines typically do not fail suddenly without warning; rather, they degrade gradually over time. Inspecting them during routine maintenance helps in the early detection of potential issues.
FAQ 5: What type of material is best for brake line replacement?
Answer: The best material depends on your specific needs and budget, but corrosion-resistant materials are generally the safest options. Traditional steel lines are sturdy, but they carry a high risk of rusting over time. Coated steel offers enhanced protection, while stainless steel provides excellent resistance to corrosion, though it can be more expensive. Copper-nickel lines are a popular choice as they offer superior corrosion resistance and are easy to bend and install. Choosing durable materials helps prevent future complications and reduces the need for frequent repairs.
FAQ 6: Why does the brake pedal feel soft after replacing the brake lines?
Answer: If the brake pedal feels soft after replacing the brake lines, it typically indicates that air has become trapped within the system. Brake systems rely on fluid to transmit hydraulic pressure; As air is compressible, its presence reduces the effectiveness of braking. This is why bleeding the brake system, that is, purging the air from it, is an essential step following installation. If the brake pedal still feels spongy after bleeding, it may indicate that the procedure was not performed correctly, or that a minor leak remains somewhere within the system. For the brakes to function properly, the system must be completely sealed and free of air.
FAQ 7: How important is proper flaring when installing brake lines?
Answer: Proper flaring is crucial because it creates a seal between the brake line and the fitting. If the flare is not formed correctly, the high pressure within the system can cause brake fluid to leak. Even a minor leak can compromise braking performance and pose a safety risk. The flare must be of the specific type required for the vehicle and should be smooth, uniform and free of cracks. A well-executed flare ensures a strong, reliable joint capable of withstanding high pressure.
Conclusion
[1] Preliminary Investigations Into Corrosion in Anti-Lock Braking Systems
https://www.nist.gov/publications/preliminary-investigations-corrosion-anti-lock-braking-systems

Hello Folks, Dean Shali here to help you out to solve the problems with your lovely vehicle, as i have lots of experience and knowledge about automotive industry as i woks directly with the customers and repair vehicles and i love to help the people to keep their cars safe and running smoothly.