Written By: Dean Shali
Fact Checked By: Sabré Cook
Reviewed By: Tamara Warren
Literally, this is the one small switch that decides that whether your braking is seen to others or completely invisible at all.
So, whenever your car slows down by braking then it sends the critical safety signal to every driver who is behind you.
And, that signal depends on a small but powerful component known as “BRAKE LIGHT SWITCH”, yes it is the device which is so simple that most of the drivers just never think about it until it fails.
Yes, it is really concerning to have faulty braking light switch as it often confuse others on the road by keeping braking lights on, not turning on at all, stops the cruise control suddenly or even have difficult to shift out of the park.
Not only this, this switch is also linked to the electronic systems such as: transmission interlocks and stability controls: which then means one small fault can create the multiple unexpected problems as well.
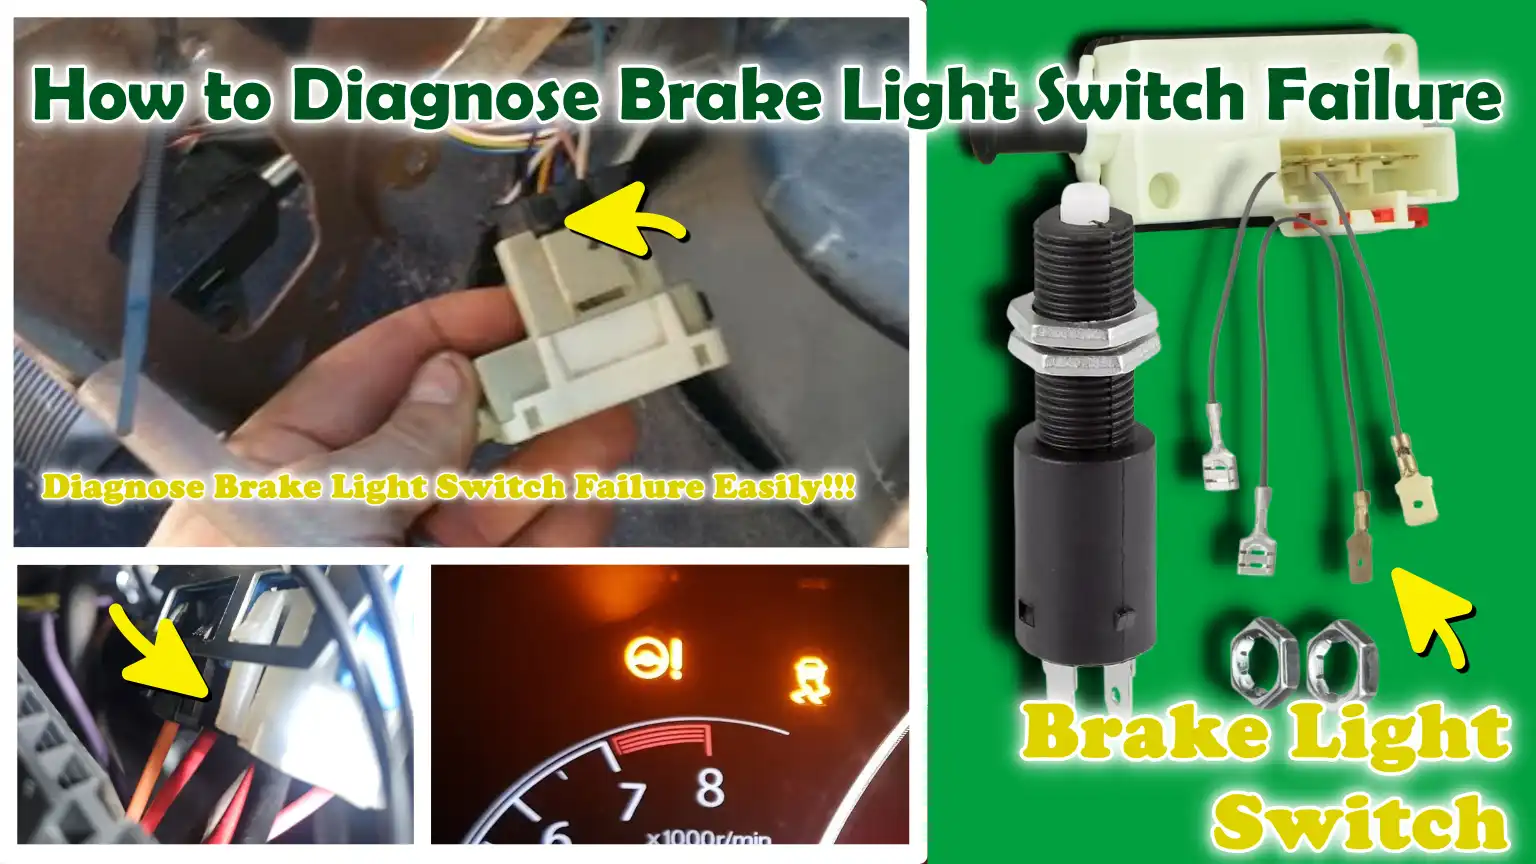
So, in this guide you’ll learn How to Diagnose Brake Light Switch Failure so that you can have the right knowledge and you’ll really identify the warning signs early on.
Know, What is a Brake Light Switch and What Does It Do?
Brake Light Switch
The brake light switch is a small electrical device that plays a crucial role in your car’s safety system.
Its primary function is simple, yet vital.
It detects when you have depressed the brake pedal and immediately sends a signal to illuminate the brake lights located at the rear of your vehicle.
This alerts drivers following behind you that you are slowing down or coming to a stop.
Although it is small and inexpensive, it remains one of the key components that help prevent rear-end collisions and ensures clear, predictable coordination between vehicles on the road.
Location – Near the Brake Pedal Assembly
The brake light switch is typically mounted beneath the dashboard, situated directly above or adjacent to the brake pedal assembly.
It is attached to a bracket positioned precisely near the area where you place your foot to depress the pedal.
When the pedal moves, it physically actuates the switch, either by engaging or disengaging it.
Due to this placement, the switch is generally not visible while driving; consequently, many drivers remain unaware of its existence until it malfunctions.
Its hidden location also protects it from direct road dust and physical damage, although continuous use can still lead to wear and tear over time.
How It Interacts with the Vehicle’s Electrical System
When you depress the brake pedal, the switch transitions from the ‘off’ to the ‘on’ position, thereby completing an electrical circuit.
This allows current from the vehicle’s battery to flow through the wiring system to the rear brake lights, causing them to illuminate instantly.
When you release the pedal, the switch breaks the circuit once again, causing the lights to turn off.
In modern vehicles, this process is even more advanced, as the very same signal is also transmitted to the vehicle’s onboard computer system.
This implies that the switch does not merely control the lights; rather, it coordinates with various electronic control units responsible for managing different vehicle functions.
Its Role in Activating Brake Lights and Safety Systems
The brake light switch performs a function far more critical than simply illuminating the lights.
It serves as a vital link between the movement of your foot and the vehicle’s various safety systems.
Its primary function is to activate the brake lights, thereby providing drivers following behind you with sufficient time to react.
However, it also plays a role in systems such as cruise control, which automatically disengages upon detecting braking, and in the gear shift interlock, which prevents the vehicle from shifting out of ‘Park’ mode until the brake pedal is depressed.
In many modern cars, it can also influence the vehicle’s stability and traction control systems by signaling that the vehicle has begun to decelerate.
Thus, the brake light switch proves to be a small, yet absolutely essential, component of the vehicle’s overall driving safety and control.
Understand, Why is it Important to Identify a Faulty Brake Light Switch?
1. Prevents Rear-End Collisions
Identifying a faulty brake light switch is crucial because it directly impacts how clearly you communicate with the drivers following behind you.
Brake lights are one of the primary signals that other drivers rely on to anticipate when your vehicle is slowing down.
If the switch malfunctions, your brake lights may fail to illuminate entirely, light up with a delay, or remain constantly lit.
In real-world driving scenarios, even a slight delay in this signal can confuse following drivers and significantly increase the risk of a rear-end collision.
Numerous studies on road safety have demonstrated that faulty or non-functional brake signals, particularly in heavy traffic or conditions with poor visibility (such as fog or rain), are a major contributing factor to chain-reaction accidents.
2. Ensures Compliance with Legal Regulations – Functional Brake Lights
A fully functional brake light system is also a legal requirement in almost every country, as it is considered a fundamental standard of road safety.
If your brake lights are not functioning correctly due to a faulty switch, you may fail a vehicle inspection or incur fines during routine traffic checks.
Law enforcement agencies rely on brake lights to quickly determine whether a driver is operating their vehicle safely and in a roadworthy condition.
This means that identifying and repairing a faulty brake light switch is essential not only for safety but also for avoiding legal complications and ensuring that your vehicle remains compliant with traffic laws.
3. Affects Systems Such as Cruise Control
In many vehicles, a faulty brake light switch can also interfere with the proper operation of the cruise control system.
Cruise control is designed to automatically maintain a vehicle’s speed; however, it relies on signals received from the brake switch to determine when to disengage.
If the switch is malfunctioning, the system may fail to shut off properly when you apply the brakes, or, as a safety precaution, it may cease functioning entirely.
This can lead to unpredictable driving behavior, particularly on highways, where precise speed control is critical for safe operation.
4. Affects the Transmission Shift Interlock
In most automatic vehicles, the brake light switch is integrated with the transmission shift interlock system.
This system prevents the gear lever from shifting out of ‘Park’ mode until the brake pedal is depressed.
If the switch is faulty, the vehicle may refuse to shift out of ‘Park’, even if you are pressing the brake pedal, or the system may operate intermittently.
This is a common symptom that often baffles drivers; yet, the root cause is typically a minor glitch in the electrical signals originating from the brake light switch.
5. Impacts ABS and Traction Control in Modern Vehicles
In modern vehicles, the brake light switch is also linked to advanced safety systems such as ABS (Anti-lock Braking System) and Traction Control.
These systems rely on precise signals to accurately detect when and how braking is occurring.
If the switch transmits erroneous or incomplete signals, it may trigger a warning light on the dashboard or temporarily disable certain safety features.
Although the vehicle may still be drivable, these systems are designed to enhance vehicle stability and control; therefore, any malfunction compromises the vehicle’s overall safety.
Consequently, it is crucial to immediately identify a faulty brake light switch, specially in newer vehicles equipped with integrated electronic systems.
Know, Common Symptoms of a Failing Brake Light Switch
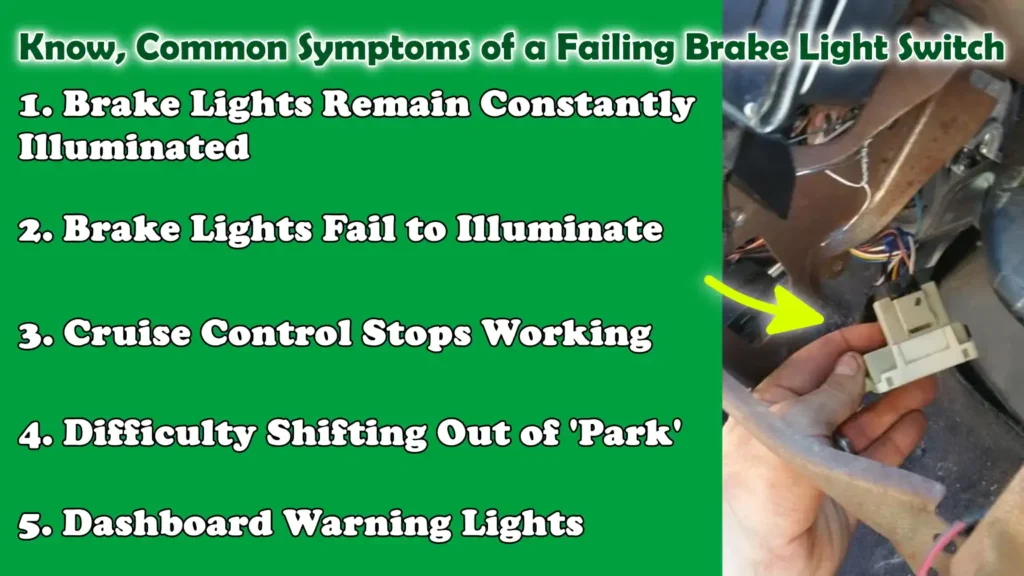
1. Brake Lights Remain Constantly Illuminated
When a brake light switch begins to fail, the most obvious symptom is that the brake lights remain illuminated even when you are not pressing the pedal.
This typically occurs when the switch gets stuck, becomes dislodged from its position, or wears out internally.
Because the circuit remains closed, the brake lights receive a continuous supply of power.
This is not merely a minor inconvenience; over time, it can drain your car’s battery, as the electrical system continues to power the lights unnecessarily.
It can also confuse other drivers on the road, as they may assume you are braking when you are not, thereby compromising driving clarity and safety.
2. Brake Lights Fail to Illuminate
Another common symptom is that the brake lights fail to light up at all when you press the pedal.
This is one of the most dangerous warning signs, as it eliminates your primary means of signaling to vehicles following behind you.
In such a scenario, the brake light switch may have failed internally, lost its electrical connection, or stopped sending the correct signal to the lighting circuit.
This can also be caused by worn-out wiring connected to the switch.
When brake lights stop working, the risk of a rear-end collision increases significantly, as other drivers receive no warning that you are slowing down or about to stop.
3. Cruise Control Stops Working
A failing brake light switch can also cause the cruise control system to suddenly stop functioning.
This happens because cruise control systems are designed to disengage immediately when the brakes are applied; therefore, they rely on the signal received from the brake switch to detect this specific action.
If the switch is faulty, the system may receive incorrect information and, as a safety precaution, shut itself down.
In some instances, the cruise control may fail to engage altogether.
This symptom often baffles drivers because, at first glance, it does not appear to be connected to anything else; however, in reality, it is directly linked to the brake switch circuit.
4. Difficulty Shifting Out of ‘Park’
In automatic vehicles, another common symptom is difficulty moving the gear lever out of the ‘Park’ position.
This occurs due to the ‘shift interlock system,’ which is designed to prevent the vehicle from moving forward unless the brake pedal is depressed.
If the brake light switch is not functioning correctly, the system cannot detect that the brakes are being applied.
Consequently, the gear lever may feel stuck, or it may require repeated attempts to shift it.
This issue is often mistaken for a transmission problem; however, in many cases, the actual culprit is a faulty brake switch.
5. Dashboard Warning Lights
In modern vehicles, a malfunctioning brake light switch can trigger warning lights on the dashboard, particularly those associated with the ABS or traction control systems.
These systems rely on precise input signals from the brakes to function correctly.
When the switch sends erroneous or erratic signals, the vehicle’s onboard computer detects a fault and illuminates the corresponding warning lights.
Even if the vehicle appears to be driving normally, these warning lights indicate that critical safety-related systems may not be operating at their full capacity.
This is why minor electrical faults such as: a defective brake light switch, should never be ignored.
Tools
| Tools | Why It Is Needed | How to Use It |
|---|---|---|
| Multimeter | A multimeter is required to test electrical flow and to verify that the brake light switch is correctly transmitting or interrupting the current. This tool assists you in checking for continuity and voltage, measurements that are crucial for diagnosing electrical faults. | Depending on the specific test being performed, set the multimeter to either continuity mode or voltage mode. Touch the probes to the switch terminals while pressing and releasing the brake pedal to observe whether the electrical signal is switching correctly. |
| Screwdriver set | A screwdriver set is essential for removing panels located beneath the dashboard and occasionally for loosening or adjusting the brake light switch. As different vehicle models utilize various types of screws, having a set of screwdrivers in assorted sizes proves highly beneficial. | Select the appropriate flathead or Phillips screwdriver. Carefully remove the under-dashboard cover or mounting screws to gain access to the brake pedal assembly area; take care to ensure that no plastic components are damaged in the process. |
| Flashlight | A flashlight is an indispensable tool, as the area surrounding the brake pedal is typically dark and lacks adequate visibility. Sufficient illumination allows you to clearly identify the switch, assess the condition of the wiring and detect any loose connections. | While inspecting the switch, direct the beam of the flashlight specifically toward the brake pedal assembly. Move the light around to ensure that the wires, clips and mounting points are clearly visible. |
| Owner’s manual | The owner’s manual helps you identify the correct fuses, wiring diagrams and the precise location of the brake light switch for your specific vehicle model. This eliminates the need for guesswork and helps prevent errors during the troubleshooting process. | Before beginning the inspection, use this resource to identify the layout of the fuse box, the location of the switch and any model-specific details. |
| Safety gloves | Safety gloves protect your hands from sharp edges located under the dashboard and provide protection against electric shock while working near wiring and metal components. | Put them on before starting the inspection and keep them on while handling wiring, connectors, or components located around the brake pedal. |
Where Can You Find the Brake Light Switch?
1. Mounted Near the Brake Pedal Arm
The brake light switch is almost always mounted near the brake pedal arm.
This arm is a metal lever that links the movement of your foot to the braking system.
The switch is designed to directly detect even the slightest movement of the pedal.
When you press the brake, the pedal arm, depending on the vehicle’s design, either directly contacts the switch or moves away from it.
It is this simple mechanical contact that enables the switch to instantly transmit an electrical signal.
Due to its mounting location, the switch typically remains out of sight, yet it is situated in close proximity to the driver’s feet.
2. Attached to a Bracket Beneath the Dashboard
In most vehicles, the brake light switch is mounted on a small bracket located beneath the dashboard.
This bracket securely holds the switch in place, ensuring that it remains in perfect alignment with the movement of the brake pedal.
The exact location may vary slightly depending on the specific vehicle model, but it is generally situated directly above or behind the pedal assembly.
The switch is connected to wiring that is integrated into the vehicle’s electrical system, thereby establishing a connection with the brake lights and other safety-related components.
Being situated beneath the dashboard protects the switch from dust and moisture; however, this location also makes it somewhat difficult to access without careful inspection.
3. Tips for Working in Tight Spaces
Accessing the brake light switch often requires working within the cramped and awkward spaces beneath the dashboard.
The area surrounding the brake pedal is typically quite confined, making it difficult to see clearly and to move one’s hands freely.
To simplify this task, it is beneficial to slide the driver’s seat as far back as possible before beginning the inspection; this creates more legroom and makes it easier to access the area.
Adequate lighting is also essential, as locating the switch is not always easy in dim light.
In some vehicles, removing a cover or panel from the lower section of the dashboard facilitates easier access to the switch.
It is crucial to proceed slowly and carefully, as this area contains numerous wires and other components; by avoiding the application of unnecessary force, you can prevent damage to surrounding parts.
How to Diagnose Brake Light Switch Failure – Beginner Friendly Guide
1. Check Brake Light Functionality
The first and easiest step in diagnosing a brake light switch issue is to verify whether the brake lights are working at all.
You can accomplish this by asking someone to stand behind the vehicle while you slowly press and release the brake pedal.
The objective of this step is to observe the brake lights’ operation in real-time.
If the lights fail to illuminate, light up belatedly, or remain constantly lit, it is a definitive initial indication that the switch, or its associated circuit, is not functioning correctly.
This basic check helps pinpoint the problem before proceeding to more in-depth electrical testing.
2. Check the Brake Light Fuse
Once a potential issue with the brake lights has been confirmed, the next step is to inspect the fuse.
The fuse box is typically located under the dashboard or within the engine compartment, depending on the specific vehicle model.
Inside the fuse box, you must identify the specific fuse responsible for the brake lights; you can use the diagram printed on the cover or consult the owner’s manual for this purpose.
A blown fuse will completely interrupt the electrical circuit, causing the brake lights to cease functioning.
Replacing a faulty fuse is a straightforward remedy; however, if the new fuse blows again, it signals a deeper electrical issue that may involve the brake light switch or the wiring.
3. Visually Inspect the Switch
Once it has been confirmed that the fuse is operational, the next step is to visually inspect the brake light switch itself.
This involves closely examining the area located under the dashboard, near the brake pedal arm.
You should look for loose electrical connections, any visible physical damage to the switch housing and signs of misalignment with the pedal.
Even a slight shift in position can prevent the switch from activating correctly.
As the switch operates through direct contact with the pedal, proper alignment is essential for it to function correctly.
4. Test the Switch Using a Multimeter
A multimeter test is one of the most reliable methods for confirming whether the brake light switch is functioning properly.
First, set the multimeter to continuity mode, which checks whether an electrical current can flow through the switch.
Next, place the probes on the switch terminals.
When the brake pedal is released, there should be no continuity; this indicates that the circuit is open.
When the pedal is depressed, there should be continuity; this indicates that the circuit is closed and electricity can flow.
If these changes do not occur as expected, it means the switch is faulty and is not performing its function correctly.
5. Check the Wiring and Connectors
If the switch itself appears to be functioning correctly, the next step is to inspect the wiring and connectors.
Over time, due to vibrations and constant movement within the pedal assembly area, wires can become frayed, damaged, or loose.
Electrical connectors can also suffer from corrosion, particularly in older vehicles or in humid environments.
These issues can interrupt the signal transmission between the brake switch and the brake lights.
It is also crucial to ensure that all grounding points are secure, as a poor ground connection can sometimes cause malfunctions in the brake light system or cause it to stop working entirely.
6. Check the Voltage Supply
Checking the voltage supply helps ensure that power is reaching the brake light switch correctly.
To perform this task, turn the ignition key to the ‘ON’ position, but do not start the engine.
Next, use a multimeter to check the voltage at the switch terminal.
A correct reading indicates that power is being supplied by the vehicle’s electrical system.
If no voltage is detected, the issue likely lies further upstream in the wiring or within the fuse.
If voltage is present but the switch is not functioning correctly, it is highly probable that the switch itself is defective.
7. Check the Brake Pedal Alignment
The final step is to ensure that the brake pedal is properly aligned and functioning smoothly.
The brake light switch relies on the correct movement of the pedal to activate.
If the pedal does not fully return to its original position, whether due to a weak return spring, accumulated dirt, or a physical obstruction, the switch may remain partially engaged or fail to activate correctly.
It is crucial to verify that the pedal moves freely and returns completely, as even a minor irregularity can cause the brake lights to illuminate erratically or malfunction intermittently.
Read More:
- How to Fix Intermittent ABS Activation
- How to Clean ABS Wheel Speed Sensor
- How to Diagnose ABS Sensor Wiring Issues
- How to Test Electronic Brake Module (EBCM)
- How to Fix Parking Brake Dragging
- How to Adjust Parking Brake Cable
- How to Check Parking Brake Cable Tension
- How to Fix Brakes Dragging While Driving
- How to Diagnose Brake Dragging Issue
- How to Fix Internal Master Cylinder Leak
- How to Test Brake Master Cylinder Pressure
- How to Replace Brake Booster
- How to Fix Brake Booster Vacuum Leak
- How to Test Brake Booster Functionality
- How to Lubricate Brake Caliper Pins Properly
- How to Rebuild Brake Caliper at Home
- How to Check Brake Caliper Piston Movement
- How to Resurface Brake Rotors at Home
- How to Fix Brake Rotor Runout
Know, About the Common Causes of Brake Light Switch Failure
1. Wear and Tear Over Time
The most common cause of brake light switch failure is aging and repeated use over time.
Every time you press the brake pedal, the switch is activated; this means that over its entire lifespan, it cycles on and off thousands of times.
Over time, its internal mechanical components may weaken, its electrical contacts may wear down and the switch’s response speed may slow down.
This gradual deterioration often leads to issues such as delayed brake light illumination, erratic operation, or the complete failure of the switch.
As this is a component subject to wear and tear, it is to be expected that in most vehicles, it will eventually require replacement after prolonged use.
2. Accumulation of Dust and Dirt
Dust and dirt can also adversely affect the functioning of the brake light switch, particularly in vehicles driven in dusty or dirty environments.
Fine dust particles can infiltrate the pedal assembly area and gradually accumulate around the switch.
This buildup can obstruct the switch’s free movement, preventing it from fully engaging or disengaging when the brake pedal is pressed.
In some instances, this can cause the brake lights to remain constantly illuminated or fail to turn on properly.
Even a minor obstruction can compromise the precision of this sensitive component.
3. Electrical Short Circuits
Electrical short circuits are another serious cause of brake light switch failure.
A short circuit occurs when electrical current flows through an unintended path, often due to faulty wiring or exposed wires.
This can place an excessive electrical load on the switch or disrupt the signal transmitted to the brake lights.
When this occurs, you may observe unusual behavior, such as flickering brake lights, lights remaining constantly illuminated, or failing to function at all.
A short circuit can also impact other interconnected systems within the vehicle, making it even more challenging to diagnose the fault and necessitating a meticulous inspection of the wiring harness.
4. Improper Installation or Adjustment
Incorrectly installing or failing to properly adjust the brake light switch can lead to problems, whether immediately or over time.
If the switch is not positioned correctly relative to the brake pedal, it may fail to activate at the appropriate moment or engage only partially.
This results in brake light malfunctions, such as a delay in the lights turning on or the lights remaining illuminated even after the brake pedal has been released.
In some instances, the switch may be either overtightened or too loose, adversely affecting its sensitivity.
Proper alignment of the switch is crucial to ensure its correct operation and to maintain vehicle safety.
5. Moisture Intrusion
Moisture intrusion is another factor that can degrade the brake light switch over time.
Water or moisture can seep into the dashboard area through leaks or condensation, particularly in older vehicles or those frequently exposed to harsh weather conditions.
When moisture reaches the switch, it can corrode its internal contacts or disrupt electrical connections.
This often leads to intermittent malfunctions, where the brake lights illuminate sporadically rather than consistently.
In severe cases, corrosion can permanently damage the switch, necessitating its complete replacement to restore proper functionality.
How to Confirm a Faulty Brake Light Switch?
1. Rule Out the Possibility of Burnt-Out Bulbs
The first step in confirming a brake light switch issue is to ensure that the problem isn’t simply due to a faulty bulb.
Over time, due to regular use, vibration and heat, brake light bulbs can burn out.
If only one brake light is not working, it is highly probable that the issue lies with the bulb itself.
However, if both lights fail simultaneously, the likelihood of a bulb-related problem decreases; nevertheless, it remains crucial to check them.
Checking or replacing the bulbs first helps prevent misdiagnosis and ensures that you do not mistakenly blame the switch for an underlying issue located elsewhere within the lighting system.
2. Rule Out the Possibility of a Blown Fuse
The next step is to check the fuse associated with the brake light circuit.
Fuses are designed to protect the electrical system; when excessive current flows through a circuit, the fuse interrupts the flow, thereby breaking the circuit.
If the fuse has blown, no power will reach the brake lights, even if the switch is functioning correctly.
This can create the impression that the brake light switch is faulty, whereas the actual problem is simply a blown protective fuse.
Checking for and replacing a blown fuse is a quick and essential step before proceeding to a more in-depth diagnosis.
3. Rule Out the Possibility of Wiring Issues
Another common cause of brake light failure is wiring issues.
Over time, wires can become loose, damaged, or corroded, particularly in areas near the brake pedal, where there is constant movement.
If there is a disruption in the wiring, the electrical signal sent from the brake light switch will fail to reach the rear lights.
This can cause the lights to function intermittently or stop working altogether.
Carefully inspecting the connectors and wiring harnesses helps eliminate other possibilities before concluding that the fault lies within the brake light switch itself.
4. Cross-check with Multimeter Results
A multimeter test is one of the most reliable methods for confirming whether or not the brake light switch is functioning correctly.
By checking for continuity and voltage, you can verify whether the switch is properly opening and closing the electrical circuit when the brake pedal is depressed.
If power is reaching the switch but is not flowing out of it when activated, there is a very high probability that the switch is defective.
This step provides concrete electrical evidence rather than relying on guesswork.
5. Temporary Bypass Test – A Brief Overview
In some instances, a temporary bypass test can be utilized as a final step for confirmation.
This involves manually simulating the closed circuit that the brake light switch typically establishes when the brake pedal is pressed.
If the brake lights illuminate during this bypass procedure, it indicates that the rest of the system is functioning properly.
If the lights still fail to light up, the problem likely lies elsewhere.
This test should be performed with caution and only for a brief duration, solely for diagnostic purposes, as it is not a permanent solution.
Can You Drive with a Faulty Brake Light Switch?
1. Legal Risks
Driving with a faulty brake light switch can quickly become a legal issue, as brake lights are considered an essential safety feature almost everywhere.
These lights are part of the basic standards for vehicle roadworthiness; if they are not functioning correctly, your vehicle may be deemed unsafe to operate.
In many jurisdictions, if your brake lights are inoperative, you could face fines or penalties during routine traffic stops or vehicle inspections.
Law enforcement agencies take faulty brake lights seriously, as they directly impact how effectively other drivers on the road can react to your actions.
2. Safety Concerns
The primary concern associated with a faulty brake light switch is safety.
Brake lights are the main means by which you signal to drivers following behind you that you are slowing down or coming to a stop.
If the switch fails, those drivers receive no warning, significantly increasing the risk of a rear-end collision, particularly in heavy traffic or low-light conditions.
Even if the switch is functioning intermittently, it sends inconsistent signals that can confuse other drivers.
This lack of clear communication on the road can very quickly transform ordinary driving situations into hazardous ones.
3. Impact on Other Vehicle Systems
A faulty brake light switch does not merely affect the lights located at the rear of the vehicle.
In modern vehicles, it is also integrated with several critical electronic systems.
For instance, the cruise control system may cease to function, as it relies on the brake signal to disengage safely.
The transmission shift interlock system may also be affected, making it difficult, or even impossible, to shift the vehicle out of ‘Park’ mode without properly depressing the brake pedal.
In some vehicles, the stability control and ABS systems may also receive erroneous signals, potentially triggering warning lights or compromising the systems’ operational efficiency.
This implies that a faulty switch can trigger a cascade of issues across various systems, rendering the vehicle less reliable and less safe to drive.
So, Understand When to Replace the Brake Light Switch?
1. Malfunction Detected During Multimeter Testing
The clearest indication that a brake light switch needs replacement is when it fails a multimeter test.
This test verifies whether the switch is properly opening and closing the electrical circuit as the brake pedal is depressed and released.
In a properly functioning switch, the electrical signal changes immediately as the pedal moves.
If the multimeter shows no change in continuity or voltage response, it indicates that the internal mechanism is no longer functioning correctly.
This is a strong and reliable sign that the switch has reached the end of its service life and should be replaced rather than repaired.
2. Intermittent Operation
Another critical reason to replace a brake light switch is when it operates only sporadically.
Intermittent operation means that the brake lights may illuminate correctly one moment but go out the next, often without any discernible pattern.
This typically occurs when the switch’s internal contacts become worn or unstable.
Even a slight vibration or a minor shift in the pedal’s position can interrupt the signal.
Such behavior is particularly dangerous because it creates uncertainty for drivers following behind you, making it impossible for them to anticipate when you are applying the brakes.
When a switch becomes unreliable in this manner, replacement is generally the safest and most practical solution.
3. Physical Damage or Sticking
Physical damage or sticking is yet another clear indication that the brake light switch requires replacement.
Over time, the switch may suffer from mechanical wear, cracks, or internal obstructions that prevent it from moving freely in conjunction with the brake pedal.
In some cases, dirt or debris can cause it to become stuck in a single position, resulting in the brake lights remaining constantly illuminated or failing to light up at all.
Visible damage to the switch housing, loose components, or improper alignment with the brake pedal also indicate that it is no longer functioning as designed.
As the switch is a small yet critical safety component, any external defect generally suggests that it cannot operate reliably and should be replaced to ensure proper functionality.
Know, How to Replace the Brake Light Switch
1. Disconnect the Battery
The first and most crucial step in replacing the brake light switch is to disconnect the vehicle’s battery.
This is done to ensure safety while working with the electrical system and to prevent any sudden short circuits or electrical sparks.
As the brake light switch is directly connected to the vehicle’s wiring, cutting off the power reduces the risk of damaging other components and protects you from electric shock while working in the cramped space beneath the dashboard.
2. Remove the Old Switch
Once the power has been safely disconnected, the next step is to locate the old brake light switch near the brake pedal assembly and carefully remove it.
This typically involves loosening a mounting clip, bracket, or locking mechanism that holds the switch in place.
It is important to handle it gently, as nearby wires and connectors can be delicate.
Removing the switch allows you to thoroughly inspect the mounting area and ensure that no hidden damage or debris is affecting the system.
3. Install the New Switch
After removing the faulty switch, the new brake light switch is installed in the same location.
It must be securely fitted into the mounting point so that it aligns correctly with the movement of the brake pedal.
Proper installation ensures that the switch can accurately detect when the pedal is depressed and when it is released.
If the switch is not seated correctly, it can lead to erratic brake light behavior or premature failure; therefore, a firm and stable fit is essential for reliable operation.
4. Adjust the Position Correctly
Correct adjustment is a critical part of the replacement process, as the brake light switch relies on precise alignment with the brake pedal.
The switch must be positioned in such a way that it activates at the precise moment the pedal is depressed and deactivates immediately upon the pedal’s release.
If adjusted too tightly or too loosely, the brake lights may remain illuminated continuously or fail to turn on at all.
Proper adjustment ensures smooth and precise communication between the pedal and the electrical system.
5. Test the Operation
The final step involves testing the entire system to confirm that the brake light switch replacement was successful.
This entails reconnecting the battery and depressing the brake pedal, while simultaneously verifying that the brake lights respond immediately and correctly.
The lights should illuminate only when the pedal is depressed and extinguish instantly the moment the pedal is released.
It is also crucial to verify that the system functions consistently and reliably to ensure that no intermittent issues are present.
A thorough check ensures that the new brake light switch is functioning correctly and that the safety system has been fully restored.
Estimated, Cost of Inspecting and Replacing a Brake Light Switch
1. Estimated Cost of the DIY Approach
Inspecting and replacing a brake light switch yourself is typically the most economical option, as the primary expense involves only the replacement part and a few basic tools (if you do not already own them).
In many cases, you may already possess tools such as a screwdriver set or a multimeter, meaning your out-of-pocket expense is largely limited to the cost of the switch itself.
Performing the inspection yourself also saves on labor charges; however, it requires time, meticulous attention to detail and a basic understanding of electrical testing.
While cost-effective, the main drawback is that the responsibility for accurately diagnosing the problem rests entirely with you, ensuring you do not inadvertently replace the wrong component.
2. Mechanic’s Labor Costs
If you decide to consult a professional mechanic, the total cost increases because you are paying for both the diagnostic work and the labor involved.
Mechanics typically charge based on the time required to diagnose the issue, which may include inspecting the electrical system, testing the switch and verifying related components such as fuses and wiring.
Labor costs can vary depending on your location and the workshop’s rates; however, in most cases, the replacement process is quite quick, as the switch is usually located near the brake pedal and is easily accessible.
Nevertheless, the final bill accounts for the mechanic’s expertise, specialized tools and the time saved on your part, making this option, despite being slightly more expensive than the DIY approach, a more convenient choice.
3. Price Range of the Part
Compared to many other automotive components, a brake light switch is typically an inexpensive part.
Its price depends on the vehicle’s make (manufacturer), model and whether the part is Original Equipment (OE) or an aftermarket component.
For standard vehicles, basic switches are typically inexpensive, whereas for modern vehicles equipped with integrated electronic systems, the switches can be somewhat costlier.
Although the price of this specific component may be relatively low, its role within safety systems is critical; therefore, its quality is of paramount importance.
Opting for a reliable replacement part guarantees proper functionality and helps avoid recurring malfunctions or additional diagnostic expenses in the future.
Tips to Prevent Brake Light Switch Failure
1. Regular Inspections
Regularly inspecting the brake light switch and its surrounding components helps identify early signs of malfunction before a complete failure occurs.
As this switch activates every time the brake pedal is depressed, it is subjected to gradual mechanical and electrical stress over time.
By periodically checking whether the brake lights illuminate instantly and consistently, you can detect early warning signs such as delays, flickering, or irregular lighting.
This simple habit helps prevent sudden failures and minimizes the risk of remaining unaware of potential safety hazards while driving.
2. Keep the Pedal Area Clean
Keeping the area surrounding the brake pedal clean is crucial, as dirt, dust and small debris can gradually accumulate near the switch mechanism.
Over time, this buildup can hinder the smooth movement of the brake pedal and compromise the switch’s functionality.
Maintaining a clean pedal area ensures that the switch can move freely and establish proper contact every time the brakes are applied.
This is particularly important for vehicles driven in dusty or muddy environments, where grime can accumulate much faster than expected.
3. Avoid Excessive Force on the Pedal
Applying excessive force to the brake pedal can shorten the lifespan of the brake light switch by increasing mechanical stress on its internal components.
The switch is designed to respond to normal pedal pressure, not to heavy or repetitive force exceeding the pressure required for braking.
Pressing down too hard or repeatedly exerting heavy pressure on the pedal can cause the switch to become dislodged or fail prematurely.
Applying the brakes in a smooth and controlled manner not only enhances driving safety but also helps extend the lifespan of the switch and its associated components.
4. Periodic Electrical Inspections
Conducting periodic electrical inspections helps ensure that the brake light switch and its associated circuits continue to function correctly over time.
These inspections involve confirming that the brake lights illuminate immediately, without any delay or irregularity, when the pedal is depressed.
In modern vehicles, this may also include checking for warning lights or diagnostic codes related to the braking system.
Regular electrical monitoring helps identify minor issues before they escalate into serious malfunctions, thereby ensuring that the switch continues to operate consistently and reliably as an integral part of the vehicle’s safety system.
Conclusion – How to Diagnose Brake Light Switch Failure
Yes, now you have clearly understood that having a properly working brake light switch is not just a convenience, as it silently protects in every drive as well.
It is the component that translates the movement of your foot into a clear warning signal for other drivers; and if it malfunctions, that vital link in communication is instantly severed.
As we have detailed in this guide, a faulty brake light switch can manifest its failure in various ways such as: the brake lights remaining constantly illuminated, failing to light up at all, the cruise control suddenly disengaging, or difficulty shifting the vehicle out of ‘Park’ mode.
These symptoms often leave drivers perplexed because they do not appear to be interconnected; yet, at the root of all these issues lies that same small electrical switch located beneath the brake pedal.
Most importantly, if one attempts to resolve this issue through a systematic, step-by-step diagnostic process, fixing it is by no means a difficult task.
By performing basic checks on components such as bulbs, fuses and wiring, you can quickly identify preliminary issues.
Conducting a more precise examination using a multimeter ensures that the switch is indeed transmitting the correct electrical signals.
In many instances, this problem does not stem from a sudden or abrupt failure, but rather arises from gradual wear and tear, improper installation, or damage to the switch’s internal components over time.
Now, you can ask all the related queries about How to Diagnose Brake Light Switch Failure, so that you can solve that questions as well.
Frequently Asked Questions
FAQ 1: What are the symptoms of a faulty brake light switch?
Answer: A faulty brake light switch typically manifests through specific symptoms, although these can often be confusing. The most common symptom is that your brake lights do not illuminate at all when you press the pedal. Another common symptom is the opposite scenario, where the brake lights remain lit even after you have taken your foot off the pedal. You may also notice that your cruise control suddenly stops working, or that you experience difficulty shifting the car out of ‘Park’ mode. These symptoms occur because the switch itself is responsible for sending the signal that informs the car’s systems when the brakes are being applied.
FAQ 2: Can a faulty brake light switch compromise driving safety?
Answer: Yes, a faulty brake light switch can directly compromise driving safety. Brake lights are one of the primary means by which you communicate with drivers following behind you. If they are not functioning correctly, other drivers will be unable to tell when you are slowing down or about to stop. This significantly increases the risk of a rear-end collision, particularly in heavy traffic or low-light conditions. Even a slight delay or an incorrect signal can cause confusion on the road; therefore, this issue should never be ignored.
FAQ 3: Why aren’t my brake lights working even though the bulbs are fine?
Answer: If your brake lights are not working despite the bulbs being in good condition, the problem is often related to the brake light switch, the fuse, or the wiring. It is possible that the switch is failing to send the electrical signal when you press the pedal, or that a blown fuse is preventing power from reaching the lights. In some cases, faulty or loose wiring can also disrupt the electrical circuit. Therefore, before replacing a specific component, it is essential to inspect each part of the system individually.
FAQ 4: Can a faulty brake light switch drain the battery?
Answer: Yes, in some cases, a faulty brake light switch can drain the battery. If the switch gets stuck in the ‘on’ position, the brake lights will remain illuminated even after the car has been turned off. This continuous power consumption can gradually drain the battery over time. Many drivers do not notice this immediately because the lights are not visible from inside the car, specially when parking during the day.
FAQ 5: Is it expensive to fix a brake light switch?
Answer: Compared to other car repairs, fixing a brake light switch is generally not very expensive. For most vehicles, the part itself is inexpensive, while labor costs depend on whether you replace it yourself or take it to a mechanic. As the switch is typically easily accessible near the brake pedal, the replacement process is often completed quickly. However, if other electrical issues such as: faulty wiring, are discovered during the inspection, the cost may increase.
FAQ 6: How long does a brake light switch last?
Answer: There is no fixed lifespan for a brake light switch, as it depends on your driving habits and road conditions. On average, it can last for several years, as it is only activated when you press the brake pedal. However, frequent braking in city driving, exposure to dust and dirt, or improper installation can shorten its lifespan. Regular inspections can help detect early signs of wear and tear before the switch fails completely.
FAQ 7: Can I drive with a faulty brake light switch?
Answer: Driving with a faulty brake light switch is not advisable, as it compromises both your safety and your compliance with legal regulations. If your brake lights are not working, other drivers will be unable to see when you are slowing down or stopping, thereby increasing the risk of an accident. Furthermore, if your vehicle is inspected, whether during a roadside stop or a routine check, you could face legal action. Even if the vehicle appears to be operating normally, the absence of proper signaling renders it unsafe.
FAQ 8: Why do my brake lights stay on continuously?
Answer: If your brake lights remain illuminated at all times, it indicates that the brake light switch has become stuck, dislodged, or is defective. This can also occur if the brake pedal fails to return fully to its original resting position, perhaps due to a weak return spring or an obstruction. When the switch remains stuck in the “on” position, it continuously supplies power to the brake lights, causing them to stay lit even when the brakes are not being applied.
References:
[1] Identification of factors that differentiate motor vehicles that have experienced wear or failure of brake system components during the warranty service period
https://www.researchgate.net/publication/351773772_Identification_of_factors_that_differentiate_motor_vehicles_that_have_experienced_wear_or_failure_of_brake_system_components_during_the_warranty_service_period

Hello Folks, Dean Shali here to help you out to solve the problems with your lovely vehicle, as i have lots of experience and knowledge about automotive industry as i woks directly with the customers and repair vehicles and i love to help the people to keep their cars safe and running smoothly.