Written By: Dean Shali
Fact Checked By: Sabré Cook
Reviewed By: Tamara Warren
You needs to be really aware in terms of using Parking Brake Cable, as every year: thousands of minor parking-related accidents happens just because of WEAK or MIS-ADJUSTED parking brake cable.
Basically, the parking brake also known as “HANDBRAKE” or “EMERGENCY BRAKE”, it is actually designed to hold a vehicle still when it is in parked mode, specially on the slopes.
And, it works through the steel cable system that actually applies the force to the rear brakes, that’s how it keeps the wheels completely locked in place even when the main braking system is off.
But, over the period of time and usage: this cable naturally gets stretched due to the repeated use temperature changes, moisture exposure and normal wear inside the brake assembly as well.
So, whenever that happens, then the brake actually loses its tightness and the vehicle may start to roll slightly, even it requires more lever travel or even fail to hold it firmly on the inclines as well.
Additionally, there’s automotive maintenance studies and service data from the brake manufacturers, that shows that the large percentage of parking brake issues are not due to the total failure of that hand brake, but simply because of improper adjustment that could have been fixed early on with basic inspection and tuning as well.
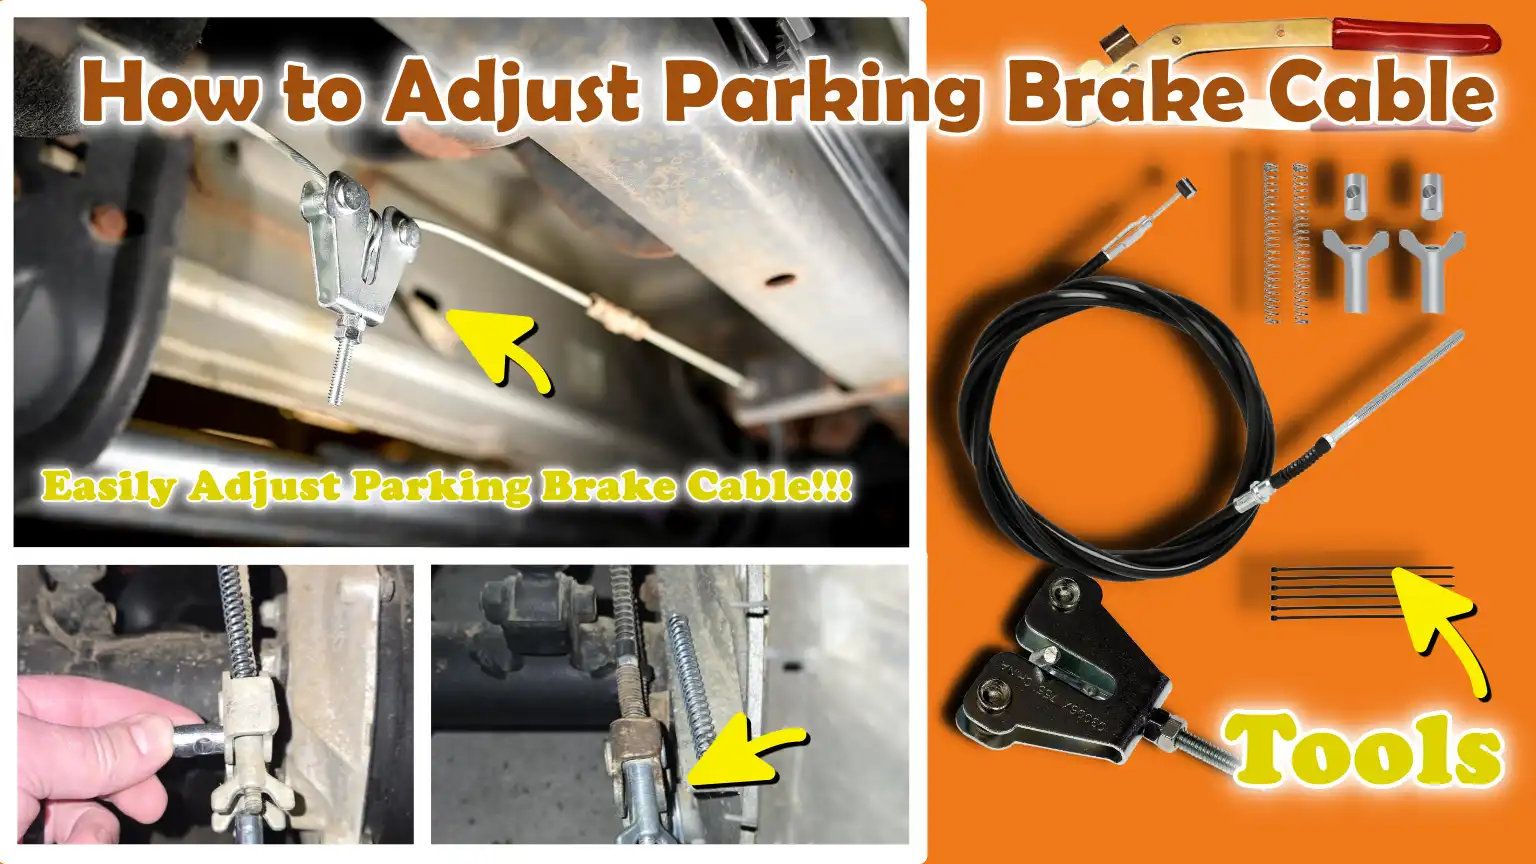
That’s why, in this guide you’ll learn How to Adjust Parking Brake Cable so that you can maintain and ensure that a vehicle stays firmly parked.
Know, Signs That Shows Your Parking Brake Cable Needs Adjustment
1. Excessive Lever Travel or Pedal Depression
As your parking brake cable begins to stretch over time, the first and clearest indication is that the lever or pedal moves, or depresses, significantly further than it used to.
Simply put, to securely park the vehicle, you may have to pull the handbrake lever much higher than before, or press the pedal much further down.
This occurs because the cable loses its original tension due to continuous use, the heat generated during braking and the general wear and tear of the metal strands.
In most vehicles, a properly adjusted parking brake should engage firmly within just a few clicks of the lever or with a slight depression of the pedal.
If it requires excessive force to engage, or travels an unusually long distance, it indicates that the braking force is not being effectively transmitted to the rear wheels.
This diminishes the brake’s ability to securely hold the vehicle in place and serves as a clear signal that the cable requires adjustment.
2. The Vehicle Rolling or Shifting Even After the Parking Brake Is Engaged
A properly functioning parking brake should completely prevent the vehicle from moving, particularly when parked on an incline.
If your vehicle rolls slightly or fails to remain firmly anchored in place even after the brake has been applied, it is a definitive sign that the cable is excessively loose or is failing to exert sufficient pressure on the brakes.
This issue is not merely an inconvenience; it poses a serious safety hazard, as even a slight shift in the vehicle’s position could lead to an accident, specially when the vehicle is situated on a slope.
The primary cause of this issue is often a lack of tension in the cable, meaning that the brake shoes or pads are unable to exert sufficient pressure on the braking surface.
Adjusting the cable restores this tension, thereby ensuring that the vehicle remains stable and safe.
3. Parking Brake Feeling Excessively Tight or “Dragging”
Occasionally, the problem is the exact opposite of looseness.
If the parking brake feels excessively tight, engages too abruptly, or does not release easily, the cable may be overtightened or jammed somewhere.
In such a scenario, even after lowering the lever or releasing the pedal, the rear brakes do not disengage completely.
This can result in a “dragging effect,” where the brakes remain slightly engaged even while driving.
Over time, this increases friction, accelerates wear and tear on brake components, boosts fuel consumption and can even lead to brake overheating.
With a properly adjusted cable, the brakes should disengage completely when not in use; therefore, if you experience any sensation of dragging or resistance, it is a clear indication that the cable requires adjustment or inspection.
4. Uneven Braking or a Burning Odor
If you notice that one side of the vehicle is braking more forcefully than the other, or if you detect a burning odor after driving, this may be linked to uneven cable tension.
The parking brake system is designed to apply equal force to both rear wheels; however, if the cable is not properly adjusted or has worn unevenly, one side may exert greater pressure than the other.
This imbalance can cause the brakes to wear unevenly, potentially causing the vehicle to pull to one side and generating excessive heat.
A burning odor often emanates from overheated brake pads or shoes that are rubbing against the drums or rotors.
Not only is this detrimental to the brake system, but if left unaddressed, it can also compromise overall braking performance.
5. Dashboard Warning Indicators – If Applicable
In many modern vehicles, the parking brake system is linked to dashboard warning lights or sensors.
If you notice that the parking brake warning light is illuminated, and remains lit even after the brake has been released, or if you observe any general alert related to the brake system, the underlying cause may be improper cable adjustment or issues related to cable tension.
While these indicators can point to other problems as well, they often serve as an early warning that something within the brake system is not functioning correctly.
Ignoring these signals can lead to more serious issues over time; therefore, whenever such a warning appears, it is crucial to inspect and adjust the parking brake cable.
Tools
| Tool/Material | Why It Is Needed | How to Use It Properly |
|---|---|---|
| Basic Hand Tools – Wrench Set, Pliers, Screwdriver | These tools are essential for adjusting the parking brake cable, as most adjustment points utilize nuts, bolts, or clips. A wrench helps you tighten or loosen adjustment nuts; pliers assist in gripping or pulling small components; and a screwdriver may be required to remove covers or panels. Without these tools, you cannot properly access or adjust the cable. | Use a wrench of the correct size to prevent the nut from slipping or becoming damaged. Turn it gradually and check the cable tension after every minor adjustment. Use pliers only when components need to be held steady, never to apply excessive force to an object. When removing panels, use the screwdriver gently to avoid breaking the clips. |
| Jack and Jack Stands | These items are necessary for safely lifting the vehicle, allowing you to access the parking brake cable located underneath. The jack lifts the car, while the jack stands securely hold it in place. This is crucial because working underneath a car without proper support can be extremely dangerous. | First, position the jack beneath the designated lifting point and slowly raise the vehicle. Once lifted, place the jack stands beneath sturdy support points and lower the car onto them. Always ensure that the vehicle is stable before getting underneath it. Never rely solely on the jack for support. |
| Wheel Chocks | Wheel chocks prevent the vehicle from rolling while you are working on it. Even though you are in the process of adjusting the parking brake, you should not rely solely on that mechanism to keep the car stationary during this procedure. Wheel chocks provide an additional layer of safety. | Firmly place wheel chocks against the tires that will remain in contact with the ground, typically the front tires, if you are lifting the rear of the vehicle. Ensure that the chocks are wedged tightly against the tires so that the car cannot roll forward or backward. |
| Flashlight | A flashlight helps you clearly see the parking brake cable, adjustment nuts and surrounding components, specially underneath the vehicle, where lighting is typically poor. Good illumination is essential to avoid errors and to ensure that adjustments are performed correctly. | Hold or position the flashlight so that its beam shines directly onto your workspace. If possible, use a hands-free light source so that both of your hands remain free to work. Before making any adjustments, always ensure that you have a clear view of the adjustment point. |
| Safety Gloves | Safety gloves protect your hands from sharp edges, dirt, rust and hot components. Brake systems can become extremely hot and may contain rough metal parts that could cause injury. Gloves also improve your grip while handling tools. | Put on your gloves before beginning the work and keep them on throughout the entire process. Ensure that they fit you properly so that you can handle your tools with ease. If they become oily or slippery, clean them or switch to a fresh pair to maintain a secure grip. |
Ensure Safety Before Starting Work
1. Park on Level Ground
Before beginning any work, always park your vehicle on a level and uniform surface; this ensures that the vehicle remains stable and minimizes the risk of sudden movement.
When a vehicle is situated on a slope, gravity constantly attempts to pull it forward or backward, making any repair work significantly more hazardous and less precise.
A level surface ensures that the vehicle remains stationary when you lift it or release the parking brake during adjustments.
It also facilitates a more accurate assessment of brake adjustments, as no gravitational forces from a slope are acting upon the vehicle.
Even a slight incline can exert additional pressure on the wheels, potentially leading to an inaccurate assessment of whether the parking brake is functioning correctly.
2. Use Wheel Chocks Correctly
Wheel chocks are simple yet essential safety devices that prevent a vehicle from rolling while work is being performed.
They function as physical barriers (blocks) placed against the tires resting on the ground.
This is particularly critical because, during the adjustment process, you may need to release the parking brake; this means that the primary force holding the vehicle in place is temporarily removed.
Without chocks, the vehicle could suddenly shift forward or backward, posing a risk of serious injury or damage to the vehicle.
To use them correctly, place them firmly against the front or rear of the tires (depending on the direction in which the vehicle might roll).
They must be securely wedged in place so that there is no gap between the chock and the tire, thereby ensuring that the vehicle remains completely stationary.
3. Allow the Brakes to Cool Down
Before touching any component of the brake system, it is absolutely essential to allow the brakes to cool down completely.
While driving, the friction generated between the brake pads (or shoes) and the rotating components creates intense heat within the braking system.
Even after the vehicle has been parked, this heat can remain trapped within the metal components for a considerable period.
Touching hot brake components poses a risk of burns; furthermore, the heat can cause these parts to expand and alter their physical properties, making precise adjustments difficult.
Waiting for the brakes to cool down ensures your safety and allows you to work on the vehicle’s components while they are in their normal operating state, thereby yielding more accurate results.
4. Secure the Vehicle Using Jack Stands
Whenever you lift a vehicle, it is absolutely essential to use jack stands to provide secure support while you are working underneath it.
Hydraulic jacks are designed to lift a vehicle, but they are not engineered to sustain the vehicle’s weight for extended periods.
Mechanical failure, a loss of hydraulic pressure, or sudden movement can cause a jack to collapse without warning.
Jack stands provide a stable and sturdy support system that securely holds the vehicle in place.
After lifting the vehicle, position the stands beneath strong sections of the frame, or at the support points specified by the manufacturer, and slowly lower the vehicle onto them.
This step ensures that, even if the jack were to fail, the vehicle would remain safely supported.
5. Never Rely Solely on the Jack
Relying exclusively on a jack while working on a vehicle is one of the most dangerous mistakes you can make.
Jacks can fail due to leaks, shifting loads, or uneven ground; when this occurs, the vehicle can suddenly crash to the ground with full force.
Such incidents can result in severe injuries or even loss of life.
For this reason, professionals always use jack stands as a backup support system.
Consider the jack merely as a lifting tool, not a safety device.
Before placing any part of your body beneath the vehicle, always double-check to ensure that it is securely resting on the jack stands.
Taking this extra step significantly reduces the risk and ensures a safe working environment.
Know, About The Types of Parking Brake Cable Adjustment Systems
1. Manual Adjustment System
Manual adjustment systems are typically found in older vehicles and certain basic modern designs where simplicity and direct control are preferred.
In this system, the parking brake cable does not adjust automatically; this means that the tension must be set by manually tightening or loosening an adjustment nut.
Over time, due to repeated use, heat generated by the brakes and environmental factors such as moisture and dirt, the steel cable naturally stretches.
As this stretching occurs, the parking brake becomes less effective, as it is unable to exert the necessary force to securely hold the vehicle in place.
Manual systems are designed to allow a technician or vehicle owner to restore the correct tension by turning an adjustment nut; this nut is typically located along the cable’s path or near the handbrake lever.
This process directly shortens or lengthens the effective pull of the cable, thereby increasing or decreasing the braking force.
The advantage of this system is that it offers precise control over the adjustment; however, it also requires regular inspection and maintenance, as it does not self-correct.
2. Self-Adjusting System
Self-adjusting systems are utilized in many modern vehicles and are designed to maintain the correct cable tension without the need for frequent manual intervention.
This system operates through an internal mechanism located within the rear brake assembly, which automatically adjusts as the brake components wear down.
For instance, as brake shoes or pads become thinner, the system compensates by slightly tightening the mechanism, ensuring that the parking brake continues to function at the proper level.
This enhances convenience and helps maintain consistent performance over time.
However, even self-adjusting systems are not entirely maintenance-free.
In some instances, dirt, corrosion, or a lack of use can cause the adjustment mechanism to cease functioning correctly.
When this occurs, the parking brake may feel loose or ineffective and it may require manual resetting or adjustment to restore it to proper working order.
It is crucial to understand that even these systems may require attention, as many drivers mistakenly assume they will never need to have them inspected.
3. Adjustment Locations
The location of the parking brake cable adjustment depends on the vehicle’s design; however, there are several common places where it is typically found.
One common location is underneath the vehicle, along the length of the cable, often referred to as the “mid-cable adjuster.”
This is the point where the main cable splits or joins and an adjustment nut is used to regulate the overall tension.
A second common location is inside the vehicle, typically near the base of the handbrake lever or beneath the center console.
In this configuration, adjusting the nut directly alters the perceived tightness of the lever and the responsiveness of the brake engagement.
A third potential location lies within the rear brake assembly itself, particularly in systems that combine both mechanical and automatic adjustment features.
The objective remains the same across all locations, to regulate cable tension, though accessing them may require different procedures.
Knowing where to look helps save time and ensures that adjustments are performed correctly, without overlooking the actual control point.
How to Adjust Parking Brake Cable – Practical Steps
1. Locate the Parking Brake Cable Adjuster
The first and most crucial step is to identify exactly where the parking brake cable can be adjusted.
In many vehicles, this adjuster is located either along the cable line underneath the vehicle or inside the cabin near the base of the handbrake lever; it is often hidden beneath a cover or the center console.
The adjuster typically resembles a threaded rod fitted with a nut; the cable’s tension can be altered by tightening or loosening this nut.
This nut regulates the amount of force transmitted from the lever or pedal to the rear brakes.
Locating the correct adjuster is essential, as adjusting the wrong component will neither resolve the existing issue nor prevent new problems from arising.
Before making any adjustments, carefully trace the path of the cable to gain a thorough understanding of how the various components of the system interconnect.
2. Lift and Secure the Vehicle
If the adjustment point is located underneath the vehicle, you must safely lift the vehicle to access it.
To prevent damage to the vehicle’s frame or body, always use the specific jacking points recommended for your vehicle.
After lifting the vehicle, place sturdy jack stands beneath solid support points and slowly lower the vehicle onto them.
This step is critical, as it ensures that the vehicle remains stable while you are working underneath it.
A stable setup not only guarantees your personal safety but also facilitates precise adjustments without the vehicle shifting.
Positioning the vehicle correctly ensures clear visibility of the cable and allows you to work with greater comfort and ease.
3. Check the Current Cable Tension
Before making any adjustments, it is crucial to understand the current state of the cable tension.
Sit inside the vehicle and either pull the parking brake lever or depress the pedal; observe how far it travels before the brakes engage.
Many vehicles have a standard operating range for brake engagement, in the case of a handbrake lever, this is often measured in “clicks.”
If the lever travels too far, it indicates that the cable is likely too loose; conversely, if it engages immediately after traveling only a short distance, it suggests that the cable is likely too tight.
This initial assessment provides a clear starting point and eliminates the need for guesswork during the adjustment process.
It also allows you to compare the extent of improvement once the adjustment is complete.
4. Adjust the Cable
Once you have determined that an adjustment is necessary, begin tightening the adjustment nut slowly and carefully.
Tightening the nut incrementally increases the tension in the cable, thereby improving the braking force applied to the rear wheels.
It is essential to make gradual changes and frequently check the results, as overtightening can cause the brakes to remain partially engaged even after the parking brake has been released.
This can lead to issues such as brake drag, excessive heat generation and premature wear of brake components.
If the system utilizes separate cables for each of the rear wheels, maintaining balance is critical to ensure that equal braking force is applied to both sides.
Uneven tension can cause one brake to engage more forcefully than the other, potentially leading to vehicle instability and uneven wear on the brake components.
5. Test the Parking Brake
After making the necessary adjustments, thoroughly test the parking brake before lowering the vehicle back down.
Engage and release the brake several times to ensure that it operates smoothly and returns to its normal position without sticking.
When engaged, the brake should feel firm and be capable of effectively locking the rear wheels.
If possible, while the vehicle is still elevated, manually rotate the rear wheels to verify that they lock completely when the brake is applied and spin freely when it is released.
This step helps confirm that the adjustments made are correct and that there is no unwanted friction or obstruction.
6. Lower the Vehicle and Perform a Final Check
Once you are satisfied with the adjustments made, carefully remove the jack stands and lower the vehicle back down to the ground.
Perform a final, real-world test by parking the vehicle on a slight incline and engaging the parking brake.
The vehicle should remain completely stationary, without rolling or sliding.
This final check is crucial, as it confirms that the cable tension is sufficient to hold the vehicle’s full weight under actual operating conditions.
If the vehicle moves or the brake feels weak, further adjustments may be required.
A properly adjusted parking brake will provide a strong and reliable hold, giving you the confidence that your vehicle remains secure whenever you park it.
How Tight Should a Parking Brake Cable Be?
1. Correct Lever Movement – Typically 5 to 8 Clicks
A properly adjusted parking brake cable allows the lever or pedal to move within a controllable and predictable range before fully engaging.
In most vehicles equipped with a handbrake lever, this range typically falls between five and eight clicks, although this number may vary slightly depending on the specific design of the vehicle.
This range is crucial because it indicates that the cable possesses sufficient tension to exert the force required to apply the brakes without becoming excessively tight.
If the lever travels significantly beyond this range, it usually implies that the cable is too loose and is failing to properly actuate the brake components.
Conversely, if the brake engages after just one or two clicks, the cable may be overtightened, potentially causing the brakes to remain partially engaged.
Maintaining the lever’s movement within the correct range ensures that the parking brake functions effectively and fully disengages when not in use.
2. The Sensation of Correct Tension
In addition to the number of clicks, the feel of the parking brake serves as a key indicator of whether it has been properly adjusted.
When you pull the lever or depress the pedal, the resistance should increase gradually and consistently.
It should feel neither excessively loose nor excessively tight.
A loose or spongy sensation typically suggests that the cable has stretched or has not been properly adjusted, thereby compromising its ability to securely hold the vehicle in place.
Conversely, a sensation of excessive tightness or stiffness may indicate that the cable is under excessive tension or that there is some form of obstruction or binding within the system.
Proper tension provides precise control and a sense of assurance, ensuring that braking force is applied consistently and effectively.
This balanced feel is the result of a harmonious interplay between properly tensioned cables and correctly functioning brake components.
3. Avoiding Brake Drag
One of the most critical objectives when adjusting the parking brake cable is to avoid “brake drag.”
Brake drag occurs when the brakes fail to fully disengage even after the lever or pedal has been released.
Brake drag generates continuous friction between the brake components and the rotating parts, leading to excessive heat buildup, accelerated brake wear and reduced fuel efficiency (mileage).
Consequently, the vehicle may feel sluggish to drive or emit a burning odor after operation.
This issue frequently arises when the cable is adjusted too tightly, preventing the brakes from having sufficient slack to return to their normal “resting position.”
To prevent this, the cable tension should be just enough to securely hold the vehicle stationary when the brake is applied, yet loose enough to allow the brakes to fully disengage when released.
Maintaining this balance ensures both the safety of the braking system and its long-term reliability.
Know, About the Common Mistakes While Adjusting Parking Brake Cable to Avoid Them
1. Overtightening the Cable
One of the most common mistakes made when adjusting the parking brake cable is overtightening it in an attempt to achieve a firmer grip.
While it may seem that a tighter cable would enhance safety, it often has the opposite effect.
When the cable is overtightened, the rear brakes are unable to fully disengage, even after the lever has been lowered or the pedal released.
This results in constant friction within the brake system, generating heat, accelerating the wear of brake pads or shoes and reducing fuel efficiency.
Over time, this excessive tension can damage brake components and even negatively impact driving performance.
A properly adjusted cable should allow the brakes to fully disengage when not in use, while providing a firm hold when applied; therefore, it is always better to make small, careful adjustments rather than drastic changes.
2. Neglecting Uneven Rear Brake Adjustment
Another major mistake is focusing solely on cable tension while failing to verify that the rear brakes are engaging evenly.
The parking brake system is designed to apply equal pressure to both rear wheels; however, if components on one side are worn, misaligned, or adjusted differently, the braking pressure becomes uneven.
This can cause one wheel to grip more forcefully than the other, potentially causing the vehicle to pull to one side, become unstable, or result in uneven wear of brake components over time.
Even if the cable appears to be correctly adjusted, uneven brake components can still compromise overall performance.
When performing proper adjustments, one must always pay attention to both sides of the rear brake system to ensure that the pressure remains balanced and uniform.
This guarantees superior control, extends the lifespan of components and ensures safe parking in all conditions.
3. Neglecting Safety Precautions
Skipping basic safety measures is a mistake that can lead to serious injury or damage.
Many people underestimate the risks involved when working on a vehicle, particularly when it is being lifted or when working underneath it.
Failing to place wheel chocks, neglecting to secure the vehicle on level ground, or relying solely on a jack can render the vehicle unstable.
If the vehicle were to suddenly shift or fall, the consequences could be severe.
Safety precautions are not optional steps; rather, they are an integral part of the process.
Dedicating a few extra minutes to properly secure the vehicle ensures that you can work with confidence and avoid unnecessary risks while performing adjustments.
4. Failing to Test After Adjustment
Failing to test the parking brake after making adjustments is another major error that can result in incomplete or substandard work.
Even if the cables appear to be properly tightened, the actual performance of the parking brake can only be verified through testing.
Without testing, you will be unable to detect issues such as insufficient grip, uneven braking, or brake drag.
A proper test involves engaging and disengaging the brake several times and verifying that the vehicle remains firmly in place, specially on a slight incline.
This step confirms that the adjustment was executed correctly and that the system is functioning exactly as designed.
Skipping this final verification step can leave hidden problems unresolved and compromise overall safety.
Understand, How to Solve Post-Adjustment Issues
1. Loose Brakes
If the parking brake still feels loose even after adjustment, it indicates that the problem runs deeper than just cable tension.
In many cases, prolonged use causes the cable to stretch beyond its operational limits; this means that even with further tightening, the necessary pressure required to engage the brakes cannot be generated.
Another common cause is the wear and tear of the rear brake shoes or pads, which reduces the contact surface area required to hold the vehicle stationary.
In drum brake systems, excessive clearance between the shoes and the drum can also compromise braking effectiveness, even if the cable has been adjusted.
It is crucial to understand that the parking brake system functions through a combination of cable tension and the internal condition of the brakes.
If any single component is worn out or misaligned, the entire system becomes ineffective.
When a simple adjustment fails to resolve the issue, it becomes essential to inspect the condition of the rear brakes and ensure that all components are operating within their normal functional parameters.
2. Brake Drag After Adjustment
If you notice that the vehicle feels sluggish, overheats excessively, or exhibits a slight hesitation while driving after an adjustment, the parking brake may be dragging.
This typically occurs when the cable has been overtightened, preventing the brake components from fully returning to their resting position due to a lack of necessary slack in the cable.
Brake drag creates constant friction between the braking surfaces, leading to increased temperatures, accelerated component wear and reduced fuel efficiency.
Over time, this can cause damage to the brake pads, shoes and even the rotors or drums.
The solution to this is to slightly loosen the adjustment and verify whether the wheels rotate freely when the brakes are released.
In a properly adjusted system, there should be no friction when the brakes are disengaged and they should provide a firm grip when applied.
3. Uneven Braking
Uneven braking occurs when one of the two rear wheels receives greater braking pressure than the other; this can happen if the cable tension is unbalanced, or if a component within the brake system has become worn or seized.
Consequently, the vehicle may feel unstable or pull slightly to one side when the parking brake is applied.
Over time, this can also lead to uneven wear on the brake components, further exacerbating the problem.
In many vehicles, the parking brake cable splits into two sections to control both rear wheels; if the cable on one side is tighter than the other, the distribution of pressure becomes uneven.
To restore balance, it is crucial to inspect the movement of the cables on both sides, ensure they are correctly adjusted and verify that the level of wear on both is equal.
Ensuring that all connected components move without obstruction and provide a consistent response will enhance both safety and performance.
4. Seized or Rusted Cable
A seized or rusted cable is a common issue, particularly in vehicles exposed to moisture, dust and road salt.
Over time, rust can accumulate inside the cable housing, making it difficult for the cable to move freely.
When this occurs, the parking brake may fail to engage or disengage properly, even if its adjustment is otherwise correct.
You may observe that the brake remains partially engaged or fails to engage at all.
This occurs because the internal movement of the cable becomes obstructed.
In such cases, simply making adjustments will not resolve the issue.
If the problem is minor, the cable may merely require lubrication; however, if the issue is more severe, replacing the cable is the only reliable solution.
Keeping the cable clean and protecting it from moisture can help prevent this problem and extend its lifespan.
When to Replace Instead of Adjusting
1. Worn or Damaged Cable
A parking brake cable is constructed by twisting together numerous thin steel strands to provide both strength and flexibility.
Over time, due to constant movement, exposure to heat and contact with dust, dirt and moisture, these strands begin to fray or wear out.
When a cable becomes worn, it loses its ability to safely withstand full tension; this means that even after adjustment, it will be unable to properly secure the vehicle.
In some instances, a damaged cable may snap suddenly without warning, particularly when the brake is applied on an incline while under a heavy load.
You may observe limited movement near the cable ends, unusual stretching, or visible signs of damage.
Once the structural integrity of the cable has been compromised, simple adjustment cannot restore its strength; in such cases, replacement remains the safest and most reliable solution.
2. Rusted or Seized Components
One of the most common causes of parking brake cable failure is corrosion.
The cable operates within a protective outer sheath; however, over time, moisture can penetrate this covering and cause the cable to rust.
This rust generates friction, preventing the cable from moving freely.
In mild cases, the cable may simply feel somewhat stiff; in severe cases, it may seize completely and cease to move at all.
When this occurs, the parking brake may fail to engage properly or fail to fully disengage, leading to a condition known as “brake drag.”
Furthermore, rust can compromise the structural integrity of other related components within the brake assembly, such as springs and levers.
As rust degrades the internal surfaces of the cable, simply adjusting the cable will not resolve the underlying issue.
To ensure proper cable movement and safe operation, it is essential to replace the damaged components.
3. Issues Requiring Frequent Adjustment
If you find that the parking brake requires frequent adjustment, or if it fails to maintain its proper setting for an extended period, it is often an indication that the cable or its associated components have worn down far beyond their normal limits.
A properly functioning system should, under normal operating conditions, maintain its settings for a considerable length of time.
Frequent loosening may signal that the cable has stretched internally, its adjustment threads have worn out, or there is a defect within the brake assembly itself.
In such cases, repeatedly tightening the cable provides only temporary relief; ultimately, it can lead to further complications, such as over-tightening of the cable or improper brake engagement.
When minor adjustments fail to yield consistently reliable results, replacing worn-out components, rather than making repeated minor tweaks that offer no permanent solution, proves to be a far more effective remedy.
4. Wear and Tear Due to High Mileage
As a vehicle accumulates mileage, every component of the parking brake system, including the cable, springs and internal brake mechanisms, gradually begins to wear down.
Due to repeated use over time, the cable may stretch and the lubrication on its internal surfaces may diminish.
This natural process of wear and tear diminishes the system’s ability to maintain proper tension and respond accurately to adjustments.
In high-mileage vehicles, even if the cable appears to be in good visual condition, its performance may be compromised due to age and material fatigue.
In such instances, replacing the cable, along with inspecting other associated components, is often the most effective method for fully restoring the system’s reliability.
A new cable ensures proper tension, smoother operation and consistently reliable performance, factors that are particularly crucial for maintaining safety when parking on inclines or uneven surfaces.
Estimated, Cost of Adjusting vs Replacing a Parking Brake Cable
1. Estimated Cost of Doing It Yourself – DIY
Adjusting a parking brake cable yourself typically incurs very little cost, as it primarily requires basic tools such as: a wrench or pliers, which many people already own.
In most cases, if the cable is still in good condition, no new parts are required; therefore, the only cost involved is your time and effort.
Even if you do need to purchase tools, the expense remains quite low and you can utilize those tools for future vehicle maintenance tasks as well.
However, if the cable is worn out or damaged and requires replacement, the cost increases because you must purchase a new cable.
The price of a parking brake cable varies depending on the type of vehicle, but it is generally quite inexpensive compared to other brake components.
Performing this task yourself can save you a significant amount of money; however, you must pay close attention to safety protocols and proper adjustment techniques to avoid errors that could lead to further complications in the future.
2. Cost of Professional Service
Having a parking brake cable adjusted or replaced by a professional costs more than doing it yourself, but the advantage is that you benefit from their experience and access to specialized tools.
For a standard adjustment, the cost typically remains moderate, as the task is not particularly time-consuming for a trained technician.
If the cable requires replacement, the total cost increases, as it incorporates the expense of both the parts and the labor (the technician’s fee).
Labor costs depend on how easily the cable can be accessed within your vehicle, as the design of some vehicles requires the removal of more components to reach the cable compared to others.
Professional service also includes an inspection of other related brake system components, which helps identify potential issues that might not be apparent at first glance.
Although the initial cost may seem slightly higher, it helps protect you from future complications and ensures that the brake system is adjusted correctly and safely.
3. Time Required
The time required to adjust or replace a parking brake cable depends on the condition of the brake system and the vehicle’s design.
If the adjuster is easily accessible and no components are seized or damaged, the standard adjustment procedure can often be completed in a very short time.
However, if accessing the cable is difficult, or if the vehicle needs to be lifted and its protective covers removed, the task may take longer.
Replacing a cable generally takes more time, as it involves removing the old cable and installing a new one; this process often requires working in tight spaces within the vehicle and reassembling components at various points.
An experienced individual can complete this task quite quickly; conversely, those attempting it for the first time (beginners) may take a bit longer to understand the brake system and perform the work while observing necessary safety precautions.
It is crucial to take adequate time to perform this task correctly, as rushing can result in improper component alignment or the oversight of essential safety measures.
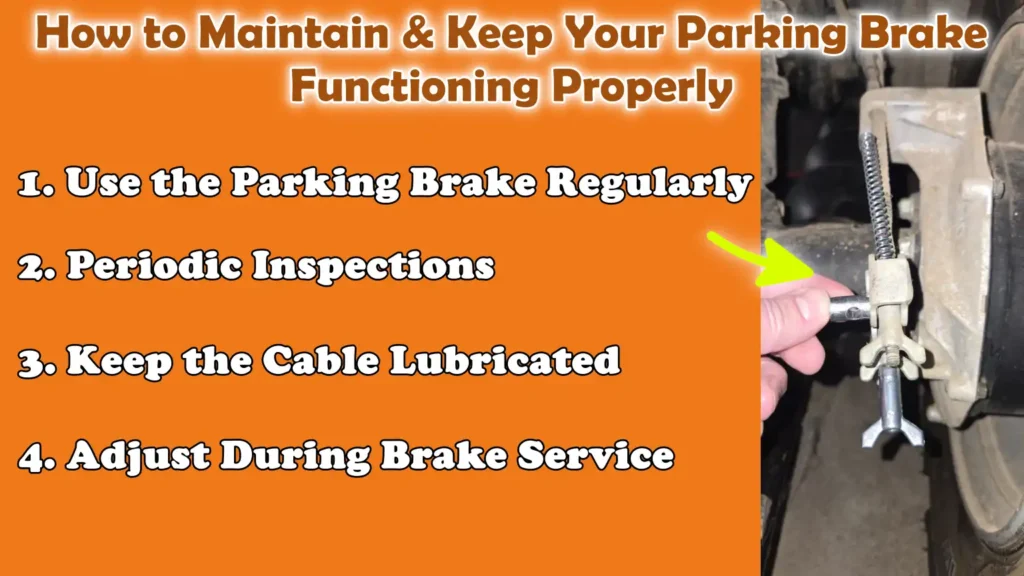
How to Maintain & Keep Your Parking Brake Functioning Properly
Also, there’s study of Parking Brake Cable Efficiency as Affected by the Construction Type that shows that parking brake performance literally depends heavily on the cable efficiency, which is directly influenced by the cable design, friction and material construction, so this research actually measured input force, output force and travel distance, that shows that inefficiency cables actually reduces the force transmitted to the braking system, which is directly affects the vehicle’s ability to stay stationary that’s why proper adjustment is really important to properly adjust it because even small losses in cable efficiency can reduce the braking effectiveness and safety as well.[¹]
1. Use the Parking Brake Regularly
Regularly using the parking brake is the easiest and most effective way to ensure that the system continues to function correctly.
When the cables and internal brake components are used frequently, they remain free-moving, thereby reducing the likelihood of them seizing up or sticking.
Regular use prevents rust from forming inside the cable housing and keeps the internal moving parts of the rear brakes active.
Many drivers use the parking brake only when parked on an incline; however, this limited usage can leave the cables dormant for extended periods, increasing the risk of corrosion and diminished brake performance.
Engaging the parking brake even on level surfaces maintains proper brake movement and ensures that the system is always ready to function when needed.
2. Periodic Inspections
Inspecting the parking brake system at regular intervals allows for the detection of minor issues before they escalate into major problems.
Over time, cables can stretch and brake components can wear down, potentially compromising the system’s ability to securely hold the vehicle in place.
A standard inspection involves checking how far the lever or pedal travels, how firm it feels and whether the vehicle remains securely stationary when parked.
It is also beneficial to inspect the cables from underneath the vehicle to identify any visible signs of damage, corrosion, or loose connections.
Early detection allows for immediate adjustments or minor repairs, thereby preventing costly future expenses and enhancing overall safety.
3. Keep the Cable Lubricated
Lubrication plays a crucial role in ensuring that the parking brake cable moves smoothly and without obstruction.
The cable operates within a protective outer sheath; however, over time, dust and moisture can infiltrate this sheath, creating friction.
This friction can make it difficult to pull the cable, potentially leading to a delay in brake engagement or preventing the brakes from fully disengaging.
Applying appropriate lubricant to the exposed ends and moving parts of the cable helps reduce friction, prevent corrosion and extend the cable’s lifespan.
Smooth brake operation ensures that braking force is applied evenly and released completely, thereby enhancing both performance and reliability.
Proper lubrication also minimizes wear on related components, extending the overall service life of the entire system.
4. Adjust During Brake Service
Adjusting the parking brake cable during routine brake service is a prudent step toward maintaining its optimal performance.
When brake pads or shoes are replaced, the clearance between the braking surfaces changes, which can impact the effectiveness with which the parking brake engages.
If the cable is not adjusted following this procedure, the brake may feel either excessively loose or excessively tight.
Incorporating cable adjustment into the regular brake maintenance schedule ensures that all components of the system operate in perfect harmony.
This approach saves time and maintains consistent brake performance, guaranteeing that the parking brake will reliably and securely hold the vehicle in place under all conditions.
Read More:
- How to Check Parking Brake Cable Tension
- How to Fix Brakes Dragging While Driving
- How to Diagnose Brake Dragging Issue
- How to Fix Internal Master Cylinder Leak
- How to Test Brake Master Cylinder Pressure
- How to Replace Brake Booster
- How to Fix Brake Booster Vacuum Leak
- How to Test Brake Booster Functionality
- How to Lubricate Brake Caliper Pins Properly
- How to Rebuild Brake Caliper at Home
- How to Check Brake Caliper Piston Movement
- How to Resurface Brake Rotors at Home
- How to Fix Brake Rotor Runout
Conclusion – How to Adjust Parking Brake Cable
Yes, you actually need to keep your parking brake in a good condition in terms to protect your car and your surroundings as well.
Although it is a simple mechanical system, it plays a crucial role in keeping a vehicle stationary when parked, particularly on inclines or uneven terrain.
Over time, the cable naturally stretches, brake components wear down and minor shifts begin to affect the system’s functionality.
These changes often occur gradually, which is why many drivers fail to notice the issue until the brake becomes excessively loose, overly tight, or completely unreliable.
Understanding how the parking brake cable operates, and recognizing the signs of improper adjustment, gives you a distinct advantage.
When you spot early symptoms such as: excessive lever travel, ineffective braking, or a sticking brake, you can take action before the problem poses a safety risk or necessitates costly repairs.
The adjustment process itself is not a difficult task; however, it requires patience, a keen eye and a focus on balance to ensure that equal braking force is applied to both rear wheels.
Now, that’s it from this guide about How to Adjust Parking Brake Cable, also you can ask related questions below.
Frequently Asked Questions
FAQ 1: How often should you adjust the parking brake cable?
Answer: There is no fixed schedule for adjusting the parking brake cable, as it depends on the frequency of vehicle usage and driving conditions. Generally, the cable should be checked during regular brake inspections or whenever you notice a change in how the parking brake functions. If the lever begins to pull up higher than usual, feels loose, or the vehicle does not hold firmly in place, it is an indication that an adjustment may be necessary. Many technicians recommend checking it at least once a year or whenever brake service is performed. Regular use and inspection ensure that the system continues to function correctly and minimizes the need for frequent adjustments.
FAQ 2: Can I adjust the parking brake without removing the wheels?
Answer: In many vehicles, the parking brake cable can be adjusted without removing the wheels, specially if the adjustment point is located underneath the vehicle or inside the cabin near the handbrake lever. This makes the process quicker and easier. However, in some cases, particularly with certain rear brake designs, it may be necessary to remove the wheels to inspect the condition of the brake components or to access the internal adjustment mechanism. Even if removing the wheels is not required, it is essential to ensure that the vehicle is safely lifted and supported before working underneath it.
FAQ 3: Why does my parking brake become loose over time?
Answer: The parking brake cable becomes loose over time primarily due to the natural wear and stretching of the steel cable. Every time you engage the parking brake, the cable stretches and then releases, causing its length to change gradually. Heat generated by braking, moisture, dirt and rust, all these factors can affect the way the cable functions. Furthermore, due to wear and tear on the brake shoes or pads, the cable must travel a greater distance to apply the necessary pressure, causing the brakes to feel loose. This is a normal process; therefore, periodic adjustments are essential to maintain proper tension and performance.
FAQ 4: Is it safe to drive with a loose parking brake?
Answer: Driving with a loose parking brake generally does not affect normal braking, as the primary braking system operates independently; however, it is not considered safe. The parking brake is designed to keep the vehicle stationary when parked and if it is excessively loose, the vehicle could suddenly roll away, specially on an incline. This could lead to an accident or cause damage to the vehicle. In certain situations, the parking brake also serves as a backup braking system during emergencies; therefore, ensuring it is properly adjusted adds an extra layer of safety. Rather than ignoring this issue, it is best to have it repaired as soon as possible.
FAQ 5: How will I know if my parking brake cable has snapped?
Answer: A broken parking brake cable typically presents clear and easily identifiable signs. The most common indication is that the parking brake is no longer able to hold the vehicle in place at all, even when fully engaged. The lever or pedal may feel very loose, offering little to no resistance. In some instances, you may hear a “snapping” sound when the cable breaks, or you may notice that the brake on one side of the vehicle is not functioning correctly. By inspecting the underside of the vehicle, you can often identify the problem by visually detecting broken or damaged sections of the cable. When a cable snaps, a simple minor adjustment will not resolve the issue; the cable must be replaced to ensure proper functionality.
FAQ 6: What happens if the parking brake cable is too tight?
Answer: If the parking brake cable is excessively tight, the rear brakes may remain partially engaged even after the brake pedal has been released. This condition is known as “brake drag.” It results in constant friction, which generates heat, accelerates the wear and tear of brake components and increases fuel consumption. You may notice that the vehicle feels sluggish or heavy to drive, or you might detect a burning odor after driving. Over time, this can lead to brake system failure and increased repair costs. When properly adjusted, the brakes should disengage completely upon release, yet remain capable of firmly holding the vehicle in place when applied.
References:
[1] A Study of Parking Brake Cable Efficiency as Affected by Construction Type
https://saemobilus.sae.org/articles/a-study-parking-brake-cable-efficiency-affected-construction-type-2011-01-2380

Hello Folks, Dean Shali here to help you out to solve the problems with your lovely vehicle, as i have lots of experience and knowledge about automotive industry as i woks directly with the customers and repair vehicles and i love to help the people to keep their cars safe and running smoothly.