Written By: Dean Shali
Fact Checked By: Sabré Cook
Reviewed By: Tamara Warren
Quiet Shockingly, even sealed brake systems cannot stop that damn moisture from quietly changing how your brakes performs.
As, there’s brake fluid which is actually responsible for transferring that necessary force from your foot into the stopping power that can weigh thousands of kilograms of moving metal.
But, even in that sealed system: there’s always possibility of having tiny amounts of water that can enter slowly and there’s research that shows that as little as 3% to 4% water contamination can significantly reduce the boiling point and thus the braking efficiency as well.
Basically, it happens as fluid can overheat under the heavy braking that’s how it can form the vapor bubbles and creates a dangerous conditions which is known as brake fade, where you car does not stop as expected to be.
This is why, we have come up with this guide about How to Flush Contaminated Brake Fluid so that you can protect hydraulic pressure from dropping below and improve the braking response as well.
Understand, Why is Flushing Brake Fluid Important?
1. Maintains Proper Hydraulic Pressure
Brake fluid acts as a force carrier (a medium for transmitting power) within your braking system.
When you press the brake pedal, that force does not reach the wheels solely through mechanical means.
Instead, it is converted into hydraulic pressure, which is then transmitted through the brake fluid.
Over time, brake fluid absorbs moisture from the air, even if the system is completely sealed.
This moisture lowers the fluid’s boiling point; this means that under heavy braking, the fluid can overheat significantly, causing tiny steam bubbles to form within it.
Unlike liquid, steam is compressible; consequently, the brake pedal feels soft or spongy when pressed, resulting in reduced braking power.
Flushing the brake fluid eliminates this moisture and restores strong, stable hydraulic pressure, ensuring that the pedal feels firm and responsive every time you apply the brakes.
2. Prevents Internal Corrosion of Brake Components
Inside the braking system, metal components such as: brake lines, caliper pistons and the master cylinder, are constantly in contact with the brake fluid.
When moisture accumulates in the fluid, it initiates a slow chemical reaction that causes internal corrosion within these components, leading to their deterioration.
This corrosion is not visible from the outside; rather, it occurs internally, gradually degrading seals, obstructing fluid flow and weakening the system from within.
Over time, this can lead to issues such as leaks or a decline in braking performance.
Regularly flushing the fluid removes contaminants and moisture, thereby protecting internal components from corrosion over the long term and ensuring that the system remains clean and stable.
3. Extends the Lifespan of Calipers, Master Cylinders and ABS Systems
Brake system components are designed to operate using clean and stable hydraulic fluid.
When old or contaminated fluid remains in the system, it increases internal friction and places excessive strain on moving parts such as the calipers and master cylinder.
In modern vehicles, the ABS system is even more sensitive, as it relies on precise fluid pressure control to prevent the wheels from locking up during braking.
Contaminated fluid can cause delayed responses or irregular pressure fluctuations within these systems.
By regularly flushing the brake fluid, you minimize internal wear on these components, extend the life of the seals and ensure that expensive parts such as: the ABS module, continue to function correctly for many years to come.
4. Ensures Consistent and Safe Braking Performance
One of the most critical reasons for flushing brake fluid is to ensure that braking performance remains reliable and safe under all driving conditions.
When you depress the brake pedal, fresh brake fluid responds instantly and applies uniform pressure to all wheels.
Conversely, degraded fluid can behave unpredictably, particularly when it heats up or contains trapped air and moisture.
As a result, problems such as uneven braking, increased stopping distances, or loss of vehicle control during emergency braking situations may arise.
A properly flushed brake system ensures that every stage of the braking process is smooth, balanced and reliable, thereby directly enhancing overall driving safety and confidence.
Tools
| Tool or Material | Why It Is Needed | How to Use It |
|---|---|---|
| Fresh Brake Fluid – DOT 3, DOT 4, or Manufacturer-Specified | This tool applies pressure within the brake system and restores safe braking performance by replacing old, degraded fluid. | Consult your vehicle’s manual, carefully remove the reservoir cap and ensure that you fill it only with the correct type of fluid during the flushing process. |
| Brake Bleeder Kit or Vacuum Pump | This simplifies the flushing process and ensures that no air gets trapped in the system, as trapped air can compromise braking effectiveness. | Connect this device to the bleeder valve and apply suction or pressure to expel the old fluid from each brake line. |
| Wrench Set – For Bleeder Valves | This tool is essential for safely opening and closing the bleeder valve, without damaging the fittings, while the fluid is draining. | Fit the correct-sized wrench onto the bleeder valve and turn it gently to open or close the fluid flow. |
| Clear Plastic Tubing | This allows you to monitor the expulsion of old fluid and air bubbles, giving you a precise indication of when the system has been thoroughly purged. | Connect one end of the tubing to the bleeder valve and place the other end into a container holding a small amount of brake fluid. |
| Catch Container | This prevents brake fluid from spilling onto the ground and facilitates the safe and proper disposal of the old, degraded fluid. | Keep the tubing submerged in the container while bleeding the air from each brake line. |
| Jack and Jack Stands | These tools are required to remove the wheels, thereby providing access to the brake calipers and bleeder valves. | Use a jack to lift the vehicle and always secure it with jack stands before working underneath the vehicle or near the wheels. |
| Gloves and Safety Goggles | Brake fluid is highly corrosive and can cause damage to skin, paint and eyes; therefore, safety is paramount. | Wear gloves before handling any fluids and use safety goggles to protect against splashes while bleeding the brakes. |
| Shop Rags or Paper Towels | These are used to immediately clean up spilled fluid and to prevent brake fluid from damaging the vehicle’s paintwork or surfaces. | Keep them close at hand throughout the entire process to wipe up any drips, spills, or residual fluid. |
How to Ensure Safety By Taking All the Necessary Precautions Before Flushing Brake Fluid
1. Work on a Level Surface
Before initiating any brake fluid flushing procedure, it is crucial that you park your vehicle on a level and stable surface.
A level surface ensures that the vehicle does not roll or shift while being lifted, thereby maintaining full control throughout the operation.
Lifting a vehicle on uneven ground can render it unstable, significantly increasing the risk of accidents.
A stable working position also aids in maintaining the correct brake fluid levels during the bleeding process, as a tilted vehicle can affect the flow of fluid within the reservoir and brake lines.
2. Use Proper Jack Stands – Never Rely Solely on the Jack
A hydraulic jack is designed solely for lifting a vehicle, not for supporting it over an extended period.
Once the vehicle has been lifted, it must always be supported by sturdy jack stands placed at the designated lifting points.
Relying solely on the jack can be hazardous, as its hydraulic pressure may gradually bleed off or its mechanism could fail, causing the vehicle to drop suddenly.
Jack stands provide a stable and robust support system, keeping the vehicle safely elevated while you work on the wheels and brake system.
This step is absolutely essential for personal safety and must never be overlooked.
3. Prevent Brake Fluid Spills – It Can Damage Paint
Brake fluid is highly corrosive to painted surfaces; if not cleaned up immediately, it can rapidly degrade the vehicle’s paintwork.
Even a single drop of fluid can leave a permanent stain or cause discoloration on the vehicle’s body.
During the flushing process, caution must be exercised when opening the reservoir and handling hoses or containers to prevent fluid leakage.
If any fluid spills, it should be wiped up immediately using a clean cloth and water.
Protecting the paintwork is crucial, as repairing damage caused by brake fluid can be both expensive and difficult later on.
4. Wear Gloves and Eye Protection
Brake fluid can cause skin irritation and can be particularly harmful if it comes into contact with the eyes.
Prolonged exposure may also lead to skin dryness or discomfort.
Wearing protective gloves prevents direct contact while handling the fluid and brake components.
Safety goggles are equally important, as they protect your eyes from sudden splashes of fluid when opening bleeder valves or removing tubing.
These simple safety measures significantly reduce the risk of injury and make the entire process safer and more comfortable.
5. Use Only the Correct Type of Brake Fluid
Different vehicles require specific types of brake fluid such as: DOT 3, DOT 4, or the specific type recommended by the manufacturer.
Using the wrong type of brake fluid can negatively impact braking performance and may even damage the internal seals within the brake system.
Mixing different types of brake fluids can reduce their effectiveness and create safety risks in high-temperature conditions.
Always consult the vehicle owner’s manual or check the reservoir cap before adding or replacing fluid.
Using the correct brake fluid ensures proper chemical compatibility, stable hydraulic pressure and the long-term reliability of the braking system.
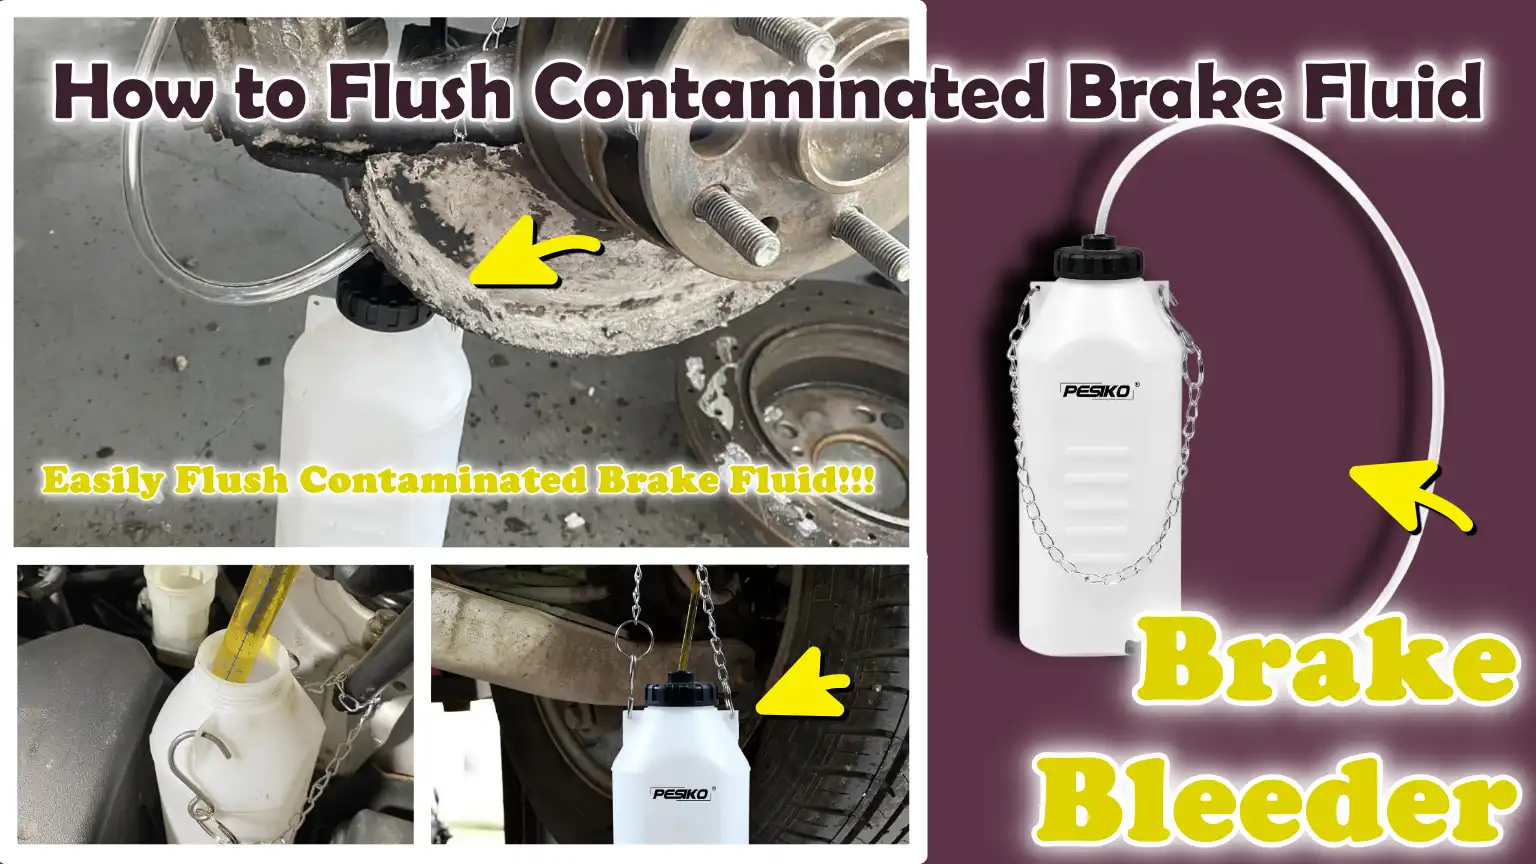
How to Flush Contaminated Brake Fluid – Best Method to Flush
1. Locate the Brake Fluid Reservoir
The brake fluid reservoir is a small plastic container that holds the hydraulic fluid for your entire braking system.
In most vehicles, it is located at the rear of the engine bay, near the firewall on the driver’s side.
It typically features a clearly marked cap bearing brake fluid symbols or warnings.
Before opening it, you should carefully clean the area surrounding the cap, as even tiny dust particles entering the system can contaminate the fluid.
Keeping the opening clean is crucial, as brake systems are highly sensitive to dust and moisture.
2. Extract Old Brake Fluid from the Reservoir
To begin the flushing process, you must first extract the old fluid from the reservoir using a clean turkey baster or syringe.
This helps remove the portion of the fluid that has degraded the most and settled at the top.
It is important to note that the tank should not be completely emptied, as doing so could allow air to enter the brake system.
The presence of air in the system can cause the brake pedal to feel spongy and compromise braking efficiency.
Leaving a small amount of fluid inside helps maintain the integrity of the system as you prepare to refill it.
3. Refill with Fresh Brake Fluid
After extracting the old fluid, the tank should be refilled with the correct type of fresh brake fluid, in accordance with the vehicle manufacturer’s recommendations.
The fluid level should be filled up to the “MAX” mark line, but not beyond it.
Leaving the cap slightly loose helps prevent dust or moisture from entering the tank, while also ensuring that it can be easily opened during the subsequent bleeding process.
Using fresh fluid is crucial, as it restores proper hydraulic pressure and ensures consistent, reliable brake performance.
4. Lift the Vehicle and Remove the Wheels
The next step involves safely lifting the vehicle using a jack and securing it by placing jack stands at the appropriate support points.
This is essential, as it provides easy access to all the wheels and brake components.
Once the vehicle has been safely elevated, the wheels must be removed to clearly expose the brake calipers and bleeder valves.
This step paves the way for safely and effectively purging the old fluid from each brake line.
5. Determine the Bleeding Sequence
To effectively purge air and old fluid from the entire system, the brake bleeding process must be performed in a specific sequence.
In most vehicles, this process begins with the wheel located farthest from the master cylinder, as this is where the fluid takes the longest to reach.
A common bleeding sequence is as follows: first the rear right wheel, then the rear left, followed by the front right and finally the front left.
Following the correct sequence ensures that air is expelled uniformly and that no contaminants remain within the system.
6. Connect a Tube to the Bleeder Valve
A clean plastic tube should be securely attached to the bleeder valve located on the brake caliper.
The other end of the tube should be placed into a clean container designated for collecting the old brake fluid.
It is essential that the end of the tube remains submerged in a small amount of brake fluid already present in the container.
This prevents air from being drawn back into the brake system during the bleeding process, thereby ensuring a consistent and controlled flow of fluid.
7. Bleed the Brake System
In this step, an assistant slowly depresses the brake pedal while the bleeder valve is slightly open.
The old, contaminated fluid will begin to flow out through the tube.
Before releasing the brake pedal, the bleeder valve must be closed to prevent air from entering the system.
This process is repeated several times until the fluid flowing out is clear and no air bubbles are visible.
This step is crucial, as it expels both the old fluid and any trapped air, thereby restoring proper hydraulic pressure.
8. Monitor the Reservoir Level
While bleeding each brake line, the fluid level in the reservoir must be continuously monitored.
It is essential that the reservoir never runs completely dry; doing so would allow air to enter the entire brake system, making the process significantly more difficult.
To maintain a consistent fluid level, fresh brake fluid should be added periodically.
This ensures that proper fluid pressure is maintained within the system throughout the bleeding process.
9. Repeat the Process for All Wheels
The bleeding procedure must be repeated for each wheel in the correct sequence.
Each wheel should be bled until the fluid runs clear and no air bubbles are visible in the tube.
Maintaining consistency throughout this entire process is crucial, as even a small amount of residual old fluid or trapped air can compromise braking performance.
Properly completing the bleeding procedure for all four wheels ensures that the entire system has been thoroughly refreshed and balanced.
10. Final Top-up and Seal
Once all wheels have been bled, the brake fluid reservoir should be refilled to the correct level indicated on the container.
Subsequently, the cap must be securely tightened to prevent any moisture or contaminants from entering the system.
This final step ensures that the brake system is completely sealed, properly filled and ready for safe and reliable operation.
So, How to Determine When the Flush is Complete?
1. The Outflowing Fluid Should Be Clear and Bubble-Free
The most reliable indication that a brake fluid flush is complete is when the fluid exiting the bleeder valve becomes clear and consistent.
At the beginning of this process, the fluid is typically dark, cloudy, or contaminated with debris, as it has absorbed moisture and impurities over time.
During a proper flush, this old fluid is gradually replaced by fresh fluid flowing from the reservoir.
When the exiting fluid becomes clear, or a light amber color, and flows smoothly without interruption, it signifies that the old, dirty fluid has been completely expelled.
Another crucial indicator is the absence of air bubbles in the stream of fluid.
The presence of air bubbles suggests that air is still trapped inside the brake lines, which can compromise hydraulic pressure.
When the fluid begins to flow in a steady, bubble-free stream, it signals that both air and impurities have been successfully purged from that section of the system.
2. The Brake Pedal Should Feel Firm and Responsive
Following a proper brake fluid flush, the brake pedal should feel significantly firmer and more stable when depressed.
A contaminated or air-filled brake system often causes the pedal to feel soft, spongy, or less responsive, as hydraulic pressure is not being transmitted efficiently.
Once the system is fully flushed and free of air, the brake fluid instantly transmits pressure from the pedal to the brake calipers.
The result is that the pedal travels a shorter distance and provides a more solid, firm sensation underfoot.
In actual driving conditions, this improvement means that the driver can apply consistent braking pressure with greater control and confidence.
A firm brake pedal is one of the most concrete practical indicators that the hydraulic system is once again functioning correctly.
3. No Change in the Color of the Outflowing Fluid
Another clear indication that the flush is complete is the appearance of the fluid flowing out of each brake line.
Contaminated brake fluid is typically dark brown, black, or cloudy, a result of moisture absorption, internal rust particles and rubber debris shedding from aging components.
As the flushing process progresses, this discolored fluid is replaced by fresh fluid, which is clear or light amber in color.
When the fluid flowing from all wheels consistently appears clear, it signifies that the old, degraded fluid has been completely purged from the entire system.
This is crucial, as even a small amount of residual old fluid remaining within the system can compromise overall braking performance.
A completely uniform fluid color confirms that the entire brake system has been properly refreshed and is ready for safe operation.
Understand, Common Mistakes to Avoid Them While Flushing Contaminated Brake Fluid
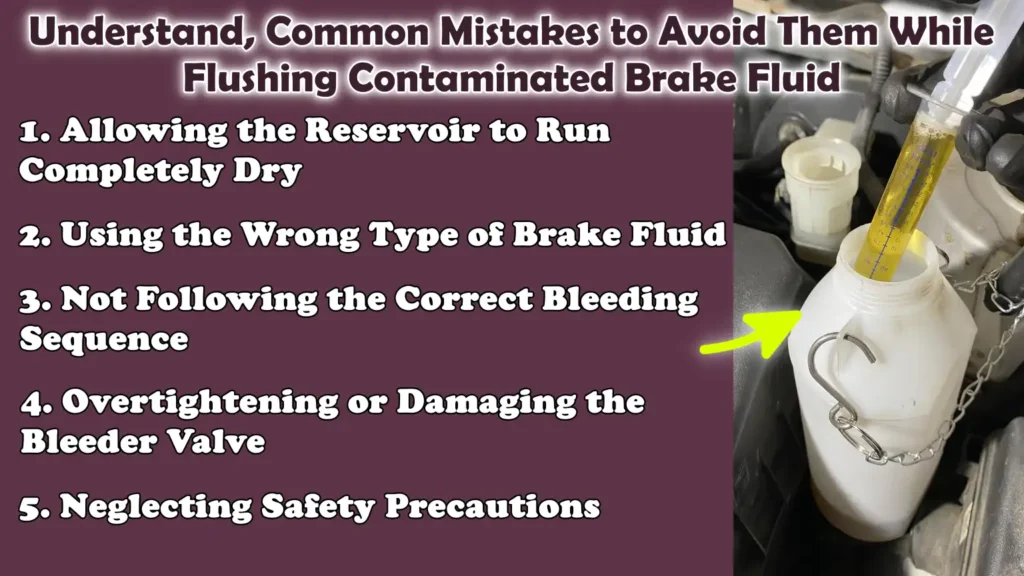
1. Allowing the Reservoir to Run Completely Dry
One of the most serious mistakes when flushing brake fluid is allowing the brake fluid reservoir to run completely dry.
The brake system relies on a continuous flow of fluid to maintain hydraulic pressure.
When the reservoir empties, air enters the master cylinder and brake lines, which can cause the brake pedal to feel very soft or fail to work at all.
Removing this trapped air is far more difficult than preventing it from entering in the first place; it often requires repeatedly bleeding the entire system.
Keeping the reservoir topped up at all times ensures that air does not enter the system and that hydraulic pressure remains stable throughout the entire process.
2. Using the Wrong Type of Brake Fluid
Using the wrong type of brake fluid is another serious error that can damage the entire braking system.
Different vehicles require specific fluids such as: DOT 3, DOT 4, or a manufacturer-approved type, all of which possess distinct boiling points and chemical properties.
Mixing incompatible fluids can lead to chemical breakdown, reduced braking performance and damage to the rubber seals within the system.
In some cases, it can even cause the fluid to thicken or lead to corrosion.
Always checking the vehicle’s owner’s manual or the reservoir cap ensures that the correct fluid is used, thereby helping to maintain safe pressure levels and the proper functioning of the system.
3. Not Following the Correct Bleeding Sequence
Following a specific sequence when bleeding the brakes is mandatory to ensure that all air and old fluid are efficiently expelled from the system.
If the sequence is incorrect, air bubbles may remain trapped in certain brake lines, particularly in longer hydraulic lines.
This can result in uneven braking, where some wheels react more quickly than others.
Typically, this process begins with the wheel located farthest from the master cylinder and proceeds sequentially toward the wheels situated closer to it.
Disregarding this sequence can destabilize the system and may necessitate repeating the entire procedure; this wastes both time and fluid, while also posing a risk of unsafe braking performance.
4. Overtightening or Damaging the Bleeder Valve
Bleeder valves are small yet delicate components that allow for the controlled expulsion of brake fluid and air.
Applying excessive force while opening or tightening them can strip their threads or damage the valve seat.
Once compromised, the valve may leak air or fluid, thereby diminishing braking efficiency and creating a safety hazard.
It is crucial to use a correctly sized wrench and apply only light, controlled pressure.
Proper handling ensures that the valve seals completely when closed and continues to function correctly during future maintenance procedures.
5. Neglecting Safety Precautions
Skipping basic safety steps during a brake fluid flush can pose serious risks.
Brake fluid is corrosive; if handled carelessly, it can damage the skin, eyes and the vehicle’s paintwork.
Working underneath a vehicle without proper support can also lead to accidents should the vehicle shift or fall.
Failing to wear gloves or safety goggles increases the risk of injury in the event of a sudden fluid spill.
Adhering to safety precautions such as: using jack stands, wearing protective clothing and keeping the workspace clean, ensures that this process is not only effective but also safe for the individual performing it.
Read More:
- How to Check Brake Fluid Contamination Level
- How to Fix Brake Bias Issues
- How to Test Brake Proportioning Valve
- How to Replace a Brake Light Switch
- How to Diagnose Brake Light Switch Failure
- How to Fix Intermittent ABS Activation
- How to Clean ABS Wheel Speed Sensor
- How to Diagnose ABS Sensor Wiring Issues
- How to Test Electronic Brake Module (EBCM)
- How to Fix Parking Brake Dragging
- How to Adjust Parking Brake Cable
- How to Check Parking Brake Cable Tension
- How to Fix Brakes Dragging While Driving
- How to Diagnose Brake Dragging Issue
- How to Fix Internal Master Cylinder Leak
Know, Difference Between Manual vs Vacuum vs Pressure Bleeding
Brake bleeding is a procedure involving the removal of old brake fluid and trapped air from a hydraulic system.
It can be performed using various methods, depending on the tools employed, the technician’s skill level and the specific requirements of the vehicle.
Each method operates on the same fundamental principle, forcing fluid through the brake lines, but they differ in the techniques used to generate and regulate the necessary pressure.
Selecting the appropriate method is crucial, as the presence of air within the system can diminish braking power, cause the brake pedal to feel spongy (soft) when depressed and ultimately compromise the overall safety of the vehicle.
1. Manual Bleeding
Manual bleeding is the most traditional and widely utilized method for routine brake maintenance.
In this technique, one person sits inside the vehicle and slowly depresses the brake pedal, while a second person simultaneously opens and closes the bleeder valves located at each wheel.
The pressure applied by foot forces the old fluid and trapped air out through the brake lines.
The primary advantage of this method is its simplicity and the fact that it requires no expensive specialized tools, making it an excellent option for DIY enthusiasts working at home.
However, it necessitates the assistance of a partner to coordinate the actions of depressing the pedal and opening/closing the valves.
Furthermore, if the bleeder valve is not properly closed before the brake pedal is released, improper timing can sometimes result in air being drawn back into the system.
2. Vacuum Bleeding
In vacuum bleeding, a hand-operated pump or an electric vacuum tool connected to the bleeder valve is used to extract brake fluid from the system.
Rather than relying on pedal pressure, this method creates suction at the wheel cylinder, effectively drawing out old fluid and trapped air.
A key advantage of vacuum bleeding is that it can be performed by a single person, making the task significantly easier in a workshop or garage setting.
It also maintains a continuous flow of fluid, allowing the entire process to be completed more quickly.
However, if the connection between the tool and the bleeder valve is not properly sealed, outside air can be drawn into the system.
This can create a false indication of trapped air within the brake lines, thereby compromising the accuracy of the procedure.
3. Pressure Bleeding
Pressure bleeding is a more modern and efficient method that utilizes a specialized tool to apply direct and constant pressure to the brake fluid reservoir.
As a result, fluid begins to flow throughout the entire braking system without the need to depress the brake pedal.
The greatest advantage of this method lies in its speed and consistency, as it ensures a smooth and continuous flow of fluid through all brake lines, thereby minimizing the likelihood of air bubbles forming.
It is typically employed in professional repair shops, as it yields reliable results, particularly in modern vehicles equipped with ABS systems.
One drawback of this method is that it requires specialized equipment, making it less practical for general or occasional home use.
Understand, When to Flush Brake Fluid?
Brake fluid does not last forever, even though it resides within a sealed system.
Over time, it absorbs moisture from the air and gradually loses its ability to withstand heat and pressure.
This degradation occurs gradually, so many drivers do not notice it until their braking performance begins to diminish.
Knowing when to flush your brake fluid is crucial, as it helps maintain safe braking capabilities, prevent internal damage and ensure that the hydraulic system continues to function exactly as it was designed.
Additionally, there’s research that found out that vehicles with the aged fluid had noticeably lower boiling points, which directly impacts on the braking safety, that clearly means that as the fluid gets older and older then it literally becomes less effective at handling heat and pressure as well, that’s why flushing the brake fluid at the regular time interval actually helps you to restore that great performance and prevents hidden degradation inside the braking system as well.[¹]
1. Every 2 Years – General Recommendation
Most vehicle manufacturers and automotive safety guidelines recommend flushing brake fluid every two years, although this timeframe may vary depending on driving conditions and climate.
The reason for this interval is that brake fluid is hygroscopic, meaning it absorbs moisture over time, even while inside a sealed system.
After approximately two years, enough moisture can accumulate to lower the fluid’s boiling point, thereby increasing the risk of it vaporizing (turning into steam) during heavy braking.
This can compromise braking efficiency and cause the brake pedal to feel soft or spongy when depressed.
Regularly flushing the system within this timeframe ensures that the fluid remains stable, clean and capable of safely handling the extreme heat generated during braking.
2. After Brake System Repairs
Brake fluid should always be flushed or replaced following major repairs to the brake system or after replacing any of its components.
This includes work performed on components such as brake calipers, master cylinders, brake lines, or ABS modules.
During repairs, the system is often opened up, allowing air and contaminants to enter the fluid.
Even a small amount of trapped air or residual old fluid remaining alongside new components can compromise hydraulic efficiency and disrupt braking balance.
Flushing the system after repairs ensures that the entire circuit is filled with fresh fluid, allowing all components to function smoothly in unison and restoring proper pressure distribution across all wheels.
3. If the Fluid Appears Dirty
The most obvious indication that a brake fluid flush is needed is when the fluid appears dirty.
Healthy brake fluid is typically clear or a light amber (golden-brown) color.
When it turns dark brown or black, it signifies that it has absorbed moisture and that internal contaminants have accumulated due to the degradation of rubber seals and corrosion within metal components.
Contaminated fluid is unable to maintain the correct pressure or heat-resistance capabilities, which can lead to diminished braking performance and accelerated internal wear and tear.
If the fluid appears dirty or cloudy when viewed in the reservoir, it is a definitive sign that the system requires a complete flush to restore it to a safe and proper working condition.
4. After Incidents of Excessive Heat or Brake Failure
It is absolutely critical to flush the brake fluid following any incident involving excessive heat or brake failure.
Such situations can arise while driving down long, steep inclines, towing heavy loads, or engaging in heavy braking, all of which place continuous, extreme stress on the system.
When brake fluid becomes excessively hot, it can reach or even exceed its boiling point, leading to the formation of vapor bubbles within the brake lines.
This condition results in a loss of hydraulic pressure, causing the brake pedal to feel soft or spongy.
Even if braking performance subsequently appears to return to normal, the fluid itself may have sustained irreversible internal damage.
Following such incidents, flushing the system removes the heat-degraded fluid and restores the proper resistance to boiling, thereby ensuring that the system remains safe and reliable, even in the future, under conditions of extreme braking stress.
Estimated, Cost of a Brake Fluid Flush
1. Estimated Cost of DIY – Do-It-Yourself
Performing a brake fluid flush at home is typically the most economical option, as you primarily only have to pay for the necessary supplies (materials).
In most cases, the cost depends on the type and quantity of brake fluid required; a complete flush usually necessitates one to two liters of fluid.
Common brake fluids, such as DOT 3 or DOT 4, are generally inexpensive, whereas high-performance or specialty-brand fluids can be more costly.
When you undertake this task yourself, the total cost remains significantly lower because no labor charges are involved.
However, if you do not already possess basic tools such as: a bleeder kit or tubing, purchasing them becomes necessary; having the right tools ensures that the system is thoroughly purged and remains free of any air bubbles.
2. Cost Range for Professional Service
Opting for a professional mechanic or service center results in a higher cost, as it incorporates expenses for labor, expertise and specialized equipment.
The cost of a professional brake fluid flush service typically varies depending on the workshop, the type of vehicle and the geographic location.
This service typically involves draining the old fluid, bleeding all four brake lines (to expel air) and refilling the system with fresh fluid.
For vehicles equipped with modern braking systems such as: ABS, professional service is often the preferred choice, as technicians utilize pressure or vacuum machines to achieve more precise results.
Although this method entails a higher cost compared to a DIY approach, it offers the convenience of professional service and significantly minimizes the risk of errors during the procedure.
3. Factors Influencing Cost – Vehicle Type, Fluid Type, Labor
The final cost of a brake fluid flush can vary significantly depending on several key factors.
The type of vehicle plays a major role, as larger vehicles, luxury cars, or performance models often require a greater volume of brake fluid, and, at times, specialized procedures as well.
The type of brake fluid used also impacts the cost; standard fluids are more economical, whereas high-temperature-resistant or synthetic fluids tend to be more expensive.
Labor charges constitute another crucial aspect, particularly in the case of professional services, where rates depend on the workshop’s location, the technician’s experience and the complexity of the braking system.
Vehicles equipped with ABS or modern electronic braking systems may require more time and precision, thereby increasing the overall cost of the service.
Learn, Pro Tips for Great Results While Flushing Contaminated Brake Fluid
1. Always Use High-Quality Brake Fluid
Using high-quality brake fluid is one of the most critical steps in ensuring long-term braking safety and performance.
Whenever you apply the brakes, the fluid operates under immense heat and pressure; if the fluid is of poor quality or incorrect specification, it can degrade rapidly, absorb moisture quickly and lose its ability to maintain robust hydraulic pressure.
High-quality fluid possesses a higher boiling point, which significantly reduces the risk of “vapor lock” (fluid vaporization) during heavy braking or while driving on steep inclines.
This ensures that the brake pedal remains firm and responsive, even under extreme pressure.
Selecting the specific fluid specifications recommended by the vehicle manufacturer guarantees compatibility with seals, ABS components and internal brake parts, thereby ensuring that the entire system operates smoothly and reliably.
2. Flush the Entire System, Not Just the Reservoir
A common mistake made during maintenance is replacing only the fluid present in the reservoir, while old, degraded fluid remains trapped within the brake lines.
This approach fails to fully resolve the issue, as the majority of contaminated fluid and air bubbles remain deeply lodged within the internal components of the system.
Over time, this can lead to corrosion, inconsistent braking performance and a compromised ability to bring the vehicle to a stop.
Flushing the entire system ensures that the complete hydraulic circuit, including all brake lines, calipers and internal passages, is thoroughly purged of old fluid and refilled with fresh fluid.
This complete fluid exchange is essential for maintaining consistent hydraulic pressure and ensuring that equal braking force is applied to all wheels.
3. Keep the System as Sealed as Possible
Brake fluid is highly sensitive to moisture, as it naturally absorbs water from the air.
Even brief exposure to air during maintenance can gradually degrade its boiling point and performance.
For this reason, it is crucial to keep the brake system as sealed as possible during the flushing process.
The reservoir cap should be opened only when absolutely necessary; and when you are not actively adding fluid, it should be loosely reattached.
To prevent fluid contamination, its container and any associated tubing should also be kept clean and covered.
Minimizing exposure to air and contaminants preserves the quality of the fluid and ensures that the system remains stable following the flush.
4. Dispose of Old Fluid Properly
Old brake fluid should never be reused, nor should it be discarded directly into the environment, as it is classified as hazardous waste due to its chemical composition and the impurities it contains.
It may contain moisture, metal particles and degraded rubber fragments from within the brake system.
Improper disposal can cause harm to soil, water sources and the surrounding environment.
Instead, used brake fluid should be collected in a sealed container and transported to an authorized recycling center, automotive workshop, or hazardous waste disposal facility.
Proper disposal not only safeguards the environment but also ensures that chemical waste is handled safely, a practice consistent with responsible automotive maintenance methods.
Conclusion – How to Flush Contaminated Brake Fluid
That simple fluid change literally enhances the effectiveness of proper braking during sudden stops and maintain the brake performance as well.
Whenever you depress the brake pedal, brake fluid plays a quiet yet vital role and its condition directly impacts how quickly and safely your vehicle comes to a halt.
Over time, due to moisture absorption, exposure to heat and internal wear, its operational efficiency gradually diminishes, often without any obvious warning signs.
This is why many brake-related issues develop insidiously, going unnoticed until the system begins to feel weak, spongy, or unresponsive.
By replacing old fluid with fresh, clean brake fluid, you restore proper hydraulic pressure, enhance brake responsiveness and mitigate the risk of internal corrosion, damage that could otherwise ruin expensive components such as the master cylinder, calipers and ABS system.
A properly flushed brake system also makes the vehicle’s stopping performance more reliable, particularly in emergency situations where every second counts.
This simple maintenance step helps maintain balance across all wheels, ensuring that the vehicle can stop smoothly and safely under various driving conditions.
Understanding when and how to replace brake fluid not only helps you avoid costly repairs in the long run but also significantly improves the overall reliability of your braking system.
Whether this task is performed at home or entrusted to a professional, the objective remains the same: to keep the hydraulic system clean, stable and efficient.
Now, that is all from this guide and now you can even ask all the related questions below.
Frequently Asked Questions
FAQ 1: What is bad brake fluid?
Answer: Bad brake fluid is brake fluid that has absorbed moisture, dirt, or internal metal particles over time. Brake fluid naturally draws water from the air, which gradually degrades its quality. When it deteriorates, it cannot handle heat effectively and may lose its ability to maintain proper brake pressure. This can result in a soft brake pedal, reduced stopping power and unsafe driving conditions.
FAQ 2: How can I tell if my brake fluid has gone bad?
Answer: You can identify bad brake fluid by its color and the feel of the brakes when applied. Good brake fluid is typically clear or light amber in color. If it appears dark brown or black, it is likely that it has deteriorated. You may notice a soft or spongy brake pedal, increased stopping distances, or inconsistent braking performance. These signs indicate that the fluid is no longer functioning correctly and may need to be replaced (flushed).
FAQ 3: Can I drive with bad brake fluid?
Answer: Driving with bad brake fluid for an extended period is unsafe. Although the vehicle may still come to a stop, braking performance becomes less reliable. Under heavy braking, the fluid can easily overheat and lose pressure. This increases the risk of “brake fade”, a condition where the brakes do not perform as expected. Driving in such a condition should be avoided, specially at high speeds or in emergency situations.
FAQ 4: How often should brake fluid be replaced/flushed?
Answer: Most manufacturers recommend changing brake fluid every two years, although this may vary depending on driving conditions. If you drive in humid climates, in heavy traffic, or frequently engage in hard braking, you may need to replace it more often. Regular fluid replacement ensures that moisture and contaminants do not accumulate, thereby keeping the braking system robust and responsive.
FAQ 5: What happens if I never change the brake fluid?
Answer: If brake fluid is never changed, it gradually degrades due to accumulated moisture and internal contaminants. This can lead to corrosion inside the brake lines, damage to the master cylinder and compromised ABS performance. Over time, braking efficiency will diminish and the risk of brake failure will increase. The cost of repairing damaged components is typically far higher than the cost of routine fluid maintenance.
FAQ 6: Is it difficult to change brake fluid at home?
Answer: Brake fluid can indeed be changed at home, but it requires caution and attention to detail. You will need a few basic tools such as: wrenches, tubing and fresh brake fluid, and you must follow the correct bleeding sequence. Most importantly, you must ensure that air does not enter the system and that the reservoir does not run dry. If performed carefully, it is a straightforward task; however, for first-timers, seeking assistance from a professional may be a safer option.
FAQ 7: What type of brake fluid should I use?
Answer: You should always use the specific type of brake fluid recommended by your vehicle’s manufacturer. Common types of brake fluid include DOT 3 and DOT 4, which possess distinct boiling points and chemical properties. Using the incorrect type of fluid, or mixing different fluids together, can compromise braking efficiency and damage internal seals. Using the correct fluid helps maintain safe pressure levels, ensures proper heat resistance and extends the lifespan of the braking system.
FAQ 8: Why does brake fluid absorb moisture?
Answer: Brake fluid absorbs moisture because it is designed to be hygroscopic (moisture-absorbing). This property prevents water from pooling in a single location; however, it also means that the fluid gradually absorbs moisture from the surrounding air. Even a small amount of moisture can lower the fluid’s boiling point, potentially degrading braking performance and causing corrosion within the internal components of the system.
References:
[1] Measurement of Brake Fluid Boiling Point
https://www.researchgate.net/publication/391853765_Measurement_of_Brake_Fluid_Boiling_Point

Hello Folks, Dean Shali here to help you out to solve the problems with your lovely vehicle, as i have lots of experience and knowledge about automotive industry as i woks directly with the customers and repair vehicles and i love to help the people to keep their cars safe and running smoothly.