Written By: Dean Shali
Fact Checked By: Sabré Cook
Reviewed By: Tamara Warren
There are many drivers that actually carries a “TIRE PLUG KIT” with them, but very few really knows how to use it in correct and easy way.
Most of the time: tire problems often begins with the something small such as: nail or screw stuck in that damn tread and that slowly letting air escape over the few hours or even days as well.
And, because it doesn’t give any necessary warning signs in early way, that’s why that single thing makes it very dangerous.
This is the reason that you need to know How to Use Tire Plug Kit Correctly so that you can actually seal that small puncture in quick fashion and restore enough pressure to get you safely back on the road without waiting for the roadside assistance to come and do that same thing.
Know, What is a Tire Plug Kit?
A tire plug kit is a convenient roadside repair solution designed to fix minor punctures located within the tire tread (the surface of the tire that comes into contact with the road).
Its primary feature is that it allows for repairs to be performed without the need to remove the tire from the wheel.
It is typically used when a nail, screw, or a similar sharp object penetrates the tire, causing air to leak out slowly or at a moderate rate.
In short, while driving, specially on highways, even a slight drop in air pressure can disrupt the tire’s balance, increase the braking distance required to bring the vehicle to a halt and, over time, lead to uneven tire wear.
A tire plug kit helps temporarily restore air pressure, enabling you to safely drive your vehicle to a workshop where a permanent repair can be performed.
Although it is not a complete substitute for a professional tire patch, when used correctly, and only for appropriate types of damage, it is considered an effective emergency tool.
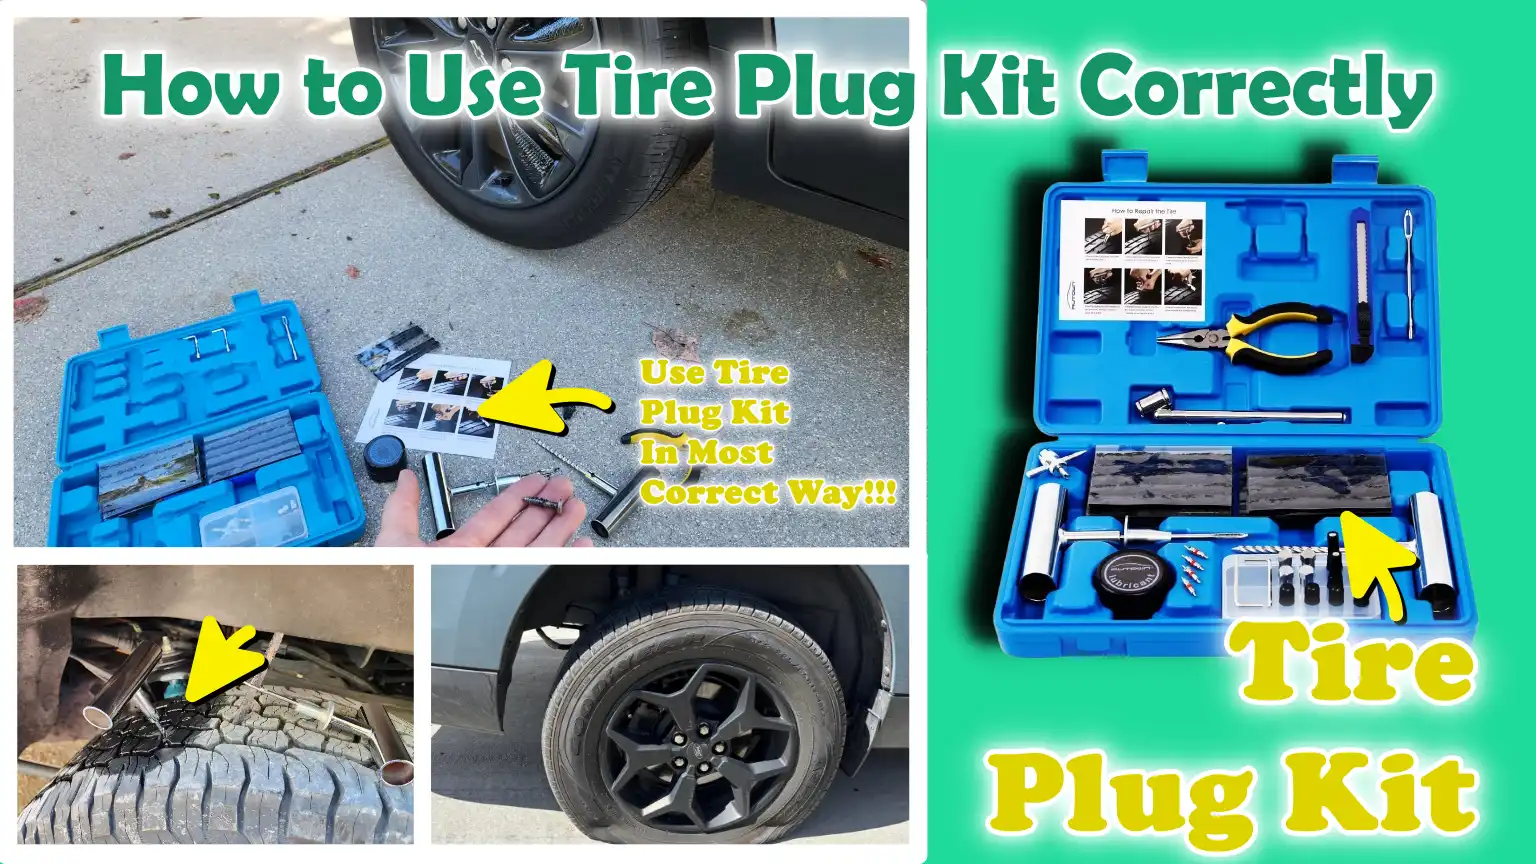
1. Brief Overview of Key Components
A tire plug kit consists of a few simple tools, each playing a crucial role in properly repairing a puncture.
Understanding these components is essential to ensure that the repair is executed safely and effectively, thereby minimizing the risk of air leakage or plug failure.
Reaming Tool – Hole Cleaning Tool
The reaming tool is the first instrument used to clean out the puncture hole and slightly enlarge it.
This step is critical because it removes any residual debris, rust, or foreign particles left behind by the object that damaged the tire.
It also creates a smooth and uniform channel within the tire’s rubber, allowing the plug to fit securely.
If this step is skipped, the plug may fail to effectively seal the puncture, thereby increasing the likelihood of air slowly leaking from the tire later on.
Insertion Tool – Plug Applicator
The insertion tool is used to drive the rubber plug deep into the tire at the site of the puncture.
It is designed to firmly grip the plug and guide it into the hole in the correct orientation.
When used correctly, it securely embeds the plug within the tire’s structure, creating a strong mechanical bond that prevents air from escaping.
Rubber Plugs – Repair Strips
Rubber plugs are tacky, flexible strips made from durable rubber material.
They are designed to expand slightly once inserted into the tire, thereby completely filling the puncture site.
Due to their flexibility, they conform to the specific shape of the hole, creating a robust seal inside the tire that helps maintain air pressure during normal driving conditions.
Rubber Cement – Optional, but Recommended
Rubber cement is an adhesive substance that helps bond the plug even more firmly to the interior of the tire.
Although some kits can be used without cement, applying it enhances the strength of the seal and reduces the risk of air leaks over time.
It also facilitates the easy insertion of the plug into the puncture site during the repair process.
2. How Tire Plugs Work
A tire plug functions by physically filling the puncture site within the tire, creating a tight obstruction that prevents air from escaping.
When a plug is inserted, it exerts firm pressure against the inner walls of the hole and, over time, bonds with the inner rubber surface of the tire.
This combined process, involving both pressure and adhesion, forms the seal.
In many cases, as the tire heats up during driving, the plug expands slightly, further strengthening the seal.
It is crucial to understand that a tire plug is generally considered a temporary or short-term repair solution.
While effective for small punctures located within the tire’s tread (surface), plugs cannot fully restore the structural integrity of the tire’s internal framework in the way that a professional internal patch can.
From a practical standpoint, a plug can safely maintain air pressure and allow you to continue driving for a limited time; however, its long-term reliability depends on several factors, such as the size of the puncture, the overall condition of the tire, driving speed and road conditions.
For this reason, most automotive safety guidelines recommend that plugs be used only as a temporary measure, after which the tire should be properly inspected and repaired at a service center.
When You Should & When You Shouldn’t Use a Tire Plug Kit?
Knowing when to use a tire plug kit is just as important as knowing how to use one.
Tire plugs are designed for specific types of damage; using them in inappropriate situations can compromise safety and increase the risk of tire failure.
Generally, tire plugs are intended for small punctures located within the tread area, the section of the tire where the internal structure remains intact.
They are not a one-size-fits-all solution for every type of tire damage.
Understanding this distinction helps drivers make safer decisions and avoid relying on repair methods that are unsuitable for the specific condition of the tire.
1. Ideal Situations
Tire plug kits work best in situations where the damage is limited and localized, specifically, where the tire’s structural integrity remains intact and the issue consists solely of a small puncture.
These are instances where air is escaping through a small hole, but the surrounding rubber and internal layers have not sustained any major damage.
Small punctures, typically less than a quarter of an inch in size, are the most suitable candidates for this type of repair, as the plug can completely fill the hole and create a robust seal without leaving any gaps.
These punctures are often caused by common road debris, such as nails or screws and typically result in a slow leak rather than a sudden blowout.
Damage confined to the tread area also constitutes a safe scenario for using a plug kit, as the tread is the thickest and most durable part of the tire.
Repairs performed in this section are more stable because the plug anchors firmly into the solid rubber material, providing the necessary support during normal driving conditions.
A nail or screw embedded in a tire typically constitutes a repairable situation, specially when the object has penetrated directly through the tread.
In many instances, air leaks from the tire gradually, providing ample time to safely extract the object and insert a plug before the tire goes completely flat.
2. Unsafe Situations
There are certain types of tire damage where using a plug kit is unsafe, regardless of how carefully it is applied.
In such cases, the structural integrity of the tire has already been compromised and a plug cannot restore the strength necessary for safe driving.
Damage to the tire’s sidewall or shoulder represents one of the most dangerous scenarios, as these areas undergo significant flexing (bending) while driving and lack the structural rigidity found in the tire tread.
A plug cannot hold securely in these flexible regions and any attempt to repair them could lead to sudden tire failure while the vehicle is in motion.
Repairing a tire with a plug is also inappropriate in cases of large punctures or blowouts, as the extent of the damage far exceeds the capabilities and structural limitations of a plug.
When a tire sustains a major cut or suffers a sudden blowout, its internal layers are typically destroyed; under such circumstances, relying solely on a simple seal is unsafe.
Heavily worn or deteriorated tires should also never be repaired using a plug kit, as the rubber in such tires has already lost a significant portion of its structural strength.
Even if the puncture appears minor, the overall condition of the tire increases the risk of failure.
In these situations, replacing the tire is the only safe option to ensure proper road grip, stability and braking performance.
Tools
| Tools | Why It Is Needed | How It Is Used |
|---|---|---|
| Tire Plug Kit | This is the primary repair kit used to seal small punctures occurring in the tire’s tread (surface). It is essential because it fills the hole and prevents air from escaping, thereby allowing the tire to regain its internal pressure. | First, the punctured area is cleaned and prepared for repair using the tools provided in the kit. Subsequently, a rubber plug is inserted directly into the hole to stop air leakage and create a robust internal seal. |
| Air Compressor or Portable Inflator | This item is crucial because, following the repair, it is essential to reinflate the tire to the correct air pressure to ensure safe driving. Without the proper pressure, the tire will not wear evenly and may sustain damage. | After inserting the plug, the tire is inflated until it reaches the specific pressure level indicated in the vehicle owner’s manual or on the sticker located on the door frame. |
| Pliers – To Remove Object | These tools are required to safely extract the nail, screw, or other sharp object that caused the puncture. Removing the object provides clear access to the hole, enabling a proper and effective repair. | The object is gently gripped and pulled straight out of the tire tread to prevent the hole from enlarging or causing further damage. |
| Spray Bottle With Soapy Water – For Leak Detection | This item is needed to check whether any air leakage persists after the repair has been completed. It helps confirm that the plug has successfully and effectively sealed the puncture. | Soapy water is sprayed onto the repaired area and the surrounding tread. If bubbles appear, it indicates that air is still leaking and the seal has not been fully established. |
| Tire Pressure Gauge | This device is required to measure the internal air pressure within a tire. Maintaining the correct pressure is essential for safe driving, fuel efficiency and extending the lifespan of the tires. | After inflating the tire, a gauge is pressed against the tire valve to verify whether the pressure corresponds to the specified level and to make adjustments if necessary. |
How to Use Tire Plug Kit Correctly – The Best Method
Tire plug repair is a practical solution for sudden roadside emergencies; however, its success depends on how carefully you follow each step and ensure they are performed in the correct sequence.
The goal is not merely to temporarily halt an air leak, but to create a robust internal seal capable of safely maintaining tire pressure until a proper repair or replacement can be performed.
Each step plays a crucial role in ensuring that the plug remains firmly seated within the tire and does not dislodge while driving.
1. Locate the Puncture
Identifying the exact location of the puncture is the first and most critical step, as overlooking even a minor leak can lead to a failed repair.
Often, the obvious cause of the puncture such as: a nail or screw embedded in the tire tread, is visible to the naked eye.
However, not all punctures are immediately apparent.
In many cases, using soapy water proves to be a more effective method, as small bubbles will begin to form at the precise spot where air is escaping.
These bubbles quickly pinpoint the exact source of the leak, helping you identify the specific area requiring repair.
2. Remove the Object
Once the puncture has been located, the next step is to carefully remove the object causing the air leak, typically a nail or a screw.
Pliers should be used for this task to ensure you can grip the object firmly without accidentally pushing it further into the tire.
It is important to be aware that as soon as you remove the object, air will begin to escape rapidly, specially if the puncture hole is relatively large.
This air leakage is a normal occurrence and serves as an indication that the puncture hole in the tire is now open and ready to be sealed.
By acting swiftly immediately after removing the object, unnecessary loss of tire pressure can be prevented.
3. Prepare the Puncture
After removing the object, it is essential to properly prepare the puncture hole so that the plug can fit securely within it.
This task is performed using a ‘reaming tool’; this tool is inserted into the hole to clean it out and slightly enlarge it.
The purpose of this step is to remove any trapped dust, dirt, or jagged edges from inside the puncture.
It is crucial that the shape of the hole is smooth and uniform, as this allows the rubber plug to grip the tire material more effectively.
If the hole is not properly prepared, the plug will fail to seal it correctly, potentially leading to a slow air leak from the tire over time.
4. Prepare the Plug
Before inserting the plug into the hole, it is necessary to prepare it properly to ensure it slides in easily and adheres firmly to the tire.
First, the plug is loaded into an ‘insertion tool’ (the device used to install the plug); this tool holds the plug firmly in place, allowing it to be inserted into the tire smoothly and without obstruction.
In many repair kits, rubber cement is also applied at this stage to further reinforce the seal.
This cement helps the plug bond more securely to the inner surface of the tire, thereby reducing the risk of air leakage and ensuring the repair lasts longer.
5. Insert the Plug
Next, the plug is firmly inserted into the prepared puncture using steady and consistent pressure.
It is essential to insert it deep enough to completely fill the entire puncture hole from the inside of the tire.
During insertion, a small portion of the plug typically remains protruding from the outer surface (tread) of the tire.
Once the plug is firmly seated in place, the insertion tool is carefully withdrawn, leaving the rubber plug embedded within the tire.
This step creates an initial seal that prevents air from escaping.
6. Trim Excess Plug Material
Once the plug is firmly seated, any excess material protruding from the tire’s surface must be trimmed away.
This is accomplished by cutting the plug flush with the tire’s tread to ensure it does not interfere with driving or become dislodged through contact with the road.
When trimming, be careful not to pull on the plug, as doing so could compromise the internal seal.
The plug should remain firmly anchored inside the tire; only the protruding excess material should be removed.
7. Inflate the Tire
After the repair is complete, it is crucial to inflate the tire to the correct air pressure.
This is essential for the safe operation of the vehicle, even tire wear and fuel efficiency.
The correct tire pressure (PSI) is typically listed on a sticker located on the vehicle’s door frame or in the owner’s manual.
An air compressor or portable inflator is used to bring the tire pressure up to the proper level.
Subsequently, a tire pressure gauge is used to verify that the air pressure is neither too low nor too high.
8. Check for Leaks
The final step is to ensure that the repair is completely sealed.
To do this, soapy water is applied once again to the repaired area.
If no bubbles appear, it indicates that the plug has successfully sealed the puncture and no air is escaping.
If bubbles do appear, it signifies that the seal is incomplete and the repair may need to be redone.
This final check is crucial, as it confirms that the tire is safe to drive on and minimizes the risk of a sudden air leak while on the road.
Know, Some Common Mistakes While Using Tire Plug Kit

Properly utilizing a tire plug kit involves more than just following the prescribed steps; it also entails avoiding minor errors that can compromise the repair or lead to recurring air leaks.
Many instances of plug failure are not due to the ineffectiveness of the kit itself, but rather stem from overlooking necessary precautions during the repair process.
Understanding these common mistakes ensures that the repair is robust, reliable and safe for driving.
1. Failing to Properly Clean/Ream the Hole
One of the most common errors is skipping the reaming step or performing it in haste.
The reaming tool is crucial because it cleans the puncture site and creates a smooth, uniform channel for the plug to enter.
If this step is not executed correctly, the hole may remain jagged or contain embedded debris, preventing the plug from forming a proper seal.
The result is often a slow, persistent air leak or the complete failure of the plug after a short period of driving.
2. Using a Plug on the Tire Sidewall
Another serious mistake is attempting to repair damage located on the tire’s sidewall or shoulder area.
These sections are designed to undergo significant flexing while the vehicle is in motion and their structural composition is not as robust as that of the tire’s central section (the tread).
A plug cannot hold securely within these flexible areas; even if the repair appears effective initially, the risk of sudden and catastrophic failure remains.
Repairing such damage with a plug is not considered a safe practice and in such instances, tire replacement is typically required.
3. Failing to Check for Leaks
Some drivers assume that the repair is complete the moment the plug has been inserted; However, failing to check for leaks poses a significant risk.
Without checking for air leaks, whether by using soapy water or another method, it is impossible to verify that the seal is completely airtight.
Minor leaks may not be immediately apparent, but over time, they can gradually deplete the tire’s pressure, rendering driving unsafe and negatively impacting tire performance.
4. Over-Inflating or Under-inflating the Tire
Failing to maintain the correct tire pressure after a repair is another common mistake.
Over-inflating the tire can increase stress on the repaired area and reduce the tire’s grip on the road; conversely, under-inflation leads to uneven tire wear and carries the risk of the tire overheating while driving.
Both of these conditions compromise tire safety and shorten its lifespan.
To ensure that a plug-based repair functions effectively under actual driving conditions, it is crucial to inflate the tire to the specific pressure recommended by the tire manufacturer.
5. Using Old or Dried-out Plugs
Using old, hardened, or dried-out plugs can also result in a failed repair.
Rubber plugs are designed to remain pliable so that they can expand and form a robust seal at the puncture site.
When they lose this flexibility, they are unable to create a proper airtight seal.
This increases the risk of air leaks and jeopardizes the integrity of the entire repair.
For tire puncture repairs, fresh and flexible plugs always represent the more reliable and safer choice.
Read More:
- How to Repair Tubeless Tire Puncture
- How to Locate a Nail in a Tire
- How to Fix Slow Tire Air Leak
- How to Detect Tire Sidewall Damage
- How to Check Tire Tread Depth at Home
- How to Bleed ABS System Properly
- How to Replace Rusted Brake Lines
- How to Inspect Brake Lines for Rust
- How to Flush Contaminated Brake Fluid
- How to Check Brake Fluid Contamination Level
- How to Fix Brake Bias Issues
- How to Test Brake Proportioning Valve
- How to Replace a Brake Light Switch
- How to Diagnose Brake Light Switch Failure
- How to Fix Intermittent ABS Activation
- How to Clean ABS Wheel Speed Sensor
- How to Diagnose ABS Sensor Wiring Issues
- How to Test Electronic Brake Module (EBCM)
- How to Fix Parking Brake Dragging
- How to Adjust Parking Brake Cable
- How to Check Parking Brake Cable Tension
- How to Fix Brakes Dragging While Driving
- How to Diagnose Brake Dragging Issue
- How to Fix Internal Master Cylinder Leak
How Long Does a Tire Plug Last?
A tire plug is designed as a practical emergency repair, rather than as a completely permanent, long-term solution for the tire.
In actual driving conditions, a properly installed tire plug can last anywhere from a few weeks to several months, and in some cases, even longer, depending on how and where the tire is being used.
However, most automotive safety experts consider it a temporary or semi-permanent solution, as it does not fully restore the tire’s internal structural integrity in the way that an internal patch or comprehensive repair would.
This means that while a plug can effectively stop air leaks for daily driving, its long-term reliability can vary significantly based on several factors.
1. Real-World Lifespan Expectations
Under normal driving conditions such as: driving on city streets and at moderate speeds, a properly installed plug often lasts until a proper, permanent repair can be performed on the tire, thereby allowing for the safe, continued use of the tire in the interim.
Many drivers experience stable performance for weeks, or even a few months, after plugging a small puncture.
However, this is not guaranteed in every case, as tires are constantly exposed to heat, pressure fluctuations and road shocks.
Over time, these factors can gradually weaken the bond between the plug and the tire; this is why it is crucial to check the tire pressure regularly following the repair.
2. Factors Affecting Durability
The lifespan of a tire plug depends on several key factors.
The size and location of the puncture play a significant role, as small punctures situated within the central tread area of the tire are more effectively sealed by a plug compared to larger punctures or those located near the tire’s sidewall.
Driving speed and road conditions also play a crucial part, as high-speed driving generates excessive heat, which can weaken the rubber bonds within the tire.
Changes in weather, particularly extreme heat or cold, as it can also impact how effectively the plug maintains its seal.
Furthermore, the quality of the plug installation is paramount; if the plug is not inserted correctly, whether due to improper cleaning or incorrect technique, the likelihood of it failing prematurely is significantly higher.
3. When to Consider a Professional Patch or Tire Replacement
In most cases, a tire plug should not be viewed as a permanent solution.
If a plugged tire continues to leak air, repeatedly loses pressure, or develops new punctures, it is a clear indication that it requires professional repair.
In many instances, a proper patch applied from the inside at a tire shop provides a stronger and more reliable seal, as the repair is performed directly on the inner surface of the tire.
If the damage is extensive, located on the tire’s sidewall, or if the tire is already significantly worn, completely replacing the tire remains the safest option.
Continuing to drive on a damaged tire increases the risk of sudden tire failure, reduced traction and difficulty maintaining vehicle control, particularly at high speeds.
Know, Tire Plugs vs Tire Patches – What’s the Actual Difference?
Understanding the distinction between tire plugs and tire patches is crucial; although both are used to repair punctures, they function in very different ways and offer varying levels of safety and durability.
Many drivers confuse the two, but choosing the right method depends on the nature of the damage to the tire and how long you expect the repair to last.
Simply put, a plug seals the hole from the outside, whereas a patch repairs the tire from the inside; this makes a significant difference in the structural integrity of the tire and its long-term reliability.
1. Tire Plugs
A tire plug is a quick, external repair method used to seal small punctures located within the tire’s tread area.
It is inserted directly into the hole, typically one caused by a nail or screw, and tightly fills the opening to prevent air leakage.
This method is often employed in emergency situations when a driver requires an immediate solution and does not need to remove the tire from the wheel.
Because this repair is performed externally and does not address the tire’s internal structural layers, it is generally considered a short-term or temporary solution.
While a properly installed plug can effectively maintain air pressure for daily driving, it does not fully restore the tire’s original internal strength; therefore, it is generally not recommended for long-term use, particularly for high-speed driving or long-distance travel.
2. Tire Patches
A tire patch is an internal repair method that involves removing the tire from the wheel and applying a sealing material to the inner surface of the punctured area.
This process repairs the tire from the inside out, thereby restoring the tire’s structural integrity and strength to a degree that is not possible through the use of plugs alone.
As the patch adheres directly to the tire’s inner lining, it creates a more secure and long-lasting seal, a solution far superior for sustained driving conditions.
According to most professional tire repair standards, the use of a patch, or a combination of a patch and a plug, is considered the safest and most reliable method for repairing punctures.
This technique is typically employed in professional workshops, as it offers superior protection against air leaks and ensures greater overall durability across both standard road and highway driving conditions.
How to Ensure Safety While Using a Tire Plug Kit
Using a tire plug kit can be an invaluable skill in an emergency; however, safety must always be the top priority, as you are working with a tire that is under air pressure, and if something goes wrong, it could suddenly deflate or behave unpredictably.
During the repair process, even a minor error can turn a simple puncture into a hazardous situation, particularly if the tire is not handled correctly or if the surrounding environment is unsafe.
Adhering to basic safety protocols minimizes risks, improves the quality of the repair and ensures that the vehicle remains stable once the work is complete.
There’s study that shows that sealing performance depends heavily on the viscosity, internal adhesion and how evenly the puncture is actually filled, as this study examines modern tire repair sealant systems which combined with inflators and shows that improved materials such as: latex-based components literally have ability to increase the sealing durability across the wide range of temperatures, that’s why you need to integrate repair system with proper application for safety purpose.[¹]
1. Always Work on a Stable, Stationary Vehicle
Before attempting any tire repair, the vehicle must be brought to a complete stop on a level and stable surface.
This is crucial because a moving or unstable vehicle could shift unexpectedly, thereby increasing the risk of injury, or, if a jack is being used, causing it to slip.
Engaging the handbrake and ensuring the vehicle is parked in a secure location helps maintain full control over the situation.
Stability is the foundation of safe tire repair, as even the slightest movement while working on a tire can compromise the safety of the entire process.
2. Avoid Repairing Tires on Busy Roads
Attempting to repair a tire in close proximity to traffic is extremely dangerous; passing vehicles, limited space and distractions can make it difficult to focus on the repair task at hand.
Even if the puncture appears minor, roadside conditions can change rapidly, posing a threat to both the person performing the repair and other drivers.
It is always safer to move the vehicle to a quiet, open and secure location before beginning any repairs.
A controlled environment offers better visibility, ample time and significantly reduced risk during the repair process.
3. Wear Gloves for Safety
Wearing gloves while using a tire plug kit is an essential, yet often overlooked, safety precaution.
Tires can harbor sharp metal fragments picked up from the road, as well as dirt and oil; direct contact with these substances can lead to injury or infection.
Furthermore, wearing gloves provides a better grip on tools such as pliers and reaming tools, thereby reducing the risk of your hands slipping while you work.
This simple safety measure not only keeps your hands clean but also makes the repair process safer and more controlled.
4. Never Attempt to Repair High-Speed Tires Indiscriminately
Attempting to fix every type of tire damage using a plug kit is not safe, particularly when the tires are designed for high-speed driving, or when the exact location of the damage is unclear.
High-speed tires are engineered to withstand specific pressures and any improper repair can compromise their structural integrity.
Attempting a repair without accurately assessing the severity or location of the damage could result in sudden tire failure while driving at high speeds.
Before deciding to repair a tire, it is crucial to inspect it carefully and fully understand its condition; in some cases, replacing the tire or seeking professional repair is the only safe option.
Understand, When You Should Go For the Professional Mechanic
A tire plug kit is useful for small and simple punctures; however, there are situations where relying on it is neither safe nor effective.
In such cases, the damage is too extensive to be remedied by a simple repair and continuing to drive without a proper inspection can increase the risk of tire failure, compromised vehicle handling and reduced braking performance.
Knowing when to stop DIY repairs and when to seek professional assistance is a crucial aspect of safe driving, as a trained technician can thoroughly inspect the tire’s internal structure to determine whether it can be repaired or requires replacement.
1. Persistent Air Leaks
If the tire continues to lose air even after a plug has been inserted, it is a clear indication that the repair was unsuccessful or that there is other hidden damage within the tire.
A gradual yet persistent drop in air pressure is not always immediately apparent, but it can be detected through recurring low-pressure warnings or the need to frequently reinflate the tire.
A persistent leak often implies that the puncture is significantly larger than initially assumed, or that the tire’s inner liner has been compromised.
In such instances, it is essential to have the tire inspected by a professional to identify the root cause of the damage and determine a safe and more appropriate repair solution.
2. Multiple Punctures
When a tire sustains multiple punctures, particularly if they are located close to one another within the tread area, repairing them with standard plugs is no longer a reliable solution.
Each puncture compromises the structural integrity of the entire tire and multiple repairs can diminish the tire’s ability to consistently maintain proper air pressure.
Even if an individual puncture appears minor, the cumulative effect of multiple punctures can adversely impact a vehicle’s stability and safety while driving.
A professional can assess whether the tire retains the structural integrity necessary for repair, or if replacement constitutes the safer option.
3. Structural Damage to the Tire
Structural damage refers to damage that affects the tire’s internal layers or sidewall, rather than merely its outer surface (the tread).
Such damage can result from hitting potholes, striking curbs, or driving on a punctured tire.
Unlike minor punctures, structural damage cannot be remedied simply by inserting a plug, as doing so compromises the tire’s ability to withstand internal pressure and heat.
Utilizing specialized equipment, a trained technician can inspect the tire’s interior to determine whether it is safe to repair or if it is no longer fit for road use.
4. Concerns Regarding High-Performance or Highway Driving
Tires designed for high-speed or highway driving are specifically engineered to withstand greater heat, pressure and stress compared to tires used for standard urban driving.
It is absolutely critical to inspect these tires with extreme diligence, even when undertaking minor repairs, as any structural weakness introduced by a repair could prove hazardous while driving at high speeds.
If there is any doubt regarding the quality of a plug-based repair, or if the tire is intended for use on long-distance highway journeys, it is advisable to have it inspected by a professional.
This ensures that the tire can reliably withstand the constant stresses placed upon it, particularly during prolonged or high-speed driving, without the risk of sudden failure.
Estimated Cost Comparison – DIY Repair vs Professional Repair
Understanding the cost difference between repairing a tire yourself and having it done by a professional helps drivers make more informed and safer decisions.
At first glance, a tire plug kit may appear to be the cheapest option; however, its true value depends on the quality of the repair, its durability and its ability to prevent future problems.
In many cases, what seems like a small saving today could turn into a major expense later, should the repair fail or if improper fixing causes further damage to the tire.
1. Average Cost of a Tire Plug Kit
A tire plug kit is generally a low-cost tool designed for emergency use.
In most markets, these kits are quite affordable as they consist of simple components such as insertion tools, reamers and rubber plugs.
The primary advantage of this option is that it allows drivers to quickly fix minor punctures without waiting for roadside assistance or visiting a workshop.
However, despite the low initial cost, its effectiveness depends entirely on the precision with which the repair is executed.
An improperly inserted plug can lead to recurring air leaks, potentially necessitating additional repairs or the complete replacement of the tire in the future.
2. Repair Prices at a Workshop
The cost of professional tire repair services is generally higher than that of DIY plug kits, but they offer a superior level of safety and reliability.
At a workshop, technicians inspect both the exterior and interior of the tire to fully assess the extent of the damage.
They often utilize a combination of patching and internal sealing methods, which repair the tire far more effectively than a simple plug.
This process ensures that the tire maintains its proper air pressure and structural integrity.
Although the initial cost is higher, professional repairs are generally more durable and reduce the likelihood of recurring problems.
3. Comparison of Long-Term Value
When comparing long-term value, professional repairs often offer greater reliability because they address both the external puncture and the internal condition of the tire.
While a DIY plug serves as a useful immediate fix, particularly in emergency situations, it cannot fully restore the tire’s original structural integrity, specially under the constant pressure exerted during driving.
Over time, a tire professionally repaired at a workshop is less prone to leaks or sudden failure, thereby saving on the costs associated with frequent repairs or premature tire replacement.
Conversely, relying solely on a plug kit may seem economical at first; however, in the long run, it can prove to be more expensive if the tire deteriorates much faster than expected or requires replacement sooner than anticipated.
Conclusion – How to Use Tire Plug Kit Correctly
All kinds of punctures are harmful, that’s why you need to respond to it in precision and learn to use Tire Plug Kit perfectly.
Most tire punctures are caused by small objects such as: nails or screws, that allow air to leak gradually from the tire’s tread area; in such situations, a plug can safely restore enough air pressure to the tire to allow the vehicle to be driven for a limited time.
Nevertheless, it is crucial to remember that a plug does not repair the tire’s internal structure; it merely seals the puncture to prevent air from escaping.
For this reason, adhering to proper safety protocols, including selecting the correct location for the plug and conducting a thorough inspection after the repair, is absolutely essential.
Actual driving conditions such as: ambient temperature, vehicle speed, road surface quality and tire age, all influence the longevity of a plugged tire.
If the repair has been executed correctly, you may be able to drive safely for a while; however, whenever possible, you should subsequently have the tire inspected or permanently repaired by a professional.
Ignoring warning signs such as: recurring air loss or unusual tire behavior, as it can lead to serious hazards, including sudden tire failure.
The bottom line is this: while a tire plug kit is a useful emergency solution, it is not a complete substitute for professional tire repair.
When used correctly and responsibly, it can save time, reduce stress and boost your confidence in handling unexpected roadside emergencies.
Now, that’s all from this guide about How to Use Tire Plug Kit Correctly, also you can comment down below.
Frequently Asked Questions
FAQ 1: What is a tire plug kit used for?
Answer: A tire plug kit is used to repair minor punctures located within the tire’s tread area (the part of the tire that comes into contact with the road). These punctures are typically caused by nails, screws, or other sharp objects. The kit works by inserting a rubber plug into the puncture hole, thereby sealing the leak and preventing air from escaping. It is primarily designed as an emergency or temporary solution, allowing you to drive safely until you can have the tire properly inspected or permanently repaired.
FAQ 2: Is a tire plug a permanent repair?
Answer: According to most professional standards, a tire plug is not considered a completely permanent repair. Although a properly installed plug can effectively retain air for an extended period, it does not repair the tire’s internal structure. For this reason, it is generally regarded as a temporary or interim solution. Many drivers subsequently have the tire inspected or patched from the inside to ensure long-term safety and structural integrity.
FAQ 3: Can all tire punctures be fixed with a plug kit?
Answer: No, not all tire punctures can be fixed with a plug kit. This kit is effective only for small holes located within the tire’s tread area. Punctures located in the tire’s sidewall or shoulder area, as well as large tears or gashes, as it cannot be safely repaired using a plug. In such cases, the tire is typically deemed unsafe and may require replacement.
FAQ 4: How long can I drive on a plugged tire?
Answer: If the tire plug has been installed correctly, it can last for weeks or even months; However, this depends on driving conditions, speed and the overall condition of the tire. Nevertheless, it is not designed for permanent use. It is always advisable to treat it merely as a temporary stopgap measure and to have the tire inspected by a professional as soon as possible to ensure long-term safety.
FAQ 5: Is it safe to drive on a tire after plugging it?
Answer: Yes, if the puncture is small, located within the tread area and the plug has been inserted correctly, driving on a plugged tire can be safe. However, safety also depends on maintaining proper tire pressure, ensuring the plug remains firmly in place and verifying that there is no other hidden damage to the tire. If the tire continues to lose air or if you experience any instability while driving, you should have it inspected immediately.
FAQ 6: Do I need to remove the tire from the rim to use a plug kit?
Answer: No, tire plug kits are designed to be used from the outside of the tire; therefore, there is no need to remove the tire from the rim. This is a major advantage of plug kits, as they allow for quick, roadside tire repairs without the need for specialized tools. However, for professional, patch-based repairs, removing the tire is necessary.
FAQ 7: What happens if a tire plug is not installed correctly?
Answer: If a tire plug is not installed correctly, it may fail to completely seal the puncture. This can lead to a slow air leak, reduced tire pressure, uneven tire wear, or even a sudden blowout while driving. Therefore, properly preparing the puncture site and correctly inserting the plug are crucial steps.
FAQ 8: Should I check the tire pressure after plugging a tire?
Answer: Yes, it is crucial to check the tire pressure after installing a plug. Maintaining the correct tire pressure makes driving safer, improves fuel efficiency and ensures even tire wear. After a repair, the tire should be inflated to the pressure recommended by the manufacturer and you should periodically check to ensure that the correct air pressure is being maintained.
FAQ 9: Can I use a plug kit more than once on the same tire?
Answer: You may use a plug kit more than once on the same tire only if the punctures are located in different areas of the tire and provided that all these punctures are situated in areas of the tire where repairs are considered safe. However, repeatedly repairing the same tire compromises its overall structural integrity. If a tire is experiencing recurring issues, it is generally safer to replace the tire rather than installing multiple plugs.
References:
[1] Development of Durability Improved Tire Repair Sealant and Intergrated Inflator
https://saemobilus.sae.org/papers/development-durability-improved-tire-repair-sealant-intergrated-inflator-2016-01-0508

Hello Folks, Dean Shali here to help you out to solve the problems with your lovely vehicle, as i have lots of experience and knowledge about automotive industry as i woks directly with the customers and repair vehicles and i love to help the people to keep their cars safe and running smoothly.