Written By: Dean Shali
Fact Checked By: Sabré Cook
Reviewed By: Tamara Warren
It is true that: your car’s stopping power actually depends on what quality of brake fluid is flowing inside the system.
Because, the hydraulic system behind that brake pedal press, depends on entirely on the condition of brake fluid.
So, it is not just an simple liquid, but it literally performs a critical job as it transfers force from your foot to the brake components at each wheel.
Not only this, brake fluid is hygroscopic: that means it naturally absorbs the moisture from the air over the time, even in a sealed system as well.
Along with this, whenever this moisture builds up then the fluid’s boiling point drops significantly and under the high braking temperatures, it can literally start to vaporize, that’s how it creates that tiny air bubbles that compresses easily.
That’s how it leads to the soft pedal feel, longer stopping distances and in extreme cases, even you have to deal with the brake failure as well.
Plus, there’s studies and manufacturer data that consistently shows that even a small percentage of water contamination literally reduces the braking efficiency and accelerates the internal corrosion in parts such as: master cylinder, brake lines and caliper as well.
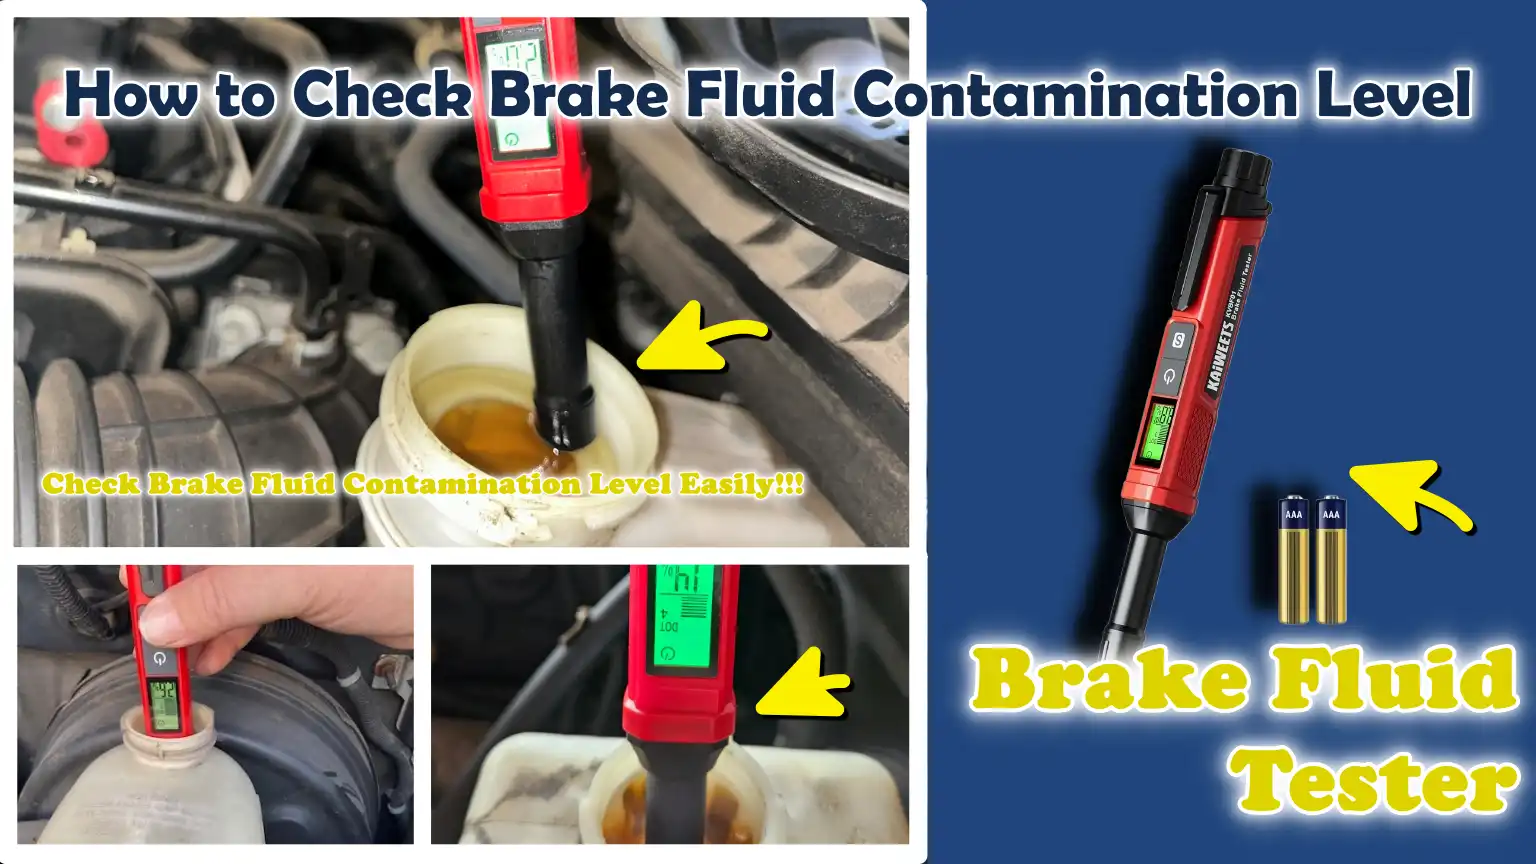
That’s why, in this guide you’ll learn How to Check Brake Fluid Contamination Level so that you can identify that hidden signs and test the fluid in most accurate way possible.
Know, What is Brake Fluid Contamination?
Brake fluid contamination is a condition in which the hydraulic fluid inside your braking system loses its purity and becomes mixed with unwanted substances such as water, air, dirt, or small particles.
Brake fluid is designed to smoothly transmit pressure from your brake pedal to the wheels; however, when it becomes contaminated, this process becomes less effective.
Over time, even a slight amount of contamination can degrade braking performance, increase stopping distances and compromise overall safety.
Simply put, this means the fluid is no longer clean enough to perform its job properly.
How Moisture, Dirt and Debris Enter the System
Although a brake system is sealed, it is not completely airtight.
Moisture from the surrounding air gradually seeps in through microscopic pores present in the rubber hoses and seals.
Every time the brake fluid reservoir cap is opened during maintenance, a small amount of humid air can also enter the system.
Dirt and debris typically enter due to carelessness during servicing such as: using dirty tools or leaving the fluid exposed to the open air for too long.
Over time, the heat generated by braking causes the seals to expand and contract, allowing even more moisture and impurities to gradually infiltrate the system.
Common Types of Contamination
Brake fluid contamination typically involves various types of unwanted substances.
Water is the most common and dangerous contaminant, as it lowers the fluid’s boiling point and increases the risk of it turning into vapor during heavy braking.
Air can enter the system and form compressible bubbles; this causes the brake pedal to feel soft or spongy when depressed.
Metal particles may accumulate due to internal wear within components such as the brake lines, master cylinder, or calipers, particularly in older vehicles.
Rubber particles may also appear as internal seals and hoses begin to degrade over time; these tiny fragments mix with the fluid, thereby reducing its effectiveness.
Why Brake Fluid Is ‘Hygroscopic’
Brake fluid is described as ‘hygroscopic’ (moisture-absorbing) because it naturally absorbs moisture from the air over time.
This is not a defect, but rather a natural chemical characteristic of most common brake fluids such as: DOT 3 and DOT 4.
The primary objective of this design is to prevent the formation of isolated water droplets within the brake system; if such droplets were to form, they could freeze in cold weather or cause uneven brake pressure.
However, a drawback of this characteristic is that as the fluid absorbs more moisture, its boiling point gradually decreases.
This means that under heavy braking conditions, the fluid can heat up rapidly, potentially leading to the formation of vapor bubbles and a consequent reduction in braking efficiency.
This gradual absorption of water is the primary reason why brake fluid requires regular inspection and periodic replacement.
So, Why Is It Really Important to Check for Contamination in Brake Fluid?
1. Prevents Brake Failure and Reduces Stopping Distance
Checking for contamination in brake fluid is crucial, as it directly impacts your vehicle’s ability to stop safely.
When moisture or air infiltrates the brake fluid, it loses its capacity to effectively transmit hydraulic pressure.
This means that when you depress the brake pedal, the full pressure may not reach the wheels.
In real-world driving scenarios, this can result in increased stopping distances and a slower or weaker brake response.
In severe cases, particularly during hard braking or in high-temperature conditions, contaminated fluid can cause steam to form within the system, potentially leading to partial brake failure.
2. Protects Critical Components Such As the Master Cylinder and Calipers
The master cylinder and brake calipers are precision-engineered components designed to operate using clean hydraulic pressure.
When brake fluid becomes contaminated, it accumulates microscopic particles, moisture and chemical impurities that gradually degrade internal seals and metal surfaces.
Over time, this can lead to internal wear, leaks and a decline in the operational efficiency of these components.
Regularly checking for contamination ensures that these expensive and critical parts remain in good working condition for the long term, thereby reducing the risk of premature replacement or mechanical failure.
3. Prevents Internal Corrosion Within the Brake Lines
One of the most damaging effects of contaminated brake fluid is internal corrosion.
When water enters the brake system, it reacts with the metal components present inside the brake lines, leading to the formation of rust over time.
This corrosion is invisible from the outside, making it all the more dangerous.
As internal corrosion progresses, it can obstruct fluid flow, weaken pipe walls and even lead to leaks.
By regularly checking for contaminants in the brake fluid, you can prevent moisture accumulation and safeguard the entire hydraulic network against gradual yet severe internal damage.
4. Maintains Consistency in Braking Performance
A clean brake fluid system ensures that every time you depress the pedal, the braking pressure remains consistent and predictable.
When contamination levels rise, the fluid becomes less stable under heat and pressure, resulting in inconsistent braking performance.
You may find that the brakes feel normal at times, but in other situations, particularly during long journeys or when braking on inclines, they may feel weak or sluggish.
Regular checks help maintain consistent vehicle performance, providing you with reliable control over your vehicle in all driving conditions.
5. Helps Extend the Lifespan of the Entire Brake System
Brake systems are designed to last for many years, but their longevity depends significantly on the condition of the fluid.
Clean brake fluid minimizes internal wear, prevents corrosion and helps ensure that all hydraulic components continue to function without obstruction.
Conversely, contaminated fluid accelerates the deterioration of internal system components and places excessive strain on seals, valves and metal parts.
By monitoring the quality of your brake fluid and keeping it in optimal condition, you not only enhance safety but also extend the overall lifespan of the braking system, thereby reducing repair and maintenance costs in the long run.
Know, The Signs of Deteriorated Brake Fluid
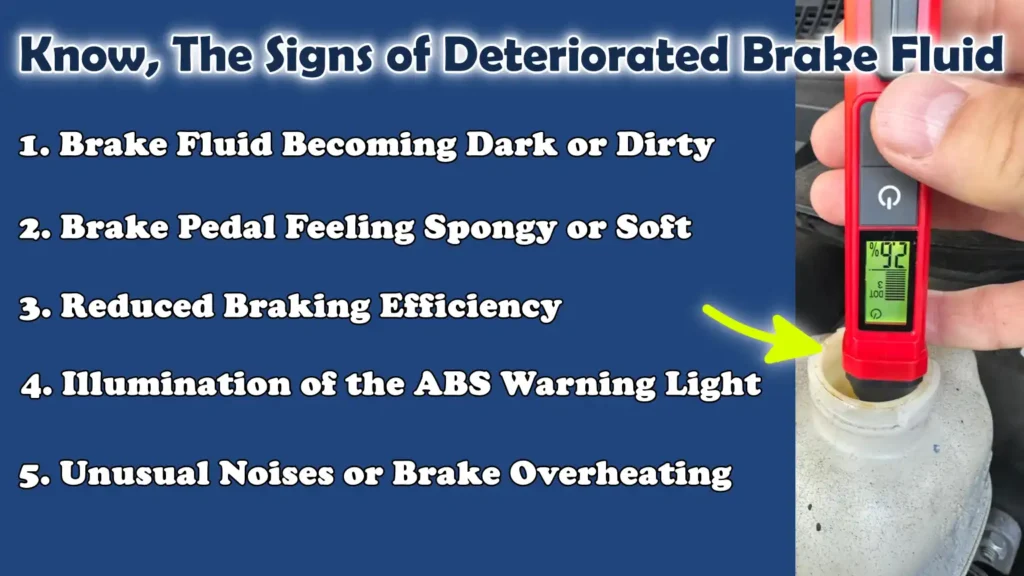
1. Brake Fluid Becoming Dark or Dirty
The easiest way to detect deteriorated brake fluid is to observe its color.
Fresh brake fluid is typically clear or a light amber (pale yellowish-brown) color; however, as it absorbs moisture and accumulates contaminants over time, it gradually darkens.
This change occurs because heat, oxidation and internal wear particles mix into the fluid.
If the fluid appears brown or nearly black, it often indicates that it has been exposed to moisture and contaminants for too long and is no longer performing at its full potential.
This visual change serves as an early warning sign that the fluid may need to be inspected or replaced.
2. Brake Pedal Feeling Spongy or Soft
A spongy or soft brake pedal is a strong indication that something is amiss within the hydraulic system.
Deteriorated brake fluid, particularly when it contains air or moisture, compresses more easily than fresh fluid.
This reduces the direct transfer of force from your foot to the brakes.
Consequently, the pedal may feel soft, travel lower than usual, or require greater effort to bring the vehicle to a stop.
This symptom is often felt more distinctly during repeated braking or while driving in hot weather, when the fluid is subjected to increased stress.
3. Reduced Braking Efficiency
When brake fluid deteriorates, its ability to withstand heat and pressure diminishes.
This leads to a reduction in braking efficiency, meaning that the vehicle takes longer to slow down or come to a complete stop.
The moisture present in the fluid lowers its boiling point; consequently, steam bubbles may form during hard braking.
These bubbles reduce hydraulic pressure and compromise braking power.
Drivers may perceive that the brakes are less responsive or that a greater distance is required to bring the vehicle to a halt, particularly on inclines or during sudden braking maneuvers.
4. Illumination of the ABS Warning Light
Modern vehicles are equipped with an Anti-lock Braking System (ABS) that relies heavily on consistent hydraulic pressure.
If contaminants within the brake fluid compromise the stability of this pressure, or the accuracy of sensor readings, the ABS system may trigger a warning light on the dashboard.
While this light does not always directly indicate the presence of contaminants within the fluid, it can serve as an indirect signal of an anomaly within the braking system.
The presence of moisture or debris in the fluid can disrupt hydraulic response, prompting the system to detect a malfunction and alert the driver.
5. Unusual Noises or Brake Overheating
Degraded brake fluid can also lead to the manifestation of unusual noises or excessive heat accumulation within the braking system.
When the fluid loses its operational efficiency, pressure distribution across components such as calipers and pads becomes uneven, resulting in squealing, grinding, or other strange sounds.
Furthermore, due to the diminished heat-resistance capacity of contaminated fluid, the system may overheat rapidly during periods of heavy use.
This excessive heat not only degrades braking performance but can also accelerate the wear and tear of surrounding components, thereby diminishing the overall reliability of the system over time.
Tools
| Tools | Why It Is Needed | How to Use It |
|---|---|---|
| Brake Fluid Tester – Electronic or Strip Type | This is the most essential tool, as it directly measures the moisture level within the brake fluid. It helps you determine whether the fluid is still safe for use or if it requires replacement. | Switch on the electronic tester and immerse its probe into the brake fluid reservoir. For a strip-type tester, dip the strip into the fluid and compare the resulting color change against the provided guide chart. |
| Clean Cloth or Paper Towel | This is used to keep the workspace clean and to prevent dirt or debris from entering the brake system. Even minute dust particles can adversely affect brake performance. | Wipe down the area surrounding the brake fluid reservoir before opening its cap. Additionally, use it to clean up any minor fluid spills that may occur during the inspection. |
| Flashlight | This tool enables you to clearly observe the color and condition of the brake fluid inside the reservoir, particularly in low-light conditions or within the recesses of the engine bay. | Shine a flashlight into the brake fluid reservoir to inspect the fluid’s color, clarity and the presence of any dirt or debris. |
| Gloves and Safety Glasses | Brake fluid can be harmful to the skin and eyes and it can also damage painted surfaces. Safety gear protects you during the inspection process. | Wear gloves before handling any component of the brake system. Use safety goggles to protect against sudden fluid splashes when opening the reservoir. |
| Turkey Baster or Fluid Syringe – Optional for Sampling | This allows you to extract a small sample of brake fluid for testing without having to dismantle the entire system. This provides more accurate information regarding the actual condition of the fluid. | Insert the syringe into the reservoir and, for inspection or close examination, slowly withdraw a small amount of fluid into a clean container. |
Know, The Methods for Testing Brake Fluid
1. Visual Inspection Method
The visual inspection method is the simplest way to get a rough estimate of the condition of the brake fluid and it often serves as the first step in checking for contamination.
This method primarily focuses on the color and clarity of the fluid contained within the reservoir.
Fresh brake fluid is typically clear or light amber in color; however, as it absorbs moisture, heat and microscopic particles over time, it gradually becomes darker and less transparent.
When performing this check, comparing the fluid against a fresh sample helps you gauge the extent of its degradation.
Although this method does not provide a precise measurement of contamination, it is highly effective in identifying clear signs of old or dirty fluid, which may necessitate further testing or replacement.
2. Electronic Brake Fluid Tester
The electronic brake fluid tester is a more precise instrument designed to measure the moisture content within brake fluid.
It operates by inserting a probe into the fluid, which detects changes in electrical conductivity caused by the presence of water.
As water conducts electricity differently than pure brake fluid, the device can estimate the amount of moisture present.
Many testers display results using LED lights or percentage readings, making it easy to determine whether the fluid is in good condition or approaching a critical level.
A low reading typically indicates that the fluid is still safe, while a high reading suggests that moisture has accumulated and the fluid may need to be replaced soon.
3. The Test Strip Method
The test strip method utilizes a simple chemical reaction to detect contamination within brake fluid.
A specialized strip is dipped into the brake fluid, where it reacts with the moisture and chemical changes present in the fluid.
After a few seconds, the color of the strip changes; this color change is then compared against a reference chart provided by the manufacturer.
Each color on the chart corresponds to a specific level of contamination, ranging from safe to severely contaminated.
This method is cost-effective and easy to use, although careful observation is required to accurately interpret the color changes.
4. Boiling Point Testing – Advanced
Boiling point testing is a professional and advanced technique used to measure how effectively brake fluid can withstand high temperatures.
Clean brake fluid possesses a high boiling point, enabling it to function effectively even under heavy braking conditions.
However, when moisture infiltrates the fluid, its boiling point drops significantly, as water vaporizes at a much lower temperature.
During intense braking, the formation of vapor bubbles within the brake system can compromise braking efficiency.
This testing method is typically performed in workshops or diagnostic laboratories using specialized equipment.
It is primarily employed in situations where a precise analysis of the fluid’s condition is critical such as: with high-performance vehicles or during safety inspections.
How to Check Brake Fluid Contamination Level – Beginner Friendly Guide
1. Locate the Brake Fluid Reservoir
The first step in checking for brake fluid contamination is to locate the brake fluid reservoir in your vehicle.
In most cars, it is situated within the engine bay, typically near the rear of the compartment, on the driver’s side.
It is a small, transparent plastic container connected to the master cylinder.
The reservoir is designed in such a way that you can observe the fluid level and condition without having to open it.
Before beginning any inspection, for the sake of both safety and accurate results, ensure that the engine is turned off and the vehicle is parked on a level surface.
2. Clean the Area Surrounding the Reservoir Cap
Before opening or inspecting the brake fluid reservoir, it is crucial to clean the area surrounding it.
If the area around the cap is not properly cleaned, dust, dirt and small particles can easily fall into the system.
Even a minor amount of contamination can negatively impact braking performance over time.
Using a clean cloth, gently wipe the area around the reservoir cap to remove any dirt or grease.
This simple step helps protect the brake system from external contaminants during the inspection process.
3. Visually Inspect the Fluid
Once the surrounding area has been cleaned, the next step is to visually inspect the brake fluid inside the reservoir.
The condition of the brake fluid can often be assessed based on its color and clarity.
Fresh fluid is typically clear or light amber (a pale brownish-yellow) in color, whereas contaminated fluid appears significantly darker, cloudy, or brown.
You should also look out for floating particles, sediment, or any unusual cloudiness within the fluid.
These signs often indicate moisture absorption or internal wear within the braking system.
This step provides you with a quick yet crucial initial assessment of whether further investigation is required.
4. Use a Brake Fluid Tester
After performing a visual inspection, using a brake fluid tester provides a more accurate assessment of the contamination level.
To do this, carefully insert the tester’s probe into the brake fluid, ensuring it is fully submerged to obtain an accurate reading.
The device should be held steady while it analyzes the fluid.
Depending on the type of tester being used, you may need to wait a few seconds for the reading to stabilize.
Electronic testers typically display results via indicator lights or a digital screen, helping to determine the moisture content within the fluid.
5. Interpreting the Results
The final step is to understand what the test results indicate.
Safe brake fluid typically has low moisture levels and remains effective at withstanding heat and pressure.
If the reading indicates a low level of contamination, the fluid is generally still suitable for use.
However, as moisture levels rise, the risk of compromised braking performance also increases.
Moderate contamination levels suggest that the fluid should be closely monitored, while high contamination levels indicate that the fluid should be replaced as soon as possible.
It is crucial to properly understand these results, as doing so helps prevent brake failure, corrosion and a decline in braking efficiency over time.
So, Let’s Understand About the Levels of Contamination in Brake Fluid
The condition of brake fluid is primarily assessed based on the amount of moisture it has absorbed over time, as even a minute quantity of water can alter the safe functioning of the braking system.
As brake fluid is hygroscopic (moisture-absorbing), it gradually draws moisture from the air through the seals and tiny pores present within the system.
This moisture lowers the fluid’s boiling point and compromises its ability to transmit braking force under conditions of heat and pressure.
Understanding these levels of contamination helps you determine how long the fluid remains safe for use and when it needs to be replaced before braking performance or safety is compromised.
1. 0–1% Moisture: Excellent Condition
When brake fluid contains between 0 and 1 percent moisture, it is considered to be in excellent condition.
At this level, the fluid’s boiling point remains high and it can effectively withstand the heat generated during normal and moderately heavy braking without degrading.
The transmission of hydraulic pressure remains smooth and consistent, meaning the brake pedal feels firm and responsive.
In this condition, the fluid still performs close to its original specifications and there is no immediate risk; however, regular monitoring remains crucial, as moisture levels will naturally rise over time.
2. 2% Moisture: Acceptable, but Monitoring Required
With a moisture content of approximately 2 percent, the brake fluid remains functional and is generally safe for daily driving, although it is no longer in its excellent condition.
Its boiling point begins to drop slightly, meaning that the fluid’s resistance to heat diminishes as temperatures rise during frequent or heavy braking.
Although most drivers may not notice any major performance-related issues at this stage, it serves as a warning sign that the fluid has begun to age.
Regular monitoring becomes crucial here, as the continuous absorption of moisture can rapidly push the fluid into a less safe category.
3. 3% Moisture: Replace Soon
When moisture levels reach approximately 3 percent, the brake fluid is considered compromised and should be replaced in the near future.
At this stage, the boiling point drops significantly, meaning that heavy braking or prolonged driving on inclines can cause vapor to form within the system.
Consequently, the brake pedal may feel “spongy” (soft) and braking efficiency may be reduced.
Furthermore, this fluid increases the likelihood of internal corrosion in metal components such as brake lines and the master cylinder.
Even if the brakes still appear to be functioning, their reliability is significantly compromised, making replacement a necessity in the near future.
4. 4%+ Moisture: Immediate Replacement Required
If moisture levels reach 4 percent or higher, the brake fluid is in a critical state and requires immediate replacement.
At this level, its boiling point is drastically reduced and vapor bubbles can form within the hydraulic system even under normal braking conditions.
This can lead to sudden brake fade, erratic pedal response and a severe reduction in the vehicle’s stopping capability.
Moreover, excessive moisture accelerates the corrosion process throughout the entire braking system, increasing the risk of damage to expensive components.
Driving with this level of contamination is unsafe and to restore proper braking performance, the fluid should be flushed and replaced as soon as possible.
Know, Common Causes of Brake Fluid Contamination
Brake fluid contamination does not occur suddenly.
It accumulates gradually over time as the braking system is exposed to heat, air and mechanical wear during vehicle operation.
Although the system is designed to be closed, it is not completely sealed off from the environment.
Understanding the primary causes of this contamination helps you prevent premature damage and maintain safe braking performance over the long term.
1. Absorption of Moisture from the Air
One of the leading causes of brake fluid contamination is the absorption of moisture from the air.
Brake fluid is naturally hygroscopic, meaning it attracts and absorbs water molecules from the surrounding atmosphere.
This can occur even when the system is closed, as small amounts of moisture gradually seep in over time through microscopic pores present in the rubber hoses and seals.
Furthermore, humid air enters the system whenever the brake fluid reservoir is opened during maintenance procedures.
As moisture accumulates, it lowers the fluid’s boiling point and gradually diminishes braking efficiency, particularly during heavy braking situations where heat levels are high.
2. Worn Seals and Rubber Components
The braking system contains various rubber components such as: seals, hoses and gaskets, that help maintain the brake fluid under pressure.
Over time, these rubber components naturally deteriorate due to heat, pressure and chemical reactions with the brake fluid.
As they age, they begin to break down and release tiny particles into the fluid.
Additionally, worn seals can allow small amounts of air and moisture to enter the system, thereby increasing contamination levels.
This slow, internal wear and tear is a primary reason why brake fluid degrades more rapidly in older vehicles.
3. Poor Maintenance or Failure to Change Fluid Regularly
Brake fluid is not a lifetime fluid and requires periodic replacement; however, many drivers delay or neglect this maintenance task.
When the fluid is not changed regularly, moisture and contaminants accumulate over time, rendering the fluid less effective.
Old brake fluid also becomes more acidic, which accelerates internal corrosion and further contaminates the system.
Without regular flushing and fluid replacement, even a well-designed braking system will gradually lose its efficiency and develop performance issues.
4. Exposure to Thermal Cycles
Heat is generated during braking, particularly during hard braking or when driving on inclines.
This heat transfers from the brake components into the fluid.
Repeated heating and cooling cause the fluid to expand and contract, gradually stressing the seals and allowing minute amounts of moisture to infiltrate the system.
Elevated temperatures can also accelerate the chemical breakdown of the fluid, diminishing its stability and increasing impurity levels over time.
Vehicles frequently driven in heavy traffic or hilly terrain are at a higher risk of experiencing this type of degradation.
5. Mixing Different Types of Brake Fluid
Another common cause of contamination is mixing different types of brake fluid that are incompatible with one another.
Brake fluids are categorized into classifications such as DOT 3, DOT 4 and DOT 5 and each category possesses its own distinct chemical characteristics.
When incompatible fluids are mixed, they can react in ways that adversely affect vehicle performance, lead to the accumulation of sludge within the system, or cause the fluids to separate into distinct layers.
Consequently, brake pressure becomes inconsistent and the internal components of the system experience accelerated wear.
To prevent such contamination and ensure the integrity of the system, it is absolutely essential to use only the specific type of brake fluid recommended by the vehicle manufacturer.
Read More:
- How to Fix Brake Bias Issues
- How to Test Brake Proportioning Valve
- How to Replace a Brake Light Switch
- How to Diagnose Brake Light Switch Failure
- How to Fix Intermittent ABS Activation
- How to Clean ABS Wheel Speed Sensor
- How to Diagnose ABS Sensor Wiring Issues
- How to Test Electronic Brake Module (EBCM)
- How to Fix Parking Brake Dragging
- How to Adjust Parking Brake Cable
- How to Check Parking Brake Cable Tension
- How to Fix Brakes Dragging While Driving
- How to Diagnose Brake Dragging Issue
- How to Fix Internal Master Cylinder Leak
So, When to Replace Contaminated Brake Fluid?
It is crucial to know when to replace contaminated brake fluid, as its condition directly impacts braking safety, it is not merely a routine part of general vehicle maintenance.
Unlike engine oil, brake fluid does not provide clear early warning signs when it begins to deteriorate; therefore, replacing it at the appropriate time relies on scheduled maintenance, manufacturer recommendations and an assessment of the fluid’s actual condition.
Timely replacement ensures stable braking pressure, prevents internal corrosion and guarantees that the system functions correctly in both normal and emergency situations.
1. Recommended Service Intervals
Most vehicles have established service intervals that recommend replacing brake fluid every two to three years, regardless of the vehicle’s mileage.
This is because, over time, brake fluid absorbs moisture from the air, whether the vehicle has been driven or not.
Even in a vehicle that is rarely driven, the fluid can deteriorate simply due to exposure to the ambient environment and the slow chemical changes occurring within the system.
Adhering to these time-based regular intervals is essential, as it helps prevent the fluid from becoming contaminated to a dangerous level before any symptoms of failure become apparent.
2. Manufacturer Guidelines
Vehicle manufacturers provide specific recommendations for brake fluid replacement based on the design of the braking system and the type of fluid utilized.
These guidelines are typically found in the owner’s manual and are based on rigorous testing of how the system performs under various driving conditions.
Some modern vehicles, particularly those equipped with advanced braking systems, may have even stricter requirements, as they are more sensitive to the condition of the brake fluid.
Adhering to the manufacturer’s guidelines is crucial, as using the correct type of fluid and replacing it at the recommended intervals ensures that the system maintains proper hydraulic pressure and long-term reliability.
3. Based on Inspection Results, Rather Than Mileage Alone
One of the most accurate methods for determining when to replace brake fluid is to assess its actual condition, rather than relying solely on mileage or elapsed time.
In demanding driving conditions such as: heavy traffic, frequent braking, high temperatures, or driving in hilly terrain, brake fluid can degrade rapidly.
Diagnostic tools can measure moisture levels and indicate whether the fluid remains safe for use or has already become contaminated.
If inspection results reveal elevated moisture levels or a reduced boiling point, replacing the fluid is imperative, even if the scheduled service interval has not yet arrived.
This “condition-based” approach is more reliable, as it reflects the actual state of the fluid rather than relying merely on estimated usage.
How to Prevent Brake Fluid Contamination?
Preventing brake fluid contamination is always preferable to repairing the damage after it has occurred.
This is because once moisture or debris enters the system, it gradually degrades braking performance and can even cause internal corrosion, damage that is often difficult to rectify.
Braking systems are designed to be completely sealed; however, real-world conditions such as: heat, humidity and maintenance practices, influence how quickly the fluid degrades.
By following a few simple yet essential guidelines, you can significantly extend the lifespan of your brake fluid and maintain safe, consistent braking performance.
Plus, there’s study that shows that brake fluid performance is strongly affected by the moisture content, which then directly lowers the boiling point and that’s how it increases the risk of vapor formation under braking, so in this study they compares DOT 3 and DOT 4 fluids then found out that increasing water content significantly reduces the thermal stability and braking reliability as well, that’s how the research literally confirms that even small percentages of water can literally create measurable performance loss specially under the repeated braking where heat build up in the system, which is why it becomes necessary to test the brake fluid contamination level to prevent brake fade and maintain safe stopping performance as well.[¹]
1. Keep the Reservoir Tightly Sealed
The most fundamental, yet crucial, step in preventing contamination is ensuring that the brake fluid reservoir remains tightly sealed at all times.
As brake fluid naturally absorbs moisture from the air, even a tiny crack can allow humid air to infiltrate the system.
Over time, this moisture accumulates and lowers the fluid’s boiling point, thereby diminishing braking efficiency.
A properly sealed reservoir helps prevent unnecessary exposure to the atmosphere, keeping the fluid stable for a longer duration.
2. Use Only the Recommended Brake Fluid
Using the specific type of brake fluid specified by the vehicle manufacturer is essential to prevent chemical incompatibilities and potential damage to the system.
Different types of brake fluid such as: DOT 3, DOT 4 and DOT 5, possess distinct chemical properties; Mixing incompatible fluids can compromise performance or trigger adverse internal reactions, thereby jeopardizing the stability of the fluid.
Using the correct fluid ensures proper lubrication and maintains uniform hydraulic pressure within the braking system’s seals and rubber components.
3. Regular Inspection of the Brake System
Regular inspections help detect early signs of contamination before they escalate into serious problems.
By periodically checking the color, level and condition of the fluid, you can quickly identify moisture accumulation or impurities.
This allows you to take necessary corrective measures before braking performance deteriorates.
Regular inspections also aid in identifying worn-out seals or minor leaks, through which contaminants can infiltrate the system over time.
4. Avoid Unnecessary Opening of the System
Whenever the brake fluid reservoir, or the system itself, is opened, there is a risk of moisture and contaminants entering it.
Even brief exposure to ambient air can introduce moisture into the fluid.
For this reason, the system should only be opened when absolutely necessary such as: during routine maintenance or fluid replacement.
Avoiding unnecessary exposure of the system helps maintain a more controlled and clean internal environment, thereby slowing down the process of contamination.
5. Establish a Schedule for Regular Brake Fluid Flushing
Regularly flushing the brake fluid is one of the most effective methods for preventing contamination over the long term.
Over time, moisture accumulates even in a well-maintained system; this moisture cannot be eliminated without completely draining the old fluid.
Flushing the system according to a set schedule replaces degraded fluid with fresh fluid, thereby restoring the system’s boiling point and hydraulic efficiency.
This process also helps remove any minute particles or old residues present within the brake lines, ensuring that the entire system remains clean and responsive.
Common Mistakes During Checking Brake Fluid Contamination Level to Avoid
Brake fluid contamination often becomes a serious issue, not merely due to general wear and tear, but also because of minor maintenance errors that many vehicle owners inadvertently commit, without fully grasping their long-term consequences.
As brake fluid is directly responsible for transmitting force within the braking system, even minor errors made while handling or inspecting it can gradually diminish braking efficiency, accelerate the wear and tear of internal components and pose safety risks during emergency braking situations.
1. Ignoring Changes in Fluid Color
One of the most common mistakes is overlooking changes in the color of the brake fluid.
Fresh brake fluid is typically clear or a light amber (golden-brown) color; however, as it absorbs moisture and accumulates particles from internal wear and tear, it gradually becomes darker and cloudier.
Many drivers ignore this change because the brakes may still feel normal during routine daily driving.
Nevertheless, a change in color is often one of the earliest visual indicators of contamination.
Ignoring this warning sign allows moisture levels to rise further, thereby lowering the fluid’s boiling point, which can adversely affect braking performance under conditions of extreme heat or heavy use.
2. Improperly Mixing DOT 3, DOT 4 and DOT 5 Fluids
Mixing different types of brake fluids without understanding their chemical compatibility is another serious error.
DOT 3 and DOT 4 fluids are glycol-based and are generally compatible with one another in small quantities; However, DOT 5 fluid is silicone-based and should never be mixed with them.
When incompatible fluids are mixed, they may separate or react in a way that degrades braking performance and creates internal instability within the braking system.
This can result in an inconsistent pedal feel, reduced hydraulic pressure and long-term damage to seals and components.
For safe operation, it is mandatory to use the specific fluid specified by the manufacturer.
3. Using Contaminated Tools
Using dirty or contaminated tools while checking or replacing brake fluid is another mistake that allows unwanted particles to enter the system.
Even minute amounts of dust, oil, or moisture introduced by tools such as: funnels, syringes, or rags, as it can mix with the fluid and compromise its effectiveness.
The brake system is extremely sensitive; therefore, any external contaminants can gradually degrade internal components like the master cylinder and calipers.
Always using clean, dedicated tools for brake maintenance ensures the purity of the fluid and the reliability of the system.
4. Neglecting Regular Inspections
Failing to perform regular checks on brake fluid is a mistake that often allows contaminants to accumulate unnoticed.
Brake fluid degrades gradually, meaning drivers often remain unaware of changes in performance until the problem becomes severe.
As the processes of moisture absorption and internal wear occur slowly, timely inspections are crucial for early detection of issues.
Without regular inspections, moisture levels in the fluid can reach dangerous levels, significantly increasing the risk of brake failure, corrosion, or reduced braking efficiency.
Regular checks ensure that the condition of the fluid is always monitored, allowing for timely replacement rather than waiting for performance to deteriorate.
Understand, Basic Difference Between Professional vs DIY Brake Fluid Testing
Brake fluid testing can be performed both at home and in a professional workshop; however, there are significant differences between the two methods regarding the level of accuracy, the tools utilized and the assurance of safety.
It is crucial to understand when you can safely undertake this task yourself and when you should rely on a professional mechanic, as brake fluid directly impacts braking performance and the overall safety of the vehicle.
The objective is not merely to inspect the fluid, but to ensure that it remains reliable even under extreme heat, high pressure and real-world driving conditions.
1. When Doing It Yourself is Enough
DIY brake fluid testing is generally sufficient for basic checks and for quickly detecting contamination.
If you simply wish to determine whether the fluid falls within a safe operating range or has begun to degrade, simple tools such as: electronic testers, test strips, or visual inspections, as it can provide a reliable indication.
This approach works well for routine maintenance between scheduled service intervals, particularly when the vehicle is operated under normal driving conditions.
DIY testing is beneficial for monitoring moisture levels, observing changes in fluid color and identifying obvious signs of degradation.
However, as it provides a general estimate rather than a highly precise analysis, it is better suited for routine monitoring than for advanced diagnostics.
2. When to Consult a Mechanic
You should consult a professional mechanic when issues with braking performance have already become apparent, or when testing results indicate elevated levels of contamination.
Mechanics utilize advanced diagnostic tools capable of measuring fluid boiling points, assessing the stability of system pressure and inspecting internal conditions that standard DIY tools cannot accurately detect.
If issues arise such as: a spongy brake pedal, inconsistent braking performance, an illuminated ABS warning light, or excessive heat, a professional inspection becomes absolutely essential.
This is particularly critical in modern vehicles equipped with advanced braking systems, where even a minor fluid-related issue can compromise the electronic stability control system.
Professional servicing guarantees a complete fluid replacement (flushing), a process that involves purging old, contaminated fluid not only from the reservoir but from the entire braking system.
3. Cost Comparison
DIY brake fluid testing is generally more economical, as it requires only basic tools such as: testers or test strips, which are either reusable or inexpensive.
Consequently, it serves as an excellent solution for conducting frequent checks without incurring significant expense.
Conversely, professional inspections and brake fluid replacements entail higher costs, as they cover labor charges, specialized equipment and the thorough cleaning of the entire system.
However, this higher cost is accompanied by greater diagnostic accuracy and a more comprehensive cleaning of the braking system.
While DIY checks facilitate early problem detection and routine monitoring, professional services offer a more in-depth examination and long-term reliability; therefore, when contamination levels become excessive, it becomes a necessary investment.
Conclusion – How to Check Brake Fluid Contamination Level
The brake condition literally decides how safely your vehicle stops your vehicle in emergency and everyday driving conditions.
Unlike many mechanical parts, where wear and tear are clearly visible, brake fluid degrades gradually within a closed system, primarily due to moisture absorption, exposure to heat and internal breakdown over time.
It is this slow and insidious deterioration that makes regular inspections so essential.
Even minor contamination can lower the fluid’s boiling point, compromise hydraulic pressure and diminish braking efficiency, particularly in situations where it is needed most, such as during sudden stops or while driving on long, steep descents.
The most important takeaway from this guide is that the true condition of brake fluid cannot be accurately assessed merely by visual inspection or by the routine feel of the brakes during daily driving.
It requires an awareness of specific warning signs such as: a change in color, a spongy brake pedal feel, or compromised braking performance, as well as knowledge of the proper methods for testing the actual moisture content within the fluid.
Simple DIY (Do-It-Yourself) checks can help keep you informed about your vehicle’s condition even between scheduled service appointments; however, when contamination becomes excessive or performance issues arise, having the system inspected by a professional becomes absolutely imperative.
Preventing brake fluid contamination is always easier and safer than dealing with its adverse consequences.
Regular inspections, the use of the correct type of fluid, avoiding exposure to air and timely fluid replacement, these measures collectively contribute to maintaining a stable and reliable braking system.
All in all, clean brake fluid delivers consistent and superior braking power, protects expensive components from corrosion and, most importantly, enables safe driving under all conditions.
So, that’s it from this guide about How to Check Brake Fluid Contamination Level, even you can ask more questions below.
Frequently Asked Questions
FAQ 1: In simple terms, what is brake fluid contamination?
Answer: Brake fluid contamination means that the fluid inside your braking system has mixed with unwanted substances such as: water, air, dirt, or tiny particles of metal and rubber. This occurs gradually over time, as brake fluid naturally absorbs moisture from the air. When it becomes contaminated, it cannot transmit braking force as effectively, which can reduce stopping power and make braking less reliable.
FAQ 2: How can I tell if my brake fluid is contaminated?
Answer: You can often observe certain signs, such as the fluid in the reservoir appearing dark or murky, the brake pedal feeling soft or spongy, or a weakened braking response. In some cases, the ABS warning light may also illuminate. However, the most accurate way to confirm contamination is to use a brake fluid tester, which measures the moisture level within the fluid.
FAQ 3: Why does brake fluid absorb water?
Answer: Brake fluid is designed to be hygroscopic (moisture-absorbing), meaning it naturally attracts and absorbs moisture from the air. This helps prevent water droplets from forming inside the braking system; however, it also means that over time, the fluid gradually accumulates water. As moisture levels rise, the fluid’s boiling point decreases and its performance degrades under the influence of heat.
FAQ 4: Is it safe to drive with contaminated brake fluid?
Answer: In everyday driving situations, operating a vehicle with slightly contaminated brake fluid may seem normal, but it is not entirely safe. As contamination levels rise, braking performance can deteriorate, particularly during sudden stops or when driving on long, steep inclines. In severe cases, this can lead to “brake fade” (a reduction in braking effectiveness) or a drastic loss of stopping power, thereby increasing the risk of accidents.
FAQ 5: How often should brake fluid be inspected or replaced?
Answer: Brake fluid should generally be inspected at least once a year; depending on the specific vehicle and driving conditions, it should be replaced every two to three years. However, if you frequently drive in heavy traffic, in mountainous terrain, or engage in aggressive braking, more frequent inspections may be necessary. The safest approach is to assess the actual condition of the fluid rather than relying solely on time or mileage intervals.
FAQ 6: Can old brake fluid damage my car?
Answer: Yes, old or degraded brake fluid can damage critical components of the braking system. It can cause corrosion inside the brake lines, reduce the lifespan of seals and adversely affect components such as the master cylinder and calipers. Over time, this can necessitate costly repairs and compromise overall braking performance.
FAQ 7: What happens if brake fluid is not replaced for a long period?
Answer: If brake fluid is not replaced regularly, moisture and contaminants will accumulate within the system. This lowers the fluid’s boiling point and increases the risk of vapor formation (boiling) during braking. This can also lead to rust forming inside the metal components, potentially causing the brake pedal to feel less responsive or to malfunction.
FAQ 8: Can I check for brake fluid deterioration at home?
Answer: Yes, you can check your brake fluid at home using simple methods, such as a visual inspection or by using an electronic brake fluid tester. These tools help you observe changes in the fluid’s color and measure its moisture levels. However, for more accurate results, or if you notice any serious warning signs, it is best to have the fluid checked by a professional.
References:
[1] Analysis of Water Content in Brake Fluid. Part I. Method Comparison: Karl Fisher Titration Versus Refractive Index
https://saemobilus.sae.org/papers/analysis-water-content-brake-fluid-part-i-method-comparison-karl-fisher-titration-versus-refractive-index-973023

Hello Folks, Dean Shali here to help you out to solve the problems with your lovely vehicle, as i have lots of experience and knowledge about automotive industry as i woks directly with the customers and repair vehicles and i love to help the people to keep their cars safe and running smoothly.