Written By: Dean Shali
Fact Checked By: Sabré Cook
Reviewed By: Tamara Warren
You need to understand the seriousness of those clueless looking “CURB RASHES” as even light scratches can break down the wheel’s protective coating but the problem with those deep down curbs that those can expose the raw metal to be affected by the moisture and later on corrosion as well.
Most of the time, even corrosion literally starts as a minor scuffs or scratches from the outer edge of the rim, because by any reason that protective layer is broken: then moisture, road salt, brake dust and oxygen begins to react with the metallic compound, that slowly leads to the severe corrosion later on and that ends up weakens the finish.
Basically, curb rash is really common cosmetic wheel issues, specially in the urban driving environments where tight parking spaces and frequent curb contact are literally unavoidable at all.
Even those, those curb rashes doesn’t affects the driving safety at all, but it gives huge negative aura point to the vehicle visual appeal and resale value as well.
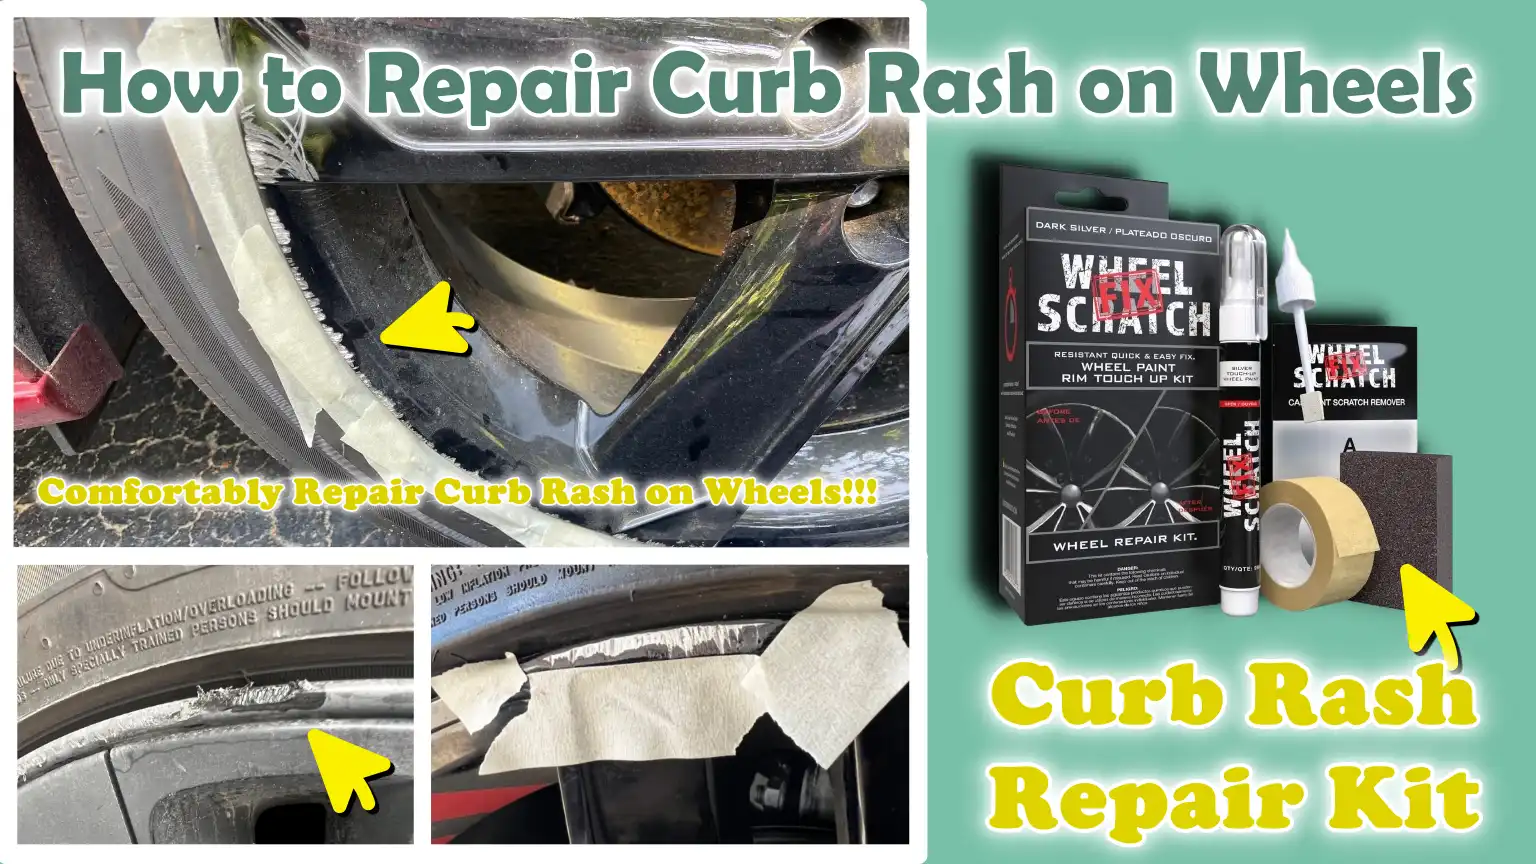
That’s why, in this guide you’ll learn everything about How to Repair Curb Rash on Wheels so that you an restore that damaged rims safely and really charmingly.
Know, The Types of Damage to Wheels Caused by Curb Rash
Curb rash can damage wheels in various ways, depending on the force with which the wheel struck the curb.
Some forms of damage affect only the outermost layer, while in other cases, the underlying metal may become exposed, or the wheel’s structural shape itself may be altered.
Understanding the specific type of damage helps you select the appropriate repair method and avoid overlooking more serious underlying issues.
1. Minor Surface Scratches
Minor surface scratches represent the most common and least severe form of curb rash.
These marks typically affect only the clear coat, a transparent protective layer applied over the wheel’s paint.
They often manifest as small white marks, faint scuffs, or hazy patches around the rim’s edge.
As the underlying paint is generally undamaged, repairing this type of damage is often quite straightforward.
Light sanding, polishing and the application of a new clear coat are usually sufficient to restore the wheel’s original luster.
Addressing this damage promptly helps protect the wheel from future wear and tear.
2. Moderate Scratches
Moderate scratches are deeper and typically damage both the clear coat and the paint layer.
In some instances, the underlying primer layer becomes visible, indicating that the wheel has lost a portion of its protective coating.
These scratches feel rough to the touch and can be easily identified even from a distance.
Repairing this type of damage requires more than just polishing.
A comprehensive repair of the affected area typically involves sanding, priming, painting and applying a clear coat.
If left unrepaired, moisture and brake dust can gradually cause further deterioration of the exposed surface.
3. Deep Gouges
Deep gouges occur when an impact with a curb is severe enough to cut through to the underlying metal of the wheel.
In the case of alloy wheels, this means that the underlying aluminum metal becomes visible.
This damage often manifests as deep grooves, sharp cuts, or chipped-off fragments along the rim.
As the underlying metal is exposed, the corrosion process can begin very rapidly.
Repairs typically involve sanding the affected area, using filler to restore the damaged section and repainting it.
Repairing deep gouges requires meticulous care to ensure that both the aesthetic appeal and the smooth finish of the wheel are fully restored.
4. Bent or Structurally Damaged Wheels
Bent or structurally damaged wheels represent a far more serious issue than mere surface scratches.
This occurs when a wheel strikes a curb with significant force, causing the rim to become deformed.
In some instances, cracks may also develop, thereby compromising driving safety.
Common symptoms include steering wheel vibration, uneven tire wear, or air leaks from the tire.
This type of damage should be inspected by a professional, as superficial repairs cannot resolve structural issues.
If a wheel is cracked or severely bent, replacing it is often the safest course of action.
Tools
| Tools | Why It Is Needed | How to Use It |
|---|---|---|
| Sandpaper – 180 to 2000 Grit | Sandpaper removes scratches, smooths out damaged areas and helps prepare the wheel for primer and paint. Different grit levels are essential; coarse grit removes damage, while fine grit smooths the surface prior to finishing. | For deep scratches, start with a low grit such as: 180 or 320. Use a medium grit such as: 600, to smooth the area. Before painting, finish with a grit between 1000 and 2000 so that the repaired area blends seamlessly with the rest of the wheel. Sand evenly and avoid applying excessive pressure. |
| Masking Tape | Masking tape protects the tire, valve stem and surrounding parts of the wheel from sanding dust, primer and paint overspray. It helps keep the repaired area clean and tidy. | Apply tape around the edge of the damaged rim and cover the tire sidewall. Press the edges down firmly to ensure that paint does not seep underneath the tape. Remove the tape only after the paint has dried completely to avoid damaging the finish. |
| Plastic Sheeting | Plastic sheeting covers larger areas surrounding the wheel, specifically the tire, brake components and body panels. It provides protection against accidental damage caused by paint overspray. | Spread the sheeting over the surrounding parts and secure it in place using masking tape. Keep it taut to prevent it from coming into contact with the wet paint during spraying. |
| Wheel Cleaner | Cleaning is crucial, as brake dust, grease and road grime can prevent the primer and paint from adhering properly to the surface. Repairs performed on dirty surfaces are often weak and of poor quality. | Spray cleaner onto the wheel and scrub thoroughly to clean the damaged area. Before sanding or applying any filler, rinse the area with water and allow it to dry completely. |
| Degreaser | A degreaser removes oil, wax and residual grime that cannot be removed through ordinary washing. This improves paint adhesion. | After washing, apply the degreaser using a clean cloth. Continue wiping the damaged area until it feels dry and free of any greasiness. Allow it to air-dry before proceeding to the next step. |
| Metal Filler | Filler is required when scratches are deep enough to expose the underlying metal. It rebuilds the damaged area and helps restore the wheel to its original shape. | Apply a small amount of filler specifically to the damaged area. Allow it to dry completely, then sand it smooth until it sits flush with the surrounding surface of the wheel. |
| Primer Spray | Primer creates a bonding layer between the repaired surface and the paint. It also helps protect exposed metal areas from rusting. | 7.2 Shake the can thoroughly and spray light coats from a short distance. Allow each coat to dry before applying the next one. Avoid over-spraying. |
| Wheel Paint | Wheel paint restores the original color and covers the underlying filler or primer. To ensure the repaired area blends seamlessly, it is essential to match the original finish. | Apply several thin coats rather than one thick coat. Keep the can steady and maintain a continuous motion to prevent the paint from dripping. Allow the paint to dry between coats. |
| Clear Coat Spray | A clear coat protects fresh paint from water, UV rays, brake dust and future wear and tear. It also restores the shine. | Spray two or three light coats onto the painted area. Allow ample time for it to dry completely before washing the vehicle or driving in wet conditions. |
| Microfiber Cloth | Microfiber cloths are safe for wiping away dust, cleaners and residue and they do not scratch the wheel’s surface. | Use one cloth for cleaning and a second, dry cloth for the final wipe-down. Avoid reusing dirty cloths, as trapped dust or particles can scratch the surface. |
| Rotary Tool | A rotary tool can accelerate the sanding process for deep damage and assist in shaping the repaired areas. It is useful for larger gouges, although it is not always necessary. | Use the tool at a low speed with a sanding attachment. Move it slowly and avoid holding it in one spot for too long, as this can remove excessive material. |
| Sanding Block | A sanding block ensures uniform pressure and helps create a smooth, level finish. It prevents the uneven sanding that can occur when sanding by hand. | Wrap the sandpaper around the block and sand in straight, unidirectional strokes. This provides better control and reduces the likelihood of creating depressions on the wheel’s surface. |
How to Repair Curb Rash on Wheels – Easy Yet Effective
To properly repair curb rash, it is essential to address the damaged layers in the correct sequence.
Wheels consist of multiple layers, including a clear coat, paint, primer and a metal base.
If even a single step is skipped, the repair may look good initially, but it could deteriorate later due to peeling paint, discoloration, or rust formation.
Dedicating ample time to each stage ensures a more durable and flawless repair.
1. Cleaning the Wheel
The first step is to thoroughly clean the wheel, as dust, brake dust and grease can prevent the filler, primer and paint from adhering properly.
Brake dust contains tiny metal particles generated by the braking system, which can become lodged inside scratches.
If these particles are left behind, they can compromise the smoothness of the surface finish once the repair is complete.
Wash the wheel with a high-quality cleaner to remove all debris from the damaged area.
Pay particular attention to the edges of the scratches, where dust is most likely to accumulate.
After cleaning, dry the wheel completely; even a trace of moisture trapped inside the scratches can hinder paint adhesion and subsequently lead to blistering of the paintwork.
2. Masking the Tire and Surrounding Areas
Masking protects areas that should not be sanded or painted.
The tire sidewall, valve stem and sections of the wheel adjacent to the repair site should be covered to prevent accidental paint overspray or scratches.
This also helps create a clean and precise repair line, giving the wheel a more professional finish once the work is completed.
Carefully apply masking tape along the edges of the damaged area, ensuring it adheres firmly to the surface.
If you are using spray paint, cover the surrounding sections with plastic sheeting.
Proper masking saves time during cleanup and prevents paint overspray from landing on the tires.
3. Sanding the Damaged Area
Sanding removes the damaged coating and smooths out scratched surfaces, allowing the new material to adhere properly.
If the curb rash is deep, start with coarse-grit sandpaper, as the coarser grit removes rough edges more quickly.
This helps create a uniform surface before the repair work is completed.
Once the deep marks have been reduced, use fine-grit sandpaper to smooth the area.
Feathering the edges is crucial, as it ensures the repaired section blends seamlessly with the rest of the wheel.
This prevents the repaired area from appearing raised or uneven after painting.
4. Filling Deep Scratches
If the curb rash has caused a piece of the metal to break off, a filler is often required to fill the resulting void.
This is common in cases of deep scratches where deep gouges or missing sections of metal are clearly visible along the rim’s edge.
Filler helps restore the wheel to its original shape before the painting process begins.
Apply the filler evenly, confining it strictly to the damaged area.
Once it has dried completely, sand it down until it is smooth and flush with the rest of the wheel’s surface.
Rushing this step can leave behind bumps or ridges, which will be easily visible after the paint is applied.
5. Applying Primer to the Surface
Primer prepares the wheel for painting and helps protect the exposed metal.
It creates a bonding layer between the repaired area and the paint.
Without primer, the paint may not adhere properly and could peel off prematurely.
Instead of applying a single thick coat, apply several thin layers.
This prevents the paint from dripping and creates a smooth base.
Allow sufficient drying time between each coat, as wet primer beneath the paint can later lead to cracks or an uneven surface.
6. Painting the Wheel
Painting restores the wheel’s original color and hides the repaired area.
Wheel paint works best when applied in several thin layers; thick paint can run, fail to dry properly, or leave the surface rough.
To ensure that the repaired section blends seamlessly with the rest of the wheel, it is essential to match the original factory color precisely.
Hold the spray can at a consistent distance and move it evenly across the wheel.
Allow each coat to dry before applying the next.
This allows the color to build up gradually, resulting in a smooth finish that closely resembles the original surface.
7. Applying a Clear Coat
A clear coat protects the fresh paint from moisture, sunlight, brake dust and road debris.
It also gives the wheel its final shine and smoothness.
Without it, the paint can fade quickly and becomes vulnerable to scratches.
Once the paint has dried, apply several thin layers of clear coat.
This seals the repaired area and enhances its texture.
A high-quality clear coat helps protect the repair from future wear and tear, while also giving the surface a more authentic, factory-like appearance.
8. Drying and Curing
Drying and curing are often assumed to be the same thing, but they are two distinct processes.
While paint may feel dry to the touch within a short time, being fully cured means that its layers have completely hardened.
If you start driving too soon, the repair could be compromised before it has fully set.
Allow the wheel to remain undisturbed for the specified curing time.
During the curing process, protect it from water, dust and excessive heat.
Proper curing ensures the longevity of the repair and minimizes the risk of the paint peeling, deteriorating, or losing its luster.
How to Do Blending and Final Finishing Touches
The final stage of curb rash repair is the one that ensures the repaired area looks completely natural rather than like a patch.
Even after sanding, filling, priming and painting, if the finish is not blended correctly, the repaired section can stand out.
Even the slightest discrepancy in texture, gloss, or edge lines can make the repair work clearly visible.
These final finishing touches help smooth the transition between the repaired area and the wheel’s original surface, resulting in a finish that looks completely factory-fresh.
1. Light Wet Sanding for a Smooth Finish
Light wet sanding is an optional step, but it often makes a significant difference in the final appearance.
It helps correct minor paint imperfections such as: rough spots, dust particles, or slight surface irregularities left behind after spraying.
Water is used during this process because it reduces friction, keeps the surface cool and washes away the fine paint particles generated during sanding.
Very fine-grit sandpaper (typically 1500 to 2000 grit) is gently applied to the repaired area once the paint and clear coat have fully dried.
The objective is not to remove the paint, but rather to uniform the surface and blend it seamlessly with the wheel’s original finish.
Applying excessive pressure can strip away the fresh paint, so light and consistent movements are essential.
This step helps give the repair a smoother and more professional look.
2. Polishing to Restore Luster
Polishing helps restore shine and ensures that the repaired area blends seamlessly with the surrounding sections of the wheel.
Fresh paint can sometimes appear slightly dull or coarse compared to the wheel’s original factory finish.
Polishing smooths out the uppermost layer and improves the way light reflects off the surface.
A polishing compound is typically applied once the clear coat has completely dried.
It is gently rubbed in using a clean cloth or a polishing pad until the surface appears uniform and glossy.
This step enhances the aesthetic appeal and renders the transition line, where the old and new finishes meet, less visible.
When executed correctly, polishing often makes a DIY repair look much neater and less conspicuous.
3. Carefully Removing Masking Tape
Removing masking tape may seem like a simple task, but doing it incorrectly can ruin a fresh paint job.
If the tape is pulled off too quickly, or removed before the paint has fully set, the edges of the repaired area may peel, or the paint lines may appear jagged.
For this reason, timing is crucial.
The tape should be removed slowly and at an angle; the ideal moment is when the paint feels dry to the touch but has not yet fully hardened.
This results in cleaner paint edges and minimizes the risk of the paint peeling.
If plastic sheeting was used, it should also be removed with care to prevent dust from settling on the fresh clear coat.
Exercising caution during this final step safeguards all the work done so far and ensures that the repair work looks neat and professional.
Know, Common Mistakes to Avoid Them While Repairing Curb Rash
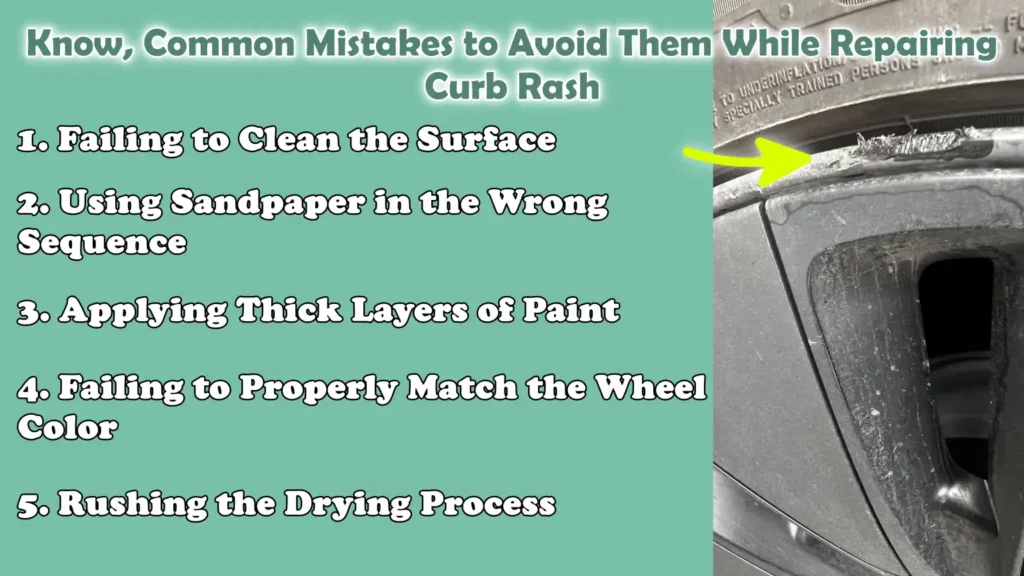
Repairing ‘curb rash’ (scratches on the wheel) might seem like a straightforward task, but minor errors made during the preparation or finishing stages often lead to poor results.
The wheel may appear fixed initially; however, if incorrect repair methods are employed, the paint may peel, the finish may look uneven, or rust may begin to form beneath the new coating.
Understanding these common mistakes ensures that the repair is more durable, flawless and long-lasting.
As well as, whenever curb rash scratches through the wheel’s coating, then it literally exposes more vulnerable to the corrosion, as even engineering research shows that aluminium wheels that depends heavily on their protective coating that resist surface damage from the moisture and road salt, that’s why repairing the curb rash quickly is not only cosmetic but it also helps you to preserve the wheel finish.[¹]
1. Failing to Clean the Surface
One of the most common mistakes in wheel repair is failing to properly clean the surface.
Brake dust, grease, road tar and fine particles accumulate on wheels, particularly along the rim edges, where ‘curb rash’ typically occurs.
These particles can remain trapped inside the scratches, preventing fillers, primers, or paint from adhering correctly.
If the wheel is not thoroughly cleaned, dirt can become trapped beneath the new coating.
Once the repair dries, this often leads to issues such as blistering, paint peeling, or a rough surface texture.
Thoroughly cleaning the surface prior to sanding significantly improves the quality of the repair, as all subsequent layers bond directly to the wheel rather than sitting atop a layer of dirt.
2. Using Sandpaper in the Wrong Sequence
Using sandpaper in the incorrect sequence can exacerbate the damage rather than repairing it.
Using very fine-grit sandpaper on deep scratches typically fails to remove sufficient material, whereas using very coarse-grit sandpaper on minor damage can inflict unnecessary scratches on the surrounding finish.
The correct sequence is crucial: coarse-grit sandpaper serves to reshape the damaged area, while fine-grit sandpaper smooths the surface in preparation for painting.
Applying paint directly over coarse sanding marks often results in those marks becoming visible beneath the new finish.
Gradual sanding creates a smoother surface, allowing the repaired section to blend naturally with the rest of the wheel.
3. Applying Thick Layers of Paint
Applying a thick layer of paint in a single pass is a common mistake; while it may seem faster, it typically leads to visible defects.
Thick layers can drip, sag, dry unevenly, or trap solvents beneath the surface.
This can cause the paint to wrinkle or remain soft for an extended period.
Thin layers dry more evenly and yield a smoother finish.
They also help the repair blend more closely with the wheel’s original texture.
Applying multiple light coats of paint may take longer, but it generally results in a stronger, better-looking repair.
4. Failing to Properly Match the Wheel Color
A wheel’s color is often far more complex than it appears at first glance.
Many factory wheels feature silver, gray, machined, satin, or metallic finishes, which can shift slightly under varying lighting conditions.
Using the wrong shade of paint can cause the repaired area to stand out, even if the surface itself is smooth.
To achieve a seamless look, it is essential to match the original color as closely as possible.
If the color does not match precisely, even a minor repair can become clearly visible.
Consulting the manufacturer’s instructions for the specific wheel finish, or using paint specifically formulated for that particular wheel style, yields superior results.
5. Rushing the Drying Process
Rushing the drying process can ruin even an otherwise successful repair.
The paint may feel dry to the touch on the surface, but the underlying layers may still be soft.
Touching the area too soon, removing masking tape prematurely, or driving the vehicle immediately can cause blemishes and compromise the durability of the finish.
Allowing ample time for drying and curing ensures a robust repair.
It guarantees that the paint cures completely, thereby minimizing the risk of peeling or the appearance of cloudy spots.
Rather than rushing through the repair process, waiting a little longer often leads to significantly better results in the long run.
When You Should Not Attempt DIY Repairs
While DIY wheel scratch repair works well for many superficial blemishes, not every wheel issue can be safely resolved at home.
Certain types of damage compromise the wheel’s structural integrity, balance, or safety; performing only cosmetic repairs may hide the problem, but it does not actually resolve it.
The wheel supports the vehicle’s weight, absorbs road shocks and rotates at high speeds; therefore, serious damage must be repaired with extreme caution.
Knowing when not to attempt DIY repairs can save you from costly mistakes and significant safety hazards.
1. Cracked Wheels
A cracked wheel should not be treated as a simple DIY project.
Severe impacts such as: striking a curb, specially at high speeds, as it can cause cracks; these often appear on the wheel’s rim, spokes, or inner barrel.
Even a hairline crack can propagate and enlarge while driving, as the wheel is constantly subjected to weight and pressure.
Cracks can lead to sudden air loss, vibrations, or even total wheel failure.
Some very fine cracks (hairline fractures) can be difficult to detect, as they may be hidden beneath accumulated dirt or brake dust.
Although sanding and repainting may superficially hide cracks, the underlying damage to the metal’s structural integrity remains.
It is crucial to have the wheel inspected by a professional, as structural cracks often require specialized repair techniques or a complete wheel replacement.
2. Severely Bent or Structurally Damaged Wheels
Bent wheels should not be repaired in the same manner as minor superficial scratches resulting from minor road mishaps.
Severe impacts can alter the structural shape of a wheel, even if visible external damage (such as scratches) appears minor.
A bent wheel can cause a slow air leak from the tire or induce vibrations in the steering wheel at certain speeds.
Structural damage affects how the wheel rotates and compromises its overall balance.
Consequently, this can lead to premature tire wear and place excessive strain on suspension components.
Standard DIY repair tools typically lack the precision required to accurately measure a wheel’s concentricity.
If a wheel feels unstable, vibrates while driving, or if the tire does not seat properly, having it professionally straightened or replaced is generally the safest course of action.
3. Excessive Rust or Peeling Paint
If a wheel exhibits extensive rust or if paint is peeling off in large sections, a superficial “spot repair” (repairing only a specific area) may not be sufficient.
Rust often spreads beneath the paint, particularly when moisture seeps underneath a compromised clear coat (the protective top layer).
What appears on the surface to be a small blister may, in reality, be causing far more significant damage to the underlying metal.
Simply sanding away the visible damaged area may leave active rust hidden beneath the surrounding paint intact.
Consequently, the top layer of paint may begin to peel again shortly thereafter.
In such cases, the wheel typically requires a comprehensive restoration process, which involves stripping the existing paint, refinishing the surface and resealing it.
Professional refinishing yields superior results, as it ensures uniform treatment across the entire surface of the wheel.
4. High-End Alloy Wheels: Where Matching the Finish Precisely Is Crucial
Some premium wheels feature specialized finishes that are difficult to replicate accurately at home.
These may include machined surfaces, diamond-cut faces, satin coatings, or multi-layered metallic finishes.
Standard wheel paints often fail to reproduce these factory-applied finishes with complete precision.
No matter how skillfully the repair work is executed, a discrepancy in color or sheen may still be noticeable.
This is particularly critical for luxury vehicles, where the appearance of the wheels impacts both the vehicle’s resale value and its overall aesthetic appeal.
Professional wheel finishers utilize specialized tools and coating techniques that match the original finish with greater accuracy, a distinct advantage that often proves invaluable for high-end alloy wheels.
How to Prevent Future Curb Damage
Preventing damage caused by curbs (the raised edges along the roadside) is far easier than repairing it.
Most wheel damage caused by curbs occurs while driving at low speeds, particularly when parking, maneuvering in tight spaces, or driving too close to raised concrete edges.
Even the slightest contact can scratch the protective coating applied to alloy wheels.
Once this layer is compromised, the wheel becomes highly susceptible to staining, corrosion and further wear and tear.
By adopting a few simple habits, you can significantly reduce the likelihood of future damage.
1. Techniques for Parking Near Curbs
Many instances of curb damage occur during parallel parking, as drivers rely entirely on their mirrors and fail to accurately judge their distance from the curb.
The wheels can strike the curb before the driver even realizes it.
This is more common in vehicles equipped with low-profile tires, as the tire sidewall offers less protection to the rim.
A safer approach is to approach the curb slowly and leave a small gap, rather than attempting to park as close to it as possible.
Carefully utilizing your side mirrors, and checking the position of your wheels before bringing the vehicle to a complete stop, as it can help minimize accidental contact.
Abruptly turning the steering wheel while maneuvering near a curb is a common cause of scratches on the rims.
2. Using Wheel Protectors or Rim Guards
Rim guards can help protect the outer edge of the wheel from minor contact.
These are protective strips or rings that are fitted onto the rim’s edge; These act as a buffer (protective shield) between the wheels and the curb.
They are particularly useful for alloy wheels that feature exposed edges.
While they cannot prevent every type of damage, they can withstand minor scratches and scrapes that would typically leave marks on the wheels.
This helps minimize external damage incurred during daily parking maneuvers.
They are most effective against low-speed contact; however, to ensure they remain securely in place while driving, they must be installed correctly.
3. Choosing a Safe Parking Spot
The location where a vehicle is parked significantly influences the likelihood of the wheels getting scratched by a curb.
Tight spaces, high curbs, angled parking spots and congested roadside areas, all of these factors increase the probability of contact occurring between the wheels and the curb.
Parking too close to damaged curbs (road edges) featuring broken concrete can also result in deep scratches on the wheels.
Opting for a wide parking space provides ample room to maneuver the vehicle correctly, thereby preventing the wheels from coming too close to the curb.
Whenever possible, avoiding extremely high curbs or poorly lit areas can help mitigate risks.
Spending a few extra seconds to select a safe parking spot can often save you from costly wheel repairs in the future.
4. Careful Driving Habits in Tight Spaces
The risk of scraping against a curb is not limited solely to parking situations.
It can also occur when making sharp turns in drive-through lanes, narrow alleys, garages and construction zones.
When navigating tight corners, the rear wheels often track closer to the curb than anticipated, particularly with longer vehicles.
Driving slowly in these areas gives you more time to gauge the position of your wheels.
Taking wide turns and avoiding sharp angles can help protect your rims from damage.
Understanding how your vehicle’s wheels track while turning is the most effective way to prevent recurring curb damage.
Read More:
- How to Fix Scratched Alloy Wheels
- How to Protect Wheels From Corrosion
- How to Remove Brake Dust From Wheels
- How to Clean Alloy Wheels Properly
- How to Upgrade Wheels Safely
- How to Check Wheel Offset Compatibility
- How to Fix Wheel Wobble Issue
- How to Diagnose Wheel Wobble at Speed
- How to Inspect Wheel Hub Damage
- How to Replace Broken Wheel Stud
- How to Remove Stuck Lug Nuts
- How to Torque Lug Nuts Correctly
- How to Check Wheel Lug Torque
- How to Install Directional Tires Properly
- How to Identify Directional Tires Correctly
- How to Choose Tires for Snow Driving
- How to Choose Tires for Wet Roads
- How to Check Tire Load Rating
- How to Store Tires Properly Long Term
- How to Prevent Tire Dry Rot
- How to Fix Tire Bulge Issue
- How to Inspect Tire Inner Sidewall Damage
Conclusion – How to Repair Curb Rash on Wheels
The parking mistake is the number 1 reason of having most of the curb rashes, but you need to repair them in terms to protect the wheels from all kinds of mishaps.
When a wheel scrapes against a curb, it damages the clear coat and paint, sometimes even exposing the underlying metal.
Once this protective layer is compromised, the wheel becomes highly susceptible to moisture, brake dust, road salt and oxidation (rusting).
Over time, what begins as a minor scratch can escalate into rust, peeling paint, or the need for major repairs, costs that far exceed those of initial maintenance.
Fortunately, in many cases where the damage is limited to superficial scratches or minor scuffs, curb rash can be successfully repaired.
The key lies in understanding that wheel repair is not merely about hiding a blemish; rather, it involves properly restoring the protective layers.
Cleaning removes accumulated grime, sanding smooths out damaged surfaces, filler restores the wheel’s original contours, primer shields the exposed metal, paint restores the wheel’s aesthetic appeal and the clear coat protects the repaired area against future wear and tear.
So, that’s it from this guide about How to Repair Curb Rash on Wheels, even you can ask related queries below.
Frequently Asked Questions
FAQ 1: Can ‘curb rash’ (scratches caused by scraping against a curb) on wheels be repaired at home?
Yes, if the damage is limited solely to the surface level, many instances of curb rash can be repaired right at home. Minor scuffs, light scratches and damage to the topcoat can often be fixed by sanding, and, if necessary, by applying filler, primer, matching paint and a clear coat. This repair method works best when the wheel is neither cracked nor bent. Taking the time to properly clean and sand the wheel and allowing each layer to dry completely, yields far better results than attempting to rush through the job. The DIY approach is most suitable in cases where the damage is purely cosmetic and the wheel remains structurally sound without any adverse effects.
FAQ 2: Is curb rash merely a surface-level (cosmetic) issue?
In many instances, curb rash begins as a cosmetic issue, as it mars the exterior finish of the wheel. It typically damages the clear coat and paint first, thereby altering the wheel’s appearance. However, if the scratch is deep enough to expose the underlying metal, the risk of corrosion at that specific spot increases. In cases involving severe impacts, the wheel may be bent or cracked in addition to having curb rash, at which point it becomes a safety concern. Therefore, rather than dismissing every scratch as merely superficial damage, it is essential to assess the true depth of the damage.
FAQ 3: How long does it take to repair curb rash on wheels?
The time required for the repair depends on the severity of the damage and the number of layers that need to be restored. Repairing minor surface scratches may take only a few hours, as they often require nothing more than cleaning, sanding and polishing. Repairing deep scratches, however, can take significantly longer, as the filler, primer, paint and clear coat all require time to dry. Even if the manual labor involved is minimal, the complete drying (curing) process can take a full day or even longer. It is crucial to allow ample time for the vehicle to dry, as driving it too soon can damage the new finish.
FAQ 4: What tools are needed to repair curb rash?
Basic tools typically include sandpaper, masking tape, wheel cleaner, degreaser, filler for deep scratches, primer, paint that matches the wheel’s color, clear coat and clean microfiber cloths. Some people also use a sanding block or a rotary tool to shape and smooth out deep scratches. These tools are utilized at various stages of the process, as each tool assists in repairing a specific aspect of the wheel’s surface. Using the correct materials ensures a cleaner repair and a longer-lasting finish.
FAQ 5: Can curb rash lead to rust?
Yes, if the curb rash penetrates the protective layer and exposes the underlying metal, it can lead to rust. Alloy wheels are typically protected by a clear coat and paint, which help to repel moisture, road salt and brake dust. When these layers become compromised, oxidation can begin in the exposed areas. This is particularly common in regions that experience frequent rainfall or where road salt is used during the winter months. Promptly repairing damaged areas helps restore protective barriers and can minimize long-term surface deterioration.
FAQ 6: Should curb rash be sanded before painting?
Yes, sanding is one of the most crucial steps in repairing curb rash. It removes rough edges, smooths out scratches and helps the new primer and paint adhere properly. Without sanding, the repaired area may remain uneven and the paint may not bond correctly. For more extensive damage, starting with a coarser grit and then progressing to a finer grit ensures a smooth finish. Proper sanding allows the repaired area to blend seamlessly with the rest of the wheel.
FAQ 7: Is filler required for every curb rash repair?
No, filler is only necessary when the damage cuts into the wheel’s material, resulting in pits or visible missing metal. Minor scratches that affect only the clear coat or paint typically do not require filler. If a section of the alloy has broken off due to contact with a curb, filler helps reconstruct the original shape before painting. Using filler when it is not needed can complicate the repair process; therefore, it is essential to first assess the depth of the damage.
References:
[1] Effects of Alloy Composition and Condition on Filiform Corrosion Performance of Cast Aluminum Wheels
https://saemobilus.sae.org/papers/effects-alloy-composition-condition-filiform-corrosion-performance-cast-aluminum-wheels-970021

Hello Folks, Dean Shali here to help you out to solve the problems with your lovely vehicle, as i have lots of experience and knowledge about automotive industry as i woks directly with the customers and repair vehicles and i love to help the people to keep their cars safe and running smoothly.