Written By: Dean Shali
Fact Checked By: Sabré Cook
Reviewed By: Tamara Warren
Yes, you can safely remove those really hard and stubborn lug nuts, but you just need to understand how corrosion, thread damage and excessive torque affects wheel hardware.
Having a stuck lug nut not seems like big problem at all, until you are stranded with a flat tire, a frozen wheel and even tools becomes completely useless.
As well as, every year there are countless drivers literally damage their wheel studs, cracks their alloy rims or strip that lug nuts simply because they actually used the wrong removal method or actually applied too much brute force.
Basically, lug nuts are literally designed to hold the thousands of pounds of pressure even it ensures rain, mud, road salt, brake heat and constant vibration at the highway speeds as well.
And because of that, over the time the rust forms between the treads, heat expands that metallic surfaces and over-tightens from impact guns that can practically weld that lug nut to the wheel stud.
That is the reason that your lug nut looking completely normal from the outside view but still you are facing incredible difficulty to remove them.
But, here’s the catch you can remove most of the stuck lug nuts safely without damaging your wheels if you just understand why they actually seized in the first place.
So, in this guide you’ll learn everything about How to Remove Stuck Lug Nuts so that you can know how to use penetrating oils and breaker bars to extractor sockets and heat methods: and with those methods you can even remvoe severely rusted, rounded edges, swollen caps or over-tightened wheel hardware in easy way.
So, Understand Why Do Lug Nuts Get Stuck At the First Place?
Whenever a vehicle is driven, its lug nuts are constantly subjected to pressure, heat, water, dust and the effects of changing weather conditions.
Although they may appear to be mere small metal parts, they play a crucial role, not only in supporting the vehicle’s entire weight at high speeds but also in securely fastening the wheel to the hub.
Over time and for a variety of reasons, removing lug nuts can become extremely difficult.
In many instances, this issue develops gradually and without any clear warning; drivers often remain unaware of the problem until they suddenly find themselves unable to remove a wheel while changing a tire or dealing with a roadside emergency.
Understanding the root causes of stuck lug nuts can help prevent damage to the wheels, broken studs, stripped threads and costly repair bills.
Most lug nuts become stuck due to rust and corrosion, improper installation, heat exposure, defective hardware, or the accumulation of dirt and debris around the threads over months or years of use.
1. Rust and Corrosion
One of the most common reasons for lug nuts getting stuck is rust and corrosion.
Lug nuts and wheel studs are made of metal and over time, the metal naturally reacts when exposed to moisture, oxygen, road salts and humidity.
When water seeps into the threads, rust begins to form between the lug nut and the wheel stud.
As corrosion progresses, the gritty particles of rust increase friction and cause the metal surfaces to seize up and bind against one another.
In colder regions, where heavy amounts of road salt are used during the winter months, the corrosion process can accelerate significantly; this occurs because salt acts as a catalyst, speeding up the chemical reaction that damages the metal.
Vehicles that remain parked and unused for extended periods are also at a higher risk of having their lug nuts seize up.
This occurs because moisture becomes trapped around the wheel hardware and the wheel does not undergo regular movement that would otherwise facilitate its removal.
In severe cases, the corrosion can be so intense that the lug nut appears almost welded to the stud.
This is why removing wheels from older vehicles, or those that have not been properly maintained, often necessitates the use of penetrating oil, heat, or extractor tools.
2. Over-Torqued Lug Nuts
Lug nuts become over-torqued when excessive force is applied while tightening them during wheel installation.
This situation is particularly common when mechanics or drivers use high-speed impact guns without verifying the final torque setting with a torque wrench.
Lug nuts are designed to be tightened within a specific torque range to securely hold the wheel in place without damaging the threads or stretching the wheel studs.
When excessive force is applied, the threads bind together extremely tightly, making them very difficult to remove in the future.
Over-tightening also places immense stress on the wheel studs, increasing the risk of stripped threads, warped brake rotors and broken studs during removal.
Many drivers face this issue after visiting a tire shop, only to discover later that loosening the lug nuts with a standard tire iron is nearly impossible.
In severe cases, the force required to remove the nut may far exceed the safe capacity of common roadside tools.
3. Cross-Threaded Lug Nuts
Cross-threading occurs when a lug nut is installed at an incorrect angle instead of being screwed smoothly onto the wheel stud.
Instead of engaging with the natural grooves of the thread, the lug nut cuts into them, thereby damaging the metal surface.
This typically occurs when a lug nut is installed too rapidly using a power tool, or when the installer forcefully tightens the nut without properly aligning it first.
Once the threads are compromised, the lug nut cannot be tightened correctly, making it extremely difficult to remove later on.
Drivers may notice a grinding sound, unusual resistance, or a rough sensation while tightening or loosening the nuts.
A cross-threaded lug nut can cause permanent damage to both the lug nut and the wheel stud, often necessitating the replacement of the entire hardware assembly.
Ignoring cross-threading can ultimately lead to wheel instability or damaged studs that may fracture under stress.
4. Heat Expansion Caused by Braking
The heat generated by the braking system can also be a contributing factor to seized nuts.
Every time the brakes are applied, particularly during hard braking or while driving down long inclines, a significant amount of heat accumulates around the brake rotors, wheel hubs and the surrounding nuts.
Metal expands when heated and due to repeated cycles of heating and cooling, the nuts can become progressively tighter on the wheel studs over time.
In vehicles used for towing, driving in mountainous terrain, racing, or stop-and-go traffic, brake temperatures are often significantly higher than under normal driving conditions.
Excessive heat can also damage the protective coating applied to the nuts, thereby increasing their susceptibility to rust and corrosion.
In some instances, the combination of heat, moisture and grime can create hard deposits around the nut threads, making them extremely difficult to remove.
This is one reason why nuts may feel tighter immediately after driving, whereas they may not seem quite as tight once the vehicle has completely cooled down.
5. Damaged or Swollen Nuts
Damaged or swollen nuts are another primary cause of the difficulties faced when attempting to remove them.
Many modern vehicles utilize nuts featuring a decorative chrome cap fitted over the main metal body.
Over time, moisture can seep beneath these thin caps, causing the underlying metal to rust and swell.
As the metal expands, the shape of the nut undergoes a slight distortion, preventing standard sockets from fitting correctly.
Drivers often identify this issue when a socket suddenly feels loose, repeatedly slips, or fails to seat fully onto the nut.
Swollen nuts can be particularly troublesome because, at first glance, they may appear normal; however, their dimensions have actually expanded slightly.
Damaged nuts, specifically those with rounded-off corners, present an even greater challenge to handle, as tools are unable to establish a proper grip on their surfaces.
Once the edges have become rounded, removing them often necessitates the use of specialized extractor sockets or professional-grade tools.
6. Accumulation of Dirt, Moisture and Road Salt
During daily driving, dirt, mud, moisture and road salt continuously accumulate around the wheel components.
Over time, these substances infiltrate the minute crevices between the nuts and the threads of the wheel studs.
Moisture accelerates the rusting process, while dirt and hard deposits create additional resistance when attempting to remove the nuts.
Road salt is particularly detrimental, as it significantly hastens corrosion and can degrade metal components at a rate far exceeding normal wear.
Vehicles frequently exposed to snow, rain, construction sites, gravel roads, or muddy terrain are more prone to dirt accumulation within the threads of their wheel hardware.
If lug nuts are neither cleaned nor removed for extended periods, the accumulated grime can harden and solidify, causing the threads to seize completely.
Regular wheel maintenance, including proper cleaning and adherence to correct torque specifications, helps mitigate these issues, making future wheel removal safer and easier.
Common Signs of a Seized Lug Nut
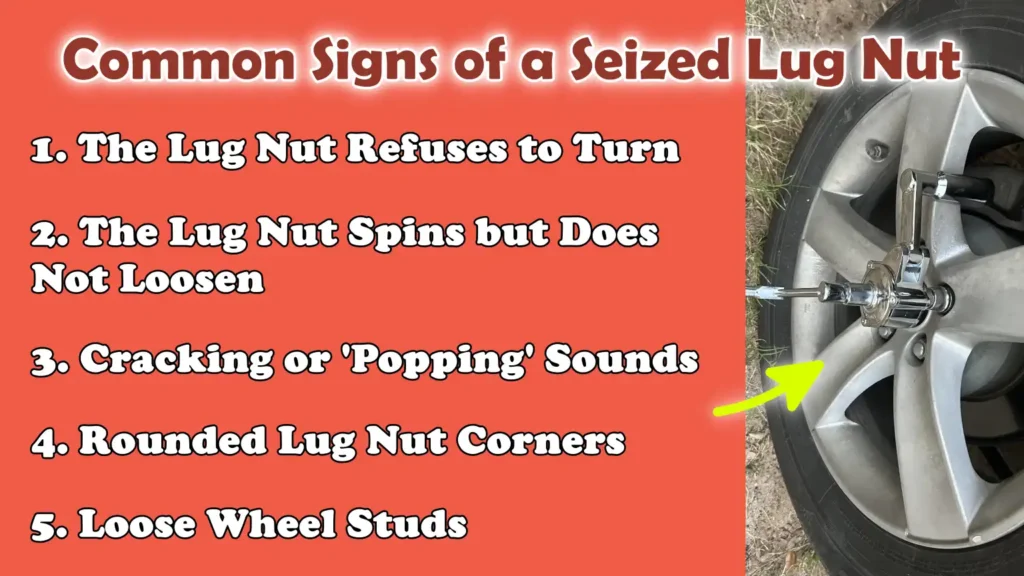
Seized lug nuts typically begin to exhibit warning signs long before they become completely impossible to remove.
Many drivers only pay attention to this issue when a tire goes flat or while changing their brakes; however, early symptoms often manifest months in advance.
Recognizing these signs can help prevent broken wheel studs, damaged alloy wheels, stripped threads and costly repair bills.
Lug nuts are designed to be easily tightened and loosened with controlled force; therefore, any unusual resistance, wobbling, noise, or tool slippage often points to an underlying issue developing within the wheel hardware.
Rust, corrosion, overtightening, damaged threads and worn-out lug nuts, all generate distinct warning signs that should never be ignored.
Understanding these symptoms helps drivers remove wheels more safely and allows them to address minor issues before they escalate into serious mechanical problems.
1. The Lug Nut Refuses to Turn
The most obvious warning sign of a seized lug nut appears when the nut refuses to turn, even when significant force is applied using a tire iron or breaker bar.
In many cases, the lug nut may feel completely “frozen” in place, as if it had been welded to the wheel stud.
This typically occurs because rust, corrosion, or excessive torque (rotational force) creates extreme friction between the threads.
Moisture and road salt can gradually induce rust within the threaded section over time, causing the metal surfaces to bond tightly together.
Overtightened lug nuts can also trigger this problem by exerting excessive force on the threads during installation.
Drivers sometimes make the mistake of applying a sudden, forceful jerk to loosen a nut; however, this can cause the wheel studs to snap or damage the socket.
A lug nut that refuses to budge at all is often an indication that the threads are severely seized and may require penetrating oil, extra leverage, heat, or specialized tools to be removed safely.
2. The Lug Nut Spins but Does Not Loosen
A lug nut that spins freely without backing out (retracting) is another serious warning sign.
At first glance, it may appear as though the nut is loosening normally; however, instead of withdrawing from the wheel, it simply continues to spin continuously in place.
This often occurs when the threads on the wheel stud become worn down or stripped within the hub assembly.
In some situations, the wheel stud itself may begin to spin along with the lug nut, as the stud has broken free from its mounting point behind the wheel hub.
Cross-threading, overtightening, corrosion and repeated improper installation can weaken the threads until they are no longer capable of maintaining a proper grip.
This issue is not merely an inconvenience; it is often a sign that the wheel hardware has sustained internal damage.
Drivers who attempt to force or further tighten the lug nut may exacerbate the damage or completely destroy the remaining threads.
In many cases, a spinning lug nut necessitates the replacement of the wheel stud to ensure that the wheel can be securely reattached.
3. Cracking or ‘Popping’ Sounds
Cracking, snapping, or ‘popping’ sounds heard while loosening lug nuts should never be ignored, as they often indicate severe stress or damage within the wheel hardware.
Some sounds may occur when rusted joints break apart, particularly in older vehicles that have been exposed to moisture and corrosion for many years.
However, loud cracking sounds can also signal that a wheel stud is stretching under pressure, weakening, or beginning to fracture.
Overtightened lug nuts place excessive strain on the studs; applying force to remove them can cause the metal to stretch beyond its safe elastic limit.
Drivers sometimes hear a sudden “pop” just before a stud snaps completely.
In other instances, this sound may arise from worn threads grinding against one another as the lug nut rotates unevenly.
Any unusual sound heard while removing lug nuts should be treated with caution, as continued force can lead to broken studs, damaged hubs, or an unsafe wheel mounting condition.
4. Rounded Lug Nut Corners
Rounded nut edges are a common indicator of a pre-existing issue or the use of improper tools.
Nuts are designed with sharp edges to ensure a firm grip when a socket is applied and turned.
When an incorrectly sized socket is used, or when tools repeatedly slip under pressure, the edges gradually wear down and become rounded.
Once this occurs, standard sockets lose their grip and begin to slip even more easily, making the removal of the nut extremely difficult.
Rounded nut edges are often caused by worn-out tools, low-quality sockets, swollen nuts, or the improper use of high-power impact guns.
While tightening a nut, drivers may notice the socket slipping, hear a clicking sound, or observe the socket disengaging from the nut.
This situation becomes increasingly hazardous as the metal edges continue to wear away, eventually leaving nothing for the tool to grip.
Nuts with severely rounded edges typically require the use of extractor sockets, hammer-driven tools, or professional repair services to be removed.
5. Loose Wheel Studs
Movement of a wheel stud while removing a lug nut is a primary indicator of a fault within the wheel hardware.
Under normal circumstances, the wheel stud should remain completely stationary while the lug nut rotates along its threads.
If the stud begins to spin, wobble, or shift from its position, it often signifies that the stud has broken away from the back of the wheel hub or that its threads have sustained severe damage.
This issue can result from years of overtightening, corrosion, frequent wheel removals, or cross-threading (improper installation).
A loose or wobbling wheel stud compromises the integrity of the wheel mounting system and if not properly repaired, it can eventually create hazardous driving conditions.
Drivers may initially perceive only a slight wobble in the stud; however, under constant stress, this damage can escalate rapidly.
Once a wheel stud begins to spin, removing the standard lug nut becomes extremely difficult and accessing the back of the wheel hub may be necessary to securely hold or replace the damaged stud.
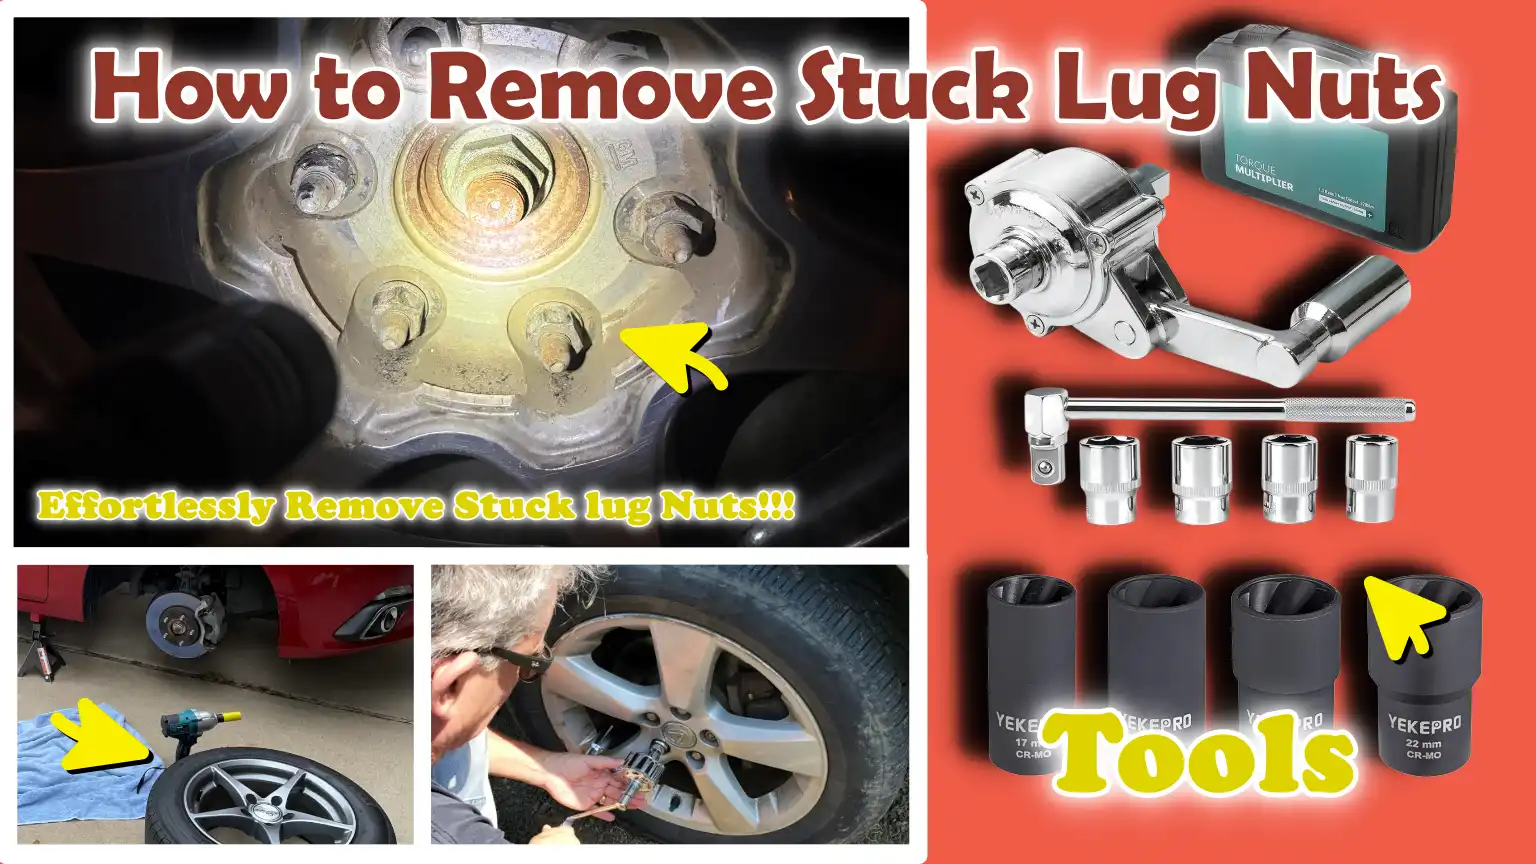
Tools
| Tool | How to Use It Properly | Important Tips |
|---|---|---|
| Breaker Bar | Attach the correct socket to the breaker bar and seat it fully onto the lug nut. Rotate the handle slowly in the loosening direction while maintaining steady and consistent pressure. Keep the tool aligned straight to prevent it from slipping or damaging the corners of the lug nut. | Whenever possible, use a 6-point socket, as it grips the lug nut more securely than a 12-point socket. Never jump on the breaker bar, as sudden and excessive force can snap the wheel studs or damage the tool. |
| Penetrating Oil | Spray penetrating oil around the base of the lug nut, particularly where the threads are located. Allow it to soak for at least 10 to 15 minutes so the oil can penetrate deep into the rusted areas. If the rust is severe, you may need to apply the oil multiple times. | Penetrating oil works best when given sufficient time to fully saturate the threads. Wiping away dust and dirt before spraying helps the oil penetrate deeper into the rust. |
| Impact Wrench | Attach the correct impact socket to the lug nut; holding the tool firmly, squeeze the trigger in short, intermittent bursts. Rather than holding the trigger down continuously for an extended period, allow the tool to do its work gradually. | Use only impact-rated sockets, as standard sockets may shatter under the intense pressure generated by the tool. When installing lug nuts, avoid overtightening them; always use a torque wrench to complete the tightening process. |
| Lug Nut Extractor Socket | Firmly hammer the extractor socket onto the damaged lug nut until it is securely seated. Attach a breaker bar or ratchet to it and, using controlled pressure, slowly loosen the nut. | When removing lug nuts, extractor sockets often damage older nuts; therefore, it is generally necessary to install new lug nuts after removal. Carefully select the correct size of the extractor socket to ensure the best possible grip. |
| Torque Wrench | Set the correct torque value on the wrench and continue tightening the lug nuts in a cross-pattern until the wrench emits a ‘click’ sound or indicates that the proper pressure has been reached. | Always use a torque wrench after reinstalling the wheels. Incorrect torque can lead to damaged wheel studs, warped brake rotors, or loose wheels. |
| Jack and Jack Stands | Position the jack beneath the correct lifting point and carefully raise the vehicle. Before working near or underneath the vehicle, place jack stands beneath sturdy support points. | Never rely solely on a hydraulic jack, as jacks can fail suddenly. For safety, always use jack stands on solid, level ground. |
| Rubber Mallet | Using controlled force, gently tap on the lug nut area or the surface of the wheel. Repeated, light blows help break apart rusted joints and gradually loosen stuck components. | Avoid using excessive force, as heavy blows can damage the wheel components. For delicate wheel surfaces, it is safer to use a rubber mallet rather than a metal hammer. |
| Heat Source – Optional | Carefully apply heat for a short duration to the area surrounding the lug nut, ensuring to avoid contact with rubber, paint, or brake components. After applying heat, attempt to remove the nut using a breaker bar or an impact wrench. | Excessive heat can damage the wheel, wheel bearings, brake components, or paintwork. Keep a fire extinguisher close at hand and never apply heat near fuel or leaking fluids. |
| Safety Gloves and Eye Protection | Wear sturdy gloves to ensure a secure grip and protect your hands. Put on safety goggles before spraying penetrating oil, using impact tools, or using a hammer to seat a socket onto a lug nut. | Many injuries sustained during wheel repairs are caused by slipping tools or flying metal fragments. Using the appropriate safety equipment significantly reduces the risk of personal injury and eye damage. |
How to Ensure Safety By Taking Precautions Before Removing Stuck Lug Nuts
Removing stuck lug nuts may seem like a simple repair task, but if proper safety precautions are overlooked, it can quickly become dangerous.
Lug nuts are tightened with immense force to ensure that the wheels remain firmly attached while driving at high speeds; this means that removing jammed or rusted lug nuts often requires heavy-duty tools, significant physical effort and sometimes the use of heat or impact tools.
Without proper preparation, the vehicle could suddenly shift, tools could slip under pressure, or a wheel component could snap unexpectedly during the removal process.
Many injuries sustained during wheel repairs occur because the vehicle was not properly stabilized before work began.
Spending a few extra minutes preparing the workspace and securing the vehicle significantly reduces the risk of accidents, wheel damage, broken studs, or serious bodily injury.
Adopting the right safety measures also makes the removal process easier, as the vehicle remains stable while you apply force to the stubbornly stuck lug nuts.
1. Park on Level Ground
Parking on a level and stable surface is one of the most critical safety measures to take before attempting to remove stuck lug nuts.
A level surface helps keep the vehicle balanced and prevents it from rolling, shifting, or sliding while you apply force to the wheel components.
When a vehicle is parked on a slope, uneven terrain, gravel, mud, or soft soil, the weight distribution changes, leaving the vehicle significantly less stable once it has been lifted with a jack.
Even the slightest disturbance can cause the jack to tilt or slip from its position, potentially creating a hazardous situation while removing a wheel.
Hard concrete or solid paved ground constitutes the safest surface for this task, as it provides uniform support to both the jack and the jack stands.
Working on level ground allows the user to apply consistent pressure to a breaker bar or impact wrench without the worry of losing their balance.
Many people underestimate the force required to loosen tightly seized lug nuts; working on unstable ground increases the risk of tools slipping and the vehicle shifting abruptly.
2. Engage the Parking Brake
Engaging the parking brake is another essential safety precaution, as it helps lock the wheels and prevents the vehicle from rolling unexpectedly during the repair process.
When force is applied to loosen tightly seized lug nuts, the resulting pressure can cause the vehicle to shift slightly if the wheels are not properly secured.
The parking brake functions by mechanically locking a specific component of the braking system, thereby providing enhanced stability when the vehicle is parked.
This is particularly crucial when you are working on the rear wheels, as the braking system helps prevent the wheel from rotating, allowing you to loosen stuck nuts with greater ease.
Many drivers of vehicles with automatic transmissions often assume that simply shifting the vehicle into “Park” mode is sufficient; however, the parking brake provides an additional, and vital, layer of safety.
Vehicles with manual transmissions should, in addition to engaging the parking brake, also be left in gear to prevent any unintended movement.
Engaging the parking brake before lifting the vehicle ensures a safer and more controlled working environment.
3. Use Wheel Chocks
Wheel chocks are a simple yet essential safety device that prevents a vehicle from rolling, particularly when you are removing tightly fastened lug nuts.
They should be placed firmly and snugly against the tires resting on the ground to ensure that the wheels do not shift either forward or backward.
Even with the parking brake engaged, the vehicle may still shift slightly when you use high-torque tools such as a breaker bar or an impact wrench.
Wheel chocks provide physical support, ensuring that the vehicle remains stable while being lifted by a jack and during the removal of wheels.
Chocks made of rubber or sturdy plastic are generally preferred, as they provide excellent grip on the ground and prevent slippage.
If dedicated wheel chocks are not available, solid blocks of wood can be used as a temporary substitute; however, purpose-built wheel chocks are safer and more reliable.
This safety precaution becomes even more critical when working on uneven surfaces or on heavy vehicles such as trucks and SUVs.
Proper placement of wheel chocks significantly reduces the risk of sudden vehicle movement, an occurrence that could otherwise result in personal injury or damage to your tools.
4. Never Rely Solely on the Jack
A hydraulic jack is primarily designed to lift a vehicle, not to provide safe support for it during repairs.
The biggest mistake people make when repairing wheels is relying solely on the jack while working near or underneath the vehicle.
A jack can fail suddenly due to a loss of hydraulic pressure, unstable ground, improper positioning, or mechanical malfunction.
If the jack slips or collapses while force is being applied to a lug nut, the vehicle could suddenly crash down, resulting in severe injuries or extensive damage.
Jack stands are specifically designed to safely support a vehicle after it has been lifted.
They provide robust mechanical support that remains stable even under heavy loads.
To safely remove a wheel, it is essential to correctly position the jack stands beneath the support points recommended by the manufacturer.
Before beginning work, gently check the vehicle’s stability once it has been placed on the stands.
Using both a jack and jack stands in tandem significantly enhances the safety of the repair process and drastically reduces the risk of accidents.
5. Wear Protective Gear
Protective gear is often overlooked during routine vehicle repairs; however, it plays a crucial role in preventing injuries when removing lug nuts.
The process of removing nuts involves the use of metal tools, the application of excessive force and exposure to rust particles, dirt and sometimes chemicals or heat, all of which can pose safety risks.
Gloves protect your hands from cuts, sharp edges, slipping tools and hot surfaces, while also improving your grip when removing nuts.
Safety glasses shield your eyes from rust particles, dirt, oil splashes and small flying metal fragments that may be dislodged when using hammers or other tools.
Protective gear becomes even more critical when you are utilizing impact tools or heat sources, as sudden movements or flying debris can occur without warning.
To minimize the risk of entanglement, one should avoid wearing loose clothing when working around rotating power tools.
Many injuries sustained during wheel repairs occur because individuals fail to accurately estimate the force and pressure required to loosen jammed nuts.
Wearing appropriate safety equipment ensures that the repair process remains safe and controlled from start to finish.
How to Remove Stuck Lug Nuts – Working Method
Safely removing a stuck lug nut requires patience, the right tools and the correct technique.
Many people make the mistake of applying excessive force and rushing the process, which often results in broken wheel studs, damaged alloy wheels, stripped lug nut threads, or personal injury.
Lug nuts can become stuck due to rust, corrosion, overtightening, temperature fluctuations and damaged threads; these factors gradually increase the friction between the lug nut and the wheel stud.
The safest approach is to start with the simplest methods first and only gradually escalate to more forceful techniques if necessary.
Understanding how each step works helps prevent unnecessary damage and increases the likelihood of successfully removing the lug nut without incurring expensive repair costs.
The goal is not merely to force the lug nut off, but to loosen it in a manner that causes no damage to the wheel hardware or surrounding components.
1. Spray Penetrating Oil
Using penetrating oil is generally the first and safest method for loosening stuck lug nuts, as it helps reduce friction between rusted or seized threads.
This oil is designed to seep into the tiny crevices between the lug nut and the wheel stud, areas where standard lubricants often cannot easily reach.
For best results, the oil should be sprayed directly around the base of the lug nut, where the threads are located.
This is typically where the greatest accumulation of rust and corrosion occurs.
If possible, the oil should also be sprayed behind the hub assembly, onto the back of the wheel stud.
This allows the oil to penetrate even deeper into the seized threads.
After spraying, it is essential to allow sufficient time for the oil to thoroughly penetrate the entire mechanism.
Lightly seized lug nuts may loosen within 10 to 15 minutes, whereas heavily rusted lug nuts may take several hours to come loose, or may require multiple applications of oil.
In severe cases, repeated applications of oil at regular intervals yield the best results.
Penetrating oil works by gradually breaking down rust and reducing the resistance between metal surfaces.
Before spraying, cleaning away any heavy accumulations of dirt or rust allows the oil to penetrate even deeper into the threads.
As well as, there’s research on the threaded fasteners that shows that static friction inside the corroded threads is the main reason that stuck fasteners resist to remove, that’s why it becomes important for lug nuts as its reverse turn may requires significantly more force than installation torque, that clearly means that loosening force is actually influenced by the surface condition and corrosion level: which is why you need to use the penetrating oil and vibration methods in terms to remove them safely and quickly.[¹]
2. Use the Correct Socket Size
Using the correct socket size is crucial; if the socket is even slightly loose, there is a risk of damaging the lug nut during removal.
Lug nuts are designed such that their edges engage firmly with the socket, ensuring that the applied force is distributed evenly across the entire metal surface.
When an incorrect socket size is used, the pressure, instead of being distributed across the entire surface of the lug nut, becomes concentrated on small sections of the corners.
This causes the corners to round off, making the nut extremely difficult to remove.
A rounded lug nut will often slip inside the socket, causing frustration and further damage to the metal.
For stuck lug nuts, six-point sockets are generally preferable, as they grip the flat sides of the nut more securely than twelve-point sockets.
Twelve-point sockets are easier to position quickly and accurately; however, they exert greater pressure on the corners of the fastener and are more prone to slipping when significant force is applied.
Compared to thin-walled or worn-out standard sockets, deep-well impact sockets offer a more robust and secure solution for removing stubborn lug nuts.
Ensuring that the socket is properly seated before applying force significantly increases the likelihood of successfully removing the nut and helps protect the wheel hardware from damage.
3. Apply Steady Pressure with a Breaker Bar
A breaker bar is one of the most effective tools for removing stuck lug nuts, as its long handle provides increased leverage (rotational force).
With the aid of leverage, an individual can generate greater rotational force with less physical effort.
The correct direction for loosening standard lug nuts is anti-clockwise, meaning the lug nut must be turned to the left.
Before applying pressure, it is crucial to seat the socket fully and securely onto the lug nut to prevent it from slipping.
Applying slow, steady pressure is more effective than making sudden, jerky movements, as this minimizes the risk of the tool slipping or the wheel stud breaking.
Proper body positioning also enhances safety when removing lug nuts.
Standing balanced on both feet, and pulling slowly with controlled force, provides greater stability than attempting to apply sudden force by leveraging one’s body weight.
Some people attempt to jump on the breaker bar; however, this creates a dangerous “shock load” that can cause studs to snap or tools to fail.
In severe cases, leverage can be further increased by sliding a long pipe over the handle of the breaker bar; however, extreme caution must be exercised to avoid applying excessive force, which could damage the hardware.
4. Try an Impact Wrench
An impact wrench can often loosen stubborn lug nuts that are difficult to remove by hand, as it combines rotational force with rapid, hammer-like blows.
These repetitive vibrations help break apart the rust and grime that have seized the threads together.
Unlike the steady force applied by a breaker bar, an impact wrench delivers a series of short, powerful bursts of energy that repeatedly strike the metal surfaces.
This vibration helps loosen seized threads while simultaneously reducing the constant tension exerted on the wheel studs.
Air-powered impact wrenches are typically used in professional repair shops, as they deliver immense torque (rotational force) and are capable of handling heavy-duty tasks over extended periods.
Cordless impact wrenches offer greater portability and provide added convenience for home use or for addressing unexpected roadside emergencies; furthermore, modern models equipped with high-power batteries are often robust enough to meet the requirements of most passenger vehicles.
When using an impact wrench, it is more effective to apply short, intermittent bursts rather than holding the trigger down continuously.
Allowing the tool to vibrate gently against the lug nut often loosens rust more effectively, while also minimizing the risk of overheating or damaging the threads.
5. Apply Heat with Caution
Heat can assist in loosening severely seized lug nuts, as metal expands when heated.
Applying heat directly to the lug nut causes it to expand slightly, which can help break the bond of rust formed between the lug nut and the wheel stud.
As the metal repeatedly expands and contracts, minute movements occur within the threads, which can reduce friction and loosen the rust.
However, heat must be applied with extreme caution, as excessive temperatures can damage surrounding components.
Brake lines, rubber seals, wheel bearings, tires, paint and brake system components should never be exposed to intense heat, as excessive temperatures can melt, weaken, or degrade them.
The heat applied via the torch should be directed solely at the nut, while surrounding components should be shielded as much as possible.
Fire safety is also paramount, as oil and other nearby fluids can ignite upon contact with an open flame.
Keeping a fire extinguisher close at hand and working in a well-ventilated area significantly enhances safety.
Heat should always be applied with caution, and only as a last resort, once all other safe methods for removing the nut have been exhausted.
6. Use a Nut Extractor Socket
Extractor sockets are specialized tools designed to remove damaged, rounded-off, swollen, or worn-out nuts, nuts that standard sockets cannot grip effectively.
The interior of an extractor socket features sharp, spiral-shaped teeth or flutes that bite firmly into the metal surface as the socket is turned.
This creates a grip that tightens further under torque (rotational force), making it possible to loosen a damaged nut, even if its corners have become completely smooth.
Before attempting to turn the socket with a breaker bar or ratchet, you should establish a secure grip by gently tapping the extractor socket onto the nut using a hammer.
These tools are particularly effective on nuts that have become severely rounded, where standard sockets would simply slip.
Selecting the correct extractor size is crucial, as a loose-fitting socket will result in a weak grip.
When turning the extractor socket, it is best to apply slow, controlled pressure, as sudden force can cause the socket to slip off the nut.
In many cases, removing a damaged nut leaves permanent marks on it, necessitating its replacement; however, the extractor tool helps prevent further damage to the wheel itself.
7. Gently Tap the Nut with a Hammer
Gently tapping the nut with a hammer can sometimes help loosen seized nuts, as the resulting vibrations help dislodge rust and debris trapped within the nut’s threads.
These small taps create minute vibrations within the seized metal surfaces, thereby loosening the grip of the rust to such an extent that turning the nut becomes significantly easier.
It is generally safer to use a rubber mallet or a small hammer rather than a large steel hammer, as this minimizes the risk of damaging the surface of the wheel or the nut.
Tapping the edges of the nut lightly and repeatedly proves more effective than delivering forceful, direct blows.
The objective is not to shatter the nut, but rather to induce controlled vibrations within the metal.
Striking the nut with a hammer after applying a ‘penetrating oil’ (rust-loosening oil) can be particularly effective, as the vibrations help the oil penetrate deep into the threads of the nut.
Excessive hammering should always be avoided, as forceful blows can cause cracks in alloy wheels, damage the wheel studs, or further distort the shape of the nut.
8. Remove Severely Damaged Nuts
Some nuts become so severely damaged or seized that standard methods cannot be safely employed to remove them.
In such situations, more rigorous techniques may be required to detach the wheel without causing further damage to the vehicle.
Cutting the Lug Nut
The method of cutting the lug nut is often employed when the lug nut has become completely rounded off or has seized onto the stud.
A rotary cutting tool or grinder is used to carefully cut through a section of the lug nut, thereby relieving the tension around the threads.
This method requires extreme caution; if the cut is made too deep, it can cause damage to the wheel or the wheel stud itself.
Wearing safety goggles is essential for eye protection, as sparks and metal fragments are generated during the cutting process.
Splitting the Lug Nut
A lug nut splitter is a specialized tool designed to cut directly through a lug nut without causing damage to the underlying wheel stud.
This tool utilizes mechanical force to drive a hardened metal blade into the lug nut until the metal fractures and splits apart.
Once split, the tension on the lug nut is released and it can typically be removed with ease.
This method is often considered safer than grinding, as it carries a lower risk of accidentally damaging the wheel.
Drilling Out the Stud
Drilling out the wheel stud is generally considered a last resort, an option pursued only after all other removal methods have failed.
A drill is used to carefully drill through the center of the wheel stud, thereby detaching the lug nut from the hub assembly.
This process demands both patience and precision; if drilled incorrectly, it can result in damage to the wheel hub itself.
Once the damaged stud has been successfully removed, it is essential to install a new wheel stud and lug nut before safely driving the vehicle again.
Now, How to Remove Rounded-Off Lug Nuts
Rounded-off lug nuts are one of the most frustrating issues associated with wheels, as their damaged edges prevent standard sockets from establishing a proper grip on the metal.
A lug nut becomes rounded when its corners wear down due to the use of incorrectly sized sockets, worn-out tools, excessive force, overtightening, or repeated slippage during removal attempts.
Once the sharp edges are gone, the socket loses its hold and, instead of turning the lug nut, merely spins uselessly against its smooth surface.
Rounded-off lug nuts are more common on vehicles where impact guns are used carelessly, or where swollen chrome-capped lug nuts no longer fit the dimensions of their corresponding sockets.
If not handled with care, attempting to forcibly remove a rounded-off lug nut can result in damage to the wheel, a broken wheel stud, or an even more complicated removal process.
The safest approach involves utilizing specialized removal techniques that gradually restore grip while simultaneously preserving the wheel hardware as much as possible.
Understanding how each method works helps drivers select the safest solution based on the severity of the damage to the lug nut.
1. The Hammer-On Socket Method
The hammer-on socket method is often the quickest way to remove slightly rounded-off lug nuts, as it creates a strong mechanical grip around the damaged surface.
In this technique, a slightly undersized socket is forcefully hammered onto the rounded lug nut, ensuring a tight, interlocking fit between the two metal components.
A sharp blow from a hammer drives the socket deep inside and over the damaged edges, allowing it to establish a grip in areas where a standard-fitting socket can no longer hold.
Once the socket is fully seated, a breaker bar or ratchet is used to apply slow, steady rotational force.
This method works best when the edges of the lug nut still retain some semblance of their original shape.
Applying controlled pressure is crucial, as sudden jerking motions can cause the socket to slip again or potentially damage the wheel stud.
Deep six-point impact sockets are generally preferred, as they provide a more secure grip on flat surfaces compared to twelve-point sockets.
In many cases, a socket hammered into place may become very tightly wedged inside the old lug nut; however, once the nut has been removed, the two can usually be separated.
2. The Extractor Socket Method
Extractor sockets are specialized tools specifically designed to remove rounded, damaged, or swollen nuts.
The interior of an extractor socket features hardened spiral flutes or reverse-cut teeth that bite into the nut as the socket rotates.
Unlike standard sockets, which rely on sharp corners for grip, extractor sockets establish their hold by digging into the metal surface of the nut as they extract it.
The greater the rotational force applied, the more firmly the extractor’s teeth grip the nut.
To use this method, an appropriately sized extractor socket is hammered onto the rounded nut until it is firmly seated.
The nut is then gradually loosened using a breaker bar or an impact wrench.
This method is highly effective, as it allows for the removal of nuts that possess an almost completely smooth outer surface.
Extractor sockets are particularly useful for severely overtightened or rusted nuts, situations where standard tools repeatedly slip.
However, as the extractor’s teeth bite deeply into the metal, the old nut is typically permanently damaged and subsequently requires replacement.
3. Bolt Extractor Kits
Bolt extractor kits are advanced tool sets designed to remove severely damaged fasteners that standard sockets cannot safely extract.
These kits often include extractors of various sizes, spiral sockets, removal bits and gripping tools, all designed to handle varying degrees of damage.
Bolt extractors function by establishing an enhanced grip around the damaged nut and distributing pressure more evenly than standard sockets.
Some extractors grip the nut using reverse-threaded grooves, while others cut into the metal as they rotate.
These kits are extremely useful for nuts that have become smooth and badly rounded due to repeated attempts at removal.
In many cases, bolt extractors work best when combined with penetrating oil and controlled pressure applied via a breaker bar; the oil reduces friction within the threads, while the extractor grips the outer surface.
Selecting the correct extractor size is crucial, as an oversized extractor may continue to slip, while an undersized one may fail to fit properly.
High-quality extractor kits are often robust enough to remove severely seized nuts without causing damage to the wheel surfaces.
4. Welding a Nut onto a Lug Nut
Welding a new nut directly onto a worn lug nut is an advanced technique, typically employed in repair shops when other methods have failed.
In this process, a standard metal nut is welded directly onto the surface of the damaged lug nut.
Once the weld has cooled slightly, the newly attached nut provides fresh edges, allowing a wrench or socket to gain a secure grip.
The heat generated during the welding process also aids in loosening rust, as metal expands at high temperatures, thereby breaking the rust bonds within the threads.
This method is highly effective for severely worn or seized lug nuts that can no longer be removed using standard extractor tools.
However, welding requires both experience and proper equipment, as adjacent wheel surfaces, paint, brake components and tires can be easily damaged by excessive heat or sparks.
Fire safety is paramount during the welding process, as oil, grease, or flammable materials present near the wheel area can easily ignite.
This technique should generally be performed by trained mechanics or experienced welders who possess the knowledge to protect the components surrounding the wheel.
5. When Professional Removal of Worn Nuts Becomes Necessary
Some worn lug nuts become so severely damaged that attempting to remove them safely at home becomes difficult, necessitating the use of professional repair tools.
If a nut is completely stripped, heavily corroded, cross-threaded, effectively “welded” in place due to rust, or spinning freely on a damaged wheel stud, seeking professional assistance is often the safest course of action.
Repair shops possess robust extractor tools, industrial-grade impact equipment, cutting tools, welding machines and specialized techniques, tools that are difficult, or even unsafe, to use without the necessary experience.
Persisting in attempts to forcibly remove a stubborn nut at home increases the risk of cracking the alloy wheel, snapping a stud, damaging the wheel hub, or necessitating costly repairs.
Professional mechanics can identify hidden issues by inspecting the wheel hardware such as: stretched studs, damaged threads, warped mounting surfaces, or corrosion within the hub assembly.
In many cases, the cost of having a nut professionally removed is far less than the cost of repairing the damage inflicted upon the wheel through improper DIY methods.
Knowing when to stop and seek professional assistance is a crucial part of preventing serious problems with the wheels and suspension.
Read More:
- How to Torque Lug Nuts Correctly
- How to Check Wheel Lug Torque
- How to Install Directional Tires Properly
- How to Identify Directional Tires Correctly
- How to Choose Tires for Snow Driving
- How to Choose Tires for Wet Roads
- How to Check Tire Load Rating
- How to Store Tires Properly Long Term
- How to Prevent Tire Dry Rot
- How to Fix Tire Bulge Issue
- How to Inspect Tire Inner Sidewall Damage
- How to Fix TPMS Sensor Not Detected
- How to Relearn TPMS Without Scan Tool
- How to Reset Tire Pressure Monitoring System Manually
- How to Check Tire Pressure Sensor Battery
- How to Seal Bead Leak in Tire
- How to Use Tire Plug Kit Correctly
Know, Common Mistakes While Removing Stuck Lug Nuts
Removing stuck lug nuts might seem like a straightforward task; however, many problems involving wheels and studs do not actually arise because the lug nuts are stuck, but rather because incorrect methods are used to remove them.
Lug nuts are designed to securely hold the wheel in place despite constant pressure, heat, vibration and changing weather conditions; this means that the wheel hardware is subjected to significant stress during normal driving alone.
When incorrect tools or unsafe techniques are employed to remove lug nuts, the risk of damaging the wheel studs, wheel hubs, the lug nuts themselves, brake components, or alloy wheels increases significantly.
Many people focus solely on applying force, but safely removing a lug nut requires control, patience and the use of the right tools.
Minor errors such as: using the wrong socket or applying a sudden, forceful jerk, as it can quickly transform a minor repair into a major and costly mechanical issue.
Understanding the most common mistakes helps drivers remove stuck lug nuts more safely while simultaneously protecting the wheel hardware from unnecessary damage.
1. Using the Wrong Socket
Using the wrong socket is one of the most common reasons why lug nuts become rounded off, suffer damaged threads, or are permanently ruined during removal.
Lug nuts are designed with specific shapes and dimensions to ensure that, when turned, the socket maintains uniform contact with the flat metal surfaces of the nut.
If a socket is too large, worn out, or does not fit properly, the pressure is concentrated on the corners of the lug nut rather than being distributed evenly across its strong, flat surfaces.
This causes the corners to wear down rapidly, leading to the problem of “rounded-off” lug nuts, an issue that subsequently becomes a major source of frustration for many drivers.
Standard twelve-point sockets are more prone to slipping off stuck lug nuts because they make contact with a very limited portion of the metal surface.
Six-point sockets are generally more secure, as they establish a firmer grip on the flat surfaces of the lug nut and distribute the applied pressure more evenly.
Cheap or low-quality sockets may even twist under excessive force, further compromising their grip.
Using a correctly sized socket, one that fits properly right from the start, significantly reduces the likelihood of slipping, damaged threads, or costly wheel repairs.
2. Applying Sudden, Jerky Force
Applying sudden, jerky force is another major mistake that can cause wheel hardware to deteriorate very quickly.
When a lug nut refuses to budge, many people become frustrated and, out of anger, begin yanking violently at it, kicking the breaker bar, or jumping onto the tool with their full body weight.
Although this method may occasionally succeed in loosening the lug nut, it generates sharp, jarring shocks that place immense stress on the wheel studs, lug nut threads, breaker bar and socket.
Wheel studs are designed to withstand steady, consistent pressure; However, a sudden, forceful jerk can cause the metal to stretch or snap, specially if the stud has already been internally weakened by rust.
Jerky movements also increase the risk of the tool slipping, which can result in personal injury or damage to the alloy wheels.
Applying slow, steady pressure is a safer approach, as it applies torque in a gradual and controlled manner without subjecting the metal components to sudden, sharp shocks.
In many instances, exercising patience, combined with the use of penetrating oil, proper leverage and repeated, controlled force, proves far more effective than relying on brute-force methods.
3. Overheating the Lug Nut
Carelessly applying excessive heat is a dangerous mistake that can damage surrounding wheel components and pose a serious safety risk.
While using heat to loosen a rusted lug nut can sometimes be beneficial, as heat causes the metal to expand, thereby breaking up the rust accumulated within the threads, overheating the lug nut or adjacent wheel parts can ruin brake components, wheel bearings, rubber seals, tires, paint and even the wheel itself.
Modern vehicles contain numerous adjacent components that are sensitive to high temperatures, particularly rubber brake hoses and wheel bearing grease.
Excessive heat can weaken these materials or cause irreparable damage that may not even be immediately apparent.
Furthermore, excessive heat increases the risk of fire; if penetrating oil, grease, or any other nearby fluids come into contact with an open flame, they can ignite.
Some people apply heat for excessive periods or from too close a proximity, without realizing how rapidly the surrounding areas absorb that heat.
It is crucial to apply heat in a controlled manner and with appropriate precautions, as the sole objective is not merely to heat the lug nut.
4. Use of Cheap Tools
The use of cheap or low-quality tools is another major factor that often makes the task of removing stuck lug nuts significantly more difficult and hazardous.
Removing lug nuts frequently requires a substantial amount of torque (rotational force), specially on rusted or overtightened wheels.
Weak sockets, inferior breaker bars and poor-quality ratchets can bend, snap, or slip under high stress.
When tools fail unexpectedly, they can damage the lug nuts, injure the user, or create additional complications that make the removal process even more arduous.
Thin-walled sockets tend to flex excessively under pressure, compromising their grip and increasing the risk of rounding off the corners of the lug nuts.
Poorly constructed breaker bars can also bend beyond their intended limits, resulting in wasted effort and making them difficult to control during removal.
High-quality, impact-rated sockets and sturdy steel breaker bars are specifically engineered to safely withstand the high-torque demands involved.
Reliable tools not only increase the likelihood of successfully removing lug nuts but also provide better control and minimize the risk of damaging expensive wheel hardware.
5. Improper Reinstallation of Lug Nuts
Improperly reinstalling lug nuts after removal is one of the primary causes of future lug nut seizure and issues with wheel hardware.
Many drivers use impact guns to tighten lug nuts excessively, often neglecting to verify the final torque setting.
Overtightening places immense stress on the threads, increases friction and subjects the wheel studs to dangerously high levels of tension.
Under-tightening is also unsafe, as loose wheels may shift slightly while driving, potentially causing damage to the studs and mounting surfaces over time.
Lug nuts should always be tightened evenly in a criss-cross pattern to ensure that the wheel seats properly against the hub.
Cross-threading, the improper engagement of threads during tightening, is another common mistake.
This occurs when a lug nut is forced onto a stud at an incorrect angle, resulting in permanent damage to the threads.
Starting to tighten the lug nuts by hand before using any tools ensures that the threads are engaging correctly.
A torque wrench should always be used to tighten lug nuts to the specific specifications recommended by the manufacturer, as applying the correct torque safeguards the wheel hardware and helps prevent difficulties when removing them in the future.
When to Call a Professional Mechanic
Some stuck nuts can be safely removed at home with the right tools and patience; however, certain situations become too risky for DIY (Do-It-Yourself) attempts.
Nuts and wheel studs are critical safety components, as they securely fasten the wheel to the hub, withstanding the forces of braking, cornering, acceleration and the shocks absorbed from rough roads.
When wheel hardware sustains significant damage, applying excessive force or employing improper repair methods can quickly escalate a minor issue into major damage to the wheel, brakes, or suspension system.
Professional mechanics possess the heavy-duty tools, industrial-grade extractors, specialized cutting equipment, welding systems, hydraulic tools and replacement parts often required for complex wheel hardware repairs.
They also know how to safeguard the wheel, hub and brake components while removing nuts.
It is crucial to recognize when a problem has moved beyond the scope of standard home repairs, as continuing forceful attempts to remove a nut can create dangerous safety hazards and significantly increase subsequent repair costs.
1. Multiple Rounded-Off Nuts
When multiple nuts on a single wheel become rounded off, having them removed by a professional mechanic is often the safest option.
Rounded nuts lose their sharp edges, preventing standard sockets from gripping the metal effectively.
If several nuts become rounded simultaneously, the risk of tools slipping, damaging the alloy wheel, or breaking the studs increases significantly during removal attempts.
This problem typically arises from using an incorrect socket size, applying excessive force with an impact gun, dealing with swollen nuts, or making repeated failed attempts.
Many people continue to apply force to the nut even after the first signs of slippage appear; this causes further abrasion of the metal at the corners, making the nut extremely difficult to remove.
Professional mechanics utilize extractor sockets, specialized gripping tools, cutting implements and specific techniques designed expressly for the controlled removal of nuts, tools specifically engineered to handle severely damaged fasteners.
They can also inspect the wheel studs to determine if the failed attempts to remove the nut have caused any hidden damage to their threads.
Calling in a professional at the right time can often prevent the need for major wheel and hub repairs in the future.
2. Broken Wheel Studs
Broken wheel studs are another definitive indication that professional repair may be required.
Wheel studs are designed to remain stationary within the wheel hub while the lug nut rotates around their threaded section.
If a stud snaps during removal or begins to spin freely within the hub, proper repair often necessitates partially disassembling the wheel assembly.
Depending on the vehicle’s design, replacing a wheel stud may require removing the brake calipers, brake rotors, wheel bearings, or even certain components of the suspension system.
Attempting an improper DIY repair can damage the hub assembly or compromise the safety of the wheel mounting.
A broken stud alters the way the wheel’s load is distributed among the remaining studs; continuing to drive in such a condition increases the risk of further mechanical failure.
Professional mechanics can safely replace damaged studs, inspect the remaining hardware and ensure that the wheel is correctly and securely fastened once the repair is complete.
3. Locked Lug Nuts Without a Key
Locking lug nuts are designed as anti-theft devices that require a specific, matching key for removal.
If the key is lost, damaged, or no longer fits properly, removing a locked lug nut without specialized tools can be extremely difficult.
Many locking lug nuts feature unique patterns or shapes on their inner surfaces that standard sockets cannot properly grip.
Attempting to remove them with incorrect tools often results in the lock’s pattern becoming completely rounded off, making subsequent removal even more challenging.
Some individuals attempt to force a standard socket onto a locked nut by hammering it into place, but this carries the risk of damaging the wheel’s surface or breaking the locking hardware.
Professional mechanics typically possess master removal kits, specialized extractor tools and the expertise to safely remove damaged wheel locks without causing harm to the wheel.
They can also replace the old locking system with a new set of lug nuts that are easier to maintain and remove in the future.
4. Damage Caused by Severe Corrosion
Severe corrosion surrounding lug nuts, wheel studs, or wheel hubs is another scenario where professional assistance may be required.
Rust and corrosion can penetrate deep into the threads over the course of several years, particularly in vehicles exposed to snow, road salt, coastal humidity, or those that have remained without maintenance for extended periods.
In extreme cases, the corrosion becomes so severe that the lug nut appears to be welded to the wheel stud.
Applying excessive force during removal can result in a broken stud, damaged threads, cracks in the alloy wheel, or even damage to the wheel hub itself.
Severe corrosion can also compromise the structural integrity of the studs and wheel mounting surfaces, creating hidden safety hazards that may persist even after the lug nuts have been successfully removed.
Professional repair centers utilize industrial-grade penetrating oils, heating equipment, impact tools, extractors and cutting systems specifically designed to handle severely corroded wheel hardware.
They can also inspect surrounding components to detect any internal damage caused by corrosion that could impact the vehicle’s long-term operational safety.
5. Risk of Wheel Damage
Modern alloy wheels can be expensive and are susceptible to damage if improper methods are used to remove lug nuts.
Slipping sockets, forceful hammering, the use of cutting tools, or excessive heat application during the removal process can result in scratches, cracks, deformation, or structural damage to the wheel’s surface.
This risk is further exacerbated in cases where nuts have become rounded off, studs are seized, or locking nuts are installed, as such situations often necessitate the application of excessive force.
Damage to the wheel’s mounting surface can lead to alignment issues or improper wheel seating, which may subsequently compromise the vehicle’s driving stability.
Professional mechanics are trained to remove stubborn nuts in a manner that preserves the wheel’s finish and prevents damage to adjacent brake components.
They utilize specialized tools designed to grip damaged nuts with greater precision while minimizing unnecessary stress on the wheel.
In many instances, having a professional remove the nuts proves far more cost-effective than having to replace a damaged alloy wheel or repair additional damage inflicted upon the wheel hub due to improper DIY methods.
Conclusion – How to Remove Stuck Lug Nuts
Most of the time removal of the lug nuts actually depends on the understanding how heat, rust, pressure and thread damage affects that metal over the period of time and then follow the working method in precise way.
The initial difficulty faced when attempting to remove a wheel, if addressed using incorrect methods, as it can quickly escalate into broken wheel studs, damaged alloy wheels, stripped threads, or conditions that render the vehicle unsafe to drive.
The most crucial point to understand is that successfully removing a lug nut does not simply entail applying maximum force.
Rather, it involves safely loosening the hardware, without damaging surrounding components, by employing the right techniques, the appropriate tools and a good deal of patience.
Penetrating oils, proper sockets, breaker bars, extractor tools, the application of controlled heat and precise torque methods all work in concert to minimize the stress placed on the wheel assembly, thereby making wheel removal both easier and safer.
Understanding why lug nuts seize in the first place is the most effective way to prevent this problem from recurring.
Corrosion caused by moisture and road salt, overtightening with impact guns, the accumulation of dirt within the threads, thermal expansion resulting from heat generated by the braking system and defective lug nuts, all contribute over time to increased friction between the lug nut and the wheel stud.
Regular wheel maintenance, including proper cleaning, adherence to correct torque specifications and the adoption of careful wheel installation practices, helps preserve the integrity of the threads and makes future wheel removal significantly easier.
Now, that’s all about this guide and if you still wanted to ask something related, then comment section is open for you.
Frequently Asked Questions
FAQ 1: Why do lug nuts get stuck?
Answer: Lug nuts typically get stuck due to a combination of rust, dirt, overtightening and heat generated by braking. When moisture and road salt accumulate around the wheel studs over an extended period, rust forms, causing the threads to gradually seize up. If lug nuts are overtightened, often using an impact tool, excessive pressure is exerted on the metal threads, making them even more difficult to loosen later on. The heat generated by the brakes also causes the metal to repeatedly expand and contract, further tightening the connection over time. All these factors gradually transform a standard lug nut into one that seems almost impossible to remove.
FAQ 2: What is the safest way to loosen a stuck lug nut?
Answer: The safest approach is to start with gentle methods first and resort to more forceful techniques only when necessary. First, spraying penetrating oil around the base of the lug nut helps to loosen the rust accumulated within the threads. After allowing it to soak in for a while, the next step usually involves applying steady pressure, often using a breaker bar. This method is safer than using sudden, jarring impacts, as it reduces the risk of snapping the wheel stud. If the nut still refuses to budge, additional force can be applied in a controlled manner by carefully using tools such as an impact wrench or an extractor socket.
FAQ 3: Can I remove stuck lug nuts without any special tools?
Answer: Yes, in many cases, you can remove stuck lug nuts without any special tools; however, this depends on just how badly they are seized. For slightly stuck lug nuts, a sturdy breaker bar, a correctly sized socket and penetrating oil are often sufficient. However, if a lug nut is heavily rusted, rounded off, or damaged, standard tools may not be enough. In such cases, to avoid damaging the wheel studs, more robust tools, such as extractor sockets (or even professional-grade equipment), may be required.
FAQ 4: Why do lug nuts become increasingly difficult to remove over time?
Answer: Over time, removing lug nuts becomes difficult primarily due to the accumulation of rust and repeated thermal cycles. Every time the car is driven, braking causes the wheels to heat up and subsequently cool down. This constant expansion and contraction of the metal gradually tightens the metal joint. Furthermore, moisture, dirt and road salt gradually accumulate within the threads. Over the course of months or years, these factors combine to create a strong bond between the lug nut and the wheel stud, making removal far more difficult than the initial installation.
FAQ 5: What should I do if a lug nut keeps spinning but won’t come off?
Answer: If a lug nut keeps spinning but fails to come off, it generally indicates that the threads on the wheel stud are damaged or stripped. In such a situation, the lug nut can no longer properly grip the stud, causing it to simply spin in place. The safest course of action is to attempt to gently hold the stud from the back (if accessible) or to employ controlled techniques to extract the nut. In most cases, the wheel stud will need to be replaced, as its threads are no longer capable of securely holding the wheel in place. Driving in this condition is unsafe because the wheel is not being properly supported.
FAQ 6: Can I drive with a stuck or damaged lug nut?
Answer: Driving with a stuck or damaged lug nut is not advisable, as it can compromise the stability and safety of the wheel. If a single lug nut is completely seized, it may also indicate that the remaining studs are corroded or damaged. If a lug nut is missing or broken, the remaining studs bear an increased load, thereby heightening the risk of their failure as well. Even if the wheel appears stable, uneven pressure can lead to damage to the wheel hub or induce vibrations. It is always safer to resolve this issue before embarking on a long-distance journey.
References:
[1] Systematic quantitative investigation of the unscrewing process with regard to breakaway torque
https://link.springer.com/article/10.1007/s13243-022-00120-x

Hello Folks, Dean Shali here to help you out to solve the problems with your lovely vehicle, as i have lots of experience and knowledge about automotive industry as i woks directly with the customers and repair vehicles and i love to help the people to keep their cars safe and running smoothly.