Written By: Dean Shali
Fact Checked By: Sabré Cook
Reviewed By: Tamara Warren
It is very much true that alloy wheels are one of the first things that people notices on your car, yet they are also among the easiest parts to get damage during everyday driving.
But, once the protective clear coat is damaged, then the moisture, brake dust, road salt and dirt can easily reach in the exposed metallic surface underneath, that’s how it leads to the oxidation, corrosion, fading and long-term wheel deterioration.
Modern alloy wheels are typically made from the lightweight aluminum-based materials which is actually designed to improve the handling, that even reduces the vehicle weight and enhances the heat dissipation around the brakes, but these same materials are softer than many people expect: which actually makes them more vulnerable to surface damage from everyday road conditions.
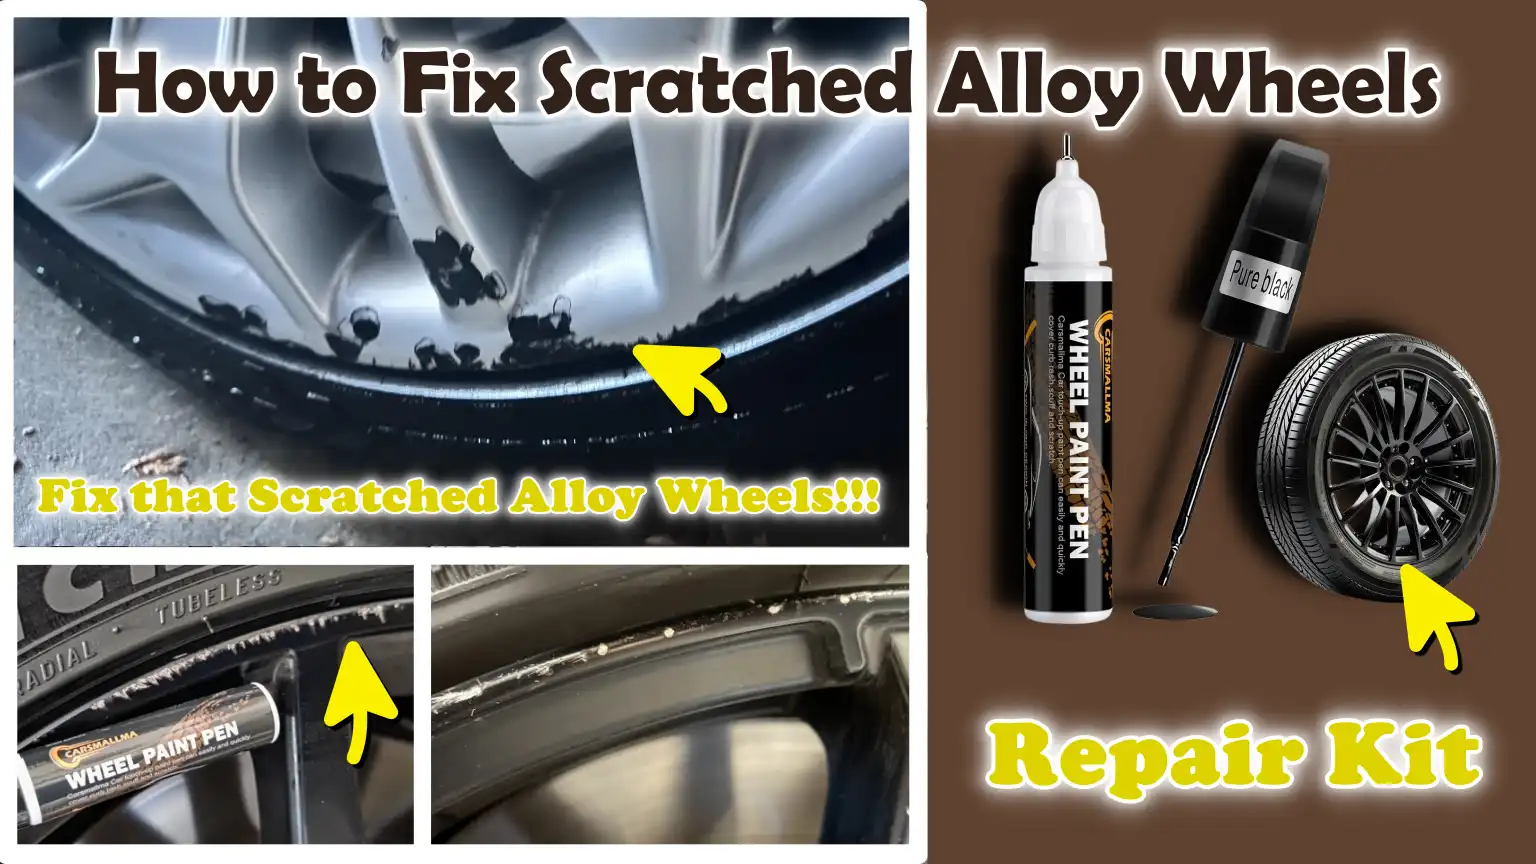
So, in this guide you’ll learn How to Fix Scratched Alloy Wheels so that you can easily restore scratched alloy wheels also it protects them from future damage as well.
Now, Understand About Scratches on Alloy Wheels
Alloy wheels are widely used in modern cars because they are lighter than steel wheels, enhance fuel efficiency and facilitate better heat management around the braking system.
Typically composed of a mixture of aluminum and other metals, they possess a sleek and attractive finish; however, this composition also renders them more susceptible to scratches and surface damage compared to their more robust steel counterparts.
As these wheels sit very close to the road surface, they are constantly exposed to dust, gravel, brake dust particles, potholes and accidental contact with curbs, which is why scratches constitute one of the most common forms of cosmetic/exterior damage vehicles sustain.
1. What Are Alloy Wheels?
Alloy wheels are specially designed wheels manufactured from aluminum-based metal alloys, shaped through either casting or forging processes.
Their primary objective is to reduce the vehicle’s overall weight, thereby improving acceleration, braking performance and fuel economy.
They also facilitate better airflow to the braking system, helping to prevent overheating during long journeys or instances of frequent, heavy braking.
Although they are sufficiently durable for daily driving, their exterior surfaces are often coated with layers of paint, lacquer, or a machined finish, which lend them a glossy appearance.
When scratches occur, it is typically this outermost layer that sustains the initial damage; if the damage is deep, the softer metal lying beneath becomes exposed.
2. Types of Alloy Wheel Damage
Damage to alloy wheels is not always uniform; Understanding the specific type of damage is crucial, as it determines whether the wheel can be easily repaired or if it requires professional assistance.
Damage can range from minor surface blemishes to severe structural issues that compromise both safety and performance.
Most drivers initially focus on external (cosmetic) issues; however, in some cases, if the damage is not properly addressed, hidden subsurface damage may develop over time.
Surface Scratches
Surface scratches represent the mildest form of alloy wheel damage and typically affect only the clear coat or paint layer applied to the wheel.
These scratches often result from minor contact with dust, sand, or small pebbles, or from using abrasive materials during cleaning.
Although these scratches may make the wheel appear dull or slightly worn, they do not compromise the wheel’s structural integrity or strength.
In most cases, surface scratches can be repaired through cleaning, light sanding, polishing and the application of a new protective coating, helping to restore the wheel’s original luster and smooth finish.
Curb Rash
Curb rash occurs when the edge or rim of the wheel scrapes directly against a curb (roadside) while parking the vehicle or while making a turn too close to an obstruction.
This type of damage is usually more visually apparent, as it often leaves behind rough abrasions, scuffed edges and chipped paint marks on the outer rim of the wheel.
In some instances, small gouges or uneven surfaces may form, making the wheel appear heavily worn.
Although curb rash is primarily superficial damage, it can expose the metal beneath the protective coating; if left untreated, this can lead to rust.
Repairing curb rash often involves sanding, filling deep gouges, repainting and sealing the surface to restore both its appearance and protective properties.
Deep Gouges
Deep gouges are more severe scratches that penetrate beneath the paint layer and cut into the underlying metal of the alloy wheel.
These typically result from forceful impacts or scrapes against sharp objects, potholes, or hard surfaces.
Unlike superficial scratches, deep gouges cannot be fixed merely by polishing, as a portion of the metal has been removed or significantly damaged.
Repairing this type of damage often requires filling the void with a specialized alloy filler, reshaping the surface and carefully repainting it to match the original finish.
If the gouge is particularly deep, it is generally advisable to seek professional repair services to ensure that the wheel remains safe and balanced.
Cracks and Bent Wheels
Among the various forms of damage that can affect alloy wheels, cracks and warping are considered the most severe, as they compromise the structural integrity of the wheel.
Cracks typically result from sudden impacts such as: driving into deep potholes or traveling at high speeds over rough terrain.
Wheels become warped when the shape of their rim becomes distorted; this can lead to vibrations, uneven tire wear and air leaks.
Unlike minor scratches, these issues directly jeopardize driving safety and should never be ignored.
In many instances, the safe repair of cracked or severely warped wheels is not feasible and replacement may be necessary to ensure that the vehicle remains stable and safe on the road.
How to Assess the Severity of Scratches on a Wheel
Understanding the severity of scratches on alloy wheels is crucial, as a single repair method does not apply to every type of damage.
Some scratches are merely superficial, affecting only the aesthetic appeal of the wheel, while others may indicate deeper structural issues that could compromise driving safety.
Identifying the severity of the damage early on helps you determine whether a simple DIY (Do-It-Yourself) repair will suffice or if a professional inspection is required.
1. Signs of Minor Damage
Minor wheel damage typically affects only the outermost layer of the alloy wheel such as: the paint or clear coat.
In such cases, the wheel functions normally while driving and there is no change in the vehicle’s handling or its performance on the road.
A key indicator of minor damage is the absence of any vibration felt in the steering wheel or the vehicle’s body while driving; this implies that the wheel’s structural integrity remains stable and properly balanced.
You may observe only visible scratches, light scuff marks, or dull spots where the protective coating has worn away.
Even though the wheel may appear slightly damaged, the overall shape of the rim remains smooth and unaltered and the underlying metal is not exposed in a manner that would compromise safety.
For such issues, performing DIY repairs using techniques such as cleaning, sanding, polishing and repainting is generally safe.
2. Signs of Severe Damage
Severe wheel damage extends far beyond mere surface aesthetics and begins to impact the wheel’s structural integrity and performance.
One of the most critical warning signs is the formation of cracks, whether located around the spokes or along the rim’s edge, which indicates that the metal has sustained structural damage as a result of an impact.
Another clear indication is a drop in tire air pressure, which can occur when damage prevents the wheel rim from sealing properly.
Drivers may also notice a distinct vibration in the steering wheel, particularly at high speeds, suggesting that the wheel may be bent or unbalanced.
A bent wheel rim is another strong indicator of impact damage, often resulting from forceful collisions with potholes or curbs.
In more severe cases, sections of the wheel’s surface may appear chipped or entirely missing, a sign of deep structural damage that cannot be remedied through superficial repairs alone.
When such signs appear, it generally becomes essential to have the wheel inspected by a professional, as driving on a damaged wheel can lead to a loss of vehicle control and exacerbate the existing damage.
3. When You Should NOT Attempt DIY Repairs
While many minor scratches and scuffs can be repaired at home, there are certain situations where, for safety reasons, you should strictly avoid attempting DIY repairs.
If structural cracks are visible in the wheel, it indicates that the metal’s integrity has already been compromised; attempting to repair this without professional tools can worsen the problem.
Major bends or distortions in the wheel are also matters of serious concern, as they can negatively impact wheel balance, proper tire seating and the vehicle’s overall stability; their safe repair requires specialized machinery.
Severe corrosion is another scenario where DIY methods may prove inadequate, particularly if the damage has penetrated deep into the metal and significantly weakened the surface.
Damage near the wheel’s lug holes is specially hazardous, as these are the critical components responsible for securing the wheel to the vehicle; Any weakness in this area can directly jeopardize the wheel’s attachment and driving safety.
In all such instances, having the wheel professionally repaired or completely replaced is the safest option, ensuring that the vehicle remains reliable and secure on the road.
Tools
| Tools | Why It Is Needed | How to Use It Properly |
|---|---|---|
| Wheel Cleaner | This is essential because dirt can hide the scratches and prevent repair materials from adhering properly. | Spray it evenly over the wheel, wait a few minutes, then gently scrub and rinse with clean water before beginning any repairs. |
| Microfiber Towels | These are necessary to prevent inflicting new scratches while cleaning or wiping down the wheel. | Use them to thoroughly dry the wheel and safely wipe away any cleaner or polish residue. |
| Sandpaper – Multiple Grits | This is essential for removing damaged paint, smoothing out scratches and preparing the surface for painting. | For deep scratches, start with a coarse grit, then use a finer grit to ensure the surface is uniformly smooth before painting. |
| Masking Tape | This is essential for protecting the tire rubber and undamaged sections of the wheel from accidental damage. | Carefully apply it around the wheel edges, tire sidewalls and valve area before sanding or painting. |
| Alloy Wheel Filler | This is essential because paint alone cannot hide the deep imperfections on the wheel’s surface. | Fill deep scratches with this material, allow it to dry completely, then sand it down until smooth so that it blends seamlessly with the wheel’s surface. |
| Primer | This is essential for improving paint adhesion and preventing rust or uneven coloration. | Spray thin coats of it over the repaired area and allow it to dry completely before applying the paint. |
| Matching Wheel Paint | This is essential for restoring the wheel to its original appearance and hiding any traces of the repair work. | Apply it in light, even coats; allow each coat to dry before applying the next to ensure a smooth finish. |
| Clear Coat | This step is essential for protecting the paint against scratches, UV rays and brake dust. | Spray a thin, even layer of this product over the painted area and allow it to dry completely to ensure a glossy and durable finish. |
| Rubbing Alcohol | This step is crucial to ensure that the surface is thoroughly clean before painting or filling. | Before applying filler, primer, or paint, wipe down the repaired area with a cloth dampened with rubbing alcohol. |
How to Fix Minor Scratches on Alloy Wheels
1. Thoroughly Clean the Wheel
The first and most crucial step in repairing minor scratches on alloy wheels is to thoroughly clean the entire surface of the wheel, ensuring that no dust, brake dust, or road grime remains.
Due to the constant friction between brake pads and rotors, a significant amount of fine brake dust accumulates on alloy wheels; over time, this dust can adhere firmly to the wheel’s surface.
If not removed properly, it can interfere with the sanding and painting processes, ultimately resulting in an uneven or poor-quality repair.
A clean surface also helps you clearly identify the precise depth of the scratches and ensures that the repair materials bond correctly with the underlying metal and paint layers.
2. Dry and Inspect the Damage
After cleaning, the wheel must be dried completely to ensure that any residual moisture does not interfere with the repair process.
Once dry, you should carefully inspect the scratches under good lighting to determine their depth and the extent of the affected area.
Minor scratches typically affect only the clear coat or the uppermost layer of paint, whereas deeper marks may slightly expose the underlying metal.
This step is critical because it helps you determine exactly how much sanding or repair work is required.
Lightly marking the damaged areas can also help you stay focused during the repair process and prevent you from accidentally sanding undamaged parts of the wheel.
3. Sand the Scratched Area
Sanding is the process that smooths out the scratches and prepares the surface for painting.
For minor scratches on alloy wheels, fine-grit sandpaper is used to gently level the damaged area without removing excessive material.
Sanding should always be performed with a controlled, uniform motion to ensure that the surface remains smooth and consistent.
Applying excessive pressure can create uneven spots, while sanding in random directions may result in a blotchy finish after painting.
The objective is to blend the scratched area with the surrounding surface in such a way that no sharp edges or visible transitions remain between the damaged and undamaged sections.
4. Apply Primer
Primer is a base coating that plays a crucial role in ensuring that the paint adheres properly to the wheel’s surface.
After sanding, paint applied directly to bare metal or an exposed surface may not adhere uniformly on its own, potentially leading to issues such as paint peeling or color inconsistencies later on.
Primer creates a strong bonding layer between the wheel and the paint, thereby enhancing both the durability and the quality of the finish.
It also helps to seal the repaired area and prevents moisture from reaching the metal in the future.
The primer should be applied in thin, even coats and allowed to dry completely before proceeding to the next step, as improper drying can negatively impact the final paint result.
5. Paint the Repaired Area
Once the primer has dried completely, the next step is to apply a matching paint, specifically, a paint that closely resembles the alloy wheel’s original factory color.
This step is critical, as even a slight discrepancy in color can cause the repaired area to stand out visibly.
Paint should be applied in thin coats rather than a single thick layer, as thin coats dry more evenly and yield a smoother finish.
Each coat must be allowed to dry before applying the next, ensuring that the surface builds up gradually and blends seamlessly with the rest of the wheel.
This process helps restore the wheel to its original condition, free of any visible signs of repair.
6. Apply the Clear Coat
The clear coat is a transparent protective layer applied over the paint to seal the repaired area and shield it from future damage.
It acts as a barrier against brake dust, sunlight, moisture and small road debris, elements that can gradually degrade the paint over time.
Without a clear coat, the repaired area may quickly lose its luster or become more susceptible to future scratches.
When applied correctly, the clear coat also enhances the wheel’s aesthetics, providing a smooth, glossy finish that matches the original factory look.
It should be applied evenly to prevent drips or inconsistencies in the shine.
7. Allow the Wheel to Dry Thoroughly
The final, and often overlooked, step in repairing a wheel scratch is ‘curing’; this is a process in which the paint and clear coat are allowed to fully harden and bond securely with the surface.
Even if the wheel feels dry to the touch on the outside, its inner layers still require time to properly set.
Rushing this process can weaken the paint’s adhesion, cause it to peel prematurely, or result in visible surface imperfections.
During the curing phase, the wheel must be protected from water, excessive dust and harsh driving conditions to ensure that the fresh repair remains undamaged.
Allowing sufficient time for drying ensures that the repair is durable, long-lasting and visually flawless, thereby restoring the alloy wheel to its pristine, like-new condition.
How to Repair Deep Scratches and Curb Rash
1. Smooth Out Rough Edges
Deep scratches and curb rash often leave behind rough, jagged metal edges on alloy wheels, which can make the damage look even worse and hinder the repair process.
The first step is to carefully smooth out these edges so that the surface becomes safe, uniform and ready for filling.
This is crucial because if the jagged parts are not addressed, the filler will not adhere properly and bumps may become visible after painting.
By gently leveling the damaged metal, you create a solid foundation that helps every subsequent step of the repair blend naturally with the wheel’s original surface.
The goal is not to remove excessive material, but rather to make the damaged area clean, controlled and sufficiently smooth for a proper repair.
2. Fill Deep Gouges
Once the surface is prepared, deep scratches and areas where material is missing must be filled using a specialized alloy wheel filler designed for metal repair.
This filler works by replacing the missing layer of the surface, thereby restoring the wheel to its original shape before painting.
It should be applied carefully to the damaged areas, ensuring that all voids are completely filled and no air pockets get trapped inside, as these can compromise the structural integrity of the repair.
A common mistake during this step is applying too much filler at once; this can lead to uneven drying, cracking, or difficulties during the subsequent sanding process.
It is also essential to allow the filler to dry completely, as rushing this stage can cause the repair to fail or eventually detach from the wheel’s surface over time.
3. Sand the Filler Until Smooth
Once the filler has fully hardened, it must be sanded down to level it out and ensure that it blends seamlessly with the original shape and surface of the alloy wheel.
This step is crucial, as it determines how natural the final repair will look.
Fine and controlled sanding helps shape the repaired area so that it integrates perfectly with the surrounding metal, leaving behind no bumps or ridges.
The goal is to recreate a factory-like finish, where the repaired section is almost impossible to distinguish.
It is important to regularly inspect the surface while sanding to ensure that its texture remains uniform; excessive sanding can create depressions in the surface, while insufficient sanding may leave raised areas that will be clearly visible after painting.
4. Repaint the Damaged Area
Once the surface is smooth and perfectly restored to its original shape, the next step is to repaint the repaired section.
To do this, select a paint color that closely matches the wheel’s original finish.
Alloy wheels often feature metallic or slightly textured finishes, so an exact color match is essential to achieve a natural look.
If the paint shade differs even slightly, the repaired area may stand out, even if the surface itself is smooth.
To prevent this, the paint should be applied in thin, controlled layers, allowing the finish to build up gradually and blend completely with the surrounding wheel surface.
Proper paint application helps avoid visible discrepancies in texture, gloss, or color, a critical factor in achieving a professional-quality result.
5. Seal with a Clear Coat
The final step in repairing deep scratches and curb rash is applying a protective clear coat to the painted area.
This layer acts as a barrier that shields the repaired surface from moisture, brake dust, UV rays and road debris, elements that can gradually damage the paint over time.
Without a clear coat, the repaired area becomes far more susceptible to fading, paint peeling, or rust formation on exposed metal surfaces.
When applied correctly, the clear coat also restores the wheel’s natural luster and helps the repaired section blend seamlessly with the surrounding surface.
This step is crucial not only for the wheel’s aesthetics but also for its long-term durability, ensuring that the repaired area remains robust and visually consistent, even under normal driving conditions.
So, How to Repair Machined or Diamond-Cut Alloy Wheels
1. Why Are Diamond-Cut Wheels Different?
Machined or diamond-cut alloy wheels differ from standard painted alloy wheels because their surface is finished using a highly precise cutting process rather than ordinary paint.
After the wheel has been cast or forged, a thin layer of metal is carefully removed using a computer-controlled lathe machine to create an incredibly smooth, lustrous and light-reflective surface.
This gives the wheel a premium aesthetic, characterized by sharp edges and a mirror-like sheen, but it also renders its surface more delicate.
Minor scratches, curb rash, or even rust spots become highly conspicuous, as there is no additional coating present to hide these imperfections.
Once this machined layer is compromised, the issue is no longer limited merely to a paint defect; it often impairs the precise surface finish that gives the wheel its distinctive, brilliant texture.
2. Can You Repair Them at Home?
In most instances, attempting a complete repair of diamond-cut alloy wheels at home is not advisable, as restoring them requires highly precise machinery.
Unlike standard alloy wheels, where scratches can often be remedied at home through sanding, filling and repainting, diamond-cut wheels require “re-turning” on a specialized lathe machine to restore their original pattern and finish.
While very minor surface blemishes can sometimes be temporarily remedied through polishing, deeper scratches, curb scrapes, or rust damage generally cannot be fully restored without professional-grade equipment.
Nevertheless, attempting home repairs may yield minor cosmetic improvements to the wheel, but they rarely succeed in restoring a true, factory-like finish; this is because even the slightest deviation in cutting angles or depth alters the way light reflects off the surface.
3. The Risks of Improper Repair
Attempting to repair diamond-cut alloy wheels without the proper tools can lead to a host of problems; often, instead of rectifying the damage, such attempts merely exacerbate existing flaws.
A significant risk is an uneven surface finish, where manual sanding or polishing creates flat spots or dull patches on the surface, thereby distorting the wheel’s distinctive pattern.
Another issue is a mismatch in color and texture; this occurs when paint or filler is incorrectly applied to a surface that, to achieve the correct finish, requires precise machining rather than mere painting.
Improper repairs can result in the excessive removal of the surface’s protective layer, thereby increasing the wheel’s susceptibility to rust and oxidation over time.
In severe cases, incorrect repair methods can cause permanent structural or aesthetic damage to the wheel; this diminishes its value and may necessitate a complete professional refinishing, or even total replacement, to restore it to a safe and proper condition.
How to Properly Match Alloy Wheel Paint
1. Identifying the Wheel’s Original Color
Properly matching alloy wheel paint begins with accurately identifying the wheel’s original color, as even a slight discrepancy in shade or finish can cause the repaired area to stand out visibly.
Most factory alloy wheels utilize specific color codes such as: silver, graphite, matte black, or machined silver.
Many manufacturers provide these codes in the vehicle owner’s manual, on service labels, or within official parts documentation.
It is crucial to understand that a wheel’s color is not limited solely to its base shade; the type of finish also plays a significant role.
Some wheels feature metallic flakes, a satin finish, or layers of glossy clear coat, all of which influence how light interacts with the surface.
To achieve the most accurate match, the existing wheel must be thoroughly cleaned to ensure that dirt, brake dust, or oxidation do not alter its appearance, thereby revealing its true color.
This step ensures that the new paint blends seamlessly with the original factory finish, preventing the repaired area from looking out of place once the work is complete.
2. Spray Paint vs Touch-Up Pens
When repairing alloy wheels, the decision to choose between spray paint and touch-up pens depends on the size and depth of the damage sustained by the wheel.
Spray paint is typically used for repairing larger areas or the entire wheel, as applying it correctly in thin, uniform layers yields an even, smooth finish that closely mimics the original factory appearance.
It helps to uniformly cover repaired areas, scratches and filler work, making it an excellent choice for repairing “curb rash” (scratches caused by scraping against curbs) or larger abrasions.
Conversely, touch-up pens are better suited for repairing very minor or superficial scratches, as they allow for precise paint application solely on the affected area without damaging the surrounding surfaces.
However, they do not blend as seamlessly as spray paints when repairing larger areas.
Understanding this distinction is crucial; using the wrong method can result in a rough surface texture, a visible patch where the repair was performed, or a discrepancy in gloss levels, any of which can detract from the overall aesthetic appeal of the wheel.
3. Common Mistakes in Paint Matching
One of the most common mistakes associated with alloy wheel paint matching is selecting a color based solely on the wheel’s visual appearance, without verifying the original factory paint code or finish type.
Many people assume that all silver or black wheels are identical; however, even a slight variation in metallic tone or gloss level can cause the repaired area to stand out conspicuously when viewed in sunlight.
Another common error is applying an excessively thick layer of paint.
This prevents the paint from drying uniformly, resulting in streaks or surface roughness that fails to match the wheel’s original smooth finish.
Some repairs also fail because the surface was not properly cleaned or prepared prior to painting; this prevents the paint from adhering correctly, causing it to peel prematurely.
Skipping the application of a ‘clear coat’ is also a common mistake, as without it, the repaired area may appear lifeless, its color may fade prematurely, or it may fail to match the surrounding luster.
For a flawless and professional-looking alloy wheel repair, precise color matching, proper paint application techniques and meticulous surface preparation are all absolutely essential.
Now Understand, How Long Does Alloy Wheel Repair Take?
Understanding the time required for alloy wheel repair is crucial, as the process involves more than just fixing visible scratches; it also entails the meticulous preparation of each layer, followed by drying and curing stages.
The total time depends on the severity of the damage, the repair method employed and the level of care exercised at every step.
While minor repairs can sometimes be completed quickly, achieving high-quality results always necessitates allowing sufficient time for the materials to cure and dry properly, a factor that directly impacts the durability and aesthetic appeal of the final finish.
1. Estimated Time for Minor Repairs
Minor alloy wheel repairs typically involve superficial scratches, light scuffs, or damage limited solely to the clear coat and paint layers.
In such instances, the process is relatively straightforward, as it does not require deep filling or structural corrections.
If executed with care, the entire procedure, which includes cleaning, light sanding, repainting and applying a protective clear coat, as it can often be completed within just a few hours.
However, even if the work appears to progress rapidly, the quality of the final finish hinges on allowing adequate time for each layer to cure properly.
While minor repairs may seem quick to complete, rushing the process can result in an uneven sheen or poor paint adhesion; for this reason, patience is essential even for minor repair jobs.
2. Estimated Time for Repairing Deep Scratches
Repairing deep scratches or damage caused by striking a curb (known as “curb rash”) takes significantly longer, as the process involves multiple stages such as: surface smoothing, applying filler, reshaping, sanding, repainting and sealing.
Each of these steps must be executed with absolute precision to restore the wheel to its original shape and appearance.
Unlike minor repairs, extensive damage cannot be repaired in a single continuous session; materials such as: alloy fillers and multiple layers of paint, require sufficient time to set and dry before the next stage of the process can begin.
Depending on the severity of the damage and the prevailing weather conditions (drying environment), a complete alloy wheel repair can take a full day, or sometimes even longer.
This additional time ensures that the repaired section blends seamlessly with the rest of the wheel and maintains its structural integrity over the long term.
3. Understanding Drying and Curing Times
Drying and curing times are among the most critical aspects of alloy wheel repair, as they determine the ultimate strength and durability of the final result.
Drying refers to the state where the surface feels dry to the touch, whereas curing signifies that the material has fully hardened and bonded at a molecular level.
Even if the paint or clear coat appears dry on the surface, the underlying layers may still be soft and remain vulnerable to damage.
Depending on factors such as temperature, humidity and the specific products used, the complete curing process can take anywhere from a few hours to a full day.
During this period, exposure to water, dust, or the physical stress associated with driving can compromise the finish or reduce its overall lifespan.
Allowing sufficient time for the material to fully cure ensures that the paint remains durable, without peeling or flaking, and retains its smooth, professional-quality appearance over time.
Read More:
- How to Protect Wheels From Corrosion
- How to Remove Brake Dust From Wheels
- How to Clean Alloy Wheels Properly
- How to Upgrade Wheels Safely
- How to Check Wheel Offset Compatibility
- How to Fix Wheel Wobble Issue
- How to Diagnose Wheel Wobble at Speed
- How to Inspect Wheel Hub Damage
- How to Replace Broken Wheel Stud
- How to Remove Stuck Lug Nuts
- How to Torque Lug Nuts Correctly
- How to Check Wheel Lug Torque
- How to Install Directional Tires Properly
- How to Identify Directional Tires Correctly
- How to Choose Tires for Snow Driving
- How to Choose Tires for Wet Roads
- How to Check Tire Load Rating
- How to Store Tires Properly Long Term
- How to Prevent Tire Dry Rot
- How to Fix Tire Bulge Issue
- How to Inspect Tire Inner Sidewall Damage
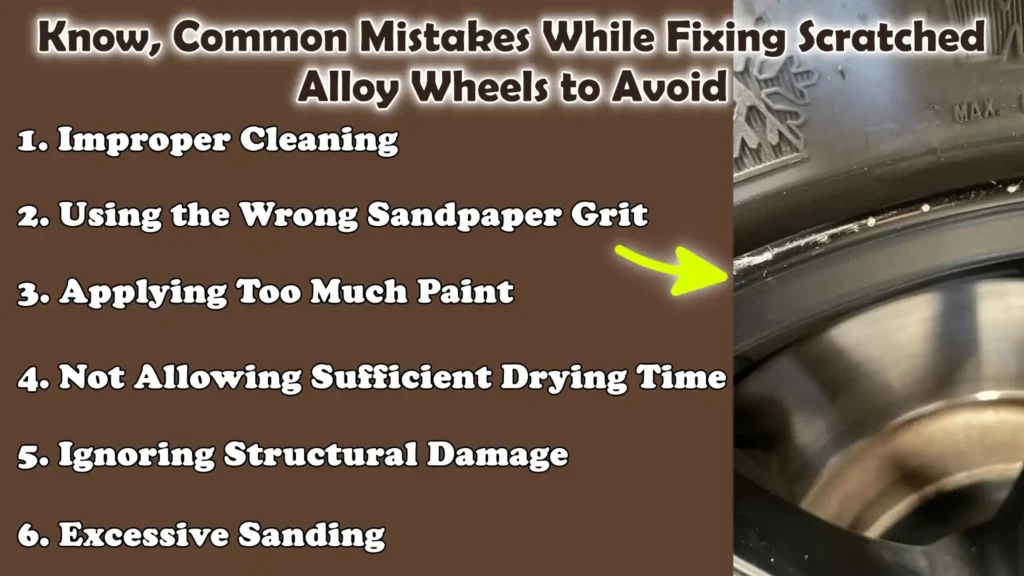
Know, Common Mistakes While Fixing Scratched Alloy Wheels to Avoid
When executed correctly, repairing scratched alloy wheels can yield excellent results; however, minor errors made during this process can sometimes lead to a failed repair or an inconsistent finish.
Understanding these mistakes is crucial, as a successful alloy wheel repair depends on proper surface preparation, the use of the right materials and precise timing.
Even minor errors can compromise paint adhesion, finish quality and durability, potentially turning a simple repair into a costly problem down the line.
1. Improper Cleaning
One of the most common mistakes is initiating the repair process without thoroughly cleaning the wheel.
Alloy wheels accumulate layers of brake dust, oil, road grime and tiny metal particles, impurities that are not always visible to the naked eye.
If this layer is not removed, the sanding and paint will not adhere properly to the surface.
This can lead to issues such as peeling paint, a rough surface texture and a compromised repair quality.
Proper cleaning ensures that the repair materials bond directly to the wheel’s surface, rather than merely resting atop dirt or contaminants.
2. Using the Wrong Sandpaper Grit
Another common error is selecting the incorrect sandpaper grit (coarseness) relative to the severity of the damage, either too coarse or too fine.
Sandpaper that is too coarse can remove excessive material from the surface and create deep scratches that are difficult to rectify later; conversely, sandpaper that is too fine will fail to adequately smooth out the damaged areas.
It is essential to use the correct sequence of grits, as alloy wheel repair involves gradually leveling and smoothing the surface.
If the wrong grit is used, the final paint finish may appear uneven, or sanding marks may be clearly visible when the wheel is viewed under lighting.
3. Applying Too Much Paint
Applying thick layers of paint is another common mistake that compromises the quality of the repair.
Many people believe that applying an excessive amount of paint will quickly hide scratches; however, in reality, thick layers often lead to paint runs, uneven drying and visible inconsistencies in the surface texture.
Alloy wheel paint performs best when applied in thin, uniform layers, allowing the color and finish to build up gradually.
This approach offers greater control over the surface finish, ensuring that the wheel looks brand new (factory-fresh) once the job is complete.
4. Not Allowing Sufficient Drying Time
Rushing the drying process is a mistake that often leads to long-term issues with wheel repairs.
Every layer, primer, paint and clear coat, requires adequate time to dry and properly adhere to the surface.
If the subsequent layer is applied too soon, it can trap moisture or soften the underlying layer, preventing proper adhesion and causing the paint to peel prematurely.
Even if the surface feels dry to the touch, the underlying layers may still be soft; therefore, exercising patience during the drying phase is crucial for a durable repair.
5. Ignoring Structural Damage
One of the most serious mistakes is overlooking structural damage to the wheel and treating it merely as cosmetic damage.
Cracks, severe bends, or damage near the rim flange or lug area can compromise the wheel’s safety and performance.
Attempting to resolve these issues solely through superficial repairs may temporarily mask the problem, but it fails to restore the structural integrity of the wheel.
Neglecting structural damage can pose serious hazards such as: air leaks, vibrations, or the complete failure of the wheel while driving; therefore, in such instances, it is absolutely essential to have the wheel inspected by a professional.
6. Excessive Sanding
Excessive sanding is another mistake that can cause permanent damage to the wheel’s surface.
While sanding is necessary to smooth out scratches and prepare the surface for painting, applying excessive pressure or sanding for too long can remove too much material from the surface and distort the wheel’s shape.
This can result in uneven patches on the surface that remain clearly visible after painting and are difficult to correct later.
To preserve the wheel’s original shape and ensure that the repaired area blends seamlessly with the rest of the wheel, it is crucial to perform sanding in a controlled and gradual manner.
How to Easily Prevent Scratches on Alloy Wheels
Preventing scratches on alloy wheels is far easier and more cost-effective than repairing them later.
Alloy wheels are constantly exposed to road hazards such as: curbs, potholes, gravel, brake dust and construction debris, meaning that even the most cautious drivers can inadvertently damage them over time.
By adopting a few simple habits and maintenance practices, you can significantly reduce the risk of curb scrapes, surface scratches and long-term wear and tear, while keeping your wheels looking clean and well-maintained.
Also, there’s engineering failure of aluminum wheels shows that surface damage is not just the cosmetic but it can also influence long-term structural health of it, so once that protective layer is broken by scratches, then contaminants can easily enter into the surface and gradually contributes to the deeper material fatigue and corrosion development, that’s why scratched alloy wheels should not be ignored at all, as this is the early signs and you can repair it to prevent progression from surface damage to the long-term structural weakening as well.[¹]
1. Improve Your Parking Technique
The most common cause of scratches on alloy wheels is poor parking technique, particularly when reversing or parallel parking near a curb.
Scratches often occur when a wheel makes direct contact with the curb while navigating tight turns.
By improving your parking control, driving slowly, utilizing your mirrors correctly and maintaining a safe distance from the curb, you can significantly minimize the likelihood of accidental scratches.
Modern vehicles equipped with parking sensors or cameras can be helpful, but careful driving remains the most reliable method for protecting your wheels from damage.
2. Avoid High Curbs
High curbs pose one of the greatest physical threats to alloy wheels; if the tire makes direct contact, these curbs can easily scratch the wheel, chip its rim, or even bend it.
Striking a sharp or raised curb, even at low speeds, as it can leave unsightly scratch marks on the wheel’s rim.
Exercising caution when parking near high curbs or rough edges helps protect the outer rim of the wheel, which is typically its most vulnerable component.
Whenever possible, choosing to park near level or low-profile curbs significantly reduces the risk of damage.
3. Maintain Proper Tire Pressure
Maintaining the correct air pressure in your tires is crucial for safeguarding alloy wheels, as underinflated tires reduce the clearance between the wheel and the road surface.
When tire pressure is too low, the tire’s sidewall becomes soft and compresses easily upon impact; this increases the likelihood of the wheel rim striking the ground or a curb.
Properly inflated tires help absorb the shocks caused by potholes and rough roads, thereby reducing the stress placed on the wheel and minimizing the long-term risk of scratches, deformation and rim damage.
4. Use Wheel Protectors
Wheel protectors such as: rim guards or protective tire rings, provide an additional layer of defense against curb impacts.
These accessories are designed to absorb minor bumps and minimize direct friction between the wheel and hard surfaces.
While they cannot guarantee that wheels remain completely scratch-free, they can significantly reduce visible damage resulting from everyday driving conditions.
They are particularly useful for drivers who frequently park in congested urban areas or navigate narrow streets, where the risk of accidentally striking a curb is higher.
5. Wash Your Wheels Regularly
Regularly cleaning your wheels helps prevent scratches caused by accumulated dirt, brake dust and fine abrasive particles.
Over time, if these particles are not removed, they can act like sandpaper, gradually wearing down the clear coat or paint layer.
Washing your wheels with appropriate cleaning products keeps the surface smooth and minimizes long-term wear and tear, ensuring that the wheels retain their luster and remain free of fine scratches.
Clean wheels are also easier to inspect, allowing you to identify early signs of damage before they become severe.
6. Drive Carefully Around Potholes and Construction Zones
Potholes, rough roads and construction zones are primary causes of damage to alloy wheels, as they often inflict sudden and forceful impacts on the wheel structure.
Hitting a pothole at high speed can result in scratches, wheel deformation, or, in severe cases, even cracks.
Driving cautiously in these areas, specifically by reducing speed, maintaining vehicle control and keeping a safe distance from rough surfaces, helps protect both the tires and the wheels.
Staying aware of road conditions is the most effective way to safeguard your wheels against sudden and costly damage.
Conclusion – How to Fix Scratched Alloy Wheels
So, basically alloy wheel damage is not always appears clearly at first seen, as it often seen when corrosion, fading and long-term structural wear shows up and then you reacts upon it.
These problems typically stem from everyday driving conditions such as: parking too close to the curb, driving on poor-quality roads, or constant exposure to brake dust and road debris.
A crucial point to understand is that most damage to a wheel originates at its surface; if identified early, it can often be remedied through simple methods such as: cleaning, sanding, filling minor cracks and repainting.
However, if left unaddressed for too long, even minor scratches can expose the underlying metal; this allows moisture and dirt to gradually induce corrosion, which over time compromises the wheel’s protective layer.
A key takeaway from this guide is that not all wheel damage is created equal.
Superficial scratches can typically be repaired at home, whereas deeper gouges, structural deformities, or cracks require greater caution, as they can jeopardize both the structural integrity and safety of the wheel.
Understanding this distinction helps prevent costly mistakes such as: attempting to fix structural damage with mere cosmetic repairs, or delaying necessary professional repairs.
So, that’s it from this guide about How to Fix Scratched Alloy Wheels, also you can ask queries below.
Frequently Asked Questions
FAQ 1: Can scratches on alloy wheels be repaired at home?
Answer: Yes, light to moderate scratches on alloy wheels can be repaired at home, provided that the damage is limited solely to the outermost layers such as: the paint or clear coat. Such scratches typically do not compromise the wheel’s structural integrity; therefore, they can be fixed through processes involving cleaning, sanding, filling minor imperfections, repainting and applying a clear coat. However, DIY repairs are best suited for damage that is purely cosmetic in nature. If a scratch is deep enough to expose the underlying metal, or if it has distorted the shape of the wheel, opting for professional repair is generally safer and yields more durable results.
FAQ 2: How can I tell if a scratch on a wheel is serious?
Answer: A scratch on a wheel is considered serious when it is not merely confined to the surface but also affects the wheel’s structural integrity or shape. If you observe cracks, bent edges, air leaks from the tire, or feel vibrations while driving, these are indications that the damage is far more severe than just superficial cosmetic damage. These signs typically suggest that the wheel has sustained a forceful impact; in such cases, attempting to repair it using only standard DIY methods may not be safe. In these situations, a thorough inspection of the wheel is essential, as any structural defect could jeopardize driving safety and tire performance.
FAQ 3: Do scratches on alloy wheels get worse over time?
Answer: Yes, if scratches on alloy wheels are left untreated, they can gradually worsen over time. Once the protective clear coat is compromised, moisture, brake dust and dirt can penetrate to the underlying metal surface. This can trigger the process of oxidation and corrosion, issues that spread gradually, causing the wheel to look unsightly and feel rough to the touch. Initially, minor scratches may not appear particularly serious; however, if left unrepaired and continuously exposed to weather and road conditions, they can slowly evolve into larger, more severe damage.
FAQ 4: How long does an alloy wheel repair typically last?
Answer: If an alloy wheel repair is executed correctly, it can last for a considerable period, often for several years, provided that the wheel surface was properly prepared for the repair and subsequently protected with paint and a clear coat. Its durability depends on the quality of the work performed at every stage, including cleaning, sanding, painting and curing (the drying process). If the repair is rushed or performed without the appropriate materials, it may begin to peel or fade prematurely. Regular cleaning of the wheels and careful driving habits also help to extend the lifespan of the repair.
FAQ 5: Can scratches on rims be completely removed?
Answer: Yes, scratches on rims can typically be repaired to restore the wheel to a smooth, like-new condition. First, the damaged area is sanded down and smoothed out to eliminate any rough edges; it is then filled if necessary and finally painted and sealed. In most cases, after repairs, the wheel looks almost brand new, specially if the damage is not too deep. However, if the scratches are extensive, you may need to have the wheels professionally refinished to ensure they look completely flawless and factory-fresh.
FAQ 6: Is it safe to drive with scratched alloy wheels?
Answer: If there are only minor surface scratches, it is generally safe to drive, as these do not compromise the structural integrity of the wheel. However, if the damage involves cracks, warping, or air leaks, driving may be unsafe. Structural defects can weaken the wheel’s strength, potentially leading to tire-related issues or vibrations while driving. Therefore, it is crucial to determine whether the damage is merely superficial or if it indicates a deeper underlying issue that requires immediate attention.
FAQ 7: Why do alloy wheels scratch so easily?
Answer: Alloy wheels scratch easily because they are constantly exposed to road conditions and are made from a softer metal compared to steel wheels. Parking near curbs, driving on rough roads, facing potholes or gravel and even the accumulation of brake dust can gradually wear down the wheel’s protective layer. The outer layers of paint and clear coat are thin; consequently, even minor bumps or scrapes can leave marks on the surface.
References:
[1] Failure Analysis in Aluminium Turbocharger Wheels
https://www.researchgate.net/publication/284137217_Failure_Analysis_in_Aluminium_Turbocharger_Wheels

Hello Folks, Dean Shali here to help you out to solve the problems with your lovely vehicle, as i have lots of experience and knowledge about automotive industry as i woks directly with the customers and repair vehicles and i love to help the people to keep their cars safe and running smoothly.