Written By: Dean Shali
Fact Checked By: Sabré Cook
Reviewed By: Tamara Warren
Basically, even a perfectly mounted tire is not safe until the bead locks in fully and evenly onto the rim.
So, whenever you mount tire on a wheel, then there’s tire bead seating that needs to be perfect, as it is the tight air seal where the tire edge locks perfectly onto the rim.
That’s why, whenever this seal is correct, then the tire actually holds the air evenly that supports the vehicle weight as well and keeps the driving really stable even at highway speeds as well.
But, if the bead is not seated properly, even by a few millimeters, then the result can be slow air leaks, uneven tire wear, steering vibration or in rare cases, there can be sudden deflation at the high speed.
Now, this is the proper guide about How to Inspect Tire Bead Seating so that you can understand how faulty one behaves, so that you can catch the problems early on and avoid unnecessary tire failure as well.
What is Tire Bead Seating?
Tire bead seating is the process in which the outer edge of the tire fits tightly against the wheel rim to create an airtight seal.
The bead is, essentially, the thick inner edge of the tire that comes into contact with the metal rim.
Embedded within this edge, inside the rubber, are strong steel wires that firmly anchor the tire to the wheel.
This connection is crucial because a tubeless tire relies entirely on this seal to maintain air pressure.
If the bead does not seat properly, air may leak out gradually, the tire could slip on the rim and driving stability could be compromised.
A properly seated bead forms a continuous seal around the entire circumference of the wheel, enabling the tire to maintain pressure and safely support the vehicle.
1. Know, About Tire Bead and Rim Interface
The tire bead is the sturdy edge of the tire that rests directly against the rim.
It is composed of thick rubber and steel wires, which provide it with strength and shape.
The rim interface is the specific contact zone where the tire bead meets the wheel.
This area must be clean, smooth and free of rust, dirt, or any form of damage to ensure that the seal is established correctly.
Together, the bead and the rim, function as a “lock-and-seal” system.
The rim provides the supportive metal framework, while the bead stretches tightly around it under pressure.
Even the slightest presence of rust or dirt in this contact zone can create tiny gaps through which air may escape.
This is why technicians always inspect and clean the rim before mounting a tire.
2. How Does the Bead Lock Onto the Wheel Rim?
The bead slides into a specially shaped groove located inside the wheel and locks onto the wheel rim.
When a tire is first mounted, the bead remains loose until air is inflated into it.
As the pressure increases, the bead expands outward and settles into the ‘bead seat’ section of the rim.
This section is designed with a slightly raised edge to prevent the tire from slipping off while the vehicle is in motion.
Once the bead reaches its correct position, it exerts uniform pressure around the entire circumference of the rim.
This creates a strong mechanical grip while simultaneously forming an airtight seal.
On many tires, manufacturers incorporate a small raised line near the sidewall, known as the ‘bead indicator line’.
This line serves as a visual aid to verify whether the tire has seated correctly and uniformly in its designated position.
If this line appears uneven or irregular at any point around the wheel, it may indicate that the bead has not seated properly.
3. The Role of Air Pressure in Seating the Bead
Ultimately, it is air pressure that seats the bead into its final position on the rim.
As air is inflated into the tire, it exerts equal outward pressure in all directions.
This pressure expands the sidewalls and presses the bead firmly against the surface of the metal wheel.
If the pressure is insufficient, the bead may fail to seat completely, potentially leaving gaps that could lead to air leaks.
During tire installation, the air pressure may be temporarily increased slightly beyond the standard driving pressure to assist in fully seating the bead into its proper position.
Once the bead seats properly, the tire pressure is restored to the PSI level recommended for that specific vehicle.
Maintaining the correct pressure is crucial, not only during the installation process but also thereafter, as low pressure can cause the seal to weaken over time.
Therefore, checking the air pressure after installing the tire is the simplest method to ensure that the bead has seated correctly and the seal remains secure.
Know, Signs of an Improperly Seated Tire Bead
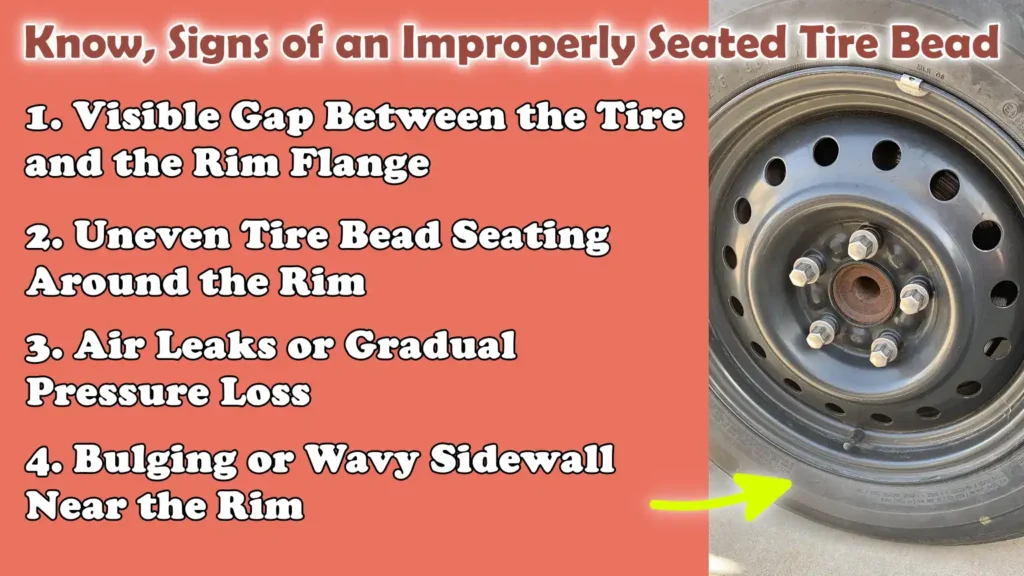
An improperly seated tire bead typically presents clear warning signs; however, if you do not look closely, many of these signs are easy to overlook.
The bead is the sealing edge responsible for retaining air inside a tubeless tire; therefore, when it does not seat correctly on the rim, it can lead to a loss of tire pressure, tire displacement, or uneven tire wear.
This issue often becomes apparent immediately after the tire is mounted, although in some cases, it may only be detected after driving.
An improperly seated bead can negatively impact steering response, tire balance, fuel efficiency and road safety.
As this problem originates precisely at the interface where rubber meets metal, the signs often manifest around the rim flange and the tire’s sidewall.
Timely recognition of these symptoms can prevent tire failure and avert costly damage to both the wheel and the tire.
1. Visible Gap Between the Tire and the Rim Flange
A visible gap between the tire and the rim flange is one of the easiest signs to identify.
The rim flange is the outer edge of the wheel upon which the tire bead is designed to rest securely.
When the bead is fully seated in its correct position, no gap should be visible between the tire and the metal rim.
If you observe a gap, even if it is just a small section where the tire’s edge appears to be separated from the wheel, it indicates that a complete seal has not been formed.
The presence of such a gap suggests that the bead has not yet fully settled into the “bead seat” area, thereby allowing air to escape through the opening.
This gap may appear in only a specific section of the wheel, particularly if the tire shifted slightly out of position while being inflated.
This often occurs when the rim is dirty or bent, or when the tire has been mounted without proper lubrication.
Using a flashlight can help identify even the tiniest gaps that might be difficult to spot under normal lighting conditions.
2. Uneven Tire Bead Seating Around the Rim
The edge of the tire should appear uniform all the way around the wheel.
Most tires feature a raised line near the rim, known as the “bead line” or “guide ring”.
This line should maintain a consistent distance from the rim throughout its entire circumference.
If one section appears closer to the rim while another seems further away, it indicates that the bead has not seated properly within its groove.
This uneven seating implies that the tire is not correctly centered on the wheel, which can lead to vibrations while driving.
Consequently, the tire may rotate with a slight imbalance, even if the wheel’s balance has already been professionally adjusted.
Improper bead seating places excessive stress on the sidewall and can eventually lead to uneven tread wear over time.
This is one of the most reliable visual checks to perform after mounting a tire.
3. Air Leaks or Gradual Pressure Loss
Gradual pressure loss is one of the most common symptoms of a bead seating issue.
Immediately after inflation, the tire may appear perfectly fine; however, over the course of several hours or days, it may slowly lose air.
This happens when the bead forms only a partial seal, allowing tiny air molecules to escape through minute gaps.
In many instances, drivers assume the tire has suffered a puncture, but the actual cause is often a poor seal against the rim.
Even in the absence of any visible damage to the tire, a significant drop in pressure (measured in PSI) often signals that air is leaking from the bead area.
This issue becomes even more pronounced during temperature fluctuations, as the air expands and contracts, causing tiny leaks to widen.
Spraying soapy water around the bead often reveals bubbles, confirming that air is indeed escaping from the seal.
Regular pressure checks help detect this problem before the tire pressure drops to dangerously low levels.
4. Bulging or Wavy Sidewall Near the Rim
A bulge or wavy appearance in the sidewall near the rim may indicate that the tire bead has not seated properly.
When a tire is correctly mounted, its sidewall should appear smooth and uniform.
If any section of the sidewall near the edge of the wheel looks raised, crooked, or uneven, the bead may have become lodged in the wrong position.
This typically occurs when one part of the bead seats correctly, while another part remains stuck down within the rim’s groove.
Consequently, the tire assumes an irregular shape, which affects its performance on the road.
This condition can also cause vibrations while driving at moderate speeds and places excessive stress on the tire’s internal structure.
In severe cases, driving on a tire with an improperly seated bead can damage the internal sidewall cords, compromising the tire’s overall structural integrity.
Tools
| Tools | Why It Is Needed | How to Use It |
|---|---|---|
| Air Compressor or Tire Inflator | Air pressure is what pushes the tire bead outward until it forms a complete seal against the rim. Without a sufficient flow of air, the bead may not seat fully in its proper position, creating a potential for air leaks. A continuous flow of air also helps verify whether the bead is seating evenly while the tire is being inflated. | Connect the inflator to the tire valve and begin inflating slowly. As the pressure rises, keep a close watch on the tire’s sidewall. Once the bead has seated evenly, stop inflating; subsequently, inflate the tire to the specific PSI level recommended by the vehicle manufacturer. |
| Tire Pressure Gauge | A tire may appear perfectly normal to the eye, yet still lose air due to a faulty bead seal. A pressure gauge indicates whether the tire is able to maintain the correct pressure after installation. This tool helps detect minor leaks that might not be immediately visible. | After inflating the tire, press the gauge firmly against the valve stem. Check the reading immediately and then check it again after a few minutes or a few hours. A drop in pressure is often an indication that the bead seal has not formed a complete seal. |
| Spray Bottle With Soapy Water | Soapy water is the simplest and most reliable method for detecting minor leaks in the tire bead. Bubbles will begin to form precisely at the spot where air is escaping (i.e., where the seal is defective). This method is widely used because it remains effective even when the leak is too small to produce an audible sound. | Fill a spray bottle with water and a small amount of dish soap. Spray this mixture onto both sides of the tire, covering the entire circumference of the rim. Keep a close watch for the formation of bubbles, as they pinpoint the exact location of the leak. |
| Flashlight | Bead seating issues are often hidden within small sections of the rim where, due to shadows, it becomes difficult to spot any gaps. Using a flashlight facilitates visibility and helps identify improper bead seating, cracks, or trapped debris around the rim’s edge. | Sweep the beam of the flashlight around the entire circumference of the wheel, paying particular attention to the interface between the tire and the rim. Look for any gaps, an uneven bead line, or sections where the tire’s edge appears seated lower than the rest. |
| Bead Seater or Tire Mounting Lubricant | Some tires fail to seat properly because the rubber adheres to the rim or does not slide uniformly. A lubricant reduces friction, allowing the bead to slide into its correct position with ease. A bead seating tool assists in rapidly inflating the tire, particularly when standard inflation methods prove insufficient. | Before inflating the tire, apply a thin layer of lubricant around the bead. If the tire still fails to seat correctly, use a bead seating tool to deliver a sudden burst of air. This procedure is frequently employed for tires that are difficult to seat, or following a tire remount. |
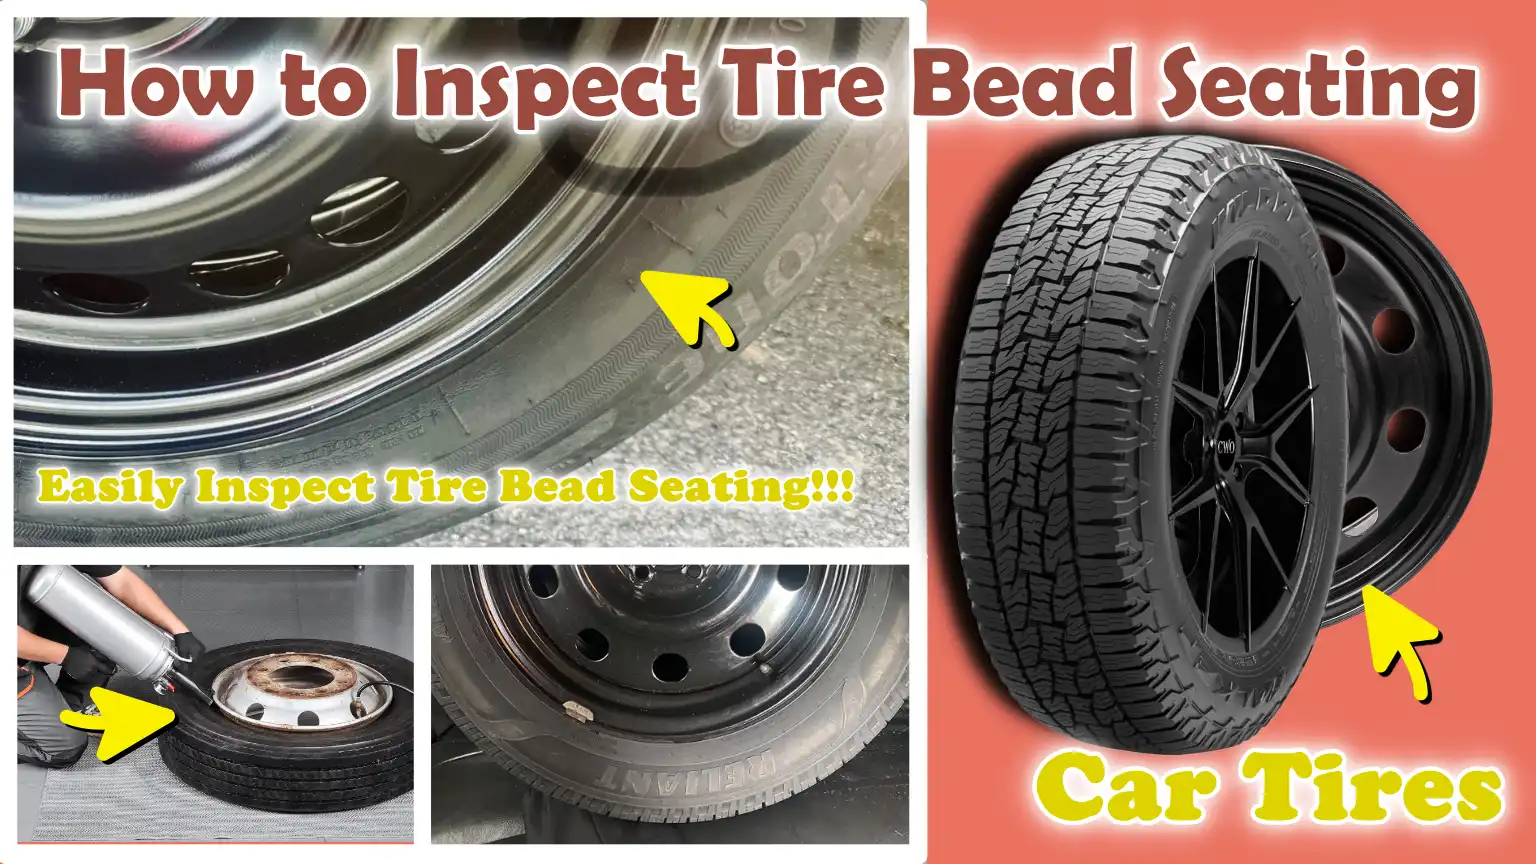
How to Inspect Tire Bead Seating – Easy Guide
The primary objective of checking tire bead seating is to determine whether the edge of the tire has sealed uniformly against the wheel rim.
Proper inspection does not require any specialized tools, but it must be performed with care, as even a small gap can lead to air leaks, vibrations, or unsafe driving conditions.
The best approach is to first conduct a visual inspection and then confirm the integrity of the seal using pressure and leak tests.
It is essential to inspect both sides of the tire; even if the outer bead appears normal, the inner bead may not be seated correctly.
1. Visual Inspection of the Rim
To begin, carefully examine the area where the tire meets the wheel rim on both sides.
The bead should be seated tightly against the rim, with no visible gaps or openings.
Inspect the outer side first, as it is easier to view and then check the inner side as well, as this is often where air leaks originate.
A flashlight can be helpful in identifying small cracks or gaps.
The contact point between the tire and the rim should appear smooth and uniform along the entire circumference.
If any section appears sunken, separated, or slightly raised, the bead may not be fully seated.
This is often the first indication of an issue faced during tire installation and must be verified before operating the vehicle.
2. Check the Bead Line Indicator
Most tires feature a thin, raised line on their sidewall, located close to the rim.
This is known as the bead line indicator.
Its purpose is to indicate whether the tire has seated uniformly after inflation.
This line should maintain a uniform distance from the rim as it traces the entire circumference of the wheel.
If this line disappears at any point, or appears to sit too close to the rim in a specific section, it indicates that the tire bead has not seated correctly.
This implies that while one part of the tire has seated properly, another part has not.
This is one of the most reliable methods for confirming the correct positioning of the bead.
3. Inflate the Tire to the Specified Pressure
Inflate the tire to the exact pressure recommended by the vehicle manufacturer.
This information is typically found on a sticker located on the driver-side door frame or within the owner’s manual.
Maintaining the correct air pressure is crucial, as insufficient pressure prevents the bead from fully locking into place.
Keep a close watch on the tire’s sidewall while inflating it.
As the internal pressure increases, the bead should shift outward and seat firmly against the rim.
If any section remains sunken or uneven, you may need to deflate the tire and properly reseat it before use.
4. Check for Leaks Using Soapy Water
After inflation, spray soapy water along the entire bead area, specifically at the junction where the tire meets the rim.
This check helps detect minor leaks that might otherwise be difficult to spot with the naked eye.
This method is widely used because bubbles begin to form immediately as air escapes.
Carefully observe the area for any signs of foaming or bubbling.
If bubbles consistently appear at a specific spot, it indicates that air is leaking from the bead seal.
This confirms that the bead has not fully seated in its proper position, or that there may be dust or rust present on the rim’s surface.
5. Listen for Escaping Air
Approach the wheel and listen closely near the edge of the rim.
A properly seated tire will not emit any “hissing” sound after being inflated.
Any persistent sound of escaping air generally indicates that the seal is incomplete.
This sound can be very faint, specially in noisy environments, so it is best to perform this check in a quiet location.
A distinct “hissing” sound emanating from a specific section of the rim often points directly to the location of the leak, thereby revealing a problem that might not be visible to the naked eye.
6. Re-check Pressure Stability
Once the tire appears to be properly seated, wait approximately 5 to 10 minutes and use a gauge to re-check the pressure.
If the reading remains stable, it indicates that the seal is effectively retaining the air.
This step helps ensure that there are no internal or hidden issues.
If the PSI drops rapidly, there is a strong likelihood that the tire is leaking at the bead area, even if no external damage is visible.
Checking again after a short interval is the simplest way to confirm whether the tire is safe to drive on or if it requires reseating.
What a Properly Seated Tire Bead Should Look Like
A properly seated tire bead should appear balanced, uniform and firmly attached to the rim from every angle.
The bead is the sealing edge that retains the air inside the tire; therefore, its positioning directly impacts safety, tire pressure and driving stability.
Once mounted, the tire should sit naturally around the wheel, exhibiting no gaps, bulges, or uneven edges.
Many bead-related issues can be easily detected by visual inspection, provided you know what to look for.
Checking your tires before driving helps identify minor seating issues before they lead to air leaks or uneven tire wear.
1. Uniform Contact with the Rim on Both Sides
A properly seated tire must maintain full contact with the rim on both its outer and inner sides.
The edge of the tire should be pressed uniformly against the metal wheel all the way around.
There should be no sections where the tire appears lifted, pinched, or loose.
It is this uniform contact that creates an airtight seal.
The inner side is just as critical as the outer side, even though inspecting it may be slightly more difficult.
Occasionally, the outer bead may appear normal while the inner bead is only partially seated.
Checking both sides helps ensure that the tire is fully locked into place and safe to drive on.
2. No Visible Gaps or Uneven Spacing
There should be no visible gaps between the tire and the rim’s edge.
A properly seated bead fits snugly against the flange, creating a continuous seal around the wheel.
If a gap is visible at any point, it indicates that the bead has not seated completely.
The distance between the edge of the tire and the rim should also remain uniform.
If one section appears wider or narrower than another, it may indicate that the tire is seated unevenly.
Even a slight discrepancy in this spacing can lead to a slow air leak or wheel vibration while driving.
3. Smooth and Uniform Sidewall Alignment
Once the bead is properly seated, the tire’s sidewall should appear smooth and rounded.
There should be no bulges, kinks, or wavy sections near the rim.
A uniform shape indicates that the tire has expanded evenly under air pressure.
If any part of the sidewall appears bulging outward or indented inward, the bead may not be seated correctly at that specific spot.
This can affect the tire’s performance on the road and cause vibrations in the steering wheel.
A smooth sidewall generally signals that the tire is properly centered on the wheel.
4. Uniform Appearance of the Bead Line
Most tires feature a small molded line near the rim, known as the “bead line indicator”.
This line is used to verify whether the tire is seated correctly.
When the tire is properly mounted, this line should be clearly visible and maintain a consistent distance from the rim all the way around.
If this line disappears at any point, or appears significantly closer to the rim in a specific area, the bead may not be seated correctly.
This typically implies that a particular section of the tire has not fully settled into the bead seat.
A uniform bead line serves as the simplest and most reliable indicator that the tire is properly seated.
Know, Common Causes of Improper Bead Seating
Improper seating of the tire bead typically occurs during the tire installation process; however, the root cause is often a minor detail that is easily overlooked.
For an airtight seal to form, the bead must adhere tightly to the rim; anything that interferes with this contact can lead to air leaks, improper bead seating, or a loss of air pressure.
In many cases, the tire itself is not defective.
Instead, the problem stems from the condition of the wheel, improper installation, or the specific mounting technique employed.
Understanding these common causes helps prevent recurring issues following tire installation.
1. Dirty or Rusted Rim Surface
The rim surface must be clean, as the tire bead seals directly against it.
Dirt, dried sealant residue, brake dust, or even minute particles can prevent the rubber from establishing uniform contact with the metal.
This creates tiny gaps through which air can escape.
Rust is another common culprit, particularly on older steel or aluminum wheels.
Rust or oxidation creates rough spots that compromise the integrity of the seal.
Even a small patch of rust can hinder proper bead contact and lead to a gradual loss of air pressure after the tire has been mounted.
2. Damaged Tire Bead
The tire bead is constructed from strong steel wires encased in rubber; for the tire to seal correctly, this component must be intact and free of damage.
If the bead becomes bent, torn, cut, or stretched during installation, it will be unable to seat properly against the rim.
This type of damage often occurs when tire-mounting tools are used with excessive force, or when an old tire is removed forcibly or using improper techniques.
Although it may be possible to inflate a tire with a damaged bead, doing so can lead to air leaks, improper bead seating, or a failure to form a complete seal.
For this reason, the bead should always be inspected before mounting a tire.
3. Incorrect Tire Size for the Rim
To seat properly, the tire’s dimensions (diameter and width) must precisely match the dimensions of the rim.
If the tire size does not correspond to the wheel size, the bead will be unable to reach its correct position.
This can result in the tire remaining loose or failing to seat correctly.
Even minor errors during installation can lead to problems.
For instance, if you use a tire that is either too narrow or too wide for the rim, it may hinder the bead from locking into its proper place.
The tire might hold air for a while, and may even appear normal, until it eventually begins to leak.
4. Insufficient Air Pressure During Installation
It is the air pressure that pushes the bead outward, causing it to seat firmly against the bead seat area.
If the air pressure remains too low during installation, the bead may never fully seat in its correct position.
The tire may appear to be partially seated, and may even look normal, until it eventually begins to leak air.
This often happens when a low-powered inflator is used or when the tire is inflated too slowly.
Some tires require higher initial air pressure to seat correctly.
If there is insufficient pressure initially, the bead may get stuck in the central groove of the rim instead of locking into its designated seat.
5. Lack of Lubrication During Installation
Tire lubricant facilitates the bead’s smooth sliding onto the rim during installation.
Without lubrication, the rubber may adhere to the wheel and stop short of reaching its proper seating position.
This often results in the bead failing to seat correctly.
The right lubricant reduces friction and helps the bead seat uniformly as the pressure increases.
If lubricant is not used, or is applied in insufficient quantities, the tire may require repeated inflation.
This also increases the likelihood of damaging the bead during the mounting process.
What are the Safety Risks of Ignoring Tire Bead Seating Issues
Ignoring tire bead seating issues can pose serious safety risks, as the bead is the component that seals the tire and securely anchors it to the wheel.
If the bead does not seat correctly, the tire may hold air for a time, but it remains vulnerable to failure under the stress of vehicle weight, heat, or road shocks.
These issues often worsen while driving, as the tire is constantly flexing; this movement can further compromise an already weak seal.
A problem that begins as a minor leak can rapidly escalate into a sudden tire failure.
For this reason, even minor bead-related issues should be resolved before operating the vehicle.
Basically, the tire bead is more than just a rubber edge, as the engineering research shows that the bead contact area actually carries measurable load and changes under the real driving conditions, that actually means that when you inspect whether the beat sits evenly around the rim is really important as uneven seating can change how the tire handles cornering forces and air sealing as well.[¹]
1. Sudden Air Loss While Driving
If the bead is not seated properly, the tire may lose air without warning.
A leak may begin gradually, but the heat generated by driving, along with the movement of the wheel, as it can widen the gap between the tire and the rim.
This can lead to a rapid loss of tire pressure while the vehicle is in motion.
Sudden air loss alters the way the tire supports the vehicle.
The tire may go flat, causing the vehicle to pull to one side or compromising braking control.
At high speeds, even a slight drop in pressure can make steering difficult and significantly increase the vehicle’s stopping distance.
2. Tire Separation at High Speeds
When the bead is not firmly locked into the rim, the tire may dislodge from its position under extreme stress.
While driving on a highway, the tire is subjected to heat and lateral forces, particularly when cornering or traveling over uneven terrain.
These pressures constantly exert force on the bead.
If the tire bead is already weak or damaged, a section of the tire may detach from the rim flange.
This can cause the tire to deflate instantly or burst violently.
Although a tire detachment at high speeds is a rare occurrence, the likelihood of it happening increases significantly if bead-related issues are ignored following installation.
3. Uneven Tire Wear
A tire that is not seated evenly will not rotate in a perfectly balanced manner.
One section of the tire may bear excessive weight, while another section fails to make proper contact with the road surface.
This results in uneven wear across the tire tread (surface).
Over time, this can reduce the tire’s lifespan and compromise its traction on the road.
The tire may wear out faster on one side, or develop irregular wear patterns that negatively impact the vehicle’s handling.
Even if a leak appears minor, a new tire can deteriorate much faster than expected, simply because its bead was not seated correctly.
4. Steering Instability
If the bead is not seated properly, it can significantly affect how the tire tracks on the road.
If the tire is not seated correctly on the wheel, it can generate vibrations, cause the vehicle to pull to one side, or make the steering feel loose or unresponsive.
These issues often become more pronounced at moderate to high speeds.
The steering wheel may shake or vibrate, particularly immediately after a tire replacement.
This occurs because the tire is not properly centered on the rim.
If left uncorrected, maintaining control over the steering, whether while braking, turning, or swerving to avoid a sudden obstacle, as it can become extremely difficult.
Read More:
Conclusion – How to Inspect Tire Bead Seating
If your vehicle’s tire not holding the air in safe way and leaking even though your tires and tubes are in great condition then it often because of the small sealing issue with the wheel edge.
This small area of contact creates an airtight seal that supports the vehicle’s weight, maintains air pressure stability and keeps the tire secure during braking, cornering and highway driving.
When the bead is not seated correctly, issues such as gradual air loss (often without immediate warning), vibrations, uneven tire wear and unstable steering can arise.
For this reason, performing a simple check after mounting a tire is not merely a step in routine maintenance; it is a critical safety verification.
In most cases, no specialized tools or professional equipment are required to verify that the bead is seated correctly.
A careful visual inspection, which may also include the use of a pressure gauge and a simple soap-and-water test, as it can detect most common issues.
Checking for uniformity in the bead line, a smooth sidewall texture and stable air pressure ensures that the tire has sealed properly.
These checks become even more crucial whenever a new tire is installed, a puncture is repaired, or a wheel is remounted following service.
Verifying that the bead is seated correctly is essential because many tire failures begin silently.
Even a minuscule gap between the tire and the rim can allow air to leak out gradually; as the tire heats up during road driving, this minor leak can escalate into a major safety hazard.
Ignoring these early warning signs can lead to difficulties in vehicle handling, reduce tire lifespan and, in severe cases, result in a sudden tire blowout while driving at high speeds.
By carefully inspecting the tire bead before every drive, you can minimize the risk of hidden issues and enhance the overall safety of the vehicle.
So, that’s it from this guide and you can comment for more information.
Frequently Asked Questions
FAQ 1: How can you tell if the tire bead is seated correctly?
Answer: A tire bead is considered properly seated when the edge of the tire sits flush against both sides of the wheel rim, without any visible gaps. Most tires also feature a thin molded line near the rim, known as the ‘bead line indicator.’ This line should maintain a uniform distance from the rim all the way around the wheel. If this line appears uneven, disappears in certain sections, or sits too close to the rim at a specific spot, the bead may not be seated correctly. The tire’s sidewall should also appear smooth and balanced, free from any bulges or distortions.
FAQ 2: Why might a tire bead fail to seat correctly?
Answer: The primary reason for a bead failing to seat correctly is a rim surface that is dirty, rusty, or damaged, preventing the rubber from forming a proper seal. This can also occur if the tire bead itself is damaged during the installation process, or if a tire of the incorrect size has been mounted on the wheel. In many cases, insufficient air pressure during the installation process prevents the bead from fully snapping into place. Failing to use the appropriate lubricant for the tire is another common cause, as the bead may stick to the rim rather than sliding into its correct position.
FAQ 3: Can a tire lose air if the bead is not seated correctly?
Answer: Yes, a tire can lose air even if it does not have a puncture. If the bead does not form a tight seal against the rim, air can slowly leak out through tiny gaps. This is often the reason why tire pressure gradually drops over the course of a few hours or days. Many drivers mistake this for a valve leak or a puncture caused by a nail, but the actual problem lies in the seal between the tire and the wheel. Applying soapy water to the area around the rim often confirms the problem, as bubbles will begin to form precisely at the spot where air is leaking.
FAQ 4: Is it safe to drive if the tire bead is not seated correctly?
Answer: Driving with an improperly seated tire bead is not considered safe, because as the vehicle’s weight bears down on the tire, the seal can become even weaker. As the tire rotates, heat is generated and the forces exerted by the road surface continuously place pressure on the bead. This can exacerbate air leakage or cause the tire to shift slightly out of position on the rim. In severe cases, particularly when driving at high speeds on a highway, tire pressure can drop suddenly. Therefore, before resuming regular use of the vehicle, it is always safer to inspect the tire bead’s seating status and rectify any issues.
FAQ 5: What does a faulty tire bead look like?
Answer: When a tire bead is faulty, a distinct gap may be visible between the tire and the rim; the spacing around the circumference of the wheel may appear uneven; or the sidewall near the edge may look wavy. The bead line may appear closer to the rim in some spots and further away in others. The tire may also appear to be mounted slightly crookedly on the wheel. In some instances, the bead may look normal from the outside but may not be seated correctly on the inside; for this reason, it should be inspected from both sides.
FAQ 6: Can you check the tire bead seating yourself at home?
Answer: Yes, with the help of a few simple tools, you can perform a basic inspection of the tire bead right at home. A flashlight is useful for examining the tire’s edge and the rim, while a pressure gauge allows you to check the air pressure. Furthermore, using a spray bottle filled with soapy water, you can detect any air leaks. These checks are often sufficient to determine whether the bead is seated correctly. However, if the tire is continuously losing air, or if the bead still fails to seat properly even after reinflating, you may need to have it inspected by a professional.
FAQ 7: Why is the bead line so important during an inspection?
Answer: The bead line is the easiest way to verify whether a tire is seated correctly. It is a raised ring molded into the tire’s sidewall, located directly adjacent to the rim. When the tire is mounted properly, this line appears uniform and distinct all the way around the wheel. If this line appears too close to the rim at a specific spot, or disappears completely in a particular section, it indicates that the bead has not seated correctly. In this way, you can easily identify bead seating issues without having to dismount the tire.
References:
[1] Bead Contact Pressure Measurements at the Tire-Rim Interface
https://saemobilus.sae.org/papers/bead-contact-pressure-measurements-tire-rim-interface-750458

Hello Folks, Dean Shali here to help you out to solve the problems with your lovely vehicle, as i have lots of experience and knowledge about automotive industry as i woks directly with the customers and repair vehicles and i love to help the people to keep their cars safe and running smoothly.