Written By: Dean Shali
Fact Checked By: Sabré Cook
Reviewed By: Tamara Warren
There’s not doubt about the usefulness of small group of studs as they literally provides safety by attaching your wheel to the vehicle, also they handles enormous pressure every second you drive.
But, if there’s a broken wheel stud then you immediately needs to fix those small metal bolts as that are the things that keeps a vehicle safe at the highway speeds.
So, every time you accelerate, brake, corner, hit a pothole or drive over rough roads, there’s wheel studs that literally holds thousands of pounds of pressure between the wheel and the hub.
Also, modern vehicles actually depends on the proper clamping force which is created by wheel studs and lug nuts to keep the wheel tightly attached and even one damaged or missing stud literally can reduce that force in significant way.
There are many reasons that leads to the stud failures such as: over-tightened lug nuts, rust buildup, cross-threading or repeated impact gun use during the tire changes.
Basically, that damaged studs usually weakens slowly over the time instead of failing instantly, that’s why many people just continue driving without even realizing that their wheel assembly is under extra stress.
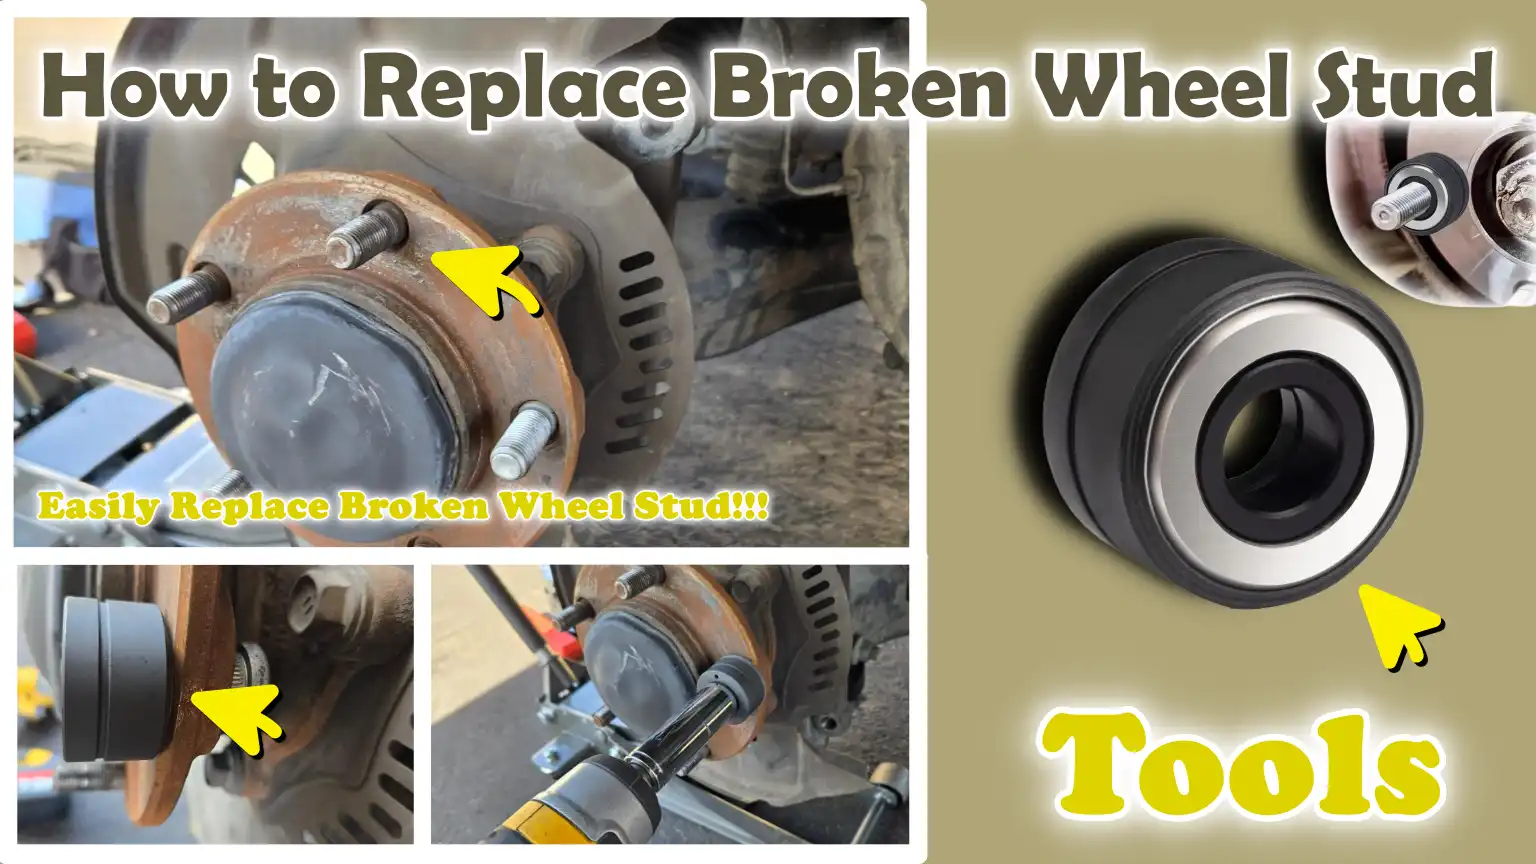
That’s why, in this guide you’ll learn How to Replace Broken Wheel Stud even you’ll learn about how wheel studs works, what actually causing them to breakdown, the warning signs and then the safest method to fix this safety hazard.
Understand, What is a Wheel Stud?
1. All About Wheel Stud
A wheel stud is a strong, threaded metal rod attached to a vehicle’s wheel hub, designed to firmly hold the wheel in place.
It serves as a fixed anchor point where lug nuts are tightened to secure the wheel.
Most passenger vehicles feature multiple wheel studs on each wheel, typically four to six, and these studs are manufactured from high-strength steel, as they must withstand constant tension, vibration, braking forces and road shocks.
Simply put, the wheel stud is one of the primary components that physically connects your wheel to your car while the vehicle is in motion.
2. What is the Difference Between Wheel Studs and Lug Nuts?
Wheel studs and lug nuts work in tandem, but they are not the same thing.
A wheel stud is permanently attached to the wheel hub and remains in place even when the wheel is removed.
A lug nut, on the other hand, is a nut that is threaded onto the wheel stud to firmly fasten the wheel to the hub.
The stud provides structural integrity and support to the wheel, while the lug nut generates the clamping force that locks the entire assembly together.
Many people confuse the two; however, the stud acts as the primary anchor, while the lug nut is the component that applies the pressure to secure the wheel.
3. How Do Wheel Studs Securely Attach the Wheel to the Hub?
Working in conjunction with lug nuts, wheel studs firmly hold the wheel in place; this process generates a specific type of pressure known as “clamping force.”
When lug nuts are properly tightened, they firmly pull and secure the wheel against the hub surface; the studs then maintain this tension, ensuring that the wheel remains stable in its position.
It is this clamping force that enables the wheel to rotate securely in unison with the hub, while simultaneously withstanding braking forces, vehicle speed and the lateral stresses faced during turns.
The friction between the wheel and the hub, combined with the tension within the studs, works to lock the entire assembly together, even when the vehicle is operating under the most demanding conditions.
If the studs are not functioning correctly, this critical balance is compromised, rendering the vehicle unsafe to drive.
4. How Can a Single Faulty Stud Weaken the Wheel’s Clamping Force?
Although a wheel typically features multiple studs, each individual stud plays a crucial role in evenly distributing the load placed upon the wheel.
If a single stud breaks, suffers damaged threads, or becomes loose, the remaining studs are forced to bear an additional load, a load for which they were not designed.
This uneven distribution of weight reduces the overall clamping force, preventing the wheel from seating properly against the hub.
Over time, this imbalance can generate vibrations, cause other lug nuts to loosen and increase the strain on the remaining studs, thereby heightening the risk of their failure as well.
In actual driving conditions, the failure of even a single wheel stud jeopardizes the safety of the entire wheel assembly and significantly increases the risk of wheel instability, particularly at high speeds or during sudden braking maneuvers.
Know, Common Signs That Your Wheel Stud Is Broken
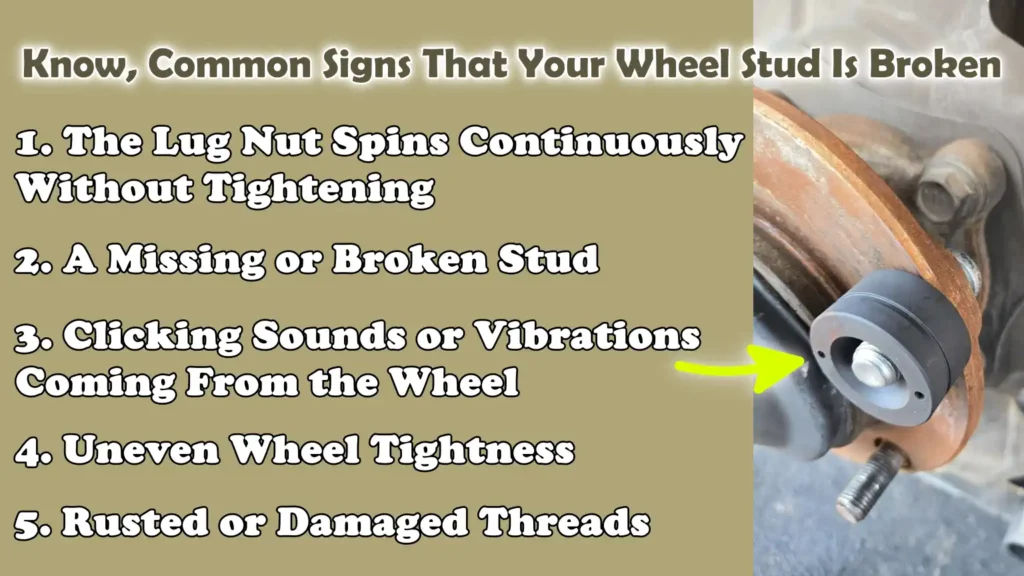
1. The Lug Nut Spins Continuously Without Tightening
The most common and obvious sign of a broken wheel stud is that, as you continue to turn the lug nut, it never tightens.
This typically occurs when the threads on the stud become stripped, or when the stud snaps off from behind the wheel surface.
Instead of generating the proper clamping force (tightening power), the lug nut simply spins freely or feels loose, no matter how much you turn it.
Under normal circumstances, tightening a lug nut should result in a gradual increase in resistance as it pulls the wheel toward the hub; however, when a stud is compromised, that resistance never develops.
This situation is dangerous because it implies that the wheel is not securely fastened in place, even if it appears normal from the outside.
2. A Missing or Broken Stud
Another clear indication is when a wheel stud is completely missing or visibly broken.
You may notice an empty hole in the wheel hub, or spot a stud that has snapped off near its base.
This is often caused by overtightening, metal fatigue resulting from rust, or the constant stress placed on the stud due to repeated use over time.
When a stud is missing, the remaining studs bear an increased load, thereby heightening the risk of further failure.
A broken stud poses a direct safety hazard, as it reduces the total clamping force holding the wheel to the vehicle; consequently, the wheel becomes unstable while driving, particularly during hard braking or when taking sharp turns.
3. Clicking Sounds or Vibrations Coming From the Wheel
Faulty wheel studs can manifest as strange clicking sounds or vibrations while driving.
These symptoms occur because the wheel is no longer seated flush against the hub.
As the vehicle moves, the slight movement between the wheel and the hub can generate a continuous metallic clanking sound or a rhythmic clicking noise.
These vibrations may be felt more distinctly at higher speeds or during acceleration.
Although these symptoms are often attributed to tire imbalance or brake-related issues, they can also indicate that one or more wheel studs are failing to properly secure the wheel, thereby creating instability within the wheel assembly.
4. Uneven Wheel Tightness
When wheel studs become compromised, you may notice that while some lug nuts tighten normally, others feel loose or uneven.
This uneven tightness occurs because each stud plays a role in distributing pressure evenly across the wheel.
If a stud has stretched, its threads have worn down, or it has sustained minor damage, it cannot provide the necessary resistance; consequently, the clamping force applied to the wheel becomes uneven.
This imbalance compromises overall safety, as the wheel is not pressing uniformly against the hub surface.
Over time, this uneven tightness places additional stress on the remaining studs, increasing the likelihood of further damage or breakage.
5. Rusted or Damaged Threads
The presence of rust on wheel studs or damage to their threads serves as a serious warning sign that the studs are at risk of breaking.
Rust compromises the structural integrity of the metal and diminishes the stud’s capacity to withstand tensile stress, particularly in environments involving exposure to moisture or road salts.
Damaged threads, often resulting from improper threading techniques or excessive force applied via impact tools, prevent the lug nut from seating securely.
When threads become compromised, the engagement between the lug nut and the stud is no longer reliable; consequently, the clamping force is reduced and the likelihood of the wheel gradually loosening increases.
Although these conditions may not immediately trigger a major failure, over time, they significantly elevate the risk of wheel stud breakage.
Know, The Common Causes of Wheel Stud Failure
1. Overtightening Lug Nuts
The most common cause of wheel stud failure is overtightening the lug nuts.
This occurs when lug nuts are tightened with excessive force, beyond the limit specified by the manufacturer.
Wheel studs are designed to stretch slightly within a safe limit to generate the correct clamping force; however, when excessive pressure is applied, it places undue stress on the metal.
This weakens the stud internally and it may eventually snap, particularly while driving, when it is subjected to additional stress from impacts caused by potholes, braking and cornering.
The error of overtightening lug nuts often occurs when power tools are used, or when lug nuts are tightened without a torque wrench, thereby compromising the precision required for a safe installation.
2. Cross-Threading
Cross-threading occurs when, during installation, a lug nut fails to align properly with the threads on the wheel stud and is instead forced into place at an angle.
This damages the fine threads on the stud, making it difficult to tighten the lug nut securely.
Even if the nut appears to seat easily, the damaged threads compromise the strength of the grip and create a weak point within the stud.
Over time, this weakened joint is unable to withstand the loads faced during normal driving and the stud may eventually snap or strip completely.
Cross-threading issues often arise when changing tires in haste, or when wheels are installed in poor lighting conditions or under time pressure.
3. Rust and Corrosion
Rust and corrosion are serious causes of wheel stud failure.
Wheel studs are constantly exposed to moisture, road salt, dust and temperature fluctuations, all factors that can gradually degrade the metal surface.
As corrosion progresses, it compromises the structural integrity of the studs and reduces the smoothness of the threads.
This makes it difficult to tighten the nuts uniformly and increases friction during installation.
Over time, rust eats away at the metal, reducing its thickness and overall strength; consequently, the likelihood of a stud fracturing under the stresses of normal driving conditions increases.
4. Damage Caused by Impact Guns
Using an impact wrench without proper control is another major cause of damage to wheel studs.
Impact guns generate sudden, intense torque that can easily exceed safe tightening limits, particularly if they are used repeatedly or for final tightening.
While effective for removing nuts, using them to install studs without monitoring the torque can lead to damage.
The repeated impact shocks can stretch the stud beyond its elastic limit, weakening its internal structure, even if no external damage is visible.
This hidden stress often leads to sudden failure later on, sometimes even while driving at high speeds.
5. Frequent Wheel Removal
Repeatedly removing and reinstalling wheels can also cause damage to wheel studs over time.
Each loosening and tightening cycle places stress on the threads and the metal of the studs.
If proper care is not taken during every installation, minor wear and tear gradually accumulates.
This includes minor wear on the threads, slight distortion, or repeated overtightening, all of which gradually diminish the strength of the stud.
Over time, this accumulated stress induces metal fatigue, thereby increasing the risk of the stud fracturing and failing, even under normal driving conditions.
So, Is it Safe to Drive with a Broken Wheel Stud?
1. Explanation of Safety Risks
Driving with a broken wheel stud is not considered safe, as the wheel is no longer fully secured using all of its designed fixing points.
Each wheel stud helps to firmly anchor the wheel to the hub; when a stud is missing or broken, the overall integrity of the connection is compromised.
Even if the wheel still appears to be attached, the safety margin is reduced; this increases the risk of the wheel shifting, vibrating and eventually working itself loose and detaching over time.
This situation becomes particularly dangerous when driving at high speeds, applying sudden brakes, or traveling over potholes and rough roads.
2. How Load Becomes Unevenly Distributed on the Wheel
Wheel studs work collectively to ensure that the forces acting between the wheel and the hub are distributed evenly.
When a stud breaks, the remaining studs are forced to bear a load exceeding their designed capacity.
This creates uneven pressure on the wheel’s mounting surface, which can lead to slight shifts in the wheel’s position while driving.
Over time, this uneven loading places excessive strain on the remaining studs, increasing the likelihood that they, too, will break or fail.
At low speeds, this imbalance may go unnoticed; however, as the vehicle’s speed increases, or when significant stress is placed on the wheel, this imbalance becomes distinctly perceptible.
3. When Driving Becomes Extremely Dangerous
Driving becomes extremely dangerous when more than one wheel stud has failed, or when symptoms such as wheel wobbling, clicking sounds, or loose lug nuts are already present.
In such instances, particularly when subjected to sudden and intense stress, such as during emergency braking or while taking sharp turns, the wheel may fail to remain securely attached to the hub.
The risk of the wheel becoming even looser while driving also increases, potentially leading to a complete loss of vehicle control.
This situation becomes specially critical when driving on highways, as the high speeds involved significantly amplify the forces exerted on the wheel assembly.
4. Why Immediate Replacement Is Recommended
Broken wheel studs should always be replaced as soon as possible, as delaying repairs places increased strain on the remaining studs and creates a risk of the wheel becoming completely unstable.
As wheel studs are relatively small and inexpensive components compared to other parts of the vehicle, replacing them in a timely manner can prevent severe damage to the wheel hub, brake components and the wheel mounting surface.
Replacing them immediately also restores the wheel’s clamping force, ensuring that the wheel remains firmly secured; furthermore, it minimizes the likelihood of vibrations, looseness, or sudden mechanical failure while driving.
Tools
| Tools | Why It Is Needed | How to Use It in This Job |
|---|---|---|
| Jack | Lifts the vehicle so that the wheel can be safely removed. | Position it directly beneath the designated lifting point and raise the vehicle until the tire clears the ground. |
| Jack Stands | Stabilizes the vehicle after it has been lifted. | Place it beneath the chassis before working under the vehicle or removing a wheel. |
| Lug Wrench | Loosens and tightens wheel nuts. | Use this to loosen the wheel nuts (lug nuts) before lifting the vehicle. |
| Socket Set | Removes bolts from brake components. | Assists in removing caliper bolts and rotor screws when necessary. |
| Breaker Bar | Provides increased leverage for tightening bolts. | Use this when wheel nuts or bolts are so tight that they cannot be loosened with a standard wrench. |
| Torque Wrench | Ensures the correct torque (rotational force) during tightening. | Precisely tighten the wheel nuts according to the specified torque value. |
| Hammer | Assists in removing or installing wheel studs. | Used to carefully extract broken studs or to properly seat new studs into their correct position. |
| New Wheel Stud | Replaces a damaged component. | Insert it into the hub and pull it into place to ensure it seats correctly during installation. |
| New Lug Nut – If Needed | Replaces damaged threads or worn-out nuts. | Used when the original nut is damaged or its threads have become worn. |
| Penetrating Oil | Loosens rusted or seized components. | Spray this onto seized nuts or studs before attempting to remove them. |
| Washer Spacers | Helps to properly seat new studs in their correct positions. | It is used in conjunction with wheel nuts to fully seat the studs into the hub. |
| Impact Wrench | Accelerates the bolt removal process. | Removes wheel nuts quickly, but should not be used for final tightening. |
| Pry Bar | Assists in the removal of seized brake components. | If the rotor or caliper is stuck, this is used to gently loosen it. |
| Brake Cleaner | Cleans away dust and grease. | Spray this onto the hub and brake components before reassembly to ensure they seat properly. |
How to Replace Broken Wheel Stud – Easy Steps to Follow
1. Park the Vehicle in a Safe Location
Before beginning any repairs, it is essential to park the vehicle on a level and stable surface to ensure it does not roll or shift while you are working.
Level ground ensures that the jack functions correctly and prevents the vehicle from tilting dangerously to one side.
The parking brake must always be engaged to keep the vehicle completely stationary specially when you are about to remove a wheel.
For added safety, place “wheel chocks” (blocks designed to prevent wheel movement) behind the wheels on the opposite side of the vehicle to prevent any sudden movement.
These simple safety precautions are crucial, as even the slightest shift in the vehicle during repairs can lead to serious injury or damage to the vehicle itself.
2. Loosen the Lug Nuts
In this step, you should slightly loosen the lug nuts, and this task must be performed while the vehicle is still resting on the ground.
Doing so is critical because, at this stage, the wheel remains stationary, allowing you to safely break the initial tight grip of the nuts.
You only need to “loosen” (turn slightly) the lug nuts; do not remove them completely.
If you remove the nuts entirely before lifting the vehicle, the wheel could become unstable.
This step minimizes the risk of the wheel spinning or slipping while you apply torque to the nuts, making the remainder of the repair process much easier and safer.
3. Lift the Vehicle
Once the lug nuts have been loosened, use the specific “jack points” (designated lifting locations) recommended by the vehicle manufacturer to lift the vehicle.
Positioning the jack at the correct points is essential, as this prevents damage to the vehicle’s frame and maintains its stability.
Once the vehicle has been raised, be sure to place jack stands underneath it before beginning any work.
A jack alone is insufficient to safely support the vehicle; jack stands provide a sturdy foundation, thereby eliminating the risk of the vehicle falling or shifting specially when you are working underneath it or near the wheel hub.
4. Remove the Wheel
Once the vehicle is securely supported, you can remove the wheel by completely unscrewing the lug nuts that were previously loosened.
After removing the wheel, it is crucial to inspect the remaining wheel studs to determine if any others are bent, rusted, or damaged.
You should also inspect the holes in the wheel through which the studs pass; if these holes are cracked or damaged, the studs will not seat properly in place.
Such an inspection ensures that replacing just a single stud is sufficient and that there is no other hidden damage to the vehicle.
5. Remove the Brake Components
Remove the Brake Caliper
The brake caliper should be carefully unbolted and removed and then supported so that it does not hang from the brake line.
Allowing the caliper to hang can damage the brake hose, which is essential for safe braking.
Remove the Brake Rotor
After removing the caliper, it may be necessary to remove the brake rotor to gain access to the wheel hub and the broken stud.
In some cases, rotors may become seized due to rust.
Gently tapping the rotor or applying penetrating oil can help loosen it.
If it remains stuck, it is essential to apply careful and even pressure without damaging the rotor surface or the hub.
6. Access the Broken Wheel Stud
Once the brake components have been removed, you may need to rotate the wheel hub slightly to create clearance behind it.
This provides better access to the broken stud from the rear side.
Creating sufficient space is crucial, as wheel studs are typically pressed into the hub from the back; having proper access facilitates their safe removal and installation.
7. Hammer Out the Broken Stud
The broken wheel stud is removed by applying controlled hammer strikes to the back of the hub.
The force applied should not be excessive, but rather steady and controlled, as applying too much force can damage the wheel bearing or surrounding components.
If the stud is seized due to rust, applying penetrating oil to loosen it before hammering can be helpful.
Patience is essential here, as attempting to force a stuck stud out can result in damage to the hub assembly.
8. Install the New Wheel Stud
The new wheel stud must be inserted from the correct side of the hub and properly aligned with the existing splines.
Splines are small ridges that lock the stud into place; therefore, correct alignment is critical to ensure a secure fit.
If the stud is not properly aligned, it will not seat correctly and may eventually come loose, thereby compromising the safety of the wheel.
9. Seat the New Stud in Place
The Washer and Lug Nut Method
A common method for seating a new stud involves using a washer and a lug nut.
The lug nut is tightened firmly onto the stud; as the pressure increases, it securely pulls the stud into its correct position.
Using a Stud Installer Tool
A specialized stud installer tool can also be used to press the stud into the hub in a more uniform and secure manner, thereby reducing the risk of damaging the threads.
With both methods, it is crucial to ensure that the stud sits completely flush against the hub surface so that the clamping force remains consistent when the wheel is reinstalled.
10. Reinstall the Brake Components
After installing the new stud, it is essential to properly place the brake rotor back onto the hub.
It must sit perfectly straight and flush, without any wobbling or misalignment.
Next, the brake caliper is reinstalled and its bolts are tightened securely.
Proper tightening is critical because the caliper is responsible for stopping the vehicle; if left loose, both braking performance and safety could be compromised.
11. Reinstall the Wheel
The wheel should be carefully placed back onto the hub, ensuring that it seats evenly across all the studs.
The lug nuts should initially be tightened by hand to prevent cross-threading, which could damage the new stud.
Hand-tightening ensures that the threads are properly seated before full torque is applied.
This step is vital, as improper threading is one of the most common causes of future stud failure.
12. Tighten the Lug Nuts to the Correct Torque
The final tightening should always be performed using a torque wrench to ensure that the precise amount of force is applied.
The lug nuts must be tightened in a star pattern to guarantee that the wheel sits flush against the hub.
This prevents uneven pressure distribution and maintains the stability of the wheel.
T = F × r
Torque refers to the rotational force applied while tightening the lug nuts.
Simply put, it depends on the amount of force you apply and the length of the tool you are using.
Applying the correct torque ensures that the wheel is fastened securely enough to remain safe, yet not so tightly that it causes damage to the studs or threads.
Always adhere to the specific torque specifications provided by the manufacturer, as every vehicle is designed with a specific and safe tightening range in mind.
So, How Long Does It Take To Replace A Wheel Stud?
1. Average Time Required for DIY Repairs
For most people performing this task at home, replacing a broken wheel stud typically takes about one to two hours per wheel, provided you have the correct tools ready.
This timeframe includes lifting the vehicle, removing the wheel, disassembling brake components, extracting the damaged stud, installing the new stud and reassembling everything.
The process may seem slow at first, as every step requires care and attention to avoid causing any damage specially when working with brake components and accessing the hub.
If an individual is familiar with basic vehicle repairs, the time required may sometimes be shorter; however, beginners should anticipate a slower and more cautious process to ensure both safety and proper installation.
2. Time Required At A Professional Workshop
At a professional repair workshop, replacing a wheel stud is typically much faster because mechanics possess the necessary experience, specialized tools and hydraulic lifts that make the process more efficient.
On average, a workshop can complete this task in approximately thirty minutes to one hour per wheel.
In some cases, if the brake rotor comes off easily and shows no signs of rust or damage, the work can be completed even more quickly.
However, workshops may allocate additional time for inspections and proper torque checks to ensure that everything is securely installed and complies with the manufacturer’s specifications.
3. Factors That Complicate The Job
Several factors can increase the time required to replace a wheel stud, particularly when components are seized or damaged.
Heavy rust is one of the biggest challenges, as it can make it difficult to remove the stud, rotor, or caliper.
In vehicles featuring a tightly designed hub assembly or limited clearance, additional steps may be required to access a broken stud.
Another contributing factor is a prior improper installation such as: cross-threaded lug nuts or overtightened studs, which can prolong the removal process.
In some instances, brake rotors may become seized onto the hub, necessitating extra effort and careful handling to remove them.
The condition of adjacent components such as: wheel bearings and brake parts, also influences the overall repair time, as it is essential to rectify any existing damage before securely installing the new stud.
Read More:
- How to Remove Stuck Lug Nuts
- How to Torque Lug Nuts Correctly
- How to Check Wheel Lug Torque
- How to Install Directional Tires Properly
- How to Identify Directional Tires Correctly
- How to Choose Tires for Snow Driving
- How to Choose Tires for Wet Roads
- How to Check Tire Load Rating
- How to Store Tires Properly Long Term
- How to Prevent Tire Dry Rot
- How to Fix Tire Bulge Issue
- How to Inspect Tire Inner Sidewall Damage
- How to Fix TPMS Sensor Not Detected
- How to Relearn TPMS Without Scan Tool
- How to Reset Tire Pressure Monitoring System Manually
- How to Check Tire Pressure Sensor Battery
- How to Seal Bead Leak in Tire
- How to Use Tire Plug Kit Correctly
Know, Common Mistakes to Avoid During Replacement of Broken Wheel Stud
1. Overtightening with an Impact Gun
One of the most common mistakes made when replacing wheel studs is overtightening with an impact gun, particularly when installing lug nuts.
Although impact tools are useful for quickly removing tight fasteners, if used incorrectly, they can easily apply excessive force.
Excessive torque can stretch the wheel stud beyond its safe elastic limit, causing damage to its internal structure, even if the stud does not break immediately.
This hidden damage often leads to sudden stud failure later on, while the vehicle is in motion.
Overtightening with an impact gun can also make it difficult to achieve uniform tension, thereby reducing the wheel’s clamping force and compromising overall safety.
2. Installing the Wrong-Sized Stud
Another serious error is using a wheel stud that does not match the specific size and specifications required for the vehicle.
Depending on the vehicle’s make and model, wheel studs come in various lengths, diameters and thread patterns.
If the wrong stud is installed, it may not seat properly within the hub or may prevent the lug nut from seating correctly.
This can lead to wheel misalignment, uneven pressure distribution and an increased risk of the stud loosening or breaking under normal driving conditions.
Even minor discrepancies in size can pose a significant safety hazard.
3. Ignoring Torque Specifications
Failing to adhere to the correct torque specifications is a mistake that directly jeopardizes wheel safety.
Every vehicle manufacturer specifies a specific torque range to ensure that the wheel is securely fastened and that the studs are not subjected to excessive stress.
If lug nuts are tightened too loosely, the wheel may eventually loosen over time, leading to vibrations and instability.
Conversely, if they are overtightened, the studs can stretch or weaken, significantly increasing the likelihood of them breaking.
Using a torque wrench is crucial because it applies a controlled force, ensuring that an equal load is distributed across all studs and that the wheel remains securely fastened.
4. Damaging the Wheel Bearings
When replacing wheel studs, mishandling the hub or applying excessive force with a hammer can damage the wheel bearings.
Wheel bearings are delicate components that allow the wheel to rotate smoothly with minimal friction.
If they are struck directly, or subjected to uneven force, while removing or installing studs, they can become worn or dislodged.
Damaged bearings often manifest symptoms such as humming or grinding noises, uneven wheel rotation and in severe cases, complete bearing failure.
This mistake can turn a simple stud replacement task into a very costly repair job.
5. Reusing Damaged Lug Nuts
Reusing old or damaged lug nuts is another common mistake that can compromise the integrity of the entire wheel assembly.
Lug nuts with worn threads, corrosion, or damaged seating surfaces cannot properly grip the wheel studs.
Even if they appear to tighten, they fail to generate the necessary clamping force required to securely hold the wheel in place.
Over time, this can lead to loose lug nuts, vibrations, or excessive stress on the new wheel studs.
Replacing a damaged nut ensures that the threads engage properly and uniform pressure is maintained across all studs, thereby guaranteeing safe driving.
Now, Understand How to Protect Wheel Studs from Damage?
Also, there’s studies that shows that improper tightening actually reduces the clamping force, which is the actually the main force that holds the wheel in place, so that’s why it becomes really important to use the torque wrench during the wheel stud installation and incorrect tightening is one of the leading causes of stud failure during drive.[¹]
1. Use a Torque Wrench
The most effective way to protect wheel studs from damage is to always use a torque wrench when tightening lug nuts.
With the aid of a torque wrench, you can apply the precise amount of force specified by the vehicle manufacturer, rather than relying on guesswork or mere experience.
Wheel studs are designed to withstand a specific clamping force; if force exceeding this limit is applied, the metal can stretch and weaken over time.
By using a torque wrench, you ensure that equal pressure is applied to every stud, thereby maintaining wheel safety and reducing the risk of future breakage.
2. Avoid Cross-Threading
Cross-threading is a major cause of damage to wheel studs, yet it can be easily avoided with careful installation.
It occurs when a lug nut is started at an angle instead of being properly aligned with the threads of the stud.
This damages the fine threads on the stud and weakens the connection between the nut and the wheel.
To prevent this, you should always start tightening the lug nuts by hand before using any tools.
Hand-tightening allows you to feel for proper alignment and ensures that the threads are engaging smoothly, thereby protecting the stud from unnecessary wear and long-term damage.
3. Regularly Clean Off Rust
The accumulation of rust on wheel studs can gradually compromise their structural integrity and make it difficult to properly tighten the lug nuts.
Over time, exposure to moisture, dust and road salt can lead to corrosion, which eats away at the metal surface of the studs from the inside.
Regular cleaning removes these deposits and ensures that the threads remain in good condition.
Using a brake-safe cleaner or a wire brush during routine maintenance or tire servicing helps keep the threads smooth.
Clean studs allow for more precise torque application and reduce friction, thereby helping to prevent uneven tightening of the nuts and potential structural damage over the long term.
4. Do Not Overtighten Lug Nuts
Overtightening lug nuts is the most common cause of wheel stud failure.
When excessive force is applied, the stud stretches beyond its safe elastic limit; even if it does not snap immediately, its internal structural integrity is compromised.
This damage accumulates over time and eventually, often while the vehicle is in motion, the stud may suddenly break.
It is crucial to tighten lug nuts strictly according to the torque specifications recommended by the vehicle manufacturer and to avoid using excessive force such as: that generated by impact tools, to fully secure them.
Proper tightening ensures that the wheel remains firmly attached without subjecting the studs to unnecessary stress.
5. Inspect Studs During Tire Rotation
Regular inspection of wheel studs during tire rotation is a vital preventive measure that helps identify early signs of damage.
During these inspections, mechanics or vehicle owners can detect issues such as: corrosion, worn threads, bending, or missing studs, before they escalate into major problems.
As the wheels must be removed for tire rotation, it presents an excellent opportunity to inspect the condition of every stud.
Detecting issues at an early stage allows for timely replacement, thereby preventing further damage to the wheel hub or brake components; this ensures long-term safety and reliability.
When Should You Replace All Wheel Studs?
1. Severe Corrosion
When severe corrosion is visible on multiple studs, the wheel studs should always be replaced as a complete set.
This is because corrosion not only looks unsightly, but it also gradually weakens the internal structure of the metal.
When corrosion extends to the threads or deep pits form on the surface of the stud, the stud’s ability to maintain proper torque (tightening force) is significantly compromised.
In such cases, replacing just a single stud is insufficient, as the adjacent studs have typically been exposed to the same conditions and are also likely to fail in the near future.
Replacing the entire set ensures uniform strength across all mounting points and restores the safety of the wheel assembly.
2. Multiple Damaged Studs
If more than one wheel stud is broken, has worn threads, or shows signs of thread damage, it is often safer to replace the entire set rather than attempting to repair them individually.
Multiple damaged studs are typically an indication of an underlying issue such as: the use of incorrect torque, repeated cross-threading during installation, or prolonged stress on the wheel assembly.
When several studs have already failed, the remaining studs are likely subjected to similar stress and may soon fail as well.
Replacing all studs simultaneously ensures a uniform clamping force on the wheel and prevents uneven load distribution, thereby reducing the risk of vibration or wheel instability.
3. High-Mileage Vehicles
In high-mileage vehicles, wheel studs often undergo gradual wear and weakening over time, even if no individual stud appears to be completely broken.
Over time, the cumulative effects of repeated wheel removal and installation, tightening cycles and exposure to various road conditions gradually degrade the structural integrity of the metal and the quality of the threads.
In the hubs of high-mileage vehicles, studs may appear to be functioning correctly; nevertheless, they remain susceptible to sudden failure (breaking due to metal fatigue).
Replacing all studs during major brake work or hub servicing is a precautionary measure that enhances the vehicle’s long-term reliability and significantly mitigates the risk of sudden stud failure while driving.
4. Performance or Towing Vehicles
Performance vehicles and those utilized for heavy-duty towing place significantly greater stress on wheel studs compared to standard passenger cars.
High-speed driving, aggressive braking, sharp cornering and hauling or towing heavy loads, all these factors amplify the pressure exerted on the wheel assembly.
Under these conditions, wheel studs are subjected to repetitive and intense stress, which can cause them to wear out and weaken rapidly, even if no external damage is visible on their surface.
In such vehicles, replacing all studs ensures that the wheel mounting system maintains its maximum structural integrity, thereby minimizing the risk of system failure, even during demanding driving conditions or while carrying heavy loads.
Conclusion – How to Replace Broken Wheel Stud
So, whenever every stud does the job perfectly without having weak or damaged signs then and only then a wheel stays safe on the road.
Each stud plays a collective role in securely fastening the wheel to the hub by exerting a controlled clamping force; and when even a single stud fails, the structural integrity of that assembly begins to weaken.
Over time, this can lead to issues such as uneven load distribution, vibrations, loose lug nuts and, in severe cases, the complete detachment of the wheel.
What makes this problem even more concerning is that damage to wheel studs often occurs gradually, stemming from causes such as overtightening, cross-threading, corrosion, or repeated tire servicing, meaning that drivers often remain unaware of the issue until its symptoms become clearly apparent.
Fortunately, replacing a broken wheel stud is a task that can be easily remedied, provided it is executed correctly using the proper tools, safe lifting techniques and precise torque settings.
Adhering to the correct procedure ensures that the new stud seats properly, the wheel remains evenly aligned and the lug nuts exert appropriate clamping pressure across all mounting points.
Prevention is just as vital as repair, as using a torque wrench, avoiding cross-threading and regularly inspecting the studs during tire maintenance can significantly extend their lifespan.
So, that’s all from this guide about How to Replace Broken Wheel Stud, now you can ask all the related questions below.
Frequently Asked Questions
FAQ 1: What is a wheel stud and why is it important?
Answer: A wheel stud is a sturdy metal bolt attached to the wheel hub that works in conjunction with lug nuts to securely hold the wheel in place. Its primary function is to generate a strong clamping force, ensuring that the wheel remains tightly fastened while the vehicle is in motion. This is crucial because all forces such as: those generated during braking, turning and driving over potholes, are transmitted through the wheel studs. If they become damaged or weakened, the wheel can loosen and become unsafe.
FAQ 2: What are the symptoms of a broken wheel stud?
Answer: A broken wheel stud typically exhibits several early warning signs before failing completely. Common symptoms include: a lug nut spinning freely without tightening, vibration in the wheel while driving, clicking sounds coming from the vicinity of the wheel, or lug nuts tightening unevenly during installation. Occasionally, you may also notice a missing stud or visible rust on its threads. These signs indicate that the wheel is not properly secured and requires immediate attention.
FAQ 3: Is it safe to drive with a broken wheel stud?
Answer: Driving with a broken wheel stud is unsafe because it compromises the structural integrity of the entire assembly connecting the wheel to the hub. Even if the wheel remains attached, the remaining studs are subjected to increased stress, thereby heightening the risk of further damage. While you may not face major issues at low speeds, the wheel can become unstable at higher speeds or during sudden braking. It is always strongly advised to have this issue repaired as soon as possible.
FAQ 4: Why do wheel studs break?
Answer: Wheel studs typically break due to overtightening of lug nuts, improper use of impact tools without proper control, corrosion and deterioration over time, cross-threading during installation, or the constant stress caused by repeatedly removing and reinstalling the wheels. In many cases, the damage accumulates gradually, causing the stud to weaken significantly and eventually snap. Poor maintenance and incorrect tightening techniques are the most common causes of this issue.
FAQ 5: Can I replace a wheel stud at home?
Answer: Yes, on most vehicles, you can replace a wheel stud yourself at home, provided you have some basic tools and follow proper safety protocols. The process involves safely lifting the vehicle, removing the wheel and brake components, extracting the broken stud and correctly installing a new stud in its place. However, caution is essential during this procedure; if not performed correctly, it can damage the wheel hub, brake components, or the threads of the new stud. If you are unsure about the process, a professional mechanic can perform this repair safely and efficiently.
FAQ 6: How long does it take to replace a wheel stud?
Answer: If performing the repair yourself, it typically takes one to two hours, depending on your level of experience and the condition of the components involved. If there is significant corrosion or if the brake components are seized, the process may take longer. A professional mechanic can often complete the job in approximately thirty minutes to one hour, as they possess specialized tools and greater experience. The actual time required for the repair depends primarily on how easily the components can be disassembled.
FAQ 7: How much does it cost to replace a wheel stud?
Answer: The cost depends on whether you perform the repairs yourself or take the vehicle to a repair shop. The wheel stud itself is not particularly expensive; it typically costs just a few dollars. If you do the work yourself, the overall cost remains quite low. At a mechanic’s shop, the total cost is higher because it includes labor charges. The price may also vary depending on the type of vehicle, the extent of corrosion and local service rates.
FAQ 8: Can I drive immediately after replacing a wheel stud?
Answer: Yes, you can drive after replacing a wheel stud, but only if everything has been reassembled correctly and the lug nuts have been tightened according to the proper torque specifications. Using a torque wrench is essential to ensure uniform and secure tightening. It is also a good idea to re-check the lug nuts after driving a short distance to ensure they remain securely fastened.
References:
[1] Lug Nut Tightness Reliability: Application of Torque-Angle Signature Analysis for Installation / Auditing Studies
https://saemobilus.sae.org/papers/lug-nut-tightness-reliability-application-torque-angle-signature-analysis-installation-auditing-studies-2014-01-0070

Hello Folks, Dean Shali here to help you out to solve the problems with your lovely vehicle, as i have lots of experience and knowledge about automotive industry as i woks directly with the customers and repair vehicles and i love to help the people to keep their cars safe and running smoothly.