Written By: Dean Shali
Fact Checked By: Sabré Cook
Reviewed By: Tamara Warren
There are lot of signs of having bad day with the CV-Axle something looks like this: clicking noises while turning or leaking grease is again considered clear warning sign that your axle needs your attention from now.
CV axle: also known as “Constant Velocity Axle”, which is actually a important component of your vehicle’s drivetrain, which is actually responsible for transferring power from the transmission to the wheels and still allows for smooth turns and suspension movement as well.
So, if the CX axle is worn out or damaged in some way, then it can literally cause several noticeable symptoms such as: clicking or popping noises during turns, vibrations whenever you accelerate, can see uneven tire wear or even you can actually see grease leaking from the CV boots.
Just don’t ignore these signs like nothing happens and nothing important to look into, as it can lead to more severe problems later on such as: transmission damage or loss of the control while you drive.
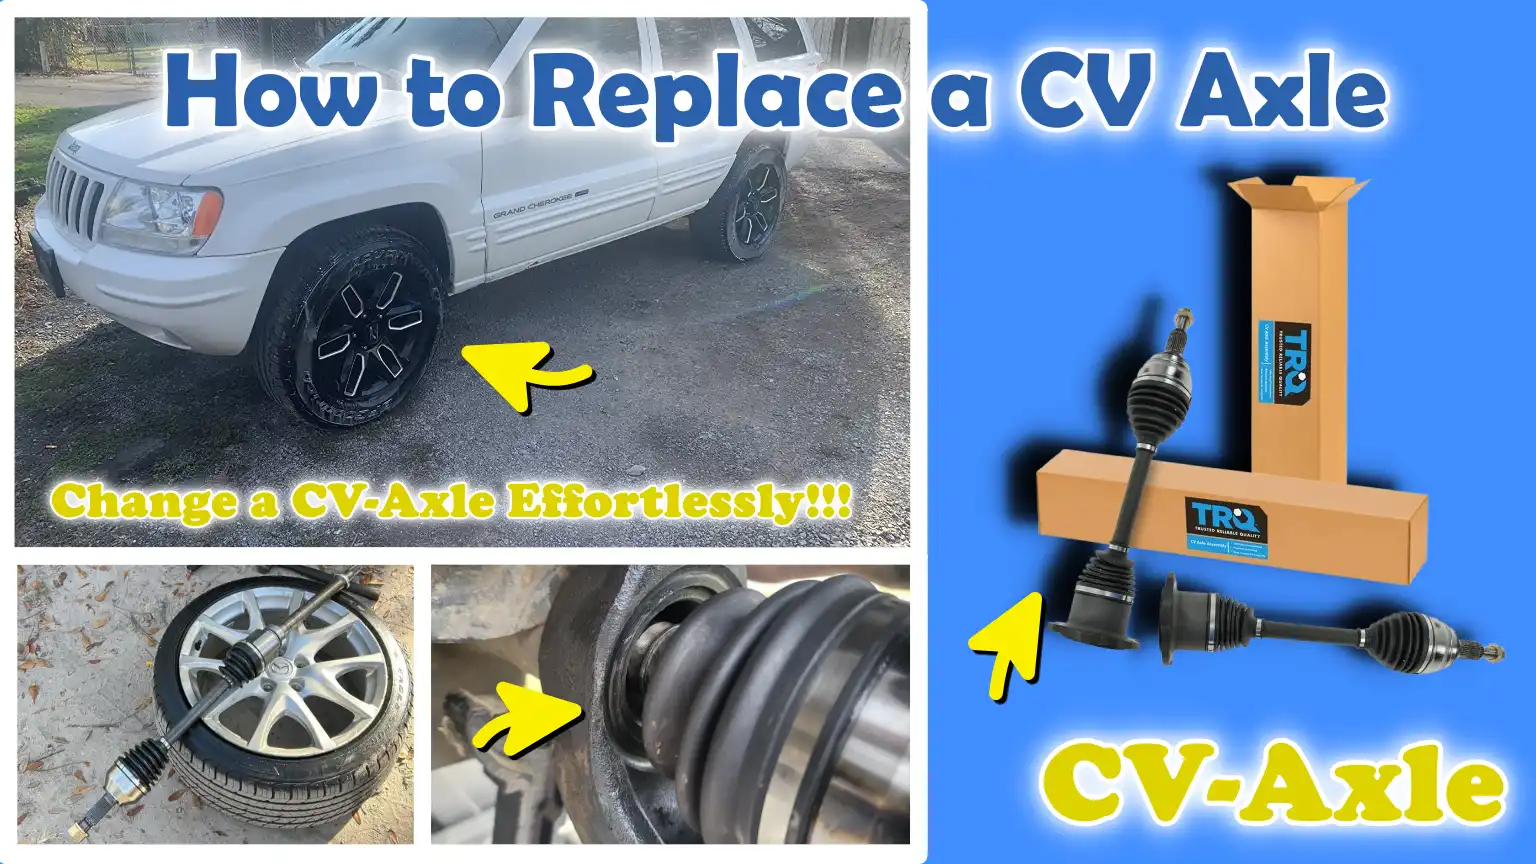
And, you would be happy to know that you can easily learn How to Replace a CV Axle, as this guide includes clear process with beginner’s friendly approach and steps so that you can easily manage this to its destiny.
How to Make Sure You & Your Vehicle Always Stays Safe
1. Work on a Level Surface
Before beginning any repair work, always ensure that your vehicle is positioned on a level and solid surface.
A level surface keeps the car stable and prevents it from suddenly rolling or shifting while you are working underneath or around it.
Even a slight incline can increase the risk of the vehicle moving specially when components like CV axles are removed, which can upset the vehicle’s balance.
A stable surface provides you with better control, enhances safety and minimizes the likelihood of accidents during the repair process.
2. Use Wheel Chocks and Jack Stands
After lifting the vehicle, it is crucial to secure it properly.
Wheel chocks (blocks designed to prevent wheels from moving) should be placed behind or in front of the tires remaining on the ground to prevent any movement that could cause the vehicle to roll.
Once the car has been lifted with a jack, always support it with jack stands, as a hydraulic jack alone can fail or gradually lose pressure over time.
Jack stands are designed to safely bear the vehicle’s weight for extended periods, making them essential for any repairs performed underneath the car.
This step significantly reduces the risk of the car falling and causing serious injury.
3. Wear Gloves and Safety Glasses
Safety gear plays a vital role in keeping you safe while replacing a CV axle.
Gloves help protect your hands from sharp edges, hot components and grease, while also providing you with a better grip on tools and parts.
Safety glasses are equally important, as they shield your eyes from dust, rust particles, or debris that may fall while working underneath the vehicle.
Even a tiny particle can cause serious injury to the eyes.
Therefore, wearing the appropriate safety gear makes the work experience both safer and more comfortable.
4. Ensure the Correct Gear is Engaged and the Parking Brake is Set
Before beginning any work, ensure that the vehicle is completely secured.
If the vehicle has an automatic transmission, place it in ‘Park’ mode; if it has a manual transmission, engage a gear.
Additionally, fully engage the parking brake to prevent the vehicle from moving.
This step adds an extra layer of safety by locking the wheels and minimizing the risk of the car rolling away.
Properly securing the vehicle is the simplest, yet most effective, method for preventing accidents during repairs.
5. Disconnect the Battery if Necessary
Disconnecting the battery is a prudent safety measure, specially when you are working near electrical components or using metal tools that could accidentally cause a short circuit.
Removing the negative terminal of the battery helps prevent electric shocks, sparks, or the vehicle’s systems from activating unintentionally.
Although this is not always required when replacing CV axles, taking this precaution adds an extra level of safety and ensures that you can work with complete peace of mind.
Tools
| Tool / Material | How to Use It | Why It Is Needed |
|---|---|---|
| Jack and Jack Stands | Use a jack to lift the car at the correct lifting points, then place jack stands beneath the frame to securely support the vehicle. | These devices safely lift and support the vehicle, allowing you to access the wheels and axles without the risk of the car falling. |
| Lug Wrench | Before removing the wheel, turn the lug nuts anti-clockwise to loosen and detach them from the wheel. | This makes removing the wheel easier; which is a necessary step for accessing the CV axle. |
| Socket Set – Axle Nut Socket | Use the correct size socket to remove the various bolts specifically, the large axle nut located in the center of the hub. | Different bolts require different socket sizes; furthermore, as the axle nut is typically tightened very securely, a precise fit is crucial. |
| Pry Bar | Insert this tool between the axle and the transmission, then apply gentle pressure to dislodge the axle from its position. | This method helps safely separate the inner CV joint from the transmission without damaging surrounding components. |
| Hammer and Punch | Use a punch and hammer to remove stuck components or to carefully loosen parts that are tightly bound. | Some parts may become jammed due to rust or compression; this technique helps to safely dislodge them. |
| Torque Wrench | Set the correct torque value and tighten the bolts and axle nut according to the required specifications. | Applying the correct torque ensures that components are neither too loose nor overtightened, thereby preventing potential damage or safety hazards. |
| Replacement CV Axle | After removing the old axle, carefully insert the new axle into the transmission and the wheel hub. | This is the primary component being installed to restore proper power transmission to the wheels. |
| Axle Grease | During installation, if necessary, apply a small amount of this substance to the joints or seals. | This reduces friction, prevents wear and tear and ensures the smooth operation of the axle components. |
| Rubber Mallet | Gently guide the axle into its correct position without applying excessive force. | This helps ensure that the parts fit together correctly, thereby preventing damage to the threads or metal surfaces. |
| Breaker Bar | Attach this tool to a socket to loosen overly tight nuts particularly the axle nut. | It provides additional leverage to easily remove bolts that have seized or are difficult to loosen. |
| Safety Gloves and Glasses | Keep these items worn throughout the entire process while using tools and working underneath the vehicle. | They protect your hands from cuts and scrapes and safeguard your eyes from dirt, dust and debris. |
How to Do Initial Preparation
1. Loosen the Lug Nuts Before Lifting the Vehicle
Before lifting the vehicle, slightly loosen the lug nuts on the wheel you intend to work on.
This step is crucial because the weight of the vehicle keeps the wheel stationary, making it easier to break the tight grip of the lug nuts without the wheel spinning.
Lug nuts are often tightened with excessive force; attempting to loosen them after the vehicle has been lifted may cause the wheel to rotate, making the task difficult and less safe.
Loosening them slightly while the vehicle is still on the ground requires less physical effort and provides better control, thereby reducing the risk of tools slipping and causing injury.
2. Lift and Properly Secure the Vehicle
Once the lug nuts have been loosened, use a jack to lift the vehicle.
Position the jack only at the specific lifting points designated by the manufacturer.
After lifting the vehicle, place jack stands beneath a sturdy section of the vehicle’s frame and slowly lower the vehicle onto them so that its entire weight rests on the stands.
This step is essential because a jack alone is not designed to support the weight of a vehicle for an extended period and can fail without warning.
Proper support ensures that the vehicle remains stable while you are working, allowing you to safely access the suspension and axle components without the risk of sudden movement.
3. Remove the Wheel
Once the vehicle is securely supported, completely remove the loosened lug nuts and take off the wheel.
This exposes the brake assembly, hub and CV axle, providing you with clear access to the components you need to work on.
Removing the wheel also allows you to inspect for any visible issues such as: uneven tire wear, damaged brake components, or grease leaks, which can provide vital clues regarding the condition of the axle and its associated parts.
Storing the removed lug nuts in a secure location ensures that they do not get misplaced during the repair process.
4. Locate the CV Axle and Inspect Surrounding Components
Once the wheel has been removed, locate the CV axle; it extends from the transmission to the wheel hub.
Take a moment to carefully inspect the surrounding components such as: the control arms, tie rods and struts.
Look for signs of wear, such as cracks, loose joints, damaged rubber boots, or grease leaks.
These components work in conjunction with the CV axle to facilitate vehicle propulsion and steering; therefore, a malfunction in any of these parts can adversely affect the vehicle’s overall performance and safety.
Identifying potential issues early on helps you determine whether additional repairs are necessary, thereby preventing future complications and ensuring a smoother, more reliable driving experience once the axle replacement is complete.
How to Remove the Old CV Axle

1. Remove the Axle Nut
To begin, remove the axle nut located in the center of the wheel hub.
This nut is typically fastened very tightly, as it securely holds the CV axle in place and is designed to withstand the high torque generated by the engine.
In many cases, a breaker bar is required to safely loosen it and apply sufficient leverage.
It is crucial to turn the nut slowly and steadily to avoid damaging its threads.
Removing this nut is a critical step, as it detaches the outer end of the axle from the hub, thereby facilitating the removal of subsequent components.
2. Disconnect Obstructing Components
After removing the axle nut, you may need to disconnect certain suspension or steering components that are obstructing access to the axle.
These components may include parts such as sway bar links, strut bolts, lower ball joints, or tie rod ends.
As these parts serve to hold the wheel assembly in place, temporarily detaching them creates sufficient clearance to allow the axle to be pulled out.
When removing these components, it is essential to handle them with care and to note their correct positioning for reinstallation.
This step ensures that you can remove the axle without applying excessive force or damaging surrounding parts.
3. Disconnect the CV Axle from the Transmission
The inner end of the CV axle connects to the transmission or differential and is typically held in place by a retaining clip.
To remove it, use a pry bar to apply controlled pressure between the axle and the transmission housing.
A firm yet careful nudge will dislodge the axle from its seating.
It is crucial to avoid applying sudden or excessive force, as this could damage the transmission seal or surrounding components.
Once loosened, the inner joint should slide out easily.
4. Remove the Outer CV Joint from the Wheel Hub
Once the inner joint has been disengaged, the outer CV joint can be removed from the wheel hub.
If it feels stuck, gently pull or tap it out; take care to ensure that neither the hub nor its threads are damaged during this process.
Sometimes, a light tap with a rubber mallet is sufficient to loosen it without causing any damage.
Once the outer joint is completely detached, the CV axle is fully separated from the vehicle; this allows you to pull it out entirely and prepare for the installation of the new axle.
5. Inspect the Hub and Transmission Seal
After removing the old axle, carefully inspect the wheel hub and the area surrounding the transmission seal.
Look for signs of wear, such as cracks, rough surfaces, or fluid leaks around the seal.
The transmission seal is particularly critical, as it prevents fluid leakage and protects the system from contamination by dirt and debris.
If any defects are discovered, they must be repaired before installing the new axle.
This inspection step helps ensure that the new CV axle functions correctly and prevents future issues that could necessitate additional repairs.
How to Install the New CV Axle – Easy Method
1. Compare the Old and New Axles
Before installing the new CV axle, carefully compare it with the old axle you have just removed.
Check its overall length, the shape of both ends, the number of splines and the placement of any clips or rings.
Even a minor discrepancy can prevent the axle from fitting correctly, potentially leading to vibrations, reduced power transmission, or damage to the transmission and wheel hub.
Verifying that both axles are identical helps ensure that you have the correct replacement part and prevents any issues during installation or while driving the vehicle afterward.
2. Insert the Inner CV Joint into the Transmission
Take the inner end of the new CV axle and align it with the opening in the transmission or differential.
Gently push it inward until you hear or feel a faint ‘click’; this indicates that the retaining clip has securely locked the axle into place.
This connection must be robust, as it is responsible for transmitting engine power to the wheels.
If the axle is not fully seated in its position, it may dislodge while driving or result in fluid leaks.
Maintaining steady pressure and verifying that it does not slide back out ensures a secure and proper fit.
3. Slide the Outer CV Joint into the Wheel Hub
Once the inner joint is securely seated, insert the outer end of the axle into the wheel hub.
Carefully align the splines and slide it in smoothly without forcing it.
If necessary, applying a few light taps with a rubber mallet can help seat it correctly.
Proper alignment is crucial, as forcing the axle can damage the splines or the hub, potentially leading to uneven wheel rotation or premature wear over time.
A correctly installed outer joint allows the wheel to rotate freely while simultaneously maintaining a robust transmission of power.
4. Reinstall Removed Suspension and Steering Components
Once the axle is properly seated in its correct position, reinstall all the components that were previously removed such as: the control arms, ball joints, sway bar links and tie rod ends.
Together, these components support the wheel, maintain alignment and facilitate proper steering movement.
Each joint must be returned to its original location and securely tightened.
Proper reinstallation ensures that the suspension system functions exactly as it was designed to, thereby maintaining vehicle stability, precise handling and safe driving conditions.
5. Install the Axle Nut and Tighten to the Correct Torque
Thread the axle nut back onto the threaded end of the CV axle and tighten it using the appropriate tools.
After the initial tightening, use a torque wrench to set it to the specific torque value recommended by the manufacturer.
This step is critical because the axle nut is what holds the entire assembly together, even under immense pressure.
If it is too loose, there is a risk of it coming loose and potentially causing damage; conversely, overtightening can strip the threads or damage the bearings.
Applying the correct torque ensures optimal long-term performance and safety.
6. Ensure All Bolts Are Properly Tightened
Finally, inspect all the bolts and connections that were disturbed during the installation process.
Verify that all fasteners are tightened according to the correct specifications and that nothing has been left loose.
Properly tightened bolts prevent components from shifting out of place, reduce vibration and ensure that the vehicle runs smoothly and without issues.
Taking the time to double-check your work helps prevent future mechanical problems and ensures that the new CV axle performs reliably under all driving conditions.
How to Reassemble It
1. Reinstall the Wheel
Once the new CV axle and all associated components have been properly installed, align the wheel with the wheel studs and mount it back onto the hub.
Press it firmly to ensure it sits flush against the hub surface, then begin hand-tightening the lug nuts to secure it in place.
Hand-tightening the lug nuts initially is crucial to prevent cross-threading; this protects the studs from damage and ensures they can be easily removed in the future.
Proper wheel installation maintains uniform contact with the hub, thereby ensuring balance, smooth wheel rotation and safe driving conditions.
2. Safely Lower the Vehicle to the Ground
Once the wheel is securely in place, use the jack to lift the vehicle slightly and carefully remove the jack stands.
Then, slowly and in a controlled manner, lower the vehicle back down to the ground.
Lowering the vehicle gently is essential, as dropping it suddenly could place excessive stress on suspension components or knock the wheel out of alignment.
Once the vehicle is back on the ground, its full weight rests on the wheels, as it is a necessary prerequisite for the final tightening of the lug nuts.
This step returns the vehicle to a stable position and prepares it for safe operation.
3. Tighten the Lug Nuts to the Specified Torque
With the vehicle resting fully on the ground, use a torque wrench to tighten the lug nuts to the specific torque value recommended by the manufacturer.
The tightening process should be uniform to ensure the wheel is properly seated and will not shift while driving.
Applying the correct torque is critical; If lug nuts are left loose, they may loosen further over time; conversely, overtightening them can damage the wheel studs or warp the brake components.
Properly tightened lug nuts securely fasten the wheels, enhance safety and ensure the vehicle’s smooth and reliable performance.
How to Do Post-Installation Testing
1. Start the vehicle and listen for any unusual noises
Once the installation is complete, start the vehicle and let it idle for a few minutes; during this time, pay close attention to any unusual sounds.
The engine should run smoothly, without any clicking, grinding, or knocking noises; specifically, these sounds should not originate from the wheel or axle area.
This initial check is crucial, as it ensures that the CV axle is properly seated within the transmission and hub assembly.
If any abnormal noises are heard at this stage, it may indicate that the axle is not fully secured, or that a surrounding component has not been reinstalled correctly.
Catching these issues early can prevent future damage and ensures that the repair work has been executed properly.
2. Drive slowly and test while turning
Once the vehicle sounds normal while idling, take it for a test drive in a safe, open area, driving in a slow and controlled manner.
First, drive the vehicle in a straight line; then, gently turn the steering wheel to the left and right to observe how the vehicle responds.
A properly installed CV axle will allow the vehicle to turn smoothly, without any resistance or noise.
This step is vital because the CV axle is designed to handle the changes in angles that occur during turns and any internal issues often manifest only when the steering is engaged.
Driving slowly maintains better vehicle control, allowing you to identify minor issues before they escalate into serious problems.
3. Check for vibrations, clicking, or leaks
While driving and after coming to a stop, check for any signs of vibration, clicking noises, or fluid leaks near the wheels or underneath the vehicle.
If vibration is felt during acceleration, it may indicate that the axle is not properly aligned or that the axle nut has not been tightened to the correct torque specifications.
If clicking sounds are heard while turning, it could mean that a joint is not properly seated.
Additionally, check for any fluid leaks around the transmission area; this may suggest that a seal was dislodged during installation.
Promptly identifying and rectifying these issues ensures the vehicle’s long-term reliability, smooth performance and safe driving conditions.
Read More:
- How to Replace Shocks and Struts
- How to Fix a Car Pulling to One Side
- How to Diagnose Wheel Bearing Noise
- How to Rotate Car Tires
- How to Fix Suspension Noise
- How to Replace Wheel Bearings
How to Maintain CX-Axle With Basic Care
Furthermore, there’s scientific analysis that shows that the CV axles actually works under the constant stress due to the rotation, heat and of course friction as well, specifically during the acceleration and turning here and there, also the analysis shows that these components must handle the complex movements while maintaining smooth power flow also, which is why you need to replace a worn out CV-axle if they are nor working properly to prevent complete failure and ensure the long-term reliability as well.[¹]
1. Regularly Inspect the CV Boot
The CV boot is a flexible rubber cover that protects the CV joint; it seals grease inside while keeping dust and water out.
Over time, due to heat, road dust and general wear and tear, the boot may crack or deteriorate.
When this occurs, grease begins to leak out and dust infiltrates the joint, accelerating the rate of wear and increasing the risk of joint failure.
Regularly checking the CV boot for visible cracks or tears or for traces of grease around the wheel area, as it helps you detect potential issues early on.
Replacing a damaged boot in a timely manner is far less expensive and easier than replacing the entire axle and it helps maintain the vehicle’s smooth and quiet operation.
2. Keep Suspension Components Well-Lubricated
The CV axle works in conjunction with suspension and steering components such as: ball joints and control arms; all of these require proper lubrication to function smoothly.
Lubrication reduces friction between moving parts, prevents them from overheating and minimizes wear and tear over time.
When these components are well-lubricated, they are able to move freely, thereby reducing the stress placed on the CV axle during driving particularly when turning or navigating rough roads.
Regular maintenance and proper lubrication enhance the vehicle’s overall performance, extend the lifespan of interconnected components and contribute to a more comfortable driving experience.
3. Avoid Aggressive Driving
Your driving style has a direct impact on the lifespan of your CV axles.
Sudden acceleration, hard braking and taking sharp or abrupt turns, as all of these actions place excessive stress on the CV joints and axle shafts.
This repetitive stress can accelerate the rate of wear and tear particularly in the joints responsible for accommodating the changes in angle that occur during turns.
Driving in a smooth and controlled manner reduces the strain on the drivetrain, allowing the axles to operate under normal conditions.
By avoiding aggressive driving, you not only extend the life of your CV axles but also save fuel, minimize wear and tear on other components and ensure overall driving safety.
How to Solve Some Issues After Replacement of the CV Axle
1. Persistent Clicking Noise
If you continue to hear a clicking or popping sound even after replacing the CV axle, it typically indicates that the axle has not fully seated or locked into place.
The inner joint of the axle must fit securely into the transmission and the retaining clip must be properly engaged.
If it is even slightly loose, it may shift out of position while turning, thereby generating noise.
It is crucial to double-check that the axle is fully seated and does not slide out easily.
Additionally, inspect surrounding components such as: the wheel hub and suspension connections as loose or improperly installed parts can also produce similar noises.
Addressing this issue immediately helps prevent further wear and tear, ensuring a smooth and quiet driving experience, particularly when turning.
2. Vibration During Acceleration
If the vehicle vibrates while accelerating, it may be a sign that something is not properly aligned or tightened.
A common cause for this is that the axle nut has not been tightened to the correct torque specifications, which can lead to slight movement within the wheel hub assembly.
Another potential cause could be that the axle splines are not properly seated within the hub or the transmission.
Even a slight misalignment can disrupt the transfer of power to the wheels, resulting in a clearly perceptible vibration.
Carefully inspecting the axle’s fitment, tightening the axle nut using a torque wrench and ensuring that all connections are properly seated will typically resolve this issue and restore a smooth ride to the vehicle.
3. Grease Leakage Around the Axle
Grease leakage around the wheel or axle is often an indication of a problem with the fitting of the CV boot.
The boot is designed to retain grease inside the joint and protect it from dust and moisture.
If the boot does not fit properly, or if the clamp is loose, grease can leak out, leading to reduced lubrication within the joint.
This can cause the CV axle to wear prematurely and eventually fail.
Inspect the boot to ensure it is positioned correctly, verify that the clamps are tight and check for any cracks or signs of wear and tear.
Promptly addressing any grease leaks helps maintain proper lubrication, extends the lifespan of the axle and prevents costly repairs in the future.
Conclusion – How to Replace a CV Axle
Now, you have understood that how important it is to maintain a properly working and well-installed CV axle as it literally ensures every turn, every acceleration and every mile stable and reliable.
The CV axle plays a pivotal role in transmitting power from the transmission to the wheels; furthermore, it provides the necessary flexibility for the vehicle when turning corners or navigating uneven terrain.
When this component becomes worn or damaged, specific symptoms may manifest such as: clicking noises, vibrations while accelerating and grease leaking from the CV boots.
Addressing these issues in a timely manner can prevent major damage to other vehicle components such as: the wheel hubs, suspension system, or even the transmission.
By following proper procedures, utilizing the correct tools and observing necessary safety precautions, this task can be successfully completed even by an individual with only basic mechanical knowledge.
To ensure optimal long-term performance, thorough preparation, the application of correct installation techniques and the proper tightening of all components are absolutely crucial.
Taking a test drive after installation during which you remain alert for any unusual signs further helps to confirm that the repair has been executed correctly.
That’s all from this guide on How to Replace a CV Axle, now you can comment for more genuine information regarding this topic.
Frequently Asked Questions
FAQ 1: What is a CV axle and what does it do?
A CV axle which is also known as a ‘Constant Velocity axle’: is a component that transmits power from the transmission to the wheels. It allows the wheels to move up and down in conjunction with the suspension, while also enabling them to turn left and right. This function is facilitated by specialized joints known as CV joints; these joints can operate at various angles without compromising power transmission. If a CV axle is not functioning correctly, your car will be unable to effectively deliver power to the wheels, thereby negatively impacting both the driving experience and safety.
FAQ 2: What are the common symptoms of a faulty CV axle?
A faulty CV axle typically presents several clear warning signs. The most common symptom is a ‘clicking’ or ‘popping’ sound heard while turning, particularly at low speeds. You may also experience vibrations as you accelerate the vehicle, which could indicate an imbalance or wear within the axle. In some instances, you may observe grease leaking near the wheel, signifying that the CV boot has failed. If these warning signs are ignored, the axle could fail completely, posing a serious safety risk while driving.
FAQ 3: Is it safe to drive with a faulty CV axle?
Driving with a faulty CV axle is unsafe, specially if the issue is severe. Initially, the symptoms may appear minor such as: faint noises but over time, the axle can weaken and eventually break. If it fails completely while the vehicle is in motion, power delivery to the wheels will cease, making it difficult or impossible to propel the vehicle forward. This poses a significant safety risk, particularly at high speeds or in heavy traffic; therefore, it is best to have this issue repaired as soon as possible.
FAQ 4: How long does a CV axle last?
A CV axle can last for a considerable amount of time, often 100,000 kilometers or even more, as it literally depends on driving conditions and maintenance. The primary cause of its failure is damage to the CV boot; this allows dust and moisture to enter, while the internal grease leaks out. Driving on rough terrain, poor road conditions and a lack of maintenance can also significantly reduce its lifespan. Regularly inspecting the CV boots allows you to detect potential issues early on and extend the life of the axle.
FAQ 5: Can I replace a CV axle myself?
Yes, if you have the right tools and some basic mechanical knowledge, you can replace a CV axle at home. This task involves lifting the vehicle, removing the wheel, detaching certain suspension components and then properly installing the new axle. Although this job requires caution and attention to detail, many DIY enthusiasts successfully complete this repair by following step-by-step instructions. However, if you are unsure of your abilities or lack the proper tools, it is safer to seek assistance from a professional.
FAQ 6: How long does it take to replace a CV axle?
The time required depends on your level of experience and the type of vehicle. For an experienced individual, the job may take approximately one to two hours. Those attempting this for the first time may take longer, as they require more time to understand each step and perform the work carefully. Factors such as rusted bolts or damaged parts can also prolong the process. Rather than rushing to finish the job quickly, it is far more important to take your time and prioritize safety above all else.
FAQ 7: Should I replace both CV axles at the same time?
It is not always necessary to replace both CV axles simultaneously. If only one axle is defective, you can simply replace that specific one. However, if both axles are old or exhibit similar signs of wear and tear, replacing both together can save you both time and future effort. Many people prefer to inspect the axles on both sides and make a decision based on their condition and their budget.
FAQ 8: What happens if a CV axle is not installed correctly?
If a CV axle is not installed correctly, it can lead to various problems. You may hear strange noises, feel vibrations, or experience difficulties in handling the vehicle. In some cases, the axle may not seat properly in its position, causing it to loosen or completely detach while the vehicle is in motion. Improper installation can also damage the transmission seal, resulting in fluid leaks. Therefore, it is crucial to follow the correct procedures and ensure that everything is securely tightened and properly seated in its designated place.
FAQ 9: Why is axle nut torque so important?
The axle nut securely fastens the CV axle to the wheel hub, ensuring that all components remain safely in place while the vehicle is in motion. If the nut is too loose, the axle may shift slightly, potentially leading to vibrations and damage over time. Conversely, if it is overtightened, the threads may become stripped, or excessive pressure may be exerted on the wheel bearing. Using a torque wrench to tighten the nut to the precise specifications ensures that the proper balance is maintained.
References:
[1] Thermo-Mechanical Coupled Analysis of Electric Vehicle Drive Shafts
https://www.mdpi.com/2076-3417/14/24/11768

Hello Folks, Dean Shali here to help you out to solve the problems with your lovely vehicle, as i have lots of experience and knowledge about automotive industry as i woks directly with the customers and repair vehicles and i love to help the people to keep their cars safe and running smoothly.