Written By: Dean Shali
Fact Checked By: Sabré Cook
Reviewed By: Tamara Warren
Yes, wheel bearings are often considered very small thing, but don’t forget that they literally caries entire weight of your vehicle and still keeps your ride smooth and stable, so whole respect to that.
Wheel Bearings are extremely important parts that actually allows your wheels to rotate in smooth way with minimal friction and they directly affects your car’s safety, stability and fuel efficiency as well.
Just think of it: everytime your vehicle moves, then these are the bearings that actually supports the full weight of the car while it handles the constant rotation, heat and road stress as well.
And, over the time, there are several factors such as: poor lubrication, water contamination, dirt buildup and rough driving conditions that can cause them to wear out or fail completely.
To make the symptoms easy to understand there are some common warning signs in a grinding or humming noise that gets louder as you accelerate, along with the vibrations in the steering wheel, uneven tire wear or a loose feeling in the wheels as well.
Basically, if you just ignore these symptoms then it can seriously lead to the wheel misalignment, damage to the hub assembly or even you can experience complete wheel failure in extreme cases as well, which is obviously very dangerous.
Moreover, there’s automotive maintenance data that clearly shows that the worn out wheel bearings are a frequent cause of the suspension-related problems that can significantly reduces the driving comfort and control as well.
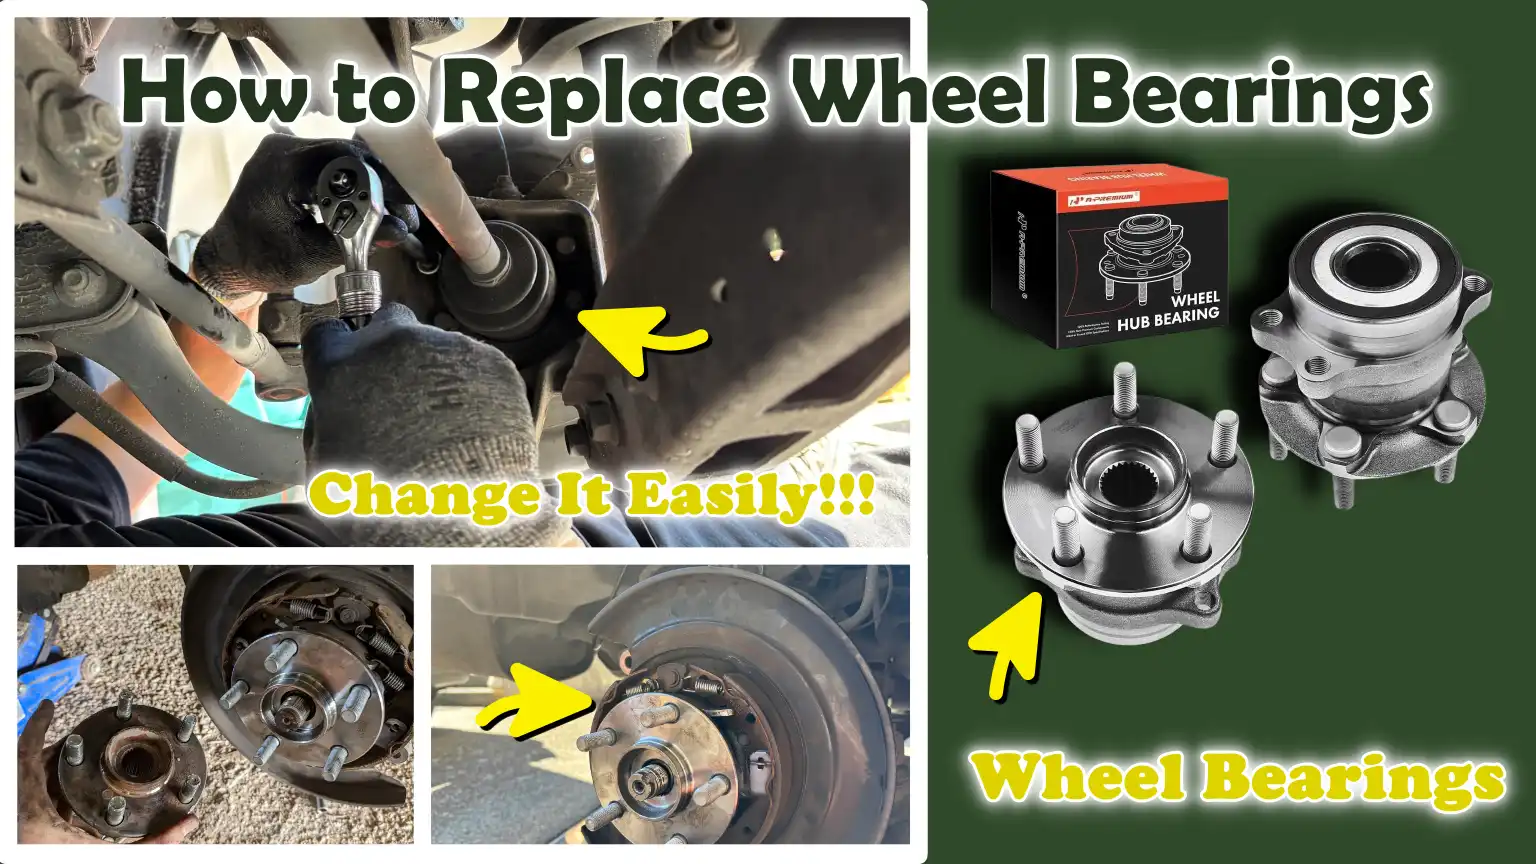
Because of all these reasons, we have come up with this guide on How to Replace Wheel Bearings, so that you can easily identify the early symptoms, understand why wheel bearings fail at the first point and then follow the clear path to solve that damn issue.
What Are Wheel Bearings?
Bearings are small yet critical components located inside the wheel hub.
They facilitate the smooth rotation of the wheel with minimal friction.
They are composed of sturdy steel balls or rollers, held together within a metal ring.
This ring is referred to as a “race.”
Their primary function is to maintain the structural integrity of the vehicle while enabling the wheels to rotate at high speeds.
Whenever you drive, accelerate, apply the brakes, or make a turn, the wheel bearings are subjected to constant pressure and heat.
High-quality wheel bearings help minimize friction, prevent wear and tear and maintain proper wheel alignment and stability.
When these bearings become worn out, they may emit grinding noises and generate excessive heat.
Furthermore, they can compromise the safe operation of your vehicle on the road.
1. Definition and Function
A wheel bearing consists of a set of steel balls or rollers positioned between two metal rings.
These components serve to reduce friction and allow the wheel to rotate freely.
Their primary role is to act as a central pivot point for the vehicle’s wheels, enabling them to spin with ease.
They also play a crucial role in maintaining proper alignment with the axle and suspension system.
If a wheel bearing fails, the wheel will be unable to rotate smoothly.
This can lead to excessive heat generation, premature tire wear and potentially a loss of vehicle control.
Simply put, wheel bearings ensure that your vehicle operates smoothly, efficiently and safely.
2. Types of Wheel Bearings
Different types of wheel bearings are utilized in various vehicles.
The specific type of bearing employed depends on the vehicle’s design, its load-carrying capacity and the type of wheel assembly installed.
The most common types include ball bearings, roller bearings and hub assemblies.
As a standard practice, bearings are designed to suit specific driving conditions, whether that involves high-speed driving, carrying heavy loads, or a combination of both.
Understanding these specifications helps you select the right supplier and provides insight into how your vehicle’s wheel system functions.
Ball Bearings
Ball bearings are the most common type of bearing found in many vehicles.
This is because they are capable of handling two distinct types of loads: radial loads (forces acting perpendicular to the axle) and thrust loads (forces acting parallel to the axle).
They consist of small steel balls that rotate within metal rings; these rings are referred to as “races.”
This design minimizes friction and facilitates smooth motion at lower speeds, making them ideal for everyday driving.
Furthermore, ball bearings offer excellent durability and are capable of operating effectively even at high speeds.
Roller Bearings
Instead of spherical balls, roller bearings utilize cylindrical rollers, enabling them to support significantly heavier loads.
They are typically employed in heavy-duty applications or in situations where a high load-carrying capacity is required.
Although they offer exceptional stability and durability, they are better suited for handling radial loads (perpendicular forces) than thrust loads (axial forces).
This implies that they are perfectly suited for driving in a straight line; however, they may not perform as effectively as ball bearings when taking sharp turns at high speeds.
Due to their design, they are better equipped to withstand the extreme pressure and wear and tear associated with supporting heavy loads over extended periods.
Hub Assembly
Hub assemblies are modern, pre-assembled units that integrate the wheel bearing, the hub itself and in some cases; the sensors used by the Anti-lock Braking System (ABS).
These are typically found in newer vehicle models, as they are easier to install and require less maintenance compared to older designs.
Rather than repairing individual components, if this unit fails, the entire assembly is replaced.
Hub assemblies are designed with a focus on durability, performance and ease of installation, making them a popular choice in modern automotive design.
3. Where are Wheel Bearings Located in a Car?
Wheel bearings are located inside the wheel hub.
The wheel hub is the central component of the wheel that connects it to the axle.
In a typical vehicle, each wheel has its own set of bearings, meaning there are usually four bearings in total.
These are situated between the axle and the wheel, allowing the wheel to rotate freely while remaining securely attached to the vehicle.
In the front wheels, these bearings serve as an integral part of the steering system; whereas in the rear wheels, their primary function is to facilitate wheel rotation and support the load of the wheel.
Due to their positioning, they are constantly exposed to heat, dust and dirt; for this very reason, proper sealing is essential to ensure their longevity.
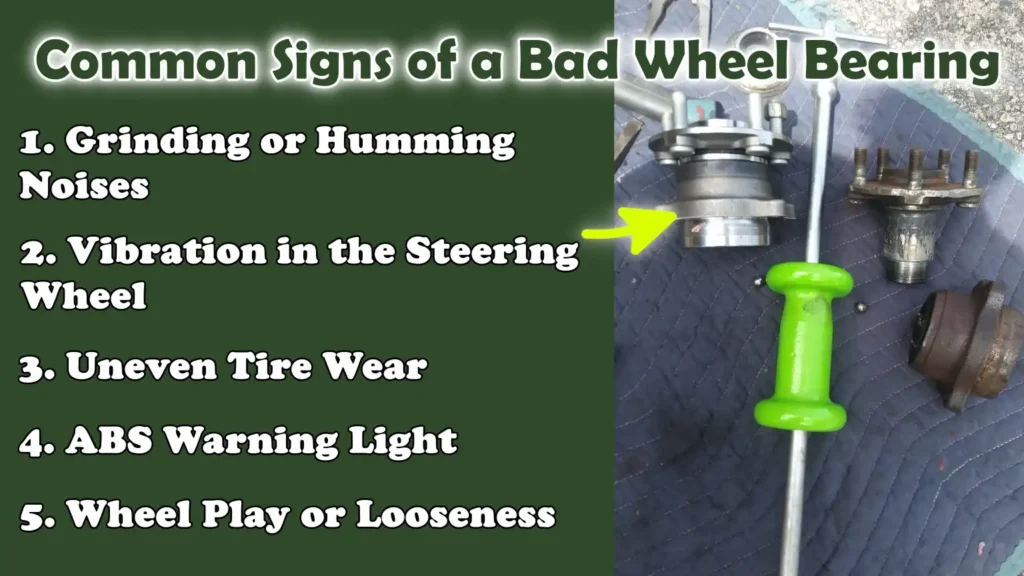
Common Signs of a Bad Wheel Bearing
A faulty wheel bearing often exhibits clear warning signs that should never be ignored, as they directly impact your safety and driving control.
Wheel bearings are responsible for the smooth rotation of the wheels; therefore, when they begin to wear out, the initial changes you typically notice include noise, vibration and instability.
These issues may seem minor, but if left unaddressed, they can quickly escalate into serious problems.
Recognizing these signs in a timely manner can help you avoid costly repairs and prevent hazardous situations, such as wheel failure.
Understanding each symptom in simple terms makes it easier to diagnose the problem and take appropriate action at the right time.
1. Grinding or Humming Noises
One of the most common and easily identifiable signs of a bad wheel bearing is a grinding or humming noise emanating from the vicinity of the wheel.
This noise typically intensifies as the vehicle’s speed increases and its pitch or intensity may shift slightly when you turn the steering wheel.
This sound occurs because the smooth metal surfaces inside the bearing have worn down or become damaged, generating friction and vibration.
In the early stages, it may sound like a faint hum, but as the fault progresses, it can evolve into a loud, distinct grinding sound.
This is a clear indication that the bearing is no longer functioning correctly and requires immediate attention.
2. Vibration in the Steering Wheel
A worn wheel bearing can induce a distinct vibration in the steering wheel; one that can be clearly felt particularly when you are driving at higher speeds.
This vibration occurs because the wheel is no longer rotating smoothly, creating uneven movement and jolts that travel through the suspension and steering systems to reach the steering wheel.
Unlike vibrations caused by tire imbalance, vibrations associated with wheel bearings often feel rougher and can intensify over time.
If left unaddressed, this can compromise your ability to properly control the vehicle, making driving less safe and less comfortable.
3. Uneven Tire Wear
Wheel bearings help maintain proper wheel alignment; therefore, when they begin to deteriorate, the wheel may tilt slightly or wobble unevenly.
This can lead to uneven tire wear, where certain sections of the tire wear down faster than others.
You may notice that one edge of the tire appears more worn than the rest, or that the tire surface feels rough to the touch.
Uneven tire wear not only reduces the lifespan of your tires but also negatively impacts grip and handling.
Regularly inspecting your tires allows you to identify this issue early on and detect any potential problems related to the wheel bearings.
4. ABS Warning Light
In many modern vehicles, wheel bearings are linked to the ABS system via sensors that monitor wheel speed.
When a bearing becomes worn or damaged, it can affect the accuracy of these sensors or prevent them from functioning correctly.
Consequently, the ABS warning light on your dashboard may illuminate.
While an illuminated ABS light does not always indicate a faulty bearing, it is a potential cause that warrants investigation.
Ignoring this warning can adversely affect braking performance, particularly in emergency situations.
5. Wheel Play or Looseness
A deteriorating wheel bearing can cause the wheel to feel loose or unstable, a condition often referred to as “wheel play.”
This means that instead of remaining firmly fixed in place, the wheel may shift slightly back and forth.
You may perceive this looseness while driving, or you may observe it during an inspection when the wheel is lifted off the ground.
This occurs because the internal components of the bearing have worn out and are no longer able to securely hold the wheel in its proper position.
Wheel play is a serious issue, as it can make controlling the vehicle difficult; in severe cases, the wheel could even detach completely from the vehicle.
Know, The Causes of Wheel Bearing Failure
Wheel bearings typically do not fail suddenly; rather, they deteriorate gradually over time.
This occurs due to a combination of mechanical and environmental factors that impact the way the bearings function.
These components are designed to withstand heavy loads, high speeds and constant rotational stress; however, to ensure their longevity, they require proper lubrication, correct installation and a clean operating environment.
When any of these conditions are not met, the internal metal surfaces begin to wear down, overheat, or become damaged.
Understanding the root causes of failure allows you to prevent problems in their early stages, extend the lifespan of your bearings and avoid costly repairs or hazardous driving conditions.
1. Normal Wear and Tear
Wheel bearings naturally wear out over time, as they are in constant rotation whenever the vehicle is in motion.
They support the entire weight of the car and endure the stresses associated with both driving on straight roads and taking turns, placing continuous strain on their internal components.
After thousands of kilometers of travel, the smooth internal metal surfaces of the bearings gradually lose their finish, leading to increased friction and heat generation.
This process is normal and expected, particularly in older vehicles or those that are driven frequently.
Even high-quality bearings have a finite lifespan and continuous use will eventually necessitate their replacement.
2. Poor Lubrication
Lubrication is critical for minimizing friction and heat within wheel bearings.
Without an adequate amount of grease, the metal components rub directly against one another, causing them to wear out rapidly and overheat.
Over time, the grease can degrade, dry out, or leak out due to a faulty seal.
When this occurs, the bearing loses its protective layer and begins to deteriorate rapidly.
Poor lubrication is one of the most common causes of premature bearing failure; if left unaddressed, a minor issue can escalate into a major problem.
Keeping the bearing properly lubricated ensures that it operates smoothly and enjoys a long service life.
3. Ingress of Water or Dirt
Wheel bearings are sealed to protect them from water, dust and dirt; however, these seals can degrade over time.
When moisture or debris enters the bearing, it mixes with the grease, thereby reducing its effectiveness.
Water can cause rust and corrosion on metal surfaces, while dust particles can act as abrasives, damaging the bearing’s smooth surfaces.
This leads to increased friction and noise, causing the bearing to wear out much faster.
Driving on wet roads, muddy paths, or in dusty environments increases the risk of contamination particularly if the seals are already worn or damaged.
4. Driving Over Potholes or Rough Roads
The impact shocks generated by potholes, speed bumps and rough roads can subject wheel bearings to sudden and excessive stress.
These impacts can cause microscopic pitting or cracks on the bearing’s surface damage that is not always visible to the naked eye but can lead to significant problems over time.
Even a severe impact can damage the internal structure of a bearing, thereby hindering its ability to rotate freely.
Repeated exposure to adverse driving conditions increases mechanical stress on the bearings and accelerates their rate of wear.
Vehicles regularly driven on poor-quality or poorly maintained roads face a higher risk of premature bearing failure.
5. Improper Installation
Improper installation is a primary cause of premature wheel bearing failure, even when new components are used.
If a bearing is not installed correctly, it may become misaligned; this results in uneven load distribution and significantly increased friction.
The use of incorrect tools, excessive force, or a failure to adhere to proper torque specifications, all of these factors can cause damage to the bearing during the installation process itself.
In some instances, if the workspace is not clean, contaminants may ingress into the bearing.
Proper installation requires meticulous attention to every detail, as well as the use of appropriate tools and careful execution to ensure that the bearing functions correctly and achieves its full service life.
Tools
| Tool / Material | Why It Is Needed | How to Use It |
|---|---|---|
| Jack and Jack Stands | These are used to safely lift and suspend the car, allowing you to remove the wheel and access the bearing. They keep the vehicle stable and prevent accidents. | Position the jack beneath the correct lifting point and slowly raise the car. Then, place jack stands under sturdy support points and lower the car onto them. Never work underneath a car that is supported solely by a jack. |
| Lug Wrench | This tool is required to loosen and tighten the lug nuts that securely hold the wheel in place. Without removing the wheel, you cannot access the bearing. | Before lifting the car, turn the lug nuts anti-clockwise to loosen them. After reinstalling the wheel, use the same tool again to tighten the nuts evenly. |
| Socket Set and Ratchet | These are needed to remove bolts from the brake caliper, rotor and hub assembly. They make the job faster and easier compared to standard tools. | Select the correct socket size, attach it to a ratchet and turn to remove or tighten the bolts. Apply steady pressure to avoid damaging the bolts. |
| Torque Wrench | This tool ensures that all bolts and nuts are tightened to the correct specifications. Proper torque is crucial for safety and for the correct functioning of the bearing. | Set the recommended torque value and continue tightening the bolt until you hear a distinct “click” sound from the wrench. This ensures that the bolt is neither overtightened nor undertightened. |
| Hammer or Mallet | This tool helps loosen components such as: hubs or rotors, that are difficult to remove due to rust or excessive tightness. | To loosen the part, gently tap around it. Use controlled force to avoid damaging adjacent components. For delicate parts, a rubber mallet is a safer alternative. |
| Bearing Puller or Press | This tool is used to remove old bearings and properly install new ones. It ensures uniform pressure and prevents damage. | Attach the puller to the bearing and turn it to extract the bearing. For installation, use a press to seat the new bearing into place with uniform pressure. |
| New Wheel Bearing or Hub Assembly | This is the replacement component that restores smooth wheel rotation and enhances the vehicle’s overall performance. | Ensure that the new part is compatible with your specific vehicle model. Carefully install it in place of the old bearing, ensuring that it is correctly aligned and seated. |
| Grease – If Applicable | Grease reduces friction and heat within the bearing, thereby extending its lifespan and ensuring smooth operation. | If the bearing is not a sealed unit, apply the appropriate amount of grease inside it. Do not overfill it, as excessive grease can lead to operational issues. |
| Safety Gloves and Glasses | These items protect your hands and eyes from dust, sharp edges and debris during the repair process. | To minimize the risk of injury, keep them worn throughout the entire procedure, specially when using tools or removing components. |
How to Ensure Safety Precautions Before Replacing Wheel Bearings
Before replacing a wheel bearing, safety must always be your top priority, as this process involves lifting the vehicle, removing heavy components and working around critical systems such as the brakes and suspension.
Even a minor error could result in personal injury or damage to the vehicle.
By taking a few simple precautions, you can work with confidence and minimize the associated risks.
These steps are not difficult, but they are absolutely essential to ensure that the repair work is performed safely and correctly.
1. Park on Level Ground
Before beginning any repair work, always park your vehicle on a level and solid surface.
A level surface keeps the vehicle stable and prevents it from rolling or shifting while you are working.
If the ground is uneven or soft, the jack and jack stands will not sit securely, thereby increasing the risk of the vehicle slipping or falling.
This can be extremely dangerous, particularly when you are working around or underneath the wheels.
A level surface provides you with better control and makes the entire process safer and easier.
2. Use Wheel Chocks
Wheel chocks are simple blocks placed either behind or in front of the wheels to prevent the vehicle from moving.
Even if the vehicle has been left in gear or the parking brake has been engaged, a slight risk of movement still remains specially while the vehicle is being lifted.
Wheel chocks provide an extra layer of safety by firmly securing the vehicle in place.
They are particularly important when you are working on an incline or when only one side of the vehicle is being lifted.
Using them takes only a few seconds, yet they significantly reduce the risk of accidents.
3. Proper Vehicle Lifting Techniques
Using the correct method to lift a vehicle is essential to prevent damage and injury.
Always position the jack beneath the vehicle’s designated lifting points specific locations designed to safely support the vehicle’s weight.
Lifting the vehicle from an incorrect spot can damage its frame or cause the jack to slip.
Once the vehicle has been raised, it should always be supported by jack stands, as relying solely on the jack to support the vehicle for an extended period is unsafe.
Proper lifting techniques ensure stability, allowing you to safely access the wheels and bearing components without risk.
4. The Importance of Torque Specifications
Torque specifications indicate the precise tightness required when tightening the bolts and nuts on your vehicle.
Applying the correct torque is crucial when reinstalling components such as wheel hubs, brake parts and lug nuts.
If bolts are left too loose, components may shift out of place or detach while the vehicle is in motion.
Conversely, if they are overtightened, they can damage the threads or place excessive stress on the components.
A torque wrench helps you apply exactly the amount of force required, ensuring that everything is secure and functioning as intended.
Adhering to the correct torque values not only enhances safety but also extends the lifespan of new wheel bearings.
How to Replace Wheel Bearings – Easy & Truly Beginner’s Guide
Replacing wheel bearings requires patience, the right tools and close attention to every step, as this component directly impacts wheel movement and vehicle safety.
This process involves removing several interconnected parts; therefore, performing the steps in the correct sequence helps prevent damage and ensures that the installation is executed properly.
Each step builds upon the previous one and skipping a section or rushing through the process can lead to improper fitting, noise issues, or even the premature failure of the new bearing.
This guide explains each step in simple, clear terms, enabling you to perform this procedure safely and achieve reliable results.
1. Loosen the Lug Nuts
Before lifting the vehicle, use a lug wrench to slightly loosen the lug nuts that hold the wheel in place.
This step is crucial because, once the vehicle is lifted off the ground, the wheel spins freely, making it difficult to loosen tight nuts.
Loosening them while the wheel is still resting on the ground provides you with better grip and control.
Do not remove them completely at this stage; simply reduce their tightness so they can be easily removed later.
2. Lift the Vehicle
Use a jack to lift the vehicle at the designated lift points and then secure it using jack stands.
Lifting the vehicle correctly is paramount for safety, as you will be working in close proximity to the wheel and its surrounding components.
Relying solely on the jack to support the vehicle for an extended period is not a safe practice; therefore, always use sturdy and stable jack stands.
Before beginning any repair work, ensure that the vehicle is balanced and stable.
3. Remove the Wheel
After safely lifting the vehicle, completely remove the loosened lug nuts and take off the wheel.
Place the wheel in a secure location where it will not roll away or sustain any damage.
Removing the wheel provides easy access to the brake system and the hub assembly, where the bearing is located.
4. Remove Brake Components
First, loosen and remove the brake caliper mounting bolts.
Carefully lift the caliper and set it aside; do not leave it hanging by the brake line, as this can damage the line and lead to brake failure.
Next, remove the brake rotor; it may slide off easily, or if it is stuck, it may require a few light taps to dislodge it.
Removing these components is essential to gain access to the hub assembly and the bearing located behind it.
5. Remove the Hub Assembly
Locate the bolts securing the hub assembly; these are typically situated at the rear of the wheel assembly.
Using a socket of the correct size, loosen these bolts and carefully pull the hub assembly straight outward.
If your vehicle is equipped with an ABS sensor, gently disconnect it to avoid causing any damage.
At this stage, the wheel bearing becomes visible; it is either an integral part of the hub itself or is pressed into the hub.
6. Remove the Old Bearing
Use a bearing puller or a press to extract the old bearing from the hub assembly.
This stage may require the application of continuous and uniform force, as bearings are typically seated very tightly.
Avoid using makeshift tools, as improper bearing removal methods can cause damage to the hub.
After removing the bearing, thoroughly clean the entire assembly to eliminate dust, old grease and any metal particles.
A clean surface is essential for the proper installation of the new bearing.
7. Install the New Bearing
Carefully insert the new bearing into the hub, ensuring that it is correctly aligned.
Use a press or an appropriate installation tool to seat it evenly.
Applying uniform pressure is crucial to prevent damage to the bearing and ensure that it rotates smoothly.
If the bearing requires lubrication, apply the appropriate amount of grease before installation.
Proper fitting at this stage extends the bearing’s lifespan and ensures continued smooth rotation.
8. Reinstall the Components
Reattach the hub assembly to its original position and securely tighten the mounting bolts.
Next, reinstall the brake rotor and firmly fasten the brake caliper.
Ensure that all bolts are properly tightened and that all brake components are correctly aligned.
Proper reinstallation of these components is vital for restoring brake performance and ensuring the overall safety of the vehicle.
9. Reinstall the Wheel
Place the wheel back onto the hub and hand-tighten the lug nuts to hold it in place.
Hand-tightening ensures that the wheel is properly seated against the hub before it is fully tightened.
This step prepares the wheel for secure installation once the vehicle is lowered.
10. Lower the Vehicle and Torque the Lug Nuts
Carefully lower the vehicle back down to the ground using the jack.
Once the vehicle is stable on the ground, use a torque wrench to tighten the lug nuts in accordance with the manufacturer’s instructions.
Applying the correct torque ensures that the wheel is securely attached, neither too loose nor overtightened.
This final step is crucial for safety and ensures that the wheel bearing replacement process is complete and reliable.
Common Mistakes to Avoid During the Replacement of Wheel Bearings
When replacing wheel bearings, many problems arise not from a defect in the bearing itself, but rather from minor errors made during installation or handling.
These mistakes can shorten the lifespan of the new bearing, generate noise, or even pose a safety risk while driving.
Understanding these common errors will help you avoid repetitive repairs, save money and ensure that your vehicle runs smoothly and safely.
Paying attention to small details at every step is just as crucial as using the correct parts.
1. Failing to Tighten Bolts to the Correct Torque
One of the most common mistakes is failing to tighten bolts to the correct torque (the precise tightening force).
Every bolt in the wheel assembly including hub bolts and lug nuts, requires a specific level of tightness.
If bolts are too loose, they may loosen further due to vibration or even detach while driving, which is extremely dangerous.
Conversely, if overtightened, their threads can become damaged, components may warp, or excessive pressure may be placed on the bearing.
Using a torque wrench ensures that every bolt is tightened with exactly the required force, thereby maintaining proper alignment and extending the lifespan of the bearing.
2. Damaging the ABS Sensor
Modern vehicles often feature an ABS sensor located near the wheel hub that monitors wheel speed.
When replacing bearings, this sensor can easily be damaged if handled carelessly or if it is not properly disconnected.
Pulling on the wires, accidentally striking the sensor, or allowing dust and debris to accumulate on it can lead to its malfunction.
A faulty ABS sensor can trigger warning lights and also compromise braking performance.
During repairs, always locate the sensor with care, detach it gently and keep it clean.
3. Neglecting Cleaning and Lubrication
Another common mistake is failing to clean the hub assembly before installing a new bearing.
Residual dust, rust, or old grease can adversely affect how the new bearing fits and functions.
This can lead to issues such as wheel rotation difficulties, excessive noise and premature bearing failure.
In cases where lubrication is required, failing to apply grease or using the wrong type of grease, as it can cause the bearing to overheat and fail prematurely.
Thoroughly cleaning the component and applying the correct amount of grease ensures that everything operates smoothly and that the new bearing reaches its full intended lifespan.
4. Using the Wrong Tools
Using incorrect tools when removing or installing a bearing can damage both the bearing itself and the surrounding components.
For instance, striking the bearing too forcefully or using makeshift tools instead of the appropriate bearing puller or press, that can disrupt its alignment or cause internal damage.
Working with the wrong tools also makes the task more difficult and compromises its precision.
Using the correct tools not only simplifies the process but also ensures that the bearing is installed correctly and functions exactly as intended.
How Long Does It Take To Replace a Wheel Bearing?
The time required to replace a wheel bearing depends on the type of vehicle, the condition of its components and the skill level of the person performing the work.
Generally, replacing a wheel bearing is a moderately difficult task, as the wheel, brake components and hub assembly must be removed before the bearing can be accessed.
For most vehicles, under normal circumstances, this process can take anywhere from one to three hours per wheel.
However, if the components are rusted, seized, or difficult to remove, the time required can increase significantly.
Understanding the time commitment involved helps you plan the work more effectively and avoid rushing, as both of which are crucial for safety and proper installation.
1. DIY vs Professional Time Estimates
When performed at home, a DIY wheel bearing replacement typically takes longer, as the duration depends on your personal experience, available tools and working conditions.
For beginners, the process may take two to four hours per wheel, as you carefully execute each step and double-check your work.
Those with some mechanical experience may be able to complete the task more quickly, specially if they possess the right tools, such as a bearing press.
In contrast, a professional mechanic can often complete the job in approximately one to two hours per wheel, thanks to their access to advanced tools, specialized equipment and extensive experience with similar repairs.
Professionals also work in a controlled environment, which accelerates the process and ensures greater precision.
2. Factors Influencing Time Requirements
Several factors can influence how long it takes to replace a wheel bearing.
The specific design of the bearing plays a major role; For instance, replacing a modern hub assembly is generally faster than replacing older “press-in” style bearings, which require significantly more physical effort and specialized tools.
The condition of the vehicle also plays a role, as rust, corrosion, or accumulated grime can make removing parts difficult and increase the time required for the job.
The availability of the right tools such as: a torque wrench or a bearing puller, that can make this task considerably faster and easier.
Weather conditions, the workspace and lighting can also impact the speed of the repair.
Rather than rushing to finish the job, it is more important to take the time to perform it carefully and correctly, as proper installation ensures both safety and long-term performance.
Know, The Cost of Replacing Wheel Bearings
The cost of replacing wheel bearings depends on the type of vehicle, the design of the bearing and whether you perform the work yourself or hire a professional.
Wheel bearings are critical for safe driving; therefore, even if the cost sometimes seems high, replacing them in a timely manner can prevent more expensive damage to the hub, suspension, or braking system.
In most cases, the total cost comprises the price of the bearing itself and the labor required for its installation.
Understanding how these costs are broken down helps you make a more informed decision based on your budget and your own mechanical capabilities.
1. Cost of Parts
The cost of wheel bearing parts depends on the specific type of bearing used in your vehicle.
Generally, simple ‘press-in’ bearings are less expensive, whereas complete ‘hub assemblies’ cost more because they incorporate multiple components within a single unit.
On average, the cost of a single wheel bearing for common vehicle models falls within a reasonable range, while for more advanced or larger vehicles, it can be significantly higher.
Vehicles equipped with built-in sensors or high-performance systems may also require parts that are more expensive.
Choosing a high-quality bearing is crucial, as inferior parts can fail prematurely and require replacement again thereby increasing costs in the long run.
2. Labor Costs
When you have wheel bearings replaced at a workshop, labor costs often constitute the largest portion of the total expense.
This is because the process involves removing several interconnected components and, in some instances, requires the use of specialized tools, such as a hydraulic press.
The time required to complete a repair, along with the technical expertise necessary for the task, as it directly influences the fee charged by the mechanic.
In most cases, labor costs can range from moderate to high, depending on the complexity of the work and the type of vehicle involved.
If parts are rusted or difficult to remove, labor costs may increase, as such tasks demand additional time and effort.
3. Do It Yourself (DIY) vs Mechanic: A Comparison
Performing the work yourself can result in significant cost savings, as you only have to pay for the parts and tools.
However, successfully and safely completing this task requires the right knowledge, the appropriate tools and ample time.
If a mistake occurs during the installation of parts, it could lead to increased repair costs or even compromise safety.
Hiring a professional mechanic entails higher costs, but it offers the advantage of benefiting from the mechanic’s experience, specialized tools and greater precision in the work.
Professional repairs also minimize the risk of errors and typically come with some form of service guarantee.
The decision to undertake the repair yourself or to call in a mechanic ultimately depends on your confidence, your skill set and the availability of the necessary tools.
When to Replace and When to Repair Wheel Bearings
Wheel bearings are sealed and precision-engineered components; this means they are designed to function trouble-free for extended periods, but once they fail, they cannot be repaired.
When a bearing begins to make noise, exhibits signs of wear, or ceases to rotate smoothly, it indicates that its internal metal surfaces have already sustained damage.
In such instances, repairing the bearing is not a reliable option, as the damage cannot be fully rectified.
Replacing the bearing with a new one is the safest and most effective method for restoring vehicle performance and ensuring safe driving.
Understanding precisely when a bearing replacement is necessary helps you mitigate risks and maintain your vehicle in optimal condition.
1. Situations Where Bearing Replacement Becomes Imperative
Bearing replacement becomes absolutely essential when specific symptoms such as: grinding noises, humming sounds, vibrations, or wheel looseness as it becomes clearly evident.
These signs indicate that the internal components of the bearing have either worn out or sustained damage.
If a bearing is exposed to water or dirt, it may corrode; this compromises its structural integrity and significantly reduces its operational lifespan.
In many modern vehicles, wheel bearings are housed within a sealed hub assembly, meaning that if the bearing fails, the entire unit must be replaced.
Driving with a faulty bearing can generate excessive heat, increase friction and in severe cases, even cause the wheel to detach from the vehicle.
This creates a hazard that can seriously compromise safety.
For these reasons, replacing bearings in a timely manner is crucial to ensure both safety and optimal vehicle performance.
2. Why is repairing bearings rarely recommended?
Repairing wheel bearings is rarely recommended because their internal structure is highly intricate and it is extremely difficult to replicate the level of precision and care required for them to function correctly.
Once the smooth internal surfaces of a bearing become damaged, they cannot be restored to their original condition.
Attempting to clean, reuse, or re-grease worn bearings does not resolve the underlying issue; it merely postpones the inevitable failure of the bearing for a short period.
In the case of sealed bearings, attempting to open and repair them is simply not feasible, as doing so would likely result in even greater damage.
Attempts to repair bearings compromise the smooth rotation of the wheels, increase noise levels and heighten safety risks while driving.
Replacing the bearings ensures that all internal components are new, properly lubricated and fully capable of safely supporting the vehicle’s weight and regulating its rotational speed.
Read More:
- How to Replace Shocks and Struts
- How to Rotate Car Tires
- How to Align Car Wheels
- How to Fix Suspension Noise
Easy Tips for Extending Wheel Bearing Lifespan
Wheel bearings are designed to last for thousands of kilometers; however, their lifespan depends significantly on how the vehicle is maintained and driven.
Because they operate under constant load and rotation, even minor issues such as: dust intrusion, lack of lubrication, or sudden impacts, as it can drastically reduce their longevity.
By adopting a few simple preventive measures, you can keep your bearings in good condition, minimize noise and vibration and avoid costly repair bills.
Understanding how to properly care for them helps enhance your vehicle’s overall performance and ensures a smoother, safer driving experience for years to come.
Moreover, there’s case studies on the bearing failure that shows that the repeated stress and poor lubrication can be the real culprit behind the surface damage inside the bearing, that leads to the rapid wear and noise as well, so this type of damage just cannot be repaired once it occurs, which is why you need to replace the bearing as it is left only reliable solution to fix it permanently. As well as, proper lubrication and correct installation during the replacement is also crucial that helps you to prevent these issues later on and improves the long term performance as well.[¹]
1. Regular Inspections
Regular inspections are one of the most effective ways to extend the lifespan of wheel bearings.
By checking for early warning signs such as: unusual noises, slight vibrations, or uneven tire wear, as you can identify problems before they become severe.
During routine servicing, mechanics often check for excessive play in the wheels and listen for noises emanating from the bearings, allowing them to detect wear and tear in its early stages.
Early detection ensures that bearings can be replaced or repaired in a timely manner, thereby preventing damage to other components such as the wheel hub or suspension system.
Keeping an eye on these minor changes can save you both time and money in the long run.
2. Avoid Water Damage
Water is the wheel bearing’s worst enemy, as it can seep past compromised seals and degrade the grease contained within the bearing assembly.
This leads to a loss of lubrication and creates an environment conducive to rust and corrosion on the metal surfaces.
Driving through deep water or flooded roads or failing to properly dry the vehicle’s undercarriage after washing it, as it can significantly increase the risk of water ingress into the bearings.
Once moisture penetrates the assembly, it can rapidly degrade the internal structure of the bearing.
Avoid exposure to water whenever possible and inspect the seals regularly; doing so keeps the bearings protected and extends their lifespan.
3. Proper Installation
Proper installation plays a crucial role in determining the lifespan of a wheel bearing.
Even a brand-new bearing can fail prematurely if it is not installed correctly.
It is essential to ensure that the bearing is properly aligned and installed using the appropriate tools to guarantee that the load is distributed evenly across its entire surface.
Applying force incorrectly, using the wrong tools, or failing to adhere to torque specifications can place excessive stress on the bearing’s internal components, leading to damage.
Maintaining a clean workspace during installation is also vital to prevent dust and debris from entering the bearing.
When a bearing is installed correctly, it rotates smoothly, handles loads evenly and enjoys a significantly longer service life.
4. Good Driving Habits
Driving habits have a direct impact on the health of wheel bearings.
Sudden impacts caused by potholes, speed bumps and rough roads can place immense stress on the bearings and cause internal damage.
Driving at high speeds over uneven surfaces also generates excessive heat and pressure within the bearings.
Good driving habits such as: slowing down on rough roads, avoiding sudden jolts and maintaining a steady speed, as it helps to reduce the stress placed on the bearings.
Driving carefully not only extends the lifespan of the bearings but also enhances the overall durability of the vehicle’s suspension and wheel systems.
Conclusion – How to Replace Wheel Bearings
Yes, it is clear that if you take care of your wheel bearings today then it can literally help you to prevent bigger repairs and unexpected breakdowns in the future as well.
They support the weight of your car, minimize friction and allow the wheels to rotate freely across varying speeds and road conditions.
When these bearings begin to fail, warning signs such as: noise, vibration, or looseness, as it should never be ignored, as they can quickly escalate into far more serious issues; these may include difficulties in vehicle handling, damage to other components, or even a complete loss of vehicle control while driving.
Fortunately, with a little knowledge, the right tools and careful execution, wheel bearings can be replaced correctly and safely, as it even if you have limited prior experience.
Understanding the causes of failure, adhering to proper installation procedures and utilizing the correct torque specifications are all essential factors for ensuring optimal and long-lasting performance.
Regular inspections and good driving habits can also help extend the lifespan of your new bearings and prevent premature failure.
Whether you decide to tackle this task yourself or entrust it to a professional, the most critical aspect is addressing the issue in a timely manner.
Taking immediate action not only saves money but also ensures that your driving experience remains quiet, stable and safe.
Now, that’s all from this guide about How to Replace Wheel Bearings, so you can ask related queries and unsolved questions in the comment section of this guide.
Frequently Asked Questions
FAQ 1: What happens if I don’t replace a bad wheel bearing?
If you do not replace a faulty wheel bearing, the problem will gradually worsen over time. Initially, you might only hear a humming or grinding noise; however, as the bearing wears down further, it can generate excessive friction and heat. This can cause damage to surrounding components, such as the wheel hub, axle and even the braking system. In severe cases, the wheel may become loose or stop rotating properly, potentially causing you to lose control of the vehicle while driving. Replacing the bearing in a timely manner helps prevent these hazards and ensures the safety of your vehicle.
FAQ 2: How can I identify which wheel bearing is bad?
You can usually identify a bad wheel bearing by listening carefully while driving. Often, the noise intensifies when turning in one direction and diminishes when turning in the other. For example, if the noise gets louder when turning to the right, the problem is often with the left wheel bearing. You may also feel vibrations or notice uneven tire wear. A thorough inspection, which involves lifting the wheel off the ground and checking for looseness, as it can provide a more accurate confirmation of the issue.
FAQ 3: Can I drive with a bad wheel bearing?
It is not safe to drive for an extended period with a bad wheel bearing. Although the vehicle may remain drivable in the initial stages, the situation can quickly become dangerous. The bearing may overheat severely, wear out completely, or even cause the wheel to loosen and detach. This significantly increases the risk of accidents, particularly at high speeds. If you observe such symptoms, it is best to have the bearing repaired or replaced as soon as possible.
FAQ 4: How long do wheel bearings typically last?
Wheel bearings are designed for longevity; depending on driving conditions and maintenance, they often last between 80,000 and 150,000 kilometers. However, if the vehicle is driven on rough roads, exposed to water or dirt, or if the bearings were not installed correctly, their lifespan may be reduced. Regular inspections and careful driving can help extend their service life.
FAQ 5: Is it better to replace a single wheel bearing or to replace all of them at once?
In most cases, you only need to replace the specific wheel bearing that has failed, rather than replacing all of them simultaneously. Wheel bearings wear out at different rates depending on usage and road conditions. However, if your vehicle has high mileage, or if multiple bearings show signs of wear, it may be a good idea to replace them in pairs to ensure balanced performance and reliability.
FAQ 6: How much does it cost to replace a wheel bearing?
The cost of replacing a wheel bearing depends on the type of vehicle and whether you perform the work yourself or hire a mechanic. The cost of the part itself depends on whether it is a standard bearing or a complete hub assembly. Labor costs can sometimes exceed the cost of the part, as the job requires both time and specialized tools. Performing the work yourself can save money, but it requires skill and caution to avoid making mistakes.
FAQ 7: Can I replace a wheel bearing at home?
Yes, if you have the right tools and a basic understanding of mechanics, you can replace a wheel bearing at home. This process involves lifting the vehicle, removing the wheel, brake components and hub assembly and then correctly installing the new bearing. However, it is crucial to follow the correct steps and safety precautions. If you are not confident in your abilities or do not possess the necessary tools, it is best to have this work performed by a professional.
FAQ 8: Do wheel bearings require regular maintenance?
Most modern wheel bearings are sealed units, meaning they do not require regular maintenance like older types of bearings. However, it is still important to check for signs of wear, such as noise, vibration, or looseness. In older vehicles, where bearings can be serviced, proper lubrication and cleaning can help extend their lifespan.
FAQ 9: Why do new wheel bearings fail so quickly?
If a new wheel bearing is not installed correctly, or if surrounding components are defective, it may fail prematurely. Common causes include misalignment, incorrect torque, contamination from dirt or moisture and the use of low-quality parts. Even minor errors during installation can impact the bearing’s performance; therefore, careful handling and the use of the correct tools are absolutely essential.
FAQ 10: Do wheel bearings affect fuel economy?
Yes, faulty wheel bearings can impact fuel economy. When a bearing becomes worn, it increases friction, forcing the engine to work harder to propel the vehicle forward. Over time, this may lead to a slight increase in fuel consumption. Replacing faulty bearings reduces vehicle downtime and improves overall efficiency.
References:
[1] Rolling element bearing failure analysis: A case study
https://www.researchgate.net/publication/257746266_Rolling_element_bearing_failure_analysis_A_case_study

Hello Folks, Dean Shali here to help you out to solve the problems with your lovely vehicle, as i have lots of experience and knowledge about automotive industry as i woks directly with the customers and repair vehicles and i love to help the people to keep their cars safe and running smoothly.