Written By: Dean Shali
Fact Checked By: Sabré Cook
Reviewed By: Tamara Warren
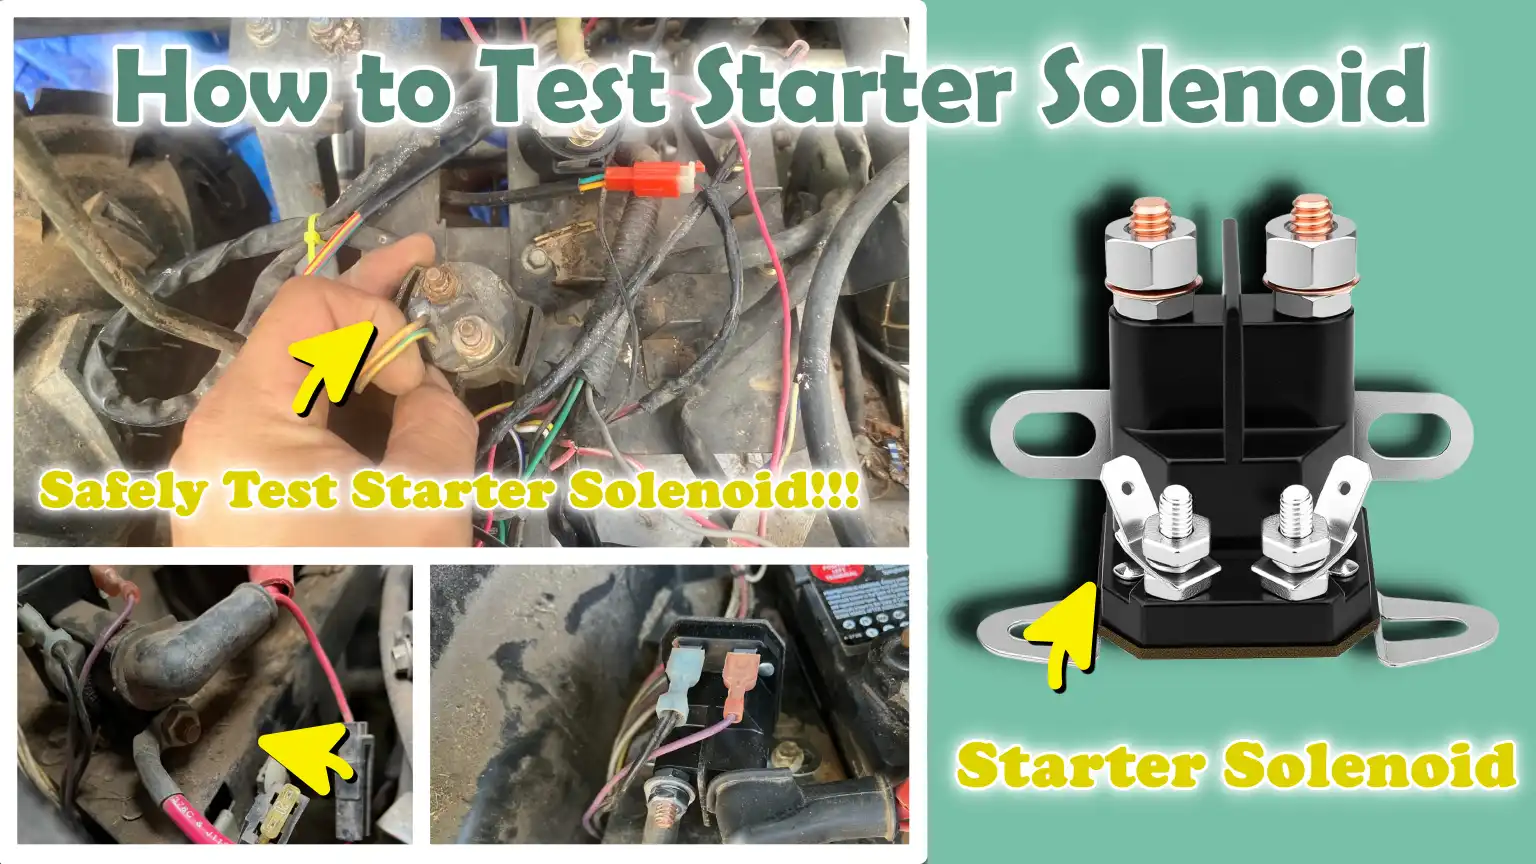
Most of the time, drivers just replaces the starter solenoid parts too early without even testing the real fault or working of it.
Basically, whenever you turn or press that damn start button, then there’s small but really important chain of electrical events begins inside the starting system.
So, there’s important components in this chain is the “STARTER SOLENOID”, which is a device that acts like a really powerful electrical switch.
And, it has one job is to connect the battery’s high current to the starter motor, along with this it physically pushes the starter gear into the engine’s flywheel as well.
Additionally, without it working properly, the engine just can’t crank at all: even if the battery and other system are completely healthy and in working condition.
As well as, when starter solenoid has any problem then it even becomes confusion for drivers to understand, but there’s some symptoms such as: clicking sounds, intermittent starting or total silence that can also look similar across different faults such as: weak battery, corroded terminals or failing starter motor as well.
That’s why, you need to understand How to Test Starter Solenoid, so that you can actually confirm if there’s any electrical issue, mechanical movement issue and identify where power is lost in the high-load system.
How to Ensure Safety By Taking Precautions Before Testing
1. Disconnecting the Battery Before Inspection
Before performing any testing on the starter solenoid, the first and most critical safety step is to disconnect the battery.
This is typically accomplished by first removing the negative terminal, thereby isolating the entire starting circuit from the electrical power source.
The reason for this is that the starter system carries a very high current; if a tool accidentally comes into contact with a live terminal, it can generate sparks or damage the wiring.
By de-energizing the power source, you make the system safe to handle and prevent sudden electrical shocks while inspecting or touching the starter connections.
2. Avoiding Short Circuits Around Starter Terminals
Starter terminals remain in direct contact with battery power at all times; if a metal tool accidentally bridges the wrong points, an immediate short circuit can occur.
This can result in sparks, melted wires, or damage to the solenoid itself.
In some cases, it may also affect other sensitive electrical components within the vehicle.
Therefore, it is essential to maintain control over your tools, keep metal objects away from exposed terminals and always double-check the path of every connection before touching any part of the starting circuit.
3. Using Insulated Tools
Using insulated tools is a vital safety practice when working around a vehicle’s electrical system.
Insulated handles are designed to minimize the risk of electrical shock and prevent accidental contact between live circuits.
As the starter solenoid carries a very high current, even momentary contact between metal tools and terminals can cause damage or injury.
Insulated tools provide you with greater control and reduce the likelihood of accidental electrical exposure while performing tests or disconnecting connections.
4. Working with the Vehicle in Park or Neutral and the Parking Brake Engaged
Before performing any testing related to the starter system, the vehicle must always be properly secured.
For automatic transmissions, the gear selector must be in Park; for manual transmissions, it must be in Neutral.
In both cases, the parking brake must be fully engaged.
This is essential because the engine may start suddenly during testing and if the vehicle is not secured, it could lurch forward unexpectedly.
Following this procedure ensures that, even if the starter activates during the inspection, the vehicle remains completely stationary and safe.
Tools
| Tools | Why It Is Needed | How to Use It in Starter Solenoid Testing |
|---|---|---|
| Digital Multimeter | This is the most important tool for checking electrical values such as voltage, continuity and resistance. It helps confirm whether power is correctly reaching the solenoid and whether the solenoid is responding internally. | Set the multimeter to DC voltage mode to check the battery and trigger voltages at the solenoid terminals. Place the red probe on the signal or battery terminal and the black probe on the ground. When the solenoid has been removed, you can also use the continuity mode to check the condition of the internal coil. |
| Test Light – Optional But Useful | A test light provides a quick and simple method for checking whether power is reaching a specific wire or terminal. It is particularly convenient for quick checks when precise voltage readings are not required. | Connect the clip to a good ground point and touch the probe to the solenoid trigger wire while someone turns the ignition key. If the light illuminates, it indicates that voltage is reaching the solenoid signal circuit. |
| Jumper Wires | These are used for bypass testing and for directly activating the solenoid. They help confirm whether the solenoid and starter motor function correctly when power is supplied directly. | Carefully use jumper cables to connect the positive terminal of the battery to the solenoid trigger terminal to observe whether the solenoid “clicks” and engages. This helps distinguish between a wiring fault and a solenoid failure. |
| Wrench Set or Socket Set | These tools are required to remove battery terminals, starter mounting bolts and solenoid connections for inspection or replacement. Without them, it is not possible to access the starter system. | Use the correct size wrench or socket to safely loosen the battery terminals and remove the starter assembly bolts. Always disconnect the battery before loosening any connections to the starter. |
| Battery Charger or Known Good Battery | A weak battery can produce misleading symptoms that mimic those of a faulty solenoid. A stable power source ensures accurate test results. | Connect a charger to maintain proper voltage during testing, or temporarily use a fully charged battery that is in good condition. This ensures that the solenoid receives sufficient current to operate correctly throughout the diagnostic process. |
Now, Let’s Understand About Starter Solenoid Terminals
1. Battery Terminal: B+
The Battery Terminal, often marked as B+, serves as the main power input point for the starter solenoid.
This terminal connects directly to the vehicle’s positive battery cable and carries full battery voltage at all times.
Its primary function is to supply high-amperage power, which is directed to the starter motor when the solenoid is activated.
Understanding this terminal is crucial; if the connection at this point is loose, corroded, or experiencing low voltage, the entire starting system will fail, even if the solenoid itself is functioning correctly.
During diagnostics, this is typically the first point where a multimeter is applied to verify whether the battery voltage is strong and stable.
2. Starter Motor Terminal: M
The Starter Motor Terminal, commonly labeled as M, constitutes the output side of the solenoid.
When the solenoid is activated, internal metal contacts bridge the battery power flowing from the B+ terminal to this M terminal.
This sends a sudden surge of high current to the starter motor, thereby cranking the engine.
If the internal contacts within the solenoid are worn or show signs of burning, this terminal may receive reduced power, or no power at all, even if the solenoid emits an audible “click”.
Therefore, checking the voltage at this terminal while attempting to start the engine is a critical diagnostic step, as it reveals whether the solenoid is functioning properly or suffering from an internal fault.
3. Ignition Signal Terminal: S or Trigger Wire
The S terminal, also referred to as the trigger wire, functions as a control input that signals the solenoid when to activate.
When you turn the ignition key or press the start button, a small voltage signal, typically around twelve volts, is sent to this terminal.
This signal activates the solenoid coil, generating a magnetic force that pulls the internal plunger inward.
If no voltage reaches this terminal while attempting to start the engine, the solenoid will not “click” or engage, even if it is otherwise functioning perfectly.
This is why the root cause of many engine starting issues is often not the solenoid itself, but rather a faulty ignition switch, a defective relay, or a fault in the wiring.
4. Ground Path: Via the Housing, or a Separate Ground in Some Vehicles
The ground path is the return circuit that completes the electrical loop necessary for the solenoid to function.
In many vehicles, the solenoid is grounded directly through its metal housing when it is bolted to the starter body and the engine block.
In some designs, a separate ground wire may also be present.
A weak or poor ground connection can compromise the solenoid’s performance or cause intermittent starting issues, as the coil inside the solenoid is unable to generate a sufficiently strong magnetic field.
Corrosion, rust, or loose mounting bolts can disrupt this ground path; therefore, for reliable operation, it is crucial that the bolts are properly tightened and that the metal-to-metal contact is clean.
Know the Initial System Checks – Before Testing the Solenoid
1. Check Battery Voltage Status
Before assuming that the starter solenoid is faulty, the first step is always to check the battery voltage status, as the battery serves as the primary power source for the entire starting system.
A healthy, fully charged battery should typically register a voltage of around 12.
6 volts when the engine is off.
If the voltage is lower than normal, the starter system may not have sufficient power to properly crank the engine, leading to symptoms that mimic a faulty solenoid such as: a clicking sound or slow cranking.
In many real-world scenarios, a weak battery is the primary culprit behind “no-start” complaints; therefore, checking the battery’s condition first can prevent the unnecessary replacement of components.
2. Check Battery Terminals for Corrosion or Looseness
Battery terminals must be securely connected and free of corrosion, as even a thin layer of white or green buildup can impede the proper flow of electricity.
Loose terminals can also disrupt the flow of current to the starter system, sometimes resulting in starting difficulties or preventing the engine from starting altogether.
As the starter motor requires a very high amperage (electrical current), any obstruction at the battery connection points becomes a significant issue.
A simple visual inspection, confirming that the terminals are tight and clean, as it can often resolve starting problems without the need for extensive diagnostics.
3. Check the Starter Relay and Fuse
The starter relay and fuse act as control points within the starting circuit and protect it from electrical overloads.
If the relay is faulty or the fuse has blown, the solenoid will not receive the necessary trigger signal.
Consequently, it is possible that no “click” sound is heard at all, even if the solenoid itself is functioning correctly.
Therefore, it is essential to inspect these components before directly testing the solenoid.
A properly functioning relay should emit a distinct “click” sound when the ignition key is turned to the “Start” position; this confirms that the control circuit is active.
4. Verifying the Ignition Switch Signal to the Starter Circuit
The ignition switch or start button sends a low-voltage electrical signal to the solenoid via the control circuit; without this signal, the solenoid will never activate.
Checking for this signal ensures that the issue does not originate from the ignition system or its associated wiring, before attributing the fault to the solenoid itself.
When attempting to start the vehicle, a clear voltage signal should reach the solenoid’s trigger wire.
If this signal is absent or weak, the problem typically lies not with the solenoid, but rather with the ignition switch, wiring harness, or relay system.
This step helps distinguish between issues related to electrical controls and actual mechanical faults within the starter hardware.
How to Test It By Solenoid Voltage Test – When Key is in ON / START Position
1. Measuring Voltage at the S Terminal During Attempted Cranking
The first true electrical test for the starter solenoid involves checking the voltage at the S terminal when the key is turned to the START position.
This procedure is performed using a digital multimeter set to measure DC voltage; the red probe is placed on the S terminal wire, while the black probe is connected to a good ground point such as: the engine block or the negative terminal of the battery.
When the ignition key is turned, this terminal should receive a low-amperage control voltage signal, which serves to activate the solenoid.
This step is crucial because it confirms whether the ignition system is, in fact, signaling the solenoid to engage.
2. Expected Result: Close to Battery Voltage – Approximately 12V
In a properly functioning system, the voltage level at the S terminal should be very close to the battery’s voltage, typically around twelve volts, at the exact moment the key is turned to the START position.
As this voltage is present for only a brief moment, the reading must be observed while the ignition key is being held continuously in the CRANK position.
If this correct voltage is present, it indicates that the ignition switch, its associated relay and the wiring leading to the solenoid are functioning correctly and the control signal is reaching the solenoid exactly as intended.
At this juncture, if the engine still fails to crank, there is a very high probability that the fault lies within the solenoid itself or within the starter motor.
3. What Does Low or No Voltage Mean? – Ignition Switch, Relay, or Wiring Issues
If a low voltage reading, or no voltage at all, is observed at the S terminal while attempting to start the vehicle, it indicates that the solenoid is not receiving the proper control signal.
This typically points to a problem within the electrical path leading to the solenoid, rather than with the solenoid itself.
Common causes include: a faulty ignition switch that fails to transmit power; a defective starter relay that is not closing correctly; blown fuses within the control circuit; or damage to the wiring connecting these components to the solenoid.
In some instances, poor connections or corrosion within the wiring harness can cause the voltage to drop so low that the solenoid fails to activate.
Identifying this specific situation is crucial, as it helps prevent the unnecessary replacement of the solenoid, particularly when the actual fault lies elsewhere within the control circuit.
How to Test It By Solenoid Click Test
1. Listening for the Audible Click When Turning the Key
The simplest, yet highly effective, method for checking the starter solenoid is to listen for a distinct clicking sound when the ignition key is turned to the “Start” position.
This click is generated by the activation of the solenoid coil, which pulls an internal plunger to engage the high-current circuit connecting the battery to the starter motor.
To perform this test correctly, the vehicle should be parked in a quiet location with the hood open so that you can clearly hear any sounds emanating from the starter assembly.
This test is crucial because it immediately indicates whether or not the solenoid is responding to the electrical signal received from the ignition system.
2. Interpreting the Sounds: A Single Click vs Rapid Clicking vs No Sound
Generally, a single, distinct click suggests that the solenoid is receiving power and attempting to engage; however, the ultimate outcome depends on the subsequent events occurring within the system.
If you hear a rapid, repetitive clicking sound, it often implies that the solenoid is repeatedly attempting to engage but is failing to receive sufficient and stable power, a condition typically caused by a weak battery or poor electrical connections.
Conversely, if there is absolutely no sound at all, it generally indicates that the solenoid is not receiving the control signal from the ignition system, or that it has suffered a major internal failure.
Each distinct type of sound serves as a specific diagnostic clue, aiding in the identification of the potential root cause of the malfunction within the starting system.
3. Interpreting the Results: A Clicking Sound Is Heard, but the Engine Does Not Start – A Fault May Exist in the Solenoid or the Motor
If you clearly hear a clicking sound but the engine fails to start, this generally indicates that the solenoid is functioning correctly, receiving the signal and engaging internally, but the high current is not reaching the starter motor properly.
This can occur if the solenoid’s internal contacts are burnt, worn out, or failing to establish proper contact.
It may also imply that the starter motor itself has failed or has seized up.
In such a scenario, the control circuit is typically functioning correctly and the fault lies within the power supply section of the starting system.
4. Interpreting the Results: No clicking sound – Fault in the Control Circuit or Solenoid
If there is absolutely no clicking sound when the key is turned, it generally means that the solenoid is not engaging.
This can happen if no voltage is reaching the trigger wire; this signals a fault within the control circuit, specifically, a defective ignition switch, a faulty relay, a blown fuse, or broken wiring.
However, it is also possible that the solenoid’s internal coil has failed and is no longer responding to the electrical input.
To confirm this diagnosis, further voltage testing is necessary to determine whether the issue lies within the control system or within the solenoid itself.
How to Test It By Direct Jump Test – Bypassing the Control Circuit
1. Securely Connecting the Battery Terminal to the Trigger Terminal
The Direct Jump Test is used to quickly determine whether the starter solenoid and starter motor are capable of operating when receiving direct power, thereby bypassing the vehicle’s normal control circuit.
In this test, the positive terminal of the battery is carefully connected to the solenoid’s trigger terminal using a jumper wire or an appropriate tool, ensuring that all safety precautions are strictly observed.
The objective of this step is to isolate the ignition switch, relays and associated wiring from the diagnostic process, allowing you to focus entirely on the solenoid and starter assembly itself.
As this test involves working with live power, it must be performed with extreme caution to prevent sparking or accidental short circuits.
2. Checking if the Solenoid Engages and the Starter Spins
Once the connection is properly established, the solenoid should immediately activate with a distinct, audible ‘click,’ and the starter motor should begin to crank the engine.
This response indicates that both the solenoid and the starter motor are capable of functioning correctly when supplied with the proper current.
If the engine cranks normally during this test, it confirms that the mechanical and electrical components on the starter side are in good working condition.
This test proves invaluable in distinguishing between issues lying within the control circuit and actual faults present within the starter system itself.
3. What the Results Indicate: Solenoid Engages – There Is an Electrical Issue Upstream in the Control Circuit
If the solenoid engages and the starter motor spins during the jump test, it signifies that the solenoid and starter assembly are functioning correctly.
In this scenario, the problem does not lie within the starter itself, but rather elsewhere in the control circuit.
This typically involves issues such as a faulty ignition switch, a defective starter relay, a blown fuse, or damaged wiring, all of which prevent the proper signal from reaching the starter when attempting to start the vehicle normally using the key.
This information is invaluable, as it shifts the diagnostic focus toward repairing the system’s control components rather than simply replacing the starter.
4. What the Results Indicate: No Response – Faulty Solenoid or Starter
If absolutely no response is observed during the direct jump test, it indicates that the problem lies within the solenoid or the starter motor itself.
This means that, despite receiving full power directly, the solenoid fails to engage, or the starter motor fails to spin.
Common causes for this include burnt contacts within the solenoid, a defective coil, seized internal components within the starter motor, or internal electrical faults.
In such a situation, the issue resides within the starter assembly itself and it typically necessitates the replacement or repair of the solenoid or the entire starter unit.
How to Test It By Voltage Drop Test Under Load
1. Measuring Voltage Drop Across Solenoid Terminals During Cranking
The voltage drop test is a more advanced and precise method for verifying how effectively the starter solenoid handles actual operating conditions.
Rather than merely confirming the presence of voltage, this test measures the magnitude of voltage loss that occurs when the system is under heavy load, specifically, during engine cranking.
To perform this test, a digital multimeter is connected across the solenoid terminals, typically between the battery input side and the starter output side, while an assistant cranks the engine by turning the ignition key.
This allows you to observe the solenoid’s power-transfer capability while it is actively engaged, rather than when it is in a dormant state.
2. Acceptable vs Excessive Voltage Drop
In a properly functioning starter solenoid, the voltage drop during cranking should be minimal; this indicates that the majority of the battery’s power is successfully reaching the starter motor.
A low voltage drop suggests that the solenoid’s internal contacts are clean and are conducting electricity efficiently.
Conversely, if the voltage drop is excessive, it implies that a significant amount of electrical energy is being wasted within the solenoid.
This can result in weak cranking, slow engine turnover, or a complete failure of the engine to start, even if the battery itself is in good condition.
Excessive voltage drop is the clearest indication of a fault within the high-current electrical path.
3. Identifying Internal Resistance or Burnt Contacts
When the voltage drop exceeds the normal range, it typically points to internal resistance within the solenoid.
This resistance is often caused by burnt, pitted, or worn internal contacts, which are no longer capable of effectively conducting the heavy electrical current required for operation.
Over time, every time the solenoid is activated, a small electrical arc forms between the contacts; through repeated use, their surfaces gradually degrade.
As this damage accumulates, the solenoid struggles to deliver full power to the starter motor.
This condition is very common in older starters and is often mistaken for a weak battery or a failing starter motor; however, a voltage drop test helps to clearly identify that the actual problem lies within the solenoid itself.
How to Test It By Continuity Test – Alternative to Bench Test
1. Removing the Starter Assembly
To perform a continuity test, the starter solenoid is removed from the vehicle and tested separately on a workbench.
This step is crucial because it allows you to completely isolate the solenoid from the rest of the vehicle’s electrical system, thereby providing clearer insight into its internal condition.
Once the starter assembly has been safely removed, accessing the solenoid’s terminals and mechanical components becomes much easier, as there are no longer any obstructions caused by the confined space of the engine bay.
This method is frequently employed when previous tests indicate a potential internal fault within the solenoid, making a thorough internal examination necessary before considering its replacement.
2. Checking Solenoid Coil Continuity with a Multimeter
After removing the starter, the next step involves testing the solenoid coil using a digital multimeter set to either continuity or resistance mode.
The solenoid coil contains internal windings that generate a magnetic field when an electric current flows through them.
If the coil is functioning correctly, the multimeter should display a stable resistance value or indicate continuity; this signifies that the internal electrical pathways within the coil are intact.
Conversely, if no continuity is detected, it typically implies that the coil has either broken internally or burnt out; in such a scenario, the solenoid will fail to operate, even if an external power source is applied.
This serves as a clear indication of an internal fault within the solenoid.
3. Checking Plunger Movement and Contact Closure
Another crucial aspect of the bench test is examining the physical movement of the solenoid plunger and ensuring that it properly closes the internal contacts.
When current flows through the coil, the plunger should move freely and engage with the internal high-current terminals that power the starter motor.
If the plunger sticks, moves sluggishly, or fails to engage fully, it can impede the proper flow of current, even if the coil itself is functioning correctly.
In a properly functioning solenoid, this movement should be swift and decisive, ensuring that a robust electrical connection is established internally.
Issues faced in this area often indicate mechanical wear, dirt accumulation, or internal damage; any of these factors can prevent the starter from engaging, even if the electrical readings appear normal.
How to Interpretation of Results – Diagnostic Summary
1. The Solenoid is Functioning Correctly
When all test results appear normal such as: correct voltage at the S terminal, a distinct clicking sound, proper engagement during jump testing and minimal voltage drop under load, it indicates that the starter solenoid is functioning correctly.
In this scenario, the solenoid is successfully receiving the ignition signal, closing its internal contacts and supplying full battery power to the starter motor.
If the engine fails to start despite these results, the problem typically lies outside the solenoid system such as: within the engine itself, the fuel supply, or the ignition timing, rather than within the starting circuit.
2. The Solenoid Fails Intermittently
Intermittent solenoid failure suggests that the component functions inconsistently, working at times and failing at others; this behavior is often influenced by factors such as temperature, vibration, or battery condition.
This issue may manifest in situations where the solenoid merely clicks but fails to crank the engine, the engine starts with a delay, or, occasionally, the engine fails to start at all.
In many cases, the underlying cause is worn internal contacts within the solenoid that fail to establish a proper electrical connection, or a weak internal coil that ceases to function under specific conditions.
Diagnosing intermittent problems is often challenging because test results may appear normal if the solenoid happens to be functioning correctly at the exact moment of testing; therefore, it is essential to perform repeated tests under varying conditions.
3. The Solenoid Has Failed Completely
A completely failed solenoid yields no response whatsoever during testing; This means that no clicking sound is heard, there is no physical movement and, despite the presence of correct voltage, no power reaches the starter motor.
A voltage test can confirm that power is reaching the solenoid’s trigger wire; however, if the solenoid fails to respond internally, it typically indicates a broken coil, burnt internal wiring, or completely worn-out internal contacts.
In this scenario, the solenoid is unable to perform its primary function of connecting battery power to the starter motor and usually requires replacement.
4. Distinguishing Between Solenoid and Starter Motor Faults
The most critical aspect of troubleshooting is determining whether the fault lies with the solenoid or with the starter motor itself, as the symptoms for both can be identical.
If a distinct “click” is heard from the solenoid but the engine fails to start, this often implies that either the solenoid’s internal contacts are burnt or the starter motor is defective.
If the starter still fails to spin even after bypassing the control circuit via jump testing, it signals a major internal issue within the starter motor, or indicates that its internal components have seized.
Conversely, if absolutely no “click” is heard despite voltage reaching the trigger wire, it is highly probable that the solenoid itself is the root cause of the malfunction.
Properly isolating and testing these two components ensures that parts are not replaced unnecessarily, thereby guaranteeing that the true cause of the problem is identified and resolved correctly.
Know, The Common Mistakes While Testing Starter Solenoid
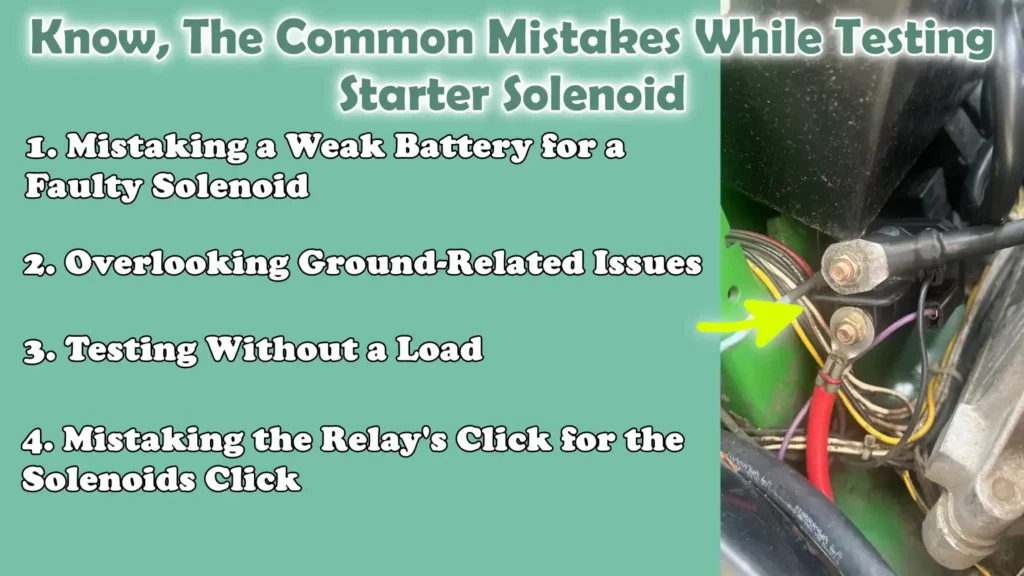
1. Mistaking a Weak Battery for a Faulty Solenoid
One of the most common mistakes made while testing a starter solenoid is assuming that the solenoid itself is defective, when the actual problem lies with a weak or discharged battery.
Even if the battery charge is low, lights and electronics may still function; however, the battery may fail to deliver the sufficient current required to meet the higher demands of the starter system.
This often leads to issues such as clicking sounds, slow cranking, or a failure to start, symptoms that are frequently misdiagnosed as a solenoid malfunction.
In reality, the solenoid may be functioning perfectly well, but it is simply not receiving the adequate and stable power necessary to properly engage the starter motor.
2. Overlooking Ground-Related Issues
Another common error is overlooking poor ground connections, which are crucial for completing any electrical circuit.
The starter system relies on a robust ground path established between the engine block and the negative terminal of the battery.
If the ground points are corroded, the mounting bolts are loose, or oxidation is present, the flow of current becomes weak or unstable.
This can result in intermittent starting difficulties, slow cranking, or a complete failure to start.
Often, the solenoid is unnecessarily replaced, when the true culprit is actually a poor or broken ground connection within the system.
3. Testing Without a Load
Testing a solenoid without accounting for real-world load conditions can also yield misleading results.
When tested without a load, the voltage readings on the solenoid may appear normal; however, it may fail when faced with the task of handling the heavy current required to crank the engine.
This is precisely why load testing is crucial, as it reveals how a solenoid performs under real-world operational pressures.
Without load testing, internal issues such as: burnt contacts or excessive resistance, may go undetected, leading to the misconception that the solenoid is functioning correctly.
4. Mistaking the Relay’s Click for the Solenoid’s Click
Many people confuse the sound of the starter relay with the click of the solenoid, which can lead to an incorrect diagnosis.
The relay’s “click” is typically a faint sound originating from the vicinity of the fuse box, whereas the solenoid’s “click” is a deeper, louder sound emanating from the starter motor assembly.
If these sounds are confused, it becomes difficult to determine whether the solenoid is actually engaging or not.
Accurately identifying the source of the sound is essential for precise diagnostics, as troubleshooting faults in a relay versus a solenoid requires entirely different diagnostic procedures.
Read More:
So, When Should You Replace the Starter Solenoid?
1. Recurring ‘No-Crank’ Issues – Engine Fails to Start
The starter solenoid should be replaced only when it consistently fails to perform its primary function, namely, engaging the starter motor.
If the vehicle is experiencing recurring ‘no-crank’ issues, even when the battery is healthy, connections are clean and the control circuit is functioning correctly, it is a clear indication that the solenoid is no longer reliable.
This persistent failure implies that the internal mechanism is not responding properly to the ignition signal, making engine starting unpredictable and rendering the vehicle unsafe for daily use.
2. Burnt or Pitted Internal Contacts
Inside the solenoid, there are robust metal contacts responsible for transmitting high electrical current to the starter motor.
Over time, due to repeated ‘electrical arcing’ (sparking) that occurs every time the engine is started, these contacts can become burnt, pitted, or worn down.
When this damage becomes excessive, the solenoid becomes unable to properly transmit full power from the battery, resulting in difficulty starting the engine or a complete failure to start.
Once the internal contacts have sustained physical damage, cleaning them is not a long-term solution; replacement remains the only reliable remedy.
3. Failure During ‘Load Testing’
If the solenoid fails a ‘load test,’ it is a definitive sign that it cannot handle real-world operating conditions.
Even if it appears to function correctly during a simple ‘voltage check,’ failing under a ‘load’ (stress) demonstrates that it cannot deliver a stable current precisely when the starter motor requires the maximum amount of power.
This often manifests as “voltage drop” (a reduction in voltage), a failure of the starter to engage properly, or an incomplete delivery of power to the starter motor during engine startup.
A solenoid that fails to function effectively under load is considered unreliable and should be replaced to ensure the engine can be started correctly.
4. Cost-Effectiveness vs Replacing the Entire Starter Assembly
In many vehicles, the solenoid is either mounted directly onto the starter motor itself or sold as an integral component of the complete starter assembly.
When deciding whether to replace only the solenoid or the entire starter unit, one must carefully consider both the cost and the long-term reliability of each option.
If the starter motor is aged, or if it exhibits signs of wear and tear alongside the solenoid, replacing the entire assembly is often the more practical and reliable solution.
However, if the starter motor remains in good condition and only the solenoid is failing, replacing just the solenoid can be a more cost-effective measure that successfully restores the engine’s starting capability.
Conclusion – How to Test Starter Solenoid
So, when you perform those tests correctly, then you can easily identify the real cause of no-start condition as starter solenoid problem rarely isolated.
The starting system relies on a simple chain of events: a robust battery, a proper ignition signal, a functioning solenoid and an intact starter motor.
If any link in this chain breaks, the engine will not crank, a problem that can manifest in various ways, such as clicking sounds, slow cranking, or complete silence.
Therefore, for accurate diagnosis, a step-by-step testing approach is essential, ranging from basic checks like assessing battery health to more detailed procedures such as measuring voltage, click testing, jump testing and voltage drop analysis.
A crucial point to remember is that the solenoid is often prematurely blamed, whereas many starting-related issues are actually caused by a weak battery, poor grounding, a faulty relay, or defective wiring.
By understanding the mechanism behind each test, you can clearly determine whether the solenoid itself is failing or if it is merely reacting to a fault located elsewhere in the circuit.
Now, that’s all about this guide and you can comment for more information regarding How to Test Starter Solenoid.
Frequently Asked Questions
FAQ 1: What does a starter solenoid do in a car?
Answer: The starter solenoid is an essential electrical switch that connects the battery to the starter motor when starting the engine. When you turn the key or press the start button, the solenoid receives a small electrical signal; it then uses this signal to close a heavy-duty internal circuit. This allows a large amount of current to flow from the battery to the starter motor, thereby starting the engine. It also helps push the starter gear into the engine’s flywheel so that the engine can crank properly.
FAQ 2: What are the common symptoms of a bad starter solenoid?
Answer: The most common symptoms include hearing a ‘click’ sound when attempting to start the car, receiving no response when turning the key, or intermittent starting, meaning the car starts sometimes but not others. In some cases, you may also hear a rapid, continuous ‘clicking’ sound; this usually indicates that the battery is weak or that the solenoid is not receiving full power. Another sign is that the engine does not crank at all, even if the lights and other electronics are functioning correctly.
FAQ 3: How can I determine whether the problem lies with the solenoid or the battery?
Answer: A weak battery often exhibits symptoms similar to those of a faulty solenoid, so it is crucial to check the battery before replacing any components. If the battery voltage is low (typically below 12 volts), the starter system will not receive the necessary power to function correctly. If the battery is in good condition, yet you still hear a ‘click’ or the engine fails to crank, the problem likely lies with the solenoid or its associated wiring. Checking for the correct voltage at the solenoid while attempting to crank the engine helps confirm whether or not power is reaching the unit.
FAQ 4: Can a faulty starter relay exhibit symptoms similar to a faulty solenoid?
Answer: Yes, a faulty starter relay can indeed exhibit symptoms identical to those of a faulty solenoid, as it forms part of the control circuit responsible for delivering power to the solenoid. If the relay fails, the solenoid does not receive the signal to engage; in such a scenario, neither is a ‘click’ heard, nor does the engine crank. For this reason, the relay and fuses are always checked before assuming that the solenoid itself is at fault.
FAQ 5: Why do I hear a ‘click’ from the solenoid, but the engine won’t start?
Answer: If you hear a ‘click’ but the engine fails to crank, it generally indicates that the solenoid is engaging, but it is unable to deliver the necessary current to the starter motor. This issue may stem from burnt internal contacts within the solenoid, poor electrical connections, or a defective starter motor. The presence of the ‘click’ confirms that the control side of the system is functioning correctly, but the power-delivery side may be faulty or weak.
References:
[1] An overview of automobile starting system faults and fault diagnosis methods
https://www.researchgate.net/publication/274701478_An_overview_of_automobile_starting_system_faults_and_fault_diagnosis_methods

Hello Folks, Dean Shali here to help you out to solve the problems with your lovely vehicle, as i have lots of experience and knowledge about automotive industry as i woks directly with the customers and repair vehicles and i love to help the people to keep their cars safe and running smoothly.