Written By: Dean Shali
Fact Checked By: Sabré Cook
Reviewed By: Tamara Warren
Basically, when you heard spinning sound during the ignition which means that starter motor is working, but the engagement mechanisms has failed there.
As, there’s small electrical motor which is also known as starter that has one job: just connect that small gear to the engine’s flywheel and spin the engine fast enough to begin combustion properly.
Yes, this is really simple thing, but that connection must happen even in the fraction of a second, under the high torque and with the perfect alignment as well.
Otherwise, starter will spin but it won’t engage, then the motor itself may still be running, yet the gear completely fails to mesh with the flywheel, so the engine never turns on.
That’s how, it creates a free-spinning or whirring sound that many drivers mistake it for dead battery, even though the electrical system is healthy in that case.
So, in reality: this issue often comes from the mechanical wear inside the starter drive, having a failing solenoid, damaged flywheel teeth or mounting misalignment can be the cause behind this malfunction as well.
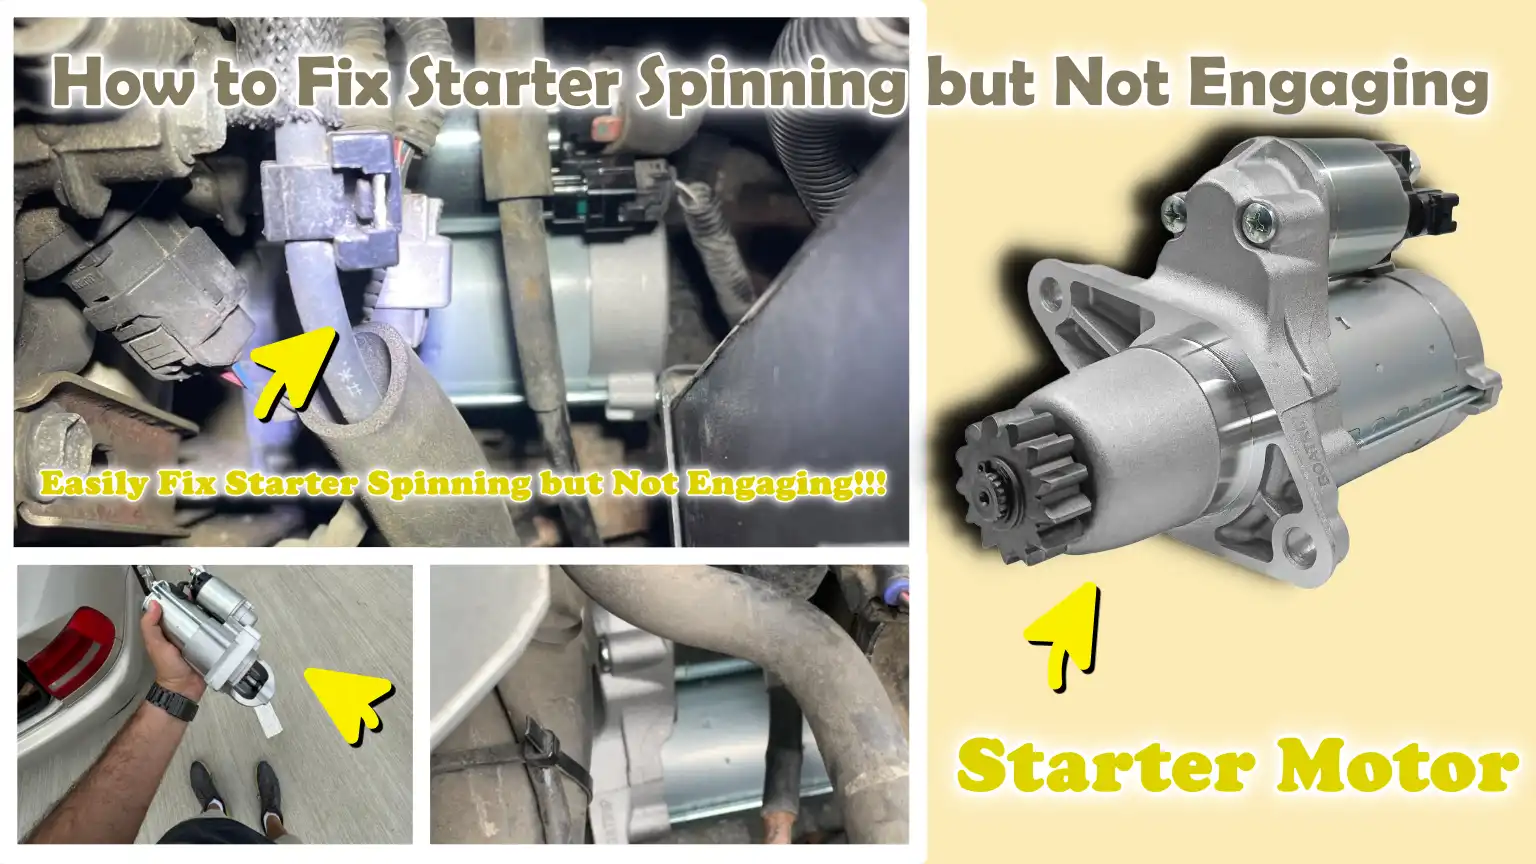
Now, that’s the proper guide about How to Fix Starter Spinning but Not Engaging, so that you can check the correct components in terms to prevent from unnecessary repairs.
So, What Does It Mean When the Starter Spins but Fails to Engage With the Engine?
When the starter spins but fails to engage with the engine, it indicates that the starter motor is receiving power and rotating; however, its small gear is unable to mesh with the teeth of the engine’s flywheel to crank (start) the engine.
Under normal conditions, the starter gear extends forward and locks into the flywheel’s teeth, thereby causing the engine to turn over.
If this engagement fails to occur, a spinning or grinding sound may emanate from the starter, while the engine remains stationary.
This issue is typically caused by a worn starter drive gear, weak solenoid action, damaged flywheel teeth, or improper starter installation.
This situation is distinct from that of a completely discharged (dead) battery; in this specific instance, the motor often continues to spin, demonstrating that electrical power is, in fact, reaching the unit.
Understanding this problem is crucial; although the accompanying sound may initially seem minor, if left unaddressed, it can quickly escalate into a severe “no-start” situation where the engine fails to start at all.
1. Definition of a ‘Free-Spinning Starter’
A “free-spinning starter” refers to a starter motor that rotates continuously but fails to transmit its rotational energy to the engine.
The electric motor housed within the starter functions correctly; however, the pinion gear either fails to extend to its proper position or, instead of engaging with the flywheel, simply slips against it.
This produces a distinct, high-pitched whirring sound that persists as long as the ignition switch remains in the “start” position.
The term “free-spinning” is used because the motor, rather than exerting force against the resistance of the engine, spins freely with very little load.
In most vehicles, the starter requires a ‘one-way clutch’ and a ‘spring-loaded gear assembly’, commonly referred to as a ‘Bendix drive’, to engage properly.
If these components become worn out, the starter motor may continue to spin, but it loses its ability to rotate the crankshaft.
This issue is frequently observed in older vehicles, where the starter has been exposed to years of heat, vibration and repeated engine starts.
2. What Characterizes a Starter That ‘Clicks,’ Makes a ‘Grinding Sound,’ or ‘Free-Spins’?
A ‘clicking’ starter typically indicates that the starter solenoid is attempting to engage but lacks sufficient electrical power to function fully; this is often caused by a weak battery or a poor electrical connection.
In such instances, you will hear a sharp clicking sound, but the starter motor itself will not rotate at all.
A ‘grinding’ starter emits a loud, harsh noise because the starter gear is making partial contact with the flywheel teeth but is slipping against them.
This usually occurs when the gear teeth are worn or the starter is misaligned.
A ‘free-spinning’ starter runs very smoothly, sounding like a high-speed electric motor running in isolation, because the starter motor is indeed rotating, but its gear fails to make contact with the flywheel.
Each distinct sound tells a different story: a clicking sound typically points to an electrical issue; a grinding sound often indicates a fault in the gears, while a rapid spinning sound frequently suggests a defective engagement mechanism within the starter assembly.
3. How Does the Starter Drive Mechanism Work?
The starter drive mechanism is designed to engage the starter motor with the engine for only a few seconds while the engine is starting.
When you turn the key, the battery sends power to the starter solenoid.
The solenoid acts as an electromagnetic switch that pushes the starter’s pinion gear forward to engage with the flywheel.
Once the gear is engaged, the starter motor spins and rotates the flywheel, which in turn rotates the crankshaft and starts the engine.
As soon as the engine starts, the starter gear retracts so that it remains disengaged while the engine is running.
This system operates very rapidly and relies on precise timing.
Even slight wear in the solenoid, pinion gear, or return spring can prevent the gear from reaching the flywheel.
If the gear does not extend far enough, the motor will spin, but it will fail to deliver the power necessary to start the engine.
4. Why Does the Engine Fail to Start When a Problem Occurs?
The engine remains stationary because the rotation of the starter never reaches the crankshaft.
The starter motor generates power internally; however, before the engine can start, this power must be transmitted to the flywheel via the pinion gear.
If the gear fails to engage properly, no mechanical connection is established between the starter and the engine.
This situation is somewhat akin to pressing the accelerator in a car stuck in neutral: the engine may roar loudly, but the wheels do not turn because the connection between them has been severed.
In this scenario, the starter motor continues to run, yet it remains completely isolated from the engine’s rotating components.
As the crankshaft does not rotate, the pistons also remain motionless; the intake cycle for air and fuel never begins and consequently, the combustion process never initiates.
This is precisely why the engine feels completely “lifeless,” even though the sound of the starter motor spinning can be clearly heard.
Know, Common Symptoms of an Engine Failing to Start Despite the Starter Spinning
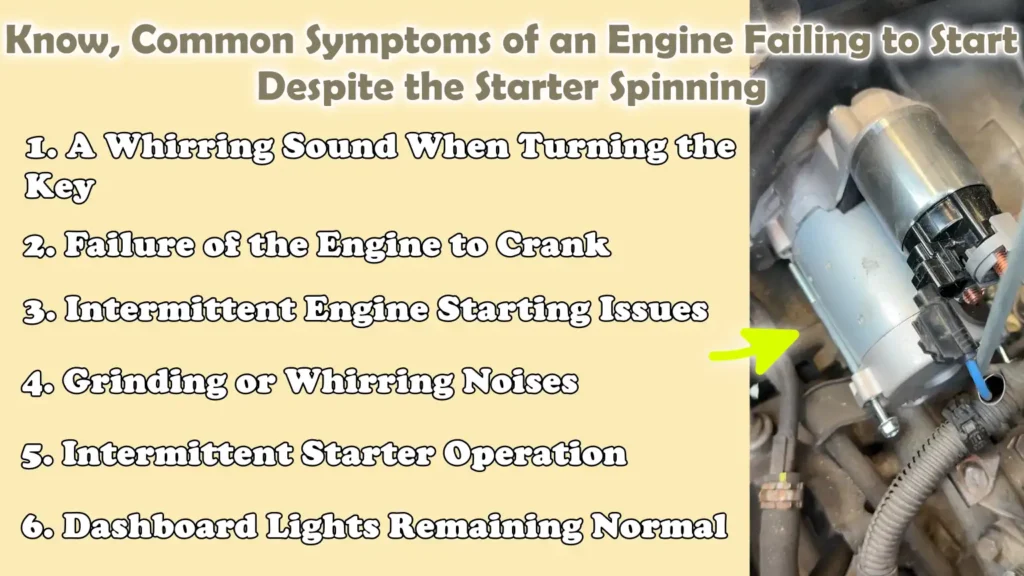
A starter that spins but fails to crank the engine typically exhibits several warning signs before failing completely.
In many vehicles, this issue begins as an intermittent failure to start and gradually worsens over time.
The starter motor continues to receive power, meaning some sounds may seem normal, yet the engine itself fails to turn over.
Paying attention to these symptoms helps pinpoint whether the problem lies with the starter gear, solenoid, flywheel, or electrical connections, allowing the issue to be diagnosed and repaired before a total failure occurs.
1. A Whirring Sound When Turning the Key
A whirring sound is one of the most common indications that the starter is “free-spinning” (rotating without any load).
This sound typically resembles a high-speed electric motor running smoothly without any resistance.
This occurs because the starter motor is indeed spinning, but the pinion gear fails to engage with the flywheel.
As the motor is not turning the engine, it produces a lighter, higher-pitched sound compared to the normal noise of the engine cranking.
This often points to a worn starter drive gear or weakened internal components within the solenoid.
2. Failure of the Engine to Crank
A failure to crank means that the crankshaft is not rotating at all.
You may hear the sound of the starter motor, but the engine remains completely motionless.
Because the starter gear fails to engage with the flywheel, the pistons do not move and the combustion process cannot begin.
This is why the vehicle fails to start, even if the battery and the electronic components on the dashboard appear to be functioning normally.
3. Intermittent Engine Starting Issues
Many problems related to the starter motor manifest intermittently.
The vehicle may start normally for several days, only to fail to start the very next day without any prior warning.
This typically occurs because worn components within the starter motor function correctly at times, but fail to engage when the flywheel happens to be positioned in a specific orientation.
Intermittent symptoms often indicate that the gear teeth are wearing down or that the solenoid is weakening; therefore, it is crucial to diagnose the problem before a complete failure occurs.
4. Grinding or Whirring Noises
Grinding or whirring sounds often signal that the starter gear is making contact with the flywheel but failing to engage properly.
This can happen if the gear teeth are worn, broken, or misaligned.
When two gears fail to mesh correctly, friction is generated, resulting in a loud, metallic grinding sound.
Continuous friction can damage the flywheel teeth, potentially escalating what would have been a minor starter repair into a major engine overhaul.
5. Intermittent Starter Operation
If the starter motor functions only sporadically, it is often an indication of internal component wear.
It is possible that the starter gear engages correctly when the flywheel is stopped at a specific position, but fails to operate when the flywheel is stopped at a different position.
This typically occurs when certain teeth on the flywheel are damaged, or when the starter’s drive gear has worn unevenly.
If the starter only engages after multiple attempts, it is often an indication that an underlying internal issue is worsening and requires immediate inspection.
6. Dashboard Lights Remaining Normal
Drivers are often confused when the dashboard lights remain normal, as this suggests that the battery is in good condition.
In many cases, the lights continue to shine brightly because the battery still retains sufficient power to operate the vehicle’s electrical system.
However, as the actual problem lies within the mechanical components of the starter assembly, the engine still fails to start.
If the starter is spinning while the lights remain bright, it often signals that power is present, but the starter is failing to transmit that power to the engine.
Most Common Causes of a Starter Spinning but Not Engaging
A starter that spins but fails to engage typically indicates that the starter motor itself is functioning correctly, but there is an issue with the mechanical or electrical connections required to start the engine.
This problem can stem from worn internal starter components, a weak electrical supply, or a fault within the flywheel system.
As the symptoms for all these issues are similar, it is crucial to thoroughly understand every potential cause to accurately diagnose the actual fault, rather than relying solely on guesswork or replacing parts unnecessarily.
1. Worn Starter Bendix Gear
The starter Bendix gear is a small rotating gear that connects the starter motor to the engine’s flywheel.
When the ignition key is turned, this gear slides forward and locks into the teeth of the flywheel to crank the engine.
Over time, due to constant contact, heat and friction, this gear becomes worn.
When its teeth become rounded or damaged, the gear is unable to properly grip the flywheel.
The result is that the motor spins, but no power is effectively transmitted to the engine.
2. Faulty Starter Solenoid
The starter solenoid is responsible for pushing the Bendix gear into its proper position and supplying power to the starter motor.
When it malfunctions, the motor may continue to spin, but the gear fails to extend far enough to reach the flywheel.
In some cases, the solenoid weakens due to worn internal contacts or diminished magnetic strength.
Consequently, the pinion gear either moves very slightly or does not move at all, resulting in a spinning sound without the engine actually starting.
3. Faulty Flywheel Ring Gear
The flywheel ring gear is a large metal gear attached to the engine, with which the starter engages.
If its teeth are worn, broken, or damaged, the starter gear cannot lock into place.
Often, this defect occurs only in specific sections, as the engine frequently comes to rest in the same position, leading to repetitive wear on those particular spots.
When the starter engages with this damaged section, it spins freely without turning over the engine.
This is a serious issue, as repairing it may require removing the transmission.
4. Loose Starter Mounting Bolts
The starter must be securely fastened so that its gear aligns correctly with the flywheel.
If the mounting bolts are loose, the starter may shift slightly out of position.
Even a minor misalignment prevents the pinion gear from properly engaging with the flywheel teeth.
This can cause the gear to slip, produce a grinding noise, or fail to engage at all.
Loose mounting bolts are often overlooked; yet, they can produce symptoms that mimic internal faults within the starter or flywheel.
5. Low Battery Voltage
A weak battery may be capable of powering dashboard lights and electronic accessories, but it cannot handle the heavy electrical load required to operate the starter system.
The starter requires a high surge of current to simultaneously activate the solenoid and drive the motor.
If the voltage drops too low, the solenoid cannot fully extend the gear to engage it with the flywheel.
This can result in the gears failing to engage properly, or the starter motor spinning without actually cranking the engine.
This issue is often exacerbated by cold weather or an aging battery.
6. Electrical Connection Issues
Faulty electrical connections can reduce the amount of power reaching the starter, even if the battery itself is in good condition.
Corrosion on battery terminals, loose cables, or poor grounding can create resistance within the circuit.
This impedes the flow of current and negatively impacts the performance of both the solenoid and the starter motor.
In many cases, cleaning and tightening the connections may temporarily improve starting performance; however, to ensure reliable long-term performance, it is essential to restore proper electrical flow throughout the entire system.
Tools
| Tools | Why It Is Needed | How to Use It |
|---|---|---|
| Socket Set | A socket set is required to remove the starter mounting bolts, battery terminals and any brackets that may be in the way. As starters are typically bolted tightly to the engine or transmission housing, using the correct socket size prevents damage to the bolts and makes their removal safer. | Select the correct socket size for each bolt, attach it to a ratchet and carefully loosen the bolt. Maintain direct pressure on the bolt head to prevent it from rounding off. If the starter is located in a confined space, use an extension bar. |
| Multimeter | A multimeter helps in checking battery voltage and ensuring that the starter is receiving adequate power. This is crucial because, in the presence of low voltage, the starter may spin without fully engaging with the flywheel. | Set the meter to DC voltage. Place the probes on the battery terminals and take a voltage reading. A healthy battery typically reads approximately 12.6 volts when the engine is off. You can also check the voltage at the starter terminals while attempting to start the engine. |
| Battery Charger | A battery charger proves invaluable when the battery is weak or discharged. Charging the battery first helps determine whether low voltage is, in fact, the root cause of any issues regarding the starter’s engagement. | Connect the charger clamps to the battery terminals, ensuring that the positive and negative connections are correctly aligned. Allow the battery to fully charge before re-evaluating the starter. Follow the charging mode recommended by the charger’s manufacturer. |
| Flashlight | A flashlight is essential, as the starter is often situated low down within the engine bay, where lighting is typically poor. This helps to clearly view the wiring, mounting bolts and flywheel teeth. | Direct the beam of light onto the starter housing, electrical terminals and surrounding components. Use this light while checking for loose wires, corrosion, or damaged teeth. |
| Jack Stand and Floor Jack | On many vehicles, accessing or removing the starter requires working from underneath the vehicle. A jack is used to lift the vehicle, while jack stands provide secure support during the repair process. | Lift the vehicle using the jacking points recommended by the vehicle manufacturer. Before working underneath the vehicle, position jack stands beneath sturdy frame components. Never rely solely on the jack to support the vehicle. |
| Safety Gloves | Safety gloves protect your hands from sharp metal edges, hot engine components, dirt and battery corrosion. Additionally, they improve your grip when handling or removing vehicle parts. | Put on gloves before touching the starter, battery terminals, or the underside of the vehicle. Wear gloves that fit your hands snugly so that you can easily handle small bolts and wiring connectors. |
| Inspection Mirror | An inspection mirror allows you to view components hidden behind the starter and inspect the flywheel teeth without having to remove any major parts. This is particularly useful when working in the cramped spaces of the engine bay. | Position the mirror near the flywheel inspection port or behind the starter and angle it toward the areas that are difficult to view directly. Use a flashlight in conjunction with the mirror to clearly observe any damage or wear on the teeth. |
How to Ensure Safety By Taking All the Necessary Precautions Before You Begin
Before diagnosing an issue where the starter fails to engage, even if it is spinning, safety is just as critical as the repair itself.
The starter is directly connected to the battery and draws a significant amount of electrical current; consequently, accidental contact can result in sparks, a risk of burns, or a short circuit.
As the starter is often located in the lower section of the engine, near moving parts and hot components, working with caution significantly reduces the risk of injury.
Taking a few simple precautions beforehand makes the diagnostic process safer and helps protect both the vehicle and your tools from potential damage.
1. Park on Level Ground
Before beginning any inspection of the starter, always park the vehicle on level ground.
A level surface keeps the vehicle stable, which is particularly important if you need to lift the vehicle to access the starter from underneath.
Working on a slope increases the risk of the vehicle rolling, which can be extremely dangerous while performing repairs on the undercarriage.
Fully engage the parking brake and ensure that the transmission is in “Park” (or, for vehicles with a manual transmission, engaged in gear).
2. Disconnect the Negative Battery Cable
Disconnecting the negative battery cable is one of the most essential safety measures.
The starter draws a substantial amount of power directly from the battery and accidental contact with the terminals can generate sparks or result in an electric shock.
Disconnecting the negative cable breaks the electrical circuit, preventing the starter from activating while your hands are working in its vicinity.
This also serves to protect sensitive electronic components within the vehicle during the repair process.
3. Allow the Engine to Cool Down
Before touching the starter or any surrounding components, allow the engine to cool down.
In many vehicles, the starter is located near the exhaust manifold, transmission, or engine block, components that can remain extremely hot for a considerable time after the vehicle has been driven.
Touching these parts immediately after driving poses a significant risk of burns.
Waiting for the engine to cool down makes it much safer to inspect the wiring, bolts and surrounding components.
4. Properly Secure the Vehicle
If the starter is located underneath the vehicle, ensure that the vehicle is properly secured before crawling underneath it.
Use a floor jack solely to lift the vehicle and then place jack stands beneath the appropriate support points.
Relying solely on the jack carries the risk of mechanical failure or sudden slippage.
Properly supporting the vehicle ensures your safety while you inspect the starter, wiring and the flywheel area.
5. Wear Safety Glasses for Eye Protection
Wear safety glasses to protect your eyes during the inspection, as dust, rust and small metal fragments may fall while working underneath the vehicle.
Debris can dislodge from the engine housing when removing the starter or while inspecting the flywheel.
Safety glasses help shield your eyes from falling debris, dust kicked up from battery corrosion and sudden sparks that may occur during electrical testing.
How to Fix Starter Spinning but Not Engaging – Easy & Effective Guide
If the starter motor is spinning but the engine fails to start, you must inspect both the electrical supply and the mechanical components connecting the starter to the engine in order to resolve the issue.
In many instances, the starter motor itself remains functional; consequently, the root cause of the problem often lies within the gears, the solenoid, or the flywheel.
Following these steps sequentially will help you avoid replacing parts unnecessarily and make it easier to pinpoint exactly why the vehicle is failing to start.
1. Confirm the Battery’s Condition
Begin by checking the battery, as the starter requires a robust power supply from the battery to spin the motor and engage the gears.
Use a multimeter to test the voltage at the battery terminals.
With the engine turned off, a fully charged battery should typically register a voltage of approximately 12.6 volts.
If the voltage is low, charge the battery before proceeding, as insufficient power can cause the starter to spin without fully engaging.
Additionally, inspect the battery terminals for corrosion, loose clamps, or damaged cables; poor connections can impede the flow of current, even if the battery itself is in good condition.
2. Listen to the Starter Sounds
Turn the ignition key and listen carefully to the sounds emanating from the starter.
A faint whirring sound often indicates that the motor is spinning, but the gear is failing to engage with the flywheel.
A grinding sound typically suggests that the gear is making contact with the flywheel but is slipping due to worn teeth.
If this issue occurs only intermittently, observe whether repeated attempts to start the vehicle result in any improvement.
Such intermittent engagement often indicates worn teeth on the starter gear or defective components within the flywheel.
3. Check the Starter Connections
Before removing any components, inspect the electrical connections attached to the starter.
Check the main positive cable running from the battery to the starter, ensuring it is securely fastened and free of corrosion.
Additionally, check the ‘ground connection’ between the engine and the battery, as the starter requires a complete electrical circuit to function correctly.
Loose or corroded terminals can impede current flow and weaken the solenoid’s movement, preventing the starter from operating properly.
4. Remove and Inspect the Starter
If the wiring appears to be in good condition, remove the starter unit for inspection.
Depending on the vehicle’s design, you may be able to access the starter from the engine bay or from underneath the vehicle.
Begin by disconnecting the battery and then detach the electrical connectors from the starter.
Carefully remove the mounting bolts and slide the starter unit out.
Once removed, inspect the teeth of the starter gear for signs of wear, check the housing for damage and look for any indications of overheating.
5. Check the Bendix Drive Gear
Pay close attention to the Bendix drive gear, as this is one of the most common points of failure.
The edges of the gear teeth should be sharp and clean; they should not appear rounded, broken, or excessively worn.
Manually rotate the pinion gear to verify that it slides smoothly along the shaft.
Also, check the return spring, as a weak spring can prevent the gear from retracting or engaging properly.
If the gear feels loose or slips, it typically requires replacement.
6. Test the Starter Solenoid
Test the starter solenoid using a bench test.
While adhering to safe testing procedures, connect the starter to a fully charged battery using jumper cables.
Observe whether the pinion gear extends outward when power is applied.
The gear should extend rapidly and completely before the motor begins to spin.
If the motor spins but the gear remains stationary or moves sluggishly, the solenoid may be defective and should be replaced.
7. Check the Flywheel Teeth
After removing the starter, inspect the flywheel teeth through the starter mounting opening.
To inspect the entire ring gear, manually rotate the crankshaft using a wrench on the crank pulley bolt.
Check for any broken, worn, or missing teeth.
If a specific section of the flywheel is damaged, the starter may fail to engage only when the engine happens to stop at that particular position.
Excessive wear on the flywheel can also prevent a newly installed starter from engaging properly.
8. Reinstall or Replace the Starter
If the starter passes inspection, carefully reinstall it, ensuring that it engages correctly with the flywheel.
Tighten the mounting bolts to the torque specifications recommended by the manufacturer to ensure the starter remains securely in place.
Securely reconnect all electrical wiring, ensuring that the terminals are clean.
After reconnecting the battery, perform a final start test.
A properly repaired system should start the engine smoothly and without hesitation.
So, How to Bench Test a Starter Motor
Testing the starter motor outside of the vehicle is the most effective way to determine whether the starter unit itself is faulty or if the problem lies elsewhere within the starting system.
A bench test allows you to verify whether the starter motor is spinning correctly and if the pinion gear is extending as expected.
This enables you to pinpoint a defective solenoid, a worn Bendix gear, or a weak internal motor without any guesswork.
It is crucial to hold the starter firmly while performing the test, as it generates significant torque and can jerk violently when power is applied.
1. Bench Testing Procedure
Place the starter on a stable surface such as: a workbench or the ground, and ensure that it does not roll or shift.
You must hold the starter housing firmly, as it may suddenly rotate the moment it receives power.
A bench test simultaneously evaluates both the electrical and mechanical functions of the unit.
If the starter motor spins but the gear does not extend, it indicates a fault within the engagement system.
If nothing happens at all, the issue may stem from a defective motor, a faulty solenoid, or an internal electrical malfunction.
2. Jumper Cable Setup
Use a fully charged 12-volt battery and a set of jumper cables.
To establish a ground connection, attach the negative cable to the metal body of the starter.
Connect the positive cable to the large power terminal located on the starter.
Next, using a short jumper wire, momentarily bridge the positive terminal to the solenoid’s trigger terminal.
Doing so activates the solenoid in the exact same manner as turning the ignition key.
Ensure that the cables are securely connected, as loose connections can generate sparks and lead to inaccurate test results.
3. Observing the Pinion Extension
When power is supplied to the starter, carefully observe its gear.
The pinion gear should extend outward just before the starter motor reaches full speed.
This movement indicates that the solenoid is functioning correctly and is pushing the gear into the engagement position.
If the gear remains stationary, moves sluggishly, or extends only halfway, it signifies a fault within the solenoid or the Bendix mechanism.
For proper engagement with the vehicle’s flywheel, it is crucial that the gear extends outward forcefully and rapidly.
4. Checking the Starter Motor Speed
During the test, pay close attention to the speed and smoothness of the starter motor’s rotation.
A properly functioning starter should spin vigorously, without any hesitation or unusual noises.
If the motor spins slowly, it may indicate worn internal brushes, weak armature windings, or insufficient battery power.
Conversely, if the motor spins rapidly but the gear fails to extend outward, the issue typically lies within the engagement system itself.
Checking both the rotational speed and the gear’s movement provides a clear indication of whether the starter is still capable of operating reliably.
How to Check for Flywheel Malfunctions
The flywheel is a large metal disc connected to the engine’s crankshaft; its outer ring gear is the component the starter motor uses to crank the engine.
If the starter spins but fails to engage with the engine, the problem may lie in damaged flywheel teeth.
Inspecting the flywheel helps confirm whether the issue originates from the starter or the engine’s ring gear.
As the flywheel teeth are hidden within the bell housing, a careful inspection is required to identify any worn, broken, or missing sections.
1. Access the Inspection Cover
Most vehicles feature an inspection port located near the transmission bell housing, where the starter is mounted.
This port allows you to view the flywheel ring gear without having to remove the transmission.
In many cases, removing the starter provides the clearest access.
Use a flashlight to look inside the port and examine the visible teeth.
Dirt and grease can obscure defects, so adequate lighting is crucial for an accurate assessment.
2. Rotate the Engine Manually
To inspect the entire flywheel, it is necessary to rotate the engine by hand.
Use a socket and ratchet on the crankshaft pulley bolt to turn the engine slowly.
This causes the flywheel to rotate, bringing different sections of the ring gear into view.
Manually rotating the engine is essential because defects often affect only a specific section of the flywheel, rather than the entire ring.
Turn it slowly and closely examine each section.
3. Identify Worn Components
Look for teeth that appear rounded, broken, cracked, or missing.
On a properly functioning flywheel, the edges of the teeth are sharp and the spacing between them is uniform.
Teeth that are worn down due to repeated slipping may appear flattened or smooth.
Damage often occurs in the specific area where the flywheel most frequently comes to rest after the engine is shut off, as the starter repeatedly engages with this particular section.
Even a minor defect can prevent the engine from starting and lead to intermittent starting issues.
4. Determine the Severity of the Damage
Minor wear on a few teeth can sometimes cause the starter to slip, whereas severe damage can completely prevent the starter from engaging with the engine.
If several teeth are broken or missing, the flywheel typically requires replacement.
As replacing the flywheel often necessitates removing the transmission, early detection of damage can prevent further wear and tear and help avoid substantial repair costs.
The severity of the damage depends on the number of teeth affected and whether the starter is still able to successfully engage with the undamaged sections.
Read More:
Can You Drive the Car if the Starter Motor Is Spinning but Failing to Engage With the Engine?
Yes, if the engine is already running, the vehicle can typically be driven, as the starter is used solely to crank the engine during startup.
Once the engine has started, the starter disengages and the engine continues to run under its own power.
However, the real trouble arises the next time you turn off the engine.
If the starter spins but repeatedly fails to engage with the engine, there is a very high probability that the vehicle will not restart.
For this reason, this issue becomes quite risky, even if the vehicle appears drivable at the moment.
1. Why Might a Vehicle Suddenly Break Down?
A starter that slips or spins freely often fails without any prior warning.
It may function correctly several times, only to suddenly stop engaging with the engine.
This occurs because worn teeth on the starter gear, or damaged teeth on the flywheel, may occasionally manage to engage with the engine, depending on the specific position in which the engine came to rest.
A vehicle that starts perfectly fine in the morning could completely fail after a brief stop at a store, a gas station, or a workplace.
It is precisely because of this unpredictability that it becomes crucial to have this issue repaired as soon as possible.
2. The Risk of Being Stranded
The greatest risk arises when the starter completely fails to engage with the engine, leaving you stranded in the middle of your journey.
As the engine cannot be cranked, the vehicle will not start, even if the battery, lights and all other electronic components are functioning perfectly.
Many drivers mistakenly assume that the issue lies with the battery and waste time replacing a battery that is, in fact, not defective.
If the starter fails in a desolate area, during bad weather, or late at night, it can quickly escalate into a major inconvenience or a serious safety concern.
3. Potential for Flywheel Damage
Continued use of a faulty starter can lead to damage to the flywheel over time.
If the starter gear slips or fails to engage properly with the engine, it may grind against the flywheel’s teeth, causing them to wear down.
Consequently, what would have been a minor task such as: replacing the starter, as it can turn into a very costly repair, as replacing the flywheel often necessitates removing the transmission.
By addressing repairs in a timely manner, this damage can be prevented from spreading to other components of the starting system.
4. Safety Considerations
A malfunctioning starter can pose a significant safety risk if the vehicle stalls, whether in traffic, at a gas station, or during an emergency, and subsequently fails to restart.
Repeated attempts to start a vehicle with a defective system can cause the starter to overheat, drain the battery and even damage the wiring.
If the starter is already spinning without engaging, the safest course of action is to have the vehicle inspected and repaired before using it for daily commutes or embarking on long-distance journeys.
What are Some Temporary Fixes You Can Try
A starter that spins but fails to crank the engine usually indicates a mechanical fault; therefore, temporary fixes are effective only in specific situations, and often, just once or twice.
These methods can sometimes help the starter function long enough to get the engine running, particularly when the issue stems from worn internal contacts, a stuck solenoid, or a weak electrical current.
While these techniques can be useful for starting the vehicle in an emergency, they do not actually repair worn-out components.
If the problem recurs, it will be necessary to have the starter or its associated components properly inspected and repaired.
1. Gently Tapping the Starter Housing
Gently tapping the starter housing can sometimes temporarily restore the functionality of a worn starter.
This action may dislodge a stuck solenoid or allow worn internal brushes to make better contact for a brief period.
The tapping should be done gently, using a small tool such as: a rubber mallet or the handle of a wrench, without applying excessive force.
This method is effective only when internal components are sticking together and it typically serves as an indication that the starter is nearing the end of its service life.
2. Slightly Rotating the Engine
Manually rotating the engine slightly can alter the position of the flywheel.
This technique can be helpful when a section of the flywheel’s teeth is damaged, causing the starter to repeatedly get stuck at that specific worn spot.
To rotate the engine slightly, use a socket on the crankshaft pulley bolt.
Doing this sometimes allows the starter gear to engage with an intact section of the flywheel teeth.
This serves as a useful diagnostic step, as it helps determine whether the root cause of the problem lies specifically with the flywheel ring gear.
3. Fully Charging the Battery
A weak battery may possess sufficient power to spin the starter motor, yet it may lack the amperage (electrical current) required to properly activate the solenoid.
Fully charging the battery sometimes provides the necessary voltage for the starter gear to engage correctly.
This issue is particularly common in cold weather or with older batteries, whose voltage often drops significantly under load.
Charging the battery before replacing the starter helps confirm whether the problem stems from a lack of electrical power.
4. Cleaning Electrical Terminals
Dirty or corroded battery terminals can impede the flow of current reaching the starter.
Corrosion creates resistance, which can weaken the starter solenoid and prevent the starter from engaging fully.
Cleaning the battery terminals and starter cable connections can significantly improve current flow.
In some cases, a simple cleaning is all that is needed to restore the starter to proper working order, specially when the issue is caused by poor electrical contact.
5. Why Temporary Fixes Offer Only Short-Term Relief
Temporary measures do not repair worn gears, weak solenoids, or damaged flywheel teeth.
Although these methods may help get the starter working for a short while, the underlying mechanical wear and tear persist.
As worn-out components deteriorate further, the starter often begins to malfunction more frequently and eventually ceases to function altogether.
These methods serve merely to move the vehicle from one location to another such as: getting it to a repair shop, and should not be considered a permanent solution.
Understand, When to Replace the Starter
The starter should be replaced when it fails to function properly, repeatedly emits a grinding noise without engaging, or fails a “bench test” after being removed.
As the starter contains both electrical and mechanical components, a single faulty part can compromise the entire system.
In many cases, replacing the entire starter assembly is more practical than repairing individual internal components, specially when the unit has endured years of exposure to heat, vibration and repeated starting cycles.
Timely replacement helps prevent sudden “no-start” situations and minimizes the risk of damage to the flywheel.
1. Signs Indicating the Need for Replacement
Typically, a starter requires replacement when the starter motor spins but fails to engage consistently, even if the battery and associated wiring are in good condition.
Common signs include repeated grinding noises during startup, intermittent cranking, scraping sounds and the starter engaging only after multiple attempts.
If the pinion gear fails to extend during a “bench test,” or if the teeth on the internal gears appear visibly worn, it indicates that the starter is nearing the end of its service life.
Emitting smoke, producing a burning odor, or causing the engine to overheat during repeated starting attempts may also signal an internal electrical fault.
2. Cost Comparison: Repair vs Replacement
Repairing only a specific component of the starter such as: the solenoid or Bendix gear, may result in lower parts costs; however, this approach does not address the underlying issue of internal wear within the motor.
Labor costs often remain consistent, as the process of removing the starter assembly is a necessary step, whether the unit is being repaired or replaced.
In many cases, replacing the entire starter unit entails a higher upfront cost; however, it ultimately saves time and eliminates the need for repeated repairs.
If the starter is aged, replacing the complete unit is often more economical than merely repairing a single worn-out component, specially when the remaining parts are also on the verge of failure.
3. Typical Service Life
A starter typically lasts between 100,000 and 150,000 miles; however, its actual service life depends on driving habits, weather conditions and the overall condition of the vehicle.
Frequent short trips, stop-and-go driving and repeated attempts to force-start the engine can significantly reduce its service life.
Excessive heat generated by the engine and oil leaks can also rapidly accelerate damage to the internal components.
While some starters may last longer, once signs of wear begin to appear, internal deterioration often progresses very rapidly within a short period.
4. Choosing a Replacement Starter
Select a replacement starter that matches the vehicle’s engine size, transmission type and original specifications.
Using an incorrect starter can lead to alignment issues and prevent the unit from functioning properly.
High-quality remanufactured starters, provided they are sourced from a reputable supplier, as it can perform exceptionally well; however, brand-new starters generally offer a longer service life.
It is also crucial to inspect the flywheel and electrical connections before installing the starter, as simply replacing the starter will not resolve issues caused by broken flywheel teeth or faulty wiring.
How to Prevent Engagement Issue When Starter Spinning
Starter engagement problems rarely occur suddenly; rather, they develop gradually.
In many vehicles, early warning signs begin to appear weeks or months before the starter fails completely.
As the starter relies on battery power, robust electrical connections and proper gear engagement with the flywheel, a little regular maintenance can significantly minimize wear and tear.
Preventive measures are crucial, as ignoring starter-related issues can lead to costly flywheel repairs.
Plus, there’s research on the starter motor systems that shows that the pinion engagement process that actually depends on the tightly coordinated electro-mechanical system where the solenoid actually pushes the pinion gear into the flywheel before full motor torque is applied, so if there’s any part of this sequence fails; then the motor may still spin, but the gear will not connect to the engine, so that shows that why starter can sound fully active while the engine remains completely still, so even small delays or weak movement in the solenoid that can prevent proper gear engagement, that leads to the classic “spinning but not engaging” like symptoms.[¹]
1. Battery Maintenance
A healthy battery is essential, as the starter requires high amperage (electrical power) to spin the pinion gear and crank the engine.
A weak battery may be able to power lights and electronic accessories, but it may fail to engage the starter due to the heavy electrical load required to start the engine.
Regularly check the battery voltage and replace aging batteries before they fail completely.
Keeping the battery fully charged reduces the strain on the starter and ensures that the solenoid operates at its full potential.
2. Regular Cable Inspection
Battery cables and starter wiring should be regularly inspected for signs of corrosion, looseness, or damaged insulation.
Poor connections create resistance, which restricts the flow of current reaching the starter.
Even a small amount of corrosion on the terminals can impede the high amperage required to start the engine.
Tight and clean connections facilitate smooth starter operation and prevent weak engagement caused by voltage drop.
3. Promptly Address Engine Starting Difficulties
Problems related to starting the engine should never be ignored, as they often place excessive strain on the starter.
If the engine takes longer than usual to start, the starter remains engaged for an extended period, leading to accelerated wear and tear on the drive gear.
Recurring difficulties in starting the engine can cause the Bendix gear and flywheel teeth to wear out prematurely.
Timely repairs to issues involving the fuel system, ignition, or battery can prevent unnecessary damage to the starter.
4. Inspect the Flywheel During Servicing
Whenever you remove the starter or perform any work on the transmission, be sure to inspect the flywheel.
As the ring gear remains hidden most of the time, early signs of wear and tear often go unnoticed until engagement-related problems begin to surface.
Checking the teeth for any signs of damage or uneven wear can help detect issues before they become severe.
Timely detection can prevent starter slippage and help you avoid major repair expenses later on.
5. Avoid Repeatedly Turning the Key
When the engine fails to start, repeatedly turning the key places immense stress on the starter system.
With every failed attempt, the gear clashes against the flywheel, rapidly accelerating wear on both components.
Prolonged cranking can also cause the starter motor and solenoid to overheat.
If the engine does not start after a few attempts, it is safer to diagnose the root cause of the problem rather than continuing to turn the key repeatedly.
Conclusion – How to Fix Starter Spinning but Not Engaging
So, that’s true that if a starter which spins without turning the engine is often the first warning sign that there’s starting problem and if you leave it right there without fixing it then it could leave the vehicle unable to start at any time.
In most cases, the starter motor is receiving power, which is why you hear the spinning sound, but its gear fails to properly mesh with the flywheel, thereby preventing power from being transmitted to the engine.
This issue is typically caused by a worn Bendix drive, a weak solenoid, damaged flywheel teeth, loose cable connections, or low battery voltage under load.
As the symptoms of various faults can be similar, the best approach is to inspect the battery, wiring, starter gear and flywheel in a systematic sequence to avoid unnecessarily replacing components that are still functioning correctly.
It is crucial to understand that this problem often manifests intermittently.
The vehicle may start perfectly fine for several days and then suddenly, without any warning, fail to start.
This occurs because worn gears may engage correctly under certain conditions but fail to do so under others.
If you ignore these initial symptoms, the vehicle may eventually refuse to start at all and the flywheel could sustain damage, repairs for which are typically very expensive.
So, that’s it about this guide and you can ask related queries below.
Frequently Asked Questions
FAQ 1: My starter is spinning, but why won’t the engine start?
Answer: When your starter spins but fails to start the engine, it generally means that the starter motor itself is functioning correctly, but its gear is failing to engage with the flywheel. The starter is generating rotational speed, but that motion is not being transmitted to the engine. This often occurs because the starter’s drive gear is worn out, the solenoid has weakened, or the teeth on the flywheel are damaged. It can also happen if the battery fails to perform adequately under load, or if there is a loose electrical connection. The root problem is quite straightforward: power is reaching the starter, but a mechanical connection with the engine is not being established.
FAQ 2: Can a weak battery cause the starter to spin but fail to engage with the engine?
Answer: Yes, in some cases, a weak battery can indeed be the cause of this specific problem. Even if the battery holds enough charge to power the dashboard lights and spin the starter motor, it may lack the necessary amperage (electrical power) to energize the solenoid sufficiently to fully extend the gear and engage it with the flywheel. When this happens, the starter may continue to spin without properly engaging. This issue is frequently observed with aging batteries, in cold weather, or when the battery is not fully charged.
FAQ 3: What does a ‘whirring’ sound coming from the starter indicate?
Answer: A ‘whirring’ sound generally indicates that the starter motor is spinning freely without any resistance. This sound occurs when the motor is running, but its pinion gear fails to engage with the flywheel, or makes no contact with it whatsoever. This is often an indication that the Bendix drive is worn out, the solenoid is stuck, or there is a malfunction within the starter’s internal engagement mechanism. This sound differs from a “grinding” noise; whereas a grinding sound implies that the two components are making at least some degree of contact with one another, an “airy” or whirring sound signifies that there is absolutely no contact between them.
FAQ 4: Is it safe to drive the vehicle if the starter is spinning but failing to engage with the engine?
Answer: It is safe to drive only if the engine is already running, as the starter is not utilized while the vehicle is in motion. However, it is not safe to ignore this issue, as there is a risk that once the vehicle is turned off, it may fail to restart. This could leave you stranded in a difficult situation without any warning. Over time, if you repeatedly attempt to start the engine, this can cause further damage to the flywheel or the starter system, potentially leading to significantly higher repair costs.
FAQ 5: How can I determine whether the problem lies with the starter or the flywheel?
Answer: You can often diagnose the problem by observing the sounds produced and the vehicle’s behavior. If the starter spins but the engine fails to start, the issue likely lies with the starter or the solenoid. If you hear a grinding sound while attempting to start the vehicle, the teeth on the flywheel may be damaged. If this issue occurs only under specific engine conditions, there is a very high probability that the problem lies with the flywheel ring gear. To identify the root cause of the problem, it is usually necessary to thoroughly examine both parts.
References:
[1] Electromechanical modeling of a pinion-engaging mechanism for starter motors
https://www.researchgate.net/publication/258858686_Electromechanical_modeling_of_a_pinion-engaging_mechanism_for_starter_motors

Hello Folks, Dean Shali here to help you out to solve the problems with your lovely vehicle, as i have lots of experience and knowledge about automotive industry as i woks directly with the customers and repair vehicles and i love to help the people to keep their cars safe and running smoothly.