Written By: Dean Shali
Fact Checked By: Sabré Cook
Reviewed By: Tamara Warren
It is true that your braking system literally depends on the precise pressure balance, so even a small fault in that can change how your car behaves on the road.
As well as, whenever you presses that damn brake pedal to slow down your vehicle, then the vehicle performs a carefully engineered balancing act that most of the drivers never think about.
So, during that braking: up to the 60% to 80% of your vehicle’s weight actually shifts toward the front wheels, which actually means that the braking system must reduce the pressure to the rear wheels in terms to prevent them from locking up.
And, this precise control is actually managed by a small but important component known as: “BRAKE PROPORTIONING VALVE”.
Plus, whenever it works in correct way, then your car stops very smoothly, stays stable and able to maintain the traction.
But, if it fails then then there’s signs that can be like: having uneven braking, longer stopping distances or rear wheels can lock up too early, it is seen specially in the wet or emergency conditions.
Even, there’s studies on the braking dynamics that shows that improper brake balance is actually the major factor in loss of control during the sudden stops that makes the accurate diagnosis really essential.
But, the challenge is that many of these symptoms are often misdiagnosed as the worn pads, bad rotors or ABS issues as well.
Which is why, testing the brake proportioning valve is not just a technical step, but it is a critical safety check as well.
That’s why, in this guide you’ll learn How to Test Brake Proportioning Valve so that you can identify the warning signs, under how brake pressure should behave and use easy to follow methods.
Understand, What is a Brake Proportioning Valve?
The brake proportioning valve is a small yet vital component of your vehicle’s braking system.
Its function is to regulate the brake force (braking power) applied to the front and rear wheels.
When you depress the brake pedal, hydraulic pressure from the master cylinder transmits brake fluid through the lines to all four wheels; however, this pressure should not be applied equally to every wheel.
This is because, as a car decelerates, its weight shifts toward the front.
This increases traction on the front tires while simultaneously reducing traction on the rear tires.
The proportioning valve adjusts the pressure in such a way that the front brakes perform the majority of the work, while less force is applied to the rear brakes.
This helps prevent the rear wheels from locking up, thereby reducing the risk of the vehicle skidding or losing control.
Without this valve, sudden braking would cause the system to apply excessive force to the rear wheels, rendering the vehicle unstable.
Simply put, the proportioning valve ensures that braking remains balanced, controlled and safe across various driving conditions.
1. How does it regulate pressure between the front and rear brakes?
The brake proportioning valve operates by limiting the hydraulic pressure reaching the rear brakes once it exceeds a specific threshold.
When brake force is minimal such as: during gradual deceleration, the valve distributes equal pressure to both the front and rear brakes, allowing the vehicle to slow down smoothly.
However, as you apply greater pressure to the brake pedal, the valve begins to reduce the pressure directed to the rear wheels while allowing increased pressure to flow to the front wheels.
This controlled reduction in pressure is crucial because, during braking, the weight on the rear wheels decreases, thereby increasing the risk of them locking up.
By regulating this pressure differential, the valve ensures that the majority of the vehicle’s stopping effort is handled by the front brakes, while the rear brakes merely provide assistance without inducing any instability.
This balance enhances tire traction, ensures the vehicle maintains a straight path during braking and minimizes uneven wear on the brake components.
2. Where is it typically located?
The brake proportioning valve is typically situated within the engine bay.
It is often mounted near the master cylinder or serves as part of a ‘combination valve assembly’, which may also incorporate a brake warning switch.
In certain vehicles, particularly older models or trucks, it may be positioned along the brake lines leading toward the rear of the vehicle; occasionally, it is even attached to the vehicle’s frame.
In specific designs, a ‘load-sensing proportioning valve’ linked to the rear suspension may be present, which adjusts the brake pressure based on the load being carried by the vehicle.
Its precise location varies depending on the specific vehicle type and design; however, it is invariably installed somewhere along the path of the brake lines, enabling it to regulate the flow of hydraulic pressure between the front and rear braking circuits.
Know, Why is Testing the Brake Proportioning Valve Important?
Testing the brake proportioning valve is crucial because it ensures that your braking system is correctly distributing pressure between the front and rear wheels.
This directly impacts how safely and smoothly your vehicle comes to a stop.
Many brake-related issues arise not from defective components, but from pressure imbalances, a problem often overlooked during routine inspections.
When this valve malfunctions, it may send either excessive or insufficient pressure to the rear brakes, potentially compromising the vehicle’s stability during braking.
By testing the valve, you obtain clear, measurable results rather than relying on guesswork.
This helps you avoid replacing components that are not actually defective and ensures that the entire braking system functions exactly as designed, whether under normal driving conditions or in emergency situations.
1. Prevents Rear Wheel Lock-up
One of the most critical reasons for testing the brake proportioning valve is to prevent the rear wheels from locking up.
If this occurs, the vehicle may skid, causing you to lose control of the vehicle.
During braking, the load on the rear wheels decreases, resulting in reduced traction (grip) on the road; consequently, the rear brakes require less force to operate effectively compared to the front brakes.
If the valve fails and allows excessive pressure to reach the rear brakes, the wheels may lock up suddenly, particularly during hard braking or while driving on wet roads.
Testing ensures that the valve is properly regulating the pressure applied to the rear brakes, thereby allowing the tires to continue rotating and maintain their grip on the road.
2. Maintains Vehicle Stability Even During Hard Braking
A properly functioning proportioning valve plays a crucial role in maintaining vehicle stability, even when you apply the brakes forcefully.
When pressure distribution is balanced, the front brakes handle the majority of the work required to bring the vehicle to a stop, while the rear brakes assist without compromising the vehicle’s stability.
If the valve is faulty, sudden braking may cause the vehicle to pull to one side, skid, or behave erratically.
Testing the valve ensures that pressure adjustments occur at precisely the right time and in the correct magnitude, allowing the vehicle to track in a straight line and remain under your control, even during emergency braking situations.
3. Ensures Uniform Wear of Brake Pads
Testing the proportioning valve also helps ensure that the brake pads wear evenly over time.
When pressure distribution is correct, both the front and rear brakes properly share the workload in accordance with their design specifications.
If the valve is not functioning correctly, one set of brakes may be subjected to excessive pressure while the other receives too little; this results in uneven wear of the brake pads.
Consequently, this may necessitate frequent replacement of brake components, diminish braking efficiency and increase maintenance costs.
By inspecting the valve, you can detect pressure-related issues early on and prevent unnecessary wear and tear on your brake components.
4. Helps Identify Hidden Issues Within the Brake System
The symptoms of various problems within a brake system often appear similar such as: diminished braking power, uneven stopping, or increased stopping distances, yet their root cause frequently lies hidden within the pressure control system itself.
Issues stemming from a faulty proportioning valve are often mistakenly attributed to problems with the calipers, brake lines, or even the master cylinder.
Inspecting the valve helps determine whether the issue lies in pressure distribution or in another component.
This allows for a more accurate diagnosis, thereby saving both time and money, as repair efforts are focused on rectifying the actual problem rather than on replacing components that are still functioning correctly.
Know, Signs of a Faulty Brake Proportioning Valve
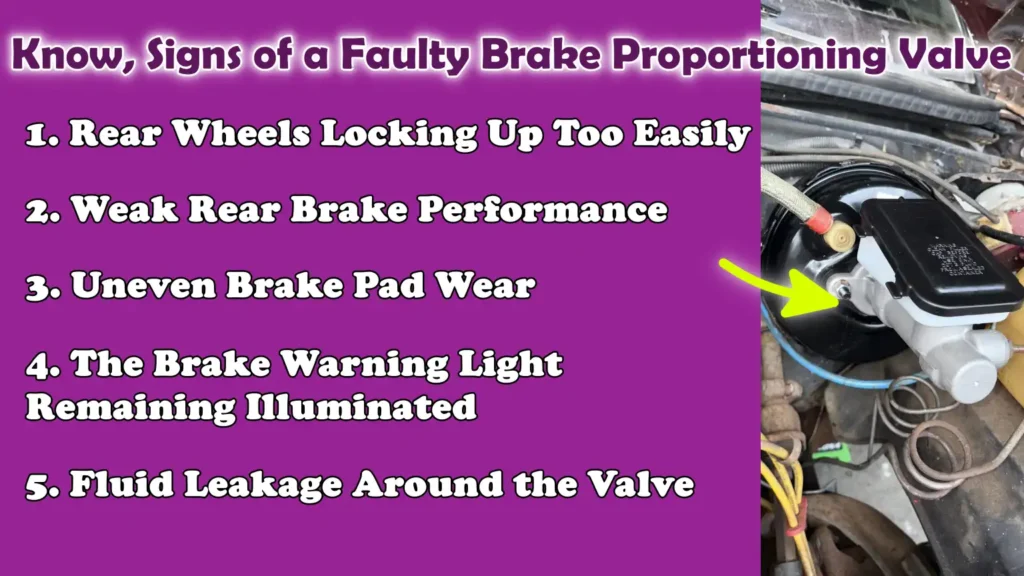
A faulty brake proportioning valve often exhibits clear warning signs; however, if you do not know what to look for, these signs can be difficult to interpret.
This valve regulates the amount of brake pressure reaching the rear wheels; consequently, when it malfunctions, the balance between the front and rear braking systems is disrupted.
This imbalance can cause your vehicle to feel unstable, increase stopping distances and compromise overall safety.
The challenge lies in the fact that these symptoms can resemble those of worn brake pads, bad rotors, or even tire-related issues, leading many people to attempt repairs on the wrong components.
Understanding these specific signs helps you identify whether the root problem is related to pressure control rather than general wear and tear.
1. Rear Wheels Locking Up Too Easily
One of the most common, and dangerous, warning signs is that the rear wheels lock up too easily when the brakes are applied.
This typically occurs when the proportioning valve allows excessive pressure to reach the rear brakes.
As the rear section of the vehicle becomes lighter during braking, the tires quickly lose their grip; the excessive pressure then causes them to suddenly stop rotating.
This can result in the vehicle sliding or skidding, particularly during hard braking or when driving on wet or slippery roads.
If you notice the rear end of your vehicle sliding or losing traction while braking, it is a definitive sign that the valve is failing to regulate pressure correctly.
2. Weak Rear Brake Performance
In some cases, the opposite problem may occur, wherein the rear brakes feel significantly weak.
This occurs when the proportioning valve restricts excessive pressure, preventing the rear brakes from effectively contributing to the effort of bringing the vehicle to a halt.
Consequently, the front brakes are forced to bear the entire workload; this can increase the vehicle’s stopping distance and place excessive strain on the front brake components.
You may perceive that the vehicle is taking longer to stop, or that the rear brakes are not engaging effectively when the brakes are applied.
3. Uneven Brake Pad Wear
Uneven brake pad wear is another clear indication of the pressure imbalance caused by a faulty proportioning valve.
When pressure is not distributed correctly, one set of brakes, typically the front or rear set, works harder than the other.
This causes the brake pads on one side to wear out more rapidly, while the pads on the other side experience very little wear.
Over time, this not only diminishes braking efficiency but also increases maintenance costs, as brake components require more frequent replacement.
By observing the wear patterns, you can determine whether a faulty proportioning valve is indeed the root cause of this imbalance.
4. The Brake Warning Light Remaining Illuminated
If the brake warning light remains continuously illuminated, it may sometimes be linked to a malfunction within the proportioning valve, particularly if the valve is part of a “combination valve assembly.”
This unit may house a “pressure differential switch,” designed to detect imbalances between the front and rear brake circuits.
If the valve fails to function correctly, or if the pressure becomes uneven, the system may trigger the warning light to alert the driver.
Although this warning light may indicate a variety of issues, it should never be ignored, as it could signal a serious internal problem within the brake pressure control system.
5. Fluid Leakage Around the Valve
Fluid leakage around the proportioning valve is a direct indication of a mechanical malfunction that requires immediate attention.
This valve operates using high-pressure brake fluid and any form of leakage can compromise the system’s ability to generate adequate braking force.
You may observe wet spots, an accumulation of dust and grime around the fluid, or a drop in the brake fluid level within the reservoir.
A leak not only impairs the valve’s performance but can also allow air to enter the brake lines, further diminishing braking efficiency and causing the brake pedal to feel soft or spongy.
Tools
| Tools | Why It Is Needed | How to Use It Properly |
|---|---|---|
| Brake Pressure Gauge Kit | This tool measures the actual hydraulic pressure reaching both the front and rear brakes. It is the most accurate method for determining whether the proportioning valve is functioning correctly. Without it, you are merely making educated guesses based on symptoms alone. | Connect the gauge to the brake lines of both the front and rear circuits. Slowly depress the brake pedal and observe the readings. Note how the pressure builds in the front and rear brakes. In a properly functioning system, hard braking generates higher pressure in the front brakes, while the rear brakes maintain a controlled, lower pressure. |
| Wrenches – Line Wrench Preferred | A wrench is required to safely loosen and tighten brake line fittings without causing damage. A line wrench is particularly essential because it grips a larger surface area of the fitting, thereby minimizing the risk of rounding off (damaging) the corners. | Use a correctly sized line wrench on the brake line nuts when installing or removing the pressure gauge. Turn the wrench slowly and firmly to prevent damage to the fittings. When reconnecting, always ensure the connection is tight to prevent any leaks. |
| Brake Fluid – Correct Type | Brake fluid maintains the hydraulic pressure within the braking system. Some fluid may be lost during testing; using the correct type of fluid ensures optimal braking performance and prevents damage to the seals. | Consult your vehicle’s specifications to identify the correct type of brake fluid (such as DOT 3 or DOT 4). Top up the master cylinder reservoir with fluid both before and after performing the test. If air enters the system, you may need to bleed the brakes using fresh fluid to purge the air. |
| Safety Gloves and Goggles | Brake fluid is harmful and can cause injury to the skin and eyes. Protective gear shields you from direct contact and prevents injury while working underneath the vehicle or around pressurized lines. | Wear gloves before handling brake fluid or opening brake lines. Wear safety goggles to protect your eyes from fluid splashes while loosening fittings or when pressure is being released from the system. |
| Jack and Jack Stands | These tools safely lift and support the vehicle, allowing you to access the brake lines and components located underneath. Proper support is crucial to prevent accidents while working. | Use a jack at designated lift points to raise the vehicle. Place jack stands beneath sturdy support points and lower the vehicle onto them. Never rely solely on the jack while working underneath the car. |
| Clean Rags | Rags are used to wipe up spilled brake fluid, clean connections and keep the workspace tidy. This helps prevent the spread of contaminants and makes it easier to detect leaks. | Always keep rags handy to immediately wipe up any spilled brake fluid. Clean the area around fittings both before and after testing so that you can clearly identify any new leaks. Dispose of brake-fluid-soaked rags safely and properly. |
How to Take Safety Precautions Before Testing Brake Proportioning Valve
Before commencing testing on the brake proportioning valve, it is imperative to observe basic safety precautions.
As the braking system operates under extremely high pressure, even a minor error can result in injury or damage.
Opening brake lines may lead to brake fluid leaks; if the vehicle is not properly supported, it could shift or move; and careless handling may cause damage to delicate components.
By taking the appropriate precautions, you can work safely, avoid costly mistakes and ensure the accuracy of your test results.
A secure setup allows you to focus on conducting precise diagnostics without the distraction of sudden hazards.
1. Work on a Level Surface
To ensure vehicle stability, always perform brake testing on a level surface.
When a car is parked on uneven ground, it may roll slightly or shift, particularly while being lifted or when force is applied to it during testing.
Such movement can be hazardous and may also compromise the accuracy of your work.
A level surface ensures that the vehicle remains stable, brake fluid levels remain consistent and your testing conditions remain controlled and reliable.
2. Properly Support the Vehicle
When working underneath or in the vicinity of the vehicle, it is crucial to ensure it is properly supported.
Jacks are designed solely for lifting a vehicle, not for sustaining its weight over an extended period.
Once the vehicle has been lifted, it must be securely rested upon jack stands positioned at designated, sturdy support points.
This prevents the vehicle from falling or shifting while you are working on the brake lines or other components.
A stable support not only protects you from serious injury but also facilitates easy access to components and allows for their safe handling.
3. Prevent Brake Fluid from Coming into Contact with Paint or Skin
Brake fluid is a potent chemical that can damage your vehicle’s paint and cause skin irritation.
If even a small amount spills onto painted surfaces and is not wiped off immediately, the paint may peel or strip away.
Upon contact with skin, it can cause dryness or irritation; if it enters the eyes, it can be harmful.
To ensure safety, handle brake fluid with care, avoid accidental spills and immediately wipe down any affected areas with a clean cloth.
Wearing protective clothing while working provides an additional layer of safety.
Brake fluid is a potent chemical that can damage your vehicle’s paint and cause skin irritation.
4. Carefully Relieve System Pressure
The brake system operates on hydraulic pressure; if you open a brake line without first releasing this pressure, fluid may spurt out forcefully.
This poses a risk of injury and can also allow air to enter the system, thereby compromising braking performance.
Before loosening any fittings, ensure that the system pressure has been relieved; to do this, turn off the engine and gently depress the brake pedal.
This releases the accumulated pressure, allowing you to disconnect fittings more safely.
Taking this step prevents sudden fluid expulsion and ensures that the system remains under your control during testing.
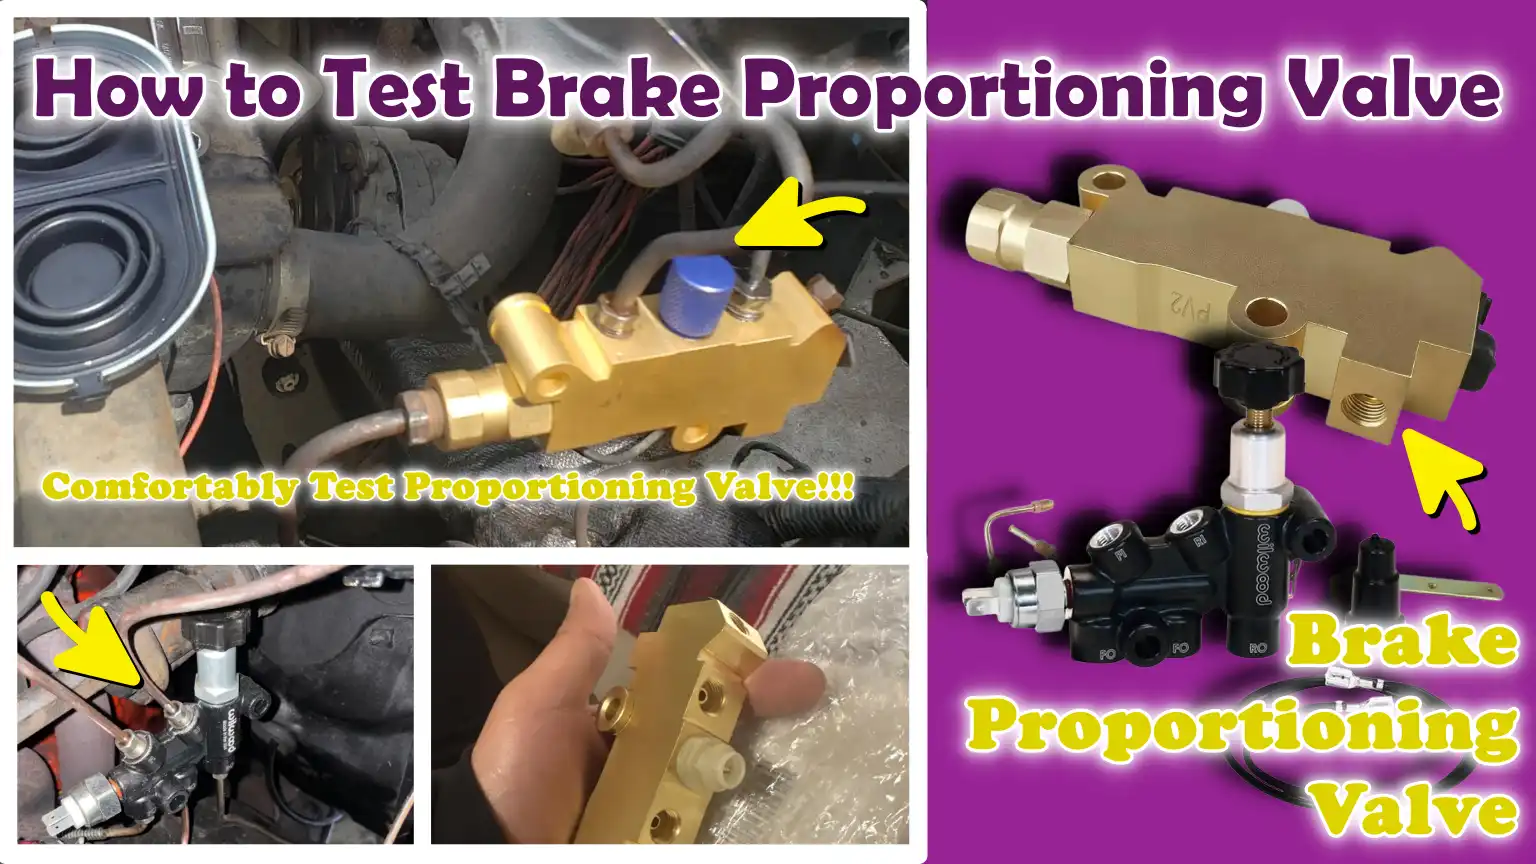
How to Test Brake Proportioning Valve – All Easy to Advance Methods
1. Visual Inspection Test
Before utilizing any diagnostic tools, the first and simplest method for assessing the condition of a brake proportioning valve is a visual inspection.
This approach focuses on everything visible in the vicinity of the valve and its associated brake lines, often revealing clear indications of issues without the need to dismantle the system.
As the valve operates with pressurized brake fluid, even minor external issues such as: leaks or corrosion, as it can compromise its ability to effectively regulate pressure.
A thorough visual examination helps you identify early warning signs, avoid unnecessary disassembly of the system and determine whether further diagnostic testing is required.
Check for Leaks, Corrosion, or Damage
To begin, carefully inspect the valve body and the surrounding area for any signs of brake fluid leaks, corrosion, or external damage.
Brake fluid leaks often manifest as wet or oily patches; over time, these patches attract dust and grime, forming a thick, sticky residue.
Corrosion may appear on metal components as rust or as rough, pitted surfaces, which can weaken the structural integrity of the valve and interfere with its internal mechanical operation.
External damage such as: cracks or dents, as it can also hinder the valve’s ability to function correctly.
Any of these signs indicate that the valve may not be sealing or operating properly and they require immediate attention.
Inspect the Brake Lines Connected to the Valve
Next, examine the brake lines connected to the proportioning valve, as they play a direct role in transmitting hydraulic pressure throughout the entire system.
Inspect the lines for signs of wear, kinks, cracks, or loose fittings.
Damaged or obstructed lines can impede fluid flow or cause uneven pressure distribution, symptoms that may closely mimic those of a faulty valve.
Ensure that all connections are tightened securely and check the joints for any signs of fluid leakage.
The integrity of the brake lines is crucial for accurate diagnostics and for ensuring that the valve functions correctly.
Check for Stuck or Misaligned Components
Finally, carefully inspect the valve and its mounting location to see if any components appear stuck, misaligned, or distorted.
In certain designs, the internal mechanisms of the valve can become jammed due to dirt, rust, or degraded brake fluid, preventing it from effectively regulating pressure.
If the valve is not properly mounted or has shifted from its original position, it will fail to perform as intended during braking.
Although you may not be able to directly observe the internal workings, external indicators such as: a mispositioned valve or clear signs of jamming, as it can point to an internal malfunction.
Identifying these issues in a timely manner helps you determine your next steps regarding further investigation or valve replacement.
2. Brake Pressure Test – The Most Accurate Method
The brake pressure test is the most accurate method for verifying whether the brake proportioning valve is functioning correctly, as it measures actual hydraulic pressure rather than relying on symptoms or guesswork.
This test precisely demonstrates how pressure is distributed between the front and rear brakes when the brake pedal is depressed.
As proper braking relies on a controlled pressure differential, this method allows you to clearly observe whether the valve is reducing the rear brake pressure to the required level.
It eliminates the need for speculation and provides direct evidence of how the system performs under load, information that is crucial for accurate diagnostics.
1. Install Brake Pressure Gauges
To begin, install brake pressure gauges on both the front and rear brake lines so that you can simultaneously measure the pressure in each circuit.
These gauges are installed by carefully loosening the brake line fittings and connecting the gauge adapters in-line with the system.
It is critical to ensure that all connections are securely tightened to prevent leaks and obtain accurate readings.
Once installed, these gauges will allow you to observe how pressure builds within each section of the braking system when the brake pedal is depressed.
2. Depress the Brake Pedal
With the gauges installed, slowly and steadily depress the brake pedal while closely monitoring the readings.
It is essential to apply a consistent and uniform force, as sudden or uneven pressure application can lead to inaccurate results.
As you depress the pedal, hydraulic pressure builds within the system and travels through the lines to both the front and rear brakes.
This step simulates actual braking conditions and allows you to observe how the proportioning valve responds as the pressure increases.
3. Compare Pressure Readings
As the pressure increases, compare the readings displayed on the front and rear gauges.
In a properly functioning system, the front brakes will show higher pressure readings, as they handle the majority of the braking force.
The rear brakes will also receive pressure; however, once a certain threshold is reached, this pressure should rise at a slower and more controlled rate.
This differential is established by the proportioning valve to prevent the rear wheels from locking up.
Observing this relationship between the front and rear pressures is the key to determining whether or not the valve is functioning correctly.
4. Analyze the Results
Once you have obtained the readings, analyze the difference between the front and rear pressures to determine if the valve is operating properly.
A normal result will exhibit a specific pattern in which, during heavy braking, the rear pressure remains lower than the front pressure.
If the rear pressure is excessively high, approaching or nearly equaling the front pressure, it may indicate that the valve is failing to regulate the pressure effectively, potentially leading to rear-wheel lock-up.
Conversely, if the rear pressure is too low, it could mean that the valve is restricting the pressure excessively, or that there is a blockage within the system, preventing the rear brakes from functioning correctly.
If the readings are inconsistent or unstable, it may signal a defect within the valve itself, or it could indicate that air is trapped inside the brake lines.
Interpreting these results will enable you to make an informed decision regarding whether to repair or replace the faulty component.
3. The Road Test Method
The road test method is a practical way to verify how the brake proportioning valve performs under actual driving conditions.
Although it is not as precise as a pressure gauge test, it offers you the opportunity to personally observe and feel the vehicle’s behavior while braking.
This method focuses on how braking force is distributed between the front and rear wheels while the vehicle is in motion.
It is essential to conduct this test in a safe, open area with minimal traffic, allowing you to concentrate on controlled braking without any interruptions.
A properly functioning proportioning valve will help the vehicle decelerate smoothly, maintain stability and retain traction without any sudden loss of control.
Perform a Controlled Braking Test
Begin by driving the vehicle at a moderate speed and applying the brakes gently; subsequently, repeat the test while applying slightly more pressure to the brake pedal.
The objective here is to apply consistent and controlled pressure to the brake pedal, rather than applying sudden or forceful pressure.
This allows you to observe how the braking system responds to varying levels of input.
During light braking, the vehicle should decelerate smoothly without exhibiting any unusual behavior.
As you increase the braking force, the system should feel smooth and predictable, free from any sudden jerks or instability.
Check for Premature Rear-Wheel Lock-up
While conducting the test, pay close attention to whether the rear wheels lock up before the front wheels.
Rear-wheel lock-up often manifests as a sensation that the rear end of the vehicle is sliding or losing traction, particularly during hard braking.
This typically indicates that excessive pressure is being applied to the rear brakes, suggesting that the proportioning valve may not be regulating the pressure correctly.
This condition may manifest more distinctly on loose or wet surfaces, where traction is already compromised.
Recognizing this behavior is crucial, as it has a direct impact on vehicle control and safety.
Assess Vehicle Stability During Braking
Another critical component of a road test is evaluating the vehicle’s stability while braking.
A properly balanced braking system ensures that the vehicle tracks in a straight line without pulling to one side or feeling unstable.
If the proportioning valve is not functioning correctly, the vehicle may feel unbalanced, drift slightly off course, or become difficult to control during sudden stops.
The vehicle’s ability to remain stable during braking serves as a strong indication that brake pressure is being distributed correctly.
If the vehicle remains stable and predictable, even under varying braking intensities, it signifies that the proportioning valve is performing exactly as intended.
4. Isolation Test – Advanced
The Isolation Test is an advanced diagnostic method used to confirm whether the brake proportioning valve is the direct cause of a braking issue.
To perform this test, the valve’s influence on the system is temporarily eliminated.
This test is typically conducted when other methods such as: visual inspection and pressure testing, fail to yield a definitive answer.
The underlying principle is simple: if you remove the valve’s control and observe a distinct change in braking behavior, there is a high probability that the valve is, in fact, the root cause of the problem.
This procedure requires extreme caution, as it alters the manner in which brake pressure is distributed.
Therefore, it should only be performed in a controlled and safe environment, with full awareness of the associated risks.
Temporarily Bypass the Valve – For Testing Purposes Only
To complete this step, the brake lines are carefully rerouted or connected in such a way that brake fluid can flow directly, thereby completely bypassing the proportioning valve.
By doing so, the valve’s ability to limit or regulate the pressure reaching the rear brakes is entirely eliminated.
Prior to testing, it is crucial to ensure that all connections are secure and leak-free, as the system continues to operate under high pressure.
This bypass configuration is intended solely for temporary diagnostic testing purposes and must never be used for normal driving, as it disables a critical safety function of the braking system.
Compare Braking Performance
Once the valve has been bypassed, perform a braking test, carefully and in a controlled manner, to observe any changes in the vehicle’s behavior.
If the actual problem stemmed from the valve restricting excessive pressure, you may observe that the rear brakes engage more firmly after the bypass.
Conversely, if the valve was previously allowing too much pressure to pass through, you might now find that the rear wheels are locking up prematurely.
The primary objective here is to compare how the vehicle responds with and without the valve present in the system.
Any distinct differences in braking balance, stopping characteristics, or stability help confirm whether the valve was indeed impacting performance.
Immediately Restore the System to Its Original Configuration After Testing
Once the test is complete, it is crucial to restore the braking system to its original configuration without delay.
Reconnect the proportioning valve exactly as it was before, ensuring that all brake line fittings are securely tightened.
After reassembling the system, check for any leaks and, if necessary, bleed the brake system to purge any trapped air.
This step is taken to expel any air that may have entered the system during the testing process.
Operating the vehicle without the valve can compromise braking safety; therefore, this step ensures that the system is returned to a proper and safe working condition.
Know, How to Interpret Test Results?
Interpreting the results of your brake proportioning valve test is the step where you transform raw data into a clear diagnosis.
The objective is to understand how brake pressure is being distributed between the front and rear wheels and whether this distribution pattern aligns with the requirements of a safe braking system.
During braking, the front wheels are designed to handle greater force as the vehicle’s weight shifts forward, while the rear wheels receive lower, yet controlled, pressure to maintain their traction on the road surface.
When test results demonstrate this pattern, it indicates that the system is functioning correctly.
Conversely, if this pattern is absent, any discrepancy in pressure distribution points directly to a potential issue either within the valve itself or elsewhere in the braking system.
Carefully analyzing the results helps you avoid replacing incorrect components and ensures that the true root cause of the problem is accurately identified and resolved.
1. Balanced Pressure Signals a Properly Functioning Valve
A properly functioning proportioning valve will exhibit a balanced and controlled distribution of pressure between the front and rear brakes.
This does not imply that the pressure must be equal; rather, it reflects a precise equilibrium where, as braking force increases, the front brakes receive higher pressure, while the rear brakes receive lower, yet still controlled, pressure.
During light braking, the pressure applied to both the front and rear brakes may appear similar; however, as you apply the brakes more forcefully, the pressure on the rear wheels should increase at a slower rate relative to the pressure on the front wheels.
This pattern demonstrates that the valve is deliberately modulating the rear brake pressure to prevent the wheels from locking up.
When you observe this clear and predictable difference in pressure readings, it confirms that the valve is functioning exactly as designed and is effectively maintaining the correct balance within the braking system.
2. Excessively High Rear Pressure Indicates a Faulty Valve
If your tests reveal that the rear brake pressure is excessively high, or nearly equal to the front pressure under heavy braking, it is a strong indication that the proportioning valve is failing to regulate pressure correctly.
This situation is dangerous because, during braking, the rear wheels typically have less traction than the front wheels; consequently, when subjected to excessive force, they can lock up easily.
A locked rear wheel can cause the vehicle to skid or result in a loss of control, particularly during sudden braking or on slippery road surfaces.
Such outcomes typically point to a faulty valve, one that may have become stuck in the open position or is failing to respond correctly to pressure fluctuations, and often necessitate the replacement of the valve.
3. Insufficient Rear Pressure Signals a Blockage or Stuck Valve
When test results indicate that the rear brake pressure is significantly lower than the front brake pressure, it suggests that the valve may be excessively restricting the flow of brake fluid, or that a blockage may exist within the brake lines themselves.
In such a scenario, the rear brakes fail to contribute fully to stopping the vehicle, resulting in an increased stopping distance and placing excessive strain on the front brakes.
This can accelerate the wear of front brake components and compromise the vehicle’s overall braking efficiency.
A blockage within the valve may be caused by accumulated debris, contaminated brake fluid, or worn internal components, preventing the valve from opening fully.
4. Inconsistent Readings Indicate Internal Valve Faults
If pressure readings remain unstable, inconsistent, or fluctuate erratically during repeated testing, it often signals an internal fault within the proportioning valve.
This can occur when internal springs, seals, or moving components become worn or damaged over time.
Such erratic behavior indicates that the valve is unable to regulate pressure reliably, thereby rendering braking performance unpredictable.
Diagnosing such issues without proper testing can be challenging, as external signs are not always readily apparent.
When the readings fail to follow a stable and consistent pattern, it is generally best to replace the valve to restore stable and safe braking performance.
Know, The Common Mistakes While Testing Brake Proportioning Valve to Avoid
When testing a brake proportioning valve, minor errors can lead to inaccurate results and result in unnecessary repairs.
The braking system functions as a cohesive unit; therefore, accurate testing requires the use of proper procedures, clean fluid and a comprehensive understanding of the results.
Many individuals rely solely on guesswork or incomplete inspections, which fails to pinpoint the root cause of the problem and results in a waste of both time and money.
By avoiding these common mistakes, you can obtain reliable results, safeguard your vehicle against future issues and ensure that any repairs you undertake effectively address the actual source of the problem.
1. Neglecting Pressure Testing
One of the most significant errors is failing to perform a brake pressure test and relying instead on visual inspections or subjective sensations felt while driving.
While symptoms such as poor braking performance or wheel lock-up may offer some clues, they do not provide precise data regarding how brake pressure is being distributed.
Without obtaining actual pressure readings, it is impossible to determine whether the proportioning valve is functioning correctly.
Skipping this step often leads to mere speculation and the replacement of components without identifying the true underlying cause of the issue.
A proper pressure test yields clear, measurable data, thereby ensuring that the diagnosis of the problem is both accurate and reliable.
2. Misinterpreting Gauge Readings
Another common issue involves misreading or misinterpreting pressure gauge readings during the testing process.
Many people expect the pressure to be identical at all four wheels, a misconception, as braking systems are designed to apply greater pressure to the front wheels and less pressure to the rear wheels during heavy braking.
If this inherent difference is not understood, a normal reading might be mistakenly interpreted as a fault, or conversely, a genuine problem could go unnoticed.
It is crucial to observe how the pressure changes when the brake pedal is depressed; rather than focusing solely on the numerical values, attention should be directed toward the relationship between the pressure in the front and rear wheels.
3. Failing to Bleed the Brakes Before Testing
Failing to bleed the brakes prior to testing can lead to inaccurate results, as the presence of air within the brake lines affects how pressure is generated and measured.
Unlike brake fluid, air is compressible; consequently, the presence of air can delay pressure readings or introduce inaccuracies into the measurements.
This can lead to the misconception that the proportioning valve is defective, whereas the actual issue lies in the air trapped within the system.
Bleeding the brakes ensures that the system contains only pure fluid, thereby facilitating proper pressure transmission and yielding accurate test results.
4. Overlooking Other Brake Components
A common error is to focus exclusively on the proportioning valve while neglecting other critical brake components such as: the calipers, brake lines, or the ABS system.
Malfunctions in these components can manifest symptoms that closely mimic those of a faulty valve such as: improper brake operation or reduced stopping power.
For instance, a seized caliper or a clogged brake line can disrupt pressure distribution in a manner identical to that of a defective valve.
Overlooking these components can lead to a misdiagnosis of the problem and the unnecessary replacement of the valve.
A thorough inspection of the entire braking system ensures that the true root cause of the issue is accurately identified.
Understand, Can You Drive with a Faulty Brake Proportioning Valve?
Driving with a faulty brake proportioning valve is not advisable, as it directly compromises your vehicle’s ability to stop safely.
This valve regulates the amount of brake pressure reaching the rear wheels; when it malfunctions, the balance between the front and rear braking systems is disrupted.
Although the vehicle may still be able to move and come to a halt, its braking performance becomes unreliable.
This can result in increased stopping distances, reduced control during sudden braking and an overall unsafe driving experience, particularly in heavy traffic or on poor road surfaces.
Before deciding to drive, it is crucial to fully understand the associated risks and limitations.
Plus, there’s engineering research that shows that whenever a proportioning valve is correctly matched and functions as it intended to do, then the braking actually becomes more stable and effective, that’s why it becomes important to test the valve and that literally ensures that the system should operate at its best and deliver the consistent stopping performance as well.[¹]
1. A Clear Overview of Safety Hazards
A faulty proportioning valve poses serious safety risks because it disrupts the critical pressure balance within the braking system.
If excessive pressure is applied to the rear brakes, the rear wheels may lock up suddenly, causing the vehicle to slide or skid, specially during hard braking or on wet roads.
Conversely, if insufficient pressure reaches the rear brakes, the front brakes are forced to overcompensate; this leads to longer stopping distances and places unnecessary strain on the front components.
In either scenario, the vehicle becomes less stable and significantly more difficult to control.
These issues become particularly dangerous in emergency situations, where the ability to stop the vehicle quickly and with full control is absolutely essential.
2. When Driving May Still Be Possible – Proceed with Caution for a Short Duration
In certain instances, provided the braking issue is minor and there are no severe symptoms such as locked wheels or a drastic loss of braking power, it may be possible to drive the vehicle for a very short period.
For example, if the issue causes only a slight imbalance in braking, and the vehicle still comes to a safe stop under normal conditions, it may be feasible to drive it carefully to a repair center.
However, this must be done with extreme caution, at low speeds and while maintaining a greater-than-usual distance from the vehicle ahead.
One should avoid sudden braking, hard braking and driving in heavy traffic or adverse weather conditions, as the braking system may fail to function correctly when subjected to such stress.
3. Why Is Immediate Repair Recommended?
Immediate repair is strongly recommended because the braking system is one of the most critical safety mechanisms in any vehicle.
A faulty proportioning valve does not self-correct; rather, the problem is likely to worsen over time as its internal components continue to wear down or seize up.
Delaying repairs increases the risk of accidents, can cause damage to other brake components and may ultimately lead to higher repair costs.
Resolving this issue as soon as possible restores proper brake balance, improves the vehicle’s stopping capability and ensures that the vehicle’s performance remains reliable across all types of driving conditions.
Read More:
- How to Replace a Brake Light Switch
- How to Diagnose Brake Light Switch Failure
- How to Fix Intermittent ABS Activation
- How to Clean ABS Wheel Speed Sensor
- How to Diagnose ABS Sensor Wiring Issues
- How to Test Electronic Brake Module (EBCM)
- How to Fix Parking Brake Dragging
- How to Adjust Parking Brake Cable
- How to Check Parking Brake Cable Tension
- How to Fix Brakes Dragging While Driving
- How to Diagnose Brake Dragging Issue
- How to Fix Internal Master Cylinder Leak
- How to Test Brake Master Cylinder Pressure
- How to Replace Brake Booster
- How to Fix Brake Booster Vacuum Leak
- How to Test Brake Booster Functionality
- How to Lubricate Brake Caliper Pins Properly
- How to Rebuild Brake Caliper at Home
- How to Check Brake Caliper Piston Movement
- How to Resurface Brake Rotors at Home
- How to Fix Brake Rotor Runout
So, When to Replace the Brake Proportioning Valve?
It is crucial to know when to replace the brake proportioning valve, as this component directly controls how safely your vehicle comes to a stop.
Although this valve is designed for longevity, it can fail due to age, internal corrosion, contaminated brake fluid, or constant pressure fluctuations within the braking system.
The decision to replace it should not be based on guesswork, but rather on clear indicators and conclusive test results.
If the valve fails to regulate pressure correctly, it can lead to braking irregularities that cannot be resolved through mere adjustments or cleaning.
Timely replacement restores the proper pressure balance and ensures that the braking system functions exactly as it was designed to.
1. Clear Criteria for Replacement
The brake proportioning valve should be replaced when testing reveals clear and recurring issues with pressure regulation.
If pressure tests confirm that the rear brake pressure is significantly higher or lower than normal, it indicates that the valve is malfunctioning.
Visible signs such as: brake fluid leaks, excessive corrosion, or external damage to the valve body, also constitute valid reasons for replacement, as these issues compromise the integrity of the valve’s seals and its internal operation.
If the valve exhibits fluctuating pressure readings or fails to function correctly during testing, it often implies that internal components such as: springs or seals, have failed.
In such instances, repair is typically not feasible, making replacement the safest course of action.
2. Estimated Cost – Parts & Labor
The cost of replacing a brake proportioning valve can vary depending on the type of vehicle and the specific design of its braking system.
While the part itself is generally reasonably priced, the total cost may increase if it is part of a larger “combination valve” assembly or if it is difficult to access and remove.
Labor costs depend on the ease of accessing and removing the valve, as well as the time required to reconnect the brake lines and subsequently bleed the air from the system.
As brake fluid must be handled with care and the system must be completely purged of air, proper installation is crucial for maintaining safe braking performance.
Although the cost may seem high, it is a small price to pay compared to the safety risks associated with driving a vehicle with a faulty valve.
3. Do It Yourself vs Professional Repair
If you possess the right tools, basic mechanical knowledge and a solid understanding of brake systems, you can replace the brake proportioning valve yourself.
This process involves disconnecting the brake lines, installing the new valve and bleeding the brakes to purge air from the system.
However, this task must be performed with extreme caution, as any error could compromise brake performance.
For those who lack the necessary experience or confidence, professional repair is the safer option.
A trained technician can ensure proper installation, secure sealing of the brake lines and precise bleeding of the system.
The choice between DIY and professional repair ultimately depends on your skill level, but safety should always be the top priority.
Learn, Pro Tips for Accurate Testing
Accurate testing of a brake proportioning valve requires clean fluid, stable conditions and a clear understanding of the expected pressure levels within a properly functioning system.
Minor errors in the setup can alter readings and yield misleading results.
The objective is to eliminate any factors that could compromise pressure integrity, ensure consistent input during every test and compare your results against a known standard.
When these fundamentals are executed correctly, the results become reliable, enabling you to determine with full confidence whether the valve is functioning properly or requires replacement.
1. Always Test with Properly Bled Brakes
Brake fluid is designed to transmit force without compressing; however, any air trapped within the lines will compress and absorb a portion of that force.
Consequently, the brake pedal may feel soft or spongy when depressed, leading to delays or irregularities in pressure buildup at the wheels.
If you test the system while air is present, gauge readings may appear low or erratic, conditions that could be mistakenly attributed to a faulty valve.
Bleeding the brakes expels trapped air and old fluid, allowing pressure to flow through the system more rapidly and consistently.
With a firm pedal and clean fluid, the readings obtained during testing will accurately reflect the true operational performance of the proportioning valve.
2. Apply Consistent Pressure to the Pedal
Applying consistent pressure to the brake pedal is crucial, as the proportioning valve regulates rear brake pressure based on the intensity with which the brakes are applied.
If the force applied to the pedal varies from one test to another, the pressure readings will fluctuate accordingly, making it difficult to draw meaningful comparisons between the results.
Depress the pedal gradually and hold it at a consistent level for each reading so that, as the pressure builds, a clear pattern emerges.
This steady input helps you identify the specific point at which the valve begins to limit pressure to the rear wheels, thereby ensuring that it is functioning smoothly and predictably.
3. Compare with Manufacturer’s Instructions – If Available
Many vehicle manufacturers specify the expected pressure ranges for their braking systems, or the specific relationship between the front and rear brake pressures.
Comparing your test results against these instructions provides a reliable benchmark, rather than relying solely on general guidelines.
If your readings align with the expected pattern, it is likely that the valve is functioning exactly as intended.
Conversely, if they fall outside the prescribed limits, it signals a potential issue that requires attention.
Using the correct specifications for your specific vehicle is paramount, as brake system designs can vary significantly based on the model, weight and intended use.
4. Inspect the Entire Brake System for Related Issues
The proportioning valve does not operate in isolation; issues within other components of the braking system can also affect pressure balance and manifest similar symptoms.
Problems such as sticking calipers, partial blockages in brake lines, worn brake hoses, or a faulty master cylinder can alter the way hydraulic pressure reaches the wheels.
If these components are not inspected, you might mistakenly attribute a problem to the proportioning valve, when, in reality, the issue was not caused by the valve at all.
A comprehensive inspection of the entire system ensures that the brake fluid flows without any obstruction, all components are functioning correctly and there are no leaks or blockages anywhere within the system.
This thorough examination facilitates accurate testing and helps prevent misdiagnosis.
Conclusion – How to Test Brake Proportioning Valve
Now, you have clearly understood that there’s difference between having safe stop and a dangerous skid and that is directly connected to how well the brake pressure is actually managed.
This small component governs one of the most critical aspects of braking: the distribution of hydraulic pressure between the front and rear wheels.
When this balance is correctly calibrated, your car stops smoothly, remains stable and maintains traction.
Conversely, if this balance is disrupted, even a well-maintained braking system can behave unpredictably.
The key takeaway is that relying solely on symptoms is insufficient for an accurate diagnosis.
Visual inspections, pressure tests and careful observation during road tests, these methods combined provide a comprehensive and precise understanding of the underlying issue.
By adhering to the correct testing protocols, you rely on concrete facts rather than guesswork.
You gain insight into how the pressure is supposed to behave, learn to identify abnormal patterns and confirm that the valve is functioning exactly as intended.
This systematic approach not only enhances safety but also prevents unnecessary repairs and wasted time.
It ensures that you address the root cause of the problem, rather than chasing after symptoms that could potentially lead to a misdiagnosis.
It is also crucial to remember that the brake proportioning valve is just one component of a larger system.
Accurate test results depend on clean brake fluid, properly bled lines and the overall integrity of every component within the system.
A meticulous and thorough diagnostic process enables you to see the complete picture and avoid misdiagnosis.
Also, you can ask more information in the comment box of this guide about How to Test Brake Proportioning Valve.
Frequently Asked Questions
FAQ 1: What does a brake proportioning valve do?
Answer: The brake proportioning valve controls how brake pressure is distributed between the front and rear wheels. When you press the brake pedal, your car’s weight automatically shifts forward; this means the front wheels can handle greater braking force, while the rear wheels require less force. During hard braking, this valve reduces the pressure applied to the rear brakes to prevent them from locking up. This ensures that the car comes to a smooth and stable stop while maintaining its grip on the road.
FAQ 2: How do I know if my brake proportioning valve is faulty?
Answer: The symptoms of a faulty brake proportioning valve are usually quite clear, provided you know what to look for. You may notice that the rear wheels lock up very easily specially during hard braking, or conversely, the rear brakes may feel weak and fail to contribute significantly to stopping the vehicle. The vehicle may feel unstable, take longer to come to a stop, or show signs of uneven wear on the brake pads. In some cases, the brake warning light may also remain illuminated. These signs point to an imbalance in pressure, precisely the condition this valve is designed to regulate.
FAQ 3: Can a brake proportioning valve fail partially?
Answer: Yes, a brake proportioning valve can fail partially and in fact, this is quite a common occurrence. Rather than ceasing to function entirely, it may either restrict too much pressure or allow too much pressure to pass through. This creates an imbalance within the braking system; the system continues to operate, but it does not function correctly. Diagnosing a partial malfunction can be more challenging, as the initial symptoms may be very subtle. Therefore, a thorough inspection is essential.
FAQ 4: How do you check a brake proportioning valve?
Answer: The most accurate method for checking a brake proportioning valve is to use a ‘brake pressure gauge.’ With this tool, you can precisely measure the amount of pressure reaching the front and rear brakes. During the inspection, the front brakes should register higher pressure, while the pressure in the rear brakes should increase gradually as you apply greater force to the brake pedal. You can also perform a visual inspection of the vehicle or take it for a test drive in a safe location; however, checking the pressure yields the most reliable and definitive results.
FAQ 5: Can I drive with a faulty brake proportioning valve?
Answer: Driving with a faulty brake proportioning valve is not advisable, as it compromises your vehicle’s ability to stop safely. If the valve sends excessive pressure to the rear brakes, the wheels may lock up, potentially causing the vehicle to skid. Conversely, if it sends insufficient pressure, the vehicle’s stopping distance will increase. In some mild cases, the vehicle may be driven cautiously for a short distance; however, it is always safer to have the issue repaired as soon as possible.
FAQ 6: Does ABS replace the brake proportioning valve?
Answer: In many modern vehicles, the ABS system can electronically regulate brake pressure, although this depends on the specific design of the vehicle. Some systems utilize a mechanical proportioning valve in conjunction with ABS, while others rely entirely on electronic controls. Even with the presence of ABS, maintaining the correct pressure balance is crucial and any malfunction within the system can adversely affect braking performance.
FAQ 7: Why do brake proportioning valves fail?
Answer: A brake proportioning valve can fail for several reasons, including internal wear and tear over time, corrosion caused by moisture in the brake fluid, or contamination from dirty fluid. Old or degraded brake fluid can clog internal components or cause them to deteriorate prematurely. External damage or leaks can also compromise the valve’s ability to properly regulate pressure. Regular maintenance and the use of clean brake fluid help extend the lifespan of the valve.
FAQ 8: How much does it cost to replace a brake proportioning valve?
Answer: The cost of replacing a brake proportioning valve depends on the specific vehicle and the availability of parts. The cost of the valve itself is typically moderate, but labor charges may vary depending on the complexity of the job. Additional costs may also be incurred for replacing the brake fluid and bleeding the system (removing air) after the valve has been installed. Although costs may vary, this is a critical repair, as it directly impacts the vehicle’s safety.
References:
[1] Braking Performance Analysis for Light Duty Vehicle Matched with Braking Force Regulator
https://www.scientific.net/AMR.510.101

Hello Folks, Dean Shali here to help you out to solve the problems with your lovely vehicle, as i have lots of experience and knowledge about automotive industry as i woks directly with the customers and repair vehicles and i love to help the people to keep their cars safe and running smoothly.