Written By: Dean Shali
Fact Checked By: Sabré Cook
Reviewed By: Tamara Warren
Yes, tires can completely look “NORMAL” while parked, but even though they can have some hidden wear or low pressure that can literally turn a safe drive into a roadside emergency.
Basically, to ensure the safe and sound long trip then the tires must be fine enough, but usually tire problems can be found out long before a flat or blowout.
As, there are small signs such as: having low air pressure, shallow tread, sidewall cracks or uneven wear that can all build into some serious failures once tires heat up at the highway speed.
Plus, according to the NHTSA tire-related problems are really huge factor in thousands of crashes each year and underinflated or damaged tires can literally reduce the control, increase the stopping distance and even raise the risk of rollover in some situations as well.
Not only this, during long trip your vehicle has to be exceptionally fit, as it needs to carry passengers, luggage and drive over the hot pavement as well.
So, yes tire failures are actually preventable, as modern tires are designed to handle the long distances, but they will only be possible when pressure, tread depth, age and conditions are checked at the regular time interval.
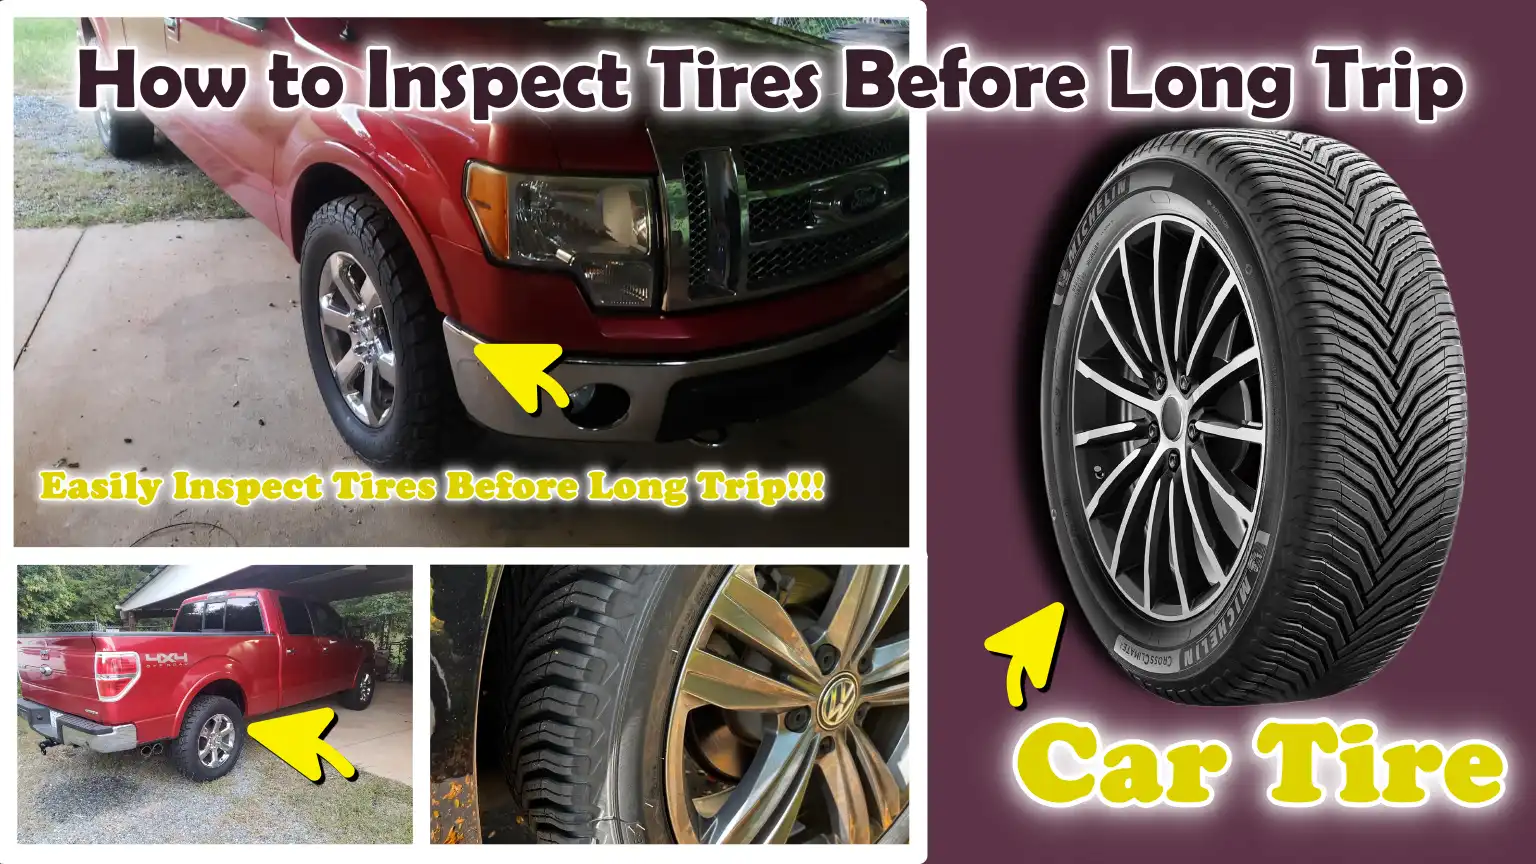
That’s why, in this guide you’ll learn How to Inspect Tires Before Long Trip so that you can catch if there’s any warning signs early on and avoid complete breakdowns on the road.
Why Checking Tires Before a Trip Is Essential
Checking tires before a long journey is one of the most critical safety checks for any driver; yet, it is often overlooked because tires may appear normal from the outside.
Due to wear and tear, heat, aging, or internal defects, a tire can gradually lose its structural integrity, even if no major issues are visible externally.
Long-distance travel places significantly greater stress on tires compared to daily local driving, as tires remain under constant load for hours on end, often operating at higher speeds and elevated temperatures.
As the tire rotates, friction generates heat within the rubber and steel belts.
If a tire already possesses a weak spot, is underinflated, or has worn tread (the outer surface), this internal heat can drastically increase the likelihood of a sudden tire blowout.
Therefore, checking your tires before a trip is not merely about avoiding inconvenience; it is directly linked to ensuring safe braking, stable steering, and maintaining vehicle control in emergency situations.
1. How Tires Affect Safety, Handling, and Fuel Efficiency
Tires are the only components of a vehicle that make direct contact with the road; consequently, every movement of the vehicle depends on the condition of its tires.
Braking, turning, accelerating, and even driving in the rain, all these actions rely on the grip (traction) established between the tire’s tread (surface) and the road.
If the tread is worn or the tire pressure is incorrect, this grip is compromised.
As a result, the vehicle may require a greater distance to come to a stop, particularly on wet roads, where worn tires can “hydroplane” (skid) because they are unable to effectively displace water.
Tire air pressure significantly influences how a vehicle handles.
Underinflated tires can make the vehicle feel heavy, unstable, and less responsive to steering inputs.
Overinflated tires can reduce the contact area with the road, resulting in a bumpier ride and diminished traction.
Fuel efficiency is also affected, as underinflated tires increase “rolling resistance”, the resistance faced during rotation.
This means the engine must work harder to propel the vehicle forward, leading to increased fuel consumption during long-distance journeys.
Even a slight drop in tire pressure can impact mileage, particularly when traveling on highways where tires are under constant stress.
2. Common Tire Problems During Long Journeys and How Inspections Can Prevent Them
During long-distance travel, most tire-related issues begin as minor anomalies that eventually escalate into major problems.
A tire blowout is one of the most serious issues; it often occurs when a tire is underinflated, overloaded, or already compromised.
When tire pressure is excessively low, the tire flexes more than usual during rotation, generating excessive internal heat.
Over time, this weakens the tire’s internal structure and can lead to sudden tire failure at high highway speeds.
Another common issue is “tread separation,” in which the tire’s outer tread (surface) begins to detach from the main body due to age, improper maintenance, or hidden internal damage.
Slow air leaks are also a common problem; these can be caused by punctures, cracks in the valve stem, or faults in the wheel seal.
Uneven tread wear can be an indication of alignment issues or suspension malfunctions, causing the tires to wear out much faster than expected.
Proper inspection allows you to identify and address these issues by spotting early warning signs such as: reduced tread depth, cuts, sidewall bulges, cracks, embedded objects (like nails), or low tire pressure.
Recognizing these warning signs before embarking on a journey significantly reduces the likelihood of a roadside breakdown and ensures a safer driving experience.
3. When to Inspect Your Tires Before a Trip
The best time to inspect your tires is at least one day before a long journey, rather than just a few minutes before setting off.
This gives you ample time to detect any issues and resolve them without feeling rushed.
Tire pressure should always be checked when the tires are cold; even a short drive can heat up the tires and increase the internal air pressure, potentially resulting in an inaccurate reading.
Inspecting your tires a day in advance provides sufficient time to visit a tire shop if a replacement or repair becomes necessary.
It is also a prudent step to give your tires a quick visual check on the day of the trip itself, specially if the vehicle has been parked overnight.
Look out for any irregularities, such as low tire pressure, sidewall damage, or objects lodged in the tire tread.
If you plan to carry passengers, luggage, or additional cargo, it is crucial to inspect your tires before loading the vehicle, as the added weight places increased stress on the tires.
During long road trips, it is advisable to continue performing regular checks throughout the journey; bec
First, Check the Tire Pressure
Before inspecting the tread (the upper surface of the tire) or looking for any visible damage, you should always check the tire pressure first, as it affects almost every aspect of the tire’s performance.
Air pressure supports the vehicle’s weight, maintains the tire’s shape, and allows the tread to make proper contact with the road.
Even a tire that appears normal to the eye may have a pressure several PSI below the recommended level, as many tires gradually lose air over time due to natural leakage or temperature fluctuations.
Pressure often drops when the outside temperature falls, meaning a tire can lose air overnight, even if it hasn’t suffered a puncture.
Setting out on a long journey with incorrect pressure can cause the tires to overheat, reduce handling control, and shorten the tire’s lifespan, often much faster than most drivers realize.
1. Why Correct Pressure Is Essential for Highway Driving
Correct tire pressure becomes even more critical when driving on the highway, as higher speeds generate increased friction and heat within the tire.
When a tire is underinflated, its sidewalls flex more while in motion; this excessive flexing generates internal heat.
Over long distances, this heat can damage the tire’s structure and increase the risk of a blowout.
Furthermore, low pressure can make the vehicle feel less stable when changing lanes or braking suddenly.
Overinflated tires can also cause problems, as excessive pressure reduces the size of the contact patch (the portion of the tire touching the road), thereby diminishing grip.
This can result in a harsher ride and reduced traction, particularly on wet roads.
Maintaining the correct pressure ensures that the tires distribute the vehicle’s weight evenly, remain cool, and provide consistent, reliable handling during long-distance journeys.
2. How to Determine the Correct PSI
The correct tire pressure is not the number printed on the tire’s sidewall.
The number printed on the sidewall typically indicates the tire’s maximum pressure capacity, not the recommended pressure for your specific vehicle.
The correct PSI is determined by the vehicle manufacturer and is based on factors such as the vehicle’s weight, suspension design, and tire size.
In most vehicles, this information is printed on a sticker located inside the driver-side door frame.
In some vehicles, this information is also provided in the owner’s manual.
The recommended pressure for the front and rear tires may differ, as weight distribution is not always uniform.
Using the PSI specified by the vehicle manufacturer ensures the optimal balance between ride comfort, handling, tire longevity, and fuel efficiency.
3. How to Check Tire Pressure Correctly
The best way to check tire pressure accurately is to use a reliable tire pressure gauge when the tires are “cold”.
“Cold” means that the vehicle has been parked for several hours and has not been driven recently.
Even driving for a short distance can cause the tires to heat up and the pressure reading to rise, potentially masking an issue with low tire pressure.
Remove the valve cap, press the gauge firmly onto the valve stem, and read the measurement.
Compare this reading with the recommended PSI for your vehicle.
If the reading is low, slowly add air and re-check the pressure.
It is best to check all four tires, as even a single underinflated tire can negatively impact handling, even if the others are properly inflated.
Checking only one tire is insufficient, as pressure loss can vary from one tire to another.
4. Adjusting Tire Pressure for Vehicles Carrying Heavy Loads
When a vehicle carries a heavy load, whether in the form of additional passengers, luggage, or cargo, its tires are subjected to increased stress, particularly during long journeys.
This increased weight places greater strain on the tires, causing them to heat up more rapidly.
For certain vehicles, specific tire pressure recommendations are provided for both normal driving conditions and fully loaded scenarios.
This information can typically be found on a sticker located on the door frame or within the owner’s manual.
Slightly increasing the tire pressure, in accordance with the manufacturer’s specifications for the given load, enables the tires to safely handle the increased weight.
However, any adjustments to tire pressure should not be made based on guesswork, but rather strictly according to the vehicle’s specific guidelines.
Overinflating tires beyond the specified limits can compromise their grip and lead to uneven tread wear.
When a vehicle is carrying a load heavier than usual, maintaining the correct tire pressure for that specific weight enhances the vehicle’s stability, braking performance, and tire longevity.
5. Why You Should Not Rely Solely on Dashboard Warnings
Many modern vehicles are equipped with a Tire Pressure Monitoring System (TPMS); however, these systems cannot replace the habit of manually checking your tires.
Typically, these systems alert the driver only when tire pressure drops below a predetermined threshold; this means that a significant amount of air may have already escaped from the tire before any warning is issued.
In some instances, the warning light illuminates only after the tire pressure has dropped by several PSI.
Furthermore, these systems fail to detect minor discrepancies between tires, variations that can impact vehicle handling and tire wear patterns.
A tire might be slightly underinflated, wearing unevenly, or even negatively affecting fuel efficiency, yet, despite all these issues, no warning signal may be triggered.
Manually checking tire pressure provides more precise information, yielding exact readings and allowing you to compare the pressure across all your tires.
While dashboard warnings are useful for alerting you to sudden changes, they should be treated merely as a “backup” when inspecting your tires before embarking on a long journey, rather than serving as the primary method of inspection.
How to Check Tread Depth
Tread depth is one of the most critical aspects of a pre-trip tire inspection, as it directly impacts how well your vehicle maintains its grip on the road.
The tread is the patterned rubber surface that makes contact with the road and generates traction.
As tires wear down, their grooves become shallower, and they lose their ability to grip the road effectively.
On dry roads, worn tread can reduce traction during hard braking.
On wet roads, this risk increases significantly because shallow treads cannot displace water quickly enough.
Consequently, instead of maintaining contact with the road, the tire begins to slide over the water, a phenomenon known as ‘hydroplaning’.
When this occurs, steering and braking can become difficult, or even impossible, for a brief period.
Checking your tread depth before a journey helps you determine whether your tires still possess sufficient grip to handle highway speeds, rainy conditions, emergency stops, and various road surfaces.
Also, there’s research that shows that tire tread depth directly affects the crash risk, specially on the wet roads, as study also found out that once tread wears down near 4/32 inch, then crash involvement begins to increase due to the reduced water dispersion and longer stopping distances as well, that’s why tread inspection is really important before long trips, as highway speed also amplifies the effects of reduces grip and increase the risk of hydroplaning as well.[¹]
1. Why Tread Depth Matters for Braking and Wet Roads
Tread depth has a far greater impact on stopping distance than many drivers realize.
Deep tread channels water away from beneath the tires, ensuring that the rubber remains in contact with the road surface.
As the tread wears down, these grooves become less effective, particularly during rainfall.
A tire with shallow tread depth may take significantly longer to stop on wet roads compared to a new tire, even if both are properly inflated.
This factor becomes even more critical on highways, where high speeds inherently increase stopping distances.
Worn tread also reduces traction while cornering, which can make the vehicle feel less stable when changing lanes or navigating turns.
During heavy rainfall, there is a significantly high probability that tires with worn treads will suddenly lose their grip.
This is why tread depth is not merely a matter of how old a tire looks; it directly impacts safety whenever road surfaces are wet or when a driver needs to apply sudden brakes.
2. Simple Methods for Measuring Tread Wear
Tread wear can be easily checked at home without any specialized tools, although a ‘tread depth gauge’ provides the most accurate measurement.
A common method involves using a coin to estimate the remaining depth of the grooves.
The coin should be placed into a main tread groove; if the upper portion of the coin is largely visible, it indicates that the tread is excessively worn.
A tread depth gauge is a superior tool, as it provides precise measurements in fractions of an inch or in millimeters.
It is essential to inspect multiple points on the tire, rather than just a single section, because tread wear is rarely uniform.
The center section may appear fine while the edges are worn, or one side may wear down rapidly due to alignment issues.
Tires also feature “wear bars” built into the grooves.
These are small, raised rubber bars that become visible when the tread approaches the minimum legal limit.
If the tread surface has worn down to the level of these bars, the tire is worn out and must be replaced.
3. Minimum Safe Tread Depth for Road Trips
In many regions, the legal minimum tread depth for passenger vehicles is 2/32 of an inch; however, this should be regarded as an absolute limit, not the safest standard for long-distance travel.
Tires with this depth possess very limited water-channeling capacity and often perform poorly in rainy conditions.
For a road trip, many tire experts recommend replacing tires once the tread depth reaches approximately 4/32 of an inch, specially if you anticipate driving in wet weather.
At this level, traction begins to diminish significantly, and the risk of hydroplaning increases.
Tires used for highway travel must possess sufficient tread depth to handle sudden braking, rough road surfaces, and changing weather conditions.
Even if a tire technically meets legal requirements, it may not be suitable for a long journey if its tread is nearing the wear limit.
Generally, greater tread depth translates to superior grip, shorter braking distances, and safer driving in unexpected situations.
4. Signs That Tires Should Be Replaced Before a Trip
Certain signs clearly indicate that tires should be replaced before embarking on a long journey.
If the tread appears smooth in certain areas, the grooves are shallow, or the wear bars are making contact with the tread surface, the tire has likely reached the end of its useful life.
Uneven tread wear is also a warning sign, as it often suggests that the tire is being damaged by alignment or suspension issues.
Cracks in the tread blocks, missing chunks of rubber, or bald spots also signal that the tire is no longer safe to use.
If your vehicle slides easily in the rain, takes longer to come to a stop, or the tires make unusual noises, worn tread could be the underlying cause.
Rather than risking a loss of control while far from home, it is far safer to replace the tires.
How to Look for Uneven Wear Patterns
Uneven tire wear is a serious warning sign, as it often points to underlying issues that are far more critical than simple tire aging.
Proper tire wear should be uniform across the entire tread (the surface of the tire).
If one section wears down faster than another, it indicates that the tire is not making proper contact with the road.
This can be caused by alignment issues, incorrect tire pressure, or worn-out suspension components.
Uneven wear can compromise grip, increase road noise, and significantly reduce the lifespan of the tire.
Before embarking on a long journey, inspecting the tread pattern can help identify hidden problems that might worsen during extended highway driving.
1. What Uneven Wear Reveals About Tire Condition
The specific manner in which a tire wears down can reveal issues that are not immediately apparent during normal driving.
As, tires bear the entire weight of the vehicle and remain in constant contact with the road, they often provide early indications of underlying mechanical problems.
Uneven wear may signal that the tire is carrying weight incorrectly or rotating at an improper angle.
Even if the tire still retains a substantial amount of tread, uneven wear can reduce traction and make braking less reliable.
It may also indicate that the vehicle requires a mechanical inspection, rather than just a new set of tires.
2. Inner Edge Wear
Inner edge wear refers to a condition where the inner section of the tread wears down faster than the rest of the tire.
This typically points to wheel alignment issues, specifically in cases where the wheels are angled too far inward.
This type of wear is often easy to overlook because the inner edge of the tire is difficult to see.
A tire worn on its inner edge may even appear normal when viewed from the outside.
Such wear reduces the contact area with the road surface and can render the tire unsafe for long-distance travel.
If the inner edge is significantly worn, it is crucial to have the vehicle inspected before embarking on a journey.
3. Center Wear
Center wear occurs when the central section of the tire tread wears down faster than the edges.
This is typically caused by excessive air pressure within the tire.
High air pressure causes the center of the tread to press more firmly against the road surface, resulting in accelerated wear.
This can lead to reduced grip, as the surface area of the tread making contact with the road is diminished.
It can also result in a rougher ride.
If the center of the tire appears more worn than the edges, the tire pressure should be corrected, and the tires should be thoroughly inspected before undertaking any long journeys.
4. Outer Edge Wear
Outer edge wear indicates that both edges of the tire are wearing down faster than the central section.
This often occurs when the tire pressure is too low.
Underinflated tires become flatter, placing greater pressure on the edges.
This generates excessive heat and increases the risk of tire failure during prolonged highway driving.
Outer edge wear can also lead to reduced fuel efficiency and negatively impact vehicle handling.
If both edges are wearing down rapidly, the tire pressure should be adjusted, and the tires should be inspected to ensure safety.
5. Cupping and Scalping
Cupping, or scalping, results in the formation of uneven patches on the tire tread (surface).
When you run your hand over the tire, it may feel rough to the touch.
This is typically caused by worn-out suspension components, such as shocks or struts.
The tire bounces more than usual, leading to varying wear patterns across different sections of the tread.
While driving, this often manifests as vibrations or a humming noise.
Even if the tire tread depth appears adequate, cupped tires do not perform well on long journeys because they fail to maintain proper contact with the road surface.
6. What Do These Patterns Reveal About Alignment, Tire Pressure, or Suspension Issues?
Uneven tire wear patterns often point to the underlying root cause of an internal mechanical issue.
Wear on the inner edges typically indicates an alignment problem.
Wear in the center of the tire often suggests that the tire pressure is too high.
Wear on the outer edges usually indicates that the tire pressure is too low.
The presence of cupping or scalping on a tire is often a sign of a suspension issue.
These indicators are crucial because, without addressing the root cause of the problem, simply replacing the tires may result in them suffering the exact same type of damage again.
Before embarking on a long journey, uneven tire wear should be taken seriously, as it impacts the vehicle’s handling, braking, and overall safety on the road.
How to Check for Visible Damage
Checking your tires for visible damage before a long journey is one of the simplest tasks, yet it is often overlooked.
A tire may possess adequate tread depth and correct air pressure, yet still be unsafe due to defects in the rubber or its internal structure.
Many road accidents are caused by minor cracks, cuts, or damage resulting from impact with objects, issues that tend to worsen over time.
Driving over long distances causes tires to heat up, and this heat can accelerate the deterioration of already weakened areas.
A careful visual inspection of every part of each tire allows for the early detection of potential problems.
This inspection should cover the tire’s sidewalls, the tread area, and any signs of objects embedded within the rubber.
1. Cracks in the Sidewall
Sidewall cracks are small fissures visible on the outer surface of the tire.
These cracks typically form when the rubber ages and loses its elasticity due to constant exposure to heat, sunlight, and varying weather conditions.
Even if the tire’s tread still appears deep, the presence of cracks in the sidewall indicates that the tire’s internal structure is weakening.
While minor surface cracks may initially seem like mere signs of aging rubber, deeper cracks allow moisture to penetrate the tire’s inner layers, further compromising its structural integrity.
Cracks are more common in older tires or on vehicles that have remained stationary for extended periods.
If cracks are visible on a tire’s sidewall, particularly in multiple locations, the tire should be thoroughly inspected before embarking on a long-distance journey.
2. Bulges or Blisters
The appearance of bulges or blisters on a tire is a serious warning sign, as it typically indicates damage to the tire’s internal structure.
These often appear after striking potholes, curbs, or road debris.
Even if the tire’s outer rubber appears intact, the internal cords may have separated or snapped, causing the tire’s sidewall to bulge outward.
The presence of a bulge suggests that the structural integrity of the tire has been compromised at that specific spot.
As the tire rotates, this weakened area undergoes excessive flexing, significantly increasing the risk of a blowout or structural failure.
A tire bulge should never be ignored, specially before driving on a highway, as it can lead to a sudden blowout without any specific prior warning.
3. Cuts, Punctures, or Embedded Objects
Cuts and punctures in a tire can be caused by nails, screws, shards of glass, sharp stones, or road debris.
Sometimes, an object becomes lodged within the tire’s tread pattern (grooves); even if it does not cause an immediate puncture, it can lead to a gradual loss of air pressure over time.
When the vehicle is stationary, the tire may appear perfectly fine, but its air pressure could drop significantly during a long journey.
Even minor punctures, if left unrepaired, can prove dangerous.
Deep cuts in the tread or sidewall can weaken the tire’s structure and increase the risk of failure.
It is essential to inspect the entire tread surface, clearing away dirt or embedded stones if necessary, to ensure that all areas are clearly visible.
You should check for any objects embedded in the tires before setting out on a trip.
4. Symptoms of ‘Dry Rot’
Dry rot occurs when rubber ages, dries out, and becomes brittle.
It typically manifests as a network of fine cracks on the sidewall or within the grooves of the tread blocks.
This process occurs naturally as tires age, regardless of how frequently or infrequently the vehicle has been driven.
Sunlight, hot weather, and leaving a vehicle stationary for extended periods can accelerate this process.
Dry rot weakens the rubber and diminishes its flexibility, thereby increasing the likelihood of a tire blowout under pressure.
A tire affected by dry rot may still hold air and appear to have adequate tread depth; however, it may not be safe for long-distance highway travel, as the rubber is no longer capable of effectively handling stress in the same way a new tire can.
5. Why Sidewall Damage Should Never Be Ignored
Sidewall damage is a matter of particular concern because the sidewall supports the tire’s structural integrity and absorbs road shocks.
Unlike damage to the tread area, damage to the sidewall typically cannot be safely repaired.
When a vehicle is in motion, the sidewall is constantly flexing; consequently, any cracks, bulges, or deep cuts in this area can deteriorate rapidly.
A compromised sidewall might be adequate for limited driving in the immediate vicinity; however, during long journeys, when the tire heats up and is subjected to greater load, the risk of failure increases significantly.
As sidewall issues often compromise the tire’s internal structure, they can lead to a sudden and catastrophic tire failure without any significant prior warning.
If any damage is visible on the sidewall, it is generally advisable to replace the tire before setting out on a journey.
How to Check the Age of Your Tires
Tire age is often overlooked because many drivers focus solely on tread depth; however, from a safety perspective, age is equally critical.
Even if a tire has deep tread and appears serviceable, years of use and exposure to the elements may have already compromised the integrity of its rubber.
Tires are made from rubber compounds that gradually harden and dry out over time.
Factors such as heat, sunlight, humidity, and prolonged periods of vehicle inactivity can accelerate this aging process.
As the rubber ages, it loses its elasticity, increasing the likelihood of cracking or internal structural separation.
Before embarking on a long journey, it is essential to check the age of your tires, as older tires may be internally compromised even if they appear normal on the outside.
1. Why Old Tires Can Be Unsafe Despite Having Good Tread
A tire does not remain safe simply because it possesses deep tread.
From the very day a tire is manufactured, its rubber and internal components naturally begin to age.
Over time, the rubber compounds dry out, and the bonds between the various internal layers may weaken.
Consequently, compared to when it was new, the tire becomes less capable of withstanding heat, internal pressure, or road shocks.
Older tires carry a higher risk of cracking, sidewall failure, or tread separation, hazards that are particularly amplified during long-distance highway driving.
This is why a tire with ample tread, yet significant age, as it can still pose a safety risk during long-distance travel.
2. How to Read the DOT Date Code
The easiest way to determine a tire’s age is to locate and read the DOT date code printed on its sidewall.
Near the letters “DOT,” you will find a sequence of numbers and letters; the last four digits of this sequence indicate the tire’s date of manufacture.
The first two digits denote the week of manufacture, while the last two digits indicate the year.
For example, “2323” means that the tire was manufactured during the 23rd week of 2023.
On some tires, this code appears on only one sidewall; therefore, it may be necessary to inspect the tire from the inner side as well.
This code indicates the tire’s date of manufacture, which is the most accurate method for determining a tire’s age, rather than the date on which the tire was installed on the vehicle.
3. Recommended Limits for Tire Age
Many automotive and tire experts advise that tires should undergo a thorough inspection approximately six years after their date of manufacture, even if their tread (the outer layer of the tire) still appears to be in good condition.
Although some tires may last longer depending on the climate, storage conditions, and maintenance they receive, the aging process accelerates in hot weather and under intense sunlight.
After approximately ten years, many manufacturers recommend replacing tires, regardless of their visual appearance, because the rubber is no longer safe for use.
Tires that are used regularly and properly maintained often remain in better condition than those that sit unused for extended periods.
Nevertheless, as a tire begins to age, regular inspections, particularly before embarking on long journeys, become even more critical.
4. Risks of Driving on Old Tires During Long Journeys
Driving long distances on old tires increases the likelihood of tire failure, as driving at high speeds on highways generates heat within the tire.
Aged rubber does not withstand heat as effectively; as the internal layers of the tire deteriorate, they begin to delaminate under pressure.
This can lead to incidents while driving, such as sudden tire blowouts, sidewall ruptures, or tread separation.
Older tires may also suffer from reduced road traction, as the hardened rubber loses its elasticity and struggles to maintain a firm grip on the road, particularly on wet surfaces.
These risks are further amplified when transporting passengers or cargo, as the additional weight places even greater stress on the tires.
Before embarking on any long journey, checking the age of your tires can help you avoid potential issues that might not be apparent during a routine inspection.
How to Check the Valve Stem and Cap
Valve stems are small components of a tire; nevertheless, they play a crucial role by sealing the air inside the tire.
The valve stem is utilized every time the tire pressure is checked or air is added to the tire.
If it becomes damaged, cracks, or loosens, air can slowly leak from the tire, often without the driver even realizing it.
This can lead to underinflation, which negatively impacts vehicle handling, fuel efficiency, and tire safety during long journeys.
As valve stems are exposed to heat, sunlight, water, and road debris, they can deteriorate over time, much in the same way that tires themselves wear out.
Performing a quick inspection before a trip can help prevent minor leaks that could escalate into major problems while driving on the highway.
1. Signs of Cracks or Leaks
Valve stems are typically made of rubber or metal, and both materials can degrade over time.
Rubber valve stems can dry out and develop cracks, particularly on older tires.
The presence of small cracks near the base of the stem is a common indication that the component is weakening.
If the stem bends easily, or appears faded or brittle (prone to breaking), it may be on the verge of failure.
Air can also leak if the internal valve core is loose or damaged.
An easy method to check for leaks is to apply a small amount of soapy water around the valve and observe whether bubbles form.
The formation of bubbles usually indicates that air is escaping.
Even a minor leak can reduce tire pressure to a level that compromises safety during a long drive.
2. Why the Absence of a Valve Cap Matters
Although a valve cap may seem like a minor component, it plays a crucial role in protecting the valve from dirt, moisture, and road debris.
The cap acts as a secondary seal, helping to prevent dirt or contaminants from entering the valve opening.
Without a cap, dust or water can accumulate inside, potentially causing the valve core to corrode over time.
This can lead to minor leaks or result in inaccurate tire pressure readings.
While the absence of a cap typically does not cause immediate tire failure, failing to replace it over the long term can lead to valve-related issues.
Replacing a lost cap is both easy and inexpensive, and it helps safeguard the valve stem during daily driving and long-distance journeys.
3. When to Replace Valve Stems
Valve stems should be replaced whenever they show signs of cracks, leaks, or aging.
Many tire shops recommend replacing rubber valve stems whenever new tires are installed, as the old stems may already be worn out.
If a tire is several years old and its valve stem appears dry, brittle, or damaged, replacing it is a prudent safety measure.
Before embarking on any road trip, any leaks originating from the valve stems should never be ignored, as tire pressure can gradually drop while driving.
Compared to the costs and risks associated with a tire-related issue on the highway, replacing a worn valve stem is typically a far more economical option.
Regular inspections ensure that your tire pressure remains at the correct level throughout your entire journey.
How to Check the Condition of the Spare Tire
People often overlook the spare tire because it remains hidden in the trunk or tucked away underneath the vehicle; however, it can prove to be absolutely essential during a long journey.
Many drivers inspect their four main tires but forget about the spare until one of the tires currently in use suffers a puncture.
In such a predicament, a damaged or underinflated spare tire can leave the vehicle stranded right in the middle of the road.
Spare tires also age over time, lose air pressure, and deteriorate, even if they have never been used.
As they are typically stored for extended periods, they may actually be older than the tires currently in use on the road.
Before setting out on a trip, checking the spare tire is just as important as checking the main tires, as it may be your only safe option in the event of a puncture.
1. Why Many Spare Tires Are Overlooked
Spare tires are often overlooked simply because they are used so infrequently.
As they remain hidden beneath a cover or stored inside the trunk, many drivers assume they are always ready for immediate use.
In reality, spare tires can lose air pressure over time, just like regular tires.
Fluctuations in temperature, aging rubber, and minor leaks can render them useless.
Some smaller, temporary spare tires require higher air pressure than standard tires, meaning they can become unsafe if not checked regularly.
A spare tire that hasn’t been checked in years may fail at the very moment it is needed most.
Therefore, before embarking on any journey, you should always include it in your regular tire inspection checklist.
2. Checking Spare Tire Pressure
Spare tire pressure should be checked using a tire gauge, rather than simply by pressing on it with your hand.
A spare tire may appear fine at first glance, but it might lack sufficient air pressure for safe use.
Many temporary spare tires require significantly higher pressure than standard tires, often around 60 PSI, whereas full-size spare tires typically adhere to the vehicle manufacturer’s standard recommendations.
Information regarding the correct pressure can usually be found on the tire’s sidewall or in the vehicle’s owner’s manual.
As spare tires are often stored for extended periods, they can gradually lose air pressure without anyone noticing.
Checking the pressure before embarking on a trip ensures that, should one of the main tires fail, the spare tire is ready to support the vehicle’s weight.
3. Checking the Spare Tire’s Tread and Condition
The spare tire should also be inspected for the condition of its tread, its age, and any visible defects.
After sitting unused for years, the spare tire’s sidewalls may develop cracks, the rubber may dry out and deteriorate, or flat spots may form on its surface.
The tread (the tire’s contact surface) may look new because it has never been driven on the road; however, the rubber itself may be old and unsafe.
Check for any cuts, bulges, cracks, or signs of dryness.
It is also essential to check the wheel for any rust or damage.
A spare tire that appears unused is not necessarily safe, specially if it is several years old.
The age of the tire matters, even if the spare has never touched the road.
4. Ensuring the Availability of a Jack and Lug Tools
A spare tire is only useful if the necessary tools to install it are available and in proper working order.
Before setting out on a trip, you should check for the presence and condition of the jack, lug wrench, and any locking wheel nut keys.
These tools are often misplaced or left behind following previous repairs.
The jack must function properly and be free of any defects or rust that could hinder its operation.
The lug wrench should fit securely onto the wheel nuts.
When changing a tire on the roadside, the absence of these tools can make it impossible to install an otherwise functional spare tire.
Checking these items before embarking on a journey saves time and helps you avoid getting stranded in the middle of a long trip.
Read More:
How to Check the Condition of Wheels and Lug Nuts
Tire safety involves more than just the rubber and the tread (the tire’s surface).
The wheels and lug nuts are equally critical, as they securely fasten the tires to the vehicle.
Even if the tires themselves are in excellent condition, damaged wheels or loose lug nuts can lead to serious issues during a long journey.
Wheels bear the vehicle’s weight, absorb road shocks, and withstand the constant stress of rotation, while lug nuts firmly anchor the wheels to the hub.
If any of these components are loose or damaged, the vehicle may experience vibrations, become difficult to handle, or become unsafe, particularly at high speeds on a highway.
Checking the condition of the wheels and lug nuts before a trip helps prevent problems that might otherwise go unnoticed during routine driving.
1. Check for Loose Lug Nuts
Lug nuts attach the wheels to the vehicle and must remain tight at all times.
If a lug nut becomes loose, the wheel may wobble slightly while the vehicle is in motion.
This can result in vibrations, knocking sounds, or an unusual sensation in the steering.
In severe cases, multiple loose lug nuts can cause a wheel to detach completely from the vehicle.
Sometimes, lug nuts may remain loose following recent tire servicing if they were not tightened properly.
Additionally, if they were not installed correctly, they may gradually loosen as the vehicle is driven.
Before embarking on a long journey, ensure that all lug nuts are securely tightened, specially if the wheels have recently been removed for tire repairs or rotation.
2. Signs of Wheel Damage
Wheels can sustain damage from potholes, striking curbs, road debris, or severe impacts.
Wheel damage may manifest as bending, cracking, denting, or any visible distortion around the rim.
A bent wheel may still hold air, but at high speeds, it can induce vibrations.
Cracks are more serious, as they can compromise the structural integrity of the wheel and worsen over time.
Scratches are typically superficial; however, deep gouges near the rim could indicate underlying structural damage caused by an impact.
If a wheel appears bent, or if the steering wheel vibrates while driving, the wheel should be inspected.
Wheel-related issues often become more apparent during long highway journeys, as high speeds place increased stress on damaged components.
3. The Importance of Proper Torque
Proper torque ensures that the lug nuts are tightened to the specific specifications recommended by the vehicle manufacturer.
If they are too loose, the wheel may shift slightly, potentially damaging the studs.
Conversely, if they are overtightened, the studs, or the wheel itself, may become damaged, making it extremely difficult to remove the wheel in the event of a roadside emergency.
Proper torque distributes the clamping force evenly across the wheel, ensuring that it remains centered, stable, and secure.
This is particularly crucial after changing a tire or servicing a wheel.
Many wheel-related problems arise because lug nuts are often tightened unevenly, frequently with excessive force, rather than in strict accordance with the proper guidelines.
4. When to Get a Professional Wheel Inspection
Some wheel-related issues, particularly minor alignment or balancing problems, are difficult to detect with the naked eye.
If the vehicle shakes at highway speeds, pulls to one side, or causes vibrations in the steering wheel, the wheels should be inspected by a professional.
A tire shop can use specialized tools to check for wheel balance, rim damage, and proper torque.
It is also advisable to get a professional inspection if the car has recently hit a large pothole or curb.
Minor wheel damage may not seem serious when driving short distances within the city, but it can become much more apparent, and potentially unsafe, during long-distance travel.
How to Check for Vibrations or Pulling
By driving your vehicle for a short while (taking a test drive) before embarking on a long journey, you can detect tire or wheel issues that are not easily visible when the vehicle is stationary.
While tires may appear normal when the vehicle is parked, internal defects, poor balancing, or alignment issues often only manifest when the vehicle is in motion.
Driving briefly at both typical city speeds and higher highway speeds can help you identify early warning signs.
If the steering feels unusual, the vehicle shakes, or it pulls to one side, you must have these symptoms investigated before beginning your trip.
A short “road test” is often the easiest way to identify problems that might otherwise be missed during a visual-only inspection.
1. Signs to Look for During a Pre-Trip Test Drive
When driven for a short period, the vehicle should feel stable, smooth, and reliable.
The steering wheel should remain steady, and the vehicle should track straight on a level road without requiring constant steering corrections.
Any vibration, pulling, or unusual noise could indicate tire issues, wheel imbalance, or suspension faults.
These signs may become more pronounced at higher speeds; therefore, taking a brief test drive on a highway before a long journey can be highly beneficial.
Identifying these symptoms early on can help prevent major problems down the road, specially when the vehicle is fully loaded and traveling for many hours.
2. Steering Wheel Vibration
Vibration in the steering wheel is a common indication that one or more tires are unbalanced, unevenly worn, or suffering from an internal defect.
This vibration may begin at a specific speed and intensify as the vehicle’s speed increases.
In many cases, this vibration signals that the tire is no longer rotating uniformly.
This uneven wear can be caused by bent wheels or cracks within the tire’s internal structure.
While a slight vibration might seem minor when driving within the city, it can become fatiguing and unsafe during long-distance travel.
If the steering wheel is vibrating more than usual, you should definitely have your tires and wheels inspected before embarking on a journey.
3. The Vehicle Pulling to the Left or Right
If your vehicle pulls to one side while driving on a straight road, it could indicate uneven tire pressure, irregularities in the tire tread (wear patterns), or alignment issues.
A vehicle in good condition should travel in a straight line when the steering wheel is held normally.
If the vehicle is pulling to one side, it may mean that one of the tires is experiencing excessive rolling resistance (friction), or that there is a fault in the wheel alignment.
This can lead to premature tire wear and make it difficult to maintain control of the vehicle while braking.
During long journeys, this issue of the vehicle pulling to one side can also cause increased driver fatigue, as the driver is forced to constantly make steering corrections.
This symptom should not be ignored before traveling on the highway.
4. Strange Sounds Coming from the Road
When something is amiss, tires can emit warning sounds.
A humming, thumping, or rhythmic noise often points to uneven tire tread wear, “cupping” (the formation of depressions), or a defect within the tire’s internal structure.
An abnormally worn tire may generate louder noises at highway speeds compared to normal city driving speeds.
This sound could also originate from a faulty wheel or a tire that has become unbalanced.
While road noise naturally varies depending on the road surface, any sudden change in sound, or the recurrence of a specific noise, could signal an underlying mechanical issue.
Paying close attention to these sounds during a short test drive can help identify problems that might not be easily detectable through visual inspection alone.
5. When to Postpone a Trip for Repairs
If the vehicle shakes violently, pulls to one side, or emits strange noises from the tires during a test drive, it is safer to have the issue inspected before embarking on a long journey.
Minor issues can escalate into serious problems after several hours of driving, particularly in hot weather or when the vehicle is heavily loaded.
Tire-related issues that may seem trivial during a short drive can, as speed and heat increase, lead to rapid tire wear, loss of vehicle control, or a breakdown on the road.
Postponing a trip for repairs may seem inconvenient, but doing so often prevents major damage and ensures your safety throughout the entire journey.
Understand, When to Replace Tires Before a Trip
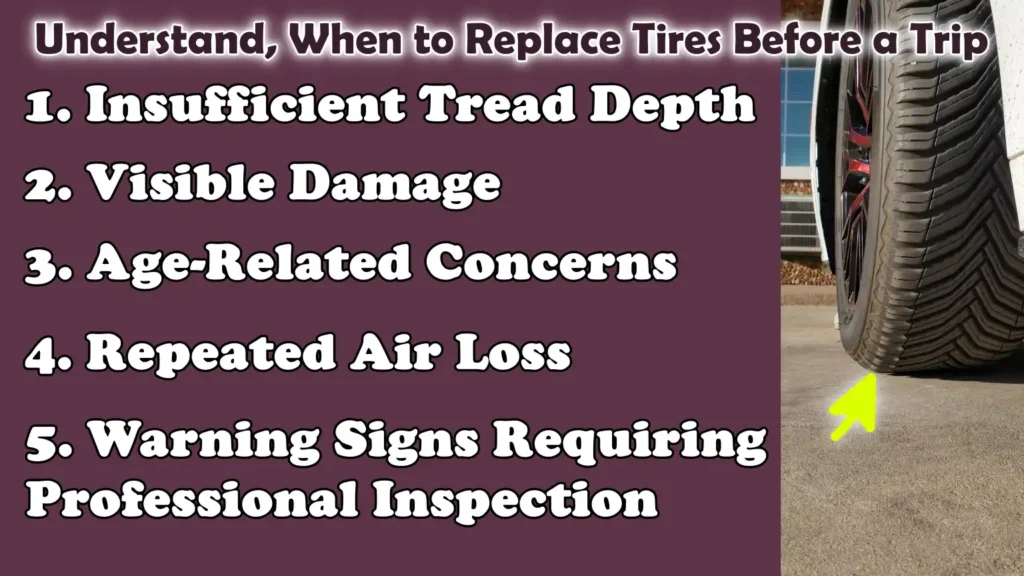
Replacing tires before a long journey is a safer option than attempting to squeeze a few more months of use out of worn or damaged tires.
During a long drive, tires are subjected to constant heat, high speeds, and heavy loads; consequently, even a minor issue can escalate into a major failure.
Even if everything seems fine while driving within the city, compromised tires can fail when subjected to hours of continuous driving on the highway.
Replacing tires before a trip may seem expensive, but it often proves to be far cheaper than dealing with issues such as a tire blowout, a roadside breakdown, or losing control of the vehicle during the journey.
If you have any doubts regarding the condition of your tires, paying attention to specific warning signs can help you determine whether replacing them is, in fact, the safer course of action.
1. Insufficient Tread Depth
One of the most common reasons for replacing tires before a trip is insufficient tread depth.
The tread provides the necessary grip for braking, cornering, and displacing water from the road surface during rainy weather.
As the tread wears down, braking distances increase and grip diminishes, particularly on wet roads.
Even if the tire technically still meets minimum legal tread requirements, it may not be suitable for a long-distance road trip.
Many drivers choose to replace their tires proactively, recognizing that high highway speeds and changing weather conditions demand superior grip.
If the tread inside the main grooves appears shallow, or if the “wear bars” (tread-wear indicators) have become nearly flush with the tread surface, replacing the tires before your trip is the safer option.
2. Visible Damage
Visible damage can also render a tire unsafe, even if the tread itself appears to be in good condition.
Cracks, bulges, deep cuts, or punctures can compromise the structural integrity of a tire and significantly increase the risk of sudden tire failure.
Bulges are particularly serious because they often indicate that the tire’s internal structure has been damaged, typically due to an impact with an object.
Cracks in the tire’s sidewall, or the drying out and deterioration of the rubber, also diminish its structural strength over time.
Even if a tire appears fully inflated while the vehicle is stationary, it may fail under the combined stress of highway heat and the vehicle’s weight.
Any visible tire damage should be taken seriously before embarking on a long journey, as the continuous stress of driving can cause weakened areas to deteriorate rapidly.
3. Age-Related Concerns
Tires can become unsafe simply due to their age, even if they still retain sufficient tread depth.
As rubber ages, it hardens and loses its elasticity.
Exposure to heat, sunlight, and prolonged periods of vehicle inactivity accelerate this aging process.
Older tires carry a higher risk of cracking, internal separation, or loss of traction, as the rubber no longer performs as it would in a new tire.
Many experts recommend having tires inspected carefully after six years and, depending on their condition, replacing them once they reach approximately ten years of age.
If the tires are old and the journey involves covering long distances on the highway, replacing the tires may be the safest option, even if their tread still appears to be in good condition.
4. Repeated Air Loss
Before embarking on any long journey, it is absolutely essential to have a tire inspected if it is repeatedly losing air.
Repeated loss of air pressure often signals a puncture, a leak from the valve stem, a rim-sealing issue, or some form of hidden internal damage.
During highway travel, a gradual loss of air can pose a significant hazard, as the heat generated by driving exacerbates pressure fluctuations and can inflict further damage upon compromised components.
Repeatedly reinflating a tire without identifying the root cause of the problem is risky, as the issue typically tends to worsen over time.
If a tire requires frequent reinflation, it should be repaired or replaced before embarking on a long journey.
5. Warning Signs Requiring Professional Inspection
Often, the safest course of action can only be determined following a professional inspection of the tires.
If a technician observes uneven tread wear, internal damage, weakened sidewalls, or excessive tire age, their recommendations should be taken seriously before setting out on a trip.
Certain tire-related issues cannot be easily detected without removing the wheel or utilizing specialized tools.
If the vehicle vibrates, pulls to one side, or if the tires emit unusual noises, a professional inspection can reveal whether a tire replacement is necessary.
Long-distance journeys place increased stress on every tire; therefore, when safety is the utmost priority, warning signs identified during a professional inspection should never be ignored.
Know, The Final Tire Checklist Before Departure
Conducting a final inspection of your tires before setting out on a journey is your last opportunity to catch any issues before they escalate into major problems on the road.
Even if the tires have been checked previously, conditions can change overnight due to temperature fluctuations, slow leaks, or the loading of heavy cargo.
A thorough final check helps ensure that every tire is prepared to handle high highway speeds, prolonged driving periods, and the increased weight of the vehicle.
It also offers peace of mind, as many tire-related issues can be easily prevented by simply investing a few extra minutes to inspect the tires before departure.
1. Pressure Check
Tire pressure should be checked one last time before the journey begins, specially if luggage or passengers have been loaded into the vehicle as the last check.
Additional passengers and cargo increase the vehicle’s weight, thereby placing greater stress on the tires.
The tire pressure should match the PSI recommended by the vehicle manufacturer, rather than the maximum pressure listed on the tire’s sidewall.
Even a slight discrepancy in pressure can impact the vehicle’s handling, fuel efficiency, and tire temperature while driving on the highway.
Verifying the correct pressure ensures that the tires can adequately support the load and minimizes the risk of overheating.
2. Tread Check
A quick inspection of the tire tread (the pattern on the surface) helps ensure that the tires possess sufficient grip for braking, cornering, and driving on wet roads.
The tire tread should appear uniform across the entire surface and should not be worn down too close to the ‘wear bars’ (indicators of excessive wear).
If the tread on a single tire appears significantly shallower compared to the others, that tire may wear out faster than the rest during the journey.
Tread depth is particularly critical when driving on highways during rainy weather, as shallow grooves are unable to effectively channel water away.
A final visual inspection of the tread ensures that the tires can safely handle changing road conditions.
3. Check for Any Damage
Before setting out on a trip, you should always perform a final visual inspection of the tires to check for any visible damage.
This includes checking for cracks, cuts, punctures, bulges, and any objects lodged within the tread.
Small objects, such as nails, may not cause an immediate blowout, but they can lead to a slow leak later on.
Damage to the tire’s sidewall (the side section) should be taken very seriously, as it often cannot be safely repaired.
A close examination of each tire can reveal issues that may have been overlooked during previous inspections.
Spending just a few minutes on this check can help prevent the dangerous hazard of a tire failure while traveling.
4. Keep the Spare Tire Ready
In addition to the main tires, the spare tire (extra tire) should also be inspected, as it may be needed unexpectedly at any moment.
Use a gauge to check the air pressure, and inspect the tire for age, cracks, and any visible damage.
Many spare tires sit unchecked for years, rendering them unreliable when they are finally needed.
A spare tire that is underinflated or damaged is virtually useless in a roadside emergency.
Ensuring that it is ready before embarking on a journey provides an essential backup for long-distance travel.
5. Pack Essential Tools
A spare tire is only useful if all the necessary tools are present and in proper working order.
Before setting out on a trip, you should check for the presence of a jack, a lug wrench, and the wheel lock key.
These tools sometimes go missing after maintenance or are accidentally left behind in another vehicle.
It is also helpful to know exactly where they are stored and to ensure they remain easily accessible, even if the vehicle is fully loaded with luggage.
The absence of just a single tool can turn a minor issue such as: a flat tire, into a major setback, particularly in remote areas.
6. Conduct a Short Road Test
Performing a brief road test after loading the vehicle with luggage is a prudent final step.
This can help detect vibrations, pulling to one side, or unusual noises emanating from the tires, issues that might not be apparent while the vehicle is stationary.
The addition of extra cargo alters the load placed on the tires, and pre-existing problems may manifest more clearly as a result.
While driving, the vehicle should feel stable, smooth, and track in a straight line.
If anything feels amiss, it is best to re-inspect everything thoroughly before embarking on the full journey.
A short test drive often reveals issues that cannot be detected through a visual inspection alone.
Know, Tire Care Tips for During the Journey
Tire care should be an ongoing process throughout the entire journey, rather than something that ends the moment you start driving.
Long-distance driving generates continuous heat, places increased stress on the tires, and exposes them to a variety of road conditions.
A tire that appeared to be in perfect condition before setting out on a trip could still develop issues just a few hours later on the road.
Conducting regular checks during stops helps detect pressure loss, damage, or abnormal wear before the problem becomes severe.
Taking a few minutes during breaks can enhance safety and reduce the likelihood of getting stranded far from assistance.
1. Re-check Tire Pressure While Refueling
Checking the condition of your tires while refueling is the ideal time to do so, as the vehicle is already stationary.
Although checking the pressure of hot tires will not yield an accurate “cold reading” (the reading taken when the tires are cool), it can still help identify potential issues, particularly if one tire appears significantly underinflated compared to the others.
Any noticeable drop in pressure could signal a slow leak, a puncture, or a valve issue.
A visual inspection of each tire by walking around the vehicle can also reveal any irregularities.
If one tire appears softer than the rest, it should be inspected immediately.
Periodic checks are specially beneficial during long-distance journeys.
2. Monitor Pressure Fluctuations Caused by Heat
As tires heat up during driving, their internal pressure naturally increases because the air inside them expands.
This is a normal phenomenon and typically results in the pressure reading rising by a few PSI.
Drivers should not bleed air from hot tires unless specifically advised to do so by the vehicle manufacturer, as the pressure could drop to dangerously low levels once the tires cool down.
However, excessive heat can also expose underlying issues within the tires.
If one tire becomes significantly hotter than the others or appears unusually distended, it may have sustained internal damage or be suffering from low air pressure.
In fact, heat is one of the primary causes of tire failure during long highway journeys.
3. Inspect Tires After Driving on Rough Roads
It is a prudent step to re-inspect your tires after driving on rough roads, over potholes, on gravel, or through construction zones.
Severe impacts can damage a tire’s sidewall, warp a wheel, or cause a hidden puncture.
Even if everything appears normal immediately after driving, the tire may still harbor issues such as cuts, bulges, or gradual air loss.
Poor road conditions can also slightly disrupt wheel alignment, leading to uneven tire wear.
Conducting a cursory inspection of your tires following such situations allows you to identify problems that could potentially escalate into more serious issues later in your journey.
4. Recognize Signs of Emerging Problems
Subtle changes in a vehicle’s handling while driving often manifest before a major tire issue becomes apparent.
Vibrations in the steering wheel, the vehicle pulling to one side, increased road noise, or sudden changes in handling characteristics, all of these can serve as warning signs.
A tire that is slowly losing air may cause the vehicle to feel less stable even before the tire pressure warning light illuminates.
Uneven tire wear can produce a buzzing or heavy sound, which often becomes even more pronounced at higher speeds.
Paying attention to these signs allows you to identify potential issues in a timely manner.
If you notice anything unusual while driving, the safest course of action is often to stop and inspect your tires before proceeding further.
Conclusion – How to Inspect Tires Before Long Trip
Actually, tires carries the full weight of every mile, that’s why even small inspection steps before travel that can prevent the major problems later on.
High speeds on the highway, sustained heat, the added weight of passengers and luggage, and varying road conditions, all these factors combine to exert continuous pressure on the tires for hours on end.
Consequently, tires that seem perfectly adequate for city driving can rapidly develop serious issues during long-distance travel.
Low tire pressure, uneven tread wear, aged rubber, hidden damage to the sidewalls, or a compromised spare tire, these issues may not appear particularly serious before the journey begins; however, when the vehicle is fully loaded and traveling at high speeds, these very problems can become life-threatening.
Tire-related issues often provide early warning signs; yet, these signals are only useful if they are identified and addressed before the journey commences.
Inspecting your tires prior to a long trip is not merely a routine maintenance task; it is the most direct and effective way to enhance safety, conserve fuel, and ensure driving reliability.
Checking tire pressure, tread depth, tire age, sidewall integrity, the readiness of the spare tire, and the overall condition of the tires provides you with a comprehensive assessment of whether your vehicle is truly prepared for a long-distance journey.
These checks also help prevent common on-road hazards such as: tire blowouts, punctures, handling difficulties, and sudden air loss.
So, that’s all about this guide on How to Inspect Tires Before Long Trip, also you can ask related questions below.
Frequently Asked Questions
FAQ 1: How often should you check your tires before embarking on a long journey?
Answer: You should check your tires every single time before setting out on a long journey, even if the vehicle has recently undergone servicing. Tire condition can deteriorate rapidly due to weather, poor road conditions, or a natural loss of air pressure. Tire pressure can drop overnight, or daily driving may cause a defect that is not immediately apparent. For long-distance travel, it is best to check your tires at least one day before your departure, and perform one final, quick check on the day of the trip. This gives you ample time to rectify any issues before you set off.
FAQ 2: What is the safest tread depth for tires for a long road trip?
Answer: In many places, the legal minimum limit for tire tread depth is set at 2/32 of an inch; however, this is merely the legal minimum, not the safest standard for travel. For long journeys, many drivers replace their tires when the tread depth reaches approximately 4/32 of an inch, specially if rain is anticipated. Deeper tread helps displace water from the road surface and improves braking performance. Shallow tread depth increases stopping distances and can heighten the risk of “hydroplaning” (tires skidding on wet roads) while driving on the highway.
FAQ 3: Can old tires be unsafe, even if their tread appears to be in good condition?
Answer: Yes, it is entirely possible for a tire’s tread to look good while, in reality, the tire is unsafe due to its age. Over time, the rubber hardens and begins to degrade, even if the vehicle has not been driven extensively. Sunlight, heat, and prolonged periods of inactivity accelerate the tire aging process. Old tires can develop cracks or suffer damage to their internal structure, even if their tread still appears to be in perfect condition. Therefore, simply inspecting the tread is not sufficient; it is also essential to check the tire’s date of manufacture.
FAQ 4: How can you determine if a tire has become too old to be safely driven on the road?
Answer: The best way to determine this is to check the DOT date code printed on the tire’s sidewall. The last four digits of this code indicate the specific week and year in which the tire was manufactured. Many experts recommend that tires be carefully inspected after approximately six years and, depending on their condition, be replaced once they reach ten years of age. If cracks are visible in the tire, if the rubber has hardened, or if it shows signs of “dry rot” (damage caused by drying out), it may need to be replaced even sooner. Tire age becomes particularly critical during long journeys, as the heat generated by highway driving places significant additional stress on older tires.
FAQ 5: Should you check tire pressure when the tires are cold?
Answer: Yes, to obtain the most accurate reading, tire pressure should always be checked when the tires are cold. “Cold” implies that the vehicle has been stationary for several hours and has not been driven recently. Driving causes tires to heat up, which results in an elevated pressure reading. If tire pressure is checked while the tires are hot, the reading may appear normal, even if the actual air level is slightly low. This can result in the tires being inflated to an incorrect pressure level before embarking on a journey.
References:
[1] An Objective Analysis of the Effect of Tire Tread Depth on Crash Causation and Wet Road Vehicle Dynamics
https://saemobilus.sae.org/articles/objective-analysis-effect-tire-tread-depth-crash-causation-wet-road-vehicle-dynamics-2013-01-0701

Hello Folks, Dean Shali here to help you out to solve the problems with your lovely vehicle, as i have lots of experience and knowledge about automotive industry as i woks directly with the customers and repair vehicles and i love to help the people to keep their cars safe and running smoothly.