Written By: Dean Shali
Fact Checked By: Sabré Cook
Reviewed By: Tamara Warren
Yes, there’s tiny switch under your brake pedal that literally controls one of the most important safety signals your car sends every second you drive to others behind you.
And, when you brake then it is really important to tell others that is driving behind you, so your vehicle does this by illuminating the brake lights behind your vehicle that gives clear signals that you are slowing down and that’s how it helps you to prevent rear-end collisions.
But, if the brake light switch is faulty then it puts you at risk, as they can be on even when you are not pressing that brake pedal or just won’t on the brake lights even when you press that damn brake.
Along with this, your brake lights might stay on all the night and drain your battery or they might not turn on at all when you press the pedal as well.
Moreover, in some of the vehicles: this signal switch also controls the systems such as: cruise control and gear shifting that means one small fault can affect multiple functions at once.
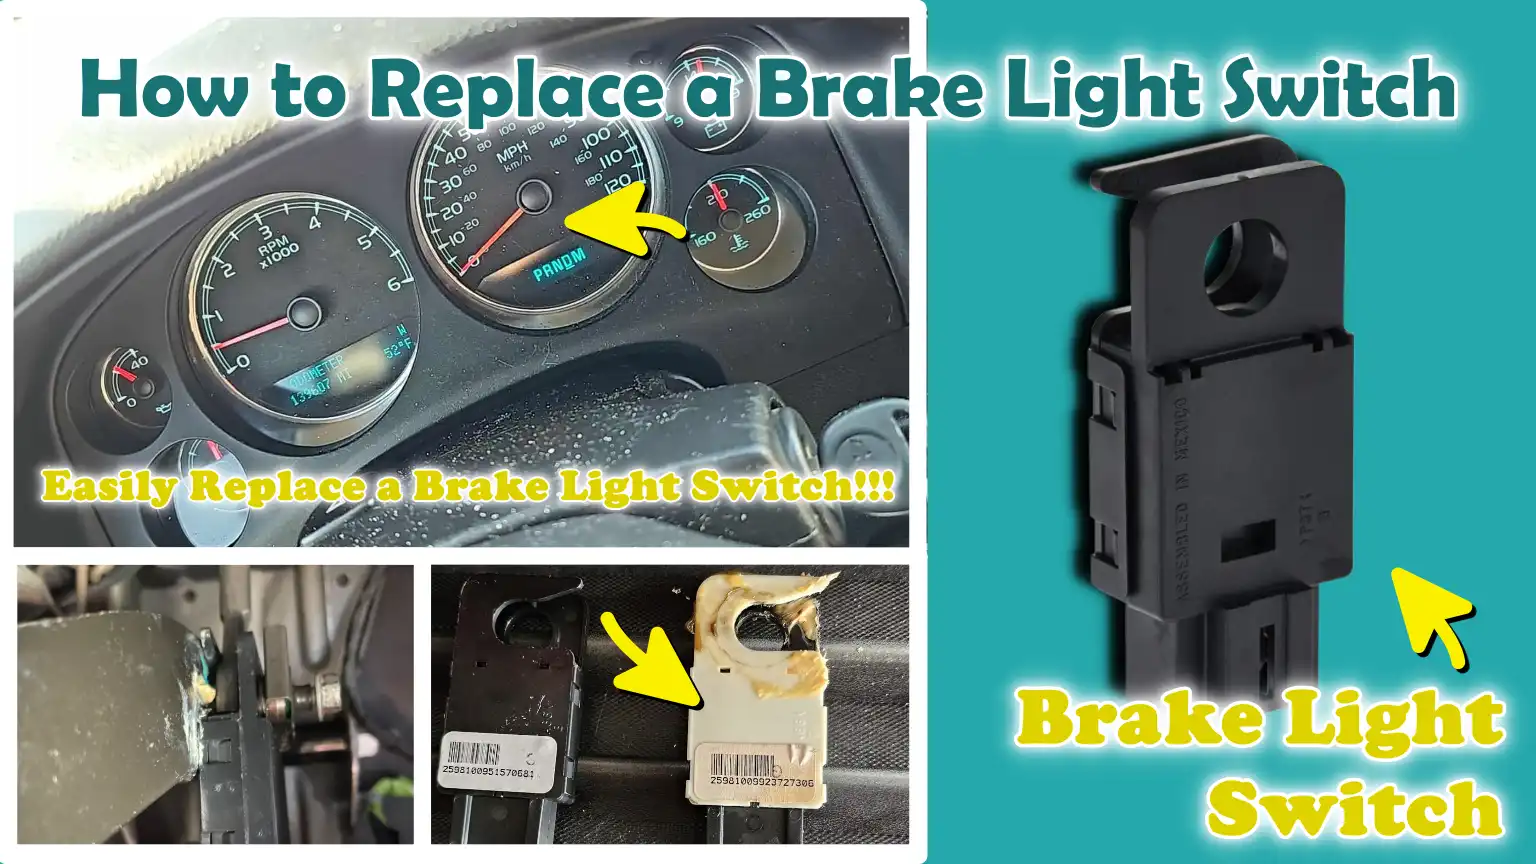
Which is why, we have come up with this guide about How to Replace a Brake Light Switch so that you can replace that faulty one and install the brake light switch in perfect way.
Know, The Signs of a Faulty Brake Light Switch
Although the brake light switch is a small component, it plays a direct role in safety, vehicle control and communication with other drivers.
When it begins to fail, its symptoms are usually easy to identify, provided you know what to look for.
This switch activates the moment you press the brake pedal; it immediately illuminates the brake lights while simultaneously sending signals to other systems, such as cruise control and transmission control.
As it is both an electrical and mechanical component, it can fail in several ways such as: sticking, wearing out internally, or becoming misaligned with the brake pedal.
Recognizing these signs in a timely manner helps prevent accidents, saves the battery from draining and stops minor malfunctions from escalating into major electrical problems.
1. Brake Lights Remain Constantly Illuminated
When the brake lights remain lit at all times, even when you are not pressing the brake pedal, it usually indicates that the switch has become stuck in the “on” position or has shifted out of alignment with the brake pedal.
This can occur due to wear and tear over time, a broken internal spring, or improper installation of the switch following a repair.
This issue is far more serious than it might appear; it can completely drain your car’s battery overnight and confuse drivers following behind you, leading them to believe you are slowing down when, in reality, you are not.
In some cases, if the lights remain illuminated for an extended period, heat can also build up inside the light housing.
Promptly repairing the switch restores the vehicle’s normal functionality and eliminates unnecessary strain on the electrical system.
2. Brake Lights Do Not Illuminate
If your brake lights fail to light up when you press the brake pedal, the switch may have completely failed, or its electrical connection may have been severed.
This is one of the most dangerous symptoms, as it provides no warning to drivers following behind you that you are slowing down or coming to a stop.
In real-world driving situations, even a slight delay in reaction time significantly increases the risk of a rear-end collision.
The primary causes of this issue may include worn-out internal contacts within the switch, a broken connector, or the switch becoming dislodged from its position, preventing it from activating even when the brake pedal is depressed.
Having the switch inspected and replaced ensures that your brake lights function instantly, a critical prerequisite for safe driving.
3. Cruise Control Malfunction
In many modern vehicles, the brake light switch is directly linked to the cruise control system.
When you press the brake pedal, the switch sends a signal to the system, disengaging the cruise control for safety reasons.
If the switch is faulty, it may transmit incorrect signals, causing the cruise control to cease functioning entirely or to behave erratically.
This often confuses drivers; they may assume the problem lies within the cruise control system itself, whereas the actual issue resides with the switch.
Replacing a defective switch restores the functionality of the cruise control system and helps avoid unnecessary diagnostic procedures.
4. Stuck Gear Selector – In Automatic Cars
In automatic vehicles, the brake light switch often serves as a safety interlock mechanism.
This system prevents you from shifting the gear selector out of the ‘Park’ position unless you simultaneously depress the brake pedal.
If this switch fails, the system is unable to detect that you are applying the brakes.
Consequently, the gear selector may become stuck in place.
As a result, you may be unable to shift the vehicle into gear, even if everything appears to be functioning correctly at first glance.
Although some vehicles feature a manual override option to address this issue, relying solely on it is not a definitive solution.
Repairing or replacing the brake light switch restores normal gear-shifting functionality and ensures that safety systems operate exactly as intended.
5. Dashboard Warning Lights
A faulty brake light switch can also trigger warning lights on the dashboard, particularly in vehicles equipped with modern electronic systems.
These warnings may include alerts related to the brake system, traction control warnings, or general malfunction indicators.
This occurs because modern vehicles rely on precise signals transmitted by the switch to regulate various interconnected systems.
When the signal received from the switch is incorrect or absent, the vehicle’s system interprets this as a malfunction.
If the switch is not checked first, these warning lights can sometimes lead to a misdiagnosis of the actual underlying problem.
Replacing a faulty switch often extinguishes these warning lights and restores proper synchronization among the vehicle’s various systems.
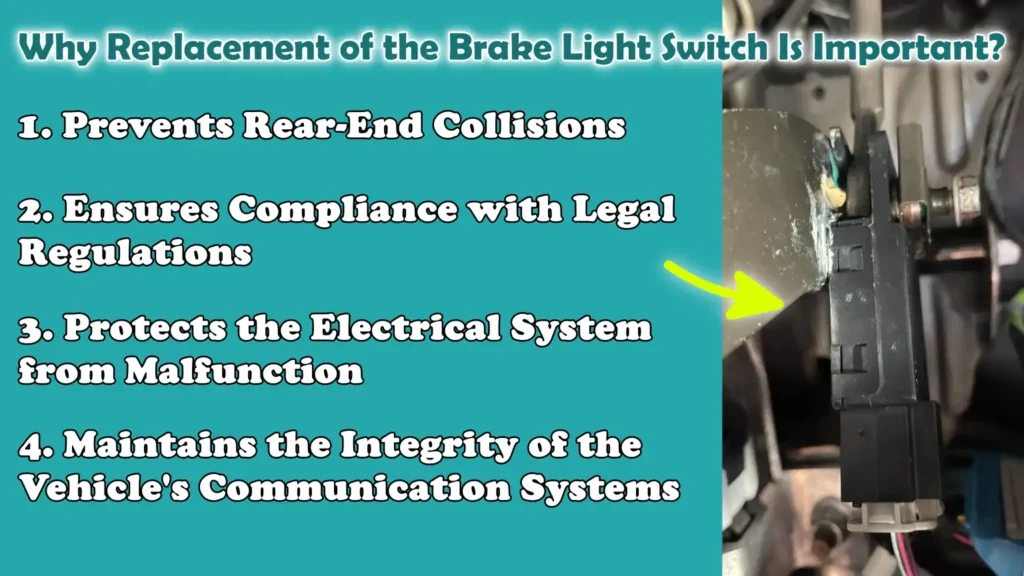
Why Replacement of the Brake Light Switch Is Important?
The brake light switch is a small component, yet it directly impacts how safely your vehicle interacts with other traffic on the road and how various internal vehicle systems function.
When operating correctly, it instantly illuminates your brake lights the moment you depress the brake pedal; this provides a clear signal to other drivers as well as to the vehicle’s internal control systems.
When it malfunctions, this timing becomes erratic or ceases entirely, potentially creating safety hazards, legal complications and hidden electrical issues.
Timely replacement of a faulty switch ensures the reliability of braking signals, prevents undue strain on electrical components and guarantees that the vehicle’s various systems continue to work in concert exactly as they were designed to do.
1. Prevents Rear-End Collisions
One of the most critical reasons for replacing a faulty brake light switch is to mitigate the risk of rear-end collisions.
Brake lights serve as the primary means by which your vehicle signals to others that you are slowing down or coming to a stop; even a slight delay in this signal can result in a corresponding delay in the reaction time of the driver following you.
If the lights fail to illuminate at all, the danger is significantly heightened due to the absence of any warning.
Conversely, if the lights remain constantly illuminated, drivers behind you may become confused and fail to react in time when you actually apply the brakes.
A properly functioning switch ensures that your brake lights illuminate instantly and accurately whenever you depress the brake pedal, thereby providing other drivers with the necessary time to react safely.
2. Ensures Compliance with Legal Regulations
In most jurisdictions, properly functioning brake lights are a fundamental legal requirement, as they are critical for road safety.
Driving with defective brake lights can lead to complications such as fines, failure during vehicle inspections, or even having your vehicle declared unsafe to operate.
Law enforcement agencies and vehicle inspection systems regard the proper functioning of brake lights as a standard safety check.
Replacing a faulty brake light switch ensures that your vehicle meets these legal requirements and helps you avoid unnecessary penalties.
It also provides you with the assurance that your car is roadworthy and safe for daily driving.
3. Protects the Electrical System from Malfunction
A failing brake light switch can trigger a chain reaction of electrical issues that extend far beyond just the lights themselves.
For instance, if the switch gets stuck in the “on” position, it can continuously supply power to the brake lights; over time, this can drain the battery and place undue strain on the vehicle’s electrical system.
In other cases, erratic or intermittent signals from a faulty switch can disrupt voltage flow, potentially accelerating wear and tear on the wiring or connectors.
Replacing the switch in a timely manner prevents these issues from escalating, thereby keeping the electrical system stable and efficient.
4. Maintains the Integrity of the Vehicle’s Communication Systems
Modern vehicles rely on precise signals from the brake light switch to control a number of critical systems, not merely the lights.
These systems may include cruise control, transmission shift interlocks and various safety-related features, all of which depend on accurately detecting the exact moment the brake pedal is depressed.
If a switch sends an incorrect or delayed signal, these systems may cease to function properly or begin to behave in unpredictable ways.
Replacing a faulty switch restores proper communication between these systems, ensuring that your vehicle responds exactly as expected across various driving conditions and maintains its overall reliability.
Tools
| Tools | Why It Is Needed | How to Use It |
|---|---|---|
| Replacement Brake Light Switch | This is the primary component that serves as a replacement for a faulty switch. Worn-out or broken switches cannot be effectively repaired; therefore, installing a new switch ensures that the brake lights function correctly and that other vehicle systems receive the appropriate signals. | Ensure that the new switch is compatible with your specific vehicle model to guarantee a proper fit. Carefully install it near the brake pedal assembly, precisely in the location from which the old switch was removed. Verify that it is securely locked or tightened in place and correctly positioned relative to the pedal. |
| Screwdriver Set | In some vehicles, panels or covers located beneath the dashboard obstruct access to the brake light switch. Using a screwdriver, these components can be safely removed without damaging their clips or screws. | Select the correct type and size of screwdriver for the specific screws involved. Turn it gently to avoid stripping the screw heads. Keep all removed screws in a single designated spot so they can be easily reinstalled once the work is complete. |
| Socket Wrench – If Required | In certain vehicles, the brake light switch is secured by a bolt rather than a simple twist-lock mechanism. When loosening or tightening the bolt, a socket wrench provides greater control and requires less physical effort. | Select the appropriate socket size and attach it to the wrench. Turn it anti-clockwise to remove the bolt and clockwise to tighten it. Avoid overtightening, as this could damage the mounting bracket or the new switch itself. |
| Flashlight or Work Light | The brake light switch is located beneath the dashboard, an area that is often dimly lit. With adequate lighting, you can clearly see the switch, the wiring connector and the mounting point. | Position your light source so that it shines directly onto the area around the brake pedal. This helps you identify the switch, prevents damage to the wiring and allows you to install new components correctly without any guesswork. |
| Safety Gloves | When working under the dashboard, your hands are at risk of injury from sharp edges, dust and confined spaces. Gloves protect your skin and improve your grip while handling tools and parts. | Put on gloves before you begin working. Ensure that they fit your hands properly so that you can maintain tactile sensitivity for handling small parts and connectors while you work. This allows you to handle the switch and tools safely and comfortably. |
Understand, Where is the Brake Light Switch Located?
The brake light switch is installed in such a way that whenever you depress the brake pedal, it can directly detect the pedal’s movement.
Because this requires an immediate response, the switch is always positioned in close proximity to the pedal, rather than elsewhere within the vehicle.
In most cars, this location is typically out of sight; consequently, many drivers remain unaware of its existence until a malfunction occurs.
Although the area can be somewhat cramped and situated beneath the dashboard, the switch can usually be replaced without the need to remove any major components.
Having a clear understanding of its precise location and physical configuration makes the replacement process significantly easier, thereby avoiding potential confusion regarding surrounding wiring or other minor parts.
1. Located Near the Brake Pedal
The brake light switch is typically mounted directly adjacent to the brake pedal, a metal lever that articulates when depressed.
The switch is positioned such that, by design, the pedal either actuates (depresses) it or releases it.
When you press the brake pedal, the state of the switch changes, causing the brake lights to illuminate instantly.
This direct physical contact is crucial, as it ensures there is no delay between your action and the signal reaching the brake lights.
Over time, due to this constant mechanical movement, the switch may experience wear or become slightly misaligned; therefore, ensuring the switch is correctly positioned during installation is of paramount importance.
2. Typically Located Beneath the Dashboard
In most vehicles, the brake light switch is situated beneath the dashboard, on the driver’s side, positioned either directly above or behind the brake pedal.
This area is often cramped and poorly lit, making it difficult to visually locate the switch without the aid of a flashlight.
To view this clearly, you may need to slide your seat back or crouch down.
Some vehicles also feature a small panel or cover that must be removed to access the switch.
Although space in this area is often limited, the switch is typically positioned in an easily accessible location so that it can be repaired without having to remove large sections of the dashboard.
3. How to Identify It Visually
The brake light switch is a small component, made of either plastic or metal, to which an electrical connector is attached.
It typically features a plunger or button-like element that remains in contact with the brake pedal.
When the pedal moves, this plunger either retracts inward or extends outward, thereby activating the switch.
You can identify it by looking for a small device connected to wires; this device is mounted on the upper section of the brake pedal assembly.
It is often secured in place using a clip, bracket, or twist-lock mechanism.
Recognizing these external visual cues helps you quickly locate the correct component, ensuring you do not confuse it with other nearby switches or wiring components.
How to Ensure Safety By Taking All the Necessary Precautions Before You Begin
Working on a brake light switch may seem simple, but it involves the electrical system and the brake pedal area, two critical components of your vehicle.
Adopting proper safety measures before you start helps prevent electrical short circuits, sudden vehicle movement and installation errors.
As you will be working in a cramped space beneath the dashboard, proper preparation also minimizes the risk of injury and facilitates the correct completion of the task.
Adhering to these precautions ensures that the repair process is not only successful but also safe from start to finish.
1. Disconnect the Battery
Disconnecting the battery is one of the most crucial steps to take before working on any electrical component of your vehicle.
The brake light switch is directly connected to the electrical system; if the battery remains connected, touching wires or improperly removing connectors could result in a short circuit.
This could also cause electrical systems to suddenly activate while you are working.
To do this safely, turn off the vehicle completely and disconnect the battery’s negative terminal first.
This simple step protects both you and your vehicle’s electrical system from potential damage.
2. Park on Level Ground
Parking your vehicle on a level and stable surface ensures that the vehicle remains balanced and does not shift while you are working.
As you will be working beneath the dashboard, near the pedals, even the slightest movement of the vehicle could cause discomfort or pose a risk of injury.
A level surface also helps maintain the proper alignment of the brake pedal, which is essential when installing and adjusting the new switch.
Although this step may seem obvious, it plays a vital role in maintaining control over the vehicle and ensuring safety throughout the entire repair process.
3. Engage the Parking Brake
Engaging the parking brake adds an extra layer of safety, as it ensures that the vehicle remains firmly anchored in place.
This is particularly crucial because you will be working in close proximity to the brake pedal and even a slight, sudden movement of the vehicle could be hazardous.
The parking brake guarantees that the vehicle will not roll forward or backward, even if the transmission is accidentally shifted or if slight pressure is inadvertently applied to the brake pedal.
Using the parking brake, in conjunction with parking the vehicle on level ground, creates a stable and secure environment for you to work in.
4. Use Proper Lighting
Adequate lighting is essential when working under the dashboard, as visibility in this area is often limited.
The brake light switch is a small component and without clear visibility, it can be difficult to locate or install correctly.
Using a flashlight or a work light allows you to clearly see the switch, the wiring connectors and the mounting location.
Good lighting minimizes the risk of incorrect wiring connections, damaged clips, or improper switch installation.
This enables you to complete your work with greater efficiency and precision.
How to Replace a Brake Light Switch – Ultimate Guide
Replacing a brake light switch is a straightforward task, provided it is performed with care.
However, paying close attention to the details is crucial, as this small component controls a vital safety signal.
The objective is to remove the faulty switch and install a new one in its precise location, ensuring it activates instantly the moment the brake pedal is depressed.
Most switches operate on a simple “on-off” mechanism, triggered by the movement of the pedal.
Therefore, even a minor error in the switch’s alignment or connections can compromise its functionality.
Executing each step in the correct sequence ensures that the brake lights function properly.
Furthermore, this prevents electrical issues and guarantees that other systems such as: cruise control and gear-shifting mechanisms, continue to operate exactly as intended.
1. Access the Brake Pedal Area
To begin, create some working space beneath the dashboard so that you can work comfortably.
Slide the driver’s seat as far back as possible to ensure unobstructed access to the brake pedal assembly.
In some vehicles, a lower dashboard panel or cover may obstruct access to the switch; in such cases, you may need to carefully remove that panel or cover.
This step is critical, as working in a cramped or confined space increases the risk of making errors or struggling to handle small parts.
Having a clear view of the switch, the wiring and its mounting location ensures that you can properly inspect everything before installing the new switch.
2. Locate the Brake Light Switch
The brake light switch is typically mounted near the brake pedal arm.
Generally, this component is situated at the point where the movement of the pedal triggers the switch to turn on or off.
To locate it, look upward along the path of the brake pedal’s travel.
You will notice a small component mounted near the pedal’s ‘pivot point’ (axis of rotation), to which an electrical connector is attached.
Identifying the wiring connector is crucial, as it ensures that you have the correct replacement part.
Additionally, take a moment to observe how the switch is positioned relative to the pedal; doing so will help you install the new switch in the exact same orientation.
3. Disconnect the Electrical Connector
Once you have located the switch, the next step is to disconnect the electrical connector.
Most connectors feature a small ‘locking tab’ that must be depressed before the connector can be pulled free.
Gently press the tab and pull the connector straight out, avoid twisting it or pulling with excessive force.
This minimizes the risk of damaging the connector or the wiring.
Refrain from pulling directly on the wires themselves, as this can loosen internal connections and lead to future electrical issues.
By working with care and steadiness, you can ensure that the connector remains in good condition and is reusable.
4. Remove the Old Switch
The method for removing the switch depends on the specific design of the vehicle.
Some switches utilize a simple twist-lock mechanism, while others are secured by bolts or clips.
If it is a twist-lock type, rotate it in the appropriate direction and gently pull it out.
If it is secured by a bolt, use the correct tool to remove the fastener.
While removing the switch, pay close attention to its exact position and orientation.
This is critical, as the new switch must be installed in precisely the same manner to function correctly.
Noting the exact positioning of the switch relative to the pedal helps prevent alignment-related issues later on.
5. Install the New Brake Light Switch
Take the new brake light switch and install it in the exact location where the old switch was previously mounted.
Carefully align it with the brake pedal so that the plunger or contact point makes proper contact with the pedal.
Insert it into the mounting point and secure it in the same manner, either by twisting it into place or by tightening a bolt.
Correct alignment is crucial, as it determines the precise timing for the brake lights to turn on and off.
If the switch is not positioned correctly, it may activate too early, too late, or not at all.
6. Reconnect the Wiring Harness
After installing the new switch, reconnect the wiring harness.
Firmly push the connector inward until you hear an audible “click.”
This click indicates that the connector has locked into place and is secure.
A loose connection can result in intermittent signals, potentially causing the brake lights to malfunction.
Ensure that the connector is seated properly and does not feel loose or wobble when lightly touched.
A secure connection ensures reliable communication between the switch and the vehicle’s electrical system.
7. Adjust the Brake Light Switch – If Necessary
Some brake light switches require adjustment to ensure the correct spacing is maintained between the switch and the brake pedal.
This spacing is critical, as it determines precisely when the switch activates.
If this gap is too small, the brake lights may remain illuminated continuously.
Conversely, if the gap is too large, the lights may fail to turn on at all when the pedal is depressed.
Adjust the switch according to its specific design specifications to ensure that, during normal pedal movement, it activates at the exact moment required.
Proper adjustment ensures precise timing and reliable performance.
8. Test the Brake Lights
Once everything has been installed and adjusted, reconnect the battery and test the brake lights.
Depress the brake pedal and observe whether the lights illuminate immediately and turn off when the pedal is released.
To verify this, having someone stand behind the vehicle, or observing the reflection of the lights on a nearby surface, as it can be extremely helpful.
Additionally, ensure that no warning lights are illuminated on the dashboard and that all related systems are functioning correctly.
Testing is the final and most critical step; it confirms that the component replacement was performed correctly and that your vehicle is safe to drive.
Know, The Common Mistakes During Replacing Brake Light Switch to Avoid
Replacing a brake light switch may sound simple, but minor errors can lead to serious safety issues or necessitate repeated repairs.
As this component determines when your brake lights illuminate, even a slight mistake can send misleading signals to other drivers or cause malfunctions in related systems, such as cruise control and gear-shifting mechanisms.
Many issues that arise after replacement are not due to a defective new part, but rather stem from improper installation or the oversight of critical details.
Understanding these common mistakes allows you to avoid unnecessary hassle, safeguard your vehicle’s electrical system and ensure that the repair is executed correctly on the very first attempt.
1. Working Without Disconnecting the Battery
One of the most common errors is leaving the battery connected while working on the brake light switch.
As this switch is an integral part of the vehicle’s electrical circuit, keeping the power active increases the risk of a short circuit, particularly if connectors are removed or handled improperly.
This can result in sparks, blown fuses, or damage to sensitive electronic components.
In some instances, it may trigger warning lights or cause system malfunctions.
Disconnecting the battery before commencing work is a simple precautionary measure that mitigates these risks and ensures the safety of both you and your vehicle throughout the entire repair process.
2. Improper Switch Alignment
Proper alignment of the brake light switch with the brake pedal is absolutely critical for its correct operation.
If the switch is not positioned correctly, it may fail to respond accurately to the movement of the pedal.
Consequently, the brake lights may remain illuminated continuously, activate with a significant delay, or fail to light up at all.
This switch relies on precise contact with the brake pedal arm; therefore, even the slightest gap or incorrect angle can adversely affect its operation.
By carefully observing the position of the old switch and ensuring that the new switch is installed in the exact same location, you can guarantee that the brake lights will illuminate at the correct moment and deliver reliable performance.
3. Forgetting to Make Adjustments
After installing certain brake light switches, a final adjustment is required to establish the correct spacing between the switch and the brake pedal.
Skipping this step is a common error that prevents the switch from functioning correctly.
If the switch is positioned too close, the brake lights may remain illuminated even when the pedal has not been depressed.
Conversely, if the switch is positioned too far away, the lights may fail to turn on when needed.
This adjustment ensures that the moment the pedal moves, the switch activates precisely when required.
Verifying and correctly setting this adjustment is crucial for ensuring the safe and accurate operation of the brake lights.
4. Using Mismatched Parts
Using a brake light switch that does not match your vehicle’s specifications can lead to fitting issues and unreliable performance.
Even if the replacement part appears visually identical, differences in design, connector type, or internal mechanisms may prevent it from functioning properly.
This can result in loose mounting, weak electrical connections, or incorrect signal timing.
In some instances, it may even have an adverse effect on other systems connected to the switch.
Always select a part specifically designed for your vehicle model to guarantee a proper fit, optimal performance and long-term durability.
Know, Information About Brake Light Switch Adjustment
The brake light switch must be positioned at the correct distance from the brake pedal so that it activates at the precise moment the pedal is pressed or released.
This small gap determines exactly when the electrical circuit opens and closes, directly influencing when your brake lights turn on and off.
If the switch is not adjusted correctly, the timing of this signal becomes inaccurate, which can confuse other drivers and negatively impact other vehicle systems.
As this switch operates on a simple on/off contact mechanism, even a slight misalignment can compromise its functionality.
Understanding why this adjustment is necessary, and how to perform it correctly, helps ensure that your brake lights function instantly and reliably every time you drive.
And, there’s studies that shows that rear-end collisions are among the most common accidents on the road, as they are account for nearly one-third of all crashes, as well as: the major reason behind these kind of accidents is delayed or missed reaction to braking signals from the vehicle ahead, that’s why it becomes really important to have brake light with clear and timely warnings to other drivers, but if brake light switch fails: then it directly affects this communication and this communication gap between you and whoever behind you gets to the risk of accidents, which is why when you replace that faulty switch then it ensures that your braking signal is immediate and visible to others and that helps other drivers to react appropriately.[¹]
1. Why Adjustment Is Necessary
Proper adjustment ensures that the brake light switch activates at the exact right moment during the pedal’s movement.
When you press the brake pedal, the switch should engage immediately so that the brake lights illuminate without any delay.
Conversely, when you release the pedal, the lights should turn off just as promptly.
This precise timing is crucial, as other drivers rely on your brake lights to react safely.
Furthermore, several vehicle systems depend on this specific signal to function correctly, including cruise control and transmission safety features.
If the switch is positioned too close to or too far from the pedal, it may send an incorrect signal, potentially compromising both safety and system performance.
2. Symptoms of Improper Adjustment
Improper adjustment often manifests through clear and easily identifiable symptoms.
If the switch is set too close to the pedal, the brake lights may remain continuously illuminated, even when you are not applying the brakes.
This can drain the battery and confuse drivers following behind you.
Conversely, if the switch is set too far away, the brake lights may fail to illuminate, or light up with a significant delay, when the pedal is depressed, thereby increasing the risk of an accident.
Other symptoms may include a malfunctioning cruise control system or, in vehicles equipped with automatic transmissions, difficulty shifting out of ‘Park’ mode.
These symptoms typically point to a simple adjustment-related issue rather than a defective switch.
3. Basic Adjustment Procedure
Adjusting the brake light switch involves establishing the correct distance between the switch and the brake pedal arm to ensure that it activates at precisely the right moment.
In most designs, this is accomplished by gently sliding the switch forward or backward within its mounting bracket, or, if the switch features this capability, by adjusting the length of its plunger.
The objective is to ensure that the switch remains fully disengaged when the pedal is in its resting position and activates immediately the moment the pedal is depressed.
Following the adjustment, it is crucial to test the brake lights; to do so, repeatedly press and release the pedal to verify that the lights illuminate and extinguish with the correct timing.
Proper adjustment ensures precise timing, reliable operation and effective communication with other drivers.
Read More:
- How to Diagnose Brake Light Switch Failure
- How to Fix Intermittent ABS Activation
- How to Clean ABS Wheel Speed Sensor
- How to Diagnose ABS Sensor Wiring Issues
- How to Test Electronic Brake Module (EBCM)
- How to Fix Parking Brake Dragging
- How to Adjust Parking Brake Cable
- How to Check Parking Brake Cable Tension
- How to Fix Brakes Dragging While Driving
- How to Diagnose Brake Dragging Issue
- How to Fix Internal Master Cylinder Leak
- How to Test Brake Master Cylinder Pressure
- How to Replace Brake Booster
- How to Fix Brake Booster Vacuum Leak
- How to Test Brake Booster Functionality
- How to Lubricate Brake Caliper Pins Properly
- How to Rebuild Brake Caliper at Home
- How to Check Brake Caliper Piston Movement
- How to Resurface Brake Rotors at Home
- How to Fix Brake Rotor Runout
Know, Estiamted Cost of Replacing a Brake Light Switch
The cost of replacing a brake light switch is typically lower than that of most other car repairs; however, it can vary depending on the vehicle type, the quality of the part and whether you perform the work yourself or hire a professional.
The design of this component is relatively simple, which keeps the cost of the part low and minimizes the time required for the job.
However, in certain vehicles where accessing the switch is difficult, or where post-installation adjustments are required, the total cost may increase slightly.
Having comprehensive information regarding part prices, labor charges and potential savings enables you to make an informed decision and avoid overpaying for a repair that is often quick and straightforward.
1. Average Cost of the Part
The brake light switch itself is typically an inexpensive component, as it is a small electrical device with a very simple function.
In most cases, the cost depends on the vehicle model and whether you choose an Original Equipment Manufacturer (OEM) part or an aftermarket alternative.
Standard switches are generally affordable; however, some modern vehicles may utilize more advanced versions that integrate with multiple vehicle systems, which can result in a slightly higher price point.
Nevertheless, compared to other electrical components, the cost remains relatively low.
Choosing the correct, high-quality part for your vehicle ensures a proper fit and reliable performance, thereby eliminating the need for frequent replacements.
2. Labor Charges – If Performed by a Professional
If you have a professional replace the brake light switch, the labor charge typically depends on the amount of time required to access and install the switch.
As the switch is usually located beneath the dashboard, near the brake pedal, an experienced technician can often complete this task very quickly.
In many cases, this task can be completed in a very short amount of time, resulting in significantly lower labor costs.
However, for certain vehicles, where accessing the switch is more difficult, or where additional panels need to be removed, labor charges may be higher.
If you lack full knowledge of this procedure, or if you wish to ensure that the switch is properly adjusted and tested, seeking the assistance of a professional may prove beneficial.
3. Saving Money Through DIY
Replacing a brake light switch yourself can be an excellent way to save money, as you only have to pay for the cost of the part itself.
This task does not require any specialized tools or complex techniques; therefore, it is an excellent option for those who feel comfortable working in confined spaces.
By following the correct procedures and ensuring that the switch is installed properly, you can achieve excellent results, comparable to those of a professional, without incurring any additional labor charges.
Performing this task yourself also provides you with a better understanding of your vehicle, enabling you to handle similar minor repairs on your own in the future.
When to Go for Professional Mechanic
Replacing a brake light switch is often a straightforward task; however, there are situations where seeking the assistance of an expert is the safer and more practical option.
Modern vehicles feature interconnected electrical systems, meaning that even a minor fault can simultaneously affect multiple components.
If the problem persists after replacing the switch, or if the wiring seems difficult to decipher, continuing to work without the proper knowledge could result in further damage to the vehicle or create a safety hazard.
Knowing when to stop and consult a professional helps safeguard your vehicle, ensures that the problem is diagnosed correctly and saves you the time and effort often wasted on repetitive repairs that fail to address the root cause of the issue.
1. Persistent Electrical Issues
If problems persist even after replacing the brake light switch, it often indicates that the issue lies much deeper within the electrical system.
This could involve faulty wiring, blown fuses, defective connectors, or issues within control modules that rely on brake signals.
In such cases, the symptoms may mimic those of a faulty switch such as: brake lights failing to function correctly or warning lights remaining illuminated, but the actual cause of the problem lies elsewhere.
Professional technicians utilize specialized diagnostic tools to accurately pinpoint electrical faults and thoroughly inspect the circuitry.
Seeking assistance at this stage ensures that the true underlying issue is identified and resolved, thereby preventing further damage to the electrical system.
2. Difficulty Accessing the Switch
In some vehicles, the brake light switch is located beneath the dashboard, situated in a very confined or hard-to-reach area.
Due to the limited space, it can be difficult to see clearly, effectively maneuver tools, or properly install the switch.
Attempting to force your way into such tight spaces can result in broken clips, damaged panels, or an improperly installed switch.
Professional technicians are trained to work in confined areas and often possess specialized tools that make this task both easier and safer.
If you find accessing the switch to be excessively difficult or awkward, it is best to entrust the switch replacement job to an expert to avoid costly mistakes.
3. Tangled Wiring
If the wiring surrounding the brake light switch appears tangled, damaged, or looks different than you expected, it is a sign that you should proceed with caution.
Some vehicles may feature multiple connectors, additional sensors, or modified wiring, making it challenging to correctly identify each component.
Connecting the wrong wires or attempting to force a connector into place can lead to system malfunctions or even cause a short circuit.
A professional technician can interpret wiring diagrams, identify the correct connections and ensure that everything is properly connected.
Seeking assistance in such situations can help you avoid errors that could negatively impact not only the brake lights but also other interconnected systems.
Conclusion – How to Replace a Brake Light Switch
So, the true value of this repair is not just the part itself, but by doing so it gives you safety and confidence as it literally restores your braking performance everytime you press that damn brake pedal.
This single component controls when your brake lights illuminate, one of the most vital signals communicated to other drivers on the road.
When it malfunctions, the consequences are not always immediately apparent; however, they can quickly evolve into safety hazards, create confusion for other motorists and cause issues with systems such as cruise control or gear shifting.
Fortunately, this is one of those repair jobs that, when executed correctly, proves to be both cost-effective and straightforward.
By identifying symptoms early on such as: brake lights remaining constantly lit, failing to illuminate, or related systems malfunctioning, you can take corrective action before the problem escalates.
Adhering to the proper procedures for replacing the switch, including correct alignment and adjustment, ensures that your brake lights function instantly and accurately.
Now, that’s it from this guide about How to Replace a Brake Light Switch also you can ask all the related queries in comment box.
Frequently Asked Questions
FAQ 1: Can I drive with a faulty brake light switch?
Answer: Driving with a faulty brake light switch is unsafe and should be avoided whenever possible. Brake lights are the primary means by which your vehicle signals to other drivers that you are slowing down or coming to a stop. If the switch is defective, your brake lights may fail to illuminate at all, remain constantly lit, or function erratically. This can confuse drivers following behind you and significantly increase the risk of a rear-end collision. In some instances, a faulty switch can also impact other vehicle systems, such as cruise control or gear shifting. Even if the vehicle appears to operate normally in other respects, a safety hazard persists; therefore, it is best to have this issue repaired before resuming daily driving.
FAQ 2: Does a brake light switch require programming?
Answer: In most vehicles, a brake light switch does not require any programming after installation. These are typically simple electrical components that function as basic on/off switches, activating in response to the movement of the brake pedal. Once properly installed and connected, they begin functioning immediately. However, in certain modern vehicles equipped with advanced electronic systems, the switch may interact with a control module; if a warning light illuminates, the system may require scanning or resetting. Generally speaking, for the majority of cars, simply installing the switch correctly and adjusting it properly is sufficient to ensure it functions as intended.
FAQ 3: Will a faulty switch drain the battery?
Answer: Yes, a faulty brake light switch can drain the battery, particularly if it causes the brake lights to remain constantly illuminated. When the lights remain on even after the vehicle has been turned off, they continuously draw power from the battery, which can lead to a gradual discharge of the battery over time. This can lead to a completely drained battery or make it difficult to start the vehicle after it has been parked for several hours or overnight. Repairing a faulty switch prevents unnecessary power consumption and helps maintain the health of the battery.
FAQ 4: Is the procedure for replacing the switch the same for all vehicles?
Answer: The basic procedure for replacing a brake light switch is largely similar across most vehicles; however, the exact method may vary depending on the specific make, model and design of the vehicle. Some switches feature a simple twist-lock mechanism, while others are secured in place using bolts or clips. The location of the switch may also differ slightly, making the replacement process easier in some vehicles compared to others. Furthermore, some cars may require manual adjustment of the switch after installation, while others feature a self-adjusting system. Due to these variations, it is crucial to follow the specific instructions provided for your vehicle to ensure that the switch is installed correctly and functions properly.
FAQ 5: How can I tell if the new switch is working correctly?
Answer: After installing a new brake light switch, you can test it to verify that it is functioning properly. When you press the brake pedal, the brake lights should illuminate immediately; conversely, when you release the pedal, they should turn off without any delay. The lights should not remain illuminated when the pedal is not being pressed. You can verify this by having someone stand behind the vehicle or by observing the reflection of the lights. It is also advisable to ensure that no warning lights appear on the dashboard and that associated systems such as: cruise control or gear shifting, are functioning correctly. Thorough inspection ensures that the switch is installed correctly and is functioning exactly as intended.
References:
[1] An empirical investigation of a dynamic brake light concept for reduction of rear-end collisions through manipulation of optical looming
https://www.sciencedirect.com/science/article/abs/pii/S1071581907000341

Hello Folks, Dean Shali here to help you out to solve the problems with your lovely vehicle, as i have lots of experience and knowledge about automotive industry as i woks directly with the customers and repair vehicles and i love to help the people to keep their cars safe and running smoothly.