Written By: Dean Shali
Fact Checked By: Sabré Cook
Reviewed By: Tamara Warren
Yes, a car jack actually lifts your vehicle in minutes, but when you place it at the wrong point then it can literally damage the car or cause a serious accident as well.
Having flat tires are actually one of the most common roadside problems that almost every driver has to deal with hear and there, but the real danger often begins when you lift the car in wrong way.
Not only this, NHTSA also shows that roadside maintenance can become hazardous in no time when a vehicle is not secured in correct way, specially on the uneven ground or near the traffic.
Plus, the power of car jack is humongous as it can lift up thousands of pounds while using very small contact area: which means that even a slight mistake in placement can cause the vehicle to shift, slip or fall as well.
That’s the exact reason: vehicle manufacturers marks specific lift points under the frame, as modern cars are not designed to be lifted from random metallic surfaces.
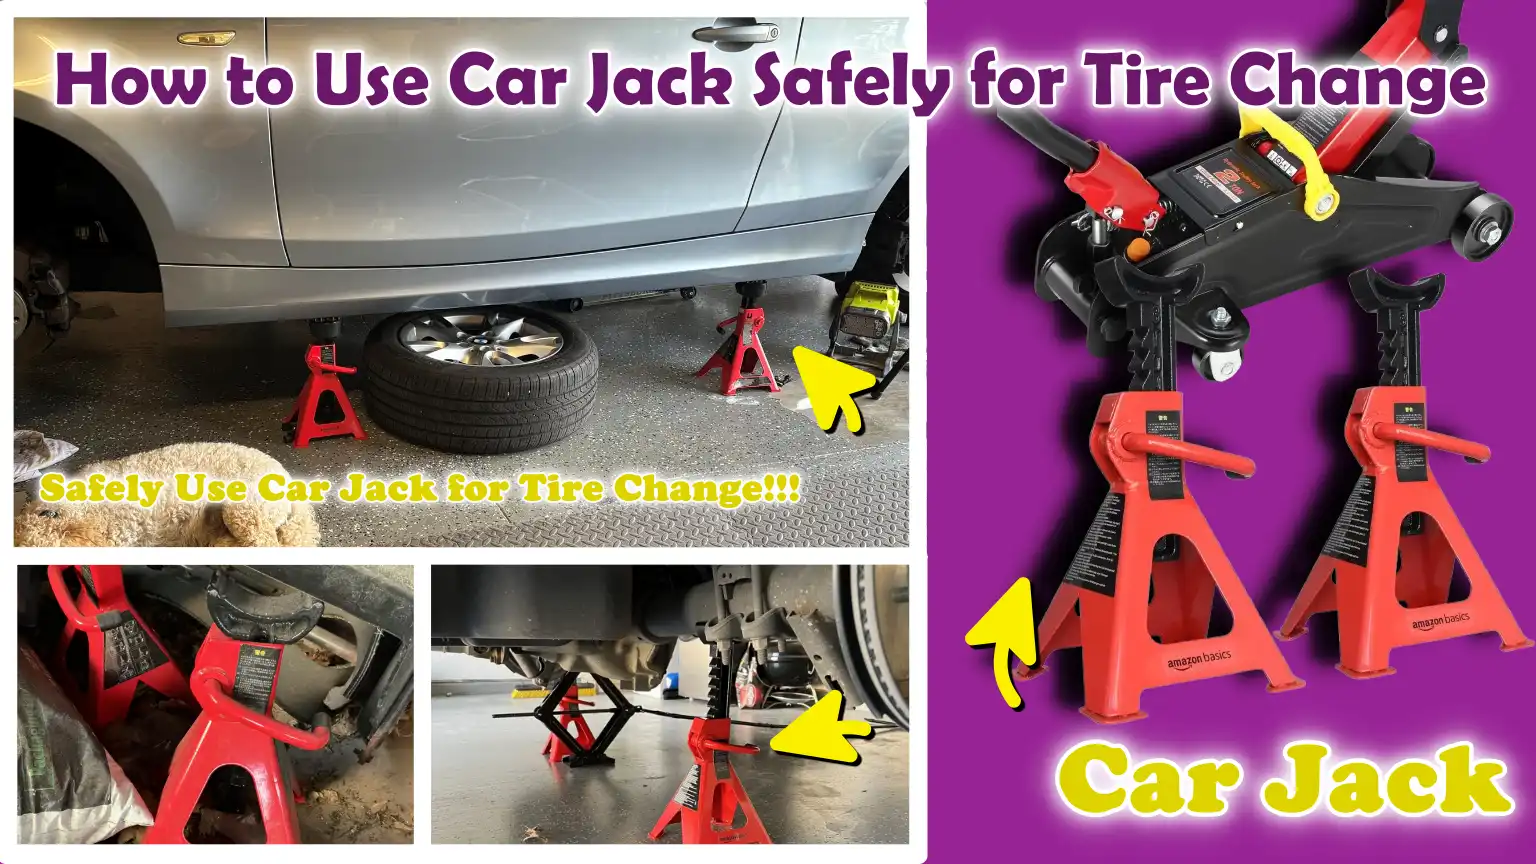
So, this is the proper guide about How to Use Car Jack Safely for Tire Change so that you can prevent crushed body panels, bent frame rails, damaged suspension parts and stay away from the serious personal injury as well.
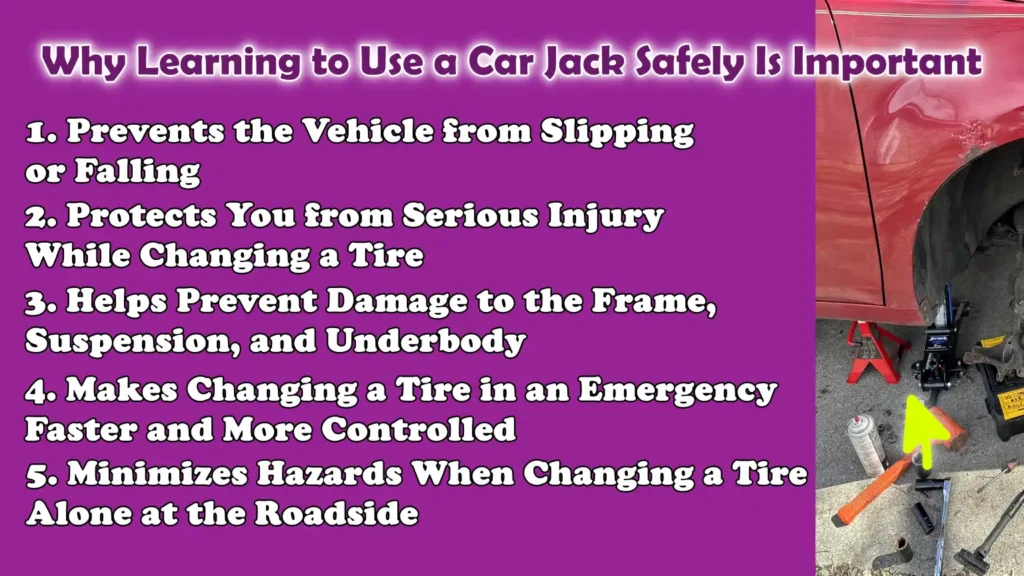
Why Learning to Use a Car Jack Safely Is Important
Using a car jack may seem simple, but it is one of the most safety-critical tasks involved in changing a tire, as the entire weight of the vehicle, even if only for a brief period, rests upon a single lifting device.
Most passenger vehicles weigh between 3,000 and 5,000 pounds and many SUVs and trucks weigh even more; this means that a minor error made while lifting the vehicle can instantly create a dangerous situation.
Car jacks are designed to lift a vehicle only from specific, reinforced points underneath it; placing the jack in the wrong spot can cause it to slip, bend metal components, or damage the vehicle’s frame.
Learning to use a jack correctly involves more than just changing a flat tire; it requires understanding how to safely lift a heavy vehicle, how to control its movement and how to protect yourself while working near or underneath a raised wheel.
This knowledge becomes particularly crucial during roadside emergencies, where uneven terrain, traffic and stress can significantly increase the likelihood of making mistakes.
1. Prevents the Vehicle from Slipping or Falling
If a vehicle is parked on soft ground or an uneven road surface, or if the jack is positioned at an incorrect lifting point, the vehicle may slip off the jack.
Because most factory-supplied jacks have a small base, the pressure exerted on that contact area becomes extremely high, causing the jack to sink into soil, gravel, or hot asphalt.
If the vehicle shifts while being lifted, its center of gravity changes, which can cause the jack to tilt to one side or topple over.
Learning how to use a jack correctly helps you identify safe surfaces, proper lifting points and the appropriate lifting height.
This minimizes the risk of the vehicle shifting unexpectedly, ensuring that the tire-changing process remains stable from start to finish.
2. Protects You from Serious Injury While Changing a Tire
The most serious hazard when changing a tire is physical injury resulting from the vehicle falling or the wheel shifting.
Hands, feet and legs are often in closest proximity to the wheel; this means that even a slight drop can result in severe injuries, such as crushing.
Many people also make the mistake of placing their hands or feet beneath the vehicle while it is supported solely by a jack, thereby creating an unnecessary risk.
Learning safe jack usage teaches you where to stand, how to position your body and, most importantly, why you should never place any part of your body beneath a raised vehicle while changing a tire.
These fundamental habits significantly reduce the likelihood of injury and make the task much safer, even if you are working alone.
3. Helps Prevent Damage to the Frame, Suspension and Underbody
Modern vehicles feature designated lifting points because many components of the underbody are not designed to support the vehicle’s entire weight.
Placing a jack beneath the floor pan, suspension arm, rocker panel, or plastic trim can result in bent metal, broken components, or damage to critical safety-related parts.
Some damage may not be immediately visible, but it can later compromise wheel alignment, suspension performance, or the structural integrity of the vehicle.
Learning to position the jack at the correct lifting points ensures that the vehicle’s sturdy structural components remain intact, helping you avoid costly repair bills.
This also reduces the risk of damage to brake lines, underbody shields and other components located near the vehicle’s lifting points.
4. Makes Changing a Tire in an Emergency Faster and More Controlled
When drivers understand how to use a jack safely, the tire-changing process becomes significantly faster because errors are minimized.
In roadside situations, specially on highways, during bad weather, or at night, time is often of the essence.
A person who is familiar with the designated lifting points, knows exactly how high to raise the vehicle and understands the proper sequence for loosening lug nuts can complete the tire-changing task with great ease.
Employing safe practices eliminates the need to repeatedly reposition the jack and prevents setbacks that would require restarting the entire process.
Greater control translates to less stress, allowing drivers to maintain their focus during an emergency.
5. Minimizes Hazards When Changing a Tire Alone at the Roadside
Many tire puncture incidents occur when drivers are traveling alone and immediate assistance is not available nearby.
In such situations, there may be no one else present to help stabilize the vehicle, hand over tools, or keep an eye on passing traffic.
Learning how to use a jack safely prepares you for these scenarios, as it makes the entire operation more organized and less hazardous.
Mastering techniques such as: using wheel chocks, engaging the parking brake and lifting the vehicle on level ground, gives you greater control over the vehicle, even in unfamiliar locations.
This proves particularly beneficial in the event of a breakdown at night or when stopping in a secluded area.
Tools
| Tools | Why It Is Needed | How to Use It |
|---|---|---|
| Vehicle Owner’s Manual | Your vehicle’s ‘Owner’s Manual’ (owner’s handbook) specifies the correct jacking points for your specific vehicle model. Every vehicle has designated lifting points; using an incorrect location can damage the vehicle’s frame or cause the vehicle to become unstable. | Locate the vehicle’s lifting equipment (jack), which is used for changing tires or in emergency situations. Before placing the jack under the vehicle, consult the provided diagram to identify the correct jacking points. |
| Scissor Jack or Hydraulic Floor Jack | The jack lifts the vehicle off the ground, allowing you to remove a punctured tire. Vehicles typically come equipped with a factory-supplied jack; however, for home vehicle maintenance, using a hydraulic floor jack is generally easier and safer. | Position the jack directly beneath the specific point where the vehicle needs to be lifted. Slowly raise the vehicle until the punctured tire clears the ground slightly. Never lift the vehicle higher than necessary. |
| Spare Tire | The spare tire replaces the damaged tire, enabling you to drive the vehicle safely after removing the punctured one. Some vehicles are equipped with a ‘temporary spare tire,’ which is intended for short-distance driving only. | Before installing the spare tire, ensure that it is properly inflated. Align the tire correctly with the ‘wheel studs’ (the bolts onto which the lug nuts are fastened) and, after removing the punctured tire, securely fasten the spare tire into place. |
| Lug Wrench | This tool is used to loosen and tighten the ‘lug nuts’ that hold the wheel in place. Without this tool, you will be unable to remove the wheel. | Before lifting the vehicle, slightly loosen the lug nuts. After installing the spare tire, tighten the lug nuts in a ‘cross-pattern’ (alternating between opposite nuts) to ensure that the pressure is distributed evenly. |
| Wheel Chocks | ‘Wheel chocks’ prevent the vehicle from rolling, particularly when one of its wheels is lifted off the ground. They are essential when working on slightly sloped or uneven terrain. | Position these chocks firmly against the tires that remain in contact with the ground. Typically, the spare tire is stored in the rear of the vehicle or within the ‘wheel well.’ |
| Flashlight | A flashlight allows you to easily locate the jack points, lug nuts and the surrounding ground in low-light conditions or during a nighttime emergency. | Use it to identify the correct jack placement points and to verify that the ground is stable, specifically, check for surfaces such as loose gravel or soft soil. |
| Gloves | Gloves improve your grip and protect your hands from dirt, sharp edges and hot metal components around the wheel area. | Put them on before handling the jack, the wheel, or the lug wrench, specially if you are changing a tire immediately after driving the vehicle for an extended period. |
| Reflective Triangle | A reflective warning triangle signals to passing drivers that your vehicle has stopped due to an emergency. It enhances safety when changing a tire in the vicinity of traffic. | Place it several car-lengths behind your vehicle so that approaching traffic can spot your stopped vehicle in advance and safely maneuver around it. |
Know What Type of Car Jack You Are Using
It is crucial to understand exactly which specific type of car jack you are using, as every jack operates differently and is designed for particular situations.
While a jack may appear simple at first glance, its design significantly impacts its stability, lifting speed and safety.
Passenger cars, SUVs and trucks often require different lifting tools based on their weight and ground clearance.
Using the wrong type of jack can render the vehicle unstable or increase the risk of it slipping while changing a tire.
Knowing how each jack functions helps you select the safest option and avoid common lifting errors.
1. The Scissor Jack and Its Common Uses
The scissor jack is a common type of jack that comes included with many cars.
Its compact size makes it easy to store in the trunk.
It operates by turning a screw mechanism, which causes the central arms to extend upward and lift the vehicle.
This type of jack is typically used for roadside tire-changing emergencies, as it is supplied with the vehicle itself and requires no additional equipment.
While useful for temporarily lifting a vehicle, it generally lifts the car more slowly and may feel less stable on uneven surfaces.
Due to its small base, it should only be used on firm, level ground and placed exclusively at the specific lift points indicated in the vehicle’s owner’s manual.
2. Hydraulic Floor Jacks for Tire Changes in a Home Garage
A hydraulic floor jack utilizes fluid pressure to lift a vehicle, requiring very little physical effort.
It is frequently used in garages because it lifts quickly, positions itself easily and generally features a wide base for enhanced stability.
This makes it particularly well-suited for routine tire maintenance at home.
It can also lift heavier vehicles with greater ease and in a more controlled manner; however, due to its large size, carrying it inside most cars is not practical.
When used correctly on a hard surface such as: concrete, it lifts the vehicle more securely and with greater control than many factory-supplied jacks.
3. Basics of the Bottle Jack
The design of a bottle jack is straightforward; it utilizes hydraulic pressure contained within a small, cylindrical housing to lift a vehicle.
It is often employed for trucks, large SUVs and vehicles with high ground clearance, as it is capable of lifting heavy loads.
It is remarkably powerful for its size; however, adequate clearance beneath the vehicle is essential to position the jack upright before lifting begins.
With low-profile cars, if a tire goes flat, the jack may not even fit beneath the vehicle’s frame.
Furthermore, compared to a floor jack, it has a smaller contact area; therefore, it is absolutely critical to use it exclusively on level and stable ground.
4. Why Must the Jack’s Capacity Match the Vehicle’s Weight?
Every jack possesses a specific weight rating and this capacity must be appropriate for the weight of the vehicle being lifted.
If the jack’s capacity falls short of the load it is required to lift, its metal components may bend, its hydraulic seals may fail, or the jack could collapse without warning.
Most passenger vehicles weigh several thousand pounds; therefore, even when lifting just a single corner of the vehicle, the jack is subjected to considerable stress.
It is always safest to use a jack with a weight capacity slightly exceeding the vehicle’s actual weight, rather than one that is exactly equal to it.
Using a jack with the appropriate capacity ensures that the vehicle remains stable and minimizes the risk of jack failure while changing a tire.
How to Prepare the Vehicle Before Lifting It
Properly preparing the vehicle before lifting it is crucial for ensuring a safe tire-changing process.
Many accidents occur even before the wheel is removed, often because the vehicle is parked in an unsafe location, has not been properly secured, or is carrying excessive weight that compromises its balance.
A jack lifts only one side of the vehicle, thereby shifting its center of gravity; if basic safety protocols are not followed, the vehicle can become unstable.
Spending a few minutes to properly prepare the vehicle prevents it from slipping, ensures the jack remains securely in place and makes the entire tire-changing procedure significantly safer.
1. Park on a Level and Solid Surface
A level and solid surface provides a stable base for the jack and helps maintain the vehicle’s balance when one of its tires is lifted off the ground.
Sloping terrain is dangerous because gravity naturally pulls the vehicle downhill; even a slight incline can cause the vehicle to roll or slide while being lifted.
The safest surfaces are level concrete, paved roads and solid asphalt, surfaces that are neither soft nor broken.
Avoid placing the jack on dirt, loose gravel, wet grass, mud, sand, or damaged pavement, as the jack may sink or tip over.
If the ground does not feel level beneath your feet, there is a strong likelihood that the jack will also remain unstable beneath the vehicle.
2. Turn on Your Hazard Lights
Turning on your hazard lights makes your stopped vehicle easily visible to other drivers, specially in low-light conditions, during rain, or in the event of an emergency on a highway.
When a tire goes flat, drivers often have to pull over near traffic, where passing vehicles may not immediately spot the stationary car.
Switching on your hazard lights alerts others that your vehicle has broken down, prompting them to slow down or maneuver around your car with caution.
This simple step enhances safety even before you begin the process of jacking up the vehicle.
3. Engage the Parking Brake
Depending on the vehicle’s design, the parking brake locks the rear wheels or the rear braking system, helping to prevent the car from shifting inadvertently.
Even on level ground, a vehicle may shift slightly while being lifted by a jack as its weight distribution shifts to the opposite side.
If the parking brake is not engaged, this movement could cause the car to roll a short distance, a distance sufficient to destabilize the jack.
Engaging the parking brake before lifting the vehicle ensures a higher level of safety while changing a tire.
4. Place Wheel Chocks
Wheel chocks are positioned against the tires that remain in contact with the ground to prevent the vehicle from rolling in any direction.
They act as a physical barrier, providing an additional layer of safety even if the parking brake is not fully functional.
The correct placement of these chocks depends on which tire has gone flat.
If a front tire is being replaced, the chocks are typically placed against the rear wheels; conversely, if a rear tire is being replaced, they are placed against the front wheels.
This prevents the vehicle from moving, as the specific corner of the car being lifted loses its contact with the road surface.
5. Remove Heavy Objects If Necessary
Heavy items stored in the trunk or cabin can alter the vehicle’s stance and the way its weight shifts during the lifting process.
Extra tools, luggage, or a fully loaded storage area can create uneven pressure, potentially causing the vehicle to lose its balance while being lifted.
Removing heavy objects reduces unnecessary weight and helps the jack lift the vehicle more evenly.
This is particularly beneficial when using smaller jacks, as reduced weight translates to better control and less strain on the vehicle’s lifting points.
How to Locate the Correct Jack Points
Finding the correct jack point is one of the most critical steps when changing a tire, as the jack must safely support a portion of the vehicle’s entire weight.
Modern vehicles are designed with robust lifting points built directly into their frames; if a vehicle is lifted from an incorrect location, the metal may bend, body panels could crack, or the vehicle might slip.
As many components underneath a vehicle look similar, drivers often mistake weaker structural elements for safe lifting points.
Knowing which points are appropriate for lifting helps prevent damage to the vehicle and ensures greater stability during the lifting process.
1. Consult the Owner’s Manual
The vehicle’s owner’s manual specifies the exact lifting points approved by the manufacturer.
These points undergo rigorous testing to ensure they can safely support the vehicle’s weight and are typically located near each wheel.
The location of these points may vary across different models, as every vehicle possesses a unique body design, frame structure and weight distribution.
A small car, an SUV, or a pickup truck may have lifting points situated in different locations, even if they are manufactured by the same company.
Consulting the manual first eliminates the need for guesswork and mitigates the risk of lifting the vehicle from its weaker underbody components.
2. Identify Robust Frame Components
Most safe jack points consist of sturdy metal components specifically designed to provide structural support during the lifting of the vehicle.
Common examples include pinch welds, reinforced jack tabs and robust support points located on the sub-frame.
Pinch welds are typically metal seams located along the underside of a vehicle; they often feature notches or markings that indicate the precise location where a jack should be placed.
Reinforced tabs are sturdy metal components specifically designed for use with factory-supplied jacks.
Sub-frame points can be utilized with certain types of jacks, particularly in a garage setting, but should only be used if they are explicitly approved for your specific vehicle.
These points offer greater structural integrity because they are directly connected to the vehicle’s main chassis.
3. Avoid Unsafe Lifting Points
Certain components on the underside of a vehicle should never be used as lifting points, as they are not designed to support the vehicle’s weight.
Decorative plastic trim pieces can shatter instantly, creating a risk of the jack slipping.
Floor pans may buckle, as they are constructed from thin sheet metal and are primarily intended to form the floor of the vehicle’s cabin.
Suspension arms can shift out of position while the vehicle is being lifted; unless specifically authorized by the manufacturer, they should not be considered safe lifting points.
The area surrounding the fuel tank is particularly hazardous, as it is not part of the vehicle’s main structural frame and is susceptible to easy damage.
By avoiding these locations, you can prevent costly vehicle repairs and minimize the risk of the vehicle falling while changing a tire.
How to Use Car Jack Safely for Tire Change – Perfect Method
To safely use a car jack, it is essential to follow a specific sequence of steps, as every action directly impacts the vehicle’s stability.
Changing a tire becomes a hazardous task when drivers rush, lift the vehicle too high, or position the jack incorrectly.
As one corner of the vehicle is lifted off the ground, the entire remaining weight shifts onto the remaining tires and the jack itself.
Consequently, maintaining balance becomes paramount.
Adopting a safe, step-by-step approach minimizes the risk of the car slipping, protects the wheel components and ensures that the spare tire installation is completed smoothly.
1. Slightly Loosen the Lug Nuts Before Lifting the Vehicle
The lug nuts should be loosened while the tire is still in contact with the ground, as this ensures that the wheel remains stable and does not spin.
Once the tire has been lifted, attempting to loosen tight lug nuts becomes quite difficult because the wheel is then free to rotate.
This often causes the vehicle, which is resting on the jack, to wobble, thereby increasing the risk of an accident.
For most vehicles, turn the lug wrench anti-clockwise to loosen the nuts.
At this stage, loosen them only slightly; removing them completely before lifting the vehicle could cause the wheel to detach suddenly.
2. Position the Jack at the Correct Location
The jack must be placed directly beneath the specific point designated as an “approved lift point” in the vehicle’s owner’s manual.
This ensures that the weight is distributed across a sturdy metal structural component specifically designed to support the vehicle’s load.
The top of the jack (the saddle) must rest securely against the lift point without tilting or shifting.
Full contact is crucial; if the contact is incomplete, the jack may slip sideways as soon as the vehicle begins to rise.
Before lifting the vehicle, step back and visually verify that the jack is perfectly upright and centered.
3. Lift the Vehicle Slowly
Raise the vehicle gradually so that the weight transfers to the jack slowly.
Lifting it too quickly can lead to sudden instability, for instance, if the jack slips or the car tilts to one side.
As soon as the wheel clears the ground, carefully observe whether the car is leaning to one side or if the base of the jack is shifting.
If anything moves, immediately lower the car and reposition the jack correctly.
Lifting slowly provides better control and allows you to identify any potential issues before they become dangerous.
4. Lift the Car Only as High as Necessary
You need to lift the car only high enough for the punctured tire to clear the ground slightly.
Typically, raising the car just a few inches is sufficient to remove the wheel and install the spare tire.
Lifting the car higher than necessary raises its center of gravity, making it less stable and placing increased strain on the jack.
By avoiding excessive lifting and keeping the vehicle relatively low, you minimize the risk of slippage and make the wheel-changing process easier.
5. Never Place Any Part of Your Body Under the Car
A car jack is designed to lift a vehicle, not to safely support a person underneath it.
A jack can fail, due to unstable ground, improper placement, or a mechanical defect, causing the vehicle to drop suddenly.
You should keep your hands, feet and legs clear of the underside of the vehicle at all times.
When changing a tire, all work should be performed from the side of the vehicle where the wheel is located.
By doing so, even if the vehicle were to shift suddenly, you would remain at a safe distance from the most hazardous area.
How to Safely Remove a Flat Tire
Once the vehicle has been properly lifted using a jack, the flat tire must be removed with care, as it is crucial that the wheel and its mounting components remain aligned so that the spare tire can be installed correctly.
Many people focus solely on the act of removing the tire; however, this step also presents an excellent opportunity to inspect the wheel hub and associated hardware for any signs of damage.
While a tire may go flat simply due to a puncture, hitting potholes, striking a curb, or colliding with road debris can also cause damage to surrounding components.
Removing the wheel slowly and gently prevents it from falling, avoids damage to the wheel studs and ensures that you do not overlook any warning signs at the wheel mounting point.
1. Removing the Loosened Lug Nuts
Once the tire is lifted clear of the ground, fully remove the lug nuts by turning them anti-clockwise.
As they were already loosened while the tire was still resting on the ground, they should come off with very little effort.
Keep them together in a safe place, as losing even a single lug nut can make it unsafe to remount the wheel.
Remove them one by one and if the tire feels loose, keep one hand resting against it.
This helps prevent the wheel from suddenly slipping or falling while you are removing the final lug nut.
2. Pulling the Tire Straight Outward
The tire should be pulled straight toward you; it should not be twisted or forced from side to side.
This ensures that the wheel remains aligned with the studs and prevents unnecessary strain on the mounting hardware.
If the tire feels stuck, it is possible that it has seized to the hub due to rust or corrosion.
In such a situation, gently pulling on the tire while rocking it slightly back and forth can help dislodge it.
Pulling at an angle could damage the studs or make removing the wheel even more difficult.
3. Inspecting the Condition of the Hub
Once the tire has been removed, the wheel hub becomes visible.
This is the metal surface against which the wheel rests.
Check it for excessive rust, accumulated dirt, cracks, or anything else that might prevent the spare tire from seating flush against it.
A clean hub helps ensure that the wheel mounts evenly and minimizes vibration while driving.
If any loose soil or debris is present, it should be cleaned off before installing the spare tire.
4. Checking the Wheel Studs for Any Damage
Wheel studs are the threaded metal posts that hold the wheel in place.
Check for bent studs, damaged threads, or signs of wear in the areas where the lug nuts attach.
These components are critical, as they firmly secure the wheel while the vehicle is in motion.
A damaged stud can prevent the wheel from being tightened properly, potentially causing the wheel to loosen and detach later on.
If the studs appear straight and their threads look clean, the spare tire can be installed much more securely.
How to Properly Install a Spare Tire
Installing a spare tire correctly is crucial, as the wheel must sit evenly on the hub to ensure safety while driving.
If the tire is even slightly off-center or the lug nuts are tightened incorrectly, the wheel may wobble, come loose, or cause vibrations at high speeds.
Even a temporary spare tire must be installed with care, as it bears the vehicle’s entire weight until the damaged tire can be repaired.
Taking the time to install it correctly prevents wheel instability and makes driving much safer after a tire change.
1. Aligning the Wheel Holes
The spare tire should be lifted and aligned so that the wheel holes line up precisely with the wheel studs.
The studs help guide the wheel into position and secure it to the hub.
The tire should slide onto the studs easily, without requiring any force or exertion.
If the holes are not aligned, the wheel may sit crookedly, making it difficult to tighten properly.
Holding the tire steady while sliding it onto the studs ensures a proper fit and prevents unnecessary strain on the wheel hardware.
2. Hand-Tightening the Lug Nuts First
Before using a wrench, you should always begin by hand-tightening the lug nuts.
This ensures that the threads engage correctly and prevents “cross-threading”, where the threads misalign, which can damage the studs.
Each lug nut should turn easily at the start.
If a nut feels tight right from the beginning, remove it and try again, as it may not be properly aligned.
Starting the tightening process by hand provides better control and ensures that the wheel is centered on the hub.
3. Tightening in a Crisscross Pattern
Instead of tightening the lug nuts in a circular motion, they should be tightened in a crisscross pattern.
This means that after tightening one nut, you tighten the nut located directly opposite it.
This method distributes pressure evenly around the wheel hub and minimizes the likelihood of the tire seating unevenly.
If the nuts are tightened sequentially around the wheel, one side may seat prematurely, causing the wheel to sit crookedly.
Even pressure is crucial for safe driving and proper wheel balance.
4. Initial Tightening Before Lowering the Vehicle
Before lowering the vehicle, tighten the lug nuts just enough to ensure the spare tire is held firmly in place, but not as tightly as required for the final tightening.
This ensures that the wheel remains properly seated once the vehicle is lowered.
Once the tire makes contact with the ground again and the wheel is stable, the nuts can be fully tightened to their specified torque specifications.
This two-step process helps center the spare tire and reduces the risk of it shifting or coming loose after installation.
Read More:
How to Safely Lower the Car
Lowering the vehicle is just as crucial as lifting it, as the car’s entire weight shifts back onto the newly installed tire.
If done too quickly, the wheel may shift slightly, the jack could tilt, or the tire might not seat properly on the ground.
Many people tend to rush this step after installing a spare tire; however, carefully lowering the vehicle maintains stability and ensures that the wheel is seated correctly.
Lowering the car slowly and in a controlled manner reduces strain on the jack and prevents sudden movements, thereby ensuring safety.
1. Lowering Slowly
The car should always be lowered gradually so that the weight shifts back onto the tire in a controlled manner.
As the jack is released, the vehicle settles down and the suspension begins to compress again.
Lowering the car too quickly can cause it to drop suddenly, potentially dislodging the spare tire or causing the jack to slip.
Lowering it slowly allows you to observe how the car is settling and enables you to stop if anything appears unstable.
This is particularly important on uneven surfaces or when using small, factory-supplied jacks.
2. Monitoring Tire Alignment
As the tire touches the ground, ensure that it remains straight and sits perfectly flush against the road surface.
The wheel should remain centered on the hub and should not appear tilted inward or outward.
If the spare tire looks crooked, it may not be seated correctly on the wheel studs.
Monitoring the alignment while lowering the vehicle allows you to detect any installation errors before you begin driving.
This also ensures that when the full weight of the car rests on the tire, that weight is distributed evenly across it.
3. Preventing the Jack from Slipping
During the lowering process, the jack may shift from its position as the car’s weight transfers away from the jack and back onto the tire.
Such movement is common; however, the jack must remain upright and stable until the tire has fully assumed the entire weight of the car.
Keep a close watch on the base of the jack and the specific point beneath the vehicle where the jack is positioned.
If it tilts or slips, immediately halt the lowering process and re-evaluate everything.
The safest approach is to stand to one side of the vehicle while observing, ensuring that your hands remain clear of the underside of the car.
4. Removing the Jack – Once the Tire is Fully Seated on the Ground
The jack should only be removed once the spare tire has made full contact with the ground and has begun to bear the weight of the vehicle.
Once the vehicle is stable, lower the jack completely until there is no longer any pressure at the lift point.
Then, carefully pull it out, taking care to ensure it does not strike the wheel or the underside of the vehicle.
Removing it too hastily could cause the vehicle to drop suddenly.
Waiting until the tire is in full contact with the ground ensures that the spare tire is properly supporting the vehicle’s weight before the jack is removed.
How to Tighten Lug Nuts After Lowering the Vehicle
Once the vehicle is back on the ground, it is crucial to give the lug nuts a final tightening, as the wheel is now supporting the vehicle’s entire weight.
This step is critical because if the nuts are not tightened evenly or securely, the wheel could come loose.
While driving, the wheel is subjected to constant stress from turning, braking and road vibrations; therefore, proper tightening ensures that the wheel remains firmly attached to the hub.
Even if the spare wheel was correctly positioned while the vehicle was raised, the final tightening performed after lowering the vehicle is what truly locks the wheel securely into place.
1. The Final Tightening Sequence
The lug nuts should be tightened in an opposing (or criss-cross) sequence; that is, rather than working your way around the wheel in a circle, you should move directly from one nut to the nut positioned directly opposite it.
This method pulls the wheel evenly against the hub and centers it correctly.
Tightening in a circular sequence can cause one section of the wheel to seat prematurely, potentially leaving the wheel slightly misaligned.
Continue tightening each nut in this opposing pattern until they all feel secure.
This creates uniform pressure across the wheel’s mounting surface.
2. Why Even Tightening Is Essential
Even tightening ensures that the wheel sits flush against the hub, which is vital for safe driving.
If one lug nut is tightened more than the others, the wheel will not seat properly, potentially leading to vibrations, noise, or looseness over time.
Uneven pressure can also place excessive strain on the studs and the wheel’s mounting surface.
A properly tightened wheel distributes weight evenly and minimizes the risk of the wheel shifting or wobbling while the vehicle is in motion.
3. Re-Checking After Driving a Few Miles
After driving a short distance, the lug nuts should be re-checked, as the wheel may settle more firmly into place after the initial few miles of travel.
This is particularly important when you are using a spare tire or have performed a roadside wheel change.
Due to road vibrations and the shifting of weight, the wheel sometimes settles into its final, proper position, which can result in a slight change in the tightness of the nuts.
Re-checking ensures that the wheel remains secure and minimizes the risk of it coming loose while driving.
Common Mistakes to Avoid When Using a Car Jack
Changing a tire often presents challenges because drivers tend to overlook simple safety precautions.
A car jack can only lift a vehicle safely if the ground surface, the lifting point and the jacking technique are correct.
Most accidents result from preventable errors such as: choosing the wrong lifting point, positioning the jack incorrectly, or lifting the vehicle too high.
Understanding these common mistakes helps minimize the risk of the vehicle slipping, sustaining damage to its underbody components, or causing injury to anyone while changing a tire roadside.
1. Using a Jack on Uneven Ground
A jack performs best when the surface beneath it is level and firm.
On uneven ground, the vehicle’s weight is not distributed evenly across the jack, causing the vehicle to tilt to one side as it is lifted.
Soft soil, gravel, mud and sloped roads are particularly hazardous, as the base of the jack may sink into the ground or slip out of place.
The moment the tire lifts off the ground, even a slight tilt can escalate into a major problem.
Choosing a level surface significantly enhances the vehicle’s stability.
2. Lifting from the Wrong Point
Every vehicle features specific, reinforced points designed to safely support the vehicle’s weight.
Attempting to lift the vehicle from just any spot underneath it can result in a bent frame, damaged underbody panels, or the jack slipping out of position.
Components such as plastic trim, floor pans and suspension parts may appear sturdy, but they are not always safe points for lifting the vehicle.
Selecting the correct jacking point ensures that the vehicle’s weight rests solely on its reinforced metal frame, thereby preventing costly damage.
3. Failure to Use Wheel Chocks
Wheel chocks help prevent the vehicle from rolling when one of its corners is lifted.
Without them, if the ground is not perfectly level or if the parking brake is not fully engaged, the vehicle may shift slightly.
Even this minor movement of the vehicle can be sufficient to dislodge the jack from its position.
Placing wheel chocks against the wheels that remain in contact with the ground significantly enhances both safety and stability.
4. Lifting the Vehicle Too High
The vehicle needs to be lifted only high enough to raise the punctured tire clear of the ground.
Lifting the vehicle higher than necessary raises its center of gravity, thereby reducing its stability.
Excessive lifting places undue strain on the jack and can cause the vehicle to wobble slightly.
Lifting the vehicle as minimally as possible makes removing the tire easier and significantly reduces the risk of the vehicle tipping over.
5. Standing Too Close While Lifting the Vehicle
Standing too close to the wheel, or directly beneath the side of the vehicle, while lifting it increases the risk of injury, particularly if the vehicle shifts unexpectedly.
As the jack rises, the geometry of the suspension changes and the vehicle may suddenly settle or drop slightly.
Maintaining a safe distance while keeping an eye on the jack creates a secure workspace for the lifting process, allowing you to detect any movement before it becomes hazardous.
6. Working Under a Vehicle Supported Solely by a Jack
Car jacks are designed solely to lift a vehicle, not to provide safety protection for a person working underneath it.
Hydraulic failure, unstable ground conditions, or improper jack placement, any of these factors can cause the vehicle to suddenly collapse.
Even a sturdy jack can fail without warning if subjected to excessive weight or used improperly.
When changing a tire, the entire operation should be performed around the wheel itself, rather than by crawling underneath the vehicle.
7. Ignoring the Jack’s Weight Capacity
Every jack has a specific weight-lifting limit; exceeding this limit can cause the jack to malfunction or break.
The weight of a large SUV or truck can be significantly greater than that of a small passenger car; therefore, using the wrong jack can prove dangerous.
Before lifting a vehicle, you should always verify the jack’s weight-lifting capacity (rating).
A jack with the appropriate capacity provides greater stability and minimizes the risk of jack failure while changing a tire.
Common Signs That a Jack Is Unsafe for Use
A car jack must be in good condition, as it supports an immense amount of weight on a very small surface area.
Once the vehicle is lifted, even a minor defect can prove hazardous.
Many jack failure incidents occur because the jack is already compromised, yet this condition goes unnoticed prior to use.
Inspecting the jack for wear and tear, oil leaks, or bent components before lifting a vehicle can prevent sudden drops and make the tire-changing process significantly safer.
If a jack appears damaged or fails to function correctly, it should not be trusted to support the weight of a vehicle.
1. Bent Metal
Bent metal is a clear indication that the jack has previously been subjected to excessive weight or has been misused.
In the case of a scissor jack, this defect is often visible in the side arms or the central screw mechanism.
With bottle jacks or hydraulic floor jacks, bent metal can typically be observed around the lifting arm or the support frame.
Bent metal compromises the structural integrity of the jack and alters its load-bearing dynamics, thereby increasing the risk of the jack slipping while lifting a vehicle.
2. Oil Leaks in Hydraulic Jacks
Hydraulic jacks rely on pressurized fluid to lift a vehicle and maintain its elevated position.
If fluid is leaking from around the cylinder or seals, the jack’s internal pressure may drop during operation.
This can cause the vehicle to descend gradually or, worse, to drop suddenly and rapidly.
Even a minor leak can be dangerous, as maintaining stable hydraulic pressure under load is absolutely critical.
A leaking jack should either be repaired by a professional or completely replaced before being used to change a tire.
3. Damaged Threads
Thread wear is a common issue in screw-type jacks, as their lifting capacity depends on how smoothly the screw rotates under the load.
Worn, damaged, or rough threads make lifting difficult; furthermore, the jack may bind or slip while in operation.
If you feel any resistance or roughness while turning the jack, if it jams, or if it emits a grinding sound, its threads may be compromised.
This can result in the vehicle failing to lift properly, creating an unsafe situation.
4. Uneven Lifting
A safe jack should lift the vehicle smoothly and in a perfectly vertical line.
If the vehicle lifts unevenly on one side, the jack tilts to one side, or the vehicle wobbles during the lifting process, there may be an issue with the jack or the ground surface.
Uneven lifting often indicates that the load is not properly centered or that there is a structural defect within the jack itself.
Continuing to lift under these conditions significantly increases the risk of jack failure or catastrophic collapse.
5. Unstable Base
The base of the jack must remain level and stable throughout the entire lifting process.
If it shifts, tilts, or slides as pressure increases, the setup is unsafe.
A compromised base or an unstable surface beneath the jack can cause it to slip out from under the vehicle.
Before initiating any lifting operation, the jack’s base must be positioned securely and perfectly upright on solid ground.
6. Rust or Broken Parts
Over time, rust and cracks can compromise the structural integrity of metal components.
Rusting can weaken screws, support arms and joints, particularly if the jack has been stored in a damp environment for years.
Cracks may also appear around welded areas, lifting saddles, or high-stress contact points.
These signs indicate that the metal could fracture under pressure.
A jack exhibiting rust or broken parts should not be used, even if it appears to be in working order.
Know, Some Safety Tips for Changing a Tire at Night or on a Highway
Changing a tire at night or near moving traffic on a highway is far more dangerous than simply pulling over to the roadside, as visibility is reduced at night and vehicles may be traveling at high speeds.
Safely changing a tire depends not only on the correct use of the jack but also on protecting yourself from traffic and low-light conditions.
Many roadside accidents occur because drivers focus solely on the punctured tire and overlook the surrounding hazards.
Before lifting the vehicle, you should make the immediate area as safe as possible.
1. If Possible, Move Away from Traffic
If you experience a flat tire while driving, it is safer to slow down and proceed to an open area, a parking lot, or a side road rather than stopping immediately in a narrow lane.
Driving a short distance on a flat tire may ruin the tire, but stopping near high-speed traffic can be far more dangerous.
Stopping in a stable, open area provides more room to work and reduces the risk of being struck by passing vehicles.
Prioritizing your personal safety is far more important than saving a punctured tire.
2. Use Reflective Gear
Reflective gear makes it easier for other drivers to spot you, specially in the dark of night, during rain, or in adverse weather conditions.
Reflective vests (jackets), warning triangles and bright roadside markers are visible from a considerable distance.
A person is often not clearly visible in the headlights of moving vehicles unless they are wearing something reflective.
Wearing reflective gear makes it easier for approaching drivers to identify you, slow down to a safe speed and safely maneuver around your location.
3. Keep Passengers Away from the Vehicle
When a tire is being changed, passengers should move away from the vehicle and stand in a safe location.
They should stay clear of traffic and under no circumstances should they remain inside the vehicle while it is raised on a jack.
Excessive movement inside the vehicle can cause its weight to shift to one side, potentially destabilizing the jack.
The vehicle remains safest during the tire-changing process if no one enters, exits, or leans against the vehicle while it is raised on the jack.
4. Use Your Phone’s Flashlight Only as a Backup
A phone’s flashlight can be useful in an emergency, but it should not be relied upon exclusively as the primary source of illumination.
Phone batteries can drain quickly and the light they emit is often neither bright nor broad enough to clearly illuminate jack points, wheel studs and the road surface.
A dedicated flashlight provides brighter and more reliable illumination.
While a phone’s flashlight serves well as a backup, relying solely on it can make it difficult to identify uneven ground or locate misplaced tools.
5. Call for Roadside Assistance in Unsafe Locations
If your vehicle breaks down on the shoulder of a narrow highway, around a blind corner, on a bridge, or on unstable ground, changing the tire yourself may not be the safest option.
In such situations, seeking assistance from a professional roadside service is often the better choice.
Trained technicians utilize warning devices, more robust lifting equipment and specialized techniques to ensure the vehicle’s safety.
If you feel that your location is unsafe, waiting for professional assistance is often the most prudent decision.
When You Should NOT Change a Tire Yourself
Changing a flat tire is often possible with basic tools; however, there are certain situations where changing a tire safely on the roadside can be extremely risky.
A car jack can only function safely if the vehicle is stable, the ground is firm and there is sufficient space to work around the vehicle.
If any of these conditions are not met, the risk of personal injury or damage to the vehicle increases significantly.
In certain specific circumstances, calling for professional roadside assistance is the safer option, even if you have a spare tire and jack readily available.
Also, there’s official workplace investigation that shows that the improper lifting can cause some serious injury even during the routine tire work as well, so these reports reinforces why the vehicle should never be trusted on a poorly positioned jack and why no one should actually place any part of the body under a car supported only by a jack, so real accident records shows that skipping support checks can turns a simple tire change into a really life-threatening event as well.[¹]
1. On the Shoulder of a High-Traffic Highway
The narrow shoulder of a highway can be dangerous because passing vehicles may be traveling at high speeds and could pass very close to your car.
The air pressure generated by large trucks can also cause a raised vehicle to sway slightly, specially if a small, factory-supplied jack is being used.
Poor visibility, curves in the road, or a narrow shoulder width further exacerbate this danger.
If traffic is heavy and there is very little space to park safely, it is generally better to call for assistance rather than attempting to change the tire yourself on the spot.
2. Soft Mud or Sand
Mud and sand do not provide a stable surface for a jack, as the jack’s base can sink under the weight of the vehicle.
As the car is lifted, the jack may sink unevenly and tilt to one side.
This can cause the vehicle to slip or tip over before the tire can be changed.
Even if the surface appears firm, hidden soft spots may give way once weight is applied.
You should never attempt to change a tire in a location where the jack cannot remain upright and stable.
3. Inclement Weather
Heavy rain, strong winds, lightning, snowfall, or extreme heat can make the task of changing a tire significantly more difficult and dangerous.
Traction on wet surfaces is reduced and tools may slip from your hands.
Due to rain, identifying the correct jack points also becomes difficult and the ground beneath the jack may become soft.
In the presence of traffic, strong winds can compromise your balance while lifting the vehicle.
In adverse weather conditions, waiting for safer conditions or professional assistance is often the better option.
4. Broken Wheel Studs
Wheel studs are metal posts that securely fasten the wheel to the hub.
If one or more studs are broken, bent, or damaged, the spare tire cannot be properly tightened.
This can cause the wheel to come loose while driving.
Damaged studs mean that the wheel mounting system is no longer secure, even if the tire has been replaced.
In such a situation, the vehicle must be inspected before being driven.
5. Vehicle Instability
If the vehicle wobbles, tilts excessively to one side, or the jack begins to slip while lifting, it indicates that the vehicle is unstable and should not be raised any further.
This may be caused by uneven ground, incorrect jack placement, or shifting weight inside the vehicle.
Any unusual movement while lifting the vehicle serves as a warning sign.
Rather than insisting on changing the tire immediately, it is safer to lower the vehicle and reassess the situation.
6. No Visible Safe Spot for Jack Placement
If you cannot find a suitable location to place the jack, you should not attempt to lift the vehicle.
Many components underneath the vehicle may appear sturdy, but they are not designed to support the weight of the vehicle.
Lifting a vehicle from the wrong location can cause its frame to bend, damage its components, or cause the jack to slip out of place.
You should always identify the correct jack points in advance by consulting the vehicle’s owner’s manual or by referring to the markings provided by the manufacturer.
If you are unable to confirm the correct jack points, seeking assistance from a professional is the safer option.
What to Do After Changing the Tire
Completing a tire change does not mean the job is entirely finished.
While the spare tire may be mounted, several essential checks still remain before you can resume driving the vehicle normally.
Many drivers drive off immediately after swapping a wheel; however, issues such as low air pressure in the spare, loose equipment, or the improper stowage of the damaged tire can create new hazards.
Dedicating a few extra minutes after changing a tire ensures that the vehicle is safe to drive and minimizes the likelihood of facing further problems down the road.
1. Check Tire Pressure
The spare tire should be checked as soon as possible, as many spare tires lose air over time while sitting in the trunk.
A spare tire that appears visually sound may still be underinflated and low air pressure can adversely affect steering, braking and tire stability.
Temporary spare tires often require higher air pressure than standard tires, sometimes significantly higher than regular road tires.
Driving on an underinflated spare tire can lead to premature tire failure and a loss of vehicle control.
If a tire pressure gauge is available, checking the pressure before driving is the safest course of action.
2. Securely Stow the Damaged Tire
The removed, damaged tire must be securely stowed in the trunk or cargo area to prevent it from rolling or shifting while the vehicle is in motion.
A loose wheel can shift during braking or cornering, potentially damaging the vehicle’s interior panels or other items stored inside.
If the damaged tire is dirty or wet, placing it on a protective mat or liner helps keep the cargo area clean.
Securing the tire prevents it from shifting around, thereby helping to maintain the vehicle’s balance while driving.
3. Inspect the Jack Before Storing It
You should inspect the jack before returning it to its storage location, specially after using it on the road.
Check to ensure that no parts are bent, that no dirt or debris has accumulated on the screw threads or hydraulic components and that it did not slip while lifting the vehicle.
If the jack was used in mud, gravel, or wet conditions, cleaning it thoroughly will help prevent rust and protect against future damage.
Storing a damaged jack without inspecting it can lead to complications during a future emergency situation.
4. If You Are Using a Temporary Spare Tire, Drive Slowly
A temporary spare tire is generally smaller and lighter than a standard tire and it is designed for short-term use only.
It often comes with specific limits regarding speed and distance, as its primary purpose is to get the vehicle to a repair center, not to serve as a replacement for regular long-distance travel.
Driving at lower speeds reduces the stress placed on the spare tire and helps maintain better control over the vehicle.
When using a temporary spare tire, you should avoid taking sharp turns, braking suddenly and driving at high speeds on the highway.
5. Visit a Repair Shop for a Permanent Solution
For most vehicles, a spare tire is not a long-term solution.
The damaged tire should be inspected to determine whether it can be repaired or if it needs to be replaced.
A repair shop can also check for any hidden damage to the wheel, valve stem, or mounting area that may have occurred as a result of the tire puncture.
Driving on a temporary spare tire for an extended period can cause premature wear on the tire and negatively affect the vehicle’s handling.
As much as possible, replacing or repairing the original tires restores the vehicle’s safety and performance to their normal levels.
Conclusion – How to Use Car Jack Safely for Tire Change
Yes, it is true that a car jack can easily solve a roadside problem in minutes, but if it is unsafe then it can create the damage far worse than the flat tire itself.
It entails mastering the handling of a heavy vehicle in a situation where even a minor error can quickly escalate into a grave hazard.
An average passenger car can weigh several thousand pounds and when one of its corners is lifted, its entire weight rests upon the precise placement of the jack, the stability of the ground surface and the accuracy of the handling techniques employed.
Therefore, changing a tire safely is not about speed; it is about control, situational awareness and executing every step with the utmost caution.
Tires often go flat without warning, whether due to a nail, road debris, or an impact, and many drivers find themselves in precarious situations while alone, at night, or on unfamiliar roads.
In such moments, knowing exactly where to position the jack, how high to lift the vehicle and how to securely mount the spare tire can make a world of difference.
Safety precautions such as: parking the vehicle on firm, level ground; placing wheel chocks beneath the tires; engaging the parking brake; and verifying the jack’s placement, all play a crucial role in preventing many common accidents.
Now, that’s all about this guide and you can ask questions below in comment box.
Frequently Asked Questions
FAQ 1: How do I safely use a car jack to change a tire?
Answer: To safely use a car jack to change a tire, you must first park the vehicle on level, solid ground where the jack can remain stable. Engage the parking brake and place wheel chocks (such as stones or blocks of wood) under the other tires to prevent the vehicle from rolling. Before lifting the vehicle, slightly loosen the lug nuts (wheel nuts), as the wheel remains stable while resting on the ground. Next, place the jack only under the specific lifting points (lift points) indicated in the vehicle’s owner’s manual. Slowly raise the vehicle until the punctured tire is lifted high enough off the ground to be easily removed. After installing the spare tire, carefully lower the vehicle and securely tighten the lug nuts.
FAQ 2: Where should I place the car jack when changing a tire?
Answer: The car jack should be placed directly beneath the specific lifting points designated by the vehicle manufacturer. These points are typically sturdy metal sections located near each wheel. Many vehicles feature small notches or indentations on the lower frame that precisely indicate where the jack should be positioned. Placing the jack elsewhere such as: under floor panels, suspension components, or plastic trim, as it can damage the vehicle and make the lifting process unsafe. The owner’s manual is the best resource for identifying the correct location, as lift points can vary depending on the specific vehicle model.
FAQ 3: Should I loosen the lug nuts before lifting the vehicle?
Answer: Yes, you should always slightly loosen the lug nuts before lifting the vehicle. When the tire is resting on the ground, it remains stationary and does not rotate, making it easier to loosen the lug nuts. If you wait until the wheel is suspended in the air, applying force may cause the tire to spin, potentially destabilizing the vehicle, which is resting on the jack. This creates an unnecessary safety hazard and can make changing the tire more difficult. The nuts should only be loosened enough to allow for their easy removal later; they should not be completely removed before the vehicle is lifted.
FAQ 4: Is it safe to change a tire using a factory jack?
Answer: Using a factory jack is safe, provided it is used correctly and under the appropriate conditions. Most vehicles come equipped with a “scissor jack,” which is specifically designed for emergency tire-changing situations. Its purpose is to lift the vehicle for a brief period, just long enough to remove the punctured tire and install the spare tire in its place. However, it must always be used on solid, level ground and applied only at the specific lift points designated by the vehicle manufacturer. Factory jacks are generally smaller and less stable than hydraulic floor jacks; therefore, exercising extra caution when using them is essential.
FAQ 5: What type of surface is safest for using a car jack?
Answer: The safest surface is one that is level and solid such as: concrete or a paved asphalt road. These surfaces help keep the jack upright and support the vehicle’s weight, preventing the jack from sinking into the ground. Soft soil, grass, sand, gravel, or muddy areas should be avoided, as the base of the jack may sink into these surfaces when the vehicle is lifted. Even slight sinking can cause the jack to tilt to one side, potentially destabilizing the vehicle. If the ground beneath your feet does not feel solid, it may not be safe to lift your car on it.
References:
[1] Accident Report Detail, Accident Summary Nr: 201094778 – Employee injures leg when vehicle lift jack kicks free
https://www.osha.gov/ords/imis/accidentsearch.accident_detail?id=201094778

Hello Folks, Dean Shali here to help you out to solve the problems with your lovely vehicle, as i have lots of experience and knowledge about automotive industry as i woks directly with the customers and repair vehicles and i love to help the people to keep their cars safe and running smoothly.