Written By: Dean Shali
Fact Checked By: Sabré Cook
Reviewed By: Tamara Warren
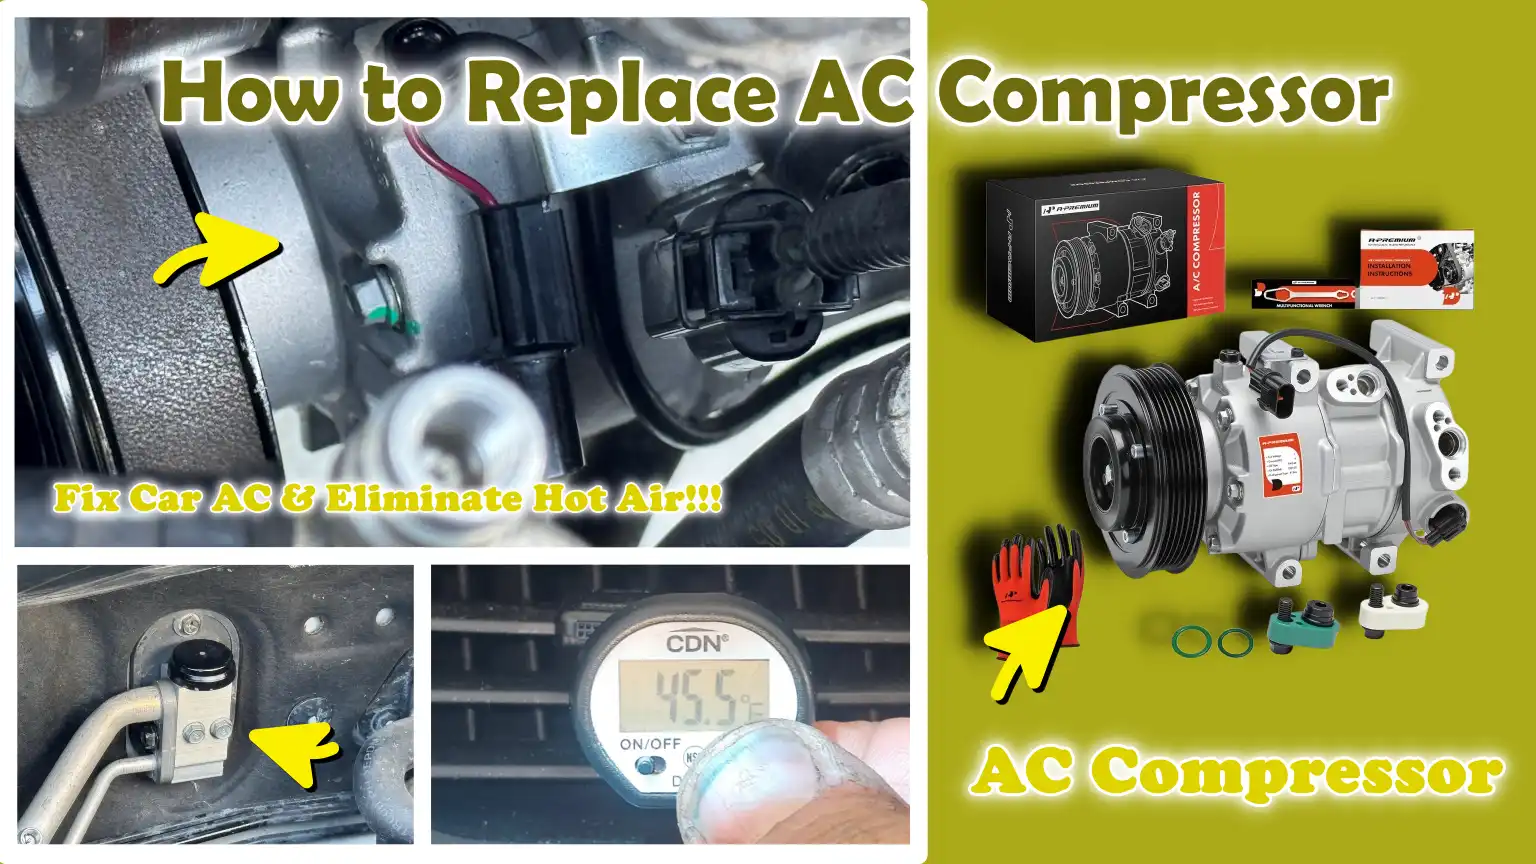
The damaged or worn-out AC compressor actually reduces the cooling efficiency of your cabin, so whenever it fails then the warm air and strange noises are common symptoms to notice: so just don’t worry about it as we are going to fix that in quick fashion.
The working of the AC compressors literally depends lot of things, but over the period of time and usage the compressors can also wear out due to the age, contamination or lack of maintenance as well, that actually leads to the common problems such as: warm air blowing form the vents, reduced system efficiency and even it can damage the other AC components like: condenser or evaporator as well.
Now, in this guide you’ll learn How to Replace AC Compressor , so that you can easily restore cooling performance and prevents from further damage and these are totally beginner friendly steps so that you can confidently restore your car’s AC system.
Tools
| Tool / Material | Why It Is Needed | How to Use It |
|---|---|---|
| Wrenches & Sockets | To remove the compressor bolts, brackets and AC line connections. | Select the correct size; turn the tool anti-clockwise to loosen bolts and turn it clockwise to tighten them during installation. |
| AC Manifold Gauge Set | This helps verify whether the system has the correct pressure and ensures that the refrigerant level is accurate. | Connect the blue hose to the low-pressure port and the red hose to the high-pressure port; take pressure readings both before and after charging the system with refrigerant. |
| Refrigerant Recovery Machine | Before opening the system, it is crucial to recover the refrigerant safely and in compliance with legal regulations. | Connect the hoses to the AC ports, switch on the machine and allow it to fully recover the refrigerant. |
| Vacuum Pump | This prevents damage and ensures optimal cooling performance after installing the new compressor. | Connect it to the manifold gauge; run the pump for 20–30 minutes to create a vacuum before charging the system with refrigerant. |
| O-Ring Kit | This prevents refrigerant leaks when reconnecting the AC lines. | Replace old O-rings with new ones; apply a thin layer of oil to them and install them before tightening the connections. |
| PAG Oil | This maintains proper lubrication inside the compressor and protects it from internal damage. | Before installing the new compressor, add the correct amount of oil to it (refer to the manual for the exact quantity). |
| Safety Gloves | This protects your hands from frostbite, sharp edges and chemicals. | Wear these when handling refrigerant or system components. |
| Safety Goggles | This protects your eyes from injuries caused by refrigerants or debris. | Wear them at all times while working on the AC system. |
| Protective Clothing | This protects your skin from exposure to refrigerants and dirt. | Wear them throughout the entire repair process. |
| Vehicle Service Manual | This provides correct torque specifications, oil quantities and specific information related to the system. | Consult it before beginning work and follow the outlined steps and instructions. |
How to Ensure Safety By Taking Necessary Precautions
1. Ensure the Engine is Off and Cool
Before beginning any work on your car’s AC system, it is absolutely essential to ensure that the engine is completely shut off and has cooled down.
Working on a running or hot engine poses a risk of severe burns, as many components under the hood such as: the exhaust and engine block, as it can become extremely hot.
Furthermore, moving parts like belts and pulleys can cause injury if the engine is accidentally started while you are working.
Allowing the engine to cool for at least 20 to 30 minutes mitigates these risks and makes it easier to handle components safely.
This simple step safeguards both your personal safety and the condition of surrounding components; otherwise, accidental contact or exposure to heat could cause damage.
2. Properly Recover the Refrigerant Before Starting Work
The refrigerant inside an AC system is stored under extremely high pressure; therefore, before opening any AC lines or removing the compressor, it is crucial to recover it safely.
Releasing refrigerant directly into the atmosphere is not only harmful to the environment but is also illegal in many countries, as it can deplete the ozone layer and contribute to climate change.
Using the appropriate refrigerant recovery machine ensures that the gas is safely captured and can subsequently be recycled or disposed of properly.
This step also prevents sudden pressure releases, which could result in injury or damage to the system.
When working on any car AC system, taking the time to properly recover the refrigerant is an essential safety and legal responsibility.
3. Avoid Contact with Refrigerant or Compressor Oil
Direct contact with refrigerant or compressor oil should always be avoided, as both substances can be harmful to your body.
If refrigerant comes into contact with your skin, it can instantly cause frostbite (cold burns), as it expands rapidly and becomes extremely cold upon release.
If it comes into contact with your eyes, it can result in severe injury or irritation.
Compressor oil, while less hazardous, can still cause skin irritation and should not be handled carelessly.
Wearing safety gloves and goggles protects you from accidental exposure to these substances.
Exercising caution when working around these materials ensures your safety on the job and helps you avoid unnecessary health risks during the replacement process.
How to Inspect the AC Compressor
1. Visual Inspection for Leaks, Defects and Burning Odors
The first step in inspecting the AC compressor is to carefully examine it visually; often, clear signs of malfunction can be identified without the use of any tools.
Begin by looking for oil or grease stains around the compressor and AC lines, as a refrigerant leak often leaves behind an oily residue that attracts and accumulates dust and dirt.
Check the compressor pulley and clutch for any visible defects such as: cracks, wobbling, or misalignment, as these components should rotate smoothly when the engine is running.
Additionally, pay attention to any unusual burning odors emanating from the compressor area; this could indicate an internal fault or overheating, potentially caused by worn bearings or a lack of lubrication.
These simple checks help you quickly identify whether the compressor has sustained external damage or is leaking, clear indications that the compressor may need to be replaced.
2. Using AC Gauges to Check System Pressure
An AC manifold gauge set is one of the most reliable tools for understanding what is happening inside your car’s AC system.
By connecting the gauges to the low-pressure and high-pressure service ports, you can measure how effectively the system is operating.
If the compressor is functioning correctly, it should establish a distinct difference between the low and high-pressure levels.
However, if the readings are excessively low or high, or if they do not fluctuate as expected, it could be a sign of a weak or faulty compressor.
For instance, equal pressure readings on both sides often indicate that the compressor is failing to compress the refrigerant at all.
This method provides you with concrete and measurable data, eliminating the need for guesswork and making it easier to determine whether the problem lies specifically with the compressor itself.
3. Confirming That the Compressor Is the Root Cause
Before replacing the compressor, it is crucial to verify that the compressor is indeed the root cause of the AC issue, as other components can exhibit similar symptoms.
Low refrigerant levels, a clogged condenser, a faulty expansion valve, or electrical issues such as: a blown fuse or a defective relay, as it can all negatively impact the AC’s cooling performance.
Take the time to inspect these components and ensure they are functioning correctly.
For example, if the compressor clutch fails to engage, the underlying cause may be electrical rather than mechanical.
Identifying the true root cause prevents unnecessary compressor replacements, saves money and ensures that the repairs you undertake genuinely resolve the problem, rather than leaving the AC system still malfunctioning.
How to Prepare the Vehicle
1. Disconnecting the Battery to Avoid Electrical Hazards
Before working on the AC compressor, disconnecting the car’s battery is a critical safety precaution that should never be overlooked.
The battery supplies power to numerous components located under the hood, including the AC compressor clutch, various sensors and wiring connections.
If the battery remains connected, there is a risk of electric shock, short circuits, or, if your hands are near moving parts, the sudden activation of a component.
To perform this safely, always disconnect the negative terminal first, as this interrupts the electrical flow and minimizes the likelihood of sparks.
This simple step protects both you and the vehicle’s electrical system from damage, ensuring that you can work on the AC system without faced any sudden electrical issues.
2. Removing Engine Covers or Obstructing Components
In most vehicles, the AC compressor is not fully visible or easily accessible, as it is often surrounded by engine covers, air intake components, or other parts.
Taking the time to remove these obstructing components provides you with clear access to the compressor, making the entire compressor replacement process significantly easier and safer.
Carefully remove plastic engine covers, loosen air ducts, or detach any pipes and brackets that are blocking your path; furthermore, keep track of all bolts and screws to ensure that nothing gets lost.
This step is crucial because working in a cramped or confined space can lead to errors such as: damaging adjacent components, stripping bolt heads, or incorrectly installing the new compressor.
Clear access allows you to clearly see what you are doing and execute every step with greater control and precision.
3. Recovering Residual Refrigerant in Compliance with Environmental Regulations
Before disconnecting any AC line or removing the compressor, it is crucial to recover any residual refrigerant remaining within the system in a safe and controlled manner.
Refrigerant is stored under extremely high pressure; if the system is opened without proper handling, the gas can escape rapidly.
Such an incident can be hazardous and may also cause environmental damage.
Rather than venting it into the atmosphere, a refrigerant recovery machine must be used, in accordance with environmental regulations, to safely capture and store the gas.
This process not only protects the environment but also prevents injuries resulting from sudden pressure drops or exposure to extremely cold refrigerant.
Proper refrigerant recovery ensures that it is safe to open the system, thereby preparing the vehicle for a safe and responsible compressor replacement.
How to Remove the Old AC Compressor
1. Disconnecting Electrical Connectors and Clutch Wires
The first step in removing the old AC compressor is to safely disconnect all electrical connectors attached to it.
The compressor features a clutch system that engages and disengages using electrical signals; therefore, it is connected via various wires and plugs.
Gently press the release tabs located on the connectors and pull them out without applying excessive force, as these plastic clips can easily break if pulled too hard.
It is crucial to ensure that the vehicle’s battery has already been disconnected before undertaking this step, in order to eliminate any risk of short circuits or accidental activation.
Avoiding haste during this stage helps prevent damage to the wiring, a critical factor in ensuring the proper functioning of the new compressor later on.
2. Removing the Drive Belt or Serpentine Belt
The AC compressor receives power from the engine via a drive belt, often referred to as the serpentine belt, which connects and drives several components, such as the alternator and the power steering pump.
To remove this belt, you must release its tension using a tensioner pulley; this pulley is designed to keep the belt taut while the engine is running.
Using a wrench, rotate the tensioner to loosen the belt and then carefully lift it off the compressor pulley.
This step is essential because the belt must be removed to free the compressor; furthermore, the belt should be handled with care to avoid cracking or damage.
If the belt shows any signs of wear such as: cracks or fraying edges, it is advisable to replace it at this stage to prevent potential issues in the future.
3. Removing Mounting Bolts and Brackets
Even after the belt has been removed, the compressor remains secured in place by several mounting bolts and, in some cases, support brackets.
These bolts are typically tightened very securely; therefore, use a correctly sized socket or wrench to avoid stripping their heads.
Slowly loosen and remove the bolts and set them aside in a safe place so they can be reused later when installing the new compressor.
Some compressors may feature multiple brackets that provide additional support; these, too, must be removed carefully to ensure they do not bend or become damaged.
This step requires patience and the use of the proper tools, as applying excessive force to the bolts can strip their threads or damage the mounting points.
4. Carefully Removing the Compressor from the Engine Bay
Once all connections and bolts have been removed, the compressor can be carefully lifted out of the engine bay.
It is crucial to lift it slowly and cautiously, as the compressor can be significantly heavier than it appears and may still contain residual oil inside.
Maneuver it out of the engine bay in such a way that it does not collide with surrounding components, such as hoses or wiring.
In some vehicles, space may be limited, so you may need to slightly adjust the angle of the compressor to safely extract it.
Exercising caution during this step helps prevent accidental damage to adjacent parts and ensures a smooth removal process.
5. Handling the Compressor Safely – Without Spilling Oil
The AC compressor contains a specialized oil that lubricates its internal components.
If the compressor is tilted or handled roughly, this oil may spill out.
To prevent oil leakage, try to keep the compressor as upright as possible while removing it.
Oil spillage not only creates a mess but can also deplete the critical oil volume required for the system; this factor is of paramount importance when installing a new compressor.
It is also beneficial to place the compressor on a level surface immediately after removing it from its packaging.
Proper handling ensures cleanliness and safety, while also facilitating better preparation for the correct installation of the new compressor.
How to Prepare the New AC Compressor
1. Ensuring the New Compressor Matches Specifications
Before installing a new AC compressor, it is crucial to ensure that it perfectly matches your vehicle’s specifications.
Compressors may appear identical visually, but they can differ in size, mounting points, pulley types, or internal capacity.
Always compare the new unit with the old one and cross-check the details provided in your vehicle’s service manual.
You can find OEM compressors, manufactured by the Original Equipment Manufacturer, as well as aftermarket compressors, which are produced by other companies.
OEM parts typically offer a perfect fit and reliable performance, while high-quality aftermarket options can be more cost-effective; however, they too must meet all technical specifications.
Ensuring a proper match helps prevent installation issues, poor performance and potential damage to the AC system.
2. Flushing the AC Lines – If Necessary
If the old compressor failed due to internal defects such as: the presence of metal fragments or debris, flushing the AC system is an essential step.
When a compressor suffers an internal failure, tiny particles can circulate throughout the AC lines, condenser and other components.
If these particles are not removed, they can quickly cause the new compressor to fail prematurely.
Flushing involves using a specialized cleaning solution to purge debris, old oil and fragments from the system.
This step helps create a clean internal environment within the AC system, allowing the new compressor to function correctly and ensuring its longevity.
Skipping this step in a contaminated system can lead to recurring failures and significantly increase repair costs.
3. Adding the Correct PAG Oil to the New Compressor
PAG oil is a specialized lubricant used within AC compressors to minimize friction and ensure the smooth operation of internal components.
Before installing a new compressor, it is crucial to add the specific type and quantity of PAG oil recommended for your vehicle.
Low oil levels can lead to excessive heat generation and internal wear, while overfilling can reduce cooling efficiency and increase pressure within the system.
In many cases, compressors come pre-filled with oil; however, it remains essential to verify the oil level and adjust it if necessary.
Proper lubrication ensures smooth operation and superior cooling performance, while also extending the lifespan of the new compressor.
4. Replacing O-Rings and Seals to Prevent Leaks
O-rings and seals are small yet critical components that maintain the airtight integrity of the AC system and prevent refrigerant leakage.
Over time, old O-rings can become hardened, cracked, or worn, particularly when exposed to heat and pressure.
When installing a new compressor, it is always advisable to replace all O-rings located at the connection points.
Prior to installation, apply a thin coat of PAG oil to the new O-rings; this facilitates the formation of a proper seal and protects against damage during the tightening process.
Properly installed seals ensure that the system maintains correct pressure, delivers optimal cooling performance and prevents refrigerant loss, factors that are vital for both the system’s operational efficiency and environmental protection.
How to Install the New AC Compressor
1. Positioning the Compressor
To begin the installation process, carefully place the new AC compressor into its designated location within the engine bay.
The compressor must be positioned in the exact spot where the old unit was previously mounted, ensuring that it aligns correctly with the mounting points and the pulley system.
Take your time to seat it comfortably into place without forcing it; applying excessive force could damage surrounding hoses or cause the unit to shift out of position.
Proper positioning of the compressor ensures that the drive belt runs smoothly and that all connections engage correctly.
Precise alignment at this stage is crucial for ensuring optimal long-term performance and for preventing issues such as vibration or uneven belt wear.
2. Tightening Mounting Bolts and Brackets
Once the compressor is seated in place, install the mounting bolts and any support brackets designed to secure it firmly in position.
Begin by hand-tightening the bolts to avoid cross-threading; cross-threading can damage the threads and compromise the structural integrity of the mount.
Subsequently, use the appropriate tools to tighten them gradually.
These bolts are designed to keep the compressor stable while the engine is running; therefore, tightening them correctly is essential to prevent the compressor from shifting or vibrating.
A properly mounted compressor enhances reliability and minimizes the risk of noise or mechanical stress during operation.
3. Reconnecting Electrical Connectors and Clutch Wires
After securing the compressor, reconnect all electrical connectors and clutch wires exactly as they were connected prior to removal.
These connections enable the compressor clutch to engage and disengage in response to your AC system being switched on or off.
Ensure that every connector seats securely in place with an audible ‘click,’ as a loose connection can prevent the compressor from operating or cause intermittent issues.
Inspect the wires for any faults before reconnecting them, as defective wiring can negatively impact performance.
Proper electrical connections ensure that the compressor receives the correct signals and operates smoothly.
4. Reinstalling the Drive Belt
Next, reinstall the serpentine, or drive, belt that powers the compressor.
Carefully route the belt over the pulleys, following the correct path; improper belt installation can compromise performance or damage the belt itself.
Use the tensioner to apply the correct amount of tension to the belt, ensuring that it fits snugly, but is not overtightened.
A correctly installed belt allows the compressor pulley to rotate freely and efficiently transfers power from the engine.
If the belt is worn or damaged, replacing it at this stage will help maintain consistent, optimal performance and prevent future issues.
5. Double-Checking All Bolt Torque Specifications
The final, and most critical, step is to double-check the torque specifications for all mounting bolts and connections.
Torque refers to the specific tightness required for a bolt and the precise values for each vehicle are outlined in its service manual.
Under-tightening bolts can cause them to loosen over time, whereas overtightening can strip their threads or cause components to crack.
By using a torque wrench, you can apply a precise amount of force, ensuring that everything is securely and firmly tightened.
This step enhances durability, prevents mechanical issues and ensures that the new compressor operates reliably under normal driving conditions.
How to Recharge the AC System
1. Evacuating the AC System to Remove Air and Moisture
After installing a new compressor, it is essential to evacuate the AC system before introducing refrigerant; this step is crucial for ensuring proper performance.
When the system is opened, air and moisture enter the lines; if these are not removed, these impurities can reduce cooling capacity and cause internal damage.
Moisture, when mixed with refrigerant and oil, can form acids that corrode internal components and shorten the compressor’s lifespan.
By using a vacuum pump connected to a manifold gauge set, the system is held under a deep vacuum for approximately 20 to 30 minutes, allowing trapped air to escape and moisture to evaporate.
A proper vacuum also helps verify the system’s ability to hold pressure, indicating the absence of any major leaks.
This step creates a clean and dry environment within the AC system, enabling it to operate efficiently and safely.
2. Using a Manifold Gauge to Recharge with the Correct Type and Amount of Refrigerant
Once the system has been completely evacuated, the next step is to recharge it with the specific type and quantity of refrigerant prescribed for your vehicle.
Using a manifold gauge set, you can control and monitor the system pressure while introducing refrigerant through the low-pressure side of the system.
It is critical to use the correct type of refrigerant such as: R134a or R1234yf, as using the wrong type can lead to system failure and compromised cooling performance.
Furthermore, introducing an excessive or insufficient amount of refrigerant into the system can lead to various issues, including poor cooling performance, excessive pressure buildup, or undue strain on the compressor.
The correct quantity is typically specified in the vehicle’s service manual or on a label located under the hood.
Charging the system gradually and carefully helps maintain balanced pressure levels, ensures effective cooling and allows the compressor to operate smoothly.
3. Checking for Leaks Using UV Dye or a Leak Detector
After recharging the AC system, it is essential to check for leaks to ensure that the refrigerant remains contained within the system and that the system maintains its efficiency.
Even a minor leak can gradually degrade cooling performance and necessitate frequent repairs.
A common method involves using UV dye; this is injected into the system and if a leak is present, it becomes visible under a specialized UV light.
Another technique involves using an electronic leak detector, which detects the presence of refrigerant gas in the surrounding air.
Carefully inspect all connection points, hoses and seals, particularly around the compressor and O-rings.
Promptly detecting and repairing leaks helps maintain proper pressure levels, protects the environment and ensures that your AC system continues to provide consistent and reliable cooling.
How to Test the New Compressor
1. Starting the Car and Turning on the AC
After completing the installation and recharging process, the first step in testing the new AC compressor is to start the car and switch on the air conditioning system.
Allow the engine to idle for a few minutes so that the system can stabilize and begin operating normally.
When the AC is switched on, the compressor clutch should engage, meaning it will begin to rotate along with the pulley.
This engagement is an indication that the compressor is receiving the correct electrical signal and has initiated the circulation of refrigerant through the system.
It is crucial to observe this initial startup carefully, as it confirms that the basic installation and electrical connections are functioning correctly.
2. Listening for Unusual Noises and Checking Airflow Temperature
Once the AC system is running, pay close attention to any sounds emanating from the compressor area.
A properly functioning compressor should run smoothly, producing only a faint and steady hum.
If you hear noises such as grinding, knocking, or loud rattling, this could indicate internal issues, improper installation, or a misaligned belt.
Additionally, check the airflow coming from the vents inside the car.
Depending on the ambient temperature, the air should gradually cool down within a few minutes.
If the air remains warm or feels only slightly cool, this may point to issues such as incorrect refrigerant levels or trapped air within the system.
This step helps you verify both the mechanical and cooling performance in a simple and practical manner.
3. Monitoring System Pressure and Ensuring Proper Cooling Performance
To fully confirm that the AC system is functioning correctly, use a manifold gauge set to monitor the system pressure while the AC is running.
Both the low-side and high-side pressure readings should fall within the recommended range for your vehicle, indicating that the compressor is properly compressing the refrigerant.
Stable and balanced pressure readings suggest that there are no major blockages or leaks within the system.
In addition to pressure, monitor the vehicle’s overall cooling performance by driving it for a while, as actual driving conditions yield more accurate results.
A properly functioning system guarantees consistently cool air, smooth compressor operation and an absence of sudden temperature fluctuations.
Monitoring these factors ensures that the new compressor is operating efficiently and that the entire AC system is performing as expected.
Know, The Solutions to Common Post-Replacement Issues
1. AC Not Cooling Properly
If your AC is still not cooling effectively even after replacing the compressor, the most common causes are likely incorrect refrigerant levels or air trapped inside the system.
If the refrigerant level is too low, it cannot absorb sufficient heat; conversely, if it is too high, it can create excessive pressure and reduce cooling efficiency.
The presence of air within the system can also hinder proper circulation and degrade performance, as air does not provide cooling like refrigerant does.
This often occurs when the system is not properly vacuumed before being recharged.
This issue can be resolved by checking the refrigerant levels using a manifold gauge set and ensuring that the system was thoroughly vacuumed.
Once the refrigerant volume and internal conditions are corrected, the AC should deliver strong, consistent cool air.
2. Strange Noises
If you hear unusual noises such as: rattling, grinding, or squealing sounds, after installing a new compressor, the cause is often an issue with the belt alignment or mounting.
The serpentine belt must sit in perfect alignment on the pulleys; even a slight misalignment can generate noise and result in uneven wear on the belt.
If the belt is either too loose or excessively tight, it can also produce noise and negatively impact the compressor’s efficiency.
Furthermore, if the mounting bolts are not properly tightened, the compressor may vibrate during operation, leading to knocking or rattling sounds.
Carefully inspecting the condition and tension of the belt, along with checking all mounting points, can help eliminate these noises and ensure the smooth operation of the AC system.
3. Electrical Issues
If the AC compressor fails to start or operates intermittently, the problem may not lie with the compressor itself, but rather within the electrical system.
The compressor clutch requires precise electrical signals to engage; if a fuse has blown, a relay is faulty, or a connector is loose, the compressor will not function.
It is essential to inspect all wiring connections to ensure they are secure and free of defects.
Checking the fuse box and replacing any blown fuses can also restore the AC system to proper working order.
Electrical issues are often easy to resolve; however, if left unaddressed, the entire AC system could cease to function completely.
Therefore, a thorough inspection is crucial to ensure reliable performance.
Read More:
- How to Check Coolant Level
- How to Fix AC in Car Blowing Hot Air
- How to Recharge Car AC
- How to Fix a Coolant Leak
- How to Fix Car Overheating
- How to Flush a Radiator
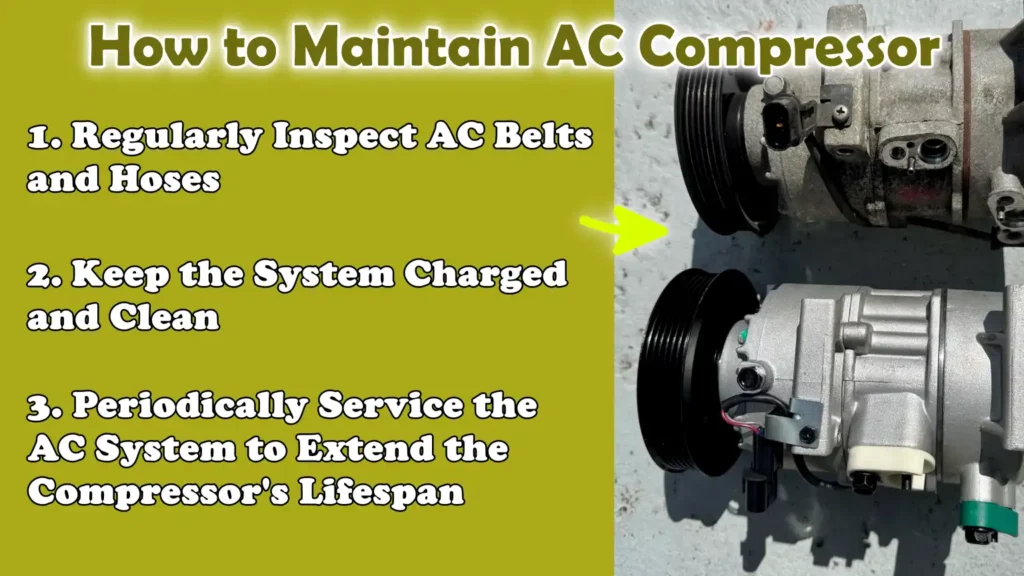
How to Maintain AC Compressor
Not only this, according to the comprehensive review in the Sustainability, the modern automotive air conditioning systems actually relies heavily on the compressor as it provides consistent cooling; and it is literally accounting for nearly one-third of the system inefficiencies if you don’t maintain it properly, so this study clearly shows that how important it is to have a routine inspections and maintenance so that you can prevent performance losses and extend the air condition system life.[¹]
1. Regularly Inspect AC Belts and Hoses
Regularly inspecting the AC belts and hoses is crucial to ensure that the compressor functions correctly and to prevent sudden malfunctions.
The serpentine belt drives the compressor; over time, due to constant heat and friction, it may develop cracks, become loose, or wear out.
A faulty belt can slip or snap, potentially causing the compressor to cease functioning entirely.
Conversely, hoses transport refrigerant under high pressure and even a minor crack or loose connection can lead to a leak.
Visually inspecting these components for signs of wear, damage, or oil residue helps you detect potential issues early on.
Timely replacement of worn belts and damaged hoses ensures proper power transmission and prevents refrigerant loss, thereby keeping the AC system operating efficiently.
2. Keep the System Charged and Clean
Maintaining the correct refrigerant level is essential for proper cooling and for the health of the compressor.
The AC system relies on refrigerant not only to cool the air but also to transport the lubricating oil that facilitates the compressor’s smooth operation.
If the refrigerant level drops too low, the compressor may run without adequate lubrication and overheat, potentially leading to internal damage.
Furthermore, keeping the system clean is equally important, as dust and dirt can obstruct airflow through the condenser and reduce cooling efficiency.
A clean system allows for efficient heat dissipation and helps maintain stable pressure levels.
Regularly checking refrigerant levels and ensuring that the condenser and its surrounding area remain free of dirt helps maintain robust cooling performance and protects the compressor from unnecessary strain.
3. Periodically Service the AC System to Extend the Compressor’s Lifespan
Periodic servicing of the AC system plays a crucial role in extending the compressor’s lifespan and maintaining its full operational efficiency.
Over time, minor issues such as: small leaks, moisture accumulation, or worn-out seals, as it can develop and gradually diminish performance.
Regular servicing involves checking pressure levels, inspecting components, cleaning the system and ensuring that oil and refrigerant levels are at the correct mark.
Occasionally running the AC system, even during the colder months, helps keep internal components lubricated and prevents seals from drying out.
Regular maintenance not only improves cooling capacity but also reduces the likelihood of major breakdowns, thereby saving both time and repair costs in the long run.
Conclusion – How to Replace AC Compressor
Yes, fixing the AC Compressor is not just about getting back that lovely cold air, but it is important as it restores comfort and control to your daily drive and gives you smooth and refreshing experience whenever you want.
The compressor plays a pivotal role in your AC system, circulating refrigerant and maintaining the necessary pressure to generate cool air; consequently, any malfunction within it directly impacts both your comfort and the system’s overall performance.
By carefully diagnosing the problem, utilizing the correct tools, adhering to safety precautions and properly installing the new compressor, you not only restore cooling performance but also safeguard other critical components from potential damage.
Steps such as evacuating the system, charging it with the precise amounts of refrigerant and oil and checking for leaks are not merely optional tasks; rather, they are essential procedures that ensure the system remains reliable over the long term.
Proper testing and regular maintenance also contribute to optimal system operation and help prevent future malfunctions.
When executed correctly, replacing the AC compressor yourself can result in significant cost savings compared to professional repairs, while also providing you with a deeper understanding of, and greater control over, your vehicle’s performance.
Now, that’s all about this guide How to Replace AC Compressor, so by now you can comment down your thoughts or unsolved queries as well.
Frequently Asked Questions
FAQ 1: What are the signs of a bad AC compressor in a car?
If you pay attention, a faulty AC compressor usually displays clear warning signs. The most common symptom is that warm air blows from the vents even when the AC is turned on. When the AC is running, you may also hear strange noises coming from the engine compartment such as: grinding, rattling, or squealing sounds. In some cases, the AC may repeatedly turn on and off, a phenomenon known as ‘short cycling’ which often points to compressor issues. You may also notice refrigerant leaks or a reduction in airflow. These signs occur because the compressor is unable to properly circulate the refrigerant or maintain the correct pressure within the system.
FAQ 2: Can I replace the AC compressor myself?
Yes, if you possess basic mechanical knowledge, have the right tools and follow proper safety protocols, you can replace the AC compressor yourself. However, this is not a particularly easy task, as it involves handling refrigerant, disconnecting various components and correctly reassembling them. You will also need certain specialized tools such as: a manifold gauge set and a vacuum pump, which are essential to ensure the system functions correctly. If you carefully follow the instructions step-by-step and take safety seriously, you can perform this job at home and save money. However, if you are unsure about any specific step, it is always safer to seek assistance from a professional.
FAQ 3: How long does it take to replace an AC compressor?
Replacing an AC compressor typically takes between 2 to 5 hours, depending on your level of experience and the specific make and model of the vehicle. For beginners, this process may take longer, as it requires extra time to understand each step and proceed with the necessary caution. The procedure involves removing components to access the compressor, disconnecting lines, installing the new unit, evacuating the system and recharging the refrigerant. If everything goes smoothly and the necessary tools are readily available, the job can be completed within just a few hours.
FAQ 4: Do I need to replace anything else along with the AC compressor?
Yes, to ensure that the system functions correctly and to prevent future issues, it is essential to replace certain components alongside the AC compressor. O-rings and seals should always be replaced, as they can develop leaks over time. In some cases, the receiver dryer or accumulator is also replaced, particularly if contaminants have accumulated inside the system. If the old compressor suffered from an internal failure, it is crucial to flush the AC lines to remove any accumulated debris. Replacing these small yet critical parts helps protect the new compressor and enhances the overall reliability of the system.
FAQ 5: What happens if I do not evacuate the AC system?
If you skip the step of evacuating the AC system, air and moisture will remain trapped inside, which can negatively impact performance. Air reduces the system’s cooling capacity because it does not function as a refrigerant. Moisture is even more detrimental, as it can lead to the formation of acids within the system, causing corrosion and damaging internal components. Without properly removing moisture, the AC will fail to cool effectively and the new compressor may suffer from premature failure. This step is absolutely critical for ensuring proper operation and long-term durability.
FAQ 6: How much refrigerant should I add after replacing the compressor?
The correct amount of refrigerant varies depending on your specific vehicle; this information is typically provided in the service manual or on a label located under the hood. Adding too little refrigerant will result in inadequate cooling, while adding too much can cause pressure to rise and potentially damage the system. By using a manifold gauge set, you can monitor the pressure levels while charging the system. It is crucial to carefully follow the specified quantity to ensure proper cooling and safe operation.
FAQ 7: Why is my AC still not cooling after replacing the compressor?
If your AC is still not cooling after replacing the compressor, there could be several reasons. The most common causes include incorrect refrigerant levels, the presence of air within the system, or a leak. It is also possible that another component such as: the condenser, expansion valve, or cooling fan is not functioning correctly. In some cases, electrical issues may prevent the compressor from operating properly. Thoroughly inspecting and diagnosing every component of the system can help identify and resolve the problem.
FAQ 8: Is it necessary to add oil to a new AC compressor?
Yes, it is absolutely essential to add the correct type and amount of oil to a new AC compressor. This oil lubricates the internal components, thereby preventing friction and overheating. Although some compressors come pre-filled with oil, it is still necessary to check and adjust the oil level to meet the specific requirements of your vehicle.
References:
[1] Air Conditioning Systems in Vehicles: Approaches and Challenges
https://www.mdpi.com/2071-1050/17/12/5257

Hello Folks, Dean Shali here to help you out to solve the problems with your lovely vehicle, as i have lots of experience and knowledge about automotive industry as i woks directly with the customers and repair vehicles and i love to help the people to keep their cars safe and running smoothly.