Written By: Dean Shali
Fact Checked By: Sabré Cook
Reviewed By: Tamara Warren
There’s no doubt about the brake performance dependency on how smooth and even your brake rotors are, as this is the surface your brake pads literally press against every time you wanted to slow down the vehicle.
But, over the time: the heat, friction and normal wear can create that small high and low spots on the rotor, that literally leads to the problems such as: steering wheel vibration, a pulsing brake pedal, reduced stopping power and uneven pad wear as well.
Also, there are many drivers that just assume that they needs to do immediate replacement, but in reality: it is just a minor surface damage issue that can often be corrected through the proper resurfacing method.
Basically, resurfacing actually works by removing very thin layer of metal in terms of restoring a flat, consistent surface so that the brake pads can make even and full contact again.
And, yes this method literally improve the braking smoothness, reduces that unwanted and irritating noise and extends the life of your braking components when you do this in correct procedure.
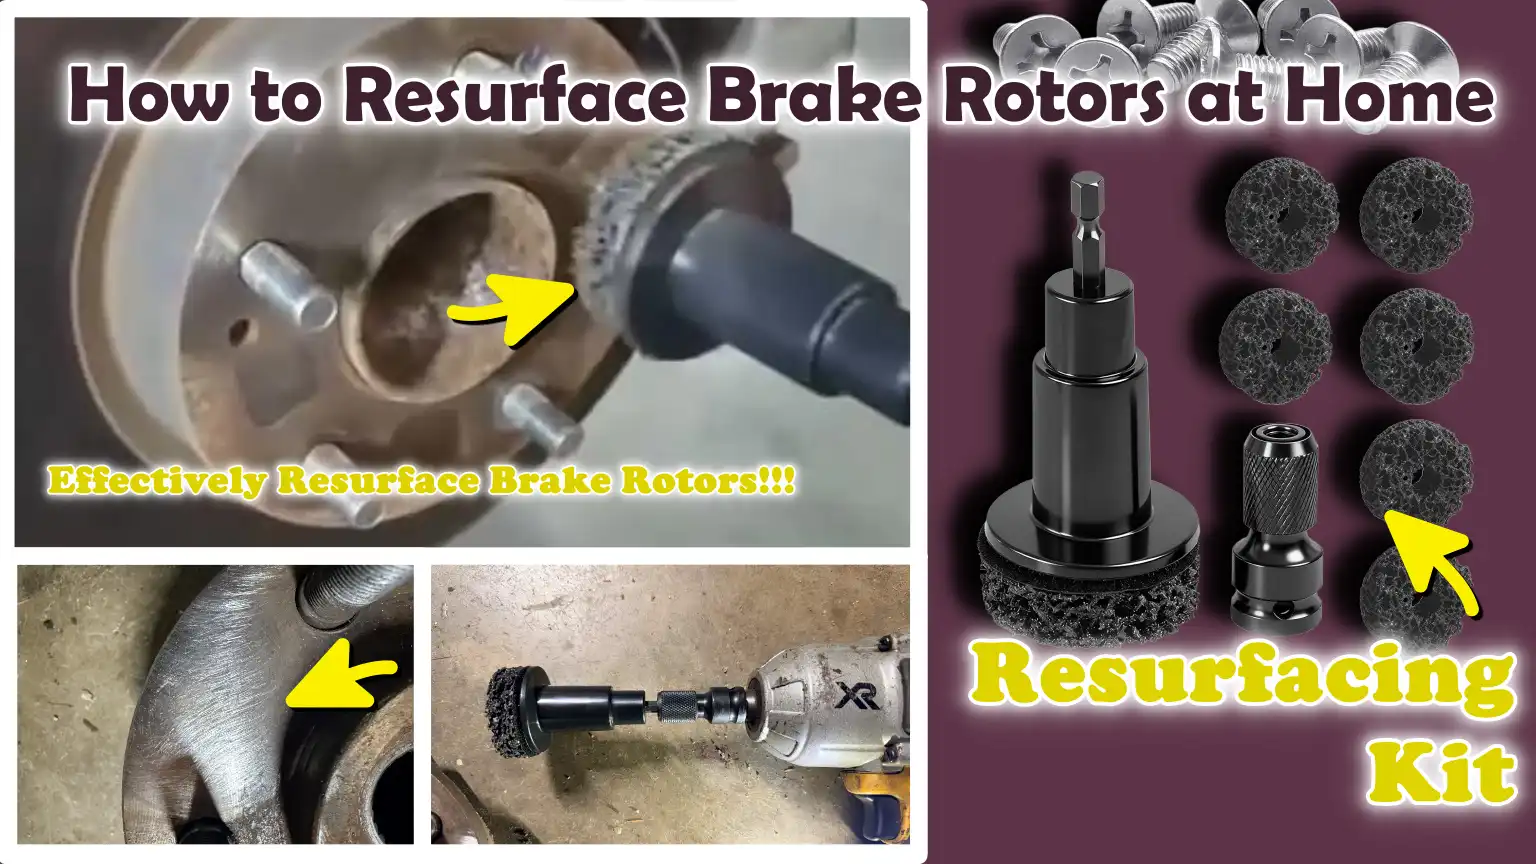
So, in this guide you’ll learn How to Resurface Brake Rotors at Home so that you can restore performance by using simple tools and identify whether your rotors are suitable for resurfacing or not so that you can avoid those common mistakes that can have negative affect braking performance.
Know, About The Common Signs Shows That Your Brake Rotors Need Resurfacing
Brake rotors wear down over time, as they are subjected to constant heat and friction every time you press the brake pedal.
As the surface becomes uneven, it affects how easily the brake pads can apply pressure to the rotor.
This leads to distinct changes in the feel and sound of your car when braking.
Recognizing these signs early allows you to address the issue before it becomes more severe or unsafe.
In many cases, provided the damage is not too deep and the rotor remains within safe thickness limits, resurfacing can restore the smoothness of the braking surface and improve performance.
Yes, brake rotor resurfacing is really important as even with the tiny surface difference can affect the braking performance very much, even there’s studies that shows that very small thickness variations can cause really noticeable vibration and pulsation while braking, so this is why you need to restore a smooth and even rotor surface by resurfacing process as it significantly improves the braking feel and gives you proper vehicle control as well.[¹]
1. Steering Wheel Vibration When Braking
One of the most common and easily identifiable signs is a vibration or shudder felt in the steering wheel, particularly when you apply the brakes (specially at high speeds).
This typically occurs when the rotor surface is uneven or slightly warped, preventing the brake pads from gripping the spinning rotor properly.
Each time the high and low spots on the rotor pass beneath the brake pads, a pulsating pressure is generated that travels through the suspension system and up to the steering wheel.
Not only does this feel uncomfortable, but it also compromises braking stability, making it difficult to maintain control of the vehicle during sudden braking situations.
2. A Pulsating Sensation in the Brake Pedal
A pulsating or vibrating sensation in the brake pedal is another clear indication that your rotors require attention.
When the rotor surface is not perfectly flat, the brake pads are unable to maintain continuous contact; As a result, the brake pedal tends to pulsate slightly up and down beneath your foot.
This sensation is often described as a rhythmic throbbing.
It becomes even more pronounced when braking at moderate to high speeds.
This issue is directly linked to variations in rotor thickness or uneven wear; if identified early, it can often be resolved through resurfacing.
3. Grooves or Scratches on the Rotor Surface
Clearly visible grooves or deep score marks on the rotor surface are a strong indication of physical wear.
These marks typically form due to worn-out brake pads, debris trapped between the pads and the rotor, or prolonged use without proper maintenance.
A healthy rotor should feel smooth and uniform to the touch; however, when grooves are present, the brake pads are unable to establish full contact with the surface.
This compromises braking efficiency and may result in longer stopping distances.
Minor scratches can often be corrected through resurfacing, but deep gouges may necessitate replacing the rotor entirely.
4. Uneven Brake Pad Wear
If your brake pads are wearing unevenly, it often signals a defect in the rotor surface.
An uneven rotor exerts uneven pressure on the brake pads, causing certain sections to wear down faster than others.
This not only reduces the lifespan of the brake pads but also diminishes overall braking performance.
Uneven wear can also generate excessive heat in specific areas (creating “hot spots”), which further damages the rotor surface over time.
Resurfacing the rotor can help ensure uniform contact and promote more even wear of the brake pads.
5. Squealing or Grinding Sounds
Unusual noises occurring while braking should never be ignored, particularly squealing or grinding sounds.
A squealing sound often arises when the rotor surface becomes rough or when the brake pads are unable to slide smoothly across it.
A grinding sound, on the other hand, is more serious and may indicate that the pads have completely worn out, causing their metal backing plates to come into contact with the rotor.
If the rotor surface is only slightly rough, resurfacing can restore its smoothness and thereby eliminate the noise.
However, if the noise is the result of severe damage, both the pads and the rotors may need to be replaced.
Tools
| Item | Why It Is Needed | How to Use It |
|---|---|---|
| Jack and jack stands | These are essential for safely lifting your vehicle and holding it securely in place, allowing you to work on the brakes. A jack alone cannot be relied upon for extended periods; therefore, jack stands are required for safety. | Use the jack to lift the vehicle at the designated lift points; then, position the jack stands under sturdy support points and lower the vehicle onto them. Ensure that the vehicle is stable before beginning your work. |
| Lug wrench | This tool is required to loosen and tighten the lug nuts that secure the wheel, thereby allowing you to access the brake rotor. | Loosen the lug nuts slightly before lifting the vehicle and then remove them completely once the vehicle has been raised. When reinstalling the wheel, put the nuts back on and tighten them evenly. |
| Socket set | A socket set assists in removing and reinstalling the bolts for the brake caliper and other components. Using the correct socket size helps prevent damage to the bolts. | Select the appropriate socket size, attach it to a ratchet and turn it anti-clockwise to remove the bolts. Keep the bolts safe and ensure they are securely tightened during reassembly. |
| Orbital sander or drill with sanding attachment | This tool helps smooth the rotor surface more evenly and quickly than manual sanding, particularly for addressing minor surface imperfections. | Move the tool evenly across the rotor surface using light pressure. Avoid lingering in one spot for too long to ensure consistent sanding results. |
| Sandpaper (80, 120, 220 grit) | Different grit levels are required to progressively smooth the rotor surface. Coarse grits remove rough spots, while fine grits make the surface smoother and cleaner. | To remove imperfections, start with 80-grit sandpaper; then, use 120-grit to further refine the surface and finish with 220-grit for maximum smoothness. Maintain a consistent pace while sanding. |
| Brake cleaner | This removes brake dust, grease and metal particles; if this debris remains on the rotor, it can negatively impact braking performance. | Spray it directly onto the rotor to wash away dirt and residual particles. Allow it to drip off and let it dry completely before touching or reassembling any components. |
| Microfiber cloths | These help clean the rotor without leaving behind lint or scratching the surface. | Use a clean cloth to wipe down the rotor after applying the brake cleaner. Avoid using dirty or coarse cloths. |
| Gloves | Gloves protect your hands from sharp edges, heat and harmful brake dust. | Keep your gloves on throughout the entire process, specially when handling the rotors and cleaning chemicals. |
| Safety glasses | These protect your eyes from dust and fine particles during sanding and cleaning. | Wear them at all times while working, particularly when sanding or spraying cleaners. |
| Dust mask | Brake dust contains fine particles that can be harmful if inhaled; therefore, wearing a mask for respiratory protection is essential. | Wear a mask while sanding and cleaning to prevent inhaling dust. Make sure that it fits properly over your nose and mouth. |
How to Ensure Safety Before Starting Work
When working on brake components, it is crucial to pay close attention to safety, as you will be handling heavy parts, critical systems and fine dust, elements that can cause injury if not handled properly.
Taking the right precautions before beginning work not only protects you from injury but also ensures that the work you perform on your brake rotors is precise and reliable.
Even minor errors in setup or handling can lead to serious hazards; therefore, it is essential to fully understand and strictly adhere to every safety protocol.
1. Proper Lifting Techniques
Lifting the vehicle correctly is one of the most critical steps in ensuring safety.
A car can weigh thousands of pounds and if not properly supported, it can fall and cause severe injury.
Always use a sturdy and stable jack to lift the car and position it at the designated lift points; these locations are typically specified in the vehicle owner’s manual.
Once the car is raised, it is absolutely essential to support it using jack stands; these stands should be placed beneath solid sections of the vehicle’s frame.
Never rely solely on the jack to hold the vehicle, as the jack’s hydraulic pressure could fail or it could suddenly slip.
Ensure that the ground surface is level and solid, as soft or uneven surfaces can cause the vehicle to become unstable.
Before beginning work, gently nudge the vehicle to verify that it is properly supported and remains steady.
2. Securing the Vehicle
In addition to lifting the vehicle, it is equally important to properly secure it to prevent it from moving while you are working.
When the car is raised, even the slightest forward or backward movement can be extremely dangerous.
Always engage the parking brake and place wheel chocks (stones or blocks of wood) behind the wheels that are in contact with the ground.
This prevents the car from rolling forward or backward.
If you are working on the front wheels, secure the rear wheels; conversely, if you are working on the rear wheels, secure the front wheels.
Keeping the car stable ensures that you can focus fully on your work without the risk of the vehicle suddenly shifting.
3. Avoiding the Inhalation of Brake Dust
Brake dust is a fine powder generated by worn brake pads and rotors; it may contain tiny metal particles and other substances that are unsafe to inhale.
When you clean or sand the surface of a rotor, this dust can become airborne, and if you haven’t taken safety precautions, it can enter your lungs.
To minimize the risk of inhaling these particles, always wear a proper dust mask that completely covers your nose and mouth.
It is also crucial that you do not blow the dust away with compressed air or brush it off with a dry brush, as this causes the dust particles to disperse even further.
Instead, use a brake cleaner to safely remove the dust so that it does not become airborne.
4. Working on a Cool Braking System
Typically, brake components become extremely hot during driving due to the friction generated when the vehicle slows down.
If you attempt to work on the brakes immediately after driving, you could easily burn your hands or damage your tools.
Before beginning any work, always allow sufficient time for the braking system to cool down completely.
A cool rotor is also easier to handle and it is safer to clean and resurface.
Working on hot components can also affect cleaning chemicals; they may evaporate very rapidly, thereby reducing their effectiveness.
Waiting until everything has cooled down ensures your safety during the surface restoration process and yields better results.
How to Resurface Brake Rotors at Home – Effective & Truly Beginner Friendly
Resurfacing brake rotors at home requires patience, precision and meticulous attention to detail, as even a minor error can compromise braking performance.
The objective is to restore a smooth and uniform surface, thereby ensuring that the brake pads maintain full contact with the rotor.
Each step plays a crucial role in both safety and the final outcome; therefore, it is essential to follow this procedure in the correct sequence and avoid rushing through any part of the process.
1. Lift and Secure the Vehicle
To begin, use an appropriate jack to lift the vehicle, positioning it at the designated jacking points.
These points are typically reinforced sections of the vehicle’s underbody, specifically designed to bear the weight of the car.
Using an incorrect location can result in damage to the vehicle or cause it to slip.
Once the vehicle is lifted, place sturdy jack stands beneath solid support points and slowly lower the vehicle onto them.
This step is critical, as relying solely on the jack to support the vehicle while you work is unsafe.
Before proceeding, ensure that the vehicle is stable and does not wobble, as this guarantees your safety throughout the entire process.
2. Remove the Wheel
Before lifting the vehicle completely, use a lug wrench to slightly loosen the lug nuts to facilitate easy removal of the wheel.
Once the vehicle is safely lifted, fully remove the lug nuts and detach the wheel.
Doing so exposes the brake assembly, which consists of the rotor, caliper and pads.
Store the lug nuts in a secure location to prevent them from getting lost, as you will need them when reassembling the vehicle.
3. Remove the Brake Caliper and Pads
The brake caliper holds the brake pads pressed against the rotor; therefore, it must be removed with care.
Use the correct socket to loosen and remove the caliper bolts.
Once the caliper is detached, do not leave it hanging by the brake hose, as this can damage the hose and lead to brake failure.
Instead, support the caliper by suspending it with a piece of wire or by resting it securely on a nearby surface.
Next, remove the brake pads and set them aside; ensure that you note their original positions so they can be reinstalled correctly later.
4. Inspect the Condition of the Rotor
Before beginning the resurfacing process, carefully inspect the rotor to determine if it is suitable for the procedure.
Check for deep grooves, cracks, excessive rust, or any obvious signs of warping.
Additionally, use a caliper or micrometer to measure the rotor’s thickness, ensuring that it exceeds the minimum thickness specified by the manufacturer.
If the rotor is excessively thin or severely damaged, resurfacing it is unsafe and replacement is the better option.
This step prevents wasting time on a rotor that cannot be properly restored.
5. Clean the Rotor Surface
Use a brake cleaner to remove dirt, grease and brake dust from the rotor’s surface.
Thorough cleaning is crucial, as any debris remaining on the surface can interfere with the sanding process and result in an uneven finish.
Spray the cleaner evenly and allow it to wash away the grime.
Wipe down the rotor with a clean microfiber cloth and let it dry completely before proceeding to the next step.
6. Sand the Rotor Evenly
Sanding is the primary step in resurfacing a rotor and must be performed carefully to ensure a uniform surface.
Begin with coarse-grit sandpaper such as: 80-grit, to remove minor imperfections and rough spots.
When sanding, use a circular or cross-hatch motion; this technique helps create a consistent pattern and prevents the formation of uneven areas on the surface.
Maintain light and even pressure across the entire surface of the rotor.
Avoid focusing on a single spot for too long, as this can create depressions in the surface and cause the rotor to become uneven, which can negatively impact braking performance.
7. Smooth with Fine-Grit Sandpaper
After the initial sanding, use fine-grit sandpaper such as: 120-grit, followed by 220-grit, to further smooth the surface.
This step helps reduce roughness and provides a finer finish, ensuring that the brake pads make even contact with the rotor.
A smooth surface enhances the braking experience and minimizes noise.
Maintain consistent pressure and work at a steady pace to ensure a uniform finish across the entire rotor.
8. Clean Thoroughly Once More
Once sanding is complete, clean the rotor again with brake cleaner to remove all dust and metal particles generated during this process.
Any remaining debris can negatively impact braking performance and lead to uneven wear.
Wipe the surface with a clean microfiber cloth and ensure it is completely clean and dry before reassembly.
This step is crucial for establishing proper contact between the rotor and the brake pads.
9. Reassemble the Brake Components
Reinstall the brake pads in their original positions, then carefully place the caliper back over the rotor.
If possible, securely tighten the caliper bolts using the correct torque specifications.
Next, remount the wheel and hand-tighten the lug nuts.
Carefully lower the vehicle from the jack stands, then fully tighten the lug nuts in a criss-cross pattern to ensure even pressure.
Proper reassembly ensures that all components function together correctly and securely.
10. Conduct a Test Drive Carefully
Once the work is finished, take the vehicle for a cautious test drive at low speeds to check how the brakes feel.
Pay close attention to any vibrations, noises, or unusual behavior.
The braking should feel smooth and consistent.
Avoid applying the brakes forcefully at first, as the brake pads require time to properly seat against the resurfaced rotor surface.
Only gradually increase your speed and braking force after confirming that everything is functioning correctly.
This final step ensures that the resurfacing process was successful and that your vehicle is safe to drive.
How to Measure Brake Rotor Thickness at Home
Measuring brake rotor thickness at home is a crucial step, as it determines whether the rotor is still safe for use or requires replacement.
Brake rotors are designed with a specific thickness to withstand the heat, pressure and friction generated during braking.
Each time you resurface a rotor or apply the brakes, a small amount of material wears away.
If a rotor becomes excessively thin, it loses its ability to properly absorb and dissipate heat; this can lead to issues such as brake fade (a reduction in braking effectiveness), warping, cracking and even complete brake failure.
Taking a few minutes to measure the thickness, both before and after resurfacing, helps you avoid serious safety hazards and ensures that your braking system functions exactly as intended.
1. Understanding Minimum Thickness Specifications
Every brake rotor has a minimum thickness specification established by the manufacturer, which indicates the lowest safe limit for the rotor’s thickness.
This value is typically stamped directly onto the rotor itself or listed in the vehicle’s owner’s manual.
The difference between the original thickness and the minimum thickness represents the amount of material that can safely wear away over time.
If a rotor falls below this limit, its structural integrity is compromised and it becomes less capable of withstanding the high temperatures generated during braking.
Thinner rotors heat up more rapidly and cool down more slowly, thereby increasing the likelihood of warping and inconsistent braking performance.
This is why, when resurfacing, only a very small amount of material should be removed from the rotor, ensuring it never approaches or falls below its specified minimum thickness limit.
2. Why Falling Below the Limit Is Dangerous
Driving with a rotor that has fallen below its minimum thickness limit is unsafe, as it directly compromises braking performance and reliability.
Thin rotors are unable to maintain their structural integrity (strength) under heat and pressure, which can lead to issues such as vibration, reduced stopping power and an inconsistent braking feel.
In severe cases, the rotor may crack or even shatter under stress, particularly during hard braking or while driving on inclines.
This places excessive strain on other brake components, such as pads and calipers, causing them to wear out prematurely and increasing the likelihood of damage to the entire braking system.
Staying within safe thickness limits ensures that your brakes can reliably handle real-world driving conditions without compromising safety.
3. Using a Micrometer or Caliper
To accurately measure rotor thickness, you will need a precision instrument, such as a micrometer or a Vernier caliper.
These tools allow you to measure the rotor’s thickness in millimeters or inches with a high degree of accuracy.
Place the measuring tool against the rotor’s surface, taking care to avoid any raised spots or edges, and take measurements at several different points around the rotor.
This helps you check for uneven wear, which is a common occurrence in used rotors.
If significant discrepancies appear in the measurements, it may indicate uneven thickness (runout), which can cause brake vibration during braking.
Always compare your measurements against the minimum thickness limit specified by the manufacturer.
If the rotor has reached very close to, or fallen below, that limit, resurfacing is generally not recommended; in such cases, replacing the rotor is the safer option.
Understand, When Not to Resurface Brake Rotors?
Resurfacing can correct minor surface imperfections, but it is not always the right solution.
In some instances, attempting to resurface a damaged rotor can compromise safety and actually degrade, rather than improve, braking performance.
Brake rotors are critical safety components that must be robust, flat and capable of withstanding high temperatures.
If the damage extends beyond mere minor wear, replacing the rotor is the safer and more reliable option.
Understanding when not to resurface a rotor saves you time and prevents serious brake-related issues down the road.
1. When the Thickness Falls Below the Specified Limit
If a rotor is already at or below its minimum thickness limit, it should never be resurfaced.
Each time a rotor is resurfaced, a thin layer of metal is removed, thereby reducing its overall thickness.
A rotor that is excessively thin cannot properly absorb and dissipate heat during braking.
This causes the rotor to overheat rapidly, diminishes braking power and increases the likelihood of the rotor warping or cracking.
Thin rotors also accelerate brake pad wear and can render braking performance unstable.
Even if the surface appears smooth after sanding, the rotor may lack the structural integrity required to function safely under actual driving conditions.
2. Deep Cracks or ‘Heat Spots’
Visible cracks or deep ‘heat spots’ (discoloration caused by heat) on the rotor’s surface are clear indications of severe damage.
Cracks typically form due to excessive heat and pressure and they compromise the structural integrity of the rotor.
“Heat spots”, which appear as dark or discolored patches, indicate that the metal has heated unevenly and subsequently hardened.
The hardness of these areas differs from that of the rest of the rotor, resulting in uneven braking and the generation of vibrations.
Resurfacing cannot repair cracks, nor can it completely eliminate heat spots, as the damage extends far deeper than the surface level.
Continuing to use such a rotor significantly increases the risk of brake failure while driving.
3. Severe Warping
Severe warping implies that the rotor is no longer flat and distinct high and low spots have become clearly visible on its surface.
This causes intense vibration in the steering wheel and a pulsating sensation in the brake pedal when braking.
Although very minor irregularities can sometimes be corrected through light resurfacing, severely warped rotors cannot be properly repaired without professional machining equipment.
Attempting to fix this at home often leaves the surface uneven, allowing underlying issues to persist.
In such cases, replacing the rotor is the only reliable method for achieving smooth and consistent braking performance.
4. Excessive Rust Damage
A certain degree of rust on brake rotors is normal, specially if the vehicle remains stationary for an extended period, but excessive rust can lead to serious problems.
When rust becomes deep-seated and spreads across the rotor’s surface or edges, it creates an uneven contact area for the brake pads.
This reduces braking efficiency and can lead to noise and vibration.
Furthermore, over time, excessive rust accumulation can compromise the structural integrity of the rotor.
Light surface rust can often be cleaned or removed through normal driving or light sanding; however, deep damage caused by rust cannot be fully remedied solely by resurfacing the rotor.
If the metal is severely degraded, replacing the component is the safer option to ensure proper braking performance.
Know, The Common Mistakes During Resurfacing Brake Rotors to Avoid Them
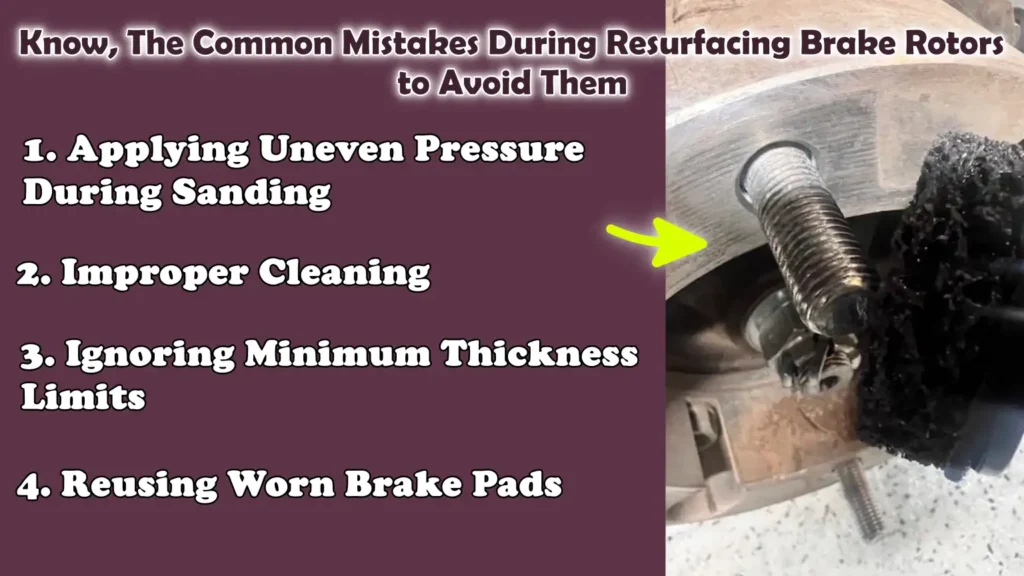
When resurfacing brake rotors at home, minor errors can compromise braking performance, accelerate wear and even pose a safety risk.
Although the process may seem simple, it demands meticulous attention to every detail, both large and small, as the functionality of the brake system relies entirely on its precision.
Avoiding common mistakes ensures that the rotor surface remains smooth, the brake pads make proper contact and the vehicle stops safely and consistently.
1. Applying Uneven Pressure During Sanding
One of the most common mistakes is applying uneven pressure while sanding the rotor surface.
When greater pressure is applied to one section compared to another, the result is an uneven surface characterized by high and low spots, rather than a uniform finish.
This unevenness leads to vibrations, a pulsating sensation in the brake pedal and irregularities in braking performance.
For the brake pads to function effectively, it is crucial that the rotor remains as flat as possible.
To avoid this issue, pressure should be light and distributed evenly across the entire surface and the sanding motion should be consistent.
It is essential not to rush this step, as haste often results in an uneven finish.
2. Improper Cleaning
Cleaning is often overlooked, yet it plays a critical role in the resurfacing process.
After sanding, fine metal dust and debris accumulate on the rotor surface, which can interfere with the contact between the rotor and the brake pads.
If this debris is not thoroughly removed, it can lead to noise, uneven wear and reduced braking efficiency.
In some cases, residual grime can even cause new scratches on the rotor’s surface.
Using the correct brake cleaner and a clean cloth ensures that the surface is completely free of any contaminants.
A clean rotor helps the brake pads establish uniform contact and perform their intended function effectively.
3. Ignoring Minimum Thickness Limits
Ignoring the rotor’s minimum thickness limit is a serious error that can compromise safety.
Every rotor has a specific limit indicating how thin it can safely become.
The resurfacing process involves grinding away a certain amount of the rotor’s material; therefore, if the rotor is already close to this limit, further sanding could render it excessively thin.
Thin rotors are unable to dissipate heat effectively and the pressure exerted during braking increases the risk of warping, cracking, or complete failure.
Consequently, this can diminish the vehicle’s stopping power and result in unpredictable braking performance.
To ensure that the rotor’s thickness remains within safe limits and to prevent hazardous situations, it is crucial to measure the rotor’s thickness both before and after resurfacing.
4. Reusing Worn Brake Pads
Reusing old or worn brake pads after resurfacing the rotor’s surface can compromise the effectiveness of the entire procedure.
The surface of worn pads is often uneven and fails to mate properly with the rotor’s newly smooth surface.
This prevents proper contact from being established, which can lead to premature rotor wear and give rise to issues such as noise, vibration and uneven surface wear.
New, or properly conditioned, brake pads are far better suited to mate with the new surface of the rotor and deliver consistently good braking performance.
Using high-quality pads also helps extend the lifespan of the rotors and improves overall braking performance.
Read More:
- How to Fix Brake Rotor Runout
- How to Check Brake Disc Runout
- How to Prevent Brake Fluid Boiling
- How to Diagnose Brake Fluid Boiling
- How to Fix Brake Pedal Sinking Slowly
- How to Check Brake Pad Wear Sensor
- How to Measure Brake Pad Thickness Without Removing Wheel
- How to Replace Brake Pads
- How to Replace Brake Rotors
- How to Bleed Car Brakes
How Long Do Resurfaced Rotors Last?
The lifespan of resurfaced brake rotors depends on several key factors, such as driving habits, the rotor’s initial condition and the quality of the resurfacing work.
Resurfacing removes a thin layer of metal, restoring a smooth surface; however, this process slightly reduces the overall thickness of the rotor.
Consequently, resurfaced rotors generally do not last as long as brand-new ones; nevertheless, if they are in good condition and used properly, they can still deliver reliable performance.
In many cases, resurfaced rotors can last anywhere from 20,000 to 60,000 miles; however, this range can vary significantly depending on real-world driving conditions and maintenance practices.
1. Driving Habits and Their Impact
Driving style plays a crucial role in determining the lifespan of resurfaced rotors.
Frequent hard braking, sudden stops and driving in heavy traffic or hilly terrain, all of these factors generate excessive heat within the braking system and accelerate rotor wear.
This excess heat can cause rotors to wear out more quickly and increases the likelihood of them becoming uneven or warped again.
Conversely, braking gently and in a controlled manner places less stress on the rotors, thereby extending their lifespan.
Drivers who maintain a safe distance from other vehicles and avoid hard braking often find that their resurfaced rotors last for a much longer time.
2. The Rotor’s Condition Prior to Resurfacing
The initial condition of the rotor prior to resurfacing is also a critical factor.
Rotors exhibiting only minor wear, slight glazing, or superficial scratches on the surface often perform better and last longer after resurfacing.
However, if a rotor has already reached its minimum thickness limit or shows signs of uneven wear, its remaining lifespan will remain limited even after resurfacing.
The removal of a layer of metal during this process means that the rotor has less material remaining to withstand heat and friction, which can accelerate its rate of wear over time.
3. Quality of Resurfacing Work
The quality of the resurfacing process has a direct impact on how long the rotors will function effectively.
If the surface is smooth and uniform, the brake pads can establish full contact with the rotor, ensuring even wear and consistent braking performance.
Conversely, if sanding or machining is not performed correctly, variations in rotor thickness may occur; this can result in vibrations while driving and lead to premature rotor failure.
To achieve the best results, proper cleaning of the rotors, the use of correct sanding techniques and careful reinstallation are all essential.
When the rotor surface is restored with precision and accuracy, it can provide stable and reliable braking performance for a significantly longer period.
Know, The Difference Between Resurfacing vs Replacing Brake Rotors
Choosing between resurfacing and replacing brake rotors depends on several factors, such as cost, performance requirements and the actual condition of the rotors.
Both options aim to restore safe braking, but they function differently and yield different results in the long run.
Understanding how each option impacts your vehicle helps you make a more informed and safe decision.
1. Cost Comparison
Resurfacing brake rotors is generally the more economical option, as it involves removing a thin layer of metal to achieve a smooth surface.
When performed at home, the cost is largely limited to tools and supplies, making it a cost-effective solution for minor issues.
Even at a repair shop, resurfacing is typically less expensive than purchasing new rotors.
Conversely, replacing rotors entails the full cost of new parts, plus labor charges if the work is performed by a professional.
However, while resurfacing offers short-term savings, it may not always prove to be the most economical option in the long run, specially if the rotors wear out quickly following the procedure.
2. Performance Differences
In terms of performance, new brake rotors generally deliver the best results, as they provide a completely fresh, perfectly uniform surface and full thickness.
This facilitates better heat dissipation, results in smoother braking and ensures a longer lifespan for the rotors.
Resurfaced rotors can also perform well, but only if they suffer from minor imperfections and the resurfacing process has been executed correctly.
As resurfacing involves the removal of metal, the rotor becomes thinner; consequently, it becomes slightly less capable of dissipating heat compared to a brand-new rotor.
This implies that when heavy braking is required, resurfaced rotors may wear out faster or develop issues sooner than new ones.
3. When Replacement Is the Better Option
Replacing rotors becomes the best and safest option when they are so severely worn or damaged that they cannot be properly restored.
If a rotor has reached or fallen below its minimum thickness limit, it should not be resurfaced, as this weakens the rotor and increases the risk of failure.
Deep cracks, visible signs of severe wear and tear, excessive warping, or heavy corrosion are also clear indications that the rotor cannot be safely repaired.
In such situations, installing new rotors maintains the structural integrity of the vehicle, improves heat-dissipation capabilities and ensures more reliable braking performance.
Although replacement entails a higher initial cost, it offers superior safety and longer-lasting results, particularly for vehicles that are driven frequently or under demanding conditions.
Basic Tips to Extend the Lifespan of Brake Rotors
Brake rotors are designed to withstand heat and friction; however, their longevity depends significantly on how they are used and maintained.
Every time you depress the brake pedal, the rotors and brake pads generate friction to slow the vehicle down, which gradually wears away the metal surface.
By adopting a few simple and practical habits, you can minimize unnecessary wear, prevent damage and ensure that your braking system continues to function smoothly for an extended period.
Proper care not only enhances safety but also helps you avoid frequent repairs and additional expenses.
1. Avoid Hard Braking
Hard and sudden braking is one of the primary reasons why brake rotors wear out prematurely.
When you brake hard, a tremendous amount of heat is generated in a very short time, subjecting the rotor surface to significant thermal stress.
Repeated exposure to excessive heat can lead to uneven spots on the rotor, warping, or the formation of hairline cracks.
Braking gradually and gently allows heat to build up slowly and dissipate evenly across the entire rotor, thereby reducing stress and wear.
Maintaining a safe distance from other vehicles and planning your stops in advance can help you avoid the need for sudden, emergency braking.
2. Use High-Quality Brake Pads
The type and quality of brake pads you use have a direct impact on the lifespan of your rotors.
Low-quality or excessively hard brake pads can accelerate wear on the rotor surface and generate excessive friction.
This can lead to grooving, uneven wear patterns and excessive heat generation.
High-quality brake pads are designed to provide a balanced level of friction while exerting minimal stress on the rotor surface.
They also generate less dust and heat, thereby helping to keep the rotor surface smooth over time.
Choosing the right brake pads ensures better compatibility with your rotors and enhances overall braking performance.
3. Keep Brakes Clean
Brake components are constantly exposed to road dust, dirt and minor debris.
Over time, these particles can accumulate on the rotor surface and become lodged between the brake pads and the rotor.
This can result in scratches, uneven wear and noise during braking.
Keeping your brakes clean helps maintain a smooth contact surface and prevents damage caused by debris.
Periodically cleaning the components with a suitable brake cleaner removes dust and grime, allowing the braking system to operate more efficiently and last longer.
4. Perform Regular Inspections
Regularly inspecting your braking system helps you detect minor issues before they escalate into major problems.
Checking the rotor surface for signs of wear, grooving, rust, or discoloration allows you to take necessary corrective measures in a timely manner.
Monitoring the condition of the brake pads is also crucial, as worn-out pads can damage the rotors if not replaced promptly.
Measuring the rotor thickness and ensuring it remains above the minimum safe limit is another vital aspect of maintenance.
Regular inspections ensure uniform wear, enhance safety and extend the overall lifespan of both the rotors and other brake components.
Conclusion – How to Resurface Brake Rotors at Home
So, the true value of resurfacing the brake rotors is not just it saves lot of money, but it gives you smooth braking that quietly protects your every time you press the brake pedal.
Brake rotors play a direct role in how quickly and safely your vehicle comes to a stop; therefore, their condition should never be taken lightly.
When the rotor surface is smooth and uniform, the brake pads can make full contact with it, resulting in superior braking control, reduced vibration and consistent performance.
However, resurfacing is not always the appropriate remedy; if excessive material is removed, or if the process is applied to a rotor that is already severely worn, its structural integrity may be compromised, rendering the vehicle unsafe to drive.
Consequently, before deciding to resurface a rotor, it is crucial to inspect it thoroughly, measure its thickness and understand its specific service limits.
Executing this task correctly requires patience, the right tools and meticulous attention to detail.
Simple steps such as: ensuring uniform sanding, thorough cleaning and careful reinstallation, as it can make a significant difference in the final outcome.
Furthermore, it is equally important to recognize when to stop and opt to replace the rotor entirely rather than attempting to resurface it.
A new rotor guarantees full thickness, superior heat dissipation capabilities and greater longevity, making it the more prudent choice in many situations.
Ultimately, the objective is not merely to fix an immediate issue, but to ensure that your braking system remains consistently reliable and safe every time you get behind the wheel.
Now, you can ask all the related questions and unsolved queries in comment box below.
Frequently Asked Questions
FAQ 1: Can the surface of all brake rotors be resurfaced?
Answer: Not all brake rotors can be resurfaced, as this depends on their condition and thickness. Rotors exhibiting only minor surface wear, small pits, or slight unevenness can typically be safely resurfaced. However, if a rotor has deep cracks, heavy rust, severe warping, or has reached its minimum thickness limit, resurfacing is not recommended. In such cases, removing additional material could weaken the rotor to the point where it cannot withstand the heat and pressure generated during braking. Always carefully inspect the rotor and measure its thickness before deciding to resurface it.
FAQ 2: Is sanding brake rotors at home actually safe?
Answer: Sanding brake rotors at home can be safe, provided it is done correctly and is used solely to address minor surface imperfections. The key is to apply even pressure, use sandpaper with the appropriate grit and avoid removing excessive material. Adhering to safety protocols such as: wearing protective gear and ensuring the vehicle is properly secured, is also crucial. However, sanding is not a substitute for professional machining and cannot repair severe damage. If not performed correctly, the surface may become uneven, potentially leading to vibrations and compromised braking performance.
FAQ 3: How smooth should brake rotors be after resurfacing?
Answer: After resurfacing, the entire surface of the rotor should be smooth and flat, free of any deep cracks, rough spots, or obvious irregularities. It is normal to have a slightly fine texture, specially if sandpaper was used, but when you lightly run your fingers over the surface, it should not feel rough or uneven. This smoothness helps the brake pads make full contact with the rotor, thereby improving braking performance and reducing noise or vibration.
FAQ 4: Can brake rotors be resurfaced without removing them?
Answer: Technically, it is possible to perform light sanding on a rotor without removing it; however, this is not recommended for a proper resurfacing job. Removing the rotor provides better access for the work and allows you to work uniformly across the entire surface. It also makes it easier to inspect for damage and accurately measure the thickness. Attempting to resurface a rotor while it remains installed can result in uneven sanding and missed spots, thereby reducing the effectiveness of the process.
FAQ 5: How many times can a brake rotor be resurfaced?
Answer: Brake rotors can only be resurfaced a limited number of times, as each resurfacing procedure removes a thin layer of metal. The number of times this can be done depends on the rotor’s original thickness and the amount of material removed during each instance. Most rotors can be resurfaced only once or twice before reaching their minimum thickness limit. Once that limit is reached, replacement becomes necessary to ensure safe braking. Regularly measuring the rotor’s thickness helps you determine whether or not it can be resurfaced.
FAQ 6: Will resurfacing completely resolve brake vibrations?
Answer: If brake vibration is caused by minor irregularities on the rotor or slight damage to its surface, resurfacing can resolve the issue. By smoothing the surface, it facilitates uniform contact with the brake pads, thereby reducing vibration. However, if the vibration stems from severe warping, suspension issues, or uneven rotor thickness, conditions that cannot be corrected through sanding, resurfacing alone may not fully resolve the problem. In such cases, replacing the rotors or inspecting other components may be necessary.
FAQ 7: Will I need new brake pads after having my rotors resurfaced?
Answer: It is highly recommended to install new brake pads after having your rotors resurfaced. Old or worn brake pads may have an uneven surface that does not mate properly with the newly smoothed rotor. This can lead to poor contact, noise and accelerated rotor wear. New brake pads establish better contact with the resurfaced surface, helping to ensure smooth and consistent braking performance. Furthermore, using new pads helps extend the lifespan of the rotors following the resurfacing process.
References:
[1] Method to Detect and Isolate Brake Rotor Thickness Variation and Corrosion
https://www.researchgate.net/publication/367234941_Method_to_Detect_and_Isolate_Brake_Rotor_Thickness_Variation_and_Corrosion

Hello Folks, Dean Shali here to help you out to solve the problems with your lovely vehicle, as i have lots of experience and knowledge about automotive industry as i woks directly with the customers and repair vehicles and i love to help the people to keep their cars safe and running smoothly.