Written By: Dean Shali
Fact Checked By: Sabré Cook
Reviewed By: Tamara Warren
Yes, there are common signs of having the problematic brake rotors such as: having vibrations, squeaking noises or leading to the longer stopping distances every time.
Just understand this simple thing: the “Brake Rotors” are the part that is directly responsible for stopping your car in safe and effective way.
But over the period of time, just like the other man-made components; the brake rotors can wear out, warp or develop some grooves due to the heat, friction and normal driving conditions as well.
Never, just never ignore these signs as it literally compromises both your safety and the performance of your vehicle as well.
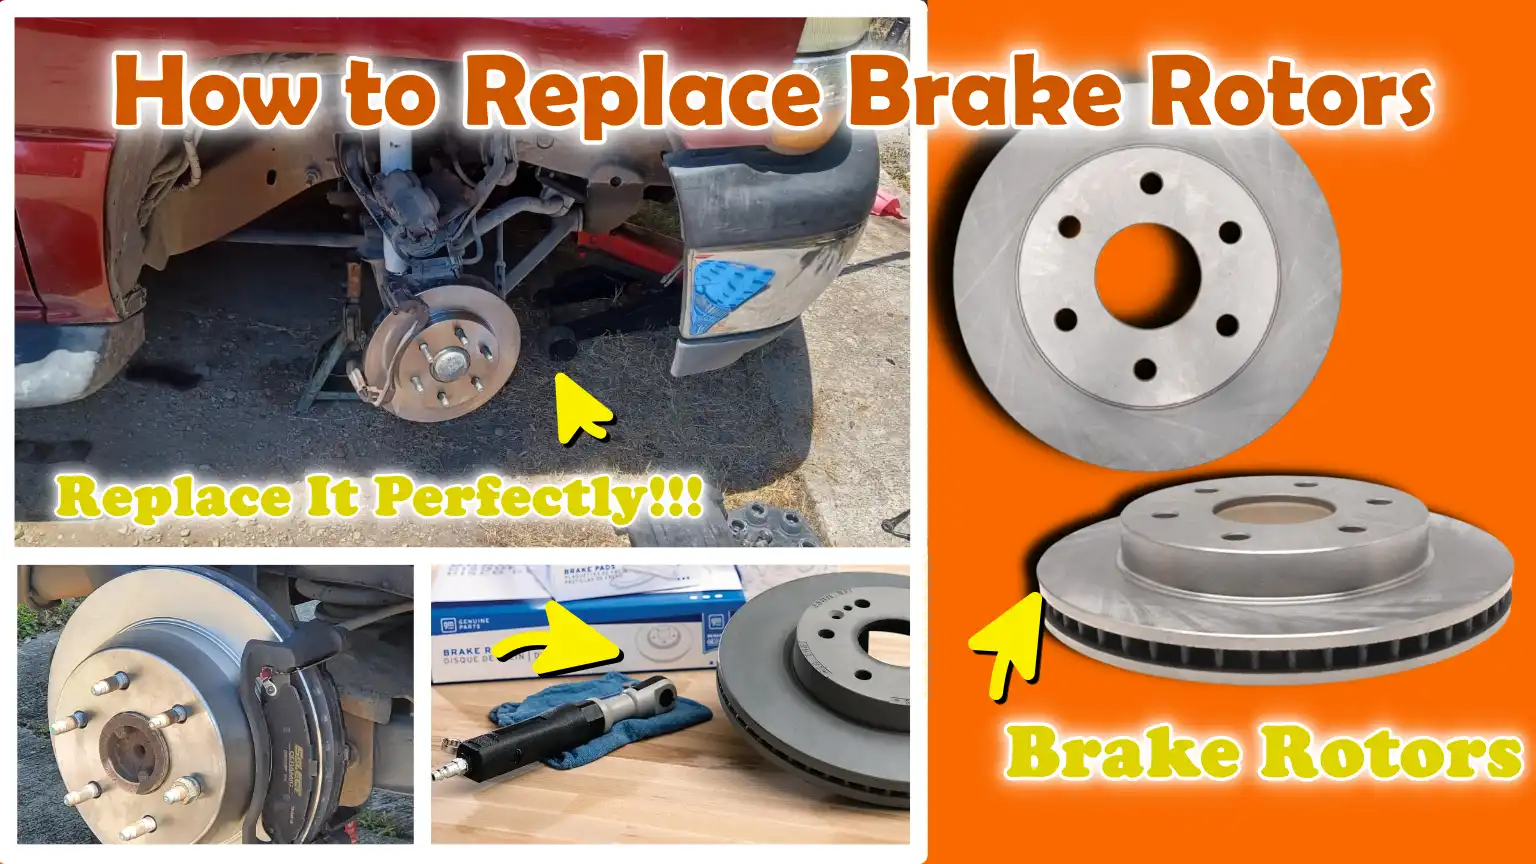
At first, replacement of the brake rotors sounds like the technical stuff, but you just need a good guidance and beginner level steps to overcome this myth, that’s why we have listed everything about How to Replace Brake Rotors in easy way from: inspection of your rotors for any damage, to removal of the worn component and after all installing the new rotors and maintain the braking performance intact.
Tools
| Tool / Material | Why It Is Needed | How to Use It |
|---|---|---|
| Car Jack | A car jack raises the car so you can remove the wheel and access the brake system. Without lifting the car, you cannot access the brake rotor. | Place the jack under the car’s designated lifting point and slowly raise the car until the wheel is off the ground. |
| Jack Stands | Jack stands hold the car firmly in place after it is lifted. They prevent it from falling while you work. | After lifting the car with a jack, place a jack stand under the frame and lower the car slightly so that its weight is on the stand. |
| Lug Wrench | A lug wrench is used to loosen and tighten the lug nuts holding the wheel in place. | Before removing the wheel, turn the lug nuts anti-clockwise to remove them. After reinstalling the wheel, tighten them firmly. |
| Socket Set and Ratchet | These tools help remove the bolts from the brake caliper and bracket so you can access the rotor. | Select the correct socket size, attach it to a ratchet and turn it to loosen or tighten the bolts. |
| C-Clamp (or Brake Caliper Tool) | This tool pushes the brake caliper piston back into its housing so that the new rotor and pads fit properly. | Place the clamp against the caliper piston and slowly tighten it until the piston slides back into the caliper. |
| Torque Wrench | A torque wrench ensures that the bolts and lug nuts are tightened to the correct level. This prevents the parts from being too loose or too tight. | Set the recommended torque value and tighten the bolts until the wrench clicks, indicating proper tightening. |
| Brake Cleaner | Brake cleaner removes grease, dust and protective coatings from the new rotor to ensure optimal braking performance. | Spray the cleaner directly onto the rotor surface and wipe it off with a clean cloth before installation. |
| New Brake Rotors | New rotors replace worn or damaged rotors that cause vibration, noise, or weak braking. | After removing the old rotor and cleaning the surface, place the new rotor on the wheel hub. |
| Safety Gloves and Goggles | Safety gear protects your hands and eyes from brake dust, sharp metal parts and chemicals. | Wear gloves and goggles before beginning the repair and keep them on throughout the process. |
How to Make Sure You Stay Safe During Replacement of Brake Rotor
1. Ensure the Car is on a Level Surface
Before beginning any brake rotor replacement work, the car must be parked on a completely level and stable surface.
Level ground helps maintain the vehicle’s balance and prevents it from moving or rolling while you work under or around it.
When a car is parked on a slope or uneven ground, gravity can cause it to suddenly slide, posing a serious safety hazard.
Even the slightest movement can cause the jack to slip or tools and parts to fall.
A flat surface also helps the jack and jack stands hold the car evenly, keeping it stable during repairs.
Most professional mechanics always work on a solid concrete floor for this reason, but a flat driveway or garage floor can also work safely.
Taking a few minutes to place the car on stable ground greatly reduces the risk of accidents and ensures that the brake repair is performed safely and correctly.
2. Using Wheel Chocks to Prevent Rolling
Wheel chocks are small but essential safety tools that prevent a car from rolling during a jack-up.
When a car is jacked up, the wheels on the ground may move slightly if they are not secured.
This movement can cause the car to slip or roll, posing a danger to anyone working nearby.
Wheel chocks are firmly placed on the ground near the tires, usually behind or in front of the rear wheels, depending on which side of the car is being lifted.
Their purpose is simple but very effective: they prevent the wheel from rotating and hold the car in place.
Many mechanics use heavy rubber or metal chocks because they grip the ground better and hold the tire securely in place.
Even if the parking brake is engaged, wheel chocks provide greater safety and stability, helping to ensure the car remains completely stationary during the brake rotor replacement process.
3. Never rely solely on a jack – always use jack stands
Car jacks are designed to lift a vehicle, but that doesn’t mean they’ll keep it secure for long periods during repairs.
If the ground is uneven, hydraulic jacks can gradually lose pressure or slip, causing the car to suddenly fall.
Because of this risk, professional mechanics always use jack stands after lifting a vehicle.
Jack stands are sturdy metal supports that firmly hold the weight of the car and keep it stable while working.
After jacking up the vehicle, place the stand under a strong structural point in the car’s frame and then slowly lower the car so that the weight is on the stand rather than the jack.
This creates a strong and stable support system that greatly reduces the risk of the vehicle falling.
Using jack stands is one of the most important safety measures in any automotive repair and it’s essential when replacing brake rotors.
4. Disconnecting the Battery If Required for Electronic Braking Systems
Modern vehicles often have advanced electronic braking systems integrated with the car’s electrical components.
These systems may include electronic parking brakes, brake sensors, or electronic stability control systems that interact with the braking hardware.
When working on brake components, it may sometimes be necessary to disconnect the vehicle’s battery to prevent these systems from being accidentally activated by an electrical signal.
Disconnecting the battery helps ensure that the brake system remains inactive during repairs, reducing the risk of accidental movement or electrical damage.
To do this safely, the negative battery terminal is usually disconnected first using a wrench.
This simple step helps protect both the mechanic and the vehicle’s electronic systems during the brake rotor replacement process.
While this step isn’t required in every vehicle, it’s specially important for cars with modern electronic brake features, where safety and system protection must always come first.
How to Prepare The Car
1. Loosening the Lug Nuts Before Lifting the Car
Before lifting the car, it’s crucial to loosen the lug nuts that hold the wheel in place.
Lug nuts are typically tightened very tightly to secure the wheel while driving, which means they can be difficult to remove if the wheel is already off the ground.
When the car is still on the ground, the weight of the car prevents the tire from rotating, making loosening the lug nuts much easier and safer.
Using a lug wrench or breaker bar, turn the nuts slightly anti-clockwise to break the tight seal, but don’t remove them completely at this stage.
This step prevents the wheel from rotating easily when the car is lifted and reduces the risk of losing balance or damaging the bolts.
Properly loosening the lug nuts first also saves time and effort later in the repair process, because once the car is raised, the nuts can be quickly removed and the wheel removed without any trouble.
2. Lift the car and place it on jack stands
After loosening the lug nuts slightly, the next step is to raise the car to access the wheel and brake components.
The car jack should be placed under the correct lifting points specified by the car manufacturer, which are usually located along the frame or on sturdy parts underneath the car.
These points are designed to safely support the vehicle’s weight without damaging it.
Then, slowly and steadily raise the jack until the tire is raised a few inches off the ground.
However, the jack is primarily designed for lifting, not to securely hold the car during repairs.
Therefore, after raising the car, place sturdy jack stands under the frame or fixed support points.
Then, carefully lower the car so that its weight rests on the jack stands.
This step creates a stable and secure support system that prevents the vehicle from falling and allows for safe repairs.
3. Removing the Wheels
Once the vehicle is securely mounted on jack stands, the wheels can be removed to expose the braking system.
The lug nuts that were previously loosened can now be fully unscrewed using a lug wrench or socket tool.
As each nut is removed, it’s helpful to keep them together in a safe place so they don’t get lost during repairs.
After removing the lug nuts, the wheel can usually be pulled straight off the hub.
In some cases, if the wheel has been in place for a long time, dirt or rust around the hub area may cause it to become stuck.
In such cases, lightly tapping the tire with your palm may help loosen it.
Removing the wheel exposes the brake rotor, brake caliper and other essential parts that will be worked on during the rotor replacement process.
This step is important because it provides complete access to the braking system and allows for proper inspection and subsequent repair.
How to Remove the Old Brake Rotor
1. Removing the Brake Caliper
The brake caliper is the part that presses the brake pads onto the rotor to slow or stop the vehicle.
Because the caliper sits directly on top of the rotor, it’s essential to remove it before removing the old rotor.
The caliper holds the brake pads in place and uses hydraulic pressure from the brake fluid to create the friction needed for braking.
When preparing for its removal, the mechanic must work carefully to avoid damaging the brake lines or surrounding components.
The brake caliper is typically mounted on a bracket and secured with strong bolts.
Properly removing the caliper allows easy access to the rotor and ensures that the brake system can be safely disassembled without damaging sensitive parts like brake hoses or pistons.
Loosen and Remove the Caliper Bolts
The brake caliper is typically secured with two strong bolts located at the back of the caliper assembly.
These bolts secure the caliper in place while driving and braking.
To remove them, use a socket and ratchet or the appropriate wrench to turn the bolts anti-clockwise.
Because brake parts are exposed to heat, dirt and moisture, these bolts can sometimes become tight or slightly worn.
Applying consistent pressure helps loosen them safely without damaging the bolt heads.
After removing the bolts, the caliper separates from the bracket.
It’s important to remove these bolts carefully, as they will be reused when reassembling the braking system.
Proper handling also prevents thread damage and ensures proper bolt tightening during installation.
Hang the Caliper Securely – Do Not Let It Dangle From the Brake Line
After removing the caliper bolts, the caliper can be lifted away from the rotor.
However, it should never be allowed to hang freely from the rubber brake line.
The brake line carries hydraulic brake fluid and is designed to support fluid pressure, not the weight of the caliper.
If the caliper hangs from the hose, the hose could stretch, break, or weaken, causing brake fluid leaks and serious braking problems.
To avoid this problem, the caliper should be gently supported with a piece of wire, a hook, or a strong zip tie.
It can be attached to a suspension component or another sturdy part of the vehicle.
This simple precaution secures the brake line and ensures that the braking system remains safe and reliable after the repair is complete.
2. Removing the Caliper Bracket If Necessary
On many vehicles, it’s necessary to remove the caliper bracket before removing the rotor.
The bracket holds the brake pads and provides the mounting structure that keeps the caliper aligned with the rotor.
These brackets are typically secured with larger and stronger bolts than the caliper itself because they must handle greater braking forces.
Using a socket and ratchet, these bolts are loosened and carefully removed.
After removing the bracket, the rotor is fully exposed and can be removed from the wheel hub.
Removing the bracket is an important step because it ensures there is enough space for the rotor to slide freely without obstruction from other braking parts.
3. Removing the Old Rotor
After removing the caliper and bracket, the old rotor can be removed from the hub.
The rotor is a heavy metal disc that rotates with the wheel and, together with the brake pads, creates friction that slows the vehicle.
Over time, constant heat and friction can cause rotors to wear, pit, or warp.
These problems often cause steering wheel vibrations, strange noises, or reduced braking performance.
Removing the old rotor allows the worn part to be replaced with a new one, which can restore braking performance.
This step is essential in any brake rotor replacement process because the rotor is the main surface where braking friction occurs.
Removing Retaining Screws or Clips
Some vehicles use small retaining screws or metal clips to secure the rotor to the hub during wheel installation.
These fasteners are not always present, but when they are used, they must be removed before removing the rotor.
Loosening these screws usually requires a screwdriver or the appropriate socket tool.
Because they are exposed to road moisture and heat, they can sometimes become tight or slightly rusted.
Applying steady pressure helps loosen them without stripping the screw heads.
Removing these small fasteners ensures that the rotor can be easily removed without damaging the hub or surrounding parts.
Removing the Rotor from the Hub
After removing all fasteners, the rotor should normally slide off the wheel hub.
However, in many cases, rust, dirt buildup, or heat between the metal surfaces can cause the rotor to feel stuck.
When this happens, lightly tapping with a rubber mallet or soft hammer can help loosen the rotor from the hub.
Tap evenly all around the rotor surface to avoid bending or damaging the hub.
Once the rotor is detached, it can be easily removed.
Carefully removing the rotor ensures that the hub surface is undamaged and the new rotor is ready for installation.
4. Cleaning the Hub Surface to Ensure the New Rotor Fits Properly
Before installing a new rotor, the hub surface must be thoroughly cleaned.
Dirt, rust and small debris can accumulate on the hub over time and if these particles aren’t removed, the new rotor may not fit perfectly flat.
Even a small amount of dirt can misalign the rotor, causing vibration when braking.
Using a wire brush or brake cleaner helps remove rust and dirt from the hub surface.
Cleaning the hub ensures that the new rotor fits properly and rotates smoothly with the wheel.
This step is crucial because proper rotor alignment helps prevent brake pulsation and ensures a safe and efficient braking system.
How to Install New Brake Rotors
1. Aligning the New Rotor on the Hub
After properly cleaning the hub surface, the new brake rotor can be installed on the hub.
The hub is the central mounting point where the rotor and wheel connect to the vehicle.
Proper alignment is crucial because the rotor must sit perfectly flat on the hub surface.
If the rotor is not properly aligned, it can cause uneven rotation, vibration during braking and accelerated brake pad wear.
Most brake rotors are designed with holes that match the wheel studs on the hub, making it easier to position the rotor correctly.
The rotor should slide easily onto the studs and rest evenly on the hub surface.
Before proceeding, it’s important to ensure that the rotor is fully seated and not bent or blocked by any debris.
Proper alignment allows the rotor to rotate smoothly with the wheel, ensuring maximum efficiency and safety for the braking system.
2. Reinstall the caliper bracket if it was removed.
After installing the rotor, the next step is to reinstall the caliper bracket, if it was removed previously.
The caliper bracket plays a vital role in the braking system, holding the brake pads in place and aligning the caliper with the rotor.
This alignment ensures that the brake pads exert even pressure on the rotor when the brake pedal is pressed.
To reinstall the bracket, it must be placed back in its original position over the rotor and secured securely using the mounting bolts that were removed earlier.
These bolts are typically strong and designed to handle the high pressure exerted during braking.
Tightening them properly ensures that the bracket remains stable and does not move while the vehicle is moving.
If the bracket is not installed properly, the brake pads may not wear properly, or the braking system may produce noise and vibration.
Properly reinstalling the bracket helps restore the structure of the braking assembly and prepares the system for caliper installation.
3. Pressing the Caliper Piston Using a C-Clamp or Brake Tool
Before reinstalling the brake caliper on the new rotor, the caliper piston must be pushed back into its housing.
The piston is the part of the caliper that moves outward when the brake pedal is pressed, causing the brake pads to apply pressure to the rotor, creating friction and slowing the vehicle.
Over time, as the brake pads wear, the piston moves outward.
Because the new rotor and possibly new brake pads are thicker than the worn parts, the piston must be pressed down to create enough space for it to be reinstalled.
A C-clamp or a special brake caliper tool is typically used for this step.
The tool is placed in front of the piston and slowly tightened until the piston easily returns to the caliper housing.
This process should be done slowly to avoid damaging the caliper seal or causing brake fluid to flow too quickly from the system.
Properly compressing the piston ensures that the caliper will fit smoothly onto the new rotor and that the brake pads will operate normally once the system is reassembled.
4. Reinstalling the Caliper on the New Rotor
Once the piston is compressed, the brake caliper can be reinstalled onto the rotor and brake pads.
The caliper must be positioned correctly within the caliper bracket so that the brake pads line up with the rotor surface.
Proper alignment ensures that when the brake pedal is pressed, the pads make full and even contact with the rotor.
Once the caliper is in place, the caliper bolts are inserted back into their mounting holes and tightened securely.
These bolts hold the caliper firmly in place and prevent it from moving while driving or braking.
It is very important to reinstall the caliper carefully because it is the main braking mechanism that applies pressure to the rotor.
If the caliper is not installed properly, the brake system may not function properly and this could lead to unsafe driving conditions.
5. Ensure all bolts are torqued to the manufacturer’s specifications
After reinstalling all parts, it’s important to ensure that each bolt is tightened to the correct torque specification specified by the vehicle manufacturer.
Torque refers to the correct amount of rotational force used to tighten a bolt.
Using the correct torque level is crucial in vehicle repair, as too-loose bolts can cause parts to move or become detached, while too-tight bolts can damage threads or weaken hardware.
A torque wrench is used to measure and apply the correct tightening force.
Every vehicle has specific torque values for brake parts such as caliper bolts, caliper bracket bolts and wheel lug nuts.
Adhering to these specifications ensures that all parts remain secure during driving and braking.
Proper torque also helps distribute braking force evenly between parts, improving safety, reducing noise and vibration and extending the life of the braking system.
Ensuring the correct torque setting is the final step in ensuring a safe and professional brake rotor installation.
How to Reinstall the Wheel
1. Installing the Wheel and Hand-Tightening the Lug Nuts
Once the new brake rotor and caliper parts are properly installed, the wheel can be reinstalled on the vehicle.
The wheel must be aligned with the wheel studs on the hub, which are threaded metal posts that securely hold the wheel in place.
When installing the wheel, it must be positioned evenly on the hub so that it rotates smoothly while driving.
Once the wheel is properly aligned, the lug nuts should be placed on the studs and tightened by hand first.
Hand-tightening is important because it ensures that the nuts fit snugly on the studs and the threads are not damaged.
If the lug nuts are tightened too quickly with a tool, they may become cross-threaded, which can damage both the nuts and studs and make it difficult to remove the wheel in the future.
Turning the lug nuts by hand until they fit snugly allows the wheel to remain in place for a short time and center properly before the final tightening step.
This step helps ensure the wheel is securely in place and prepares the vehicle for the next stage of lowering and tightening to the correct torque.
2. Safely Lowering the Vehicle from Jack Stands
Once the wheel is in place and the lug nuts are lightly tightened, the vehicle can be carefully lowered back to the ground.
This step should be done slowly and carefully to maintain stability and safety.
First, the car jack should be placed back under the correct lifting point so that the vehicle is slightly raised above the jack stands.
Once the weight is removed from the stands, they can be safely removed from under the vehicle.
After removing the stands, the jack should be slowly lowered so that the tires return to the ground in a controlled and stable manner.
Lowering the vehicle slowly helps prevent sudden weight shifts that could damage suspension parts or cause the vehicle to move suddenly.
When the tires are fully touching the ground, the vehicle’s weight will help secure the wheels in place, which is essential for the final tightening of the lug nuts.
Taking time to safely lower the vehicle helps prevent unnecessary hazards for both the mechanic and the vehicle.
3. Torque the lug nuts in a star pattern according to the manufacturer’s specifications
Once the vehicle is back on the ground, tighten the lug nuts according to the correct torque specifications provided by the vehicle manufacturer.
Torque refers to the correct force used to tighten the bolts or nuts and it is crucial for wheel safety.
If the lug nuts are too loose, the wheel may move or even come apart while driving.
If they are too tight, the wheel studs may be damaged or stripped.
A torque wrench is used to apply the correct amount of force to properly tighten each lug nut.
When tightening lug nuts, they should always be tightened in a star pattern rather than a circle.
A star pattern means tightening one nut, then moving to the next nut on the wheel and then the next.
This pattern helps distribute pressure evenly on the wheel and ensures that the wheel rests flat on the hub.
Even pressure prevents vibration, uneven rotor contact and wheel misalignment.
Following the correct torque specification and tightening pattern is one of the most important final steps in brake rotor replacement, as it ensures the wheel is secure and the vehicle can be driven safely.
What are the Important Post-Installation Steps
1. Pump the Brake Pedal to Ensure the Caliper Pistons Are in the Correct Position
After installing the new brake rotor and reassembling the braking components, it is crucial to pump the brake pedal before driving.
When the brake caliper piston was first pressed in during the repair process, it retracted into its housing to make room for the new rotor and brake pads.
Because of this, the brake pads will not touch the rotor surface immediately after installation.
By pumping the brake pedal several times, the hydraulic brake system pushes the pistons out again, returning the brake pads to their correct working position.
This process re-establishes normal contact between the brake pads and rotor, which is essential for optimal braking performance.
As the pedal is repeatedly pressed, it should gradually become firmer rather than softer or looser.
This firmness indicates that the brake pads are now properly seated on the rotor and the braking system is functioning normally.
Skipping this step can result in very weak braking when starting the vehicle, which can be dangerous, so this is an important safety step before driving.
2. Checking the Brake Fluid Level and Topping Off If Necessary
Brake fluid plays a vital role in the braking system as it transfers force from the brake pedal to the brake calipers via hydraulic pressure.
During brake repairs, small changes in fluid level may occur, specially when the caliper pistons are pushed back into place.
For this reason, the brake fluid reservoir should always be checked after installation is complete.
The reservoir is usually located in the engine compartment and has clear markings indicating the minimum and maximum fluid levels.
The fluid level must remain within this safe range to ensure the braking system can maintain proper hydraulic pressure.
If the fluid level is below the recommended level, carefully add the correct type of brake fluid until it reaches the correct level.
Maintaining the correct brake fluid level helps ensure that the braking system responds quickly and consistently to each pedal press.
It also prevents air from entering the brake lines, which can reduce braking power and cause a soft or unresponsive brake pedal.
3. Test drive the vehicle at low speeds to ensure the brakes are functioning properly
Once the brake pedal feels firm and the brake fluid level is correct, the next important step is to test the vehicle in a controlled and safe environment.
A short test drive at low speeds allows the driver to confirm that the new rotors and brake parts are functioning properly.
During this test, the vehicle should be driven slowly in an open area or on a quiet road where it is safe to stop suddenly.
The brakes should be applied gently several times to observe how the vehicle responds.
Smooth and steady braking indicates that the parts were installed correctly and the pads are making proper contact with the rotor surface.
This test drive also allows the brake pads and rotor to begin the bedding process, where the surfaces gradually adjust to each other and create consistent friction.
A careful test drive helps identify any potential problems early and ensures the braking system operates safely before returning to normal driving conditions.
4. Listen for Strange Sounds or Vibrations
While driving during the test, it’s important to pay close attention to any strange sounds or vibrations coming from the wheels or braking system.
Properly fitted brake rotors and calipers should operate smoothly and quietly.
If the brakes make grinding sounds, loud squealing sounds, or obvious vibrations in the steering wheel or brake pedal, this could indicate something is wrong or a component needs adjustment.
For example, debris stuck between the rotor and hub, loose bolts, or improperly positioned brake pads can cause strange noises or improper braking.
Early detection of these signs allows the problem to be corrected before it becomes more serious.
In many cases, new brake components may make a very gentle noise during the first few stops as the surfaces adjust, but loud or persistent noises should always be investigated.
Listening and feeling carefully for any unusual movements helps confirm that the repair was successful and ensures that the vehicle is safe for everyday driving.
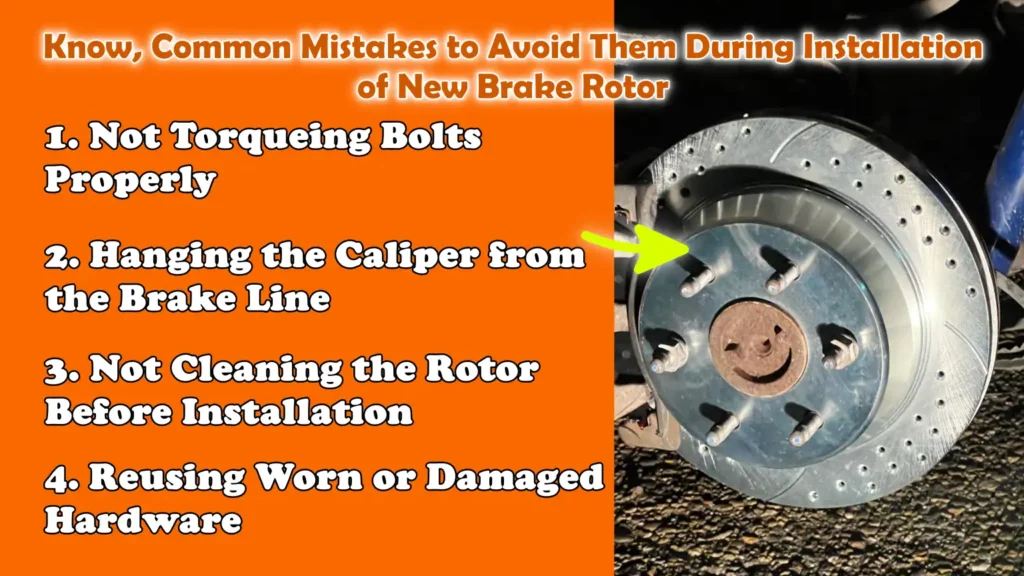
Know, Common Mistakes to Avoid Them During Installation of New Brake Rotor
Furthermore, there’s research in the Applied Sciences journal that explains that the ventilated brake rotors actually helps you to manage the heat in more effective way as it literally draws cool air through the internal channels, that actually improves the head dissipation and prevents the brake fade during the repeated braking, also you need to understand that because excessive heat is literally one of the main causes of rotor damage and warping, that’s why you need to maintain them and replace the rotor if needed to maintain consistent braking performance throughout the year.[¹]
1. Not Torqueing Bolts Properly
One of the most common mistakes when replacing brake rotors is not tightening the bolts to the correct torque.
Torque refers to the correct force used to tighten bolts and lug nuts so that the parts are securely in place without damage.
Brake parts such as caliper bolts, caliper bracket bolts and wheel lug nuts are designed to operate under heavy pressure when the vehicle slows or stops.
If these bolts are not tightened properly, vibration and repeated braking can cause the parts to loosen over time.
Loose bolts can cause noisy brakes, poor braking performance, or, in extreme cases, cause parts to come loose while driving.
On the other hand, overtightening bolts can damage the threads or stretch the metal hardware, which can also cause problems.
This can weaken the connection and complicate future repairs.
Using a torque wrench and following the manufacturer’s torque specifications ensures that each bolt is tightened with the correct amount of force.
Proper torque keeps the braking system stable, prevents mechanical failure and ensures safe vehicle operation.
2. Hanging the Caliper from the Brake Line
Another common mistake is leaving the brake caliper loose from the rubber brake line during the repair process.
The brake line is designed to carry hydraulic brake fluid from the master cylinder to the caliper, allowing the system to maintain pressure when the brake pedal is pressed.
Although the hose is strong enough to handle fluid pressure, it is not designed to support the heavy weight of the caliper.
If the caliper is left hanging, the excess weight can stretch or damage the brake hose.
Over time, this stress can weaken the hose material, cause small cracks, or even cause brake fluid leaks.
Damaged brake lines can reduce hydraulic pressure in the system and lead to brake failure, which is very dangerous.
To avoid this problem, the caliper should always be supported with a piece of wire, hook, or strong tie and attached to a stable suspension part of the vehicle.
This simple step protects the brake line and keeps the braking system safe and reliable.
3. Not Cleaning the Rotor Before Installation
Many new brake rotors come from the manufacturer with a thin protective coating of oil or grease.
This coating is applied to prevent rust during storage and shipping.
However, if the coating is not removed before installation, it can hinder the braking process.
When brake pads apply pressure to a rotor that still has oil on it, the friction required for proper braking is reduced.
This can cause brake pad wear, strange brake noises and wear.
In some cases, residual oil can also cause the pads to slip or wear improperly.
Thoroughly cleaning the rotor before installation is a simple but essential step.
Brake cleaner spray and a clean cloth are typically used to remove all protective coatings, dust and debris from the rotor surface.
A clean rotor surface ensures that the brake pads make full contact with the metal disc, allowing the braking system to generate consistent friction and reliable stopping power.
4. Reusing Worn or Damaged Hardware
Reusing worn or damaged hardware is another mistake that can reduce the effectiveness and safety of the braking system.
Brake parts are exposed to extreme heat, road moisture, dirt and constant mechanical stress.
Over time, bolts, clips and other small parts can wear, rust, or weaken.
Even if they appear to be in good condition, worn hardware cannot hold the parts firmly in place under the heavy forces exerted during braking.
For example, weak caliper bolts can become loose and worn retaining clips can prevent the brake pads from aligning properly.
When these parts don’t function properly, the braking system can become noisy, the pads may not wear properly, or braking performance may be reduced.
For this reason, it’s often recommended to carefully inspect all hardware and replace any parts with signs of wear or corrosion when replacing a rotor.
Using new or good quality hardware ensures a long-lasting and reliable braking system.
Proper hardware also helps maintain proper alignment of the brake pads and rotors, improving overall braking safety and performance.
Read More:
Conclusion – How to Replace Brake Rotors
Yes, when you maintain those brake rotors then you can have reliable and safe driving experience, as it literally determines the stopping power of your vehicle whenever it is needed.
Brake rotors, along with the brake pads and calipers, create friction that slows and stops the vehicle.
Over time, the constant heat, pressure and friction from daily driving can cause rotors to wear, warp, or develop deep grooves.
When this happens, drivers may notice symptoms such as steering wheel vibration, creaking or grinding noises, or longer stopping distances.
Ignoring these warning signs can lead to reduced braking efficiency and an increased risk of accidents.
By learning how to properly replace brake rotors and following the correct steps, vehicle owners can restore their vehicle’s braking performance and regain complete control.
A successful brake rotor replacement involves careful preparation, proper safety procedures and attention to every detail at every step of the process.
Ensuring the vehicle is stable, carefully removing parts, cleaning the hub surface, properly installing the new rotor and tightening the bolts to the correct torque all contribute to a reliable repair.
Every part of the braking system must function properly and even small mistakes like improperly tightening bolts or dirty rotor surfaces can impact braking performance.
When done correctly, new rotors help improve braking response, reduce noise and vibration and extend the life of other brake parts like pads and calipers.
So, that’s it from this guide about How to Replace Brake Rotors and you can ask related questions in comment box.
Frequently Asked Questions
FAQ 1: What are brake rotors and what do they do?
Brake rotors are large metal discs attached to the vehicle’s wheels. When you press the brake pedal, brake calipers push brake pads against these rotors. This creates friction and that friction slows the wheel and ultimately stops the vehicle. Because brake rotors are exposed to extreme heat and pressure when braking, they are made of strong metal that can withstand high temperatures. Every time the driver applies the brakes, the rotors absorb and release heat, helping to safely control the vehicle’s speed. Without brake rotors, the braking system would not be able to create the friction needed to stop the car.
FAQ 2: How do I know if my brake rotors need replacing?
There are several common signs that indicate a brake rotor may need replacing. One of the most noticeable symptoms is vibration or shaking in the steering wheel or brake pedal when braking. This often occurs when the rotor surface becomes rough or warped due to heat. Another common sign is a grinding or squeaking sound when braking, which can indicate that the rotor surface is worn or damaged. Drivers may also notice that the car takes longer than usual to stop. In some cases, deep dents or scratches may appear on the rotor surface. If any of these symptoms are observed, it is important to have the brake system inspected immediately, as worn rotors can reduce braking performance and increase safety hazards.
FAQ 3: How often should brake rotors be replaced?
There is no set time for replacing brake rotors, as their lifespan depends on many factors, such as driving habits, road conditions and vehicle type. In many vehicles, brake rotors can last 50,000 to 70,000 miles, but this depends on how often the brakes are used and how fast the vehicle is driven. Frequent braking in city traffic, driving up steep hills, or towing heavy loads can wear the rotors faster. Regular brake inspections during regular vehicle maintenance can detect rotor wear early. Mechanics usually determine whether they need to be replaced by looking at the thickness and surface condition of the rotors.
FAQ 4: Can I replace brake rotors without changing the brake pads?
Technically, brake rotors can be replaced without the brake pads, but it’s generally recommended to replace both at the same time. New rotors have a smooth and uniform surface, while used brake pads may already be worn or shaped to match the old rotor. If old pads are used on a new rotor, they may not make proper contact with the new surface, which can reduce braking performance and cause uneven wear. Installing new brake pads with a new rotor ensures proper operation of both components and improves the braking system’s performance. This method also helps extend the life of the new rotor.
FAQ 5: What causes brake rotors to warp or wear?
Brake rotors wear primarily due to the heat and friction generated during braking. Each time the driver presses the brake pedal, the brake pads apply tight pressure to the rotor surface, generating heat. Over time, repeated heating and cooling can slightly alter the shape of the metal rotor, causing it to warp. Driving habits also play a role. Hard braking, frequent stops in heavy traffic and driving downhill for long periods of time can all increase heat in the braking system. Additionally, dirt, rust and road debris can gradually damage the rotor surface. These factors can cause the rotor to become uneven, thin, or grooved, reducing braking power.
FAQ 6: Is it safe to drive with worn brake rotors?
Driving with worn brake rotors is not recommended because they can reduce the effectiveness of the braking system. When rotors are too thin or worn, they can’t handle heat and friction properly. This can cause the vehicle to stall for extended periods, cause vibrations when braking and cause strange wheel noises. In severe cases, severely worn rotors can crack or crack under intense braking. Because brakes are one of the most important safety systems in a vehicle, worn rotors should be replaced as soon as possible to maintain safe driving conditions.
References:
[1] Structural Optimization of Vented Brake Rotors with a Fully Parameterized Model
https://www.mdpi.com/2076-3417/12/4/2184

Hello Folks, Dean Shali here to help you out to solve the problems with your lovely vehicle, as i have lots of experience and knowledge about automotive industry as i woks directly with the customers and repair vehicles and i love to help the people to keep their cars safe and running smoothly.