Written By: Dean Shali
Fact Checked By: Sabré Cook
Reviewed By: Tamara Warren
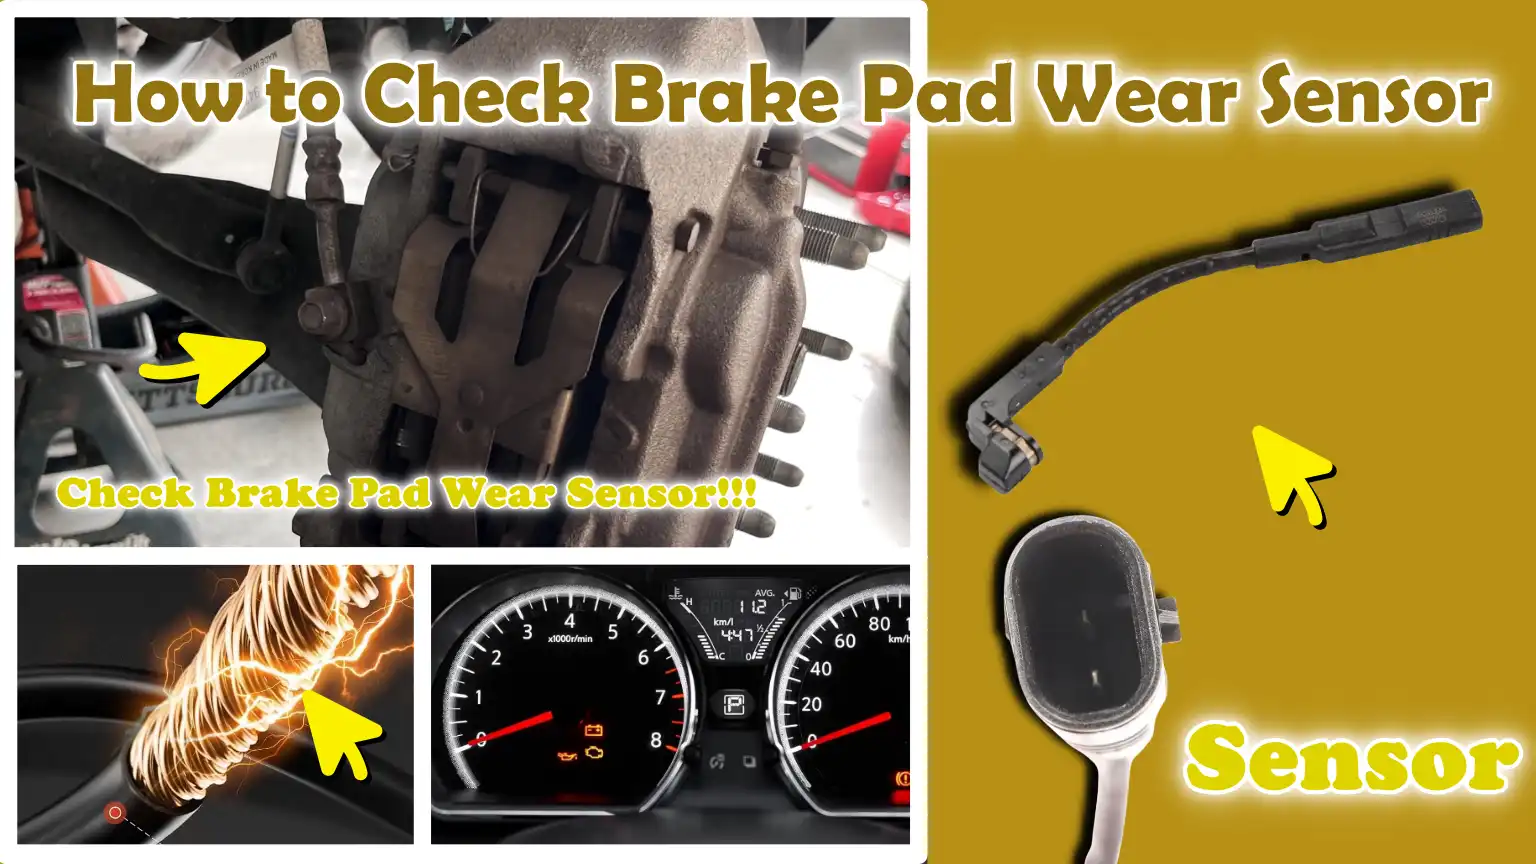
Basically, your car often knows that your “CAR BRAKES” are actually wearing out before you do: so this is how you can confirm it.
Because, modern vehicles are actually designed to warn you about the problems before they become dangerous and the brake pad wear sensor is one of the most important early-warning system in your car before going for the holiday.
Also, it is true that brake pads gradually wear down every time you press the pedal and once they reach a critical thickness, then stopping distance can increase and braking performance can drop significantly as well.
So, to prevent this; many cars uses either electronic sensors or simple mechanical indicators that actually alerts you through a dashboard warning light or a high-pitched squeal as well.
Plus, the key advantage of a brake pad wear sensor is that is literally helps you act early, before damaging spreads to expensive parts such as: rotors or calipers.
Now, this is the guide about How to Check Brake Pad Wear Sensor, so that you can learn how to identify warning signs, inspect the sensor and confirm whether your brakes actually needs replacement to avoid unnecessary repair costs as well.
What is a Brake Pad Wear Sensor?
A brake pad wear sensor is a small yet critical safety component that helps you determine when your brake pads have become excessively worn and require replacement.
Brake pads are designed to wear down over time, as they generate friction to bring your car to a halt; and as they become thinner, their ability to safely decelerate the vehicle diminishes.
The purpose of a wear sensor is to provide you with advance warning, before the pads wear down to a dangerous level, so that you can replace them in a timely manner and prevent damage to other expensive components, such as the brake rotors.
This system helps enhance safety, reduce repair costs and prevent sudden brake failure, which could otherwise pose a risk to your life on the road.
1. Definition and Purpose
Simply put, a brake pad wear sensor is a device that monitors the thickness of your brake pads and alerts you when they have worn out.
Its primary objective is to serve as an early warning system, ensuring that you do not have to rely on guesswork regarding the condition of your brakes.
Without this sensor, many drivers only discover a problem when they hear grinding noises or feel a reduction in braking power, which often implies that the pads have already worn down excessively.
By providing a clear signal, typically via an illuminated light on the dashboard or an audible warning, this sensor enables you to take timely action, thereby keeping your vehicle safe and preventing further damage.
2. How It Works – Electronic vs Mechanical Systems
Brake pad wear sensors operate in two common ways, depending on the specific type of sensor installed in your vehicle.
Electronic sensors utilize a small wire embedded within or attached to the brake pad.
When the pad wears down to a specific limit, this wire either severs or makes contact with the brake rotor; this alters the electrical circuit, causing a warning light to illuminate on your dashboard.
This system provides the driver with a clear and direct signal.
Mechanical systems are simpler in design and feature a small metal tab attached to the brake pad.
As the pad wears down, this metal tab begins to scrape against the brake rotor, producing a loud, sharp, squealing sound.
This sound is specifically designed to grab your attention and alert you that it is time to inspect or replace the brake pads.
Both of these systems are effective; however, electronic sensors offer greater precision, whereas mechanical indicators rely on audible signals.
3. Common Vehicles Equipped with Wear Sensors – Luxury vs Standard Models
Brake pad wear sensors are predominantly found in modern, high-end vehicles, particularly those that prioritize advanced safety features.
Luxury brands such as BMW, Mercedes-Benz and Audi almost invariably include electronic wear sensors as a standard feature, as they provide accurate and immediate warnings.
Many newer mainstream vehicles from brands like Toyota, Honda and Ford have also begun incorporating these systems, particularly in their mid-range and higher trim levels.
However, some basic or older models may still rely entirely on mechanical indicators, or may lack sensors altogether, making regular visual inspections even more critical for these vehicles.
3. Types of Brake Pad Wear Sensors
Brake pad wear sensors primarily fall into two categories, both of which are designed to alert you when your brake pads have worn down to a point where they can no longer function safely.
Although their objective is the same, the methods they use to alert you differ.
Understanding these types helps you identify the specific warning your car is issuing and assess the severity of the situation.
Some systems rely on electrical signals and dashboard alerts, while others utilize sound to grab your attention.
Recognizing this distinction allows you to react more quickly and prevent further damage to your brakes.
1. Electronic Wear Sensors
Electronic wear sensors represent the more modern type and are commonly found in today’s vehicles.
These sensors operate using a simple circuit-based system connected to your car’s electrical network.
A small sensor wire is embedded within, or attached to, the brake pad; as the pad wears down, this wire either severs or comes into contact with the brake rotor.
When this occurs, it alters the electrical circuit, a change that your vehicle immediately detects.
This alteration triggers a warning light on the dashboard, clearly indicating that your brake pads have reached their wear limit.
This system is highly accurate, as it transmits a direct signal rather than relying on sound or estimation.
It also enables drivers to take timely action, often before any noticeable decline in braking performance has occurred.
However, issues such as wiring faults, corrosion, or improper sensor installation following brake repairs can sometimes result in false warnings; therefore, it is always advisable to visually inspect the sensors yourself.
Circuit-Based Systems
The circuit-based system present in electronic sensors operates by maintaining a complete electrical loop as long as the brake pads remain in good condition.
As long as the pad thickness stays within a safe limit, the circuit remains intact and no warning is displayed.
As soon as the pads wear down to a critical level, the sensor wire severs, or the circuit is interrupted, sending a signal to the vehicle’s control system.
This simple yet effective design ensures that a warning is issued precisely when it is needed most, helping to prevent excessive wear that could potentially damage the brake rotors.
Illumination of the Dashboard Warning Light
When the circuit breaks or changes state, the vehicle immediately illuminates a warning light on the dashboard.
This light is typically associated with the brake system and is designed to be highly conspicuous so that the driver cannot overlook it.
In many cars, this warning remains illuminated until the worn brake pads and sensors have been replaced and the system has been reset.
This highly visible warning makes electronic sensors one of the most reliable methods for monitoring the condition of brake pads.
2. Mechanical/Audible Indicators
Mechanical wear indicators represent a simple, traditional type of system; nevertheless, they remain widely used today because they are reliable and do not depend on electronics.
Instead of utilizing wires or circuits, this system employs a small metal tab attached to the brake pad.
As the brake pad wears down over time, this metal tab moves closer to the brake rotor.
When the pad becomes excessively thin, the tab makes contact with the rotor’s surface, producing a loud, sharp, squealing sound.
This sound does not indicate a malfunction; Rather, it serves as an internal warning mechanism, designed to alert you that your brake pads require attention.
While this method is effective, its success hinges on whether the driver actually hears and interprets the sound; occasionally, this noise is overlooked or mistaken for an indication of a different issue.
The Metal Tab Design
The metal tab incorporated into the mechanical indicator is meticulously positioned to make contact with the rotor only once the brake pad has worn down to a specific limit.
This ensures that the warning is issued at precisely the right moment, neither too early nor too late.
Its design is simple and robust, requiring no electrical connections whatsoever; this minimizes the likelihood of malfunctions caused by wiring-related issues.
However, because it relies on direct physical contact, the sound may occasionally be triggered under specific conditions such as: the presence of dust or moisture, which can sometimes lead to confusion for the driver.
The Squeal of Worn Pads
The loud noise emitted by a mechanical indicator is typically quite shrill and easily audible specially when you apply the brakes at low speeds.
This sound is deliberately designed to be loud enough to grab your attention and prompt you to inspect your brakes.
It is crucial to understand that this noise is not merely a nuisance, but rather a warning signal.
Ignoring it for an extended period can lead to the complete wearing down of the brake pads; consequently, the pads may grind against the brake rotors, producing abrasive noises, and potentially causing damage to the rotors as well.
Recognizing this initial sound and taking timely action can save you money and ensure the safety of your vehicle.
Know, Common Signs That Shows Your Brake Pad Wear Sensor Has Activated
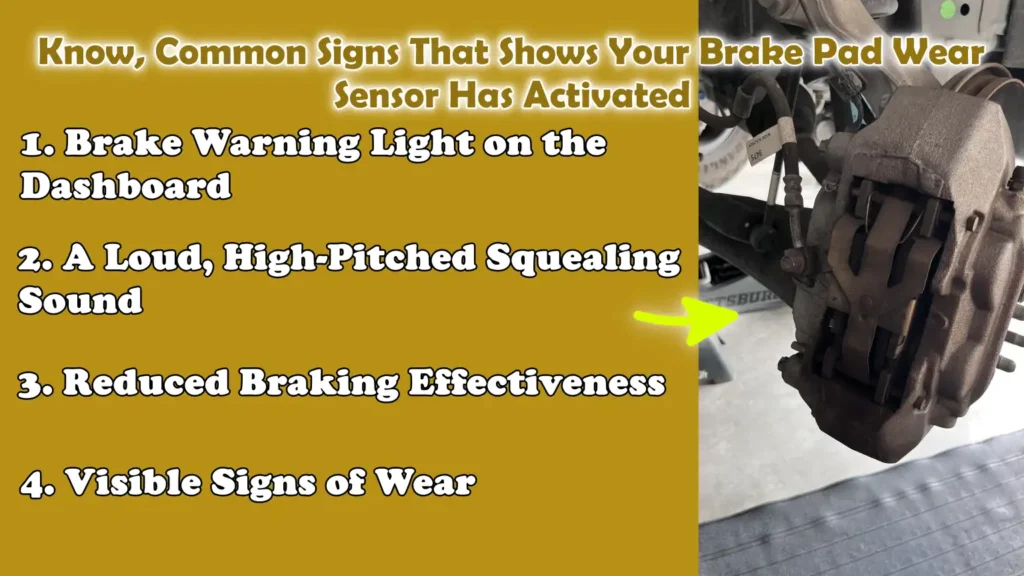
Your vehicle is designed to alert you to brake-related issues before they become dangerous and the activation of a brake pad wear sensor is one of the earliest and most critical warnings you will receive.
As brake pads wear down, they lose their ability to generate the friction necessary to effectively bring your car to a halt, particularly during sudden stops or high-speed braking.
Wear sensors help you identify this situation early through clear indicators, such as warning lights, unusual noises, or changes in braking performance.
Understanding these signs in simple terms allows you to take timely action, prevent damage to expensive components like rotors and maintain safe driving conditions.
1. Brake Warning Light on the Dashboard
One of the most common and easily recognizable signs is the illumination of the brake warning light on your dashboard.
In vehicles equipped with electronic wear sensors, this light activates when the sensor detects that the brake pads have worn down to a critical level.
This occurs because, as the pads become excessively thin, the electrical circuit connected to the sensor is interrupted.
This warning light is designed to remain illuminated until the underlying issue is resolved; this typically involves replacing the brake pads and in some cases, the sensor itself may also need to be replaced.
It is crucial not to ignore this light, as it serves as a direct signal from your vehicle that your braking system requires immediate attention.
2. A Loud, High-Pitched Squealing Sound
If you hear a loud, high-pitched squealing sound while applying the brakes, it is often an indication that a mechanical wear indicator is doing its job.
This sound occurs when a small metal tab attached to the brake pad begins to make contact with the brake rotor as the pad wears down.
This sound is intentionally designed to be loud and attention-grabbing so that drivers cannot overlook it.
Although it may initially seem like a minor annoyance, it actually serves as an early warning that your brake pads are reaching their limit.
Ignoring this sound for too long can lead to more serious issues, including grinding noises and damage to the rotors.
3. Reduced Braking Effectiveness
As brake pads wear down, you may begin to notice a change in how your car decelerates.
This can manifest as increased stopping distances, a brake pedal that feels soft or less responsive, or the need to press the pedal harder than usual to achieve the same stopping power.
These changes occur because worn brake pads cannot generate sufficient friction, nor can they dissipate heat as effectively, as new pads.
When this symptom appears alongside a sensor warning, it is a definitive sign that the brake pads are worn out and require immediate inspection.
4. Visible Signs of Wear
In some cases, you can confirm that the wear sensor has been triggered simply by visually inspecting the brake pads.
Many brake pads feature built-in wear indicators such as: grooves or notches, that indicate how much material remains on the pad.
If the pad’s thickness appears significantly reduced, typically down to just a few millimeters, it is a clear indication that the pads are nearing the end of their useful life.
You can also check whether the sensor wire is positioned too close to the rotor or if there are any visible signs of contact.
This visual inspection helps you verify the accuracy of the warning and provides a clearer assessment of the condition of your braking system.
Tools
| Tool | Why It Is Needed | How to Use It |
|---|---|---|
| Flashlight | This allows you to clearly see brake pads, sensor wires and small components that are often hidden behind the wheel or located in dimly lit areas. | Switch on the flashlight and direct it straight onto the brake assembly. Slowly move it around to inspect the pad thickness, the sensor’s position and any visible damage. |
| Jack and Jack Stands | This safely lifts the car, enabling you to remove the wheel and access the brake system. Jack stands keep the car stable and prevent accidents. | Use the jack to lift the car at the correct lifting points. Once lifted, place jack stands underneath the car for support. Never rely solely on the jack while working. |
| Lug Wrench | This is used to loosen and remove the wheel nuts, allowing you to take off the tire and access the brake pads and sensors. | Before lifting the car, turn the nuts anti-clockwise to loosen them. After lifting, remove them completely and take off the wheel. |
| Multimeter | This helps in checking electronic brake wear sensors by detecting whether their electrical circuit is intact or broken. | Set the multimeter to continuity or resistance mode. Connect the probes to the sensor’s terminals and observe the reading. A broken circuit usually indicates that the sensor has been triggered or is faulty. |
| Safety Gloves | This protects your hands from dirt, sharp edges and hot brake components while you are working. | Put on the gloves before beginning the inspection. Ensure they fit your hands properly so that you can safely handle tools and maintain a firm grip on them. |
How to Check Brake Pad Wear Sensor – Easy Guide
Checking the brake pad wear sensor is a simple yet crucial procedure.
It helps you determine whether your brake pads are genuinely worn out or if the warning is being triggered by a fault within the sensor itself.
The objective is to allow you to visually verify the information provided by your vehicle.
By following these steps in the correct sequence, you can avoid confusion, minimize the risk of overlooking a genuine issue and ensure that your braking system remains safe and reliable.
This process does not require any specialized skills, but it does call for careful observation and a few basic tools.
1. Check the Dashboard Warning Light
An illuminated brake warning light on the dashboard is typically the first indication that something requires attention.
In vehicles equipped with electronic wear sensors, this light activates when the brake pads have worn down sufficiently to trigger the sensor.
Depending on the vehicle model, this warning symbol may appear as a circle enclosed within brackets, or it may simply display the word “BRAKE.”
When this light is linked to the wear sensor, it signifies that the electrical circuit connected to the sensor has been interrupted, a condition that typically occurs when the brake pads become excessively thin.
However, this light can also illuminate for other reasons such as: low brake fluid levels, making it essential to confirm the actual cause of the warning before taking any further action.
If this light remains continuously illuminated while driving, it is a definitive sign that the wear sensor has been triggered and you should have your brake pads inspected as soon as possible.
What Does the Brake Warning Symbol Mean?
The brake warning indicator is designed to alert you to issues related to your braking system.
When this indicator illuminates due to a wear sensor, it signifies that the system has detected that the brake pads no longer meet safe thickness standards.
This serves as an early warning, providing you with ample time to inspect and replace the brake pads before your braking performance is adversely affected.
When does the indicator signal that the sensor has been triggered?
This warning light signals that the sensor has been triggered when it illuminates without any accompanying indications such as: low brake fluid levels or an engaged parking brake.
If this light turns on and remains illuminated even after restarting the vehicle, it generally implies that the sensor has detected worn brake pads, or that there is a fault within the sensor itself.
2. Perform a Visual Inspection
A visual inspection helps you determine the actual condition of the brake pads and the sensor.
This step is crucial, as it allows you to verify whether the warning is legitimate or if it stems from another underlying internal issue.
To do this, you may need to remove the wheel to gain a clear view of the brake assembly.
Once the assembly is visible, you can inspect both the thickness of the brake pads and the condition of the sensor wire.
Locate the Brake Pads and Sensor Wire
The brake pads are situated inside the brake caliper, which is mounted around the brake rotor.
The wear sensor wire is typically attached to one of the brake pads and extends outward toward the vehicle’s main wiring harness.
Locating these two components is the first step in assessing their current condition.
Check Pad Thickness
Brake pads consist of a layer of friction-generating material that gradually wears down with use.
If this layer appears excessively thin, typically when only a few millimeters remain, it indicates that the time to replace the pads is fast approaching.
Thin pads confirm that the sensor warning is likely accurate and should not be ignored.
Check Sensor Positioning
The sensor must be properly seated within the brake pad and positioned close to the surface of the rotor.
If it appears loose, dislodged, or improperly connected, it may trigger a false warning.
Correct positioning ensures that the sensor activates only when the pads have reached their wear limit.
3. Check the Sensor Wire
The sensor wire is a critical component of the electronic system; any fault within it can result in false warnings or cause the system to cease functioning correctly.
Carefully inspecting the condition of the wire helps you determine whether the issue lies with the brake pads or the sensor itself.
Check for Damage, Wear, or Broken Connections
Inspect the entire length of the sensor wire for cuts, worn insulation, or broken sections.
Even a minor defect can interrupt the electrical signal and trigger the warning light.
If a connection in the wire is severed, the system will still display a warning, even if the brake pads are in good condition.
Check Mounting Clips
The sensor wire is typically held in place by small clips, which secure it and keep it clear of moving parts.
If these clips are broken or missing, the wire may shift out of position, become damaged, or rub against other components.
Ensuring that the wire is properly secured helps prevent future issues.
4. Check the Sensor with a Multimeter – Electronic Systems
Checking the sensor with a multimeter provides a clear indication of whether the sensor’s circuit is functioning correctly.
This step is particularly useful when a warning light is illuminated, yet the brake pads do not appear to be fully worn down.
How to Check for Continuity
To check for continuity, set the multimeter to continuity or resistance mode and connect its probes to the terminals of the sensor connector.
If the circuit is intact, the multimeter will display a reading or emit a beep, indicating that the sensor is still operational.
If no reading appears, it signifies that the circuit has been broken; this typically occurs when the brake pad has worn down sufficiently to trigger the sensor.
Expected Readings
A functioning sensor typically indicates a closed circuit when the brake pads still retain a significant amount of thickness.
As the pads wear down and the sensor is triggered, the circuit opens up and the multimeter will no longer indicate continuity.
This distinct change helps you verify whether the sensor is functioning as intended or if it requires replacement.
5. Listen for Mechanical Indicators
In vehicles equipped with mechanical wear indicators, sound plays a crucial role in providing a warning when the brake pads are wearing down.
Listening carefully while applying the brakes can help you identify whether your brake pads are approaching their wear limit.
When does a squealing sound occur?
A squealing sound typically occurs when you apply the brakes at low speeds.
This happens because, as the brake pads wear down and become thinner, a small metal tab begins to make contact with the brake rotor.
This sound is intentionally designed to be easily audible, allowing you to take action before the pads wear out completely.
Distinguishing between normal and warning sounds
Normal brake sounds are typically faint and inconsistent, whereas the warning sound emitted by a wear indicator is loud, sharp and recurs every time the brakes are applied.
If the sound intensifies or changes into a grinding noise, it indicates that the pads have likely worn out completely, thereby increasing the risk of damage to the rotors.
Recognizing this distinction helps you take timely action and avoid more extensive repairs.
How Brake Pad Wear Sensors Work – Technical Details
Brake pad wear sensors operate on a very simple yet effective principle: they monitor the condition of the brake pads and transmit a signal when they have worn down to an unsafe thickness.
Although this system may sound technical, it is based on fundamental electrical principles that are reliable and easy to understand.
The sensor is typically embedded within or attached directly to the brake pad itself, allowing it to react immediately to the wear process.
As the brake pad gradually thins out through use, the sensor reaches a point where it alters the electrical state of a circuit.
This change is then detected by the vehicle’s onboard system, which alerts the driver via a warning light.
The primary advantage of this system is that it provides a clear and early indication of wear before braking performance is compromised; this helps prevent damage to critical components such as: the brake rotors, and enhances overall safety.
1. Closed-Circuit vs Open-Circuit Systems
Brake pad wear sensors typically function using either a closed-circuit or an open-circuit system, both of which are designed to detect changes resulting from pad wear.
In a closed-circuit system, when the brake pad is in good condition, the electrical circuit remains complete.
This means that electrical current flows normally through the sensor wire and no warning is displayed.
When the brake pad wears down to a specific limit, the sensor wire severs or wears through completely, thereby opening the circuit.
This interruption halts the flow of electricity and immediately triggers a warning light on the dashboard.
In an open-circuit system, the mechanism operates in the exact opposite manner.
Under normal operating conditions, the circuit remains open; However, as the brake pad wears down, the sensor comes into contact with the brake rotor or another metal surface, thereby completing the circuit.
This completed connection then transmits a signal to the vehicle.
Both systems are reliable; however, the closed-circuit design is more commonly employed due to its simplicity and ease of monitoring.
2. How Wear Disrupts the Circuit
The fundamental operation of a brake pad wear sensor is based on how physical wear affects the sensor’s wire.
The sensor is embedded within the brake pad at a specific depth, ensuring that it activates only when the pad reaches its minimum safe thickness.
As brake pads wear down through regular use, the friction material embedded within them gradually diminishes until it reaches the level of the sensor.
At this juncture, the sensor wire is either severed, abraded, or exposed in such a way that the state of the circuit changes.
This physical alteration directly impacts the electrical signal, which is then recognized by the vehicle.
Because the sensor is positioned with such precision, it ensures that the warning is issued at the appropriate moment, neither too early nor too late, providing the driver with ample time to safely replace the brake pads.
3. Integration with the Vehicle’s ECU
In modern vehicles, the brake pad wear sensor is connected to the vehicle’s Electronic Control Unit, commonly referred to as the ECU.
The ECU functions as the vehicle’s central computer; it receives signals from various systems and determines the appropriate response.
When the wear sensor detects a change in the circuit, it transmits this information to the ECU.
The ECU then processes this signal and illuminates the brake warning light on the dashboard, ensuring that the driver clearly perceives the alert.
In some vehicles, the ECU can also store fault codes or display messages that provide more detailed information regarding the issue.
This integration makes the system more accurate and reliable, as it enables the vehicle to monitor brake wear in real time and alert the driver without any delay.
Know, Common Issues Associated with Brake Pad Wear Sensors
Brake pad wear sensors are designed to provide timely and accurate warnings; however, like any small component exposed to heat, dust and constant vibration, they too can occasionally develop issues.
These problems can cause confusion, as the warning light or audible alert does not always correspond to the actual condition of the brake pads.
Understanding these common issues helps you avoid unnecessary repairs and makes it easier to determine whether the problem lies with the brake pads themselves or with the sensor system.
Most issues stem from electrical faults, physical damage, or the neglect of simple maintenance steps following the replacement of brake components.
1. False Warning Signals
False warning signals are one of the most common issues drivers face with brake pad wear sensors.
This occurs when the warning light on the dashboard illuminates, even though the brake pads still retain a significant amount of thickness.
The cause is often an interruption or fault within the sensor circuit, a condition entirely unrelated to the actual wear of the pads.
For instance, a loose connection, a slightly damaged wire, or even moisture ingress into the connector can trigger the system.
In some cases, the sensor may be overly sensitive and activate prematurely.
These false warnings can be confusing; if the system is not properly diagnosed, drivers may end up replacing components that are still in good working condition.
2. Damaged Wiring
The sensor wire plays a critical role in an electronic wear sensor system and it is one of the components most susceptible to failure.
This wire is situated in close proximity to moving parts such as: the wheels and suspension, meaning it is constantly exposed to vibration, heat generated by braking and road debris.
Over time, due to this contact, the wire may wear down, develop cracks, or even break completely.
When the wire becomes damaged, it interrupts the electrical signal and often triggers a warning light, even if the brake pads themselves are not fully worn out.
In some instances, loose mounting clips can cause the wire to rub against other components, thereby increasing the risk of damage.
Regular inspection of the wiring can help detect these issues before they escalate.
3. Failing to Reset the Sensor After Replacing Pads
After replacing brake pads, many electronic wear sensors require either a reset or replacement to clear the warning signal.
If this step is overlooked, the dashboard warning light may remain illuminated, even though new brake pads have already been installed.
This can occur because some sensors are designed for single-use; once they detect wear, they lock into a triggered state.
In other cases, the vehicle’s system may require a manual reset or a diagnostic scan tool to clear the warning.
Failing to properly reset the sensor can create the misconception that a problem still exists, potentially confusing the driver and leading to unnecessary troubleshooting efforts.
4. Rust or Dirt Accumulation
Brake components are constantly exposed to harsh environmental conditions such as: water, dust, dirt and road salt, which can lead to rust formation or dirt accumulation around the sensor and its connections.
Rust can corrode the metal contacts inside the sensor connector, degrading the quality of the electrical signal or causing the connection to fail completely.
Dirt can also interfere with proper contact or prevent the sensor from seating correctly within the brake pad.
These conditions can result in incorrect readings, delayed warnings, or false alerts.
Keeping brake components clean and ensuring that connectors are free of rust and dirt can help the sensors function properly and extend their lifespan.
How to Reset the Brake Pad Wear Sensor
Resetting the brake pad wear sensor after repairing or replacing worn brake pads is a crucial step, as the system needs to recognize that the issue has been resolved.
In many modern vehicles, sensors are designed to trigger a warning when the brake pads wear down to a specific level; however, simply installing new pads does not automatically clear this warning.
The resetting process clears the warning signal and allows the system to resume monitoring the new brake pads.
If the sensor is not properly reset, the warning light on the dashboard may remain illuminated, potentially confusing the driver and making it difficult to identify genuine mechanical issues in the future.
Understanding when and how to reset the sensor helps ensure that your braking system functions correctly and provides accurate alerts.
1. When a Reset Is Necessary
A reset is required whenever the brake pad wear sensor has been triggered and the brake pads have either been replaced or confirmed to be in good condition.
In many cases, the sensor itself is a single-use component; this means that once the brake pads have worn down to their limit, the sensor fails or becomes permanently activated.
When this occurs, simply installing new brake pads is not sufficient; depending on the system’s design, it is also necessary to replace or reset the sensor.
If the warning light remains illuminated even after brake repairs are complete, it is a clear indication that the system still requires a reset.
Neglecting this step can result in the warning light remaining constantly lit, which may erode confidence in the system and lead the driver to overlook genuine mechanical problems in the future.
2. Manual Reset vs Scan Tool Reset
Depending on the vehicle, the brake pad wear sensor can be reset either manually or with the aid of a scan tool.
In some vehicles, a manual reset can be performed by turning on the ignition, without starting the engine, and following a specific sequence involving the pressing of certain buttons or the use of dashboard controls.
This procedure signals to the vehicle that the brake system has been serviced and clears the warning light.
In other vehicles, particularly those equipped with more advanced electronic systems, a scan tool is required to reset the sensor via the vehicle’s onboard computer system.
The scan tool connects to the vehicle and sends a command to clear the fault codes associated with the brake wear sensor.
Both methods are effective; however, to avoid errors, it is crucial that you utilize the specific procedure outlined for your particular vehicle.
3. Vehicle-Specific Reset Procedures
Reset procedures can vary significantly across different vehicles, as each manufacturer designs its systems in its own unique way.
Some cars automatically reset the sensor after a new sensor has been installed and the system detects a valid signal, while others require a manual or electronic reset procedure.
These specific steps may involve pressing particular combinations of buttons, selecting options from menus on the dashboard display, or utilizing diagnostic equipment.
Due to these variations, it is always essential to follow the precise procedure specified for your specific vehicle to ensure that the reset is successful.
If the procedure is not completed correctly, the warning light may remain illuminated, or may light up again shortly thereafter, even if there is no actual issue with the brake pads.
Read More:
- How to Measure Brake Pad Thickness Without Removing Wheel
- How to Replace Brake Pads
- How to Replace Brake Rotors
- How to Bleed Car Brakes
When to Replace Wear Sensors
To maintain the accuracy and reliability of your braking system, it is crucial to replace brake pad wear sensors at the appropriate time.
This sensor is designed to alert you when the brake pads have worn down to a specific level; however, once it has fulfilled this function, it may no longer operate correctly.
As this small component directly impacts the warning system, using old or faulty sensors can lead to false alerts, or, conversely, result in no warning being issued when the pads wear down again.
Understanding when a sensor needs to be replaced helps you avoid confusion, maintain safety and ensure that your vehicle continues to provide accurate information regarding the condition of its brakes.
1. Sensors That Remain Active After Wear
In many vehicles, brake pad wear sensors are designed as single-use components.
When the brake pads wear down to the sensor’s contact point, the sensor wire either severs or undergoes a change in its electrical state, triggering the warning light.
Once this occurs, the sensor typically cannot revert to its original operational state.
Even if new brake pads are installed, the old sensor may continue to display a warning because the circuit remains broken.
Therefore, a sensor that has already triggered a warning should be replaced rather than reused.
Retaining a sensor that has already issued a warning can cause the warning lights to remain continuously illuminated, thereby diminishing confidence in the system.
2. Replacing Sensors Concurrently with Brake Pads
It is generally recommended that wear sensors be replaced simultaneously with the brake pads, particularly if the sensor has already triggered a warning.
This ensures that both components begin operating from a fresh state and function in perfect synchronization with one another.
Installing new brake pads while retaining old or defective sensors can result in inaccurate readings or premature warnings.
In many cases, the cost of the sensors is negligible compared to the total cost of the brake service; therefore, replacing them during the same service saves time and eliminates the need to reopen the brake system at a later date.
This practice also ensures that the warning system continues to provide accurate information throughout the entire lifespan of the new brake pads.
3. Cost Considerations
The cost of brake pad wear sensors is generally lower than that of other brake components, although this can vary depending on the specific vehicle and the type of sensor utilized.
Simple sensors are often inexpensive, whereas the more advanced systems found in modern vehicles, due to their complex designs and integration requirements with the vehicle’s electronic systems, as it can be more costly.
If the sensors are replaced concurrently with the brake pads, labor costs are typically minimal, as the brake assembly is already disassembled.
However, replacing the sensors separately at a later time can result in increased labor time and expense.
Given the relatively low cost of sensors and the critical role they play in safety, replacing them at the appropriate time is a cost-effective decision that helps prevent significant future expenses.
Know, The Safety Tips When Inspecting Brake Components
If you follow the proper precautions, working on your car’s brake system can be both safe and easy; however, neglecting basic safety measures can lead to serious injury or damage.
Brake components are heavy, can become extremely hot and are often situated in tight spaces amidst moving parts.
Many accidents that occur during brake inspections happen not because the task itself is difficult, but because safety protocols are ignored or the work is performed in haste.
Spending a few extra minutes to prepare properly, use the correct support equipment and remain aware of your surroundings can make the entire process significantly safer and more comfortable.
Understanding and adopting these safety tips not only protects you but also ensures that the inspection is conducted correctly.
Also, there’s modern research that shows that brake pad wear sensors are not just convenience features but it is truly essential safety components, as study also confirms that real-time monitoring systems can warn the drivers before brake failures occurs, specially under the extreme driving conditions, so this shows that why checking and maintaining your brake pad wear sensor is really important for prevention of accidents and ensuring the reliable braking performance as well.[¹]
1. Proper Vehicle Lifting Techniques
Before inspecting any brake components, properly lifting the vehicle is one of the most critical steps.
Every vehicle features specific lifting points designed for safe elevation; using an incorrect location can result in damage to the vehicle or cause it to slip.
When lifting the vehicle, the ground surface must be level and stable to prevent the car from shifting.
The jack should be positioned firmly and directly beneath the designated lifting point and the vehicle should be raised slowly and smoothly.
Lifting the vehicle abruptly or unevenly can compromise its stability.
Taking a moment to ensure that everything is correctly positioned significantly reduces the risk of the vehicle shifting or falling while you are working.
2. Avoiding Hot Brake Components
After driving, brake components can become extremely hot due to the friction generated to slow the vehicle down.
This heat can linger in the brake pads, rotors and calipers for a considerable time specially if you have applied the brakes forcefully or have just completed a long journey.
Touching these components too soon poses a risk of burns or physical injury.
Before beginning any inspection, it is always best to allow the vehicle to cool down completely.
Even if the brakes do not feel hot to the touch initially, residual heat may still be present within certain parts of the system.
Waiting for them to cool ensures that you can work safely and handle the components without risk.
3. The Importance of Secure Jack Stands
When lifting a vehicle to perform work underneath or around it, using jack stands for support is absolutely essential for safety.
Car jacks are designed to lift a vehicle, but they are not intended to hold it in a stationary position for extended periods.
If a jack fails or slips out of place, the vehicle could suddenly collapse.
Jack stands provide sturdy and stable support, ensuring that the vehicle remains securely in place while you work.
After lifting the car, the stands should be positioned beneath strong points of the frame and set to the appropriate height.
Before beginning any inspection, it is crucial to ensure that the car is resting entirely on the stands.
This additional support significantly reduces the risk of accidents and creates a safe working environment.
Difference Between DIY vs Professional Inspection
In many cases, checking brake pad wear sensors can be performed right at home; however, before making any decision, it is crucial to understand your own limitations as well as the condition of your vehicle.
A basic inspection primarily involves a visual examination of the brake pads, checking the sensor wiring and verifying that the warning light is functioning correctly.
These tasks are relatively simple and, provided you adhere to proper safety protocols, can be accomplished using only basic tools.
Nevertheless, brake systems are critical to vehicle safety and even a minor error can compromise your vehicle’s stopping capability.
Professional inspections are more comprehensive, as trained mechanics utilize specialized tools, follow established procedures and can identify hidden issues that might typically go unnoticed during a self-inspection.
Knowing when to tackle a task yourself and when to seek the assistance of an expert ensures both safety and accuracy.
1. When DIY Suffices
Do-it-yourself (DIY) inspections are generally sufficient when you are conducting routine checks and the indicators are clearly visible.
For instance, if you simply wish to verify whether the brake pads are worn, check for any obvious damage to the sensor wiring, or determine why the warning light has illuminated, these tasks can often be performed at home.
If you possess basic tools, a safe workspace and a clear understanding of the correct procedures, you can quickly identify common issues.
DIY inspections are also valuable for routine maintenance, particularly when there are no unusual noises, no significant changes in braking performance and no complex electronic malfunctions.
In such instances, a simple self-inspection can save time and help keep you informed about the overall condition of your vehicle.
2. When to Consult a Mechanic
You should consult a mechanic when the issue is unclear or when the symptoms appear to be far more serious than a basic warning.
If the brake warning light remains illuminated even after replacing the pads and sensors, or if you experience reduced braking efficiency, grinding noises, or uneven braking, it is best to seek professional assistance.
Mechanics possess the expertise to diagnose deeper issues such as: sensor malfunctions, wiring problems, or damage to the brake system, that may not be immediately apparent.
They can also utilize diagnostic tools to reset the system and check for hidden error codes stored within the vehicle’s onboard computer.
In such cases, having a professional perform the inspection eliminates the need for guesswork and ensures that the brake system is functioning safely and correctly.
3. Cost Comparison
The cost of inspecting brake pad wear sensors can vary depending on whether you perform the task yourself or visit a professional.
A do-it-yourself (DIY) inspection typically incurs minimal cost, as you may already own the necessary basic tools; and even if you do need to purchase them, they can be reused for future projects.
Conversely, a professional inspection includes labor costs, which can increase the total expense.
However, this cost covers expert assessment, quality workmanship and accurate results.
In some instances, spending more on a professional inspection can actually save money in the long run by helping you avoid incorrect repairs or overlooked issues.
The decision to choose between these two options ultimately depends on the complexity of the problem and your level of confidence in your ability to perform the inspection safely yourself.
Conclusion – How to Check Brake Pad Wear Sensor
So, now you have understood that: brake safety does not depends on the luck, as it depends on how early you notice the warning signs.
This sensor is designed to provide you with advance warning when your brake pads begin to wear excessively; this allows you to take the necessary steps in a timely manner, rather than waiting for a major problem to arise.
By understanding how the sensor functions, recognizing warning signs such as: an indicator light illuminating on the dashboard or a loud squealing sound coming from the brakes, and following simple inspection procedures, you can avoid costly damage to components like brake rotors and maintain robust brake performance.
It is also important to remember that not every warning signifies an immediate danger; nevertheless, no warning should ever be ignored.
Sometimes the issue may be as minor as a faulty wire or a sensor that simply requires a reset; conversely, it could be a clear indication that the brake pads are completely worn out and require replacement.
Understanding this distinction enables you to make better decisions and avoid unnecessary repairs.
Whether you inspect this system yourself or seek the assistance of a professional, the most critical aspect is to take timely action and conduct regular checks.
Now, that’s all about this guide on How to Check Brake Pad Wear Sensor, also you can ask remaining questions below.
Frequently Asked Questions
FAQ 1: What happens when the brake pad wear sensor is triggered?
When the brake pad wear sensor is triggered, it indicates that your brake pads have worn down to a point where they require immediate attention. In electronic systems, the sensor alters an electrical circuit, causing a warning light to illuminate on your dashboard. In mechanical systems, you may hear a loud, sharp, squealing sound when applying the brakes. This serves as an early warning, not a malfunction, but it must be taken seriously; continued driving can compromise braking performance and eventually lead to damage to other components, such as the brake rotors.
FAQ 2: Can I continue driving after the brake pad wear sensor warning appears?
Yes, you can generally continue driving for a short while after the warning appears, though it is not advisable to ignore it for an extended period. These sensors are designed to alert you when the brake pads begin to wear dangerously thin, giving you some time to take action. However, delaying repairs can diminish your vehicle’s stopping capability and potentially increase repair costs. The safest course of action is to have the issue inspected and resolved as soon as possible.
FAQ 3: How accurate are brake pad wear sensors?
Brake pad wear sensors are generally very accurate, as they are installed directly within, or in close proximity to, the brake pads themselves. They are designed to trigger at a specific level of wear, thereby facilitating the timely replacement of brake pads. However, they can occasionally generate false warnings due to faulty wiring, corrosion, or improper installation. Therefore, if you have any doubts, it is crucial to visually inspect the brake pads yourself to confirm their actual condition.
FAQ 4: Do all cars have brake pad wear sensors?
Not all cars are equipped with brake pad wear sensors. In many modern and high-end vehicles, electronic sensors come as a standard feature, whereas some older or basic models may only have mechanical indicators, or no sensors at all. In vehicles without sensors, drivers must rely on regular inspections, unusual noises, or changes in braking performance to determine when their brake pads need replacement.
FAQ 5: How long do brake pad wear sensors last?
Brake pad wear sensors generally last as long as the brake pads to which they are attached. In many cases, they are designed for single use and are triggered once the brake pads have worn down completely. Once triggered, they often need to be replaced along with the brake pads. Attempting to reuse a triggered sensor can lead to false warnings or system malfunctions.
FAQ 6: Why is my brake warning light still on after replacing the brake pads?
If your brake warning light remains illuminated even after replacing the brake pads, the reason is often that the wear sensor has not been replaced or reset. Some sensors remain in a triggered state after detecting wear and do not reset automatically. In some instances, manually resetting the system or using a diagnostic scan tool may be required to clear the warning. This issue could also be caused by faulty wiring or loose connections.
FAQ 7: Can brake pad wear sensors be reused?
In most cases, if a brake pad wear sensor has already been triggered, it should not be reused. Once the sensor wire is broken or worn through, it cannot return to its original state. Attempting to reuse it may cause the warning light to remain illuminated or result in inaccurate readings. For precise monitoring, it is generally best to install a new sensor whenever new brake pads are fitted.
FAQ 8: What does a brake wear sensor sound like?
When brake pads become thin, a mechanical brake wear sensor emits a loud, sharp, squealing sound. This sound is typically heard when braking at low speeds and is designed to grab your attention. It differs from a grinding sound, which indicates more severe damage. This squealing serves as an early warning and should not be ignored.
References:
[1] Development of Sensor for the Real-time Monitoring of Brake Pad Wear and Brake Disc Temperature in High Temperature
https://link.springer.com/article/10.1007/s12239-023-0129-z

Hello Folks, Dean Shali here to help you out to solve the problems with your lovely vehicle, as i have lots of experience and knowledge about automotive industry as i woks directly with the customers and repair vehicles and i love to help the people to keep their cars safe and running smoothly.