Written By: Dean Shali
Fact Checked By: Sabré Cook
Reviewed By: Tamara Warren
If there’s corrosion and vibrations available on the battery terminals then simply you have to fix that issue, as it can literally weakens the overall productivity of your vehicle.
Because, most of the time drivers just assumes that the battery has failed, but in many cases, the real problem could be because of the worn out “BATTERY TERMINALS”.
Basically, these are the small metallic connectors that serves as the critical bridge between your battery and every other electrical system in your vehicle.
So, without having a clean and totally secure connections, the battery just can’t efficiently deliver the power to the starter motor, ignition system, lights, sensors or onboard computers as well.
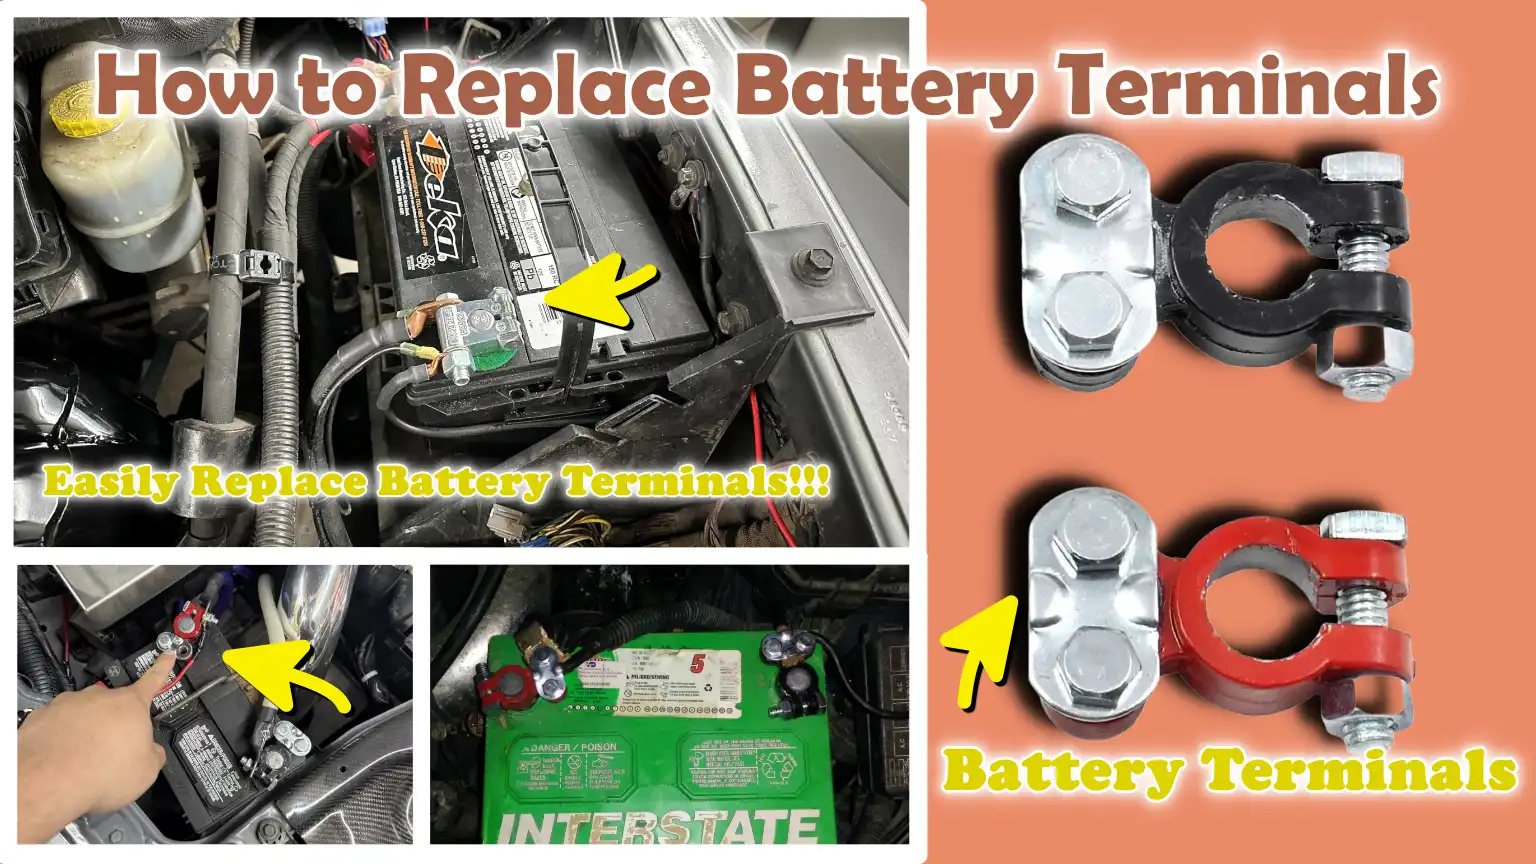
That’s why, in this guide you’ll learn How to Replace Battery Terminals so that you can throw that loosed, cracked and corrosion-less connectors and reignite that needed spark for your vehicle.
Know, What Are Battery Terminals?
Battery terminals are metal connectors attached to a vehicle’s battery that facilitate the flow of electricity between the battery and the vehicle’s electrical system.
They serve as the primary connection points for the battery cables, helping to deliver power to the starter motor, lights, ignition system, sensors and onboard electronics.
Although they are small components, battery terminals are crucial for the reliable operation of a vehicle.
If they become loose, damaged, or corroded, they can disrupt the flow of electricity, leading to difficulties in starting the vehicle, charging issues and compromised electrical performance.
1. Positive vs Negative Battery Terminals
Every vehicle battery features a positive terminal and a negative terminal.
The positive terminal, marked with a plus (+) sign, transmits power from the battery to the various electrical components of the vehicle.
The negative terminal, marked with a minus (-) sign, connects to the vehicle’s chassis and provides a return path for the electrical current.
Together, these two terminals complete an electrical circuit, enabling the battery to supply power to the vehicle.
Any issue with either terminal can interrupt this flow, potentially causing problems such as slow starting, dim lights, or the vehicle failing to start altogether.
2. Types of Battery Terminals
Different types of battery terminals are used depending on the vehicle and its application.
Top-post terminals are the most common; they feature round posts located on top of the battery, making them easy to access and maintain.
Side-post terminals feature threaded connections located on the side of the battery and are typically found in specific vehicle models.
Marine battery terminals are designed for use in boats and other watercraft; they are constructed from rust-resistant materials to ensure they do not deteriorate when exposed to moisture and salt.
Universal replacement terminals are aftermarket connectors that fit a wide variety of battery cables; they are frequently used when original terminals become damaged or heavily corroded.
Selecting the appropriate type of terminal ensures a secure connection and facilitates efficient power transfer.
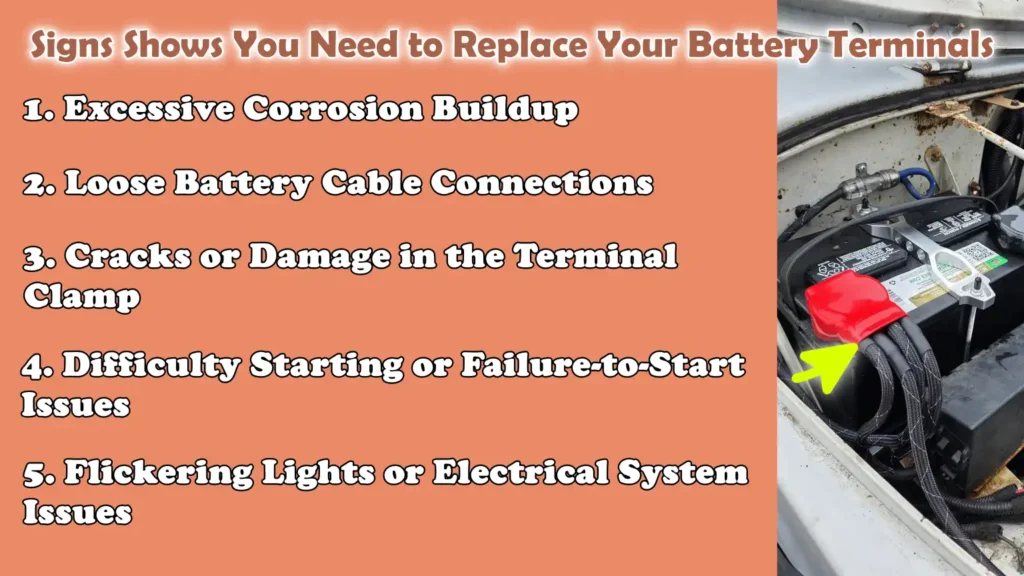
Signs Shows You Need to Replace Your Battery Terminals
Battery terminals are designed to provide a strong and reliable connection between the battery and the vehicle’s electrical system.
However, over time, exposure to heat, moisture, vibration and chemical reactions can cause them to deteriorate.
When battery terminals become corroded or worn out, they can disrupt the flow of electricity and lead to starting issues as well as various other electrical problems within the vehicle.
Recognizing these warning signs early on can prevent sudden vehicle breakdowns and ensure that your vehicle continues to operate reliably.
1. Excessive Corrosion Buildup
The most common sign indicating the need to replace battery terminals is the presence of excessive corrosion buildup around the terminal connections.
Corrosion often appears as a white, blue, or green powdery layer on the battery posts or cable ends.
These deposits form as a result of chemical reactions occurring between the battery acid, moisture and the metal components.
As corrosion accumulates, it acts as an insulator, increasing electrical resistance and reducing the amount of power reaching the vehicle’s systems.
While minor corrosion can often be cleaned off, heavy corrosion that recurs frequently, or causes visible damage to the terminal, may indicate that replacement is the best and most long-term solution.
2. Loose Battery Cable Connections
Battery terminals must fit snugly onto the battery posts to maintain a secure electrical connection.
If a terminal remains loose even after being tightened, it may be worn out, stretched, or damaged.
A loose connection can lead to intermittent electrical issues, as the flow of electricity may be disrupted whenever the vehicle travels over rough terrain or experiences vibration.
Drivers may occasionally face problems such as difficulty starting the vehicle, flickering lights, or sudden power outages.
If the terminal can no longer maintain a firm grip on the battery post, it typically becomes necessary to replace it.
3. Cracks or Damage in the Terminal Clamp
Physical damage is another clear indication that the battery terminal requires replacement.
Factors such as age, corrosion, overtightening, or repeated removal and reinstallation can cause cracks, breakage, or excessive wear in the terminal clamp.
Even minor cracks can weaken the connection and compromise the terminal’s ability to effectively transmit electrical current.
Damaged terminals may also be difficult to tighten properly, thereby increasing the risk of poor electrical contact.
Replacing a broken or cracked terminal helps to re-establish a secure and reliable connection.
4. Difficulty Starting or Failure-to-Start Issues
Faulty battery terminals can generate excessive electrical resistance, making it difficult for the battery to deliver the necessary power to the starter motor.
Consequently, the engine may crank slowly, require multiple attempts to start, or fail to start altogether.
In many instances, drivers assume that the battery itself is failing, whereas the actual problem lies in a poor connection at the terminals.
If the battery tests as functional but starting issues persist, the terminals should be carefully inspected, specifically for signs of wear or corrosion, and replaced if necessary.
5. Flickering Lights or Electrical System Issues
Modern vehicles rely on a steady flow of electricity to power everything, from headlights and dashboard displays to sensors and control modules.
When battery terminals become loose, corroded, or damaged, the electrical connection can become unstable.
As a result, headlights may flicker, interior lights may dim, warning lights may suddenly illuminate, or electronic systems may behave erratically.
Since these symptoms can affect multiple vehicle systems simultaneously, faulty battery terminals are often overlooked.
Replacing defective terminals can help restore a steady flow of electricity and improve the vehicle’s overall reliability.
Know, What are the Benefits of Replacing Battery Terminals
Replacing worn, corroded, or damaged battery terminals can offer several significant benefits to your vehicle’s electrical system.
Battery terminals serve as the primary connection points between the battery and the vehicle; therefore, their condition directly impacts the efficiency with which electricity flows throughout the car.
When terminals deteriorate due to corrosion, looseness, or physical damage, they can create a blockage that diminishes performance and leads to a variety of electrical issues.
Installing new battery terminals helps re-establish a robust connection, improves power delivery and ensures the reliable operation of the vehicle’s critical systems.
1. Improved Electrical Conductivity
The most significant benefit of replacing battery terminals is improved electrical conductivity.
Clean and properly installed terminals allow electricity to flow more freely between the battery and the vehicle’s electrical components.
Corrosion, dirt and terminal deterioration can act as obstructions, hindering the flow of current and increasing electrical resistance.
By replacing faulty terminals, you create a clean and more efficient pathway for electrical energy, ensuring that the starter motor, ignition system, lights and electronic modules receive the necessary power to function correctly.
2. Helps Prevent Engine Starting Issues
Battery terminals play a crucial role in the engine starting process, as the starter motor requires a massive surge of electrical current to crank the engine.
If the terminals are loose, corroded, or damaged, they may fail to deliver sufficient power during the starting sequence.
As a result, the engine may crank slowly, intermittent starting issues may arise, clicking sounds may be heard, or the engine may fail to start altogether.
Replacing faulty terminals helps ensure a stable electrical connection, making engine starting more consistent and reducing the risk of sudden breakdowns.
3. Reduces Voltage Drop
Voltage drop occurs when, due to electrical resistance, the battery’s full voltage fails to reach the vehicle’s components.
Corroded or worn-out battery terminals are a common cause of voltage drop, as they impede the flow of electricity.
Even a slight increase in resistance can compromise the efficiency of the starting and charging systems.
New battery terminals help minimize resistance, allowing a larger portion of the battery’s available voltage to reach the starter, alternator and other electrical devices.
This contributes to improved performance and more efficient operation of the entire electrical system.
4. Extends Battery and Cable Lifespan
Faulty battery terminals can place excessive strain on both the battery and the battery cables.
When electrical resistance increases, the battery may have to work harder to supply power; over time, this can generate excessive heat and diminish its capacity.
Corrosion can also spread from the terminals to the battery cables, causing further damage.
Replacing faulty terminals helps preserve these components by maintaining proper electrical flow, reducing unnecessary strain and slowing the spread of corrosion, thereby averting the risk of premature battery failure.
5. Enhances Overall Vehicle Reliability
Modern vehicles rely on a stable and dependable electrical supply to power dozens of systems, including engine management systems, fuel injection systems, safety features, sensors, lighting and infotainment systems.
A poor battery connection can trigger sudden electrical issues that are often difficult to diagnose.
Replacing old battery terminals helps establish a reliable electrical connection, which is essential for the vehicle’s stable and consistent operation.
This can reduce the likelihood of electrical malfunctions, enhance overall reliability and provide drivers with greater confidence that their vehicle will start and run exactly as they expect.
Tools
| Tools | Why It Is Needed | How to Use It |
|---|---|---|
| Wrench Set | A wrench set is used to loosen and tighten battery terminal nuts and cable connections. Since battery terminals are secured by nuts or bolts, a wrench is often the primary tool required for their removal and installation. | Select the correct size wrench that fits snugly onto the terminal nut. Turn the wrench anti-clockwise to loosen the connection and turn it clockwise to tighten the nut after installing a new terminal. |
| Socket Set | A socket set facilitates the removal and installation of battery terminal bolts more quickly and efficiently, particularly in the tight confines of the engine compartment where there may not be enough clearance to maneuver a standard wrench. | Attach the appropriately sized socket to a ratchet handle and position it over the terminal bolt or nut. Rotate the ratchet to loosen or tighten the bolt or nut as required. |
| Wire Cutters | Wire cutters are essential for removing old, damaged, or heavily corroded battery terminal ends from the battery cables. They provide a clean cut, ensuring that the new terminal can be installed correctly. | Position the blades of the cutters around the battery cable near the old terminal and apply steady pressure to cleanly sever the cable. |
| Wire Stripper | A wire stripper removes the layer of insulation covering the battery cable, exposing the metal conductor so that it can be connected to the new battery terminal. Proper removal of the insulation ensures a secure electrical connection. | To remove the insulation, select the slot on the tool that corresponds to the size of the cable. Insert the cable into the slot, squeeze the handles and pull the tool backward to strip away the insulation without damaging the cable wires. |
| Crimping Tool | A crimping tool securely attaches a new battery terminal to the exposed end of a battery cable. Proper crimping creates a robust mechanical and electrical connection capable of handling high current flow. | Insert the stripped cable into the terminal connector. Position the terminal within the appropriate slot of the crimping tool and squeeze firmly until the connector is securely crimped around the cable. |
How to Ensure Safety Before Replacing Battery Terminals
Replacing battery terminals is generally a straightforward repair task; however, it involves working directly with the vehicle’s electrical system and the battery itself.
Car batteries are capable of delivering very high electrical currents and contain corrosive acid, which means that adhering to proper safety precautions is absolutely essential.
Taking a few simple steps before beginning the work can help prevent accidental short circuits, electrical sparks, personal injury and damage to the vehicle’s electrical components.
Following these safety measures creates a safer working environment and helps ensure that the battery replacement process is completed without any complications.
1. Turn Off the Vehicle
Before touching the battery or its terminals, ensure that the vehicle is completely turned off.
When the engine is running, the battery and alternator continuously supply power to the vehicle’s electrical system.
Working on battery connections while electrical current is flowing increases the risk of generating sparks and potentially damaging sensitive electronic components.
Turning off the vehicle ensures that the electrical system is inactive, thereby reducing the likelihood of accidental electrical mishaps during the repair process.
2. Remove the Key from the Ignition
Removing the key from the ignition is a crucial step that is often overlooked by many.
Even if the engine is off, if the key remains in the ignition, certain vehicle systems may remain active.
In modern vehicles, various electronic modules, sensors and security systems can continue to draw power from the battery.
Removing the key ensures that no one accidentally starts the vehicle while you are working on the battery; furthermore, it minimizes the risk of sudden electrical surges or activity.
3. Wear Essential Safety Equipment
Safety equipment helps protect you from potential hazards while working around batteries.
Safety goggles shield your eyes from corrosion particles, dust, debris, or sudden splashes of battery acid.
Safety gloves help prevent direct skin contact with the corrosive substances that often accumulate around battery terminals.
These corrosive substances frequently contain chemical compounds that can cause irritation to the skin and eyes.
Wearing basic safety gear provides an extra layer of protection, making the task safer and more comfortable.
4. Avoid Sparks and Open Flames
Car batteries can release small amounts of hydrogen gas during normal charging and discharging cycles.
Hydrogen is highly flammable and can ignite if it comes into contact with sparks, cigarettes, lighters, welding equipment, or any other open flame.
Even a small spark near a battery can create a dangerous situation.
To mitigate this risk, avoid smoking near the battery, keep sources of ignition away from your workspace and handle tools with care to prevent accidental contact between metal parts that could generate sparks.
5. Work in a Well-Ventilated Area
Proper ventilation is crucial whenever you are working around batteries.
Although most automotive batteries are sealed, they can still release small amounts of gas, particularly when they are charging, damaged, or have internal faults.
Working in a well-ventilated garage or an open outdoor space allows any released gases to dissipate into the air, thereby enhancing overall safety.
Proper airflow also helps make the working environment more comfortable and reduces the risk of exposure to dust, rust particles and chemical fumes present around the battery.
So, How to Replace Battery Terminals – With Clear Instructions
Replacing battery terminals is a practical repair that can restore proper electrical flow between the battery and the vehicle.
This process involves removing the old terminals, preparing the battery cables, installing a new connector and ensuring that all connections are secure.
Taking your time and carefully following each step can help prevent electrical issues, improve the vehicle’s starting performance and extend the lifespan of both the battery and the cables.
1. Locate the Battery
Begin by locating the vehicle’s battery.
In most vehicles, the battery is located under the hood; however, in some models, it may be found in the trunk or under a seat.
Once located, identify the positive terminal, which typically bears a plus (+) sign and is often connected to a red cable, and the negative terminal, which bears a minus (-) sign and is generally connected to a black cable.
Correctly identifying these terminals is crucial, as disconnecting and reconnecting them in the proper sequence helps prevent electrical problems and accidental short circuits.
2. Disconnect the Negative Battery Cable
Using the appropriate wrench or socket, loosen the negative battery terminal and carefully remove the cable from the battery post.
The negative cable should always be disconnected first, as it is connected to the vehicle’s chassis ground.
Removing it first minimizes the risk of an accidental short circuit should a tool come into contact with a metal part of the vehicle while working on the battery.
Once removed, position the cable away from the battery to ensure it does not accidentally reconnect.
3. Disconnect the Positive Battery Cable
After removing the negative cable, disconnect the positive battery cable.
Loosen the terminal clamp and lift it off the battery post.
Disconnecting the positive cable second is safer, as the vehicle’s ground connection has already been removed.
This reduces the risk of sparks or electrical shorts occurring while using tools around the battery.
Position the positive cable in a location where it cannot come into contact with the battery post during the repair process.
4. Inspect the Battery Cables
Carefully inspect both battery cables before installing the new terminals.
Look for signs of corrosion, cracks in the insulation, exposed wires, broken strands, or heat damage.
Sometimes, corrosion can extend deep inside the cable, where it is not immediately visible.
If the cable feels stiff, swollen, or heavily corroded, replacing the entire cable, rather than just the terminal, may be the better option.
High-quality battery cables are essential for maintaining a reliable electrical connection.
5. Cut and Remove the Old Battery Terminal
Use wire cutters to remove the damaged battery terminal from the cable.
Whenever possible, make the cut on a clean section of the cable, specially if corrosion has spread beyond the terminal.
Cutting away the damaged section ensures that the new terminal will connect to a clean, electrically conductive wire surface.
Making a clean cut also simplifies the installation process and results in a higher-quality connection.
6. Strip the Cable Insulation
Using a wire stripper, remove enough insulation to expose the bare wire required for installing the new terminal.
Most new terminals require approximately half an inch to three-quarters of an inch of exposed wire; However, always follow the manufacturer’s recommendations.
During this step, be careful not to cut or damage the individual strands of the copper wire.
Intact wire strands conduct electricity more efficiently and ensure a robust connection within the new terminal.
7. Install the New Battery Terminal
Fully insert the stripped end of the battery cable into the new battery terminal.
Depending on the terminal’s design, secure the connection by tightening the terminal bolt or by crimping the connector using a crimping tool.
The cable should fit firmly and remain completely motionless, even if subjected to a slight tug.
A secure connection is critical, as battery cables carry high currents, particularly during engine startup.
Loose connections can lead to interruptions, excessive heat generation and future electrical problems.
8. Apply Heat-Shrink Tubing – If Necessary
If you are using heat-shrink tubing, slide it onto the cable before attaching the terminal; alternatively, depending on your installation method, slide it over the connection once the connection is complete.
Apply uniform heat to the tubing until it shrinks tightly around the connection.
Heat-shrink tubing provides an extra layer of protection against moisture, dirt, road salt and corrosion.
It can also help strengthen the connection and extend its lifespan.
9. Clean the Battery Posts
Before reconnecting the cables, thoroughly clean the battery posts.
Use a battery terminal cleaning brush or an appropriate tool to remove corrosion, dirt and debris from the posts.
Clean metal surfaces ensure better electrical contact and minimize resistance.
Even a brand-new terminal may not function correctly if it is connected to a dirty or corroded battery post.
Ensuring that both surfaces are clean helps maximize electrical conductivity.
10. Reconnect the Positive Terminal
Place the new positive terminal onto the positive battery post and tighten it securely.
The terminal should seat properly without requiring excessive force.
Reconnecting the positive terminal first aligns with standard battery service practices and helps minimize the risk of accidental short circuits during installation.
Double-check to ensure that the terminal is seated correctly and does not spin loosely on the battery post.
11. Reconnect the Negative Terminal
Once the positive connection is secure, reconnect the negative terminal to the negative battery post.
Tighten the connection until it is firm and stable.
Reconnecting the negative terminal last restores power to the vehicle’s electrical system and completes the battery installation process.
Inspect both terminals to ensure they are securely fastened and do not wobble.
12. Check the Connections
Start the vehicle and observe its operation.
The engine should turn over normally and start without any hesitation.
Verify that the headlights, interior lights, dashboard display, radio and other electrical components are functioning correctly.
Check the battery terminals for any signs of looseness or poor contact.
A successful check confirms that the new battery terminals are providing a robust electrical connection and that the vehicle’s electrical system is functioning as intended.
Know, Common Mistakes to Avoid When Replacing Battery Terminals
Replacing battery terminals is a fairly simple repair task; however, minor errors can lead to poor electrical connections, starting difficulties, battery damage, or even safety hazards.
Many issues related to battery terminals that arise after installation are not due to defective parts, but rather due to mistakes made during the replacement process itself.
Understanding these common errors helps ensure that the new terminals establish a safe, reliable and long-lasting connection with the vehicle’s electrical system.
And, there’s even research which is published by SAE International found that high-resistance automotive electrical connections can literally cause noticeable temperature that increases and voltage loses at the battery cable connection points, so this finding shows that why replacing worn out, loose or corroded battery terminals is really important, so having a secure terminal connection actually helps you to reduce the resistance, improves the electrical efficiency and ensure that all the other important components such as: the starter motor and charging system that receives the power they needed to operate it properly.[¹]
1. Removing the Positive Terminal First
One of the most common mistakes is removing the positive battery terminal before disconnecting the negative terminal.
The negative terminal is connected to the vehicle’s chassis and serves as the electrical ground.
If the positive terminal is removed first and a metal tool accidentally touches a grounded metal surface, it can cause a short circuit and generate sparks.
Removing the negative terminal first breaks the ground connection, significantly reducing the risk of accidental electric shock while working on the battery.
2. Choosing the Wrong Terminal Size
Battery terminals are designed to fit specific battery post sizes and cable diameters.
Installing a terminal that is too large can result in a loose connection, while a terminal that is too small will not fit properly or may become damaged during installation.
Using the wrong terminal size can increase electrical resistance, impede proper current flow, cause the battery to overheat and lead to recurring starting difficulties.
Always ensure that the replacement terminal matches the size of both the battery post and the battery cable.
3. Failing to Clean the Battery Posts
Many people install new battery terminals without first properly cleaning the battery posts.
Even if a new terminal is in pristine condition, the rust, dirt and oxidation accumulated on the battery posts can still impede the flow of electricity.
Rust acts as an insulator and increases electrical resistance, thereby diminishing the battery’s power-delivery capability.
Thoroughly cleaning the battery posts before installing the terminals ensures direct metal-to-metal contact, which facilitates better electrical flow and maintains reliable battery performance.
4. Loose Terminal Connections
Battery terminals must fit firmly onto the battery posts without any excessive movement.
If the connection remains loose, engine vibrations and rough road conditions can cause the terminal to shift out of place, potentially interrupting the flow of electricity.
Loose terminals are a common cause of intermittent starting difficulties, flickering lights, sudden power loss and malfunctions within the charging system.
After installation, always verify that the terminal is securely fastened and that it does not feel loose or wobble on the battery post.
5. Overtightening Terminal Clamps
While it is essential to tighten battery terminals firmly, applying excessive force can be just as detrimental as leaving them loose.
Overtightening can cause the terminal clamp to snap, damage the battery post, strip the bolts, or distort the shape of the connector.
In some instances, excessive pressure can weaken the terminal and significantly reduce its service life.
The objective is to establish a secure and stable connection without applying any unnecessary force.
Adhering to the specific tightening specifications provided by the manufacturer helps prevent damage while simultaneously ensuring proper electrical contact.
6. Ignoring Faulty Battery Cables
If the battery cable itself is defective, simply replacing the terminals will not resolve electrical issues.
Corrosion can spread deep inside the cable, where it is not always visible from the outside.
Frayed wires, cracks in the insulation, swelling in parts of the cable, or signs of excessive heat, all of these can be indicators of a faulty cable.
Installing a new terminal onto a defective cable prevents proper electrical flow and leads to recurring electrical problems.
Before completing the repair, carefully inspect the entire cable; if any significant damage or corrosion is visible, replace it.
Read More:
Conclusion – How to Replace Battery Terminals
So, yes the condition of your batter terminals actually determines whether electrical power flows smoothly throughout the vehicle or struggles to reach to the all the important components as well.
Every time you start the engine, turn on the headlights, charge electronic devices, or operate the vehicle’s modern systems, electricity must flow through the battery terminals.
When these connections become corroded, loose, broken, or damaged, they can create obstructions that disrupt the flow of electricity, leading to a variety of issues such as: slow engine cranking, intermittent starting problems, dimming lights, charging system malfunctions and sudden power failures.
Fortunately, replacing battery terminals is one of the easiest and most affordable maintenance tasks that any vehicle owner can perform themselves.
By timely identifying faulty terminals, adhering to proper safety protocols, using the right tools and installing high-quality replacement terminals, you can restore proper electrical flow and enhance the performance of the entire electrical system.
Now, that’s it from this guide about How to Replace Battery Terminals and you can comment for more information.
Frequently Asked Questions
FAQ 1: Can I replace the battery terminals without replacing the battery itself?
Answer: Yes, in most cases, you can replace the battery terminals without replacing the battery. The battery terminals and the battery are two distinct components. If the battery is still charging properly and passes a battery test, it typically does not need to be replaced simply because its terminals have corroded, become loose, or are damaged. Replacing damaged terminals often restores proper electrical flow and resolves starting or charging issues without the additional expense of purchasing a new battery.
FAQ 2: What happens if the battery terminals are loose?
Answer: Loose battery terminals can create an unstable electrical connection between the battery and the vehicle. This can lead to issues such as slow engine cranking, intermittent starting failures, flickering headlights, illuminated dashboard warning lights, radio resets, or sudden power loss. In severe cases, the vehicle may fail to start at all. Since a vehicle is constantly subjected to vibrations while driving, loose terminals can evolve into a major problem over time if not addressed promptly.
FAQ 3: Can corroded battery terminals prevent a vehicle from starting?
Answer: Yes, severely corroded battery terminals can prevent a vehicle from starting. Corrosion creates a barrier between the battery and the battery cables, thereby obstructing the proper flow of electricity. Since the starter motor requires a significant amount of power to crank the engine, even a small amount of corrosion can reduce the available power level enough to cause starting difficulties, slow cranking, clicking sounds, or a complete failure to start.
FAQ 4: How long does it take to replace battery terminals?
Answer: For most vehicles, replacing battery terminals takes anywhere from 30 minutes to an hour. The actual time required for this task depends on the amount of corrosion present, the condition of the battery cables and the type of new terminals being installed. If the cables are in good condition and the terminals are easily accessible, the job can often be completed quite quickly. However, if extensive cleaning or cable repairs are required, the process may take longer to finish.
FAQ 5: Should I replace both battery terminals at the same time?
Answer: If the battery terminals show signs of wear, corrosion, or damage, it is often a good idea to inspect and replace both terminals. Even if it appears that only one terminal is causing the problem, there is a strong possibility that the other terminal will eventually deteriorate in a similar manner over time. Replacing both terminals simultaneously helps maintain a balanced electrical flow and reduces the likelihood of future connection-related issues.
FAQ 6: What is the best material for battery terminals?
Answer: Commonly used materials for battery terminals include lead, brass and copper. Brass terminals are often preferred because they offer excellent protection against corrosion, good electrical conductivity and a long service life. Copper terminals provide superior conductivity but may require additional protection to prevent corrosion. The best choice depends on the specific vehicle, driving conditions and the quality of the terminal design.
FAQ 7: How tightly should battery terminals be fastened?
Answer: Battery terminals should be tightened just enough so that they cannot be moved or rotated on the battery posts by hand. However, they should not be overtightened. Applying excessive force can cause the terminal to crack, damage the battery post, or strip the threads of the tightening hardware. A properly installed terminal provides a strong and secure connection without exerting any unnecessary pressure on the battery or the terminal components.
References:
[1] Evaluation of High Resistance Connection in Automotive Application
https://saemobilus.sae.org/articles/evaluation-high-resistance-connection-automotive-application-2020-01-0926

Hello Folks, Dean Shali here to help you out to solve the problems with your lovely vehicle, as i have lots of experience and knowledge about automotive industry as i woks directly with the customers and repair vehicles and i love to help the people to keep their cars safe and running smoothly.