Written By: Dean Shali
Fact Checked By: Sabré Cook
Reviewed By: Tamara Warren
Understand This: a worn out belt can cause charging problems and you think that it is solely battery fault.
As, it is not just the simple rubber belt under the hood, but is actually plays a really important role that keeps a vehicle running without any problem.
And, in many cars, this very belt drives the alternator, which then generates the electricity while the engine runs and keeps the battery perfectly charged.
So, without it, the battery can lose the power in quick way, also it can cause warning lights to appear, headlights may dim as well and the engine may eventually stall once electrical reserve is gone.
Even, with the small cracks, a glazed surface, loose tension or edge fraying can literally develop long before the belt breaks, that’s why you can notice the squealing sound during the startup: so that’s the clear signal that it might be slipping, poor tension or pulley is misaligned as well.
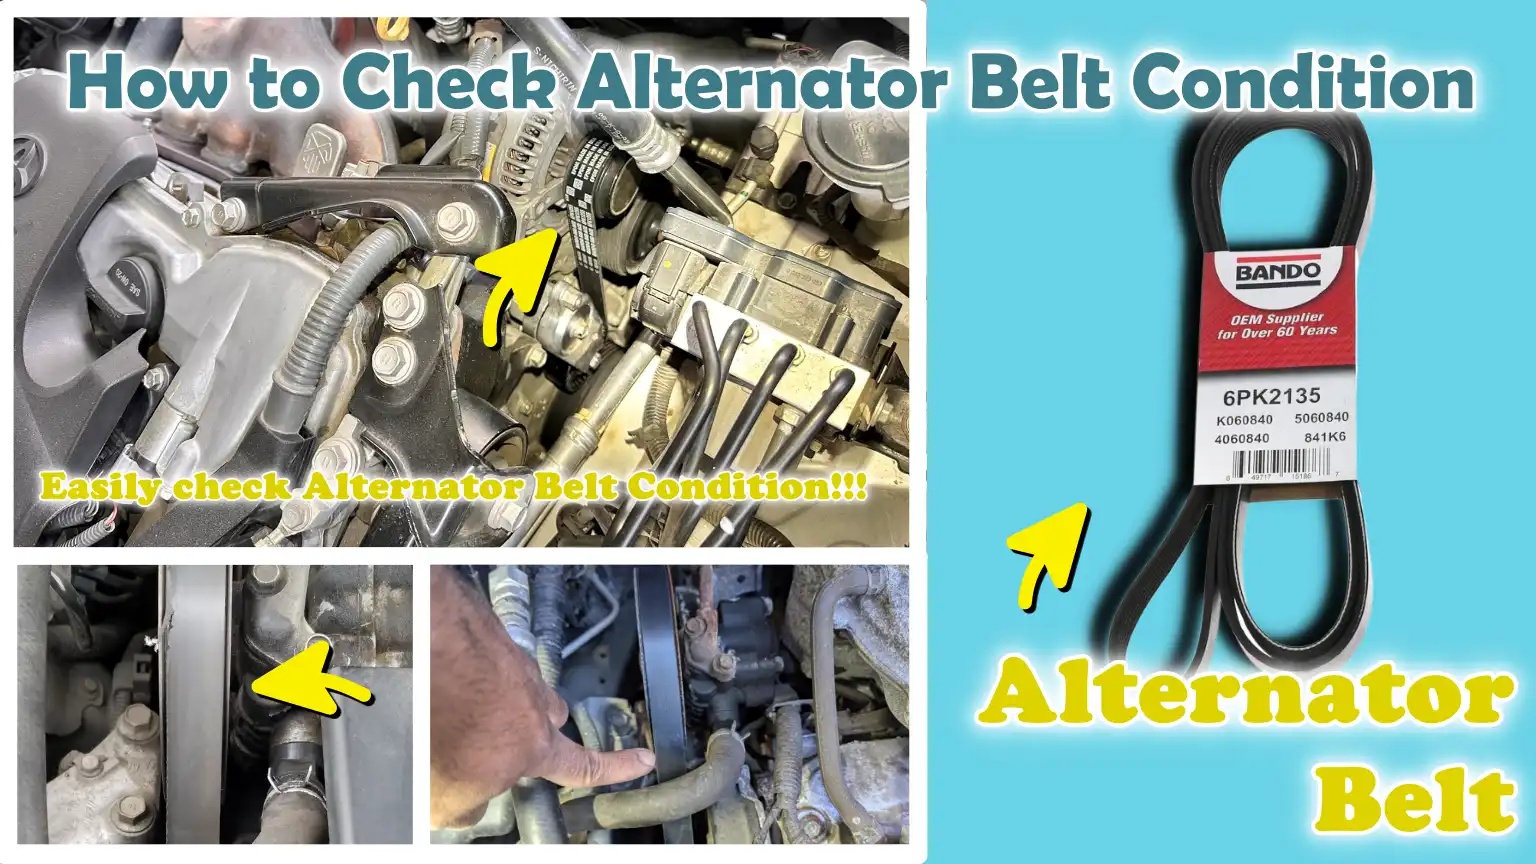
Now, that’s the proper guide about How to Check Alternator Belt Condition so that you can prevent roadside breakdowns and deal with the charging failure as well.
Know, What is an Alternator Belt and What Does It Do?
The alternator belt is a drive belt made of durable rubber.
It transmits power from the engine to the alternator, enabling the vehicle to generate electricity while in operation.
It connects the engine’s rotating pulley to the alternator’s pulley, allowing the alternator to generate power for the battery and all of the vehicle’s electrical systems.
These systems include headlights, dashboard instruments, the ignition, the radio, power windows, sensors and various modern electronic controls.
If the belt becomes loose, cracks, or breaks, the alternator may cease to charge the battery properly.
This can result in dimming lights, the illumination of the battery warning light, difficulty starting the vehicle and, ultimately, a complete vehicle shutdown.
Because this belt is in constant motion whenever the engine is running, it is continuously subjected to the effects of heat, friction, tension and wear over time.
For this reason, regular inspection of the belt is crucial.
1. The Primary Function of the Alternator Belt
The primary function of the alternator belt is to transmit mechanical power from the engine to the alternator.
When the engine is running, the crankshaft rotates continuously.
This rotational force drives the belt, which, in turn, spins the alternator’s pulley.
Inside the alternator, this rotation generates electricity that charges the battery and powers the various electrical components of the vehicle.
Simply put, this belt acts as a connector that keeps the charging system operational.
Without it, the alternator would be unable to spin fast enough to generate electricity.
This means that the battery will gradually discharge, as the vehicle continues to consume the power stored in the battery but is unable to replenish it.
When in good condition, a belt maintains a consistent electrical output, particularly when the headlights, air conditioning and other accessories are in operation.
2. How Engine Rotation Powers the Alternator
The alternator belt functions because, whenever the engine is running, the engine’s crankshaft pulley rotates.
As the crankshaft turns, it drives the belt around the connected pulleys.
This rotational motion causes the alternator pulley to spin at a very high speed, often many times faster than the engine’s idle speed (when the engine is running slowly).
Inside the alternator, specialized components convert this rotational energy into electrical current.
This current recharges the battery and powers the vehicle’s electrical systems while the vehicle is being driven.
If the belt slips, due to looseness or wear, the alternator may spin too slowly, thereby reducing its charging capacity.
Consequently, the battery may discharge even while the engine is running.
This is why a slipping belt often produces a squealing sound, specially when the vehicle is started, as the rubber attempts to gain proper traction against the surface of the pulley.
3. The Difference Between an Alternator Belt and a Serpentine Belt
The term “alternator belt” is often used to refer to the belt that drives the alternator; however, in many modern vehicles, a single belt powers multiple engine accessories.
Older vehicles often utilized separate belts for the alternator, the air conditioning compressor and the power steering pump.
In those systems, the alternator had its own dedicated belt.
Modern vehicles typically utilize a serpentine belt, a long, multi-ribbed belt that winds around several pulleys to simultaneously power multiple components.
These components include the alternator, water pump, power steering pump, air conditioning compressor and sometimes other auxiliary accessories.
Therefore, although people often refer to it as the “alternator belt,” it is technically a serpentine belt.
Understanding this distinction is crucial because the failure of this single belt can impact not only the battery charging function but also several other systems.
4. Why Do Many Modern Vehicles Use a Single Belt for Multiple Components?
Modern vehicles employ a single belt for multiple components because this approach enhances efficiency, simplifies engine design and reduces maintenance costs.
Compared to older, multi-belt systems, a single serpentine belt requires fewer pulleys and fewer adjustment points.
This conserves space within the engine bay, enabling manufacturers to design more compact engines.
It also reduces the total number of parts that require replacement over time.
In modern systems, automatic belt tensioners help maintain the correct belt tension without the need for manual adjustments, thereby making vehicle operation more reliable.
However, using a single belt for multiple systems means that if that one belt fails, it can have a detrimental effect on several critical components.
If the belt snaps, the alternator may stop charging, the water pump may cease circulating coolant and the steering system may become difficult to operate.
Signs Shows That the Alternator Belt May Be Worn Out
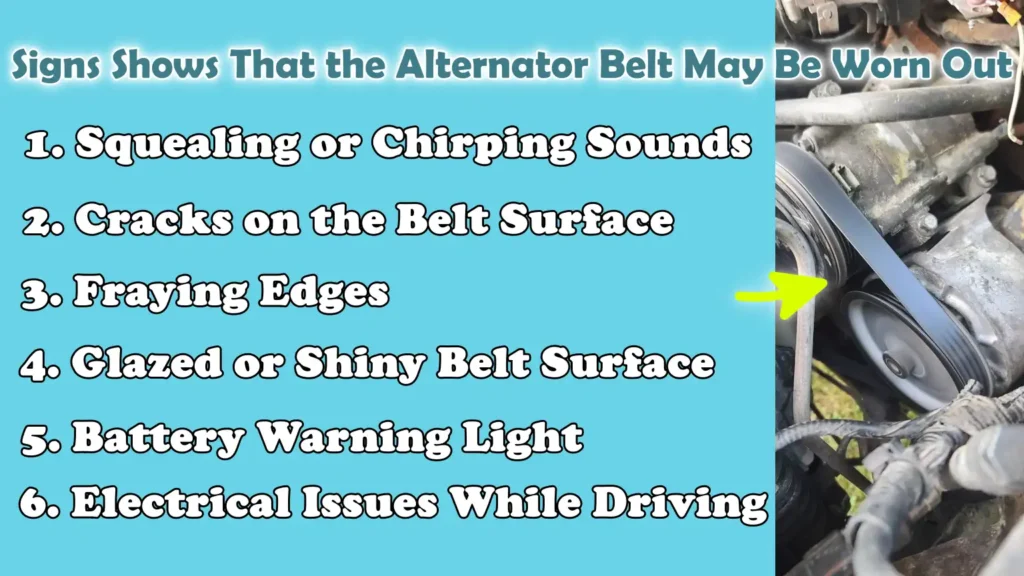
The alternator belt typically provides several warning signs before failing completely.
As this belt powers the alternator, any wear on it can reduce charging capacity and negatively impact the battery, lights and other vehicle systems.
In many vehicles, this same belt also drives the water pump and power steering; therefore, ignoring early symptoms can lead to major problems.
To detect wear before the belt snaps, it is often helpful to visually inspect the belt and listen for any unusual noises.
1. Squealing or Chirping Sounds
Squealing or chirping sounds coming from the engine compartment are among the most common signs of a worn alternator belt.
This often occurs when the belt slips against the pulley instead of gripping it properly.
These noises may become louder when starting a cold engine, turning on the air conditioner, or whenever electrical demand increases.
A loose belt, a weak tensioner, or a worn belt surface, all can contribute to this issue.
A persistent squealing sound should not be ignored, as it often indicates that the belt is no longer functioning correctly.
2. Cracks on the Belt Surface
The appearance of small cracks on the belt’s surface is a clear indication that the rubber is aging.
Engine heat, constant tension and general wear and tear gradually cause the belt material to dry out.
Cracks often appear on the belt’s ribs (grooves) or on its smooth back surface.
However, while minor surface cracks may appear with age, the presence of deep or excessive cracks is generally an indication that the belt is deteriorating.
If these cracks are ignored, they can propagate further and eventually cause the belt to tear or snap.
3. Fraying Edges
Fraying edges indicate that the belt is not wearing evenly.
This typically occurs when the belt is misaligned, a pulley is worn out, or the belt is rubbing against another component.
Loose threads protruding from the belt or rough edges are signs that the belt is deteriorating faster than normal.
Fraying edges compromise the structural integrity of the belt and increase the risk of sudden failure.
Even if the central section of the belt appears normal, damaged edges can significantly reduce the belt’s lifespan.
4. Glazed or Shiny Belt Surface
If a belt appears shiny or polished, its surface has likely become “glazed”.
This happens when heat and friction cause the rubber to harden.
A glazed belt becomes less flexible and is more prone to slipping on the pulleys.
Such slipping reduces the alternator’s rotational speed, which can, in turn, lower the charging output.
If the belt feels smooth like plastic rather than exhibiting the slightly rough texture characteristic of rubber, its grip may be weakening.
5. Battery Warning Light
A battery warning light on the dashboard may indicate that the alternator belt is not driving the alternator effectively.
Many drivers assume that this light always signals a faulty battery; however, it often points to issues within the charging system itself.
If the belt is loose or slipping, the alternator may be unable to generate the necessary electricity to recharge the battery.
This warning light may appear while driving, particularly when headlights, the blower motor, or other electrical accessories are in use.
6. Electrical Issues While Driving
If the alternator belt is worn out, electrical issues may arise while driving, resulting in compromised charging performance.
Common symptoms include dimming headlights, flickering dashboard lights, sluggish power windows, reduced air conditioning blower speed, or receiving battery-related alerts.
In severe cases, the engine may even stall, as modern vehicles rely heavily on electricity for their ignition and control systems.
If these symptoms are accompanied by noises emanating from the belt, the belt should be inspected immediately.
Tools
| Tools | Why It Is Needed | How to Use It |
|---|---|---|
| Flashlight | The alternator belt is often situated deep within the engine bay and parts of it may be obscured behind pulleys, covers, or hoses. With the aid of a flashlight, you can clearly identify cracks, signs of wear, grease buildup and alignment issues, subtle details that might otherwise go unnoticed in dim lighting. | Direct the beam of light along the entire length of the belt, rather than focusing solely on the visible front section. Slowly sweep the light across the belt’s surface, inspecting both its ribbed sections and its edges. Under bright illumination, tiny cracks and shiny spots caused by friction and wear become easily visible. |
| Clean Cloth | Dust, road grime and oil residue can accumulate on the belt, making it difficult to inspect. Wiping away surface debris with a clean cloth allows you to clearly observe the true condition of the rubber material. | With the engine turned off, gently wipe away any dirt accumulated on the belt’s surface. Do not wet the cloth or use any chemical cleaning agents. A dry cloth is sufficient to remove dust, enabling you to examine the belt’s texture, detect cracks and identify signs of wear. |
| Work Gloves | Engine components can be hot, rough and dirty. During an inspection, gloves protect your hands from accidental contact with sharp edges, hot parts, or rough pulleys and brackets. | Put on gloves before touching the belt or any surrounding components. Always wear gloves when checking belt tension by hand, specially in the cramped areas of the engine bay where metal brackets could scratch your skin. |
| Owner’s Manual | The location of the belt may vary depending on the vehicle model. The owner’s manual contains a diagram of the belt routing, which also indicates whether your vehicle utilizes a separate belt for the alternator or a single serpentine belt. | Open the maintenance or engine compartment section of the manual and locate the belt routing diagram. Using this diagram, you can identify which pulley drives the alternator and determine the correct path for routing the belt around all the pulleys. |
| Inspection Mirror | Certain sections of the belt are not directly visible, as they face the engine block or are hidden behind pulleys. By using a small mirror, you can inspect these hidden areas for cracks or damage without having to remove any components. | When using a flashlight, position the mirror at an angle behind or beneath the belt. This allows you to inspect the hidden sections, particularly the underside of the belt, where cracks often tend to appear first. |
How to Make Sure Safety Before Inspecting the Belt
Inspecting the alternator belt is a simple task, but safety is paramount, as the belt is located near moving engine components; if inspected carelessly, these parts can cause injury.
The belt may be situated near cooling fans, pulleys and hot engine parts, components that can continue to spin or remain hot even after the vehicle has been driven.
By observing a few basic precautions, you can safely inspect the belt while avoiding burns, pinched fingers, or accidental contact with moving parts.
1. Park on Level Ground
Before opening the hood, always park the vehicle on a level and stable surface.
A level surface keeps the vehicle stationary, thereby minimizing the risk of the vehicle rolling while you are working near the engine.
If the parking brake is not fully engaged, the vehicle could slide even on a slight incline.
After parking, engage the ‘Park’ mode (for automatic transmissions) or shift into first gear (for manual transmissions) and set the parking brake.
This ensures that the vehicle remains stable while you are conducting inspections under the hood.
2. Turn Off the Engine
Before touching the belt or inspecting it closely, the engine must be completely shut off.
When the engine is running, the belt spins at very high speeds and can instantly snag fingers, gloves, clothing, or tools.
Even momentary contact can result in injury, as the belt moves much faster than it appears to.
Shutting off the engine brings the belt to a halt, providing you with a safe opportunity to inspect the belt for cracks, tension and alignment without the hazards associated with moving parts.
3. Allow the Engine to Cool Down
After driving, engine components can remain extremely hot for several minutes.
Although the alternator belt itself may not feel particularly hot, surrounding components such as: the radiator, exhaust parts and engine cover, as it can cause burns.
Waiting approximately 15 to 30 minutes allows the engine components to cool down sufficiently for a safe inspection.
This ensures that you can comfortably touch the belt and its adjacent pulleys while checking for signs of wear or proper tension.
4. Keep Hands Away from Moving Parts
Even during an inspection, should you need to start the engine to listen for any unusual noises, you must keep your hands clear of any moving parts.
The belt, pulleys, cooling fan and tensioner can begin to move suddenly; furthermore, in some vehicles, these components may even activate automatically.
Never bring your fingers close to the belt while the engine is running.
If you notice any rattling or unusual movement, maintain a safe distance and use a flashlight to examine the area rather than reaching your hand into the engine compartment.
This minimizes the risk of injury while still allowing you to conduct a thorough inspection.
How to Check Alternator Belt Condition – Easy Guide
Inspecting the alternator belt is the easiest way to catch charging-related issues before they completely drain the battery or cause a vehicle breakdown.
At first glance, the belt may appear fine; however, it could harbor cracks, stiffness, or looseness, conditions that negatively impact the charging system.
A careful, step-by-step inspection helps you detect early signs of wear that might otherwise go unnoticed until electrical problems begin to manifest in the vehicle.
1. Open the Hood and Locate the Belt
To begin, open the hood while the engine is off and cool.
In most vehicles, the belt is located at the front or side of the engine, where several pulleys are visible.
In many newer vehicles, the alternator belt is part of the main serpentine belt system.
Look for the long rubber belt that wraps around multiple pulleys.
If the engine compartment is heavily crowded with components, consulting your vehicle’s owner’s manual can help you accurately identify the belt’s routing.
2. Identify the Alternator Pulley
The alternator pulley is attached to the front face of the alternator and is typically engaged with the belt.
The alternator itself is often a metal component featuring vents for airflow and attached electrical wiring.
Once you have located it, observe which section of the belt is in contact with the pulley.
This ensures that you correctly identify the specific portion of the belt responsible for driving the alternator, thereby allowing you to focus your inspection on the charging system.
3. Check the Belt for Cracks
Carefully inspect the rubber surface, paying particular attention to the ribbed section of the belt.
As the belt ages due to exposure to heat and repeated flexing, small cracks often begin to appear between the ribs.
While minor surface imperfections may develop over time, deep cracks or extensive cracking in multiple areas indicate that the belt is wearing out.
A cracked belt becomes compromised and poses a risk of sudden failure.
4. Check for Wear and Loose Threads
Check both edges of the belt for rough spots, loose fibers, or frayed edges.
Frayed edges often indicate that the belt is not tracking correctly, either because the pulleys are misaligned or other components are worn out.
Even if the center section of the belt appears to be in good condition, wear on the edges compromises the structural integrity of the belt.
Edge wear can progress rapidly, potentially leading to belt failure while the vehicle is in operation.
5. Check the Belt for ‘Glazing’
The rubber surface of a healthy belt should feel slightly rough to the touch.
If the belt appears shiny, smooth, or polished, it may have become ‘glazed’.
This condition typically results from exposure to heat and slippage against the pulleys.
A glazed belt often emits squealing or chirping noises and fails to maintain proper grip on the pulleys.
Reduced grip means the alternator may spin at a slower speed and charge less efficiently.
6. Check the Belt Alignment on the Pulleys
Ensure that the belt is properly seated and centered on every pulley.
It should run perfectly straight and true, without leaning to one side or slipping.
If the belt slips to one side or does not sit correctly, the pulley may be worn, the tensioner may be weak, or there could be an alignment issue.
Misalignment increases friction and causes the belt to wear out prematurely.
It can also lead to noise and frequent belt breakage.
7. Manually Check the Belt Tension
With the engine turned off, gently apply downward pressure to the longest straight section of the belt.
It should deflect slightly, but it should not feel excessively loose.
Excessive looseness may indicate that the belt has stretched or that the tensioner is weak.
A loose belt can slip while the engine is running or when the electrical load increases.
An overly tight belt is also detrimental, as it accelerates wear on the pulleys and bearings.
8. Listen for Sounds When Starting the Engine
Start the engine and listen carefully to the sounds produced during the first few seconds.
A worn belt often emits an immediate squealing or chirping sound upon startup, as it struggles to maintain traction in cold conditions.
This noise may subside after a short while, but that does not mean the belt is in good condition.
Noise occurring during engine startup is often an early warning sign of belt slippage, insufficient tension, or rubber wear.
9. Observe the Belt’s Movement While the Engine is Running
While the engine is running, observe the belt from a safe distance.
The belt should run completely smoothly, without any wobbling, bouncing, or shifting back and forth on the pulley.
If there is excessive vibration or the belt is not tracking properly, the belt may be loose, or a pulley may be defective.
Smooth belt operation is generally an indication of correct tension and alignment.
10. Compare Belt Wear Against Manufacturer Recommendations
Most vehicle manufacturers recommend inspecting belts during routine maintenance and replacing them after a specific mileage interval or upon the appearance of clear signs of wear.
Compare the results of your inspection against the service guidelines provided in the owner’s manual.
If the belt exhibits cracks, glazing, fraying, or looseness sooner than expected, replacement may be necessary.
Real-world conditions such as: heat, oil leaks and frequent stop-and-go driving, as it can significantly reduce a belt’s lifespan well before the officially prescribed service intervals.
How Tight Should an Alternator Belt Be?
An alternator belt should be tight enough to firmly grip the pulley without slipping, yet not so tight that it places excessive strain on the bearings and other engine components.
Proper belt tension is crucial, as the alternator must rotate continuously to ensure the battery charges correctly.
If the belt is too loose, it may produce squealing or chirping noises and will fail to drive the alternator at the necessary speed.
Conversely, if the belt is excessively tight, it can accelerate wear on the pulley, the alternator bearings and the belt itself.
1. General Guidelines for Belt Tension
When a properly tensioned belt is pressed by hand along its longest straight section, it should exhibit a slight amount of deflection.
In many vehicles, a healthy belt will yield slightly under finger pressure; however, it should not feel loose or appear to sag excessively.
The precise amount of required deflection depends on the specific vehicle and belt design, this is where the owner’s manual proves invaluable.
A belt that feels too loose will often slip when the engine is under heavy load, whereas a belt that feels excessively taut has likely been overtightened.
2. Manually Tensioned Belts vs Automatic Tensioners
Older vehicles often featured manual belt-tensioning systems, wherein the position of the alternator itself was adjusted to tighten the belt.
In these systems, achieving the correct belt tension relies entirely on the precision with which it was set during installation.
Modern vehicles are typically equipped with automatic tensioners, which maintain constant pressure on the serpentine belt.
This ensures that the belt tension remains consistent over time, even if the belt stretches slightly through use.
Despite the presence of this automatic system, the tensioner itself can wear out, potentially causing the belt to become loose.
3. Signs of Excessive Tightness
An excessively tight belt may not produce any distinct noises initially; however, it can accelerate the rate of wear on both the belt and the pulleys.
Excessive tension places undue stress on the alternator shaft, tensioner, water pump and other pulleys.
Over time, this can result in bearing failure.
Signs of this include buzzing or whistling sounds, rapid belt wear, pulley wear, or recurring issues related to the bearings.
If the belt feels extremely difficult to depress by hand, it has likely been overtightened.
4. Signs of a Loose Belt
A loose belt is usually easy to detect, as it often produces a squealing or chirping sound when the vehicle is started or when other electrical accessories are activated.
The belt may slip on the pulleys, reducing the alternator’s rotational speed and, consequently, diminishing its charging capacity.
This can cause the battery warning light to illuminate while driving, dim the headlights, or prevent the battery from charging properly.
Visually, a loose belt may exhibit excessive movement, fluttering, or wobbling.
If it deflects significantly when pressed by hand, it may require adjustment or replacement.
How to Determine When to Replace the Belt
The alternator belt should be replaced when its condition provides clear indications that it is no longer maintaining a proper grip or safely handling the engine’s load.
Even if the belt appears to be in good condition visually, it may have weakened to the point where it begins to slip, fails to charge effectively, or snaps without warning.
By visually inspecting the belt for signs of external wear and tear, listening for unusual noises and assessing its remaining service life, one can determine that replacing the belt is the better option rather than waiting for it to fail completely.
1. Deep Cracks
As a belt ages, minor surface marks may become visible; however, deep cracks are a definitive sign that the belt has reached the end of its service life.
These cracks typically form due to engine heat, repeated flexing over pulleys and the drying out of the rubber material.
If the cracks are deep enough to cut into the belt’s ribs or appear in multiple locations, it indicates that the belt has lost its elasticity and structural integrity.
A cracked belt carries a high risk of snapping under load, particularly during cold starts or when electrical demand is high.
2. Missing Rib Sections
The ribbed section of the belt is designed to grip the pulley and transmit power from the engine.
If sections of the belt’s ribs are broken, torn, or missing, the belt is unable to maintain a consistent grip.
Consequently, the alternator’s rotational speed decreases and charging-related issues may begin to manifest even before the belt fails completely.
The loss of rib sections often occurs when the belt becomes stiff or when a worn pulley damages the rubber.
Once sections of the ribs begin to separate, replacing the belt is generally the safest course of action.
3. Loud Squealing Noises
Initially, faint squealing sounds may be considered an indication of early belt wear; however, a persistent, loud squealing noise generally signals that the belt is no longer maintaining a proper grip.
This can happen if the belt has worn out, stretched, become glazed, or has been contaminated with oil or coolant.
If the noise persists even after the engine has warmed up, or if it intensifies when the headlights or air conditioning are switched on, the belt may be slipping excessively.
A continuous squealing sound often suggests that, upon inspection, it would be prudent to replace the belt rather than merely tightening (adjusting) it.
4. Uneven Wear
The wear on the belt’s surface should be uniform.
If one edge of the belt appears thinner, one side looks worn down, or a specific section appears more deteriorated than the rest, there may be an alignment issue.
Uneven wear is often an indication of a misaligned pulley, a weak tensioner, or a faulty bearing.
Even if the rest of the belt appears to be in good condition, uneven wear can lead to sudden belt failure, as the entire load becomes concentrated at a single point.
If signs of uneven wear are observed on the belt, it should generally be replaced and the pulley system should be inspected.
5. Belt Age and Mileage
Even if a belt appears to be in good condition visually, its age and the distance it has covered (mileage) are also crucial factors.
Over time, rubber hardens and loses its elasticity, even if no cracks are visible on its surface.
Although many belts can last for several years, exposure to heat, frequent stop-and-go driving, dust and fluid leaks can significantly reduce their lifespan.
If a belt has been in use for several years, or if the replacement interval recommended by the manufacturer is approaching, replacing it proactively can help prevent sudden mechanical failures.
Wear caused by aging often begins internally, even if no defects are visible on the surface.
Know, Common Mistakes Made When Inspecting the Alternator Belt
Inspecting the alternator belt seems quite simple; yet, many issues go unnoticed because the inspection is performed too hastily or from only a single angle.
The belt may appear normal from the front, but its hidden sections could harbor severe wear.
Many charging-related problems arise not solely due to the belt itself, but also due to issues such as incorrect tension, pulley wear, or misalignment.
Understanding these common mistakes helps in recognizing early warning signs, which, if ignored, can lead to consequences ranging from battery-related issues to sudden belt failure.
1. Inspecting Only the Visible Section
A common mistake is to inspect only the portion of the belt that is easily visible from above.
The visible section may appear perfectly fine, while its underside could be hiding cracks, broken ribs, or worn surfaces.
As the ribbed side of the belt makes contact with the pulleys, this is often where signs of failure first emerge.
A thorough inspection must cover the entire path of the belt, including sections hidden behind the pulleys.
Using a flashlight and a mirror can reveal wear that might otherwise be missed during a cursory glance.
2. Ignoring Noise Under Load
Some belt-related issues manifest only when the system is placed under a heavy load.
This typically occurs when accessories such as: headlights, air conditioning, the rear defroster, or the blower fan, are switched on.
These accessories increase the electrical demand, forcing the alternator to work harder.
If a belt is worn, it may begin to slip, and generate noise, particularly under heavy load.
Ignoring these noises can delay the identification of the problem’s root cause, as the belt may appear to be in good condition when the vehicle is merely idling.
3. Mistaking Pulley Noise for Belt Noise
Not every squeaking or chirping sound necessarily originates from the belt itself.
A worn pulley, tensioner, or bearing can produce similar noises.
A faulty pulley bearing may emit grinding or chirping sounds, even if the belt is in good condition.
Replacing the belt without inspecting the pulleys does not resolve the actual problem.
It is crucial to pinpoint the source of the noise and inspect all components that rotate in conjunction with the belt.
4. Using Belt Dressing as a Solution
Some individuals use belt dressing sprays to suppress squeaking noises; however, this often merely masks the underlying issue rather than fixing it.
While belt dressing may temporarily reduce noise, it does not resolve problems such as cracks, glazing, or improper tension.
In some instances, it may even attract dust and grime, thereby accelerating the belt’s wear process.
If a belt is squeaking, it is best to investigate issues related to belt wear, alignment, or tension.
Temporary relief-providing sprays are no substitute for a proper diagnosis.
5. Failing to Check Belt Tension
A belt may appear to be in good condition visually, yet fail to function correctly due to improper tension.
During an inspection, people often focus solely on visible cracks while overlooking the actual tension of the belt.
If the belt is too loose, it may slip, potentially reducing the alternator’s charging output.
Conversely, if the belt is excessively tight, it can lead to premature bearing wear and shorten the belt’s own lifespan.
Manually checking the belt tension and observing its movement while the engine is running provides a much clearer insight into its true condition.
Skipping this step often results in failing to identify one of the most common causes of belt-related charging issues.
Why Do Alternator Belts Fail Prematurely?
Alternator belts are designed to last for many years; however, their actual lifespan depends largely on driving conditions, engine health and maintenance.
Even if a vehicle has low mileage, the belt can still fail much sooner than expected.
Heat, fluid leaks, poor alignment and worn-out supporting components often damage the belt faster than normal wear and tear would.
Understanding these factors can help you avoid the need for frequent belt replacements and prevent issues related to the vehicle’s charging system.
1. The Impact of Heat
Engine heat is a primary cause of premature belt failure.
The belt operates in close proximity to the engine, where temperatures can become extremely high during normal driving.
Constant exposure to heat gradually causes the rubber to harden, reducing its flexibility.
As the rubber dries out, small cracks begin to form, particularly around the belt’s ribs.
Vehicles frequently driven in heavy traffic or hot climates subject the belt to greater thermal stress, which can significantly shorten its lifespan.
2. Exposure to Oil
Exposure to oil can cause a belt to deteriorate rapidly.
Even a minor engine oil leak such as: one from a valve cover gasket or a front seal, as it can reach the belt and compromise the rubber’s grip on the pulleys.
The oil softens certain parts of the belt while making other sections slippery.
This can lead to squeaking noises, swelling of the belt material and uneven wear.
A belt exposed to oil can fail very quickly, even if it appears to be in good condition visually.
3. Pulley Misalignment
The belt is designed to run in a perfectly straight line across all pulleys.
If a pulley is tilted or misaligned, the belt is subjected to uneven tension every time the engine runs.
This generates excessive friction on one side, causing the belt’s edges to wear down; the belt fibers begin to fray and the belt stretches prematurely.
Misalignment can be caused by worn brackets, defective pulleys, or improper installation.
Even a minor alignment issue can significantly reduce the lifespan of the belt.
4. Weak Tensioner
In vehicles equipped with a serpentine belt, an automatic tensioner maintains the belt at the correct tension.
If the tensioner spring weakens, the belt may become loose and begin to slip.
Slippage generates excessive heat and causes the belt to wear out rapidly.
A weak tensioner can also lead to vibration and noise, particularly when the vehicle is started.
Simply replacing the belt, without addressing the faulty tensioner, often results in the same problem recurring.
5. Worn Pulley Bearings
Pulley bearings facilitate the smooth rotation of the belt.
If a bearing becomes rough or begins to fail, it creates resistance, forcing the belt to work harder.
This increased friction generates heat and causes the belt to wear unevenly.
In some instances, a faulty bearing can cause the belt to slip slightly or flutter while the vehicle is in operation.
This additional stress can lead to cracking, noise and a reduced belt lifespan.
6. Age and Dry Rot
Even if the vehicle is driven very infrequently, the belt will inevitably age over time.
Exposure to oxygen, temperature fluctuations and engine heat causes natural changes to occur in rubber over time.
This process is often referred to as “dry rot”.
Even with low mileage, a belt can harden, lose its elasticity and develop cracks.
Old belts can fail simply because their material has become brittle (easily breakable); therefore, age is just as important a factor as the distance the vehicle has traveled.
Can You Drive with a Bad Alternator Belt?
A vehicle can continue to run for some time even with a faulty alternator belt; however, doing so is risky because the belt directly impacts the charging system, and, in many vehicles, other essential systems as well.
A damaged belt can slip without warning or snap completely while you are driving.
When this happens, the alternator stops generating electricity and the vehicle becomes entirely dependent on battery power.
How far you can drive depends on the condition of the battery, the electrical load and whether that same belt also drives the water pump.
1. The Risks of Driving Short Distances
Some drivers continue to operate their vehicles even after hearing a squealing sound from the belt or noticing signs of wear, specially for short trips; however, driving even short distances carries risks.
A belt that appears only slightly worn on the surface can fail suddenly, as internal cracks are often deeper than those visible from the outside.
Even if the battery warning light has not yet illuminated, short trips may seem safe; however, the belt can snap when the vehicle accelerates, when a cold engine is started, or when accessories increase the electrical load.
If the rubber has already deteriorated, driving just a few miles may be enough to cause a weakened belt to fail completely.
2. What Happens When the Belt Snaps
If the alternator belt snaps while you are driving, the alternator immediately stops rotating.
This means it can no longer charge the battery or support the vehicle’s electrical system.
The vehicle will continue to run only until the battery’s charge is completely depleted.
Warning lights on the dashboard may illuminate first, followed by dimming headlights, reduced power steering assistance (in some systems) and potential issues with engine operation.
In modern vehicles, when the battery voltage drops too low, the engine may stall because the ignition and fuel systems require electricity to function.
3. Consequences of Battery Depletion
When the belt stops rotating the alternator, the battery becomes the sole source of power.
Consequently, every system, including headlights, ignition, the engine computer, the fuel pump and cooling fans, draws upon the electricity stored in the battery.
As a result, the battery drains much faster than many drivers anticipate.
Depending on the condition of the battery and the vehicle’s power demands, the vehicle may stall after traveling only a very short distance.
The use of air conditioning, lights, audio systems, or charging devices can cause the battery to discharge even more rapidly.
4. The Risk of Overheating in Serpentine-Belt Systems
In many modern vehicles, the alternator belt is an integral part of the main serpentine-belt system.
This means that the same belt also drives the water pump, which circulates coolant throughout the engine.
If this belt snaps, the flow of coolant may cease, causing the engine to overheat very rapidly.
Overheating issues can develop within just a few minutes, particularly in heavy traffic or hot weather.
This is a far more serious problem than a drained battery, as overheating can cause significant damage to the engine, head gaskets, or the cooling system.
Read More:
So, How Often Should the Alternator Belt Be Inspected?
The alternator belt should be inspected regularly, as belt wear often begins gradually and can become severe before any obvious symptoms become apparent.
A quick inspection can detect issues such as cracks, glazing, wear, or looseness before they begin to impact the vehicle’s charging performance.
As the belt remains active whenever the engine is running, it is constantly subjected to heat, stretching and tension.
Regular inspections allow for early identification of problems, thereby preventing issues such as battery failure, engine stalling, or overheating, particularly in vehicles equipped with a ‘shared belt system’.
1. Monthly Quick Check
Performing a quick visual inspection of the belt once a month is a good habit, specially if the vehicle is driven daily.
It takes very little time and often reveals early signs of belt damage before any audible noises or symptoms develop.
Checking for cracks, glazed surfaces, frayed edges, or abnormal belt movement helps identify potential issues that could later escalate into serious problems.
Monthly inspections are particularly beneficial in regions with hot climates, as heat accelerates the degradation process of rubber belts.
2. Before Long Road Trips
Inspecting the belt before embarking on a long journey is crucial, as highway driving and prolonged engine operation place continuous strain on the charging system.
After extended periods of continuous use, a weakened belt may snap, specially when accessories such as the air conditioner, headlights and charging ports are being utilized frequently.
A simple pre-trip inspection helps minimize the risk of getting stranded far away from home.
This method proves even more useful when the belt is old or has already started making noise.
3. During an Oil Change
Inspecting the belt during an oil change is a practical approach, as the vehicle’s hood is already open at that time and the engine is typically being inspected anyway.
This makes it easier to monitor wear and tear over time and to compare any changes that may have occurred as the previous service.
As oil changes are performed at regular intervals, this provides a convenient maintenance schedule for checking the belt for cracks, signs of tension and pulley alignment.
It also helps in detecting leaks that could potentially damage the belt.
4. Recommended Intervals Based on Mileage
Vehicle manufacturers often specify a fixed interval for inspecting and replacing the belt based on mileage (distance traveled); however, the actual wear on the belt does not depend solely on the distance covered.
Heat, frequent stop-and-go driving, dust and fluid leaks, all of these factors can significantly reduce the belt’s lifespan; often, the belt fails well before the scheduled service time.
Some belts may appear to be in good condition even after accumulating high mileage, while others may begin to show signs of wear very quickly.
Although it is essential to follow the vehicle owner’s manual, when deciding whether to inspect or replace a belt, priority should always be given to any visible damage or unusual noises coming from the belt, rather than relying solely on mileage as the deciding factor.
Know, Difference Between Alternator Belt vs Serpentine Belt – Basically What to Check
Many drivers use the terms “alternator belt” and “serpentine belt” interchangeably, assuming they refer to the same component; however, they are not always identical.
In some older vehicles, a separate belt was dedicated solely to the alternator.
In most modern vehicles, a single, long belt drives multiple components, including the alternator.
The inspection procedure remains largely the same, but understanding which system is utilized in your vehicle helps you identify specific points to check and prevents you from overlooking issues related to the charging system.
1. General Inspection Procedure
Both alternator belts and serpentine belts should be inspected for common signs of wear.
These include cracks, fraying, glazing (a smooth, shiny surface), missing sections of the belt and improper tension.
You should also ensure that the belt is seated correctly on its pulley and that it runs smoothly when the engine is operating.
Regardless of whether a belt drives a single component or multiple accessories, the condition of the rubber and its grip are checked using the same basic method, as both types of belts rely on friction to transmit engine power.
2. Key Differences
The primary difference lies in the specific components driven by each belt.
A dedicated alternator belt drives only the alternator; therefore, any defect in this belt primarily impacts the battery charging function.
Conversely, a serpentine belt typically drives the alternator alongside other systems such as: the water pump, power steering pump and air conditioning compressor.
Consequently, if a problem arises with the serpentine belt, several of the vehicle’s systems can be affected simultaneously.
Depending on the vehicle’s design, even a minor crack or an issue related to tension can trigger problems ranging from a malfunction in the charging system to heavy steering or engine overheating.
3. Design Variations Based on the Vehicle
The design of the belt varies according to the vehicle’s engine design and model year.
Older vehicles often feature multiple belts, each requiring individual adjustment.
Newer vehicles typically utilize a single, long belt equipped with an automatic tensioner.
In some engines, the belt is clearly visible, whereas in others, certain sections may be hidden behind covers or engine mounts.
Therefore, consulting the vehicle’s owner’s manual is beneficial, as its diagrams clearly illustrate which belt drives the alternator and how it routes through the pulleys.
4. Why Using the Correct Terminology is Essential for DIY Owners
Knowing and using the correct terminology can help prevent misunderstandings when inspecting or replacing a belt.
A driver might identify an issue with the “alternator belt,” when in reality, the vehicle utilizes a single “serpentine belt”.
If only the section connected to the alternator is inspected, malfunctions occurring in other parts of the system may go undetected.
This is crucial because a single belt governs the vehicle’s charging, cooling and steering systems.
A proper understanding of the belt system enables DIY owners to inspect the entire belt routing and diagnose problems with greater accuracy.
So, When to Consult a Professional Mechanic
Regular inspection of the belt can reveal many visible issues; however, some problems are linked to hidden components that are difficult to identify without specialized tools.
If symptoms persist even after checking the condition of the belt, the root cause may lie in the tensioner, pulley, bearings, or the charging system itself.
It is crucial to consult a mechanic when symptoms persist, as belt-related issues can quickly impact battery charging, and in some vehicles, the cooling and steering systems as well.
1. Persistent Squealing Sounds Even After Inspection
If a squealing sound persists even after checking the belt for visible signs of wear, the actual problem may not be apparent to the naked eye.
The belt may appear normal, yet it could be slipping due to incorrect tension, contamination from hidden grease or fluids, debris lodged in the pulleys, or internal structural defects.
Recurring squealing, particularly when starting the vehicle or when high-power accessories are in use, typically indicates that a specific component within the belt system requires closer examination.
A mechanic can pinpoint the root cause of the problem by checking the pulley tension, alignment and the output of the charging system.
2. Premature Belt Wear
If the belt wears out repeatedly, and sooner than expected, the problem often lies not with the belt itself, but with another component within the system.
The appearance of cracks, fraying, or the recurrence of squealing sounds shortly after replacing the belt usually points to an underlying issue, such as pulley misalignment, a weakened tensioner spring, or a fluid leak.
Simply replacing the belt again will not resolve this root cause.
By inspecting the associated components, a mechanic can determine why a new belt is wearing out so rapidly and abnormally.
3. Loose Tensioner
In vehicles equipped with a serpentine belt system, the tensioner maintains the correct tension on the belt.
If the tensioner arm appears weak, exhibits excessive movement, or allows the belt to vibrate, it may need to be replaced.
A loose tensioner can also cause a new belt to slip, resulting in noises such as squeaking or chirping.
As tensioners utilize springs and bearings that wear out over time, failure of this component is a common occurrence in older vehicles.
A mechanic can inspect the tensioner to confirm whether it is maintaining the proper pressure.
4. Persistent Charging Issues
If the battery warning light remains illuminated, or if electrical issues persist, even after the belt appears to be in good condition, the problem may lie with the alternator or another component of the charging system.
A faulty alternator, loose wiring connections, a weak battery, or a failing voltage regulator, all can manifest similar symptoms.
Because many charging-related issues initially mimic belt-related problems, it is prudent to have the vehicle inspected by a professional mechanic if symptoms persist.
By measuring the charging voltage, a mechanic can verify whether or not the belt is the actual root cause of the problem.
5. Visible Damage to Pulleys
If a pulley appears damaged, corroded, bent, or worn, it is best to have it inspected by a professional.
The pulley should rotate freely and keep the belt properly aligned.
Damaged pulley grooves can cut into the belt, generate noise and cause the belt to fail prematurely.
If the pulley wobbles while the engine is running, its bearing may be faulty, or it might not be properly tightened.
As pulley issues often cause even new belts to fail prematurely, it is best to have the pulley inspected before replacing the belt again.
Know, Very Immediate Maintenance Tips to Extend Belt Lifespan
An alternator belt lasts longer when the entire drive system is clean, properly aligned and free of leaks or worn components.
In most cases, the cause of belt failure is not the belt itself, but rather surrounding issues such as: oil leaks, a faulty tensioner, or a worn pulley.
Simple maintenance habits can reduce friction, prevent slippage and help the belt maintain proper grip on all pulleys, thereby keeping the charging system stable and reliable.
Not only this, there’s study about the Failure Analysis of Serpentine V-Ribbed Belt Drive System that shows that cracking in the rubber ribs is literally the one of the most common failure modes in automotive belts, specially under the repeated engine load and heat cycling as well, which then directly reduces the power transmission efficiency and actually increases the slip risk in the alternator drive system, that’s why when you observe early visual inspection then it can be game changing for prevention of that chagring system failure.[¹]
1. Keep Pulleys Clean
Keeping pulleys clean is crucial, as dirt, dust and grease can weaken the belt’s grip and cause it to slip.
When grime accumulates on pulley surfaces, it can lead to squealing noises from the belt or cause it to wear unevenly.
Cleaning helps ensure proper rotation and contact between the belt and the pulley grooves.
A clean system also minimizes heat buildup, which slows down the rubber’s aging process and allows the belt to last longer under normal engine loads.
2. Fix Leaks Immediately
If engine oil or coolant leaks are ignored, they can damage the belt very rapidly.
Even a minor leak can reach the belt and alter the properties of the rubber, causing it to become slick or soft in some areas while hardening in others.
This leads to issues such as uneven wear, glazing and premature belt failure.
Addressing leaks immediately protects the belt from contamination and also safeguards the surrounding pulleys and tensioners, which can be similarly damaged by these fluids.
3. Replace Worn Tensioners
A weak tensioner fails to maintain proper pressure on the belt, causing it to slip and vibrate.
Over time, the tensioner’s spring and bearing wear out, particularly in high-mileage vehicles.
When tension becomes unstable, the belt is subjected to excessive stress during acceleration, engine startup and fluctuations in electrical load.
Replacing a worn tensioner ensures consistent belt grip and reduces the likelihood of premature belt failure, even if a new belt has been installed.
4. Inspect After Severe Weather
Extreme heat, heavy rain, or bitter cold can adversely affect a belt’s performance and lifespan.
High temperatures cause the rubber to dry out more rapidly, while cold weather can stiffen the belt and reduce its flexibility during engine startup.
Dusty or wet environments can also compromise the friction between the belt and the pulleys.
Following severe weather conditions, a quick visual inspection helps identify early signs of cracks, slippage, or squeaking before they escalate into major problems.
5. Adhere to Scheduled Service Intervals
Every vehicle has specific recommended intervals for belt inspection and replacement, typically outlined in the owner’s manual.
Adhering to these schedules helps prevent unexpected vehicle breakdowns, as belts naturally wear out over time, even if they appear to be in good condition visually.
Regular service checks also facilitate the timely detection of associated issues, such as pulley wear or insufficient belt tension.
Following the recommended maintenance schedule minimizes the risk of sudden vehicle failure and ensures the continued proper functioning of the charging system.
Conclusion – How to Check Alternator Belt Condition
Most of the time alternator belt failures in quiet fashion, that’s why if it is getting loud and inefficient then you have to inspect the system.
It directly supports the charging system by driving the alternator and in many modern engines, it also assists in powering other essential systems such as cooling and steering.
As it operates continuously whenever the engine is running, it gradually wears down due to heat, tension and constant friction.
Long before the belt fails completely, minor issues such as: cracks, glazing, squeaking noises, or looseness, often begin to manifest; therefore, regular inspections are vital to prevent sudden vehicle breakdowns.
Understanding how to inspect the condition of the belt allows you to identify early warning signs in a timely manner, before they escalate into major problems, such as a discharged battery, a loss of electrical power, or the overheating of certain engine systems.
Most belts do not fail suddenly or without warning; rather, they deteriorate gradually, exhibiting signs of wear, noise, or changes in performance.
By paying attention to these indicators and adopting a few simple maintenance habits, you can extend the lifespan of the belt and safeguard the entire charging system.
And, that’s all from this guide How to Check Alternator Belt Condition, also you can comment for more information.
Frequently Asked Questions
FAQ 1: How do I know if my alternator belt is going bad?
Answer: You can usually identify a failing alternator belt by visual inspection and by listening for specific sounds. Common symptoms include chirping or squealing noises coming from the engine, visible cracks on the belt’s surface, or a shiny and glazed texture, which indicates that the belt is slipping. You may also notice symptoms such as dimming headlights, improper battery function, or warning lights illuminating on the dashboard. These symptoms occur because the belt is unable to drive the alternator effectively, resulting in reduced charging capacity.
FAQ 2: What does a bad alternator belt look like?
Answer: When a worn alternator belt is examined closely, it often displays clear signs of physical damage. Its rubber surface may exhibit small or deep cracks, the edges may appear frayed or worn, or sections of the belt’s inner ribs may be missing. In some cases, the belt may appear excessively shiny and smooth, indicating that its surface has become glazed due to heat and slippage. A healthy belt typically looks flexible and has a slightly textured surface, rather than being stiff or completely smooth.
FAQ 3: Can I drive with a bad alternator belt?
Answer: You can drive a very short distance with a bad alternator belt, but it is not safe to rely on it for longer journeys. If the belt is slipping or has deteriorated, the alternator will be unable to charge the battery properly, which could lead to a complete loss of electrical power while driving. In some vehicles, this same belt also drives the water pump; therefore, a faulty belt could also cause the engine to overheat. Consequently, continuous driving becomes risky, specially during long journeys.
FAQ 4: How long does an alternator belt last?
Answer: An alternator belt can last for several years; this depends on driving conditions, the type of vehicle and its maintenance. On average, many belts last between 60,000 and 100,000 miles, but extreme heat, oil leaks and frequent stop-and-go driving can shorten their lifespan. Even if the vehicle has been driven sparingly (low mileage), the belt can still deteriorate over time, as the rubber naturally dries out and develops cracks as the years go by. Rather than relying solely on a fixed mileage schedule, it is more important to inspect the belt regularly.
FAQ 5: Can a faulty alternator belt completely drain the battery?
Answer: Yes, a faulty alternator belt can completely drain the battery. If the belt is slipping or has broken, the alternator cannot generate enough electricity to recharge the battery, even while the vehicle’s engine is running. In such a situation, the vehicle becomes entirely dependent on the power already stored in the battery. Consequently, the battery gradually begins to lose its charge and may eventually drain completely, specially when electrical systems such as lights or air conditioning are in use.
FAQ 6: Should I replace the belt if it is making a squealing noise?
Answer: If the belt repeatedly makes a squealing noise, it is a clear indication that it needs to be inspected, and possibly replaced. A squealing sound typically occurs when the belt is slipping due to wear, improper tension, or a slippery (greasy) surface. Occasionally, this noise can be temporarily silenced by adjusting the belt tension; however, if the belt is already worn out or has become stiff, replacing it is the more sensible solution. Ignoring this noise could lead to a sudden belt failure.
References:
[1] Failure Analysis of Serpentine V-ribbed Belt Drive System
https://saemobilus.sae.org/papers/failure-analysis-serpentine-v-ribbed-belt-drive-system-2004-01-0993

Hello Folks, Dean Shali here to help you out to solve the problems with your lovely vehicle, as i have lots of experience and knowledge about automotive industry as i woks directly with the customers and repair vehicles and i love to help the people to keep their cars safe and running smoothly.