Written By: Dean Shali
Fact Checked By: Sabré Cook
Reviewed By: Tamara Warren
Literally, if there’s air in the brake lines then it reduces the hydraulic pressure, that actually affects the braking responsiveness and that leads to the unsafe driving experience as well.
And over the time, air can enter the brake lines due to the leaks, fluid changes or won-out components, which is actually causing a “Spongy” brake pedal that feels soft or really unresponsive as well.
Furthermore, this air disrupts the hydraulic pressure that is really important for having the proper braking effectiveness, which can increase the stopping distances and creates dangerous driving conditions.
So, understand this bleeding your car brakes is just the process to remove the trapped air and that restores full hydraulic efficiency, that ensures your vehicle stops smoothly and reliably in every manner.
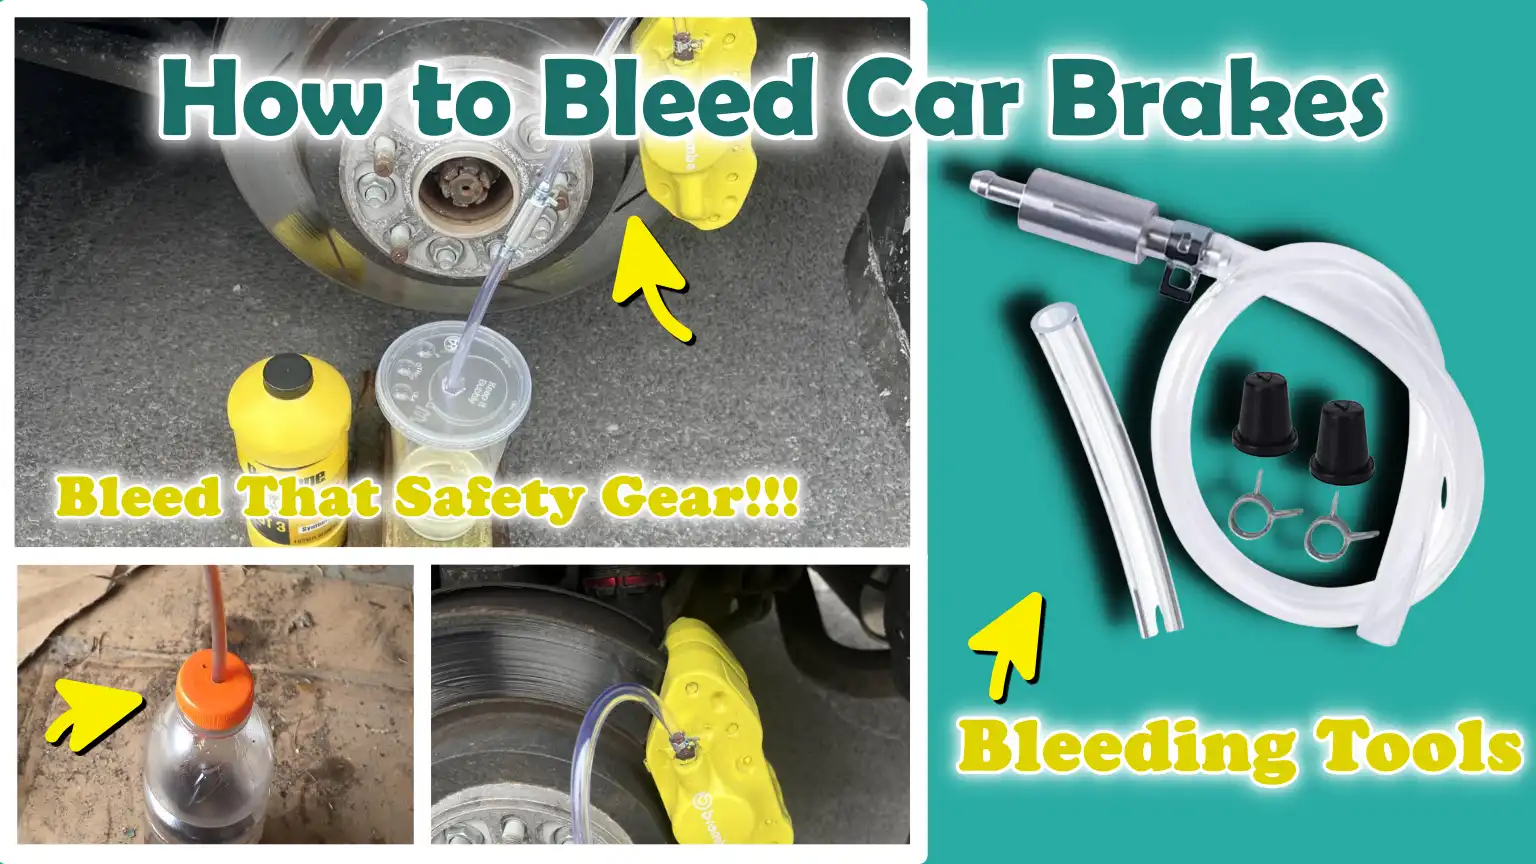
That’s why, we have come up with this proper guide on How to Bleed Car Brakes; as even totally beginner can learn and perform this bleeding process in effective way.
So, Let’s Understand About Brake Bleeding
1. What is Brake Bleeding?
Brake bleeding is the process of removing trapped air from a vehicle’s hydraulic braking system so that brake fluid can flow freely through the brake lines and apply full stopping force to the wheels.
Modern vehicles use hydraulic systems, in which, when the brake pedal is pressed, brake fluid travels from the master cylinder through metal lines and rubber hoses to the brake calipers or wheel cylinders.
Because brake fluid is not compressible, the force applied by your foot is directly applied to the brakes, slowing or stopping the car quickly.
However, air works very differently from fluid.
Air is easily compressible, which means that if air gets into the brake lines, pressure from the brake pedal is absorbed instead of being fully transmitted to the brakes.
This causes a slow or delayed braking response.
Brake bleeding removes this trapped air and restores proper hydraulic pressure so that the braking system works efficiently, safely and consistently.
This maintenance process is often necessary when replacing brake parts, changing brake fluid, repairing brake lines, or whenever air is accidentally injected into the system.
2. How Air Gets Into the Brake System
Air can enter the brake system in several common ways and understanding these causes helps drivers avoid future problems.
One of the most common causes is when brake parts such as calipers, brake hoses, wheel cylinders, or the master cylinder are replaced or disconnected during repairs.
Whenever the hydraulic system is opened, air can easily enter the lines.
Another common cause is a low brake fluid level in the master cylinder reservoir.
If the fluid level drops too much, air can enter the system when the brake pedal is pressed.
Brake fluid also absorbs moisture over time because it is hygroscopic, meaning it draws water from the surrounding air.
This moisture can eventually form small steam bubbles when the brakes heat up during driving.
Bad brake lines, loose fittings, or worn seals can also gradually allow air into the system.
Regular brake fluid changes can also introduce air if the process isn’t done correctly.
Because the braking system relies entirely on sealed hydraulic pressure, even a small amount of trapped air can significantly impact braking performance.
3. Symptoms of Air in the Brakes
When there’s air in the brake lines, the braking system usually displays clear warning signs that drivers should never ignore.
One of the most noticeable symptoms is a spongy or soft brake pedal.
Instead of feeling firm when pressed, the pedal may gradually sink to the floor as air becomes trapped in the lines.
Drivers may also experience longer stops, making it take longer for the vehicle to come to a complete stop.
Another common symptom is inconsistent brake performance, with the brakes feeling firm one moment and weak the next.
In some cases, the brake pedal may need to be pumped several times before it becomes hard enough to stop the vehicle properly.
Drivers may also notice delayed or uneven brake response, specially during sudden stops.
These symptoms indicate that hydraulic pressure is not being properly transmitted through the brake fluid.
If these warning signs appear, it’s usually necessary to bleed the brakes to remove trapped air and restore proper braking force.
4. Types of Brake Bleeding Methods
Manual Brake Bleeding – Traditional Pump Method
Manual brake bleeding is the most common and traditional method used by mechanics and car owners.
This method usually requires two people to perform properly.
One person sits inside the vehicle and presses the brake pedal, while the other person opens and closes the bleeder valve on the brake caliper or wheel cylinder.
When the pedal is pressed, brake fluid and trapped air are released into a container through a bleeder valve.
The valve is then closed before releasing the pedal to prevent air from returning to the system.
This process is repeated several times until only clear brake fluid, without any air bubbles, flows out.
Manual bleeding is the most commonly used method because it requires minimal tools and works well for most vehicles.
However, it requires coordination between two people and close attention to the brake fluid level in the master cylinder to prevent air from re-entering.
Pressure Brake Bleeding
Pressure brake bleeding is a more advanced method that uses a special pressure bleeder tool to remove brake fluid from the braking system.
In this method, a sealed container filled with fresh brake fluid is connected to the master cylinder reservoir.
The pressure bleeder applies controlled air pressure to the container, forcing brake fluid through the brake lines and out of the bleeder valves at each wheel.
This constant flow of fluid removes air from the system quickly and efficiently.
Pressure bleeding is often used by professional mechanics because it allows one person to perform the entire process without assistance.
It is also very effective for completely flushing old brake fluid and replacing it with fresh fluid.
Because the pressure remains constant, this method often removes air more thoroughly than manual bleeding.
Vacuum Brake Bleeding
Vacuum brake bleeding uses a vacuum pump to remove brake fluid and air from the system, rather than forcing it through a bleeder valve.
In this method, a handheld or pneumatic vacuum pump is connected to the bleeder valve using a clear hose.
When the pump is activated, it creates suction that forces brake fluid and trapped air out of the brake lines and into a collection container.
Vacuum bleeding is easy because it can usually be performed by one person and does not require pumping the brake pedal.
It is commonly used in automotive workshops because it allows for controlled fluid removal and makes it easier to see air bubbles escaping the system through the clear hose.
However, the bleeder valve must be properly sealed during this process to prevent outside air from entering the system around the threads.
Gravity Brake Bleeding
Gravity brake bleeding is the easiest and slowest method of removing air from a brake system.
This technique relies on the natural force of gravity to force brake fluid down the brake lines and out the bleeder valve.
To perform this method, the master cylinder reservoir is filled with fresh brake fluid and the bleeder valve on the wheel is opened.
Because the reservoir is higher than the brake components, gravity causes the fluid to slowly flow through the lines and remove air from the system.
This method requires very little equipment and can often be performed by a single person without any special tools.
However, it takes significantly longer than other bleeding methods and does not always remove stubborn air pockets in complex brake systems.
Despite its slowness, gravity bleeding can be useful for simple brake systems or as a preliminary step before using other bleeding techniques.
Tools
| Tool or Material | Why It Is Needed | Use It Properly |
|---|---|---|
| Brake Fluid – Correct Type | Brake fluid is essential because the entire braking system uses hydraulic pressure. When the brakes are bled, old fluid and trapped air are expelled, so adding new fluid is essential to maintain proper pressure and prevent air from re-entering. Using the correct fluid also prevents damage to seals, hoses and internal brake components. | First, consult your vehicle’s manual to ensure the correct brake fluid type. Open the master cylinder reservoir under the hood and fill it with new fluid. During the bleeding process, carefully monitor the fluid level and refill it frequently so that the reservoir never reaches empty. This ensures that the system is always full of fluid during the bleed. |
| Wrench for Bleeder Screws | Without loosening the bleeder screw, air trapped in the brake line cannot escape. A wrench allows the valve to be opened in a controlled manner so that fluid and air can safely escape without damaging the screw. | Choose a wrench that exactly fits the size of the bleeder screw so that the edges are not rounded. Place the wrench on the bleeder screw and turn it slightly anti-clockwise to open it. When fluid begins to drain, tighten the screw again before releasing the brake pedal to prevent air from entering the system. |
| Clear Tubing | Tubing helps securely carry brake fluid into a container and prevents it from spilling onto vehicle parts. Because it is transparent, you can clearly see air bubbles escaping from the brake line, which lets you know when the bleeding process is complete. | Press one end of the tubing firmly onto the bleeder screw. Place the other end inside a container. When the bleeder valve opens, brake fluid and air bubbles will flow out of the tube. Continue bleeding until fluid flows freely and no air bubbles are visible. |
| Catch Container | Brake fluid must be collected safely as it can damage painted surfaces and should not be spilled on the ground. A container keeps the work area clean and allows for proper disposal of used brake fluid. | Place the container under the brake assembly and insert clear tubing into it. Ensure the container is stable so it doesn’t tip over. Fluid flowing through the tubing will collect inside, while air will be expelled from the system. |
| Assistant – For Manual Bleeding | Manual brake bleeding requires teamwork. One person pumps and holds the brake pedal, while the other controls the bleeder screw. This teamwork helps to effectively remove air and old fluid from the brake lines. | An assistant sits in the driver’s seat and slowly presses the brake pedal several times to build pressure. They then hold the pedal down until the bleeder screw opens. After the fluid has drained and the screw is closed, the assistant releases the pedal and repeats the process until no air bubbles are visible. |
| Vacuum or Pressure Bleeder Kit Truly Optional | These tools make brake bleeding faster, easier and more consistent. They are specially useful when working alone or flushing the entire brake fluid. They also help remove air from a difficult brake system more efficiently. | For a vacuum bleeder, connect the hose to the bleeder valve and activate the pump to remove fluid and air from the system. For a pressure bleeder, connect the tool to the master cylinder reservoir and apply pressure so that fresh fluid flows through the brake line and air is expelled through the bleeder valve. |
| Safety Gear – Gloves and Goggles | Brake fluid can irritate the skin and eyes and it can damage painted surfaces. Wearing safety gear can help the technician avoid accidental splashes and chemical exposure. | Wear chemical-resistant gloves before handling brake fluid or tools. Wear safety goggles to protect your eyes from splashes when opening the bleeder valve or working under the vehicle. Immediately clean up any spilled fluid to avoid injury. |
How to Prepare Your Vehicle First
1. Park on a Level Area and Apply the Parking Brake
Before beginning the brake bleeding process, it’s crucial to place your vehicle in a stable and secure location.
Parking your vehicle on a level and straight surface is essential for maintaining balance and preventing the vehicle from rolling while working.
A level surface also helps distribute brake fluid evenly in the master cylinder reservoir, which is essential for maintaining proper hydraulic pressure during the bleeding process.
After parking, the parking brake must be fully engaged to lock the rear wheels and prevent the vehicle from suddenly moving.
Even the slightest movement when raising or removing the wheels can be dangerous.
In addition to using the parking brake, many mechanics also place wheel chocks or blocks on the ground behind the tires for added safety.
Taking the time to properly secure your vehicle reduces the risk of accidents and creates a safe environment for brake maintenance.
2. Remove the wheels for easy access to the calipers or wheel cylinders
To properly bleed the brakes, you need easy access to the brake components behind each wheel.
This usually requires removing the wheels to gain easy access to the brake calipers or wheel cylinders.
The bleeder screw, which is the small valve used to remove air and brake fluid from the system, is located on the brake caliper for vehicles with disc brakes or on the wheel cylinder for vehicles with drum brakes.
These components are located behind the wheel, so removing the wheel allows you to clearly see and access the bleeder valve.
To safely remove the wheel, the vehicle must first be raised using a proper jack and then supported with jack stands to keep it stable.
Once the vehicle is safely supported, the lug nuts can be loosened and the wheel removed.
Having direct access to the brake assembly makes it easier to install clear tubing, unscrew the bleeder screw and monitor fluid flow during the bleeding process.
3. Locate the Master Cylinder and Check the Brake Fluid Level
The master cylinder is the central component of the hydraulic braking system and plays a crucial role during brake bleeding.
It’s typically located in the engine bay near the driver’s side firewall and connected to a small tank that stores brake fluid.
When the brake pedal is pressed, the master cylinder pushes brake fluid through the brake lines to the calipers or wheel cylinders, which then apply pressure to the brake pads or brake shoes.
During the brake bleeding process, fluid will be drained from the system through the bleeder valve, so it’s important to keep the master cylinder tank filled with fresh brake fluid.
If the fluid level drops too low or the tank becomes empty, air can enter the brake lines, halting the entire bleeding process.
Before starting, remove the tank cap and carefully check the fluid level.
If the fluid is low, refill it with the correct type of fluid recommended by the vehicle manufacturer.
Checking and maintaining the fluid level throughout the process ensures that the hydraulic system remains filled with fluid and free of air.
4. Safety Precautions to Avoid Brake Fluid Spills
Brake fluid must be handled carefully as it is a strong chemical that can damage vehicle paint and cause skin or eye irritation.
Even small drops on painted areas, such as the car body or engine parts, can peel or stain the paint if not cleaned up immediately.
Therefore, it is important to work slowly and carefully when opening the master cylinder reservoir or loosening the bleeder screw.
Using a clean funnel when adding brake fluid can help prevent accidental spillage around the reservoir mouth.
Placing a cloth or absorbent towel around the master cylinder area can also prevent small drops from reaching painted areas.
When bleeding brakes, always connect clean tubing to the bleeder valve so that the fluid flows directly into the container, not onto the ground or brake parts.
Wearing protective gloves and safety glasses when handling brake fluid adds another layer of safety.
By taking these safety precautions, you can keep your work area clean, protect your vehicle’s finish and perform the brake bleeding process safely and efficiently.
How to Bleed Car Brakes – Beginner Friendly Guide
How to Bleed Car Brakes In Manual Way – Manual Brake Bleeding
Manual brake bleeding is the traditional and most common method of removing trapped air from a vehicle’s braking system.
This technique is commonly used in home garages and professional workshops because it requires only basic tools and allows technicians to clearly see air escaping from the brake lines.
This method works by using the pressure generated by pressing the brake pedal.
When the pedal is pressed down, the master cylinder pushes brake fluid through the brake lines to each wheel.
By opening a small valve called a bleeder screw at the right time, trapped air and old brake fluid are expelled from the system.
Because air is easily compressed, while brake fluid is not, removing the air restores the strong hydraulic pressure needed for safe and responsive braking.
This process typically requires two people: one to operate the brake pedal and the other to open and close the bleeder valve.
When done carefully and in the correct order, manual bleeding can completely remove air pockets and restore proper braking performance.
1. Start with the wheel farthest from the master cylinder
The first step in manual brake bleeding is choosing the correct wheel to start with.
In most vehicles, the correct order starts with the wheel farthest from the master cylinder because this section of the brake line typically contains the most air and old fluid.
The master cylinder is the part that pushes brake fluid into the system when the brake pedal is pressed.
Because brake lines extend from this section to each wheel, the farthest wheel typically has the longest fluid path.
In many cars, this wheel is the rear passenger-side wheel, although the exact order may vary depending on the vehicle design.
Starting with the farthest wheel helps remove air from the longest section of the brake line first, improving the overall effectiveness of the bleeding process and preventing air from leaking back into the system.
2. Attach clear tubing to the bleeder valve and place the other end in a container.
After finding the right wheel, the next step is to prepare the bleeder valve for draining the fluid.
The bleeder valve is a small screw that is located on the brake caliper for disc brakes or on the wheel cylinder for drum brakes.
A clear plastic tube should be screwed firmly onto the end of the bleeder valve to ensure a tight fit and prevent leaks.
The other end of the tube should be placed inside a container that will collect the brake fluid drained from the system.
Using clear tubing is very helpful because it allows you to see the flow of brake fluid and see air bubbles passing through the tube.
This visual check helps confirm that the air has been completely removed from the brake line.
The container collects the used fluid so it doesn’t spill onto the ground or vehicle parts, as brake fluid can damage paint and other surfaces.
3. Ask an assistant to gently depress the brake pedal several times.
Once the tubing and container are in place, the assistant inside the vehicle will begin the next part of the process.
The assistant should gently press the brake pedal several times to build pressure in the hydraulic braking system.
Slowly pumping the pedal forces brake fluid out of the brake line and toward the bleeder valve.
After a few pumps, the assistant should firmly press the pedal and hold it there without releasing it.
Holding the pedal down maintains hydraulic pressure within the system, which is necessary to expel air and fluid when the bleeder valve opens.
During this step, communication between the assistant and the person operating the steering wheel is crucial to prevent the pedal from being released at the wrong time.
4. Loosen the bleeder valve to allow fluid and air to escape.
With the brake pedal depressed, the person at the steering wheel can carefully loosen the bleeder valve using the appropriate wrench.
Turning the valve slightly will allow pressurized brake fluid to flow out of the clear tube and into the container.
Along with the fluid, trapped air will also escape from the brake line and appear as small bubbles in the tubing.
This step is an important part of the bleeding process as it removes air that is impairing the hydraulic pressure of the braking system.
The valve should be opened only slightly, as opening it too much could allow outside air to enter or cause fluid to leak rapidly.
5. Close the valve before the assistant releases the pedal
Once the fluid and air have been temporarily drained, the bleeder valve must be retightened before the assistant releases the brake pedal.
This step is crucial to prevent air from returning to the brake system.
If the brake pedal is released while the valve is open, the master cylinder can draw air back into the brake lines through the bleeder valve.
By closing the valve first, the system remains sealed and protected from new air entering the lines.
Once the valve is properly tightened, the assistant can slowly release the brake pedal and be ready to repeat the process.
6. Repeat the process until no air bubbles are visible.
The bleeding process usually needs to be repeated several times to remove all trapped air from the brake line.
Each time the pedal is pumped and pressed, a small amount of fluid and air is released from the tube.
The person watching the tubing should carefully monitor the flow of fluid.
Initially, air bubbles will often be visible floating in the fluid.
As the process progresses, the bubbles will become smaller and less frequent.
When the fluid flows smoothly through the tube and no air bubbles are visible, it means that air has been successfully removed from that section of the brake line.
During this process, it is important to frequently check the brake fluid level in the master cylinder reservoir and add new fluid if needed so that the reservoir never reaches empty.
7. Proceed to the Front Wheel in the Correct Order
After the first wheel has been completely bled, the process should continue with the remaining wheels in the correct order.
In many vehicles, the common order is first the rear passenger side, then the rear driver’s side, then the front passenger side and finally the front driver’s side.
This sequence gradually moves closer to the master cylinder, ensuring that the longest brake lines are emptied of air before moving on to the shorter brake lines.
Repeating this bleeding process on each wheel ensures that all parts of the braking system are free of air and filled with clean brake fluid.
Once all wheels have been bled, the brake pedal should feel firm and responsive, confirming that hydraulic pressure has been fully restored and the braking system is functioning properly.
How to Bleed Car Blades With Different Method
1. Pressure Bleeding
Pressure bleeding is a modern and effective method used to remove air and old brake fluid from the braking system.
In this method, a special tool called a pressure bleeder is connected to the brake fluid reservoir located on top of the master cylinder.
This tool contains fresh brake fluid and uses controlled air pressure to force fluid through the brake lines and out the bleeder valves at each wheel.
Because the system is constantly under slight pressure, fluid continuously flows through the brake lines, expelling trapped air.
This process fills the entire brake system with fresh fluid and removes air bubbles that can cause light or weak braking.
Pressure bleeding is often used in professional repair shops because it allows one person to perform the task without the need for an assistant to pump the brake pedal.
This is specially useful when completely changing the brake fluid or working on modern vehicles with complex braking systems involving long brake lines.
This method is also used when the brake system is being opened for major repairs, such as replacing calipers, brake lines, or the master cylinder, as it allows for more effective air removal than older methods.
2. Vacuum Bleeding
Vacuum bleeding is another common method that removes air and brake fluid by creating suction at the bleeder valve.
Instead of pushing fluid through the system like pressure bleeding, this method uses a handheld or pneumatic vacuum pump connected to a hose attached to the bleeder valve.
When the pump is turned on, it creates negative pressure that forces the brake fluid and trapped air out of the brake line and into a collection container.
A major advantage of vacuum bleeding is that it can usually be performed by a single person, making it easier for home mechanics who don’t have an assistant.
The process is also quite quick and allows the worker to clearly see air bubbles passing through the transparent hose.
This makes it easier to determine whether the brake system is fully ventilated.
However, vacuum bleeding also has some disadvantages.
If the threads of the bleeder screw are slightly loose, the vacuum pump may suck air through the threads instead of removing air from the brake line.
This can make it difficult to determine whether the air bubbles seen in the hose are coming from the brake system or from outside air around the valve.
Therefore, it is important to properly seal the bleeder screw during the process to get accurate results.
3. Gravity Bleeding
Gravity bleeding is the easiest method of removing air from the brake system and relies entirely on the natural force of gravity rather than pressure or suction tools.
In this method, the master cylinder reservoir is filled with fresh brake fluid and the bleeder valve on one wheel is slightly opened.
Because the master cylinder is located above the brake components, gravity slowly forces the brake fluid down the brake lines and out the open bleeder valve.
As the fluid moves through the system, it gradually removes air from the brake lines.
The biggest advantage of gravity bleeding is its simplicity, as it requires very few tools and can usually be performed by a single person.
The process is also gentle on the braking system because the fluid moves slowly without sudden pressure changes.
However, the main disadvantage of this method is that it takes significantly longer than other bleeding techniques.
It can take several minutes or more for the fluid to flow steadily from the bleeder valve.
Furthermore, gravity bleeding cannot always remove stubborn air pockets trapped in complex brake systems.
Although this is slow, it can be a preliminary method to let some air escape before using manual, vacuum, or pressure bleeding to complete the process.
How to Check and Refill The Brake Fluid
1. The Importance of Maintaining the Correct Fluid Level Throughout the Process
Maintaining the correct brake fluid level is a crucial part of the brake bleeding process because the entire braking system relies on the hydraulic pressure generated by this fluid.
Brake fluid transfers force from the brake pedal to the brake calipers or wheel cylinders, which then press the brake pads or brake shoes against the rotor or drum to slow the vehicle.
During brake bleeding, some fluid is deliberately released through the bleeder valve to remove trapped air from the brake lines.
As this fluid leaves the system, the level inside the master cylinder reservoir gradually decreases.
If the fluid level drops too low or the reservoir becomes empty, pressing the brake pedal can refill the brake lines.
This introduces new air into the system and undoes any progress made during bleeding, requiring the process to begin again.
For this reason, the fluid level should be checked frequently throughout the process and topped up as necessary.
Keeping the reservoir properly filled ensures that only brake fluid passes through the system and that no new air is introduced into the hydraulic lines.
2. Using the Correct Brake Fluid Type
Using the correct type of brake fluid is essential to maintaining the performance and safety of the braking system.
Brake fluids are classified into different types based on their chemical composition and boiling point and the most common types used in passenger vehicles are DOT 3, DOT 4 and DOT 5.1.
These fluids are designed to withstand the high temperatures generated during braking, specially when a vehicle decelerates from high speeds or is carrying heavy loads.
DOT 3 and DOT 4 fluids are glycol-based and are widely used in most standard vehicles, while DOT 5.1 is often used in vehicles that require higher temperature resistance and improved performance.
Each vehicle manufacturer specifies the correct fluid type, as different brake systems are designed to work with specific fluid properties.
Using the wrong brake fluid can damage rubber seals, reduce braking performance, or cause corrosion in the brake system.
Before adding or replacing brake fluid, it’s always important to check the vehicle’s owner’s manual or the markings on the master cylinder reservoir cap to confirm the recommended fluid type.
Using fresh, high-quality brake fluid that meets the manufacturer’s specifications helps ensure consistent braking pressure and long-term reliability.
3. Avoid Contamination
Keeping brake fluid clean and free of contamination is crucial, as even a small amount of dirt can impact braking system performance.
Brake fluid is hygroscopic, meaning it naturally absorbs moisture from the surrounding air over time.
When moisture enters the brake fluid, it lowers the fluid’s boiling point.
If the brakes overheat during hard braking, contaminated fluid can begin to boil and create steam bubbles inside the brake lines.
These steam bubbles act like trapped air and can make the brake pedal soft or spongy, reducing braking efficiency and increasing stopping distance.
Dirt, dust and small metal particles can also contaminate the fluid and damage sensitive parts inside the master cylinder, brake lines and calipers.
To avoid contamination, the brake fluid reservoir cap should only be opened when needed and tightly closed after checking the fluid level.
Fresh brake fluid should always be added from a sealed container, as fluid left open for extended periods can absorb moisture from the air.
Using clean tools and avoiding contact between fluid and dirty surfaces also helps keep the brake system clean and functioning properly.
By preventing contamination and maintaining clean fluid, drivers can protect the braking system and ensure reliable stopping performance.
How to Test the Brakes After Bleeding
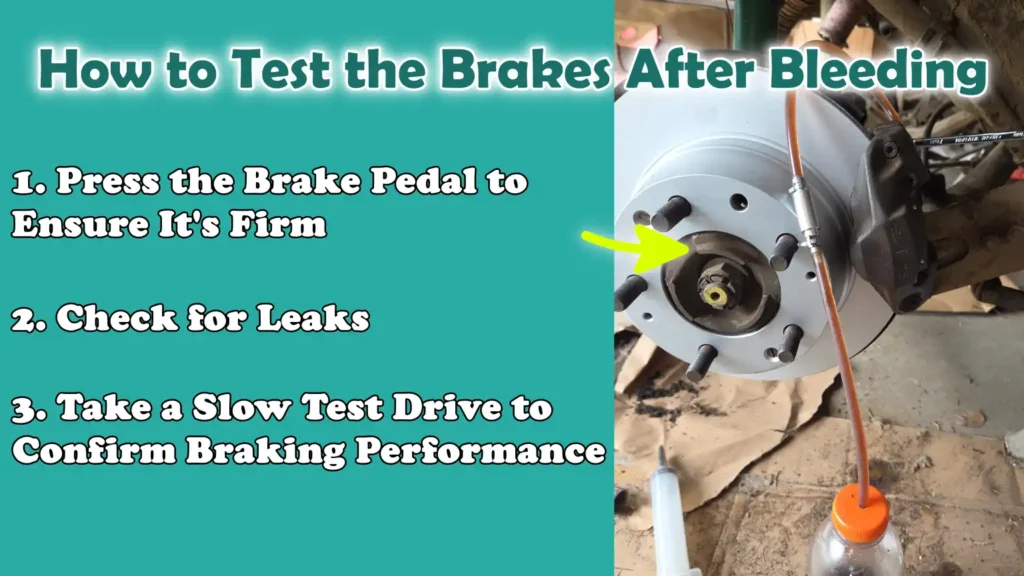
1. Press the Brake Pedal to Ensure It’s Firm
After completing the brake bleeding process, the first and most important step is to test the brake pedal to ensure that the proper hydraulic pressure has returned to the braking system.
When the air has successfully been emptied from the brake lines, the brake pedal should feel firm and stable.
The driver should sit in the vehicle with the engine off and gently press the brake pedal several times.
The pedal should not feel soft, spongy, or sink into the ground.
Instead, it should stay in place and offer firm resistance.
This firmness indicates that the brake fluid is properly transmitting pressure from the master cylinder to the brake calipers or wheel cylinders.
If the pedal still feels soft or continues to sink, it usually means that some air is still trapped in the brake lines and the bleeding process may need to be repeated.
Pedal strength testing is an important safety check because a properly functioning brake pedal ensures that braking force is delivered quickly and effectively when the driver presses the pedal during normal driving.
2. Check for Leaks
After bleeding the brakes, another important step is to check for leaks throughout the braking system.
To maintain proper pressure, brake fluid must remain within a sealed hydraulic system.
Even a small leak can cause gradual fluid loss and reduce braking performance over time.
After bleeding the brakes, each bleeder screw should be checked to ensure it is properly tightened.
Brake lines, rubber hoses and connections near the caliper or wheel cylinder should also be carefully examined.
Wetness, dripping fluid, or shiny spots around these areas may indicate a leak.
The master cylinder reservoir should also be checked to ensure the cap is tightly closed and the fluid level is stable.
If any leaks are found, they should be repaired immediately before driving.
Brake fluid leaks are dangerous because they can cause a sudden drop in hydraulic pressure, potentially leading to brake failure.
Taking the time to carefully inspect the system helps ensure that the braking system remains completely sealed and reliable.
3. Take a Slow Test Drive to Confirm Braking Performance
When the brake pedal feels firm and no leaks are visible, the final step is to conduct a slow, controlled test drive to confirm that the brakes are functioning properly under real driving conditions.
The test drive should begin in a safe, open area, such as an empty parking lot or a quiet road with very little traffic.
The driver should start the vehicle slowly and gently depress the brake pedal to observe how the brakes respond.
The vehicle should decelerate smoothly and predictably, without any unusual noises, vibrations, or delays.
Gradually increasing speed and applying the brakes several times helps confirm that the braking system is functioning normally at different pressure levels.
During this test drive, the driver should also pay attention to how the brake pedal feels while the vehicle is moving.
A firm and consistent pedal response indicates that the brake bleeding was successful and the hydraulic system is functioning properly.
If the brakes feel weak, uneven, or spongy during the test drive, the vehicle should be stopped immediately and the braking system should be rechecked.
Carefully testing the brakes after bleeding ensures that the vehicle is safe to drive and that the braking system can function properly under real road conditions.
Read More:
Know, Common Mistakes to Avoid Them Later
1. Leaving the Master Cylinder Dry
One of the most common and serious mistakes during brake bleeding is leaving the master cylinder reservoir dry.
The master cylinder is the main component that pushes brake fluid through the brake lines when the brake pedal is pressed.
During the bleeding process, brake fluid is deliberately released from the bleeder valves at each wheel to remove trapped air and old fluid.
As this fluid leaves the system, the level in the reservoir gradually decreases.
If the reservoir is empty, air will be drawn into the brake lines the next time the brake pedal is pressed.
This introduces new air into the hydraulic system and cancels the previously completed bleeding process.
Once air enters the master cylinder or brake lines, the brake pedal may feel very soft or spongy and the system may need to be bled again from the beginning.
To avoid this problem, the fluid level in the master cylinder reservoir should be checked frequently during the bleeding process and new brake fluid should be added whenever necessary.
Keeping the reservoir properly filled ensures that the braking system always contains fluid rather than air and helps maintain stable hydraulic pressure.
2. Leaving or Bleeding Wheels in the Wrong Order
Another common mistake is leaving one wheel unattended or bleeding the brakes in the wrong order.
Braking systems are designed with multiple brake lines connecting the master cylinder to each wheel.
These lines can vary in length and the longest brake line typically contains the most air.
Because of this, brake bleeding should be done in a specific order, starting with the wheel farthest from the master cylinder and working to the wheel closest to it.
In many vehicles, the usual sequence starts with the rear passenger-side wheel, followed by the rear driver-side, then the front passenger-side and finally the front driver-side.
If this sequence is not followed, air can become trapped in certain parts of the brake lines, affecting braking performance.
Leaving a wheel unattended can also create air pockets in that part of the system, leading to poor braking or a soft brake pedal.
Following the correct bleeding sequence ensures that air is properly and effectively vented from the entire braking system.
3. Using the Wrong Brake Fluid Type
Using the wrong brake fluid type is another mistake that can damage the braking system and reduce braking performance.
Brake fluids are specially designed hydraulic liquids that must meet specific temperature and chemical standards.
Common brake fluid types include DOT 3, DOT 4 and DOT 5.
1 and each vehicle manufacturer recommends a specific type for its braking system.
These fluids vary in their boiling point, chemical composition and compatibility with seals and internal parts.
If the wrong fluid is used, it may not be able to handle the high heat generated during braking, which can cause the fluid to boil and create steam bubbles inside the brake lines.
These bubbles act like trapped air and reduce braking efficiency.
In some cases, the wrong fluid can also damage rubber seals and hoses, leading to leaks and costly repairs.
To avoid this mistake, drivers should always check the vehicle’s owner’s manual or master cylinder reservoir cap to confirm the specified brake fluid type before adding or replacing fluid.
4. Not Tightening the Bleeder Screw Properly
Bleeder screws are small valves located on each brake caliper or wheel cylinder.
They allow brake fluid and air to escape during the bleeding process.
After the bleeding process is complete, these screws must be tightened properly to seal the brake system.
If the bleeder screw is loose or not tightened properly, brake fluid may leak while driving.
Even a small leak can reduce the amount of fluid in the braking system and lead to a gradual decrease in hydraulic pressure.
This can cause a soft brake pedal, reduced braking performance and, in extreme cases, even brake failure.
In addition to fluid loss, a loose bleeder screw can allow air back into the brake line, defeating the purpose of the bleeding process.
To avoid this problem, carefully tighten each bleeder screw with the correct wrench after bleeding is complete.
The area around the screw should also be checked for any signs of fluid leakage to ensure that the braking system is completely sealed and safe to drive.
How to Maintain Car Brakes in Top-Notch Condition
Even, there’s scientific research on braking systems that shows that the contaminated brake fluid actually directly influences how quickly a vehicle slows down, as a study in the Transportation Research Procedia found that the moisture accumulation in the brake fluid actually increases the time required for the braking force to reach to its maximum level: basically this delay can lengthen the stopping distances and literally reduces overall braking efficiency, that’s why most of the experts recommended to have to routine brake fluid replacement and take care of the bleeding procedures time-to-time.[¹]
1. How Often to Bleed the Brakes
Brake bleeding isn’t something that needs to be done very often, but it’s still an essential part of proper vehicle maintenance.
Most vehicle manufacturers recommend changing or bleeding brake fluid approximately every two to three years, although this time can vary depending on the type of vehicle, driving conditions and the type of brake fluid used.
Brake fluid absorbs moisture from the surrounding air over time because it is hygroscopic, meaning it attracts and traps water molecules.
As moisture builds up inside the brake fluid, the fluid’s boiling point decreases.
When the brakes heat up during hard braking, driving on inclines, or in stop-and-go traffic, poor fluid can begin to form steam bubbles.
These bubbles act like trapped air and can make the brake pedal feel soft or less responsive.
Regular brake bleeding or brake fluid changes help remove moisture, old fluid and small air pockets that can build up in the system over time.
Many mechanics also recommend bleeding the brakes whenever major brake parts, such as brake calipers, brake lines, wheel cylinders, or the master cylinder, are replaced, as opening the system can allow air to enter.
Following the maintenance schedule provided in the vehicle’s owner’s manual keeps the braking system reliable and safe.
2. Signs That Your Brakes May Need to Be Bled Again
Even if the brakes have been bled before, certain warning signs may indicate that air pockets have re-formed in the system and need attention.
One of the most noticeable signs is a soft, spongy feel to the brake pedal, or requiring more pressure to slow the vehicle.
A properly functioning brake pedal should feel firm and stay in place when pressed.
If the pedal sinks slowly to the floor or appears to bounce up and down, this could be due to trapped air in the brake lines or moisture in the brake fluid.
Drivers may also notice that the vehicle takes longer than usual to stop or that there’s a delay when braking.
Another sign could be poor braking performance, where the vehicle doesn’t slow down easily.
In some cases, repeatedly pumping the brake pedal may temporarily improve braking force, another common sign of air in the hydraulic system.
These symptoms indicate that hydraulic pressure within the braking system isn’t being properly transmitted through the brake fluid.
If any of these warning signs appear, inspecting the brake system and re-bleeding the brakes can help restore optimal braking performance and safety.
3. Long-Term Care of Brake Fluid and the Brake System
Long-term proper care of brake fluid and the entire braking system is essential for maintaining safe and reliable stopping power.
Brake fluid should always be stored in a sealed container and replaced with new fluid during maintenance, as fluid that has been exposed to air for extended periods may already contain moisture.
When checking the master cylinder reservoir, the cap should only be opened when necessary and then tightly closed to minimize moisture entering the system.
It is also helpful to regularly inspect brake lines, hoses and connections for signs of leaks, corrosion, or wear.
Damaged brake lines or worn rubber hoses can introduce air into the system and reduce braking performance.
Keeping the brake system clean and free of dirt also protects vital parts like the master cylinder, calipers and wheel cylinders from internal damage.
In addition, drivers should also pay attention to other brake maintenance tasks, such as replacing worn brake pads, inspecting brake rotors or drums and maintaining proper brake fluid levels.
Maintaining the entire braking system not only improves vehicle safety, but also extends the life of expensive brake parts and ensures quick and timely stopping in everyday driving conditions.
Conclusion – How to Bleed Car Brakes
Yes, it is always recommended to maintain the car brakes in a strong manner as it literally necessary to stop your vehicle in quick way, as they actually gives you complete control over your vehicle no matter the driving and weather conditions are out there.
The braking system uses hydraulic pressure, which means brake fluid must flow smoothly through sealed brake lines to transfer force from your foot on the brake pedal to the wheels.
When air enters the system, it disrupts this pressure because air compresses easily, while brake fluid does not.
This small difference can cause the brake pedal to become soft or spongy, the vehicle to stall for long periods and reduce braking control.
Removing trapped air through proper brake bleeding restores the system’s full hydraulic efficiency, resulting in quick and consistent brake response.
Understanding how the braking system works also helps drivers understand why regular maintenance is important.
Over time, brake fluid absorbs moisture from the surrounding air and this moisture can reduce the fluid’s ability to handle the heat generated during braking.
Bad fluid can eventually cause steam bubbles to form inside the brake lines, which act like trapped air and impair braking performance.
By bleeding the brakes and replacing the old fluid with new, manufacturer-recommended brake fluid, drivers can maintain strong hydraulic pressure, protect sensitive parts like the master cylinder and brake calipers and extend the life of the entire braking system.
Now, that’s all from this guide about How to Bleed Car Brakes and you can ask more related questions by the help of comment box below.
Frequently Asked Questions
FAQ 1: What does it mean to bleed car brakes?
Bleeding car brakes means removing trapped air from the brake lines so that the braking system can function properly. Car brakes use hydraulic pressure generated by brake fluid to transmit force from the brake pedal to the brake pads or brake shoes on the wheels. Brake fluid is not compressible, so it can transfer this pressure efficiently. However, air is easily compressed and when air enters the brake lines, it blocks this pressure. This can cause the brake pedal to feel soft or spongy and reduce braking performance. Bleeding the brakes removes this air from the system through a small valve called a bleeder screw. Once the air is removed and the system is refilled with clean brake fluid, the brakes can provide full stopping force again.
FAQ 2: Why is brake bleeding important for vehicle safety?
Brake bleeding is important because the braking system must operate quickly and reliably whenever the driver presses the brake pedal. Trapped air in the brake lines can weaken the braking system and prevent consistent braking pressure. This can increase stopping distances and delay braking. In an emergency, even a slight delay in applying the brakes can increase the risk of an accident. Proper brake bleeding restores full hydraulic pressure, giving the brake pedal a firm feel and ensuring quick and easy stopping. Regular brake maintenance also helps protect expensive parts like brake calipers, wheel cylinders and the master cylinder.
FAQ 3: How do you know if your brakes need bleeding?
There are several signs that may indicate your brakes need bleeding. One of the most common symptoms is a soft, spongy, or sinking feeling when the brake pedal is pressed. Normally, the brake pedal should feel firm and stay in place. Another sign is that the vehicle takes longer than usual to stop or requires more pressure on the brake pedal. Some drivers may also notice that pumping the brake pedal a few times temporarily improves braking power. This is usually because pumping the pedal releases air trapped in the brake lines. These symptoms often indicate air or moisture in the brake fluid and bleeding the brakes can help restore proper braking performance.
FAQ 4: How often should you bleed your car’s brakes?
Brake bleeding is usually performed as part of regular brake fluid maintenance. Many vehicle manufacturers recommend changing or bleeding the brake fluid approximately every two to three years. However, the exact interval can vary depending on the type of vehicle, the type of brake fluid used and driving conditions. Vehicles that experience intense braking, frequent stop-and-go driving, or mountainous terrain may require more frequent brake maintenance. Brake bleeding is also necessary whenever the brake system is opened for repairs, such as replacing brake calipers, brake hoses, or the master cylinder. Regular brake fluid service helps remove moisture and dirt that can affect braking performance.
FAQ 5: Can you bleed brakes without an assistant?
Yes, it is possible to bleed brakes without an assistant using specialized tools designed for single-person brake bleeding. A common tool is a vacuum bleeder, which uses suction to remove brake fluid and air through the bleeder valve. Another option is a pressure bleeder, which forces fresh brake fluid through the system from the master cylinder reservoir. Both of these tools allow one person to perform the bleeding process without pumping the brake pedal inside the vehicle. Some drivers also use a simple one-way valve tube system that prevents air from flowing back into the brake lines. These tools simplify the process for home mechanics working alone.
FAQ 6: What happens if air gets trapped inside the brake lines?
If air gets trapped inside the brake lines, the braking system cannot maintain proper hydraulic pressure. Because air is easily compressed, pressing the brake pedal will compress the trapped air, instead of pumping brake fluid directly into the brake calipers or wheel cylinders. This causes the brake pedal to become soft or spongy and weaken braking force. In severe cases, the brake pedal may sink too close to the floor before the brakes engage. This can significantly increase stopping distances and make driving unsafe. Removing air through proper brake bleeding restores the strong hydraulic pressure needed for reliable braking.
References:
[1] Method of assessing the influence of the moisture content in the braking fluid on the braking system actuation efficiency
https://www.sciencedirect.com/science/article/pii/S2352146518305027

Hello Folks, Dean Shali here to help you out to solve the problems with your lovely vehicle, as i have lots of experience and knowledge about automotive industry as i woks directly with the customers and repair vehicles and i love to help the people to keep their cars safe and running smoothly.