Written By: Dean Shali
Fact Checked By: Sabré Cook
Reviewed By: Tamara Warren
It is true that: by this simply voltage test you can know if there’s charging problems is waiting for you in nearby future.
Because, whenever you start your car: then it is the battery that gets most of the attention related to turning on the vehicle engine, but after engine turns on it is alternator’s responsibility to keep that battery alive.
This is why, it becomes obvious reason that you need to take care of alternator as well, as it is the important part to charge the system as it produces electricity while the engine runs.
Basically, it powers headlights, ignition, fuel injection, sensors, climate controls and dozens of electronic systems in modern vehicles.
As well as, having a healthy alternator keeps charging voltage between about 13.5 and 14.8 volts, that depends on temperature, engine speed and electrical load as well.
So, if voltage falls too low, then the battery slowly drains while driving, even though the engine seems completely normal from outside.
Now, this is the guide that shows you How to Test Alternator Output Voltage so that you can ensure it supplies enough power under the real operating conditions to prevent unnecessary replacement of parts and repairs.
So, What is Alternator Output Voltage?
Alternator output voltage is the electrical pressure generated by the alternator to charge the battery and power the vehicle’s electrical system while the engine is running.
It is measured in volts and indicates whether or not the charging system is functioning correctly.
When the engine is running, the battery provides only the initial power required to crank the starter motor.
Subsequently, the alternator takes over and becomes the primary source of electricity for the entire vehicle.
This means that the battery is not designed to provide continuous power while the vehicle is being driven.
The alternator must generate sufficient voltage to recharge the battery and to power systems such as lighting, ignition, fuel delivery, sensors, engine controls and comfort features.
If the output voltage is too low, the battery’s charge level will begin to deplete even while the vehicle is in operation.
Conversely, if it is too high, electrical components may sustain damage over time.
Checking this voltage is one of the most reliable methods for assessing the health of the charging system, as it reveals the extent of electrical support the engine is providing under real-world operating conditions.
1. What is the Function of the Alternator in a Car’s Charging System?
The alternator is a belt-driven generator connected to the engine.
As the engine rotates, the serpentine belt drives the alternator’s pulley.
Inside the alternator, a rotating magnetic field passes through copper windings, generating an alternating current (AC), which is subsequently converted into direct current (DC), the form of electricity that the vehicle can utilize.
This process ensures a continuous supply of electricity whenever the engine is running.
Simply put, the alternator converts the mechanical energy produced by the engine into electrical energy for the vehicle.
One of the most critical functions of an alternator is to recharge the battery once the engine has started.
Within just a few seconds of starting the engine, a significant amount of battery power is consumed because the starter motor draws a very high current.
Once the engine is running, the alternator replenishes this expended energy.
Without this charging process, the battery would quickly drain after just a few starts.
This is why a car with a faulty alternator might start successfully once, provided the battery is fully charged, but could cease to function after being driven for a short period.
When the engine is running, the alternator powers almost every electrical device in the vehicle.
Headlights, dashboard displays, engine computer systems, fuel injectors, ignition coils, radios, air conditioning blower motors, heated seats, charging ports and safety systems, all rely on a continuous supply of electricity.
Modern vehicles can contain dozens of control modules, many of which require a stable voltage to function correctly.
If the alternator fails or generates an unstable voltage, these systems may begin to malfunction even before the battery warning light illuminates.
This may manifest as dim headlights, a sluggish AC blower fan, flickering displays, sudden warning messages, or poor engine performance, as electronic systems depend on a stable voltage to operate properly.
2. Normal Alternator Voltage Range
Most vehicles generate a charging voltage between 13.5 and 14.8 volts while the engine is running.
This range is considered standard for many petrol and diesel passenger vehicles.
When the vehicle is switched off, a fully charged battery typically registers 12.6 volts; therefore, the alternator must generate a voltage higher than that of the battery to allow electrical current to flow back into it.
This higher voltage facilitates the recharging of the battery.
If the alternator were to generate a voltage equal to that of the battery, proper charging would not occur.
Voltage levels may fluctuate slightly depending on factors such as engine speed, ambient temperature, battery condition and the number of active accessories.
In cold weather, the charging voltage may increase slightly, as lower temperatures require more energy to ensure the battery charges effectively.
When multiple accessories are in use, the system may temporarily adjust its output to meet the increased electrical demand.
Minor fluctuations are normal, but sudden, significant changes in voltage often indicate an underlying issue.
Older vehicles typically feature simpler voltage regulators that maintain a largely consistent voltage level.
In many older systems, the voltage remains relatively constant, regardless of whether the vehicle is idling or traveling at high speeds.
However, newer vehicles often incorporate “smart” charging systems controlled by the engine’s onboard computer.
These systems can automatically adjust the alternator’s output based on factors such as battery temperature, fuel-saving strategies and current electrical demand.
Consequently, in some modern vehicles, the charging voltage may occasionally appear lower than expected, even if the alternator is functioning correctly.
For instance, certain smart systems may reduce the alternator’s output during light driving conditions to minimize the load on the engine and enhance fuel efficiency.
This highlights a crucial aspect of understanding a vehicle’s specific charging system, enabling accurate interpretation of its voltage readings.
3. Why Correct Voltage Is Essential
Maintaining the correct alternator voltage is paramount, as all of a vehicle’s electrical systems rely on a stable power supply.
When the charging voltage is too low, the battery is forced to power systems that the alternator should, in fact, be supporting.
Consequently, the battery gradually discharges while driving, even though the engine is running.
Drivers often face issues such as rapid battery depletion, prolonged engine cranking (slow starting), or the need for a jump start from another vehicle after driving only a short distance.
Low charging voltage can also negatively impact engine performance, as modern fuel injection systems, ignition systems, sensors and control modules depend on precise voltage levels to function correctly.
Conversely, if the charging voltage becomes excessively high, the consequences can be equally severe.
Overcharging causes an excessive flow of current into the battery, leading to overheating and internal damage.
In traditional lead-acid batteries, overcharging accelerates the process of gas formation within the battery, which can result in a depletion of the electrolyte fluid level.
This reduces the battery’s lifespan and can lead to corrosion around the battery terminals.
In sealed batteries, overcharging can damage the internal plates and diminish the battery’s capacity to retain a charge.
Furthermore, excessive voltage can place undue stress on sensitive electronic components such as: infotainment systems, the Engine Control Unit (ECU) and various sensors.
Electrical components are designed to operate within a specific voltage range; excessive voltage can significantly shorten their operational lifespan.
The lifespan of a battery is directly linked to the charging voltage it receives.
A battery that is consistently undercharged runs the risk of sulfation, a condition in which lead sulfate crystals accumulate on the internal plates.
These crystals diminish the battery’s capacity and compromise the efficiency of the charging process.
Conversely, a battery that is frequently overcharged may suffer thermal damage, potentially leading to the deterioration of its plates.
Both of these scenarios shorten the battery’s service life, even if the battery was initially in good condition.
This is why many batteries fail prematurely, not simply due to old age, but rather due to underlying issues within the charging system.
Understanding the alternator’s output voltage helps in identifying potential problems before they become severe.
A simple voltage test can reveal whether the charging system is properly supporting the battery or placing undue, hidden strain upon it.
As the symptoms of charging-related issues often mimic those of a failing battery, checking the alternator’s voltage can prevent the unnecessary replacement of functional components and help pinpoint the true cause of starting difficulties or electrical system malfunctions.
Know, The Signs That Your Alternator’s Output Is Declining
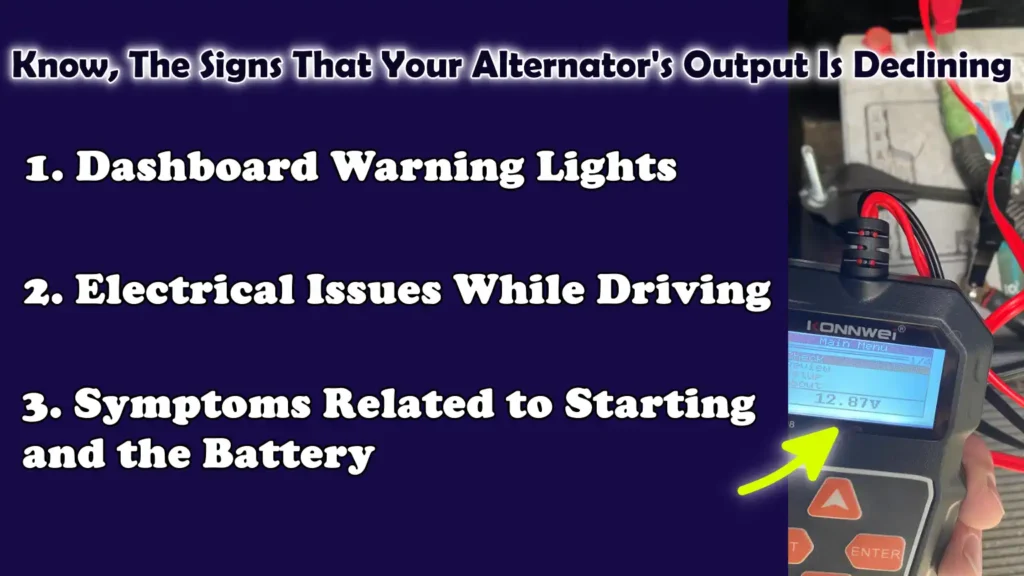
A failing alternator often exhibits several warning signs before it stops charging completely.
As the alternator supplies power while the engine is running, any reduction in its output can simultaneously affect both the battery and various electrical systems.
These symptoms may appear gradually, making it easy to mistake them for a weak battery or loose connections.
Recognizing these signs early can help you avoid a sudden “no-start” situation and prevent you from unnecessarily replacing parts that are not actually defective.
1. Dashboard Warning Lights
One of the earliest indicators is the battery warning light on the dashboard.
Although it resembles a battery icon, this light typically signals an issue within the charging system, rather than always indicating a fault with the battery itself.
It illuminates when the vehicle detects that the charging voltage is either lower or higher than expected.
In many vehicles, the engine control system monitors the alternator’s performance and can trigger a charging system alert if the voltage falls outside the normal operating range.
Some vehicles also display messages such as “Check Charging System” or “Service Battery Charging System”.
These alerts are often early indications that the alternator is failing to maintain the correct voltage.
Even if the vehicle still starts and runs, the battery may not be receiving an adequate charge, which could lead to its failure later on.
2. Electrical Issues While Driving
When the alternator’s output weakens, the electrical system fails to receive a consistent supply of power.
Headlights often dim, particularly when the engine is idling or when accessories are switched on.
Interior lights may flicker and dashboard displays may appear unstable.
These fluctuations occur because the alternator is not generating sufficient voltage to handle the electrical load.
Power windows may operate more slowly than usual, as their motors require robust voltage to function correctly.
The blower motor for the heating or air conditioning system may also weaken, resulting in reduced airflow.
In many cases, these symptoms become even more pronounced when multiple accessories such as: headlights, defrosters and air conditioning, are being used simultaneously.
This happens because a failing alternator struggles to meet the increased electrical demand.
3. Symptoms Related to Starting and the Battery
A faulty alternator can cause the battery to go completely dead, even if the vehicle has recently been driven.
This occurs because the battery is being discharged during use, but it is not being properly recharged while the vehicle is running.
Many drivers assume that a dead battery simply indicates that the battery has aged; however, the actual culprit may be low output from the alternator.
The need for frequent jump-starts is another common indicator.
If the vehicle starts after being jump-started but stalls again after being driven for a short while, it suggests that the alternator is likely failing to replenish the energy consumed during the starting process.
When the battery charge drops to a very low level, it is also common to hear a distinct “clicking” sound when attempting to start the vehicle.
This clicking sound typically originates from the starter solenoid, which is attempting to engage despite not receiving sufficient power.
When all these symptoms appear simultaneously, checking the alternator’s output voltage is the most effective way to confirm whether or not the problem lies with the charging system.
Tools
| Tools | Why It Is Needed | How to Use It |
|---|---|---|
| Digital Multimeter | A digital multimeter is the most essential tool for testing an alternator’s output, as it directly measures the battery and charging voltage. It provides a precise numerical reading, which helps confirm whether or not the alternator is charging correctly. This method is more reliable than relying solely on warning lights or symptoms, as it displays actual electrical values. | Set the meter to the DC voltage setting; on most meters, this is typically within the 20V range. Touch the red probe to the battery’s positive terminal and the black probe to the negative terminal. Perform an initial test with the engine off, then repeat the test with the engine running to compare the voltage readings. |
| Insulated Work Gloves | Gloves help protect your hands from accidental contact with battery terminals, hot engine components and the moving parts near the alternator belt. They also improve your grip while handling tools within the engine compartment. | Put them on before opening the hood and keep them on throughout the entire testing process. Ensure they fit your hands properly so that you can firmly grip the multimeter probes without them slipping. |
| Safety Glasses | Eye protection is crucial, as gases and corrosion particles can be emitted from the battery, specially around older terminals. Sparks generated by dirt, corrosion, or loose connections during the inspection can also cause eye injuries. | Put on safety goggles before inspecting the battery area. Keep them on while attaching the probes and checking cables, particularly if you observe any signs of corrosion or loose wiring. |
| Battery Tester | A battery tester helps determine whether the battery itself is weak or failing. This step is vital because a faulty battery can yield misleading results during an alternator test. Testing both components helps prevent misdiagnosis. | Connect the tester’s clamps to the battery terminals in accordance with the tester’s instructions. If you are unsure about the condition of the battery, perform a battery health check or a load test before checking the alternator voltage. |
| Clamp Meter | By using a clamp meter, you can measure the current flowing from the alternator without having to cut any wires. This is particularly useful when you need to verify whether the alternator is delivering sufficient charging current under an electrical load. | With the engine running, position the meter’s clamp around the charging cable exiting the alternator. Switch on accessories such as the headlights and blower to observe how the current output changes. |
| OBD-II Scan Tool | In modern vehicles equipped with smart charging systems, a scan tool is an essential diagnostic instrument. It can display charging commands, the operational status of the regulator and diagnostic trouble codes, information that cannot be obtained using a standard multimeter alone. | Connect the scan tool to the OBD-II port located beneath the dashboard. With the engine running, monitor the live charging data and check for any fault codes related to the charging system or voltage regulator. |
Know, How to Stay Safe Before Testing Alternator Voltage
Testing alternator voltage is a straightforward task; however, safety is paramount because you are working in close proximity to a running engine, a rotating drive belt and a charged battery.
If the vehicle is not properly secured or if the battery connections are loose, even a routine voltage check can become hazardous.
Adopting a few simple safety measures before conducting the test ensures accurate readings and protects you from injury, sudden short circuits, or errors caused by poor connections.
1. Properly Park the Vehicle
Before performing the test, always park the vehicle on a level and stable surface.
A level surface prevents the vehicle from rolling and allows the engine to idle normally during the voltage check.
If the vehicle is parked on an incline, engine vibrations or sudden movements could render the testing process unsafe, particularly when the hood is open and your hands are near the battery or engine components.
The parking brake must always be engaged before you begin the test.
This ensures that the vehicle remains stationary even while the engine is running, specially if you need to increase the engine speed (RPM) to check the charging output at higher speeds.
Some charging tests require you to slightly depress the accelerator while the vehicle remains stationary; in such instances, a properly engaged parking brake significantly mitigates the risk of sudden, unintended movement.
For vehicles equipped with an automatic transmission, placing the gear selector in ‘Park’ mode, or for manual transmission vehicles, shifting into ‘Neutral’ while properly utilizing the brakes, adds an extra layer of safety.
2. Inspect the Battery Terminals First
Before using a multimeter, carefully inspect the battery terminals.
Corrosion is one of the most common causes of inaccurate charging readings.
The accumulation of white, green, or blue deposits on battery posts can disrupt proper electrical contact, creating the impression that the alternator has failed, even if it is, in fact, functioning correctly.
Corroded terminals increase electrical resistance, thereby reducing the charging current reaching the battery.
Loose battery cables can also lead to inaccurate test results.
If a terminal wobbles when shaken by hand, it can interrupt the flow of voltage, potentially causing lights to flicker, warning lights to illuminate unexpectedly, or difficulty in starting the vehicle, symptoms that may be mistakenly attributed to an alternator failure.
Before conducting any tests, ensure that both the positive and negative cables are securely connected.
A loose connection can interfere with accurate readings and may even trigger the battery warning light, even if the alternator is functioning properly.
3. Avoid Common Testing Mistakes
One of the most common errors is setting the multimeter to the wrong mode.
The meter should be set to DC voltage, rather than AC voltage or resistance.
Using an incorrect setting can result in inaccurate readings and lead to erroneous conclusions regarding the condition of the alternator.
As most automotive charging systems operate on 12-volt DC, the 20V DC setting, found on many digital multimeters, is typically the appropriate range to use.
When the engine is running, avoid touching moving belts or pulleys.
The alternator is driven by a serpentine belt, which begins to rotate rapidly the moment the engine starts.
If loose clothing, hands, or tools come too close, they can become entangled in the moving components.
Always keep your hands clear of rotating parts while taking meter readings.
Testing with loose probes is another common issue.
The multimeter probes must maintain firm contact with the battery terminals.
If they slip or accidentally touch an incorrect metal component, the readings may fluctuate or prove to be inaccurate.
A poor connection with the probes can even make a perfectly functional alternator appear to be defective.
Holding the probes steady while the engine is idling and accessories are switched on ensures reliable results.
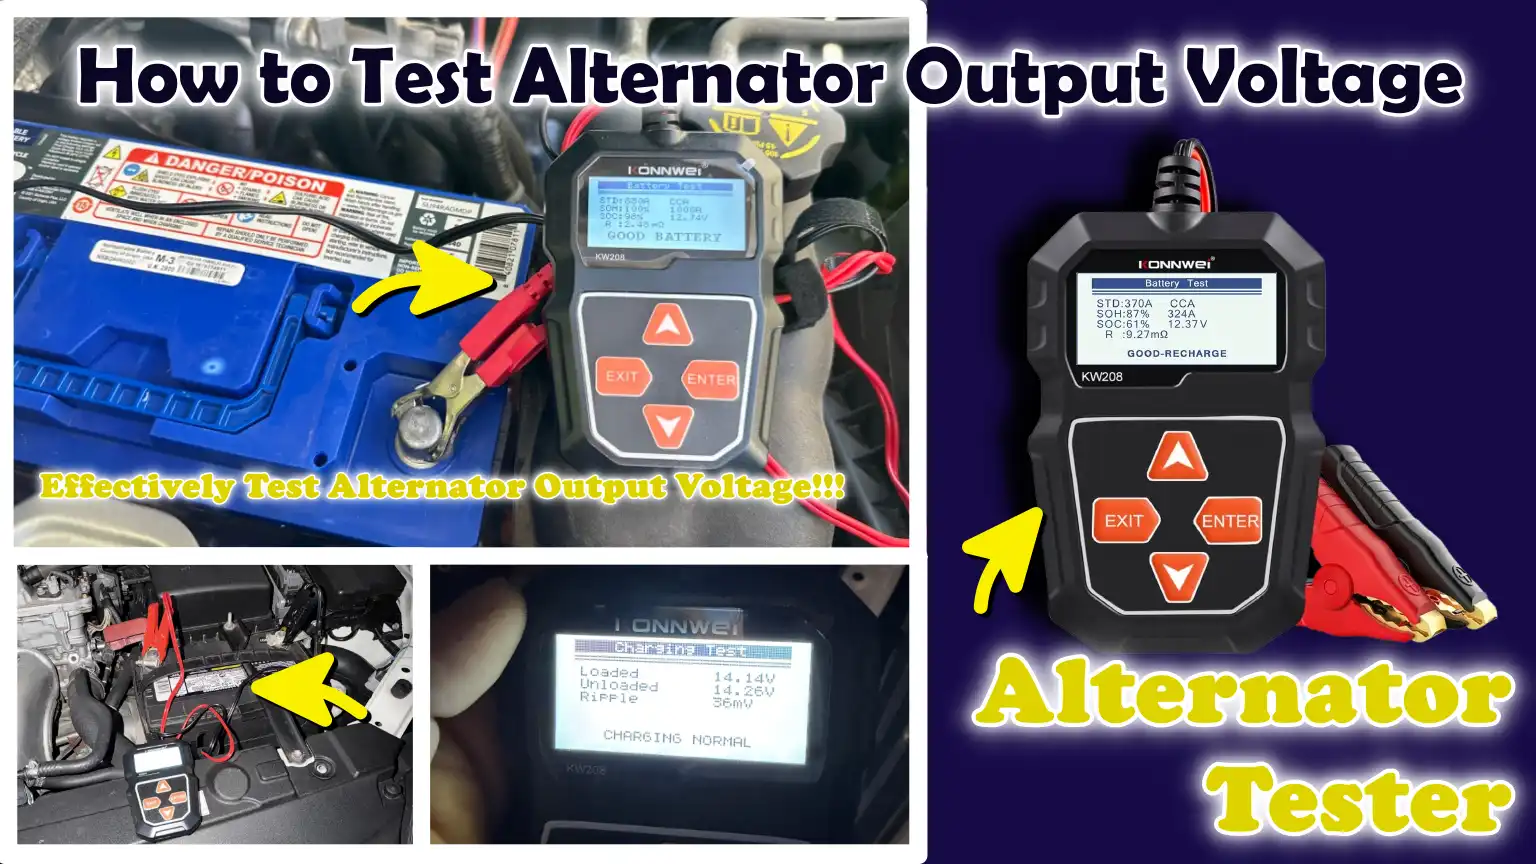
So, How to Test Alternator Output Voltage Using a Multimeter
Testing the alternator output voltage with a multimeter is the easiest way to verify whether the charging system is functioning correctly.
It helps you determine if the alternator is generating sufficient voltage to recharge the battery and power the vehicle while it is running.
This test compares the battery voltage before the engine is started with the voltage after the engine is running.
The difference between these readings can indicate whether the alternator is charging normally, undercharging, or overcharging.
A digital multimeter provides the most reliable results because it displays precise voltage values rather than relying solely on warning lights or symptoms.
1. Check Battery Voltage with the Engine Off
To begin, turn off the engine and ensure that all accessories are also switched off.
Set the multimeter to measure DC voltage, typically within the 20-volt range.
Place the red probe on the positive battery terminal and the black probe on the negative terminal.
This will reveal the battery’s resting voltage, which serves as your baseline reading before the alternator begins charging.
A healthy, fully charged battery typically displays a voltage of approximately 12.6 volts when the engine is off.
If the reading is around 12.4 volts, the battery is likely slightly undercharged.
If it drops to 12.2 volts or lower, the battery may already be weak.
This initial reading is crucial because it establishes the battery’s starting condition.
Without this baseline, it is difficult to determine whether the alternator is actually improving the battery voltage once the engine is running.
2. Start the Engine and Measure the Voltage
Start the engine and allow it to idle.
Place the multimeter probes on the same battery terminals.
The voltage reading should be higher than the reading taken with the engine off, as the alternator should begin charging immediately.
This increase indicates that the alternator is sending current to the battery and powering the electrical system.
Optimal charging systems register approximately 13.5 to 14.8 volts while idling.
If the voltage remains roughly equal to the battery reading taken with the engine off, the alternator is likely not charging properly.
It is crucial to position the probes correctly, as poor contact can result in unstable readings.
For the most accurate results, ensure that the probes make direct contact with the battery posts rather than with dirty terminal clamps.
3. Increase Engine RPM
Increase the engine speed to approximately 1,500 to 2,000 RPM for a few seconds.
This helps determine how the alternator performs when spinning at higher speeds.
Many alternators deliver better charging output at slightly higher engine speeds, particularly when electrical demand increases.
Monitor the voltage reading as the engine speed rises.
The voltage should remain stable and typically stay within the normal charging range.
It may rise slightly, but excessive fluctuation could indicate an issue with the voltage regulator.
If the voltage drops as the RPM increases, this may signal worn internal components, a slipping belt, or faulty wiring connections.
4. Activate Electrical Loads
With the engine running, switch on the major electrical loads.
These include the headlights, the AC blower and, if equipped, the rear defroster.
These accessories increase electrical demand and test whether the alternator can maintain its charging output under load.
Observe how the voltage responds.
When the accessories are first switched on, the voltage may drop slightly; However, in most vehicles, this reading should typically remain above approximately 13 volts.
If the voltage drops significantly and persists at that low level, it is possible that the alternator is not functioning correctly under actual driving conditions.
This step is crucial because some alternators appear to operate normally when the engine is idling with no electrical load; however, they fail to perform adequately when multiple vehicle systems simultaneously demand power.
5. Compare the Readings
Compare the reading obtained with the engine off to the reading obtained with the engine running.
When the engine is running, the voltage should be significantly higher than the battery’s static voltage.
This difference confirms that the alternator is charging the battery.
If there is very little or no increase in voltage, the alternator may not be supplying sufficient power.
Furthermore, compare the readings taken under ‘no-load’ and ‘loaded’ conditions.
‘No-load’ means that the engine is running, but all accessories are switched off.
‘Loaded’ means that the headlights, blower and other systems are switched on.
A properly functioning alternator should be capable of handling this additional demand without a significant drop in voltage.
Comparing these readings provides a more comprehensive insight into charging performance and helps identify a weak alternator, one that often fails only when subjected to an electrical load.
So, What Do Alternator Voltage Readings Mean?
Alternator voltage readings indicate how effectively the charging system is functioning while the engine is running.
A multimeter reading is far more than just a number; it reveals whether the alternator is properly charging the battery, maintaining the stability of the electrical system and responding correctly under electrical loads.
Minor fluctuations based on engine speed, ambient temperature and electrical demand are considered normal; however, if readings fall outside the standard range, it often points to an underlying issue within the charging system.
Understanding the significance of each reading can help you identify problems early, before the battery fails or the vehicle refuses to start.
1. Readings Below 13 Volts
If the engine is running and the voltage remains below 13 volts, the alternator may not be generating sufficient charge.
In most vehicles, this typically signals that the charging system is not functioning correctly or is failing to meet the vehicle’s electrical demands.
Low voltage readings can cause the battery to slowly discharge while driving, even with the engine running.
Over time, this often leads to starting difficulties, illuminated warning lights and recurring battery-related issues.
A failing alternator is a common cause of this problem.
Internal components such as: worn brushes, defective diodes, or aged coils (windings), as it can compromise the alternator’s output.
A loose serpentine belt can also diminish charging performance, as the alternator is unable to spin fast enough to generate its full electrical potential.
Wiring-related issues may also be a potential cause; Corroded terminals, loose cables, or poor ground connections can reduce the voltage reaching the battery, making the alternator appear weaker than it actually is.
2. Readings Between 13.5 and 14.8 Volts
For most passenger vehicles, a reading between 13.5 and 14.8 volts is generally considered normal.
This range indicates that the alternator is generating sufficient voltage to charge the battery while simultaneously powering the lights, engine electronics and other accessories.
It is typically a sign that the charging system is functioning correctly.
Minor fluctuations within this range are normal.
Voltage may rise slightly in cold weather, as the battery requires more assistance during the charging process at lower temperatures.
Voltage fluctuations may also occur when accessories such as: headlights or air conditioning, are switched on.
Modern vehicles equipped with smart charging systems can automatically adjust the voltage based on the battery’s condition, engine load and fuel-saving controls.
For this reason, obtaining a steady reading anywhere within this range is generally considered a positive sign.
3. Readings Above 15 Volts
If the charging voltage exceeds 15 volts, the system may be overcharging.
This often points to a faulty voltage regulator, the component responsible for controlling how much voltage the alternator sends to the battery.
The regulator is designed to keep the output within a safe range; therefore, a reading above 15 volts generally indicates that it is no longer properly regulating the charging process.
Overcharging can damage the battery.
Excessive voltage generates significant heat inside the battery, which can drastically reduce its lifespan.
In traditional lead-acid batteries, this can lead to a depletion of the water level within the battery and cause corrosion on the terminals.
In sealed batteries, it can damage the internal plates and reduce their overall capacity.
Excessive voltage can also place strain on the vehicle’s electronics, including sensors and control modules, as many components are designed to operate within a specific voltage range.
4. Voltage Fluctuations
Consistent fluctuations in voltage readings may indicate an issue within the charging system, particularly when these variations occur without any accessories being switched on or off.
Minor fluctuations are normal; however, sudden and significant changes may signal an unstable output.
Loose battery terminals or poor ground connections are common causes of such problems.
These factors disrupt the flow of current, resulting in irregularities in the readings.
Internal faults within the alternator such as: defective diodes or worn brushes, as it can also cause voltage instability, as the alternator becomes unable to generate a steady current.
In some modern vehicles, the Engine Control Unit (ECU) manages the alternator’s output and may deliberately adjust the voltage based on driving conditions.
In such systems, minor fluctuations may be normal; however, if there is a sudden, drastic drop or surge in voltage, accompanied by the illumination of the battery warning light or the manifestation of other electrical issues, it is crucial to have the system inspected.
How to Test an Alternator Under Load
Testing alternator voltage under load is the most effective method for diagnosing charging-related issues that might not surface during a simple idle test.
When the engine is running without any accessories engaged, the alternator may display normal voltage readings; however, it may fail to perform adequately when the vehicle requires a higher electrical output.
As real-world driving scenarios typically involve the simultaneous use of headlights, air conditioning, windshield wipers, radios and charging ports, load testing provides a far more accurate assessment of how the alternator performs during daily operation.
This process helps identify any degradation in charging capacity, a weakness that may only become apparent when the electrical demand increases.
1. Why Load Testing Is Essential
An alternator may occasionally pass a basic voltage test while idling, yet still be defective.
This occurs because generating voltage under low demand is significantly easier than supplying power under a genuine electrical load.
A failing alternator may display normal charging readings when the battery is nearly fully charged and accessories are switched off; however, the moment the vehicle requires increased current, its output may drop precipitously.
This is critically important because many charging-related issues manifest only during actual driving conditions.
For instance, switching on headlights at night, or utilizing the blower motor, rear defroster, seat heaters, or device charging ports, all of which increase electrical demand.
If the alternator is unable to meet this demand, the battery begins to supply the additional power instead.
Over time, this leads to the battery discharging even while the vehicle is in motion, potentially resulting in issues such as frequent dead batteries and difficulty starting the vehicle.
Load testing helps identify potential issues with the alternator before it suffers a complete failure.
2. How to Properly Apply an Electrical Load
Start the engine and let it idle.
Connect a multimeter to the battery terminals and note the normal charging voltage.
Next, switch on several accessories to create an electrical load.
Good options include the headlights, the air conditioning blower on a high setting, the rear defroster, seat heaters (if available) and the cabin lights.
These systems increase electrical demand and force the alternator to work harder.
Monitor the voltage reading as each accessory is switched on.
It is normal for the voltage to drop slightly when the load is first applied, as the system adjusts to the increased demand.
The alternator should respond within a few seconds and stabilize the voltage.
This indicates that it is increasing its output to meet the electrical requirements.
Testing with multiple accessories simultaneously yields more realistic results, as many charging-related issues only manifest when electrical demand is high.
3. Interpreting Load Test Results
A healthy alternator typically maintains a voltage of over 13 volts in most vehicles, even when multiple accessories are running.
This reading may be slightly lower than the no-load reading, but it should remain stable after the electrical load is applied and quickly return to a normal level.
Minor fluctuations are normal as the alternator adjusts to the electrical demand.
A weak charging system often exhibits a significant drop in voltage, which persists at a lower level.
If the voltage drops close to the battery’s resting voltage, or continues to drop steadily as accessories are switched on, the alternator may not be generating sufficient current.
This may occur due to wear and tear of internal components, belt slippage, a faulty voltage regulator, or poor wiring connections.
If, during this test, the lights dim, the blower speed decreases, or warning lights illuminate, these are definitive indications that the charging capacity is insufficient under actual operating conditions.
Read More:
Know, Some Common Causes of Incorrect Alternator Voltage
Incorrect alternator voltage does not always mean that the alternator itself has completely failed.
The charging system relies on the collaborative operation of several components, including the belt, battery, wiring, regulator and ground connections.
If even a single component malfunctions, the voltage readings may appear too low, too high, or unstable.
This is why inspecting only the alternator, without examining its associated components, as it can lead to an incorrect diagnosis.
Understanding these common causes helps in identifying whether the problem lies within the alternator itself or elsewhere in the charging system.
1. Worn Alternator Brushes
Inside the alternator are small carbon brushes that remain in contact with the rotating rotor.
These brushes wear down over time as they constantly rub against rapidly spinning, electrically charged surfaces.
As they wear, the electrical contact weakens and the alternator becomes unable to produce a consistent electrical output.
This often leads to issues such as low voltage, flickering lights, or intermittent charging.
Worn brushes can manifest symptoms suddenly and without warning.
The alternator may charge normally one moment and completely stop supplying power the next, particularly when engine RPM fluctuates.
Because the brushes wear down gradually, the battery warning light often begins to flicker intermittently before a complete charging failure occurs.
This is a common issue in older alternators that have been in service for many years.
2. Faulty Voltage Regulator
The voltage regulator controls the amount of electricity that the alternator sends to the battery and the vehicle’s electrical system.
Its function is to maintain the charging voltage within a safe operating range.
If this component fails, the alternator system may either undercharge or overcharge.
In many modern vehicles, the voltage regulator may be mounted directly inside the alternator itself, while some systems utilize electronic control via the engine computer.
A faulty regulator, often without any warning, as it can cause the voltage to spike above normal levels or drop significantly below them.
Excessive voltage can damage the battery and the vehicle’s internal electronics, whereas low voltage can cause the battery to gradually drain while the vehicle is in operation.
Symptoms often include the illumination of the battery warning light, electrical components malfunctioning and sudden voltage fluctuations observed during testing.
A faulty regulator is one of the most common causes of abnormal readings from the alternator.
3. Loose or Slipping Serpentine Belt
The alternator relies on the serpentine belt to rotate and generate electricity.
If the belt becomes loose, worn, or slips on the pulley, the alternator cannot spin fast enough to generate electricity at its full capacity.
This can lead to a drop in charging voltage, even if the alternator unit itself is in good working condition.
A slipping belt may produce a loud, high-pitched squealing sound, particularly when the vehicle is started or when high-draw accessories are switched on.
This occurs because the electrical demand increases, forcing the alternator to exert greater tension on the belt to generate the necessary power.
If the belt slips under this increased load, the charging voltage may drop.
Cracks in the belt, glazing, or excessive slack, all of these factors can compromise charging performance and manifest symptoms typically associated with a faulty alternator.
4. Faulty Battery Cables
Battery cables serve the function of transmitting charging current from the alternator to the battery.
If cable terminals become damaged or corroded, electrical resistance increases.
This impedes the flow of current, causing the observed charging voltage to appear lower than the alternator’s actual output.
White, blue, or green powdery deposits are often visible around the battery posts and cable terminals.
Faulty cables can lead to slow charging, difficulty starting the vehicle and various other electrical issues.
Even if the alternator is generating the correct voltage, resistance or obstructions in the current’s path can prevent that voltage from reaching the battery effectively.
Cleaning the terminals can sometimes restore proper charging and resolve issues that might otherwise appear to be symptoms of a faulty alternator.
5. The Impact of a Weak Battery on Test Results
A weak battery can impact alternator testing, as the charging system operates based on the condition of the battery itself.
If the battery has diminished capacity, internal defects, or has undergone sulfation, it may draw excessive current from the alternator or fail to retain a charge.
This can lead to erratic voltage readings, creating the misconception that the alternator is at fault.
A battery with internal defects can also cause fluctuations in charging voltage as the alternator attempts to maintain a charge.
In some instances, the alternator may be functioning correctly yet appear to be underperforming because the battery is unable to store the energy being supplied to it.
Therefore, it is crucial to assess the condition of the battery before replacing the alternator.
A faulty battery can exhibit symptoms that closely mimic problems within the charging system itself.
6. Ground Connection Issues
The charging system relies on a robust ground connection to complete its electrical circuit.
The battery’s negative cable is typically connected to the engine block and the vehicle’s chassis.
If these connections are loose, corroded, or damaged, the charging current cannot flow back properly.
This can result in voltage instability, weak charging and various electrical malfunctions.
Grounding issues are often overlooked because, when the alternator and battery are tested individually, they may appear to be functioning correctly.
Poor grounding can manifest as dim lights, difficulty starting the vehicle, sensor malfunctions and inaccurate voltage readings.
During testing, a faulty ground connection may present itself as fluctuating readings or charging voltages that fall below normal levels.
Checking and cleaning the ground connections is often a simple solution that restores the charging system to proper working order.
How to Confirm That the Problem Lies with the Alternator
A low charging reading does not always mean that the alternator is at fault.
Several other components within the charging system can exhibit similar symptoms such as: a weak battery, a loose belt, faulty wiring, or a poor ground connection.
Many people immediately replace the alternator the moment the battery warning light illuminates; however, the actual cause may lie elsewhere.
To confirm that the root problem indeed lies with the alternator, you must inspect the entire charging circuit.
This will enable you to determine whether the alternator itself is failing, or if it is failing to generate power because another component is not functioning correctly.
1. First, Check the Condition of the Battery
Before attributing the fault to the alternator, you should always inspect the battery.
A weak battery can manifest symptoms identical to those of a failing charging system such as: slow cranking, a frequent need for jump-starts, dim lights, or the illumination of warning lights.
If the battery has an internal defect, has lost capacity, or has undergone sulfation, it will be unable to hold a charge, even if the alternator is functioning perfectly.
This often leads to the misconception that the alternator is failing to charge the system.
A healthy battery, when fully charged and with the engine turned off, typically registers a reading of approximately 12.6 volts.
If the reading drops significantly below this level, or if the battery fails a “load test,” the actual problem may, in fact, reside within the battery itself.
As the alternator is responsible for charging the battery, a defective battery can negatively impact charging readings by drawing an excessive amount of current.
By first checking the condition of the battery, you avoid unnecessarily replacing a perfectly functional alternator when the actual problem lies with the battery itself.
2. Check the Condition of the Drive Belt
The alternator relies on the ‘serpentine belt’ to rotate and generate electricity.
If the belt is loose, worn, cracked, or slipping, the alternator may produce low voltage, even if its internal components are functioning perfectly.
This is a common cause of undercharging, particularly when electrical demand increases.
Inspect the belt for any visible cracks, fraying, glazing, or signs of wear.
You can also check the belt’s tension by pressing down on it; if it feels excessively loose, it indicates a problem.
If the belt is slipping, you may hear a loud squealing sound when starting the engine or when switching on the headlights and air conditioning.
As the alternator requires continuous rotation, if the belt fails to drive it properly, even a perfectly sound alternator will be unable to adequately charge the system.
3. Check the Charging Circuit Connections
The charging circuit consists of cables, fuse links, connectors and ground straps, which facilitate the flow of current between the alternator, the battery and the vehicle’s electrical system.
If any component within this circuit malfunctions, the charging voltage may appear low, even if the alternator is, in fact, generating power.
Fuse links protect the charging system from overloads.
If one of these links fails or becomes even slightly loose, the charging current will not be able to reach the battery effectively.
Ground straps are equally critical, as they serve to complete the circuit.
Loose or corroded ground connections can lead to voltage instability and cause intermittent electrical problems.
Inspecting these connections helps determine whether the alternator itself is failing or if there is an obstruction in the flow of electricity before it reaches the battery.
4. Get a Professional Load Test
If the results of home-based tests are inconclusive, a professional load test can provide more precise information.
A repair shop or auto parts store can evaluate the alternator’s output under controlled conditions using specialized equipment; these tools measure voltage, current and charging performance under various electrical loads.
This is particularly beneficial when the alternator appears to function correctly at times, yet problems persist.
Some alternators only begin to fail when subjected to heavy loads or when they overheat, issues that can be difficult to detect using a standard multimeter.
A professional load test can confirm whether the alternator is weak, the voltage regulator is failing, or if the battery itself is yielding misleading results.
When DIY tests yield normal readings but the battery continues to discharge, a professional test is often the only way to pinpoint the true cause of the problem.
Know, Common Mistakes When Testing Alternator Output
Testing alternator output with a multimeter is a straightforward task; however, inaccurate results often stem from errors made during the testing process itself, rather than from any actual fault within the alternator.
An erroneous test can falsely indicate that a perfectly functional alternator is defective, or conversely, make a faulty alternator appear to be working correctly.
As the charging system relies on the condition of the battery, wiring, voltage regulator and engine, even a minor error can significantly skew the readings, potentially leading to incorrect repairs.
Understanding these common mistakes helps ensure accurate diagnostics and prevents the unnecessary replacement of expensive components.
1. Testing Immediately After a Jump Start
Testing immediately after a jump start can yield misleading readings.
When a dead battery is jump-started, the alternator often works harder than usual to replenish the substantial amount of energy consumed during the starting process.
This can cause a temporary surge in charging voltage, as the battery requires a rapid influx of current to recharge quickly.
Consequently, the alternator may appear to be functioning correctly, even if it harbors an internal fault in its output.
In some instances, the voltage may appear normal simply because the alternator is reacting to a recently discharged battery.
Generally, it is advisable to let the engine run for a while, allowing the battery time to stabilize, before taking any readings.
This provides a more accurate assessment of the charging system’s performance.
2. Overlooking the Battery’s Condition
Many people attempt to test the alternator without first checking the condition of the battery.
This can lead to inaccurate results, as a weak battery may exhibit symptoms identical to those of a faulty alternator.
An internally defective, sulfated, or low-capacity battery cannot effectively hold a charge; consequently, even if the alternator is functioning correctly, you may still face recurring difficulties in starting the vehicle.
A faulty battery can also affect voltage readings by drawing excessive charging current.
This can make the alternator appear weak or unstable.
It is crucial to check the condition of the battery before testing the alternator, as these two components work in tandem.
A fully functional alternator cannot completely compensate for the deficiencies of a battery that is no longer capable of storing energy.
3. Failure to Test Under Load
Testing with the engine running and all accessories switched off reveals only the basic charging performance.
Some alternators may generate normal voltage at idle, but they fail when electrical demand increases.
This occurs because if internal components are worn or weak, they are unable to handle the increased current load.
It is essential to switch on the headlights, blower motor, rear defroster and other accessories, as this simulates real-world driving conditions.
Without this test, a weak alternator may go undetected.
Many charging-related issues only manifest when multiple systems are drawing power simultaneously; this is why load testing yields more accurate results.
4. Assuming That Voltage Alone Tells the Whole Story
Voltage is important, but it does not provide a complete picture of the charging system’s condition.
An alternator may generate the correct voltage but fail to deliver the necessary current when placed under load.
This means that even if the voltage reading appears normal, the battery may still slowly discharge while the vehicle is being driven.
Current output, wiring condition and battery health are equally critical factors.
In certain situations, voltage readings may appear normal despite a faulty diode, loose cable connections, or internal damage within the alternator.
Relying solely on voltage readings can lead to overlooked, hidden faults.
Comparing readings under varying loads and examining accompanying symptoms provides a more accurate diagnosis than simply relying on a single numerical value.
5. Misunderstanding Smart Charging Systems
Many modern vehicles are equipped with smart charging systems controlled by the engine’s onboard computer.
These systems can adjust the charging voltage based on factors such as battery temperature, engine load and fuel-saving strategies.
Consequently, the voltage does not remain constant, as was the case in older-generation vehicles.
Some drivers mistakenly interpret a low voltage reading as an indication of a faulty alternator, whereas, in reality, the system is functioning exactly as intended.
Smart systems may lower the charging voltage under specific driving conditions to reduce the load on the engine and enhance overall efficiency.
It is crucial to determine whether your vehicle is equipped with such a system, as the range of “normal” voltage can vary significantly.
A reading that might appear abnormal in an older vehicle could be entirely normal in a modern, electronically controlled vehicle.
So, When to Replace the Alternator
Generally, the alternator should be replaced only when testing confirms that it is no longer charging properly.
Many charging-related issues can stem from a weak battery, damaged cables, or a loose belt; therefore, the decision to replace the alternator should be based on concrete evidence rather than merely on symptoms.
A healthy alternator can often last for many years, but its performance gradually degrades due to internal wear, heat and electrical stress.
When issues such as consistently low output or unstable charging persist, even after associated components have been inspected, replacing the alternator becomes the most reliable solution.
1. Low Voltage Despite a Healthy Battery
If the battery is in good condition, yet the charging voltage remains low once the engine is running, the alternator may not be generating sufficient power.
A healthy battery typically eliminates one of the most common causes of poor charging, making consistently low operating voltage a strong indicator of an alternator fault.
This often implies that internal components have worn out.
The brushes may not be making proper contact, the windings may have weakened, or the diodes may not be rectifying the current correctly.
If the voltage remains close to the battery’s static voltage even after the engine has started, the alternator is not effectively charging the battery.
In such cases, replacing the alternator often becomes necessary, as the charging system fails to function under normal driving conditions.
2. Reduced Output When Using Accessories
The alternator may appear to function normally while the vehicle is idling; however, it may fail when electrical demand increases.
Activating accessories such as headlights, air conditioning, the rear defroster, or the blower motor places an additional load on the charging system.
If the voltage drops significantly, and remains low, during this test, the alternator’s output capacity may be insufficient.
This is a critical indicator because, under actual driving conditions, multiple electrical systems are typically operating simultaneously.
A weak alternator may allow the vehicle to run for a short period; however, if the alternator fails to supply adequate power, the battery will gradually discharge.
If the voltage repeatedly drops when using standard accessories, replacing the alternator often becomes necessary to prevent permanent damage to the battery caused by chronic undercharging.
3. Recurring Charging Issues
If the battery repeatedly discharges, even after being recharged or replaced, it indicates that the alternator is failing to properly charge the battery during daily driving.
Symptoms of this issue often include a recurring need for jump-starts, the illumination of warning lights and a battery that initially appears fully charged but quickly becomes weak again after a short period.
Recurring charging problems typically suggest that the alternator is unable to replenish the energy consumed during vehicle startup.
Over time, this results in the battery remaining in a partially charged state, thereby shortening its lifespan and making it increasingly difficult to start the vehicle.
If charging issues persist even after replacing the battery and inspecting the cables, the alternator is often the root cause and should be replaced.
4. Confirming a Faulty Internal Regulator
The voltage regulator controls the amount of voltage that the alternator supplies to the battery.
If diagnostic testing confirms that the regulator is defective, it typically becomes necessary to replace it.
In many vehicles, the regulator is housed within the alternator assembly itself; consequently, the entire alternator unit is often replaced as a single component.
When the regulator malfunctions, the voltage output may drop excessively low, surge too high, or fluctuate erratically.
Overcharging is particularly damaging, as it can ruin both the battery and sensitive electronic components.
Once a faulty regulator has been confirmed, continuing to drive the vehicle can lead to even more severe electrical problems.
Replacing the alternator restores proper voltage regulation and safeguards the charging system against future issues.
Basic Tips to Extend the Life of an Alternator
An alternator often lasts for many years, but its lifespan depends significantly on the condition of the battery, the drive belt and the surrounding electrical connections.
Whenever the battery weakens or electrical resistance increases within the charging system, the alternator is forced to work harder.
Heat, vibration and prolonged periods of high-output charging can cause internal components such as: brushes, bearings and the voltage regulator, to wear out prematurely.
Simple maintenance practices can alleviate this strain and help the alternator continue to deliver a stable charging voltage for a longer duration.
Basically, alternator charging performance changes with the engine speed, that’s the reason voltage testing at the idle alone may miss that hidden charging problems as well, so there’s research that clearly shows that alternator rotor speed directly affects battery charging efficiency, which means a failing alternator may only show some symptoms when engine speed increases or when electrical demand rises.[¹]
1. Keep the Battery in Good Condition
A healthy battery reduces the strain on the alternator because it accepts a charge efficiently and stores energy effectively.
When a battery becomes old or weak, the alternator has to work harder to recharge it every time the vehicle is started.
This increased demand generates excessive heat inside the alternator, which can shorten the lifespan of its internal components.
Regularly checking the battery’s condition can help prevent this issue.
Any battery that begins to lose its charge, resulting in slow engine cranking, or that fails a load test should be addressed as soon as possible.
Replacing a weak battery in a timely manner actually protects the alternator, as it prevents the charging system from being forced to operate at continuously high-output levels.
2. Keep Battery Connections Clean
Clean battery terminals facilitate the smooth flow of charging current between the alternator and the battery.
Corrosion on the battery posts creates electrical resistance, forcing the alternator to work harder to push current through the connection.
This can reduce charging efficiency and generate heat within the cables.
It is essential to inspect the terminals for any white, green, or blue deposits.
Cleaning the battery posts and cable terminals ensures good contact and facilitates a more accurate flow of voltage.
Tight, clean connections reduce the strain on the charging system and can prevent many common charging-related issues before they even arise.
3. Inspect the Belt Regularly
The alternator relies on the serpentine belt to rotate.
If the belt becomes worn, loose, or cracked, the alternator will be unable to rotate properly.
This diminishes charging performance and may force the alternator to operate under adverse conditions.
Regular belt inspections allow you to detect wear and tear before it begins to impact the charging system.
Cracks, glazing, fraying edges, or squealing noises are often indicators that the belt requires attention.
Proper belt tension helps the alternator maintain a stable output and prevents it from slipping during heavy electrical loads.
4. Avoid Repeatedly Allowing the Battery to Fully Discharge
Repeatedly allowing the battery to discharge excessively can shorten the lifespan of the alternator.
When a fully discharged battery is jump-started or recharged using an external charger, the alternator is often forced to operate at a high output for extended periods to replenish the battery.
This generates excessive heat and stress within the alternator.
The battery may become fully discharged if you leave the lights on, make frequent short trips without allowing sufficient time for recharging, or continue to draw power while the vehicle is parked.
By preventing the battery from repeatedly discharging, the alternator is able to operate under normal conditions rather than constantly performing heavy recovery charging.
This can significantly enhance its long-term reliability.
5. Promptly Investigate Warning Lights
The battery warning light is often the first indication of a problem within the charging system.
Many drivers continue to ignore issues as long as their vehicle remains operational; however, doing so can allow a minor problem to escalate into a complete system failure.
A loose belt, a poor connection, or a faulty regulator may initially manifest merely as an intermittent flickering of the warning light.
Inspecting the charging system as soon as a warning appears can help avoid the need for major repairs.
Early investigation can detect low voltage, loose cables, or a weak battery condition before they cause damage to either the battery or the alternator.
Promptly addressing warning signals often extends the lifespan of the alternator, as minor issues are resolved before they place unnecessary strain on the system.
Conclusion – How to Test Alternator Output Voltage
So, most of the no-start problems actually blame the battery but actually it begins way before with the charging system that was slowly failing over the time and you need to address that in early on.
Many starting-related issues, which may superficially appear to be caused by a faulty battery, are actually the result of an alternator that is failing to charge properly.
As the alternator is responsible for powering the battery once the car has started, as well as supplying electricity to the headlights, ignition system, engine computer and other accessories, even a minor charging issue can impact the entire vehicle.
This is why certain symptoms often manifest before the car fails to start completely; these include dimming lights, a recurring need for jump-starts, illuminated warning lights and a decline in the performance of power-operated accessories.
A simple voltage test, performed with the aid of a digital multimeter, can often pinpoint the problem within just a few minutes.
Checking the battery voltage with the engine off establishes an initial baseline, while checking the voltage with the engine running reveals whether or not the alternator is charging.
For most vehicles, a healthy charging system typically maintains a voltage between 13.5 and 14.8 volts, although some modern vehicles feature “smart charging” systems where this voltage may vary.
So, that’s it from this one and you can comment for more information regarding this guide.
Frequently Asked Questions
FAQ 1: How can you test an alternator’s output voltage at home?
Answer: You can test an alternator’s output voltage at home using a digital multimeter. Set the meter to DC voltage, then place the red probe on the battery’s positive terminal and the black probe on the negative terminal. First, check the battery with the engine off; when fully charged, it typically reads around 12.6 volts. Then, start the engine and check again. In most vehicles, the voltage should rise to somewhere between 13.5 and 14.8 volts. This increase indicates that the alternator is charging the battery while the engine is running.
FAQ 2: What should the voltage of a running alternator be?
Answer: In most passenger vehicles, a properly functioning alternator typically produces a voltage between 13.5 and 14.8 volts while the engine is running. This range provides sufficient power to recharge the battery and operate electrical systems such as headlights, ignition, air conditioning and onboard electronics. In some modern vehicles equipped with smart charging systems, the reading may vary slightly depending on the battery’s condition and driving conditions; however, this range remains the standard for many vehicles.
FAQ 3: Is it normal to have 12.6 volts while the engine is running?
Answer: No, 12.6 volts is generally considered normal when the battery is fully charged and the engine is off, not when the engine is running. If the engine is running and the reading remains around 12.6 volts, the alternator may not be charging properly. Once the engine is started, the charging voltage should typically exceed the battery’s resting voltage. A reading of approximately 12.6 volts could indicate a faulty alternator, loose wiring, or an issue with the belt.
FAQ 4: Can an alternator appear fine during a test but still be defective?
Answer: Yes, an alternator may appear normal during a simple idle test, but it can fail when subjected to an electrical load. This occurs when it generates sufficient voltage with only a few accessories running, but fails to provide adequate power when headlights, the blower motor and other systems draw higher current. That is why testing under load is crucial. A weak alternator may pass a basic voltage check yet still drain the battery during normal driving conditions.
FAQ 5: Can a faulty battery affect alternator test results?
Answer: Yes, a faulty battery can skew alternator readings and complicate the diagnostic process. A weak or defective battery may draw excessive charging current, forcing the alternator to work harder than necessary. It may also fail to retain the charge being supplied. Consequently, voltage readings may become unstable, or a perfectly functional alternator may appear to be performing poorly. Checking the battery first helps ensure that the charging issue stems from the battery itself rather than the alternator.
FAQ 6: How can you identify a faulty voltage regulator?
Answer: A defective voltage regulator often causes voltage levels to be excessively high, too low, or unstable. If readings exceed approximately 15 volts, the regulator may be overcharging the system. Conversely, if readings remain consistently low, even if the battery is in good condition, the regulator may not be regulating the output correctly. Symptoms may include flickering lights, the illumination of the charging warning light, battery overheating and recurring battery-related issues. In many vehicles, the voltage regulator is mounted inside the alternator itself; therefore, it may be necessary to replace the entire alternator.
FAQ 7: Why does the alternator voltage drop when accessories are turned on?
Answer: A slight drop in voltage is normal, as the use of accessories increases the electrical demand. Headlights, air conditioning blowers, rear defrosters and heating systems, all of these require a significant amount of electricity. To maintain proper charging, the alternator must increase its output to meet this demand. If the voltage drops significantly and remains low, it may be an indication that the alternator is unable to supply sufficient current. This often signals a reduction in charging capacity or wear on the alternator’s internal components.
References:
[1] Experimental study on the effect of alternator speed to the car charging system
https://www.researchgate.net/publication/312288249_Experimental_study_on_the_effect_of_alternator_speed_to_the_car_charging_system

Hello Folks, Dean Shali here to help you out to solve the problems with your lovely vehicle, as i have lots of experience and knowledge about automotive industry as i woks directly with the customers and repair vehicles and i love to help the people to keep their cars safe and running smoothly.