Written By: Dean Shali
Fact Checked By: Sabré Cook
Reviewed By: Tamara Warren
Basically, when you use a trickle charger in correct way, then it can protect your vehicle’s battery life, improves reliability and actually helps you to avoid unexpected “No-Start Situations”.
And, most of the time, battery loses charge slowly over the days or weeks, specially when a vehicle is parked for long period of time, driven only for the short trips or extremely exposed to the cold weather as well.
Not only this, modern cars continue using small amounts of battery power even when you have turned your vehicle off and this is because system such as: security alarms, clocks and onboard electronics stays alive throughout the non-activity as well.
So, over the period of time, this drain can lower the voltage enough to make the engine crank really slow or it won’t start at all.
That’s why, trickle charge is really useful, as it delivers a low but steady electrical charge which is designed to replace the lost power gradually without stressing the battery as well.
Now, in this guide you’ll learn How to Use Trickle Charger for Car Battery so that you can understand when trickle charging actually makes sense and how to connect the charger and avoid mistakes.
So, What is a Trickle Charger for a Car Battery?
1. Know About Trickle Charger and Its Basic Function
A trickle charger is a small, low-power charging device designed to gradually restore and maintain a car battery’s charge over time.
Rather than delivering a rapid surge of power like a jump starter or a standard charger, it provides a steady and controlled flow of current.
This slow method of charging is essential because most car batteries are lead-acid batteries, which are sensitive to sudden, high-power inputs.
Trickle chargers are primarily used when a vehicle is not being driven regularly; they help maintain the battery at a usable voltage level so that the car can start normally when needed.
2. How It Maintains Battery Charge
A car battery’s charge naturally diminishes over time, even when the engine is turned off.
This occurs due to minor electrical drains from systems such as alarms, clocks, keyless entry modules and onboard computers.
A trickle charger compensates for this gradual loss by continuously supplying a small amount of power or by automatically adjusting the charge as needed.
Modern “smart” trickle chargers monitor the battery’s voltage, reduce or halt the charging process once the battery is fully charged and resume charging when the voltage level drops again.
This helps prevent both undercharging and overcharging, ensuring that the battery remains stable and in good condition even during prolonged periods of inactivity.
3. What is the Difference Between a Trickle Charger and a Standard Battery Charger?
A standard battery charger is designed to recharge a discharged battery relatively quickly by delivering a higher current.
It is typically used when a battery has become completely discharged or lacks sufficient power to start the engine.
In contrast, a trickle charger operates at a very low current; its objective is not to rapidly restore the battery, but rather to maintain it over an extended period.
While a standard charger can fully recharge a battery in just a few hours, a trickle charger may take significantly longer to accomplish this and is not designed for starting a vehicle in emergency situations.
The primary difference lies in their purpose: one is designed to restore the battery, whereas the other aims to maintain it and prevent it from discharging.
4. Trickle Charger vs Battery Maintainer
A traditional trickle charger continuously delivers a low current regardless of the battery’s precise condition; if left unregulated, this can sometimes pose a risk of overcharging older or sensitive batteries.
A battery maintainer, on the other hand, is a more advanced device that utilizes smart technology to monitor the battery’s condition in real time.
It automatically adjusts the charging cycle, pausing once the battery is fully charged and resuming only when necessary.
For this reason, maintainers are safe for long-term use, particularly for vehicles that remain parked in one spot for weeks or months.
Simply put, a trickle charger delivers power continuously at a low level, whereas a maintainer intelligently manages the charging process to preserve the battery’s health over time.
Know, Why Is It Essential To Use a Trickle Charger?
1. Prevents Battery Discharge When The Vehicle Is Parked
When a vehicle remains unused for several days or weeks, the battery gradually begins to lose its charge, even if no obvious faults are apparent.
This occurs because modern vehicles constantly draw small amounts of power to keep systems such as alarms, ECU memory, keyless entry and the clock operational.
Over time, this silent discharge can deplete the battery’s voltage to a level where starting the engine becomes difficult.
A trickle charger prevents this issue by delivering a very low, continuous stream of power, thereby replenishing the charge lost by the battery.
This ensures that the battery’s voltage remains at the optimal level, even after the vehicle has been parked for extended periods, allowing the car to be started without the need for a jump-start or emergency charging.
2. Extends the Lifespan of the Car Battery
Car batteries are designed to perform optimally when maintained within a stable charge range.
When a battery repeatedly drops to low charge levels or remains in a discharged state for prolonged periods, the internal chemical changes that occur can diminish its capacity to hold a charge.
This is a common reason why batteries fail prematurely.
A trickle charger prevents the battery from becoming fully discharged by continuously topping it up.
By avoiding situations of severe undercharging, it reduces internal stress on the battery and slows down the natural aging process.
Consequently, this can extend the battery’s usable lifespan and reduce the need for early replacement.
3. Helps Prevent Sudden Battery Failure
One of the most common frustrations drivers face is the sudden, unannounced failure of their car battery.
In reality, this is often the result of a gradual depletion of power that goes unnoticed.
For instance, during short trips, the battery may not have sufficient time to fully recharge; alternatively, the battery of a parked vehicle may gradually discharge over time.
A trickle charger helps eliminate this risk by maintaining a steady charge level at all times.
This means that the likelihood of the battery voltage dropping below the minimum level required to start the engine is significantly reduced.
Consequently, motorists face fewer instances of sudden starting failures, particularly early in the morning or after leaving the vehicle parked for extended periods.
4. Beneficial for Seasonal or Infrequently Driven Vehicles
Many vehicles are not driven on a daily basis such as: weekend cars, seasonal vehicles, or backup cars.
These vehicles often remain stationary for long periods, leading to the natural discharge of the battery.
This issue is further exacerbated in cold weather, as low temperatures diminish battery performance and make starting the vehicle more difficult.
In such situations, a trickle charger proves invaluable, as it keeps the battery charged and in good condition even when the vehicle is not in use.
This ensures that when the car is finally needed, it starts up easily without any battery-related hitches or malfunctions.
So, When Should You Use a Trickle Charger?
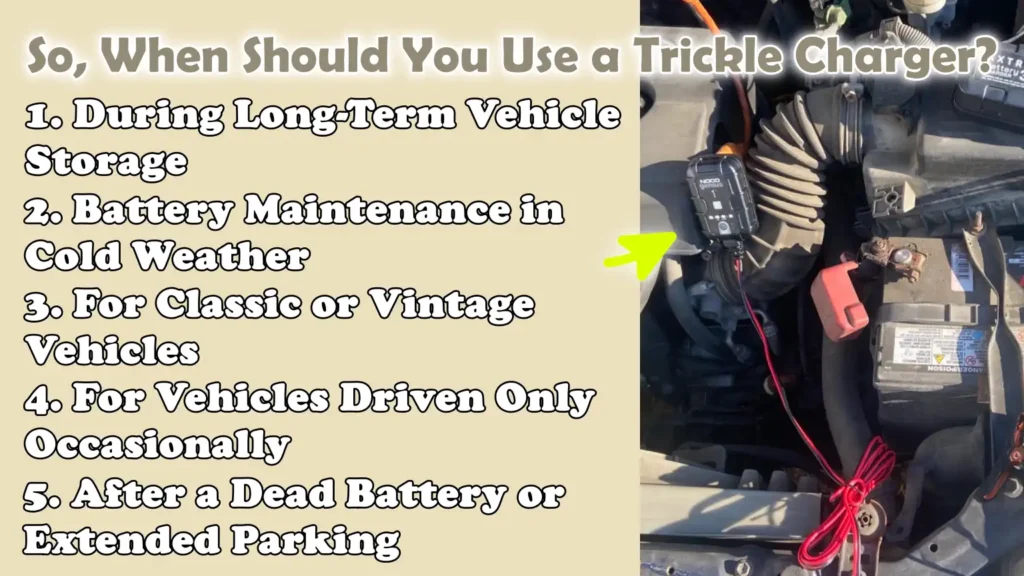
1. During Long-Term Vehicle Storage
A trickle charger is most useful when a vehicle is stored for an extended period without being driven such as: for several weeks or months.
During storage, the vehicle’s battery gradually loses its charge.
This occurs for two reasons: first, due to natural self-discharge within the battery itself; and second, due to the continuous, albeit minimal, power consumption by the vehicle’s electronic systems.
Even when everything appears to be switched off, systems such as security alarms, onboard computers and keyless entry modules continue to draw a small amount of power.
Over time, this can cause the battery voltage to drop to a level where the engine is unable to start.
Using a trickle charger during storage helps maintain a consistent charge level.
This prevents the battery from becoming completely discharged and ensures that the vehicle starts easily when it is put back into use.
2. Battery Maintenance in Cold Weather
Cold weather places additional strain on a car battery because, as temperatures drop, the chemical reactions occurring within the battery slow down.
This reduces the battery’s power output capacity, which is why many cars struggle to start during the winter months.
Furthermore, a battery tends to lose its charge more rapidly in cold weather.
A trickle charger helps mitigate this issue by keeping the battery fully charged during cold spells.
By maintaining proper voltage levels, it minimizes the risk of the vehicle failing to start on a cold morning or sustaining permanent damage, particularly in regions where nighttime temperatures drop significantly low.
3. For Classic or Vintage Vehicles
Classic or vintage vehicles are often not driven on a daily basis; many of these cars remain parked in garages or storage facilities for extended periods.
These vehicles may also feature older electrical systems, which tend to be more sensitive to low voltage levels.
In such cases, a trickle charger becomes essential, as it prevents the battery from gradually discharging when the vehicle is not in use.
This ensures that whenever the vehicle is started, whether for maintenance or inspection, the battery retains sufficient charge to power the engine and the electrical system.
This helps protect both the battery and the vehicle’s electrical components from the damage that can result from a complete discharge.
4. For Vehicles Driven Only Occasionally
Some vehicles see very limited use such as: a second car, a weekend cruiser, or a vehicle used solely for minor errands.
These cars are often not driven frequently enough, or for long enough durations, for the alternator to fully recharge the battery.
Short trips are often a primary cause of gradual battery discharge, as the energy consumed to start the engine frequently exceeds the energy replenished into the battery during the drive.
In such situations, a trickle charger helps maintain charge levels during the intervals between drives, ensuring that the battery does not degrade gradually over time.
Consequently, this reduces the risk of issues such as: the vehicle failing to start, precisely when it is needed most.
5. After a Dead Battery or Extended Parking
If a car has remained parked and unused for an extended period, or if the battery has already been drained due to lights being left on or the use of other electrical accessories, a trickle charger can help restore and stabilize the charge.
While it cannot instantly jump-start a completely dead battery, if the battery is otherwise in good condition, it can gradually restore a partially discharged battery to a usable level.
After a vehicle has been parked for an extended period, the battery voltage often drops below the optimal level; a slow, continuous charging process helps to safely rectify this situation.
This controlled charging process minimizes strain on the battery and helps return it to a stable operating condition without any sudden electrical overload.
Tools
| Tools | Why It Is Needed | How to Use It Properly |
|---|---|---|
| Trickle Charger | This is the primary device used to slowly charge the car battery and maintain it in good condition. It prevents the battery from discharging when the vehicle remains parked for extended periods and stabilizes the voltage to ensure the vehicle starts easily. | Connect the red clamp to the positive terminal and the black clamp to the negative terminal; then, plug the unit into a power source and allow it to charge safely in accordance with the instructions. |
| Safety Gloves | These protect your hands from battery acid, corrosion and accidental electrical contact while you are working near the battery. | Put them on before touching the battery or clamps and keep them on until the charger has been completely disconnected. |
| Safety Glasses | These protect your eyes from potential sparks, acid splashes, or corrosive dust while you are connecting or cleaning the battery. | Put them on before opening the hood and keep them on throughout the entire charging process to ensure your safety. |
| Clean Battery Terminals | Clean terminals ensure a strong electrical connection and optimal charging efficiency, as dirt or corrosion can impede the flow of current. | If corrosion is present, gently clean the terminals with a dry brush or an appropriate cleaning agent before attaching the charger clamps. |
| Extension Cord – If Needed | This allows you to connect the charger to a distant power outlet when the vehicle is parked at a considerable distance from the power source. | Use an outdoor-rated extension cord with the appropriate specifications and ensure it is fully uncoiled to prevent overheating or electrical hazards. |
| Vehicle Owner’s Manual | This provides essential information regarding the battery, such as its voltage type, safety warnings and manufacturer recommendations. | Before charging, refer to this label to identify the correct battery type, charging limits and any specific instructions applicable to your vehicle. |
How to Prepare Your Car Battery Before Charging
1. Park in a Safe, Ventilated Area
Before connecting a trickle charger, the first step is to move the vehicle to a safe and open location.
A well-ventilated area is essential because car batteries can emit small amounts of gas, specifically hydrogen gas, while charging; if this gas becomes trapped in enclosed spaces, it can pose a hazard.
Parking in a poorly ventilated garage or near heat sources increases this risk.
A stable, dry surface is also necessary to prevent the charger from slipping or becoming damaged.
Proper preparation during this step minimizes safety risks and makes the entire charging process more reliable.
2. Turn Off the Engine and Electronics
The car must be completely shut down before charging begins.
This involves turning off the engine, removing the key (or switching off the ignition) and ensuring that all electrical systems such as: headlights, interior lights, the radio and air conditioning, are switched off.
Modern vehicles contain sensitive electronic control units that can be adversely affected if the vehicle’s systems are active while being connected to an external power source.
Switching everything off helps prevent electrical surges and ensures that the charger connects directly to the battery without any unnecessary load or risk of damage.
3. Check the Battery for Any Damage
Before charging, it is crucial to perform a visual inspection of the battery’s condition.
Look for signs of damage, such as cracks in the casing, bulging sides, or any leakage around the terminals.
Attempting to charge a damaged battery can be unsafe, as it may fail to hold a charge properly or could begin leaking hazardous substances.
Batteries naturally degrade over time and any physical damage serves as a clear warning sign that charging may not be safe or effective.
If any significant damage is visible, the battery should be replaced rather than charged to avoid potential hazards.
4. If The Battery Terminals Show Signs of Corrosion, Clean Them
A white or bluish powdery substance, known as corrosion, often accumulates on battery terminals; this forms as a result of chemical reactions occurring over time.
This buildup can obstruct the flow of electricity and reduce charging efficiency.
Before connecting a trickle charger, it is crucial to thoroughly clean these terminals to ensure that the clamps can establish a strong and stable connection.
A clean connection ensures that electricity flows properly into the battery, allowing it to charge evenly and safely.
Poor contact can result in slow or incomplete charging.
5. Identify the Positive and Negative Terminals
Every car battery features two terminals, one positive and one negative, and correctly identifying them is essential for safe charging.
The positive terminal typically bears a “plus” (+) sign and may feature a red cover or marking; conversely, the negative terminal bears a “minus” (-) sign and is often black in color.
Connecting the charger incorrectly can cause severe damage to the battery or the vehicle’s electronics.
Taking a moment to properly identify both terminals before attaching the clamps ensures that the charging process begins safely and correctly, thereby eliminating the risk of “reverse polarity”.
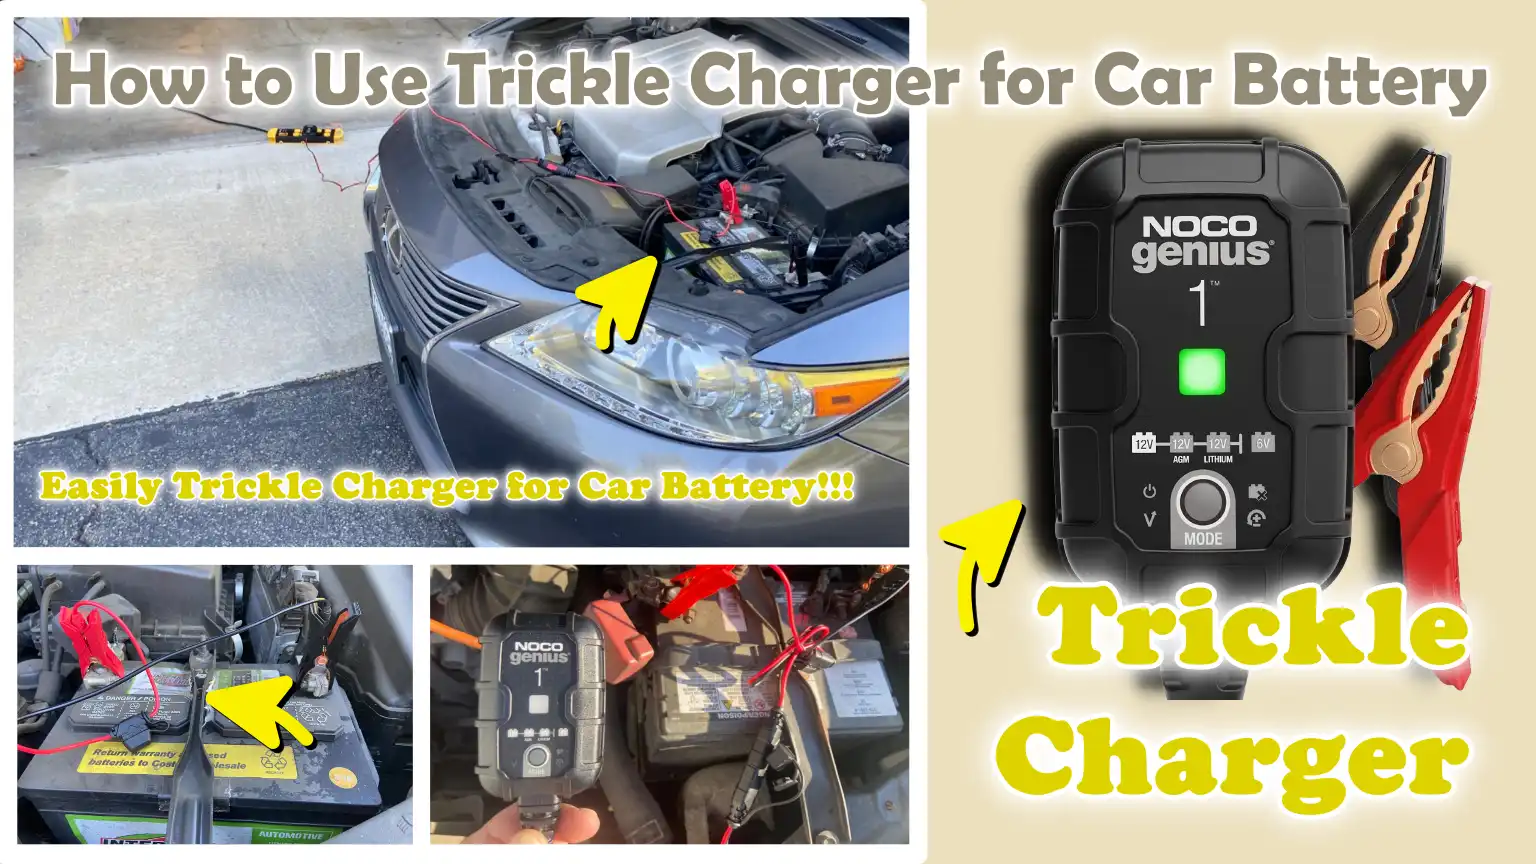
How to Use Trickle Charger for Car Battery – Really Easy Steps
1. Read the Charger Instructions
Before doing anything else, it is crucial to carefully read the instructions that came with the trickle charger, as safety guidelines and settings may vary slightly across different models.
Most car batteries utilize a 12-volt system; however, verifying voltage compatibility ensures that the charger matches your specific battery type and prevents potential electrical damage.
This step also helps you understand whether your charger features manual settings or automatic modes and how to safely switch between them.
Many charging-related issues arise simply because users skip this step, assuming that all chargers operate in exactly the same way.
2. Place the Charger in a Safe Location
The charger should always be placed on a stable, dry and level surface near the vehicle, but kept away from moving engine parts or direct sources of heat.
Ensuring stability prevents the unit from accidentally falling or placing excessive strain on the cables during the charging process.
It is also vital to ensure that the charger is not placed on wet ground or exposed to water, as moisture can significantly increase the risk of a short circuit.
Proper placement also facilitates adequate airflow around the device, thereby preventing overheating during prolonged charging sessions.
3. Connect the Positive Clamp
The next step involves connecting the red clamp to the battery’s positive terminal, which is marked with a plus (+) sign.
This connection must be secure and firm to ensure that the electrical current flows smoothly and without interruption into the battery.
A loose connection can reduce charging efficiency or generate sparks when power is applied.
Establishing this connection first, before completing the negative connection, helps create a safe circuit path, thereby minimizing the risk of accidental short circuits.
4. Connect the Negative Clamp
After connecting the positive clamp, the black clamp should be attached to the negative terminal or to a suitable grounding point on the vehicle.
Many modern vehicles recommend grounding the negative clamp to a metal part of the chassis, rather than connecting it directly to the battery terminal, to reduce the risk of sparks occurring near the battery.
This step completes the electrical circuit necessary for charging.
Ensuring that both clamps are securely attached helps maintain a steady flow of current throughout the charging process.
5. Plug in the Charger
Once both clamps are properly connected, the charger can be plugged into a safe and appropriately rated power outlet.
This step initiates the charging process and allows electricity to flow into the battery at a controlled rate.
It is essential to ensure that the plug connection is secure and the power source is stable to prevent any interruptions.
At this stage, most chargers display indicator lights or a screen confirming that the charging process has successfully begun.
6. Select the Correct Charging Mode
Many modern trickle chargers come equipped with various modes such as: automatic charging or maintenance mode, and selecting the correct mode is crucial for protecting the battery.
The automatic mode adjusts the charging level based on the battery’s condition, while the maintenance mode keeps the battery fully charged without overcharging it.
Choosing the correct mode ensures that the battery receives only the amount of power it requires; this prevents overheating, overcharging, or placing unnecessary strain on the battery during prolonged charging periods.
7. Monitor Charging Progress
During the charging process, it is essential to regularly check the indicator lights or display screen to monitor the battery’s status.
Most chargers indicate whether the battery is currently charging, fully charged, or still in the recovery phase.
Monitoring this ensures that the charging process is proceeding correctly and safely.
If any unusual signs appear such as: a flashing error light or the battery overheating, the charger should be inspected immediately.
This step helps maintain safe charging conditions and prevents potential damage.
8. Safely Disconnect the Charger
Once charging is complete, the disconnection process must be carefully reversed to avoid electrical sparks or any form of damage.
First, unplug the charger from the power outlet to cut off the flow of electricity.
Next, remove the negative clamp from the battery or grounding point, followed by the positive clamp.
This specific sequence is crucial as it minimizes the risk of a short circuit.
After disconnecting, it is also a good idea to perform a quick check of the battery before closing the hood to ensure that everything is normal and secure.
How Long Should You Keep a Trickle Charger Connected?
1. Typical Charging Duration
The duration for which a trickle charger should remain connected depends primarily on the battery’s current charge level and its overall condition.
In most cases, a healthy car battery that has only been slightly discharged may take several hours to reach a full charge.
However, if the battery has remained unused for several days or weeks and has lost a significant amount of power, the process can take considerably longer, sometimes requiring a full day or even more.
Unlike fast chargers, a trickle charger operates deliberately slowly; this preserves the battery’s internal structure and minimizes the stress placed on its internal chemical components.
2. Factors Influencing Charging Duration
Several key factors influence how long a trickle charger needs to remain connected.
Battery size plays a significant role, as larger batteries naturally require more time to charge.
The charger’s output power is another factor, as lower-amperage chargers deliver energy gradually over time, though this method is inherently safer.
The battery’s current condition is also a critical factor, as older or weaker batteries often charge more slowly and may struggle to retain a charge effectively.
Environmental factors, such as temperature, can also impact charging speed; cold weather slows down the chemical reactions occurring within the battery, thereby extending the charging process beyond its typical duration.
3. Indicators of a Fully Charged Battery
Most modern trickle chargers are equipped with indicators that signal when the battery has reached a full charge.
These indicators often include a continuously glowing green light, a message displayed on a digital screen, or a transition into “maintenance mode”, a state in which the charger reduces or halts active charging.
If checked with a multimeter, the voltage level in a fully charged battery will also appear stable.
Another practical indication is when the charger ceases to actively supply current and merely maintains the charge.
These signals are crucial as they help prevent unnecessary “overcharging” and ensure that the battery remains in good condition.
4. When to Disconnect the Charger
As soon as the battery is fully charged and the charger switches into “maintenance” or “standby mode,” you should disconnect the trickle charger.
If the charger is a “smart model,” it may be safe to leave it connected for extended periods, as it automatically regulates the flow of power.
However, in the case of standard chargers, it is not advisable to leave them plugged in indefinitely once charging is complete.
Disconnecting the charger at the appropriate time helps avoid “overcharging,” which can cause gradual damage to the battery over time.
It is also a good practice to disconnect the charger when the vehicle is about to be used; this ensures that the vehicle can start safely and smoothly without any external power connections.
Know, Some Safety Tips When Using a Trickle Charger
1. Avoid Overcharging
Overcharging occurs when a battery receives power for an excessive duration or beyond its actual requirements, which can gradually damage its internal structure.
In lead-acid car batteries, overcharging can generate excessive heat, deplete the water content within the electrolyte and ultimately reduce the battery’s overall lifespan.
Many modern trickle chargers are designed with automatic shut-off features or maintenance modes to prevent this issue; nevertheless, it is crucial to understand how your specific charger operates.
Monitoring indicator lights or voltage levels helps ensure that the battery does not charge beyond its full capacity.
This simple habit safeguards the battery and helps maintain its reliable performance over the long term.
2. Never Charge a Damaged Battery
A battery that is cracked, swollen, leaking, or exhibits any visible external damage should never be connected to a charger.
Damaged batteries can be unstable and may be unable to safely handle electrical currents.
In some instances, internal damage can lead to short circuits or generate excessive heat during the charging process.
External damage often serves as an indication that the battery is already compromised or nearing the end of its useful life.
Attempting to charge such a battery increases safety risks and may also result in damage to the charger itself.
Carefully inspecting the battery prior to charging helps prevent hazardous situations and ensures that only intact, undamaged batteries are subjected to maintenance or recharging.
3. Keep Away from Sparks and Open Flames
Car batteries release small amounts of hydrogen gas during charging, particularly as they approach full capacity.
Hydrogen is highly flammable and even a small spark or open flame can pose a serious safety hazard.
Therefore, it is crucial to keep the charging area free from open flames, smoking, or any source of sparks.
When the charger is connected, avoid working near tools or equipment that could generate electrical sparks.
Adhering to this precaution significantly reduces the risk of fire or explosion, ensuring a safe charging environment for both the user and the vehicle.
4. Use in a Well-Ventilated Area
Proper airflow is essential when charging a car battery, as the gases released during this process must be safely dissipated into the air.
Charging in an enclosed or poorly ventilated space increases the likelihood of gas accumulation, which can become hazardous over time.
A garage with open doors or a shaded outdoor area typically serves as the ideal location for charging.
A well-ventilated environment prevents heat from building up around the charger and battery, ensuring that both operate within safe temperature limits.
This simple step enhances overall safety and mitigates hidden risks during the charging process.
5. Double-Check Polarity Before Connecting
One of the most critical safety measures is ensuring that the positive and negative terminals are correctly identified before attaching the charger clamps.
The positive terminal is typically marked with a plus sign (+), while the negative terminal is marked with a minus sign (-).
Reversing these connections can cause severe damage to the vehicle’s electrical system, the battery, or the charger itself.
It may also result in sparks or a short circuit.
Spending a few extra seconds to verify the correct polarity ensures that the flow of electricity remains stable and safe once charging begins.
Know, Common Mistakes While Using Trickle Charger to Avoid Them
1. Connecting the Clamps Incorrectly
One of the most serious mistakes when using a trickle charger is connecting the clamps to the wrong battery terminals.
The positive clamp must always be connected to the positive terminal and the negative clamp to the negative terminal.
Reversing this connection can immediately lead to electrical issues, such as sparking, blown fuses, or damage to the car’s electronic control systems.
Modern vehicles contain sensitive electronics; therefore, incorrect polarity can necessitate costly repairs.
This mistake often occurs due to rushing through the setup process; consequently, it is always essential to carefully identify the terminals before making any connections.
2. Using the Wrong Charger Voltage
Car batteries are designed to operate at a specific voltage, typically 12 volts for most passenger vehicles.
Using a charger with an incorrect voltage setting can cause severe damage to the battery.
If the voltage is too high, the battery may overheat, potentially damaging its internal chemical structure.
If the voltage is too low, the battery will not charge properly and may remain weak or underpowered.
This mistake often happens when people assume that all chargers are interchangeable; however, matching the correct voltage is crucial for safe and effective charging.
3. Leaving a Standard Charger Connected for Too Long
Not all trickle chargers are designed to remain connected for extended periods.
Basic models continue to supply power even after the battery is fully charged, which can lead to overcharging over time.
Overcharging reduces the battery’s lifespan, increases internal heat and can deplete the electrolyte in lead-acid batteries.
Consequently, leaving a non-smart charger plugged in for an excessive amount of time is a common mistake.
Without any monitoring or automatic shut-off features, the battery can gradually degrade, even if it appears to be charging normally.
4. Ignoring Battery Damage
Attempting to charge a battery without first inspecting its condition is another common error.
It may not be safe to charge a battery that exhibits visible cracks, swelling, corrosion, or leakage.
These signs often indicate internal damage or aging, issues that cannot be resolved simply by charging the battery.
Ignoring these warning signs can lead to unsafe conditions during the charging process or result in the complete failure of the battery.
A damaged battery may also be unable to regulate the charge properly, rendering the charging process inefficient and potentially hazardous.
5. Charging in Unsafe Conditions
Charging a car battery in an unsafe environment can create unnecessary risks.
This includes charging in enclosed spaces with poor ventilation, near open flames, or in areas exposed to water or extreme heat.
During charging, batteries can emit gases that must be allowed to dissipate safely.
In adverse conditions, the risk of gas accumulation, sparking, or electrical hazards increases.
A safe and well-ventilated location helps ensure stable charging and minimizes the likelihood of accidents or damage to equipment.
Signs Shows That Your Car Battery May Need Replacement
1. The Battery Fails to Hold a Charge
A clear indication that your car battery may require replacement is when it fails to retain a charge for a reasonable period.
Even after using a trickle charger or fully charging the battery, it may lose its power again within a very short time.
This typically occurs because the battery’s internal chemical composition has degraded over time.
In a healthy battery, stored energy remains available for several days or weeks, depending on usage; however, a failing battery loses its charge rapidly, even when the car is not in use.
This recurring loss of power suggests that the internal plates within the battery are no longer functioning correctly and simply recharging the battery will not resolve the issue.
2. Slow Engine Starting
When the engine takes longer to start than usual, or produces a sluggish sound during ignition, it is often a sign that the battery is no longer capable of delivering sufficient power.
A healthy battery should provide a strong surge of energy to crank the engine rapidly.
If the sound of the engine starting seems sluggish, uneven, or hesitant, it indicates that the battery is struggling to deliver the necessary current.
This happens because, as a battery ages, its internal resistance increases, making it difficult to provide the powerful surge required to start the vehicle.
If this issue persists even after fully charging the battery, it is generally a definitive sign that the battery needs to be replaced.
3. A Swollen Battery Case
A swollen or bulging battery case is a serious warning sign indicating that the battery is failing.
This condition is often caused by excessive heat, overcharging, or the accumulation of internal gases resulting from chemical breakdown within the battery.
The casing of a healthy battery should remain flat and stable; therefore, if it appears swollen anywhere, it indicates that its internal structure has been compromised.
Using a swollen battery is unsafe, as it may leak, fail suddenly, or, in rare instances, even pose a hazardous risk.
When this condition is observed, the battery should be replaced immediately rather than recharged.
4. Corrosion Buildup
Corrosion around battery terminals typically manifests as a white, blue, or green powdery substance.
While mild corrosion can sometimes be cleaned away, excessive or recurring corrosion may signal that the battery is leaking gases or nearing the end of its service life.
Heavy corrosion can also obstruct the proper flow of electricity, making it difficult for the battery to consistently power the vehicle.
If corrosion returns rapidly and frequently even after cleaning, it often indicates a deeper internal issue with the battery that cannot be fully resolved.
5. Battery Exceeding Its Expected Lifespan
Car batteries have a finite lifespan; typically, depending on usage, climate and maintenance, they last approximately three to five years.
As batteries age beyond this limit, their capacity to hold a charge and deliver power gradually diminishes, even if they still appear to be functioning normally.
Older batteries become less reliable and are at a higher risk of sudden failure, particularly in adverse weather conditions.
If a battery has reached the end of its expected lifespan and exhibits any of the symptoms mentioned above, replacing it is generally the most practical and safe option to avoid sudden failure.
Know, How to Solve Trickle Charger Issues
As well as, there’s scientific studies that confirms that lead-acid batteries actually performs best when charged by using controlled low-current methods, so research also shows that improper charging can reduce the battery life due to the internal heat and chemical wear, that’s why it is really useful to use a trickle charging as a maintenance method that literally keeps voltage really stable without overloading the battery system.[¹]
1. The Charger Is Not Turning On
When a trickle charger fails to turn on, the first step is to check the power source, as many issues stem from a loose plug, a faulty outlet, or a defective extension cord.
If the outlet is functioning correctly but the charger still won’t turn on, the problem may lie within the charger’s internal fuse or cabling.
Some chargers also incorporate safety mechanisms that prevent them from powering up until the clamps are properly connected to the battery.
This means that a poor or loose connection at the terminals can prevent the charger from activating.
Individually checking each connection typically helps in identifying whether the issue lies with the power supply, the wiring, or the safety lockout features.
2. The Battery Is Not Charging
If the charger is powered on but the battery is not charging, the issue may be related to poor clamp contact, corroded terminals, or a completely discharged battery.
Dirty or corroded terminals can impede the flow of electricity, creating the impression that the charger is defective, even if it is functioning correctly.
In some instances, a completely depleted or severely degraded battery may be unable to accept a charge.
It is also possible that the charger is set to the wrong mode or voltage, preventing it from charging effectively.
Ensuring correct polarity, clean terminals and appropriate settings is essential for restoring the normal charging process.
3. The Charger Displays an Error Indicator
Most modern trickle chargers feature indicator lights or digital displays that present error messages when something goes wrong.
These errors may be triggered by incorrect polarity, poor connections, or a battery that is too weak or degraded to be charged safely.
Some chargers also display error messages when the ambient temperature is either too high or too low for safe operation.
When an error appears, it is crucial to immediately stop charging and re-examine all connections, the battery’s condition and the charger’s settings.
Ignoring error signals can lead to unsafe charging conditions or cause further damage to both the battery and the charger.
4. Excessive Battery Heating During Charging
It is normal for a battery to warm up slightly during charging; however, excessive heat is a warning sign.
Issues involving excessive heat can stem from overcharging, internal battery damage, or the use of a charger with an excessively high output.
This can also occur if the battery is old and unable to properly handle the charging current.
Heat accumulation increases internal pressure within the battery, which can reduce its lifespan or pose safety risks.
If the battery becomes excessively hot, the charger must be disconnected immediately; furthermore, to prevent future issues, the battery should be inspected for any signs of damage and replaced if necessary.
Read More:
Great Tips for Extending Your Car Battery’s Lifespan
1. Drive Regularly
Driving your car regularly is the easiest and most effective way to keep the battery healthy, because when the engine is running, the alternator continuously recharges the battery.
When a vehicle sits idle and unused for an extended period, the battery gradually loses its charge.
This occurs due to natural self-discharge and the minor electrical drain caused by the vehicle’s internal systems.
Short trips are often insufficient to fully recharge the battery; however, consistent driving helps maintain a stable charge level over time.
This reduces the likelihood of the battery entering a low-voltage state, a primary cause of premature battery failure.
2. Keep Terminals Clean
Keeping the battery terminals clean is crucial to ensure a smooth and efficient flow of electricity between the battery and the vehicle.
Over time, corrosion can accumulate on the terminals, forming a layer that obstructs the proper flow of electricity.
This can force the battery to work harder than necessary, thereby diminishing its performance.
Periodically cleaning the terminals ensures a robust connection, which improves both the vehicle’s starting power and its charging efficiency.
A clean connection also places less strain on the alternator and charging system, resulting in a more reliable overall electrical system.
3. Periodically Check Battery Voltage
Periodically checking your battery’s voltage helps you assess its true condition and identify potential issues before they escalate.
A healthy, fully charged car battery typically maintains a stable voltage level, whereas a low reading may indicate that the battery is gradually discharging or developing an internal fault.
Regular inspections help detect early signs of battery deterioration, allowing you to take necessary measures before the battery fails completely.
This simple habit is particularly beneficial for vehicles that are not driven frequently, as it helps ensure that the battery remains within a safe operating range.
4. Prevent the Battery from Fully Discharging
A “deep discharge” occurs when a battery’s charge level drops excessively low; this condition can cause long-term damage to the battery’s internal structure.
Each time a battery undergoes a deep discharge, its capacity to retain a charge diminishes slightly.
Subjecting the battery to this cycle repeatedly reduces its overall lifespan and increases the risk of sudden failure.
Keeping the battery consistently charged helps prevent such strain and maintains its chemical balance.
Utilizing tools such as trickle chargers, or simply driving the vehicle regularly, as it can help avoid deep-discharge situations and keep the battery healthy for the long term.
5. Park Your Vehicle Properly
Parking your vehicle correctly, or storing it in a suitable location, plays a crucial role in preserving battery life, specially when the vehicle is not going to be used for an extended period.
Parking in a cool, dry and well-ventilated area reduces the rate of self-discharge and protects the battery from sudden temperature fluctuations.
Excessive heat can accelerate the battery’s deterioration process, while extreme cold can diminish its power-delivery capabilities.
If the vehicle is to remain stationary for a prolonged period, disconnecting unnecessary electrical loads or using a maintenance charger can help keep the battery in good condition.
Adopting proper vehicle maintenance habits ensures that whenever the vehicle is needed again, the battery is in perfect working order and ready for use.
Conclusion – How to Use Trickle Charger for Car Battery
So, maintaining the battery is really important that’s why trickle charger completely changes how long your car battery lasts and performs as well.
Many battery-related issues do not arise suddenly but rather develop gradually over time, often due to self-discharge, frequent short trips, or periods of prolonged inactivity.
When a battery remains in a low-charge state for an extended period, its internal chemical structure degrades; this diminishes its capacity to store power and reliably start the engine.
A trickle charger helps prevent this issue by delivering a continuous, low-level charge, thereby ensuring that the battery remains within a safe voltage range.
Proper usage entails more than just connecting the cables; it also requires an understanding of appropriate timing, safety protocols and the battery’s current condition.
When utilized correctly, a trickle charger mitigates the risk of sudden vehicle breakdowns, extends the battery’s lifespan and enhances its overall reliability, whether for starting the car in cold weather or after a prolonged period of being parked.
So, that’s all about this guide and you can comment for more information regarding this guide.
Frequently Asked Questions
FAQ 1: What is a trickle charger and how does it work?
Answer: A trickle charger is a small charging device that delivers a slow and steady flow of electricity to a car battery. It works by replenishing the small amount of power that a battery naturally loses over time when the vehicle is not in use. Instead of rapidly charging the battery like a standard charger, it continuously supplies a low current to maintain a safe and stable voltage level. This helps prevent the battery from becoming completely discharged when the car remains parked for extended periods, ensuring that the battery is ready to start the vehicle whenever needed.
FAQ 2: Can a trickle charger fully recharge a completely discharged car battery?
Answer: A trickle charger is primarily designed to maintain and gradually recharge a partially charged battery, rather than to revive a completely dead one. If a battery has become deeply discharged, but is otherwise in good condition, a trickle charger can gradually revive it over time. However, if the battery is completely dead or internally damaged, it may not respond to charging at all. In such cases, replacing the battery is usually the only reliable solution.
FAQ 3: How long should you keep a trickle charger connected to a car battery?
Answer: The duration depends on the extent of the battery’s discharge and the type of charger being used. A slightly discharged battery may take several hours to charge, while a deeply discharged battery could take a full day or even longer. Many modern trickle chargers can remain connected for extended periods, as they automatically switch into a “maintenance mode” once the battery is fully charged. However, a standard charger should not be left connected unattended for extended periods, as this can lead to the battery becoming “overcharged.”
FAQ 4: Is it safe to keep a trickle charger connected to a battery at all times?
Answer: If you are using a ‘smart trickle charger’ or a ‘battery maintainer’ that automatically regulates the charging process, doing so can be safe. These devices cut off or reduce the power supply once the battery is fully charged and resume supplying power only when necessary. However, older or standard chargers do not always possess this feature; therefore, leaving them connected for prolonged periods poses a risk of the battery becoming ‘overcharged.’ Consequently, before leaving any charger connected to a battery for an extended duration, always verify the specific type of charger you are using.
FAQ 5: What is the difference between a trickle charger and a battery maintainer?
Answer: A trickle charger continuously supplies a small amount of power to the battery, even after the battery has reached full charge. A battery maintainer is more advanced; it automatically adjusts the charging process based on the battery’s current condition. It ceases charging once the battery is fully charged and resumes charging only when the voltage drops. For this reason, a maintainer is safer for long-term use, particularly for vehicles that remain stationary for weeks or months at a time.
FAQ 6: Can you use a trickle charger on any car battery?
Answer: Trickle chargers can be safely used on most 12-volt car batteries; however, it is essential to verify beforehand that they are compatible with one another. Different types of batteries such as: lead-acid, AGM, or gel-type batteries, may require specific charging settings. Using the wrong charger or selecting the incorrect mode can shorten the battery’s lifespan or cause permanent damage. Before connecting a charger, always carefully consult the battery’s label and the charger’s instructions to ensure compatibility.
FAQ 7: How can I tell if a trickle charger is working properly?
Answer: When a trickle charger is functioning correctly, its indicator light or display will indicate whether the battery is currently charging or is in maintenance mode. After some time, the battery should reach a stable charge level; at that point, the charger may switch to a slower or standby mode. Following the charging process, the car should also start more easily. If an error light illuminates on the charger, or if there is no improvement in the battery’s condition, there may be an issue with the battery itself or its connections.
References:
[1] Review on different charging techniques of lead-acid batteries
https://www.researchgate.net/publication/283462701_Review_on_different_charging_techniques_of_lead-acid_batteries

Hello Folks, Dean Shali here to help you out to solve the problems with your lovely vehicle, as i have lots of experience and knowledge about automotive industry as i woks directly with the customers and repair vehicles and i love to help the people to keep their cars safe and running smoothly.