Written By: Dean Shali
Fact Checked By: Sabré Cook
Reviewed By: Tamara Warren
The job of the spare tire is to get you home safely, but if you use it in the wrong way then it can create a much bigger problem than the flat itself.
Most of the time, the flat happens on the highways, in parking lots, during rainy days, at night or when you are already running late.
But, if you change those flat tires with the spare one in hurry, then you can risk the vehicle and your safety by lifting the vehicle incorrectly, park on unstable ground or if spare tire is installed without proper checks.
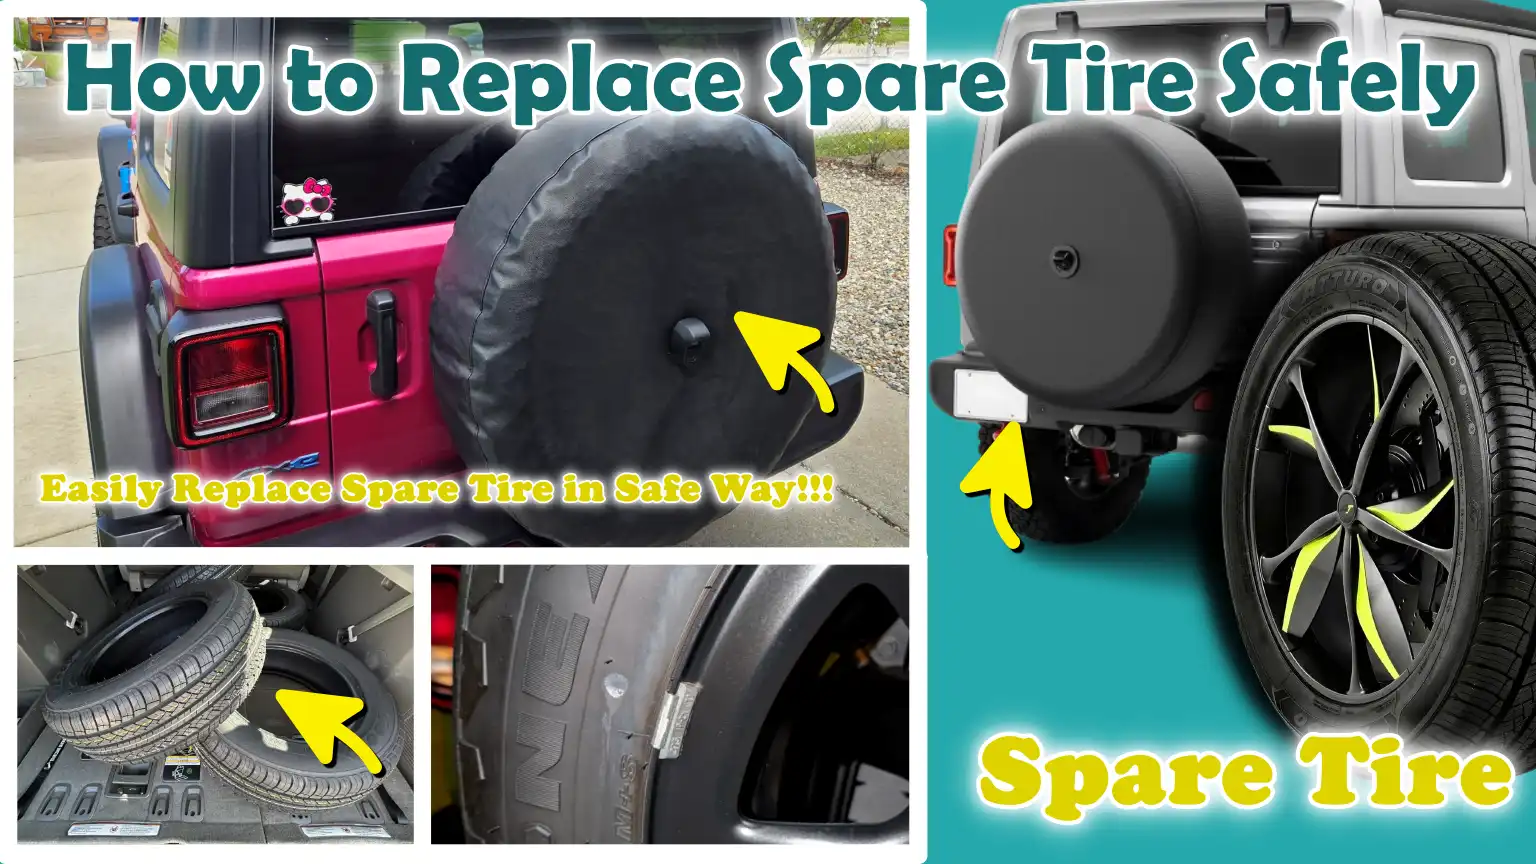
This is why, in this guide you’ll learn How to Replace Spare Tire Safely, so that you can use those spare tires in the most reliable and vehicle friendly way.
As well as, it is really important to check the condition of the spare tire as well, as it could hide you about their low air pressure, sidewall failure, bent rims, suspension impact or damaged wheel studs as well.
That’s why, when you replace those tires then you need to make sure you protect the vehicle, prevents injury and turns that stressful roadside problem into a really manageable thing.
Understand, Why Safely Changing a Spare Tire Is Essential
Safely changing a spare tire is crucial because the process involves lifting a heavy vehicle off the ground, a task often performed on the roadside under stressful conditions.
Most passenger vehicles weigh between 3,000 and 5,000 pounds, meaning that even a single corner of the vehicle can exert significant pressure on the jack.
If the vehicle is not properly secured, even the slightest movement could cause it to shift suddenly.
Although the purpose of a spare tire is to provide assistance in emergencies, changing it hastily or incorrectly can create new safety hazards.
Understanding the correct procedure for changing a tire ensures the safety of both the driver and the vehicle, while also minimizing the likelihood of mechanical issues arising after the vehicle is driven.
1. Prevents the Vehicle from Slipping or Falling While Being Lifted
If the vehicle is parked on uneven, soft, or unstable ground, it may slip off the jack.
This often occurs on gravel shoulders, soft soil, sloped surfaces, or grassy roadsides, where the base of the jack may sink into the ground or tilt under pressure.
When a punctured tire is removed, the support the vehicle receives from that specific wheel is eliminated; consequently, the jack becomes the primary source of support.
If this support fails, the vehicle could suddenly crash to the ground.
Such an incident can result in damage to the suspension, brake rotors, wheel studs, or body panels.
Using the correct, factory-specified jacking points and stopping on a level, paved surface significantly reduces this risk.
Wheel chocks and a fully engaged parking brake provide additional layers of safety, preventing the vehicle from rolling forward or backward while it is being lifted.
2. Reduces the Risk of Injury While Changing a Tire on the Roadside
Drivers may face numerous hazards when changing a tire on the roadside, particularly when they are in close proximity to moving traffic.
Many roadside injuries occur because drivers focus solely on the punctured tire and overlook their immediate surroundings.
Any vehicle passing at highway speeds generates a strong gust of wind, which can easily throw off a person’s balance while they are lifting or removing a wheel.
Furthermore, there remains a risk of tools slipping, a lug wrench suddenly disengaging, or the vehicle shifting while the tire is being removed.
Wearing gloves protects the hands from injuries caused by the sharp edges of the wheel, while placing reflective warning triangles ensures that oncoming traffic can clearly spot your vehicle.
Taking a few extra minutes to park the car at a safe distance from traffic significantly reduces the likelihood of injury.
3. Helps Avoid Errors During Wheel Installation That Could Lead to a Loose Wheel Later On
A common mistake made when installing a spare tire is failing to tighten the lug nuts correctly.
If the nuts are tightened unevenly, the wheel will not seat properly against the hub.
This causes vibration and can result in the wheel coming loose after driving.
This is why mechanics use a “star pattern” when tightening nuts; the star pattern distributes pressure evenly across the wheel and helps properly center the rim.
Initially tightening the lug nuts by hand, and then tightening them further after lowering the vehicle back to the ground, helps prevent cross-threading and wheel misalignment.
Lug nuts that appear tight while the wheel is suspended in the air may actually become loose once the full weight of the vehicle rests upon the spare tire.
4. Protects Brake Components, Studs and Wheel Threads From Damage
The wheel assembly contains components that can be damaged if proper care is not exercised while removing or installing a tire.
Located behind the wheel are the brake rotor or brake drum, as well as the studs that hold the wheel in place.
If a punctured tire is pulled off at an awkward angle or dropped, it may strike and damage the brake assembly.
Forcing lug nuts onto misaligned studs can strip the threads, making it unsafe to install a wheel in the future.
Cross-threaded lug nuts may appear secure at first glance, but road vibrations can cause them to loosen and detach.
Carefully aligning the spare tire and hand-tightening the lug nuts before using a wrench helps protect these components.
5. Use Temporary Spare Tires Only Within Safe Driving Limits
Many spare tires are temporary, often referred to as “donut spares”, and are constructed differently than standard tires.
They are generally smaller and lighter and are specifically designed for short-distance emergency travel.
Most manufacturers recommend adhering to a reduced speed limit (often 50 miles per hour) and limiting the distance traveled.
Precise limits may vary depending on the specific vehicle and tire design, but their primary purpose is always to provide temporary transportation until the original tire can be repaired.
Driving at high speeds or over long distances on a temporary spare tire generates heat, which can compromise the tire’s structural integrity.
This can also adversely affect braking distance, traction and cornering stability, as the performance of the spare tire may not match that of the other tires.
Proper installation ensures that the spare tire functions effectively until a permanent repair is completed.
Know, Signs that You Need to Replace a Tire with a Spare
A spare tire should be used only when driving on the regular tire is no longer safe.
Some tire issues are easily visible, while others may not appear dangerous until the vehicle is in motion.
The tire may seem fine initially; however, due to hidden internal damage, its air pressure could drop suddenly, making the vehicle difficult to control or causing the tire to fail completely.
Recognizing these warning signs helps you determine when to replace a tire immediately, rather than attempting to continue driving on it.
Timely identification of these issues can prevent accidents and protect the wheels, suspension and braking systems.
1. A Flat Tire That Won’t Hold Air
If a tire’s air pressure continues to drop steadily even after being inflated, it often signals a puncture, a leaking valve, or a defect in the bead (the part of the tire that seals against the wheel rim).
If the air pressure drops again within a short period, it is generally unsafe to drive on that tire.
The heat and pressure generated while driving can cause even a small puncture to expand into a larger one.
Driving on a tire that cannot hold air can damage the tire’s sidewall and the wheel rim; in such cases, a situation that might have initially required only a minor repair could ultimately necessitate replacing the entire tire.
If a tire goes flat again almost immediately after being inflated, installing the spare tire is generally the safer option.
2. Cuts, Bulges, or Punctures in the Sidewall
The sidewall supports the weight of the vehicle and absorbs the stress placed on the tire while driving.
A cut in the sidewall can compromise the structural integrity of the tire, while a bulge often indicates that the internal cords within the tire have snapped.
This type of damage cannot safely withstand the continuous pressure exerted over time.
Sidewall punctures are generally more serious than punctures in the central part of the tire (the tread), as they undermine the fundamental structural strength of the tire itself.
If you notice a bulge, a deep cut, or a crack in the sidewall, you should not drive on that tire; instead, it should be replaced immediately with a spare tire.
3. Tire Blowout While Driving
A blowout occurs when the air pressure in a tire drops suddenly while the vehicle is in motion; this is often caused by excessive heat, damage resulting from an impact with an object, or a weakness within the tire’s internal structure.
When this happens, you may hear a loud, explosive sound, followed by the vehicle suddenly pulling to one side or a violent vibration felt through the steering wheel.
Following a blowout, the tire’s sidewall typically sustains severe damage; therefore, you should never attempt to reinflate and reuse it.
The wheel rim may also become bent due to impact with the road surface after the tire has deflated.
Before installing a spare tire, be sure to inspect the wheel and its surrounding components for any signs of damage.
4. Severe Tread Separation
Tread separation occurs when the outer rubber layer of the tire begins to detach from the main body of the tire.
While driving, this condition may manifest as bulges, loose rubber, vibrations, or flapping sounds.
This issue is frequently observed in older tires, tires that have overheated, or tires that have been driven with insufficient air pressure.
Once the tread begins to separate, the risk of sudden tire failure increases significantly, specially at high speeds.
The tire must be replaced immediately, as continued driving could lead to complete tire failure and a loss of vehicle control.
5. Tire Damage Caused by Striking Potholes or Road Debris
A forceful impact with a pothole, curb, or debris can damage a tire, even if an immediate puncture does not occur.
Such impacts can result in sidewall cuts, cracks in the internal structure, or a bent wheel.
Sometimes, the tire does not begin to lose air immediately after the impact, but rather some time later.
You may feel vibrations in the steering wheel, notice the vehicle pulling to one side, or hear unusual noises.
If, following an impact, you observe any bulges, cuts, or a sudden drop in tire pressure, replacing the damaged tire with a spare is often the safest and most practical temporary solution.
Tools
| Tools | Why It Is Needed | How to Use It |
|---|---|---|
| Vehicle Owner’s Manual | This manual outlines the correct jacking points for your vehicle, the location of the spare tire and the proper procedure for changing a tire. Placing the jack in an incorrect position can result in damage to the vehicle’s frame or cause the jack to slip. | Before lifting the vehicle, locate the spare tire and emergency tool kit and identify the correct jacking points. Follow the specific instructions provided by the manufacturer for your particular vehicle model. |
| Spare Tire | The spare tire serves as a replacement for a damaged tire, allowing you to drive the vehicle to a repair shop. Most spare tires are intended for temporary use only and are designed for driving over short distances. | Thoroughly inspect the spare tire before use. Check for any cracks, low air pressure, or other signs of damage. Install the tire only if it is properly inflated and fits securely onto the wheel hub. |
| Vehicle Jack | The jack is used to lift the vehicle, enabling the removal of the damaged tire. Without properly lifting the vehicle, the tire cannot be changed safely. | Place the jack on level ground, directly beneath the specific lifting point designated by the manufacturer. Slowly raise the jack until the damaged tire clears the ground. Never go underneath the vehicle while it is supported solely by the jack. |
| Lug Wrench | A lug wrench is used to loosen and tighten the nuts that securely fasten the tire in place. It provides the necessary leverage to safely loosen the nuts. | Before lifting the vehicle, slightly loosen the lug nuts. After installing the spare tire, tighten the nuts in a “star pattern” to ensure even pressure distribution. |
| Wheel Chocks or Solid Blocks | These items prevent the vehicle from rolling while it is being lifted. This becomes even more critical when the road surface is not perfectly level. | Place them firmly and snugly against the tires, specifically on the side opposite to the tire you are working on. If you do not have wheel chocks, use sturdy blocks of wood or large bricks as substitutes. |
| Flashlight | Tire-related issues often arise at night or during bad weather. With adequate lighting, you can clearly see the jack points, lug nuts and any potential damage to the vehicle. | Direct the light toward the tire area and the ground beneath the vehicle. Keep a light source close at hand throughout the entire tire-changing process. |
| Reflective Warning Triangle | This signals to passing drivers that your vehicle is stationary, thereby reducing the risk of road accidents. | Place it at a sufficient distance behind the vehicle to ensure it is clearly visible, specially on highways or poorly lit roads. Position it correctly before you begin changing the tire. |
| Gloves | Gloves protect your hands from sharp metal edges, dirt and the tires themselves; the tires may still be hot from driving. | Put on gloves before handling the wheel, lug nuts, or jack. They also improve your grip while using tools. |
| Tire Pressure Gauge | At first glance, a spare tire may appear normal, but it could have low air pressure. A spare tire with insufficient pressure can fail prematurely while the vehicle is in motion. | Inspect the spare tire before installing it. Compare its pressure reading against the recommended pressure listed on the tire label located inside the driver’s door. |
Where to Stop Before Changing a Tire
The location you choose to stop when changing a tire is the single most critical decision regarding safety.
Many injuries sustained during tire changes occur because drivers stop immediately, without verifying whether the ground is level and firm, or if surrounding traffic poses a hazard.
Selecting a safe place to stop provides the jack with a stable base, keeps the vehicle steady and gives you ample room to work without getting too close to moving vehicles.
If a tire is changed in an unsafe location, even a correctly installed spare tire can prove dangerous.
Taking a few extra moments to select the right spot makes the entire tire-changing process significantly safer.
1. Find a Level and Firm Surface
Level ground helps maintain the vehicle’s balance, even when one of its wheels is lifted off the ground.
Jacks are designed to lift a vehicle straight up; if the ground is uneven, the jack may tilt to one side or slip.
Concrete or asphalt parking lots, or smooth road shoulders, are often safer options than soft, unpaved road shoulders.
If the ground is sloped, the vehicle’s weight may shift to one side when you remove the punctured tire.
This movement can cause the jack to slip, creating a risk of the vehicle falling.
Always choose the most level and firm surface available before you begin changing a tire.
2. Stay as Far Away from Traffic as Possible
Stopping too close to traffic increases the risks associated with changing a tire.
Passing vehicles, specially trucks, as it can generate strong gusts of wind that may throw you off balance while you are handling tools.
Furthermore, drivers traveling at high speeds may fail to notice someone working on the roadside.
If you experience a flat tire on the highway, it is often best to drive slowly to reach the nearest exit, parking area, or a wide section of the roadside, provided the wheel remains sturdy enough to support the vehicle’s weight while moving.
Changing a tire in a safe location significantly reduces the risk of secondary accidents.
3. Avoid Soft Ground, Gravel and Slopes
On soft ground, the base of the jack may sink into the earth due to the weight of the vehicle.
Gravel can shift and on sloped terrain, the vehicle may roll even after the parking brake has been engaged.
Lifting the vehicle in such locations becomes difficult and unsafe and the risk of the jack tipping over increases.
On a sloping road, the weight distribution across the wheels also shifts and becomes unbalanced; this can make it difficult to properly install the spare tire.
Choosing a firm and level surface significantly enhances safety and ensures that the vehicle remains stable.
4. Turn On Your Hazard Lights
Hazard lights signal to other drivers that your vehicle is stationary and may be obstructing a portion of the roadway.
They improve visibility during the day, in rain, in fog and at night.
Turning them on immediately after stopping gives approaching drivers more time to slow down or maneuver around your vehicle.
This is particularly crucial when you are stopped along the edge of a lane or on the shoulder of a highway.
Hazard lights should remain active until the spare tire has been installed and the vehicle is ready to be driven again.
5. Fully Engage the Parking Brake
When a wheel is removed from the vehicle, the parking brake helps prevent the vehicle from rolling.
Once the punctured tire has been removed, the vehicle’s stability relies on the remaining wheels and the jack.
If the parking brake is not fully engaged, the vehicle could slide even on a slight incline.
This could cause the jack to slip, or the vehicle to slide off the jack and roll away.
By fully engaging the parking brake before loosening the lug nuts, the vehicle remains securely in place throughout the entire tire-changing process.
How to Replace Spare Tire Safely – Best Method
Safely changing a spare tire involves more than just removing the punctured tire.
Every step of this process impacts the vehicle’s stability while the tire is being changed, as well as the security of the wheel afterward.
Most difficulties faced during a tire change arise because certain steps are skipped, the vehicle is jacked up in an unsafe location, or the spare tire is installed too hastily.
Following the correct sequence helps prevent issues such as personal injury, damage to the wheel and loose lug nuts after driving.
1. Park the Vehicle in a Safe Location
The first step is to move the vehicle to a safe location where it can remain stable while being jacked up.
Whenever possible, choose a level surface (such as a paved road), as removing a wheel on a sloped road could cause the vehicle to roll or slide.
If the vehicle has an automatic transmission, shift it into ‘Park’; if it is a manual, engage first gear.
Turn off the engine to ensure the vehicle is completely stationary.
Immediately turn on your hazard lights so that other drivers are alerted that your vehicle is stopped and that there is an issue on the roadside.
2. Place Wheel Chocks
Wheel chocks prevent the vehicle from moving while the punctured tire is being jacked up.
They should be placed firmly against the wheel directly opposite the punctured tire.
For example, if a front tire is flat, place the wheel chocks behind the rear tire.
These chocks act as a barrier should the vehicle attempt to roll.
If you do not have wheel chocks, sturdy blocks of wood or large bricks can be used in their place.
This step is crucial, as even the slightest movement of the vehicle could destabilize the jack.
3. Retrieve the Spare Tire and Tools
Before lifting the vehicle, retrieve the spare tire and all necessary tools.
In most cars, the spare tire is stored inside the trunk, beneath the floor of the cargo area; however, in some trucks and SUVs, it is mounted underneath the vehicle.
Inspect the spare tire thoroughly to ensure there are no cracks, excessive wear, or low air pressure.
The air pressure in a spare tire that has been stored for several years may decrease over time.
Before removing the punctured tire, verify that the size of the spare tire matches the vehicle’s wheel and that it is safe to install.
4. Loosen the Lug Nuts Before Lifting the Vehicle
The lug nuts should be loosened while the tire is still in contact with the ground.
Doing so prevents the wheel from spinning while you apply force to the nuts.
Use a lug wrench and turn the nuts in a anti-clockwise direction.
Break the initial tightness of the nuts, but do not remove them completely just yet.
Performing this step in advance makes it easier to remove the nuts after the vehicle has been lifted and also places less strain on the jack.
5. Position the Jack Correctly
Place the jack beneath the factory lift point specified in the owner’s manual.
This specific location is reinforced to safely support the weight of the vehicle.
Placing the jack in the wrong spot could result in a bent vehicle frame or cause the jack to slip.
Before lifting the vehicle, ensure that the jack is upright and perfectly vertical.
The base of the jack must rest on firm ground and remain stable before lifting the vehicle.
6. Carefully Lift the Vehicle
Lift the vehicle only until the punctured tire clears the ground.
Lifting the vehicle too high reduces its stability and creates unnecessary risk.
Keep an eye on the jack while lifting to ensure it remains upright.
During this step, never place your hands, arms, or any part of your body underneath the vehicle.
The jack is designed solely to lift the vehicle, not to support a person underneath it.
7. Remove the Lug Nuts and Punctured Tire
Once the tire is completely off the ground, fully remove the loosened lug nuts.
Keep them together so they do not get lost.
Pull the punctured tire straight toward you.
Avoid pulling it at an angle, as doing so may cause it to strike the brake rotor or studs.
Lay the removed tire flat on the ground nearby so that it does not roll away.
8. Install the Spare Tire
Lift the spare tire and align its wheel holes with the studs.
Push it fully onto the hub until it sits flush against the mounting surface.
Begin tightening the lug nuts by hand.
Tightening them by hand first helps prevent cross-threading (improper tightening), which can damage the studs.
Tighten each nut a little at a time to ensure the wheel remains centered.
9. Lower the Vehicle
Slowly lower the jack until the spare tire touches the ground and the vehicle’s weight rests upon it.
Once the vehicle is fully lowered, carefully remove the jack.
The vehicle must remain stable and motionless.
Slowly lowering the vehicle ensures that the wheel seats properly onto the hub.
10. Properly Tighten the Lug Nuts
Tighten the lug nuts in a star pattern to ensure that the pressure is distributed evenly across the entire wheel.
This keeps the wheel securely in place and minimizes the likelihood of vibration or loosening.
Tighten each lug nut firmly and then re-check them after lowering the car completely to the ground.
After driving a short distance, check the lug nuts again, as they may loosen slightly once the full weight of the vehicle rests on the spare wheel.
So, How Tight Should Lug Nuts Be?
Lug nuts securely fasten the wheel to the hub and for safety reasons, it is crucial that they be tightened correctly.
If they are not tightened properly, the wheel may wobble, shake, or come loose while driving.
Conversely, if they are overtightened, they can damage the studs or make them extremely difficult to remove in the future.
Proper tightening is measured in terms of “torque,” which refers to the amount of rotational force applied.
Every vehicle manufacturer specifies a recommended torque setting; adhering to this value ensures that the spare tire remains securely in place until the original tire can be repaired.
1. Why Is Correct Torque Important?
Correct torque ensures that the wheel is pressed against the hub uniformly.
When all lug nuts are tightened with the proper force, the wheel remains centered and rotates smoothly.
This helps prevent vibrations, uneven tire wear and excessive stress on the wheel studs.
If one lug nut is tighter than the others, the wheel will not sit flush against the hub, which can negatively impact braking and steering performance.
Correct torque also prevents lug nuts from loosening, particularly when the vehicle travels over rough terrain or negotiates turns.
2. Common Torque Ranges Based on Vehicle Type
Torque values vary depending on the size of the vehicle, the wheel design and the type of studs used.
For many small cars, the lug nut torque typically ranges between 80 and 100 pound-feet.
Mid-sized sedans and crossovers often require a torque of approximately 90 to 110 pound-feet.
Large SUVs, pickup trucks and heavy-duty vehicles may require 120 pound-feet or more of torque.
The precise value is specified in the owner’s manual, as wheel size and material can alter this requirement.
The safest approach is always to use the exact value recommended by the manufacturer, rather than attempting to estimate the force required.
3. Using a Torque Wrench
The most accurate method for tightening lug nuts is to use a torque wrench.
This tool precisely measures the rotational force being applied and helps prevent uneven tightening.
After installing the spare tire and lowering the vehicle, set the torque wrench to the specific value recommended for your vehicle.
Tighten each lug nut in a star pattern to ensure that the pressure is distributed evenly across the entire wheel.
This method centers the spare tire and minimizes stress on the wheel assembly.
It is advisable to re-check the torque after driving a short distance, as the wheel may settle slightly into place.
4. The Dangers of Overtightening
Overtightening places excessive stress on the wheel studs and threads.
This can cause the studs to stretch, the threads to strip, or even result in breakage.
If a tire issue arises later, removing overtightened lug nuts on the roadside can be extremely difficult.
In some cases, overtightening can warp the brake rotors because the wheel fails to exert uniform pressure on the hub.
These issues often occur when excessive force is applied using a long breaker bar without verifying the torque.
5. The Dangers of Undertightening
Undertightening is equally dangerous, as it compromises the safety of the wheel while the vehicle is in motion.
If the lug nuts are too loose, the wheel may shift slightly every time the vehicle turns or travels over uneven terrain.
This movement generates vibrations, which can cause the remaining lug nuts to gradually loosen further.
In severe cases, the wheel could even detach from the vehicle.
Re-checking the lug nuts after driving a few miles on a spare tire ensures that they remain tight and secure.
Know, Common Safety Mistakes to Avoid Them While Replacing Spare Tire
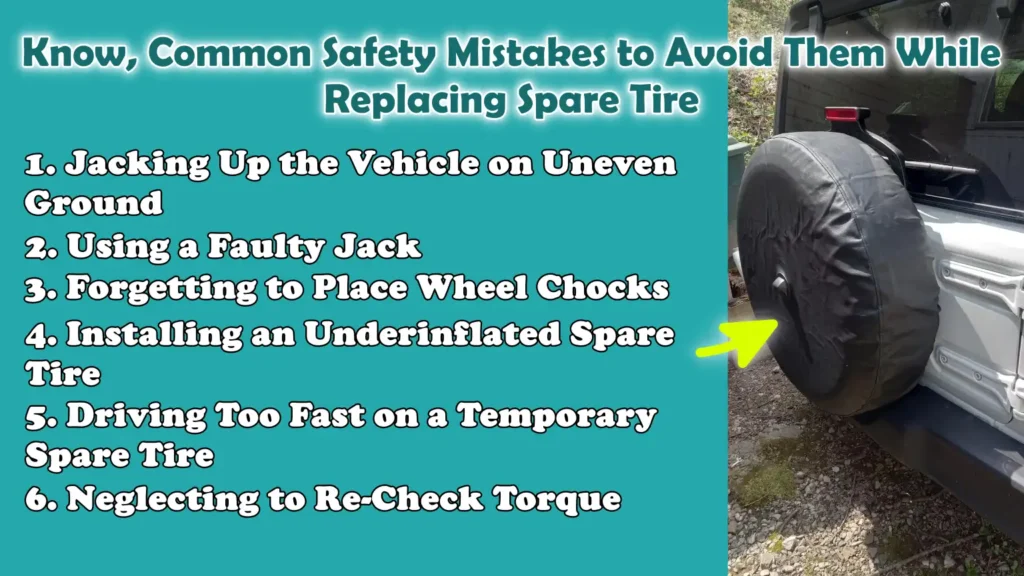
Changing a tire may seem simple, but minor errors committed during the process can pose serious safety risks.
Removing a wheel renders the vehicle unstable and even a small mistake can cause the car to shift, topple over, or result in a malfunction after the spare tire has been installed.
Many roadside accidents are not caused by a defective spare tire itself, but rather by changing a tire on unstable ground, using faulty tools, or failing to perform a final safety check.
By avoiding these common mistakes, you can ensure that the vehicle remains stable and that the spare tire can be used safely.
1. Jacking Up the Vehicle on Uneven Ground
Uneven ground is the most common cause of a vehicle slipping off its jack.
Jacks are designed to lift vertically; however, slopes and uneven road surfaces alter the distribution of the vehicle’s weight.
When a flat tire is removed, the vehicle may slide down the incline, causing the jack to shift sideways.
Soft ground on the roadside, sloped roadways and rough surfaces significantly increase this risk.
If possible, always move to a level section of the road, even if it means driving slowly for a short distance before stopping.
2. Using a Faulty Jack
A defective jack can suddenly collapse under the weight of the vehicle.
Bent metal components, broken support points, leaking hydraulic seals, or rusted threads can compromise the structural integrity of the lifting mechanism.
As many factory-supplied jacks go unused for years, any underlying defects often go unnoticed until an emergency situation arises.
Any jack that is bent, crooked, or appears unstable should not be used.
Inspecting the condition of the jack before lifting the vehicle helps prevent sudden drops and reduces the risk of injury.
3. Forgetting to Place Wheel Chocks
Without wheel chocks, the vehicle can roll, even if the parking brake is engaged.
This is particularly common on slight inclines, where gravity can cause the vehicle to drift slowly while it is being lifted.
When a wheel is removed, the vehicle’s stability is compromised, increasing the likelihood of it shifting.
Placing wheel chocks in front of the tires on the opposite side creates a physical barrier and helps prevent the vehicle from moving unintentionally.
If proper wheel chocks are not available, sturdy blocks of wood or bricks serve as a safer alternative than leaving the wheels unchocked.
4. Installing an Underinflated Spare Tire
Even a spare tire that appears normal to the eye may have unsafe air pressure levels.
Temporary spare tires often lose air pressure over time due to prolonged periods of disuse.
Driving on an underinflated spare tire generates excessive heat, weakens the tire’s structural integrity and reduces steering control.
It can also compromise braking performance and result in uneven contact between the tire and the road surface.
Checking the pressure of the spare tire before installation ensures that it can safely support the weight of the vehicle.
5. Driving Too Fast on a Temporary Spare Tire
Most temporary spare tires are designed solely for emergency use and are smaller than standard tires.
Their lightweight construction means they are not built to withstand sustained highway speeds or for long-distance travel.
Driving at excessive speeds generates significant heat inside the tire, substantially increasing the risk of tire failure.
Handling the vehicle may also become difficult, as installing a spare tire alters the car’s balance and traction.
Maintaining a reduced speed and driving only to the nearest repair center helps ensure the safety of both the spare tire and the vehicle.
6. Neglecting to Re-Check Torque
After installing a spare tire and driving for a while, the lug nuts may loosen slightly.
This occurs because driving on the road allows the wheel to settle properly into its correct position.
If the nuts are not re-checked, even slight looseness can lead to vibrations or cause the wheel to wobble.
Re-checking them after driving a short distance ensures that the spare tire is securely fastened.
This final step is often overlooked, yet it remains one of the most critical safety checks to perform after changing a tire.
So, How Fast Can You Drive on a Spare Tire?
Spare tires are typically designed as a temporary emergency solution rather than a permanent replacement.
Many drivers continue to drive as usual after installing a spare tire, but this can be unsafe because temporary spares are often smaller, lighter and constructed from different materials than regular tires.
They are designed to help you reach a repair shop, not to handle long-distance travel, high speeds, or heavy loads.
Driving beyond the limits of a spare tire can negatively impact braking, cornering and tire durability.
Understanding the limitations regarding speed and distance helps prevent further damage to the tire.
1. Speed Limits for Temporary Spare Tires
Most temporary spare tires have a lower speed limit compared to standard tires; these are often referred to as “donut spares”.
The generally recommended maximum speed is around 50 mph, although the exact limit depends on the specific vehicle and tire design.
This limit exists because the spare tire has a smaller contact area with the road (tread contact) and features a lighter construction.
At higher speeds, the tire flexes more and generates heat rapidly.
This can also compromise steering stability, particularly during sudden turns or hard braking.
The speed limit is typically printed directly on the sidewall of the spare tire.
2. Distance Limits
Temporary spare tires are generally designed for short-distance use only.
Many manufacturers advise using them only until you can reach a tire shop or a safe location for repairs.
Driving for excessive distances causes the tire to wear out rapidly, as spare tires are not built for continuous use.
Furthermore, because its diameter may be smaller, it can affect the rotational dynamics of the wheels and the vehicle’s overall handling.
Prolonged use can place undue stress on the drivetrain, particularly in vehicles equipped with all-wheel drive systems.
The safest course of action is to replace a damaged tire as soon as possible.
3. Risk of Heat Buildup
Heat is one of the primary factors contributing to the failure of temporary spare tires.
As the tire rotates, its sidewalls flex, generating heat within the rubber compound.
Temporary spare tires contain less rubber and feature a smaller air chamber; consequently, they generate heat much more rapidly than standard tires.
High speeds, long-distance travel, hot weather conditions and carrying heavy loads further exacerbate this effect.
Excessive heat can weaken the internal cords of the tire, thereby increasing the risk of a blowout.
Driving at lower speeds helps prevent heat buildup, ensuring that the spare tire remains functional until the original tire can be properly repaired.
4. Manufacturer’s Recommendations
Every vehicle manufacturer provides specific instructions regarding the use of spare tires, as there are significant variations in tire sizes, weight limits and wheel designs across different vehicles.
Some vehicles come equipped with full-size spare tires, while others feature smaller, temporary-use spares.
The owner’s manual typically outlines speed limits, distance restrictions and the correct wheel position for mounting the spare tire.
These instructions may also include restrictions regarding towing or highway driving.
It is crucial to follow these instructions, as they are specifically tailored to the unique design of both the vehicle and the spare tire.
If you have any doubts, the safest course of action is to drive slowly and have your original tire reinstalled as soon as possible.
Read More:
How to Maintain Your Spare Tire for Emergencies
It is easy to forget about your spare tire, as it often sits unused for months or even years; however, it serves its purpose only if it is ready for use when you face a flat tire.
Many drivers, often only during an emergency, discover that their spare tire is underinflated, cracked, or that essential tools are missing.
A spare tire continues to age even when not in use, as its rubber gradually dries out over time.
Regular inspections ensure that the tire, jack and tools will function correctly when needed.
By performing a few simple checks, you can avoid a situation where your spare tire is unsafe to install.
As well as, a spare tire should never be assumed always ready to use just because it has not been used, even safety agencies also recommends to check the spare pressure in every month as it stored tires that naturally lose air over time, so this simple maintenance step that can prevent being stranded with a flat spare during a roadside emergencies as well.[¹]
1. Check Air Pressure Monthly
A spare tire can naturally lose air pressure over time, even if it has never been used.
Tire pressure gradually leaks through the rubber and the valve stem, a process that can occur without any visible external signs.
The spare tire may look normal, yet it could be so underinflated that it cannot safely support the vehicle’s weight.
Checking the pressure once a month ensures that the tire is ready for use in an emergency.
Compare the pressure reading against the information provided on the label located inside the driver’s door or against the values printed directly on the spare tire itself.
Maintaining the correct pressure ensures that the tire can safely support the load and reduces the risk of failure.
2. Inspect the Tread and Sidewall
You should inspect the external condition of your spare tire to detect any signs of damage, even if it has never been driven on the road.
Look for cracks, dried-out rubber, bulges, cuts, or worn tread.
As rubber ages, cracks often develop in the sidewalls, a common issue, particularly in vehicles that are regularly parked outdoors in direct sunlight.
A tire with compromised sidewalls can fail even during a short drive.
The tread should also be inspected, as some full-size spare tires are rotated into regular use alongside the vehicle’s standard tires.
A quick visual inspection can reveal damage before it leads to a problem on the road.
3. Check the Condition of the Jack Kit
The jack and tool kit are just as important as the spare tire itself.
Factory-supplied jacks can sit unused for years, potentially rusting, seizing up, or deteriorating without anyone realizing it.
Ensure that the jack operates smoothly, its handle fits securely and the lug wrench is present.
If any component is missing, changing the tire could become impossible.
Periodically testing the jack ensures that it will be able to safely lift the vehicle in the event of a genuine emergency.
4. Practice Using the Tools in Advance
Many drivers open their spare tire kit for the very first time only when they suffer a flat tire.
This can make the task of changing a tire slow and extremely stressful, specially at night or amidst heavy traffic.
Practicing at home helps you understand where the spare tire is stored, how the jack fits and how the lug wrench operates.
It also reveals whether the tools are complete and in usable condition.
Familiarizing yourself with the entire process before an emergency strikes makes changing a tire on the road safer and faster.
5. Replace Old Spare Tires Based on Their Age
A spare tire, even if it still retains ample tread, can become unsafe due to aging.
Over time, exposure to heat, air and storage conditions causes the rubber to deteriorate.
Cracks may develop within the tire’s internal structure that are not easily visible.
Many tire manufacturers recommend replacing old tires after a certain number of years, even if they have seen very little use.
A tire’s age can be determined by checking the date code stamped on its sidewall.
Replacing an old spare tire before it deteriorates ensures that it will function properly when needed.
Conclusion – How to Replace Spare Tire Safely
A spare tire is meant to solve that unexpected emergency problem, but you need to replace the tire in safe and correct way otherwise it can create another emergency as well.
Yet, in that moment of crisis, the difference between safely changing a tire and facing a dangerous roadside situation often hinges on your level of preparedness and the steps you take.
Safely changing a spare tire involves more than just removing one wheel and installing another.
It entails selecting a safe location to stop, stabilizing the vehicle, using the correct tools and ensuring that the spare tire itself is in roadworthy condition.
Although a flat tire may seem like a minor inconvenience, if not handled properly, it can lead to damage to the wheel assembly, steering issues, or an increased risk of injury.
The most critical aspect of changing a spare tire is understanding that it serves merely as a temporary solution.
Many compact spare tires are generally not designed for daily driving, covering long distances, or traveling at high speeds.
They can compromise braking, traction and vehicle stability, as they often differ from standard tires in both size and construction.
Therefore, maintaining proper tire pressure, tightening the lug nuts correctly and limiting your driving until the original tire is properly repaired are all essential steps.
So, that’s all from this guide and you can comment for more.
Frequently Asked Questions
FAQ 1: How do you safely change a spare tire?
Answer: To safely change a spare tire, first move the vehicle to a level, stable area away from traffic. Turn on your hazard lights, fully engage the parking brake and place wheel chocks or solid blocks behind the wheels opposite the one being changed. Loosen the lug nuts slightly before lifting the vehicle, as the tire needs to remain firmly planted on the ground when the nuts are first loosened. Lift the vehicle using the correct jack points specified in the owner’s manual, remove the punctured tire, mount the spare tire and tighten the lug nuts in a star pattern. After lowering the vehicle, re-check the lug nuts to ensure the wheel remains secure while driving.
FAQ 2: Can you drive normally on a spare tire?
Answer: A spare tire is generally not intended for normal driving. Many vehicles are equipped with temporary compact spare tires that are smaller in size and designed only for short-term use in emergencies. These tires often have lower speed limits and should be used solely to reach a repair shop. Driving long distances normally on a temporary spare tire can negatively affect braking, steering and tire wear. If the spare tire is full-sized and matches the other tires, it may be safe for extended use; however, it is still essential to consult the manufacturer’s instructions.
FAQ 3: How fast can you drive on a temporary spare tire?
Answer: The recommended speed limit for most temporary spare tires is approximately 50 mph, although the exact limit depends on the specific tire and vehicle. The speed rating is typically printed directly on the sidewall of the spare tire. Temporary spare tires are constructed using lightweight materials and feature a smaller tread contact area (the surface area in contact with the ground); consequently, driving at high speeds generates excessive heat, increasing the risk of tire failure. Maintaining a reduced speed helps preserve the tire and ensures better vehicle control until the regular tire can be repaired.
FAQ 4: How long can you drive on a spare tire?
Answer: Spare tires should be used only for short distances. Many compact spare tires are designed solely to transport the vehicle to a repair shop. Driving for extended distances can cause the spare tire to wear out rapidly and overheat. Prolonged use can also affect wheel alignment and place undue stress on certain drivetrain systems, particularly in all-wheel-drive vehicles. Rather than using a spare tire for an extended period, the safest course of action is to have the damaged tire repaired or replaced as soon as possible.
FAQ 5: Should lug nuts be retightened after driving?
Answer: Yes, the lug nuts should be rechecked after driving a short distance. When a spare tire is initially installed, the wheel may settle slightly onto the hub once it bears the full weight of the vehicle. This settling can cause the nuts to loosen slightly. Rechecking the lug nuts ensures that they remain securely tightened. This step is particularly important after driving the first few miles, as the nuts may shift slightly even if they appeared secure during installation.
References:
[1] Safety and Savings Ride on Your Tires
https://www.nhtsa.gov/es/tires/safety-and-savings-ride-your-tires

Hello Folks, Dean Shali here to help you out to solve the problems with your lovely vehicle, as i have lots of experience and knowledge about automotive industry as i woks directly with the customers and repair vehicles and i love to help the people to keep their cars safe and running smoothly.