Written By: Dean Shali
Fact Checked By: Sabré Cook
Reviewed By: Tamara Warren
Yes, you heard this right: most of the brake calipers can be “REBUILT” instead of fully replaced.
And, because the brake calipers are one of the most important parts of your car’s braking system, that’s why you need to check and maintain them regularly.
Basically, a caliper’s main job is to press the brake pads against the rotor, that literally creates the friction which is actually needed to slow down or stop your vehicle completely.
But, over the time there’s heat, moisture, dirt and brake fluid leaks that can cause the internal piston and rubber seals to wear out or stick up badly.
Whenever this things happens, then you many notice some warning signs such as: uneven braking, the car is pulling to one side more, squeaking noises or even a burning smell after the driving as well.
Along with this, there’s automotive repair data that shows that a sticking or seized caliper is one of the common causes of uneven brake pad wear and reduced braking efficiency in everyday vehicles.
So, instead of replacing that entire caliper, there are many units that can be safely rebuilt at home by replacing seals, cleaning the internal parts and restoring that smooth piston movement as well.
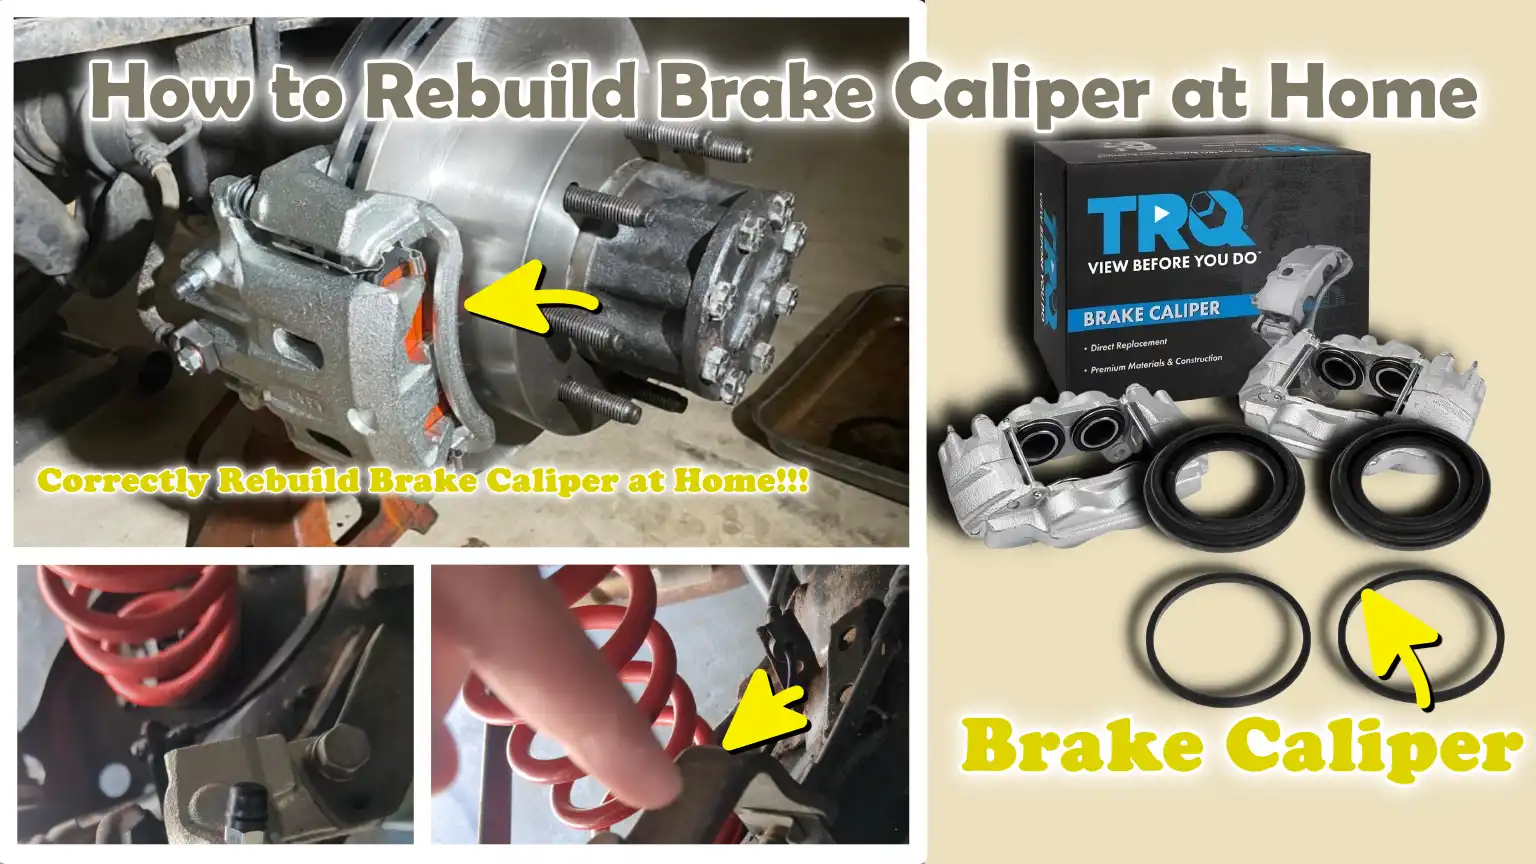
Now, in this guide you’ll learn How to Rebuild Brake Caliper at Home, so that you can understand everything from symptoms, causes and complete rebuilding process in simple way.
Know, The Signs That Your Brake Caliper Needs a Rebuild
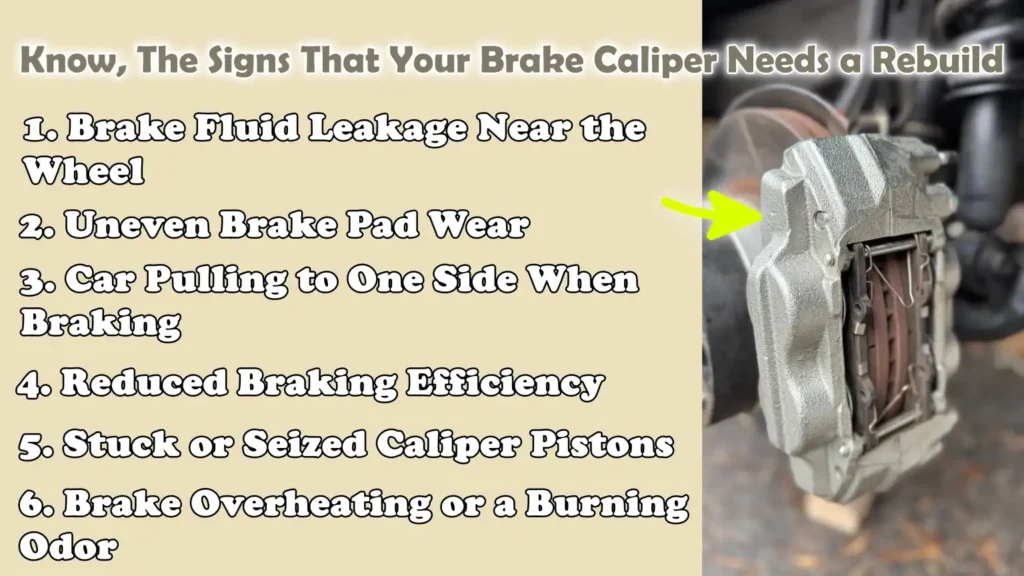
1. Brake Fluid Leakage Near the Wheel
One of the earliest and most serious signs of a failing brake caliper is the leakage of brake fluid near the wheel.
This typically occurs when the internal piston seal or dust boot becomes worn, cracked, or otherwise compromised.
As brake fluid is what generates hydraulic pressure within your braking system, even a minor leak can diminish braking power over time.
If you notice wet spots, oily residue, or clear fluid around the tire or inside the wheel rim, it is often an indication that the caliper is no longer sealing properly and may require a rebuild.
Ignoring this issue can allow air to enter the brake system, rendering the braking weak and unsafe.
2. Uneven Brake Pad Wear
Uneven brake pad wear is another strong indication that the caliper is not functioning correctly.
A properly functioning caliper applies equal pressure to both brake pads; however, if it begins to stick or seize, one pad may wear down significantly faster than the other.
This happens because the piston is unable to move freely or retract properly after the brakes are applied.
Over time, this imbalance reduces braking efficiency and can also cause damage to the brake rotor.
If you observe that one brake pad is almost completely worn out while the other still retains a substantial amount of material, it is often a clear sign that the caliper requires attention, or a complete rebuild.
3. Car Pulling to One Side When Braking
If your car pulls to one side when you press the brake pedal, it could be a sign that a caliper on one of the wheels is sticking.
This occurs when one caliper exerts greater braking force than the other, resulting in uneven stopping pressure.
In most cases, a stuck caliper fails to release properly, creating a constant drag on that specific wheel.
This not only diminishes driving comfort but also compromises vehicle control, particularly during sudden braking situations.
A properly balanced braking system should keep the car traveling in a straight line when the brakes are applied; therefore, any instance of pulling should be investigated immediately.
4. Reduced Braking Efficiency
A general decline in braking efficiency is another warning sign that should not be ignored.
You may notice that the brake pedal feels softer than usual, or that it takes longer for the vehicle to come to a complete stop.
This can happen if a caliper piston is not moving freely or if the internal seals have worn out, leading to a loss of hydraulic pressure.
In some instances, contaminated brake fluid or the presence of air within the system can also adversely affect braking performance.
When a caliper malfunctions, the entire braking system becomes less responsive, requiring a greater stopping distance and increasing safety risks on the road.
5. Stuck or Seized Caliper Pistons
A stuck or seized caliper piston is one of the most common reasons why a caliper requires rebuilding.
Whenever you press and release the brake pedal, the piston should slide smoothly in and out each time.
However, an accumulation of dirt, rust, or contaminated brake fluid can cause the piston to seize.
When this occurs, the brake pads may remain in contact with the rotor, even when you are not applying the brakes.
This results in constant friction, causes the brake pads to wear out prematurely and reduces fuel efficiency.
In severe cases, turning the wheel may even feel difficult because the brakes remain partially engaged at all times.
6. Brake Overheating or a Burning Odor
Brake overheating, or detecting a strong burning smell after driving, is often an indication that the caliper is not functioning correctly.
When the piston remains partially engaged, the brake pads continuously rub against the rotor, generating excessive heat.
This heat can damage the brake pads, warp the rotor and even compromise the effectiveness of the brake fluid.
After driving, you may even observe smoke rising from one of the wheels or detect a strong burning odor.
This situation is dangerous because, when brakes overheat, they can lose their ability to effectively bring the vehicle to a stop, particularly in situations requiring frequent braking.
Tools
| Tool or Material | How It Is Used |
|---|---|
| Jack and Jack Stands | A jack lifts the vehicle so that you can remove the wheel. Jack stands securely support the vehicle, ensuring that it does not fall while you are working. |
| Lug Wrench | This tool is used to loosen and tighten the nuts that hold the wheel in place, both before and after working on the caliper. |
| Socket Set and Ratchet | It helps in removing the bolts that securely fasten the brake caliper and bracket in position. |
| Torque Wrench | It ensures that the bolts are tightened correctly, preventing any component from being either too loose or too tight, a critical factor for safety. |
| Screwdrivers – Flathead and Phillips | It is used to handle small components around the caliper, such as retaining clips or protective covers. |
| Brake Caliper Piston Tool or Compressed Air | It assists in extracting the piston from the caliper body without causing any damage to the internal components. |
| Brake Line Wrench | It is designed to loosen brake fluid lines without damaging their fittings. |
| C-Clamp – Optional | It is used during reassembly to gently push the piston back into its original position, as needed. |
| New Seals and O-Rings | These rubber components create a tight seal inside the caliper, preventing fluid leaks and the loss of hydraulic pressure. |
| Dust Boot | It covers the piston, preventing dust, water and debris from entering the caliper. |
| Replacement Piston – If Needed | Use this only if the original piston is rusted, scratched, or otherwise unfit for reuse. |
| Brake Cleaner Spray | It removes oil, dirt and brake dust from the caliper components prior to reassembly. |
| Wire Brush or Soft Brush | It helps remove rust or accumulated dirt from the metal surfaces on both the inner and outer sides of the caliper. |
| Clean Rags or Shop Towels | It is used to dry and clean components, ensuring that no dirt or moisture remains on them during the assembly process. |
How to Stay Completely Safety By Taking All the Necessary Precautions Before Starting Work
1. Work on a Level and Stable Surface
Before commencing any work to rebuild a brake caliper, the vehicle must always be parked on a level and stable surface.
This is crucial because lifting the vehicle on an uneven or soft surface can cause it to shift or become unstable.
When you are working underneath or in close proximity to the vehicle, even the slightest movement can pose a serious safety hazard.
A solid concrete or hard surface is always preferable, as it keeps the vehicle stable and minimizes the risk of it slipping or rolling during the repair process.
2. Always Use Jack Stands; Never Rely Solely on the Jack
A hydraulic jack is designed solely for the purpose of lifting a vehicle, not for supporting it in an elevated position for an extended period.
Once the vehicle has been lifted, it must always be supported by jack stands placed at the designated support points.
This is absolutely essential because hydraulic jacks can fail due to pressure loss or sudden movements.
Jack stands provide stable and secure support, ensuring that the vehicle remains safely elevated while you work on the brake caliper with the wheel removed.
Relying solely on the jack is one of the most dangerous mistakes one can make during any brake repair procedure.
3. Wear Gloves and Eye Protection
Brake systems contain hazardous substances such as: old brake fluid, rust particles and brake dust, all of which can cause skin and eye irritation.
Wearing gloves protects your hands from chemicals and sharp edges, while safety goggles shield your eyes from dust and fluid splashes.
Repeated exposure to brake fluid can also cause damage to the skin; therefore, wearing appropriate safety gear is absolutely vital.
Adopting these simple safety measures significantly reduces the risk of injury and ensures your safety throughout the entire repair process.
4. Avoid Inhaling Brake Dust
Brake dust consists of microscopic particles from worn brake pads and rotors and prolonged inhalation can be harmful.
These particles may contain substances that irritate the lungs and should never be inhaled directly.
It is crucial to avoid blowing the dust away with compressed air, as this can disperse the dust into the air you breathe.
Instead, use a brake cleaner or a damp cloth to safely remove the dust.
Working in a well-ventilated area also helps minimize the risk of exposure to dust.
5. Keep Brake Fluid Away from Painted Surfaces
Brake fluid is highly corrosive to automotive paint; if it comes into contact with the vehicle’s body, it can permanently ruin the paint finish.
If even a small amount spills onto the paint and is not cleaned up immediately, it can cause the paint to peel or leave permanent stains.
When removing calipers or bleeding the brakes, special care must be taken to ensure that no fluid spills onto painted surfaces.
If a spill does occur accidentally, the area should be rinsed immediately with water to prevent damage.
Exercising caution when handling brake fluid helps protect both the vehicle’s aesthetic appeal and its surrounding components.
How to Rebuild Brake Caliper at Home – Working Method
1. Lift the Vehicle and Remove the Wheel
The first step in rebuilding a brake caliper is to safely lift the vehicle and remove the wheel so that you can access the brake assembly.
Always lift the vehicle using the correct lifting points recommended by the manufacturer, these are typically marked on the frame or on notches near the wheels, as lifting from an incorrect location can damage the vehicle or cause it to become unstable.
Once the vehicle is lifted, place jack stands underneath it to provide secure support before you begin working.
With the vehicle safely supported, use a lug wrench to loosen and remove the lug nuts; then, carefully remove the wheel and set it aside in a stable location to expose the brake caliper and rotor.
2. Remove the Brake Caliper
Once the wheel is removed, the brake caliper becomes visible and easily accessible.
To begin, use a socket set and ratchet to unbolt the caliper from its mounting bracket; be sure to support the caliper so that it does not hang by the brake line.
If possible, avoid completely disconnecting the brake line to minimize the loss of brake fluid; however, if disconnection is necessary, use a brake line wrench to carefully loosen it.
To prevent brake fluid from leaking out and to keep air from entering the system, seal the open brake line with a suitable cap or plug.
This step is crucial, as contamination of the brake fluid or the introduction of air into the system can negatively impact braking performance later on.
3. Remove the Caliper Piston
To access the inner seal and complete the brake caliper rebuilding process, it is necessary to remove the caliper piston.
This can be accomplished by carefully introducing compressed air into the brake line port; alternatively, if the caliper is still partially connected, this can also be done by gently depressing the brake pedal.
The piston may eject suddenly; therefore, to prevent any damage or injury, it should always be handled with caution and in a controlled manner.
The piston surface must not be scratched or dropped, as it plays a critical role in generating the correct hydraulic pressure during braking.
4. Remove the Old Seal and Dust Boot
Once the piston has been removed, the next step is to extract the old inner seal and dust boot.
These components are seated within small grooves inside the caliper body; their function is to seal in the brake fluid and prevent external contaminants from entering the system.
Carefully inspect the seal grooves and remove the rubber seals; while doing so, avoid using any sharp tools that could scratch or damage the metal surface.
Damaging the caliper bore during this stage can lead to leaks or malfunctions during reassembly, making it essential to perform this task with extreme care.
5. Thoroughly Clean the Caliper
Cleaning the caliper is the most critical step in the rebuilding process, as accumulated dirt, rust and old brake fluid can adversely affect its performance.
To remove dirt and deposits from the caliper body, use a brake cleaner spray in conjunction with a wire brush or a soft-bristled brush.
Ensure that all old fluid, rust particles and debris have been completely removed so that the internal surfaces are thoroughly cleaned.
While cleaning, carefully inspect the caliper bore for scratches, deep pits, or signs of rust; such imperfections can compromise proper sealing and may necessitate replacing the caliper rather than rebuilding it.
6. Inspect Components for Wear
Once the caliper is clean, carefully inspect all critical components before reassembling the unit.
You should check the piston for rust, pitting, or any surface damage, as even minor defects can lead to leaks or binding issues.
If the piston is damaged, it should be replaced rather than reused.
Additionally, check the caliper housing for cracks or signs of wear and ensure that the slide pins move freely.
Any stiffness or corrosion in these components can disrupt braking balance, making it essential to address these issues before proceeding.
7. Install New Seals and Lubricate
Following the inspection, it is essential to install new seals and O-rings to ensure proper sealing within the caliper.
To prevent damage to these rubber components, they should be carefully seated into their respective grooves using clean hands or a non-metallic tool.
It is necessary to apply a small amount of fresh brake fluid or an approved lubricant to the seals to ensure the piston moves smoothly during operation.
Proper installation and lubrication ensure that the hydraulic pressure system functions correctly, without any leaks or friction-related issues.
8. Reinstall the Piston
After installing the new seals, the piston is reinserted into the caliper bore.
It must be pressed in slowly and evenly to prevent damaging the seals or dislodging the piston from its proper position.
Forcing the piston into place or twisting it during installation can damage the seals, potentially leading to fluid leaks or seized brakes later on.
The piston should slide smoothly into the bore and seat correctly to ensure the hydraulic system functions properly when the brakes are applied.
9. Properly Install the Dust Boot
The dust boot is installed to protect the piston from dust, moisture and road debris.
It must be securely seated around both the piston and the caliper housing to create a complete seal.
If the dust boot is not installed correctly, contaminants can enter the caliper, leading to premature wear or seized brakes.
Proper installation during this step extends the lifespan of the rebuilt caliper and ensures consistent, reliable performance.
10. Reinstall the Caliper on the Vehicle
Once the rebuilding process is complete, the caliper is reinstalled onto the vehicle’s brake assembly.
Position the caliper over the rotor and secure it using the mounting bolts; for safety and proper alignment, tighten the bolts according to the torque specifications provided by the manufacturer.
If the brake line was disconnected, carefully reattach it and ensure it is fully sealed and free of leaks.
Proper bolt tightening and correct alignment are critical to prevent vibrations, noise, or brake imbalance.
11. Bleed the Brake System
The final step is to bleed the brake system; This involves purging any air that may have entered the system during the caliper rebuilding process.
The presence of air within the brake lines can cause the brake pedal to feel spongy and compromise braking effectiveness.
Bleeding the air restores proper hydraulic pressure, ensuring that the brakes once again feel firm and responsive.
This step is critical for safety, as even tiny air bubbles can significantly diminish the vehicle’s stopping power and negatively impact overall braking performance.
Know, About The Common Mistakes During Rebuilding the Brake Caliper at Home to Avoid Them
1. Damaging the Caliper Bore During Cleaning
One of the most common and costly mistakes made when rebuilding brake calipers is damaging the caliper bore during the cleaning process.
The bore is the smooth inner surface along which the piston travels and it is crucial that it remains completely clean and scratch-free to ensure proper sealing.
Using sharp tools, metal scrapers, or aggressive scrubbing methods can create minute grooves or scratches, which may not be immediately visible, but can later lead to brake fluid leaks or a seized piston.
Even slight damage to this component can compromise braking efficiency and may force you to replace the entire caliper rather than successfully repairing it.
To protect this critical surface, always employ safe cleaning methods, such as using brake cleaner sprays and soft-bristled brushes.
2. Improper Seal Installation
Another serious error is installing seals and O-rings in the wrong location or without proper alignment.
These seals are designed to maintain hydraulic pressure within the caliper; even slight misalignment can result in fluid leaks or uneven braking.
If a seal becomes twisted, pinched, or fails to seat fully within its groove, the piston will be unable to move freely, potentially leading to a seized brake or a loss of pressure.
It is imperative that each seal be carefully and correctly seated in its designated position and that you verify it sits flat and evenly before inserting the piston.
Rushing through this step often results in brake failure or necessitates repeating the entire repair process.
3. Reusing Old or Contaminated Brake Fluid
Reusing old brake fluid is a mistake that can have severe consequences for both braking performance and safety.
Over time, brake fluid absorbs moisture, which lowers its boiling point and diminishes its ability to effectively transmit hydraulic pressure.
Degraded fluid can lead to the formation of air bubbles within the braking system and cause internal corrosion.
If old fluid is reused during repairs, it can result in a spongy brake pedal, reduced stopping power, or internal damage to brake components.
Always use fresh, clean brake fluid to ensure the system operates at full capacity and remains reliable, even under conditions of extreme heat and pressure.
4. Skipping Brake Bleeding
Skipping the brake bleeding process after caliper repairs is a critical error that directly compromises safety.
When air enters the brake lines, typically during the removal or reinstallation of components, it compresses under pressure, preventing the braking system from generating the necessary force.
Consequently, the brake pedal feels spongy or soft and braking responsiveness is significantly reduced.
Even if the caliper has been completely rebuilt, trapped air can render the system unsafe to operate.
Bleeding the brakes expels all air bubbles and restores robust hydraulic pressure, ensuring that the brakes engage instantly and consistently whenever applied.
5. Overtightening or Undertightening Bolts
Improperly tightening bolts is another common mistake that can lead to serious issues after servicing the caliper.
Overtightening bolts can strip their threads, cause components to crack, or exert uneven pressure on the caliper housing, resulting in long-term damage.
Conversely, undertightening bolts can allow the caliper to shift slightly during braking, potentially causing vibrations or noise; in severe cases, this can even lead to a complete loss of braking stability.
Every bolt in the braking system must be tightened precisely according to the torque specifications prescribed by the manufacturer.
This ensures both safety while driving and proper mechanical performance.
Follow, Tips for Successfully Rebuilding Brake Calipers
1. Always Use a High-Quality Rebuild Kit
Using a high-quality rebuild kit is one of the most critical factors in ensuring the successful repair of a brake caliper.
These kits contain essential components such as: seals, O-rings and dust boots, designed to restore proper sealing and ensure the smooth movement of the piston.
Low-quality or inexpensive kits may not fit correctly or may deteriorate prematurely, increasing the likelihood of brake fluid leaks or inconsistencies in braking performance.
A reliable rebuild kit ensures that all internal components meet the necessary specifications, allowing the caliper to function like new again and enhancing overall safety on the road.
2. Replace the Piston If in Doubt
The caliper piston plays a crucial role in applying pressure to the brake pads; therefore, its condition must be absolutely pristine.
If it shows even the slightest signs of rust, pitting, or any form of surface damage, it is safer to replace the piston rather than attempting to reuse it.
A compromised piston can lead to issues such as uneven pressure, fluid leaks, or seized brakes, problems that directly impact stopping performance.
Even minor imperfections, which may seem insignificant at first, can evolve into major problems over time due to constant exposure to heat and pressure.
Whenever there is any doubt, replacing the piston ensures long-term reliability and minimizes the risk of brake failure following the rebuild.
3. Work Systematically and Keep Components Organized
Rebuilding a brake caliper requires patience and meticulous attention to detail, as it involves removing, cleaning and reassembling numerous small components in the correct sequence.
Working too hastily increases the likelihood of overlooking essential steps or misplacing components, which can lead to system failure.
Arranging all parts in a clean, organized manner helps you understand how everything fits together and minimizes confusion during the reassembly process.
Working slowly and carefully also ensures that seals, pistons and other sensitive components are handled correctly, without sustaining any damage, resulting in a safer and more reliable brake system.
4. Take Reference Photos While Disassembling Parts
Taking photos while disassembling parts is a simple yet highly effective method for ensuring that they are reassembled correctly.
Brake calipers contain many small components that can be difficult to recall once they have been removed.
By snapping clear photos at every stage, you create a visual reference that illustrates the original placement of each part.
This is particularly useful for correctly orienting and reinstalling seals, dust boots and brackets.
Photos minimize the risk of errors and streamline the reassembly process specially for beginners who lack prior experience working on brake systems.
Understand, When to Replace a Caliper Instead of Rebuilding It?
Even, there’s literally research that shows that corrosion buildup inside the braking system can cause the sticking effect between the brake components, as it directly impacting caliper performance, also this is really important because when corrosion develops inside the caliper area, then it can literally prevent the smooth piston movement, which leads to the uneven braking and reduced safety as well, so this is why rebuilding a caliper with the new seals and proper cleaning is really necessary to restore that properly function one.[¹]
1. Severe Corrosion Inside the Caliper Bore
If excessive corrosion has developed inside the caliper bore, rebuilding it is generally not a safe option.
A smooth bore is essential for the piston to move correctly and for proper hydraulic pressure to be maintained.
When rust accumulates deep within the inner surface of the bore, it can compromise the sealing surface, preventing new seals from functioning effectively.
This often leads to issues such as brake fluid leaks, piston sticking, or uneven braking.
In such cases, even the use of a complete rebuild kit cannot restore safe braking functionality; therefore, completely replacing the caliper remains the more reliable option.
2. Deep Scratches or Pitting on the Piston
It is crucial for the piston’s surface to be perfectly smooth so that it can slide freely within the caliper and apply uniform pressure to the brake pads.
If rust or wear has caused deep scratches, pits, or rough spots to form on the piston, it will fail to seal properly, even after installing new seals.
This can result in fluid leaks, reduced braking power, or the piston sticking during braking.
As the piston directly regulates brake pressure, any visible damage to it is a clear indication that replacing the entire unit, rather than attempting to repair it, is the safer course of action.
3. Cracks or Damage to the Caliper Housing
The caliper housing serves as the primary structural framework that holds all the brake components together, regardless of the immense pressure they are subjected to.
If the caliper housing exhibits any cracks, structural defects, or signs of metal fatigue, the caliper should not be repaired and reused.
The heat and pressure generated during braking can cause even minor cracks to propagate, creating a risk of sudden brake failure.
As the braking system operates under immense force, it is absolutely critical that the housing remains structurally sound at all times.
If there are any visible signs of defects in the housing, replacing the entire caliper remains the only safe option.
4. The Cost of Parts Being Nearly Equal to the Cost of a New Caliper
Occasionally, the total cost of replacing seals, pistons and other repair components approaches the price of a brand-new or remanufactured caliper.
In such situations, investing time and effort in repairs, or accepting the associated risks, is not a prudent course of action; particularly if the old caliper harbors hidden defects, such as excessive wear or corrosion.
A new caliper offers factory-tested reliability and often comes with a warranty, making it a far more practical choice.
When the costs are roughly equivalent, it is preferable to replace the caliper rather than repairing it; this ensures superior safety and performance in the long run, while also eliminating the uncertainties associated with reused components.
The Cost of Rebuilding Brake Calipers at Home
1. The Cost of a Standard Rebuild Kit
The cost of rebuilding a brake caliper depends primarily on the quality of the rebuild kit you choose.
A standard kit typically includes seals, O-rings and a dust boot, components essential for ensuring proper internal sealing within the caliper and facilitating the smooth movement of the piston.
In most cases, basic kits are quite affordable, whereas higher-quality kits, featuring superior rubber materials and enhanced durability, come at a higher price point.
Costs may also vary depending on the type of vehicle, as larger vehicles or high-performance models often require more expensive parts.
Despite these variations, rebuilding is generally considered a more cost-effective option than replacing the entire caliper assembly, as you are essentially renewing only the internal components rather than purchasing a complete new unit.
2. The Cost of Tools – If You Don’t Already Own Them
If you already possess a basic set of garage tools, the cost of rebuilding a caliper remains relatively low; however, beginners lacking the necessary tools may incur additional expenses.
Essential tools such as: a jack, jack stands, a socket set, a torque wrench and brake cleaner, as it can significantly increase the total cost if purchased brand new.
In some instances, specialized tools such as: a brake caliper piston tool or a brake line wrench, may also be required.
Nevertheless, as these tools can be reused for future repairs, they should be viewed as a long-term investment rather than a one-time expense.
Once acquired, these tools can be utilized for a variety of brake-related tasks and other maintenance procedures, thereby reducing future repair costs.
3. Comparison with Professional Repair or Replacement
When comparing DIY (Do-It-Yourself) repairs with professional services or a complete caliper replacement, rebuilding the unit yourself is generally the most cost-effective option.
Professional repair services charge labor fees in addition to the cost of parts, which can significantly increase the total expense.
On the other hand, completely replacing a caliper with a new or remanufactured unit is often the most expensive option, although it offers the greatest convenience and reliability.
DIY repair strikes a middle ground between these two approaches, balancing cost savings with performance; however, it requires time, patience and close attention to detail.
If executed correctly, it can restore brake performance, at a fraction of the cost of professional services, while ensuring safe and reliable braking.
How Long Does it Take to Rebuild a Brake Caliper?
1. Average Time for Beginners vs Experienced DIYers
The time required to rebuild a brake caliper depends primarily on your level of experience and your knowledge of brake systems.
For a beginner attempting this task for the first time, the process typically takes longer, as every step must be executed with caution and every component double-checked to ensure no errors occur.
On average, a beginner might spend several hours on a single caliper, as they require more time to disassemble, clean, identify components and reassemble the unit.
Conversely, an experienced DIY mechanic can perform the same task much more quickly, as they already know the correct sequence of steps, are proficient in using the necessary tools and know exactly where each component fits.
For them, rebuilding a caliper is often a much faster process, sometimes completed in just one or two hours, provided everything goes smoothly.
However, whether a beginner or an expert, no one should rush this task, as the brake system directly impacts driving safety and requires meticulous attention to even the smallest details.
2. Factors Affecting Time – Rust, Seized Parts, Available Tools
Several real-world factors can significantly increase or decrease the total time required to rebuild a brake caliper.
One of the most critical factors is rust, particularly in older vehicles or those frequently exposed to moisture and road salt.
Rust can make it difficult to remove bolts, slow down the process of extracting the piston and increase the time needed to clean the internal components of the caliper.
Another common cause of delay is the seizing of components such as: a piston failing to retract smoothly, or a slide pin becoming stuck due to rust.
Rectifying these issues often requires extra effort, thorough cleaning, or the careful application of force, thereby increasing the total time required for the repair.
The availability and quality of tools also play a crucial role; having the right tools at hand from the outset makes the process significantly easier and faster, whereas a lack of appropriate tools can lead to unnecessary delays and setbacks.
Ultimately, the condition of the caliper, along with the quality of the tools available to the mechanic, determines whether the job will be completed quickly and easily, or if it will prove to be a time-consuming and arduous task.
Read More:
- How to Check Brake Caliper Piston Movement
- How to Resurface Brake Rotors at Home
- How to Fix Brake Rotor Runout
- How to Check Brake Disc Runout
- How to Prevent Brake Fluid Boiling
- How to Diagnose Brake Fluid Boiling
- How to Fix Brake Pedal Sinking Slowly
- How to Check Brake Pad Wear Sensor
- How to Measure Brake Pad Thickness Without Removing Wheel
- How to Replace Brake Pads
- How to Replace Brake Rotors
- How to Bleed Car Brakes
Conclusion – How to Rebuild Brake Caliper at Home
So, now you understand that: just knowing when to rebuild and when to replace is what actually separates safe repair from the risky repair as well.
The caliper is directly responsible for applying pressure to the brake pads; this means that even a minor error during the rebuilding process can impact how effectively your car comes to a stop on the road.
When executed correctly, a rebuild can restore smooth braking performance, resolve issues such as stuck pistons or fluid leaks and extend the lifespan of your brake system without requiring the replacement of the entire assembly.
However, the key to a successful rebuild lies in patience, cleanliness and meticulous attention to detail at every stage, from removing old seals to the subsequent process of bleeding air from the brake system.
It is also important to remember that rebuilding is not the right option for every caliper, particularly if it exhibits deep corrosion, cracks in the housing, or severe internal damage.
In such instances, replacement remains the safer and more reliable choice.
Now, you can ask related questions below this guide about How to Rebuild Brake Caliper at Home.
Frequently Asked Questions
FAQ 1: What is the function of a brake caliper in a car?
Answer: The brake caliper is a crucial component of your car’s braking system. Its primary function is to firmly clamp the brake pads against the brake rotor when you press the brake pedal. This action generates friction, which slows down your vehicle and brings it to a stop. Inside the caliper, a piston is actuated by the hydraulic pressure of the brake fluid; this movement exerts force upon the pads. If the caliper is not functioning correctly, your car will be unable to stop easily or safely.
FAQ 2: How do I know if my brake caliper needs to be rebuilt?
Answer: If you observe certain warning signs such as: brake fluid leaking near the wheel, uneven wear on the brake pads, or the car pulling to one side while braking, as your brake caliper may require a rebuild. Other indicators include sticking brakes, a reduction in braking efficiency, or a burning smell after driving. These symptoms typically suggest that the internal piston or seals within the caliper are worn out, damaged, or seized and require immediate attention.
FAQ 3: Is it safe to rebuild a brake caliper at home?
Answer: Yes, rebuilding a brake caliper at home can be safe, provided you carefully follow the correct procedures. However, as the braking system is a critical safety component, any error during this process could be dangerous. You should work in a systematic manner, maintain cleanliness throughout the entire job, use the appropriate tools and always bleed the brakes once the work is complete. If the caliper is severely damaged or heavily corroded, it is safer to replace it entirely rather than attempting to repair it.
FAQ 4: How difficult is it for a beginner to repair a brake caliper?
Answer: For beginners, repairing a brake caliper is considered a task of moderate difficulty. It is not overly complex, but it requires close attention to detail and patience. The most challenging aspects involve removing seized components, thoroughly cleaning the caliper and correctly installing the seals. With the aid of the right guides and tools, most beginners can successfully complete this task; however, rushing through the process can lead to errors that compromise braking safety.
FAQ 5: How long does a repaired brake caliper last?
Answer: If high-quality parts are used and the work is performed correctly, a repaired brake caliper can last for several years. Its lifespan depends on driving conditions, maintenance practices and environmental factors such as: humidity and road salt. Under normal driving conditions, a properly rebuilt caliper can function just like a brand-new one for a long time, provided it is not exposed to severe corrosion or excessive wear and tear.
FAQ 6: Do I need to change the brake fluid after rebuilding a caliper?
Answer: Yes, in most cases, it is recommended to bleed or replace the brake fluid after rebuilding a caliper. This is because opening the caliper allows air to enter the brake lines and the presence of air diminishes braking efficiency. Fresh brake fluid also ensures proper hydraulic pressure and flushes out any old or degraded fluid from the system. This step is essential for restoring a firm and responsive feel to the brake pedal.
FAQ 7: What happens if I don’t rebuild a faulty brake caliper?
Answer: If a faulty brake caliper is not repaired or replaced, it can lead to serious issues. A seized caliper can cause problems such as uneven braking, accelerated tire wear, excessive heat generation and reduced fuel efficiency. In severe cases, this can increase the vehicle’s stopping distance and compromise driving safety. Ignoring this issue can also damage other brake components such as: rotors and pads, that potentially leading to higher repair costs down the road.
FAQ 8: When should I replace a caliper instead of rebuilding it?
Answer: You should replace a brake caliper rather than rebuilding it, if there is severe corrosion inside the bore, significant damage to the piston, or cracks in the caliper housing. If the cost of repair is roughly equivalent to the cost of purchasing a new caliper, replacement is the better option. If the structural integrity of the caliper has been compromised, it cannot be safely repaired; in such cases, installing a new or remanufactured caliper is the safest course of action.
References:
[1] Corrosion Stiction in Automotive Braking Systems
https://www.mdpi.com/1996-1944/16/10/3710

Hello Folks, Dean Shali here to help you out to solve the problems with your lovely vehicle, as i have lots of experience and knowledge about automotive industry as i woks directly with the customers and repair vehicles and i love to help the people to keep their cars safe and running smoothly.