Written By: Dean Shali
Fact Checked By: Sabré Cook
Reviewed By: Tamara Warren
if you have noticed that: your steering wheel is shaking while braking, then it is the rotor thing that needs to be checked properly.
Because, brake performance literally depends heavily on the precision and with even very small imperfections that could lead to the noticeable problems.
As, the commonly found issues in that case are: brake disc runout, which refers to how much the rotor actually wobbles side-to-side as it rotates.
So, this movement is often measured in the thousandths of an inch, yet it can cause the clear symptoms such as: brake pedal pulsation, steering wheel vibration, uneven brake pad wear and even reduces stopping smoothness as well.
Along with this, there’s even studies in automotive service data that shows that excessive runout is one of the leading causes of having brake vibration complaints: even when the rotors are new as well.
Basically, it often develops due to the improper installation, uneven lug nut torque, rust or dirt as between the hub and rotor or as simple as heat stress over the period of time and usage.
Now, this is the specific guide about How to Check Brake Disc Runout, so that you can accurately diagnose brake issues and avoid unnecessary part replacements as well.
What is Brake Disc Runout?
Brake disc runout is a precise measurement of how much a brake rotor moves laterally (side-to-side) as it rotates with the wheel.
In a properly functioning braking system, the rotor should spin in a perfectly straight and flat motion, without any wobble.
However, when runout is present, the rotor does not remain perfectly aligned; instead, it shifts slightly left and right during rotation.
This movement is typically very slight—often measured in thousandths of an inch—yet it can cause noticeable issues, such as a pulsating sensation in the brake pedal, vibration in the steering wheel, and an uneven feel when braking.
Even new rotors can exhibit runout if they are not installed correctly or if the mounting surface is not clean.
Since effective braking relies on smooth and uniform contact between the brake pads and the rotor, even a minuscule amount of runout can compromise braking consistency and comfort over time.
1. Definition of Brake Disc Runout
Brake disc runout refers to the amount of lateral movement or wobble observed as a brake rotor spins.
It is measured using a precision instrument called a “dial indicator,” which tracks how far the rotor’s surface deviates from its true central axis.
A perfectly aligned rotor will show very little to no movement, whereas a rotor with runout will exhibit variations during rotation.
Manufacturers establish specific limits for acceptable runout; these limits are extremely strict, as braking systems require a high degree of precision to function correctly.
When runout exceeds these limits, it can cause the brake pads to be pushed back and forth, resulting in uneven pressure and vibration during braking.
2. The Difference Between Lateral Runout and Thickness Variation
Lateral runout and thickness variation are closely related, yet they are not the same thing; understanding the distinction between them is crucial for accurate diagnosis.
Lateral runout refers to the side-to-side wobble that occurs as the rotor spins, indicating that the rotor does not remain perfectly flat within a single plane.
Thickness variation, on the other hand, refers to differences in the rotor’s thickness at various points across its surface.
Runout is often the root cause of thickness variation; when a rotor wobbles, the brake pads exert uneven pressure upon it over time, causing the rotor to wear unevenly.
This uneven wear leads to variations in the rotor’s thickness, which can result in a rough or pulsating sensation during braking—even if the original runout is no longer severe.
Simply put, runout is a dynamic issue, while thickness variation is the resulting wear.
3. How Runout Develops Over Time
Brake disc runout can develop gradually due to several common causes that affect how the rotor seats and rotates on the wheel hub.
One of the most common causes is improper installation—specifically when lug nuts are tightened unevenly or without the correct torque.
This can compromise the rotor’s alignment relative to the hub, resulting in immediate runout.
Another major cause is trapped dirt, rust, or debris between the rotor and hub surfaces, which prevents the rotor from seating completely flat.
Heat is also a major contributing factor, as repeated braking generates excessive temperatures, which can lead to slight deformation in the rotors over time—particularly when the brakes are subjected to heavy use.
Furthermore, worn or damaged wheel hubs and bearings can also induce movement that results in runout.
Since these issues develop gradually, many drivers remain unaware of the problem until its symptoms—such as vibration or uneven braking—become more pronounced.
Know, Why Checking for Brake Disc Runout Is Essential?
Checking for brake disc runout is crucial, as it directly impacts the operational efficiency and safety of your braking system.
Brakes are designed to apply uniform pressure to both sides of the rotor; this can only occur if the rotor rotates in a perfectly true plane.
When runout occurs—even in minute amounts—it creates uneven contact between the brake pads and the rotor surface.
Over time, this leads to issues that compromise driving comfort, performance, and component longevity.
Regularly checking for runout allows for the early detection of these problems, enabling you to address them before they escalate into more serious and costly issues.
It also ensures that any brake-related maintenance you perform—such as replacing pads or rotors—yields the expected results and is free from any hidden defects that could degrade performance.
1. Prevents Brake Pedal Vibration
Brake pedal vibration is one of the most common symptoms of excessive runout; it is often felt as a pulsating vibration or a series of jolts when you depress the brake pedal.
This occurs because the rotor is not rotating uniformly, causing the brake pads to oscillate in and out as they attempt to follow the uneven surface.
This repetitive movement travels back through the braking system and is felt at the pedal.
By promptly checking for and correcting runout, you can prevent this vibration from occurring, ensuring a smooth and stable braking experience every time you decelerate.
This not only enhances driving comfort but also improves your control over the vehicle while braking.
2. Prevents Uneven Brake Pad Wear
Uneven brake pad wear is another direct consequence of rotor runout, and it can significantly reduce the lifespan of your brake components.
When a rotor wobbles, certain sections of the brake pads make greater contact than others, causing those specific areas to wear down more rapidly.
Over time, this creates an uneven surface on the pads, further diminishing braking efficiency and potentially leading to noise or vibrations.
By checking for runout and correcting any alignment-related issues, you ensure that the brake pads wear evenly across their entire surface.
This helps extend the lifespan of both the pads and the rotors, saving you money and reducing the need for frequent replacements.
3. Improves Braking Efficiency and Stopping Distance
A braking system with minimal runout operates more efficiently because the brake pads maintain consistent and full contact with the rotor.
When runout occurs, this contact becomes uneven, thereby reducing the effective friction required to decelerate the vehicle.
This can slightly increase stopping distances and make braking feel less reliable—particularly at high speeds or during sudden braking situations.
By ensuring that the rotors are properly aligned and remain within acceptable runout limits, you enable the braking system to perform at its full potential.
This results in smoother, more robust braking across all driving conditions, as well as more reliable stopping performance.
4. Helps Detect Underlying Issues
Checking for brake disc runout involves much more than just inspecting the rotor itself; it also aids in identifying other underlying issues within the braking system and wheel assembly.
Excessive runout can stem from issues such as a warped hub, worn wheel bearings, or improper lug nut torque during installation.
If excessive runout persists even after cleaning and reinstalling the rotor, it often points to these underlying mechanical issues.
By measuring runout, you gain a clear and precise method for identifying the root cause of the problem—rather than relying on guesswork or replacing parts unnecessarily.
This makes the repair process more efficient and ensures that the actual problem is resolved, rather than merely treating the symptoms.
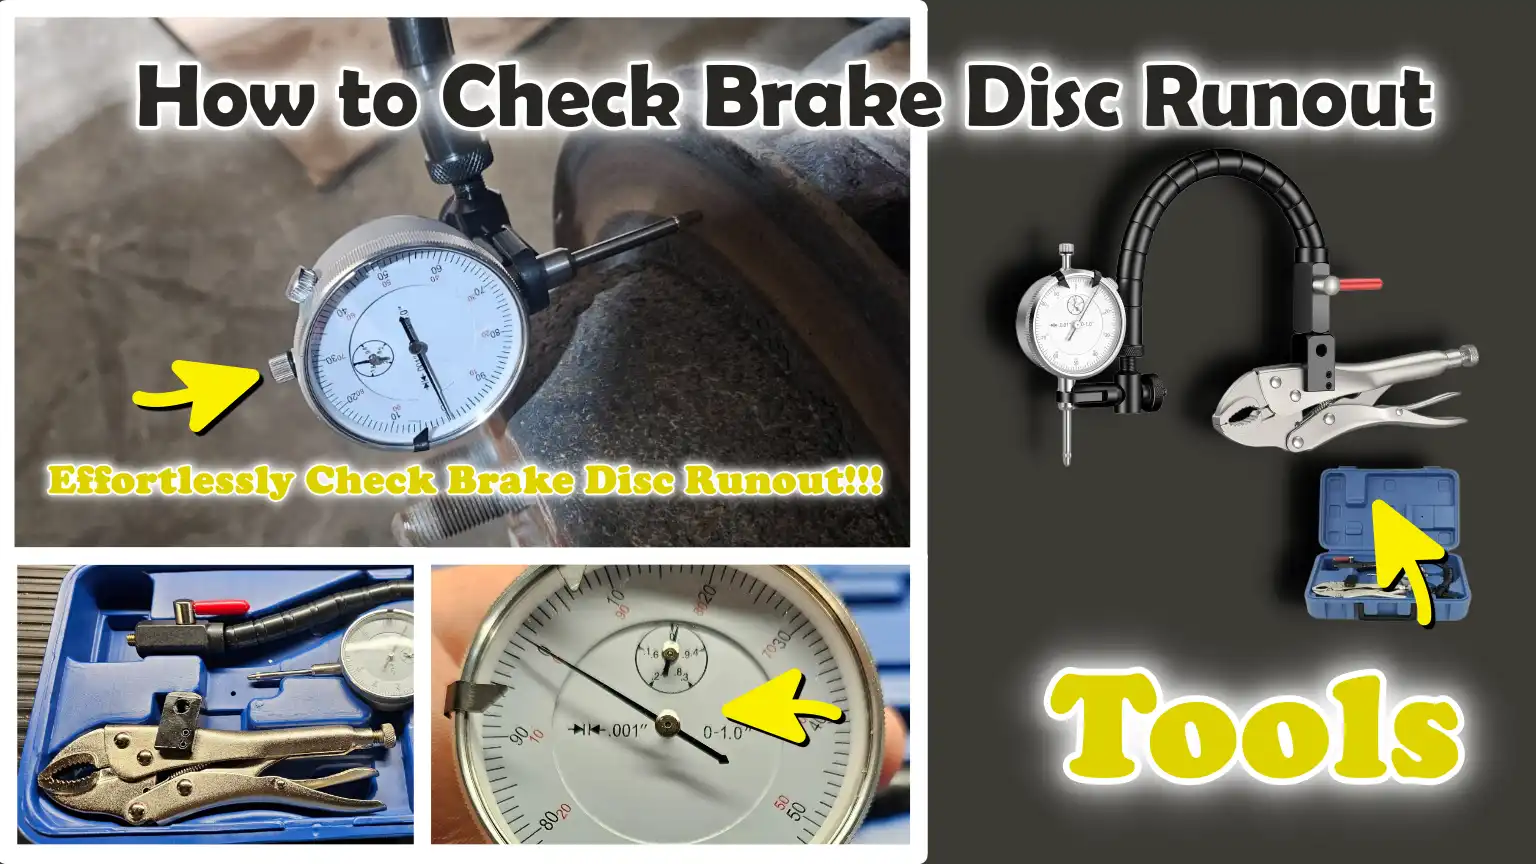
Tools
| Tool Name | Why It Is Needed | How to Use It Properly |
|---|---|---|
| Dial Indicator with Magnetic Base | This is the most essential tool, as it measures the amount of lateral movement (wobble) exhibited by the brake disc while it rotates. It provides highly precise readings—typically measured in thousandths of an inch—helping you determine whether the runout falls within safe limits. | Attach the magnetic base to a sturdy metal component—such as the suspension assembly or steering knuckle—to ensure it remains firmly anchored in place. Gently position the tip of the dial indicator against the surface of the rotor. Slowly rotate the rotor by hand while observing the movement of the needle. Note the highest and lowest readings to determine the total runout. |
| Lug Nuts or Wheel Spacers | These are required to firmly secure the brake rotor to the wheel hub. If the rotor is not properly secured, it may remain loose, potentially resulting in inaccurate or unreliable readings. Establishing proper contact between the rotor and the hub is crucial for obtaining precise measurements. | Place the rotor onto the hub and use a few lug nuts to tighten it evenly. Tighten them in a cross-pattern sequence to ensure that the rotor seats fully and remains perfectly aligned with the hub. Avoid overtightening them unevenly by hand, as this can lead to erroneous runout readings during the measurement process. |
| Torque Wrench | A torque wrench ensures that the lug nuts are tightened with consistent and precise force. Uneven or improper tightening is one of the most common causes of brake disc runout; therefore, this tool helps prevent errors during the setup procedure. | Set the torque wrench to the specific torque value recommended for your vehicle. Tighten each lug nut following a star or cross-pattern sequence. This maintains uniform pressure and ensures proper alignment between the rotor and the hub. |
| Jack and Jack Stands | These tools are essential for safely lifting the vehicle and keeping it stable while you work on it. Proper support is crucial, as you must be able to rotate the wheel hub freely and perform your work without any instability or risk. | Use a jack to lift the vehicle at the designated lifting points. Once lifted, place jack stands underneath the vehicle to support it. Gently lower the vehicle onto the stands, and ensure that it is stable before removing the wheel and beginning your work. |
| Wire Brush or Cleaning Tool | Dust, rust, and debris trapped between the rotor and the hub are the primary causes of “runout.” This tool helps clean these surfaces, allowing the rotor to seat perfectly flat and flush—a prerequisite for obtaining accurate measurements. | Use a wire brush to clean the hub surface and the back of the rotor. Remove all rust, dust, and loose particles. Before reinstalling the rotor, wipe the area with a clean cloth to ensure that the mounting surface remains smooth and uniform. |
Know, Safety Precautions Before Starting Work
Before checking for brake disc runout, it is crucial to observe basic safety measures to prevent accidents and ensure that the work is performed correctly.
Since inspecting brakes involves lifting the vehicle and working in close proximity to critical components, even a minor error can lead to serious injury or severe consequences.
Ensuring that the vehicle is stable, properly supported, and situated in a secure location allows you to focus on taking precise measurements without facing any unnecessary risks.
These precautions are not merely general guidelines; they directly impact both your personal safety and the accuracy of the runout readings.
If the vehicle is not secured, or if the brakes are excessively hot, measurements may be inaccurate, and the situation could quickly become hazardous.
1. Park on Level Ground
Always begin your work by parking the vehicle on a flat and level surface, as lifting a vehicle on uneven ground can compromise its stability.
If the ground is sloped or uneven, the vehicle’s weight may suddenly shift to one side, significantly increasing the risk of the vehicle rolling or slipping off the jack stands.
A level surface ensures that the vehicle remains balanced and stable throughout the entire process.
It also facilitates accurate measurements, as even a slight tilt or movement can affect how the rotor sits and rotates during the runout check.
2. Use Wheel Chocks
Wheel chocks are used to secure the wheels that remain in contact with the ground, thereby preventing the vehicle from rolling forward or backward.
Even after engaging the parking brake, there remains a possibility of slight vehicle movement—particularly when a portion of the vehicle has been lifted.
Placing wheel chocks snugly against the tires provides an extra layer of safety, ensuring that the vehicle remains completely stationary.
This becomes even more critical when you are working on the front or rear wheels, as any sudden movement of the vehicle could cause it to shift from its position and create an unsafe situation.
3. Properly Lift and Support the Vehicle
Lifting the vehicle correctly is the most critical safety step.
A jack should be used solely to raise the vehicle, not to support it in that elevated position for an extended period.
Once the vehicle has been raised, it is essential to support it using sturdy jack stands placed at the appropriate locations.
To distribute the vehicle’s weight evenly, these stands must be positioned at the points specified by the manufacturer.
Proper support eliminates the risk of the vehicle suddenly falling or shifting—an occurrence that can be extremely dangerous.
Furthermore, it ensures that the wheel hubs and rotors can rotate freely without obstruction, thereby making it possible to take accurate runout measurements.
4. Ensure the Brakes Are Cool
Before beginning any work, verify that the brakes are completely cool to the touch.
Applying the brakes generates a significant amount of heat, and recently used brake discs can become hot enough to pose a burn hazard.
This heat can also induce slight thermal expansion in the metal, which may compromise the accuracy of measurements taken immediately after the vehicle has been driven.
Allowing the brakes to cool down not only ensures your safety but also yields more reliable readings.
Working on cool components makes the process more comfortable and reduces the risk of injury while handling the rotors and surrounding parts.
How to Check Brake Disc Runout – Perfect Method
Checking brake disc runout is a precise procedure that helps you determine how straight and true the rotor is spinning relative to the hub.
Even the slightest deviation can impact the smoothness of braking; therefore, every step must be executed with care and precision.
The objective is to establish a stable setup, ensure that the rotor is seated perfectly in place, and then measure its lateral movement using a dial indicator.
When performed correctly, this process yields clear and reliable results, allowing you to confidently diagnose vibrations, uneven wear, and other braking-related issues.
1. Lift and Secure the Vehicle
To begin, safely lift the vehicle so that the wheel you are working on is raised off the ground.
Use a jack to lift the vehicle at the designated lifting points, and then place sturdy jack stands beneath strong structural components to securely support the vehicle.
The vehicle must remain stable, as any movement could compromise both safety and the accuracy of the measurements.
Once the vehicle is safely lifted, completely remove the wheel to expose the brake rotor and hub assembly.
This ensures full access and allows the rotor to spin freely during the testing process.
2. Clean the Rotor and Hub Surfaces
Cleaning the rotor and hub surfaces is one of the most critical steps, as even the slightest amount of dirt or rust can result in inaccurate runout readings.
Use a wire brush or cleaning tool to remove all rust, dirt, and debris from the face of the hub and the back of the rotor.
These surfaces must be smooth and flat to ensure that the rotor seats completely and uniformly against the hub.
If the rotor is mounted on a rough or dirty surface, it will not align correctly, and measurements will indicate a runout that is not actually caused by the rotor itself.
Proper cleaning ensures that the readings you obtain are accurate and reliable.
3. Reinstall the Rotor Correctly
After cleaning, place the rotor back onto the hub and secure it using the lug nuts.
The rotor must be held firmly in place so that it does not shift during measurement.
Tighten the lug nuts evenly in an opposing pattern (a criss-cross sequence) to ensure that the rotor seats perfectly against the hub.
Using a torque wrench here is crucial; if the tightening is uneven or incorrect, the runout readings will be inaccurate.
By applying the correct torque uniformly, you simulate how the rotor seats when the wheel is mounted; this makes your measurements more realistic and precise.
4. Set Up the Dial Indicator
Next, set up the dial indicator to measure the rotor’s movement.
Attach the magnetic base to a sturdy and stable part of the suspension or steering assembly—ideally a location that will not shift or vibrate during testing.
Position the tip of the dial indicator so that it lightly touches the rotor’s surface—typically near the outer edge, where runout is easiest to detect.
To ensure accurate readings, the tip should be positioned at a right angle (90 degrees) relative to the rotor’s surface.
A stable setup is essential, as any movement of the tool itself can compromise the accuracy of the measurements.
5. Measure Runout
Once the dial indicator is set up, slowly rotate the rotor by hand and observe the movement of the indicator needle.
As the rotor turns, the needle will move back and forth, clearly revealing any variations in the rotor’s position.
Pay close attention to the highest and lowest points the needle reaches during a full rotation.
These values represent the maximum deviation of the rotor from its true axis of rotation.
Take your time during this step to ensure that the rotation is uniform and smooth, allowing for accurate observation, as rapid or erratic movement can affect the readings.
6. Calculate Total Runout
To determine the total runout, subtract the lowest reading displayed on the dial indicator from the highest reading.
This value is referred to as “Total Indicated Runout” (TIR), and it represents the total lateral movement of the rotor from one side to the other.
Once you have obtained this figure, compare it against the acceptable limits specified for your vehicle.
For most vehicles, these acceptable limits are quite strict, as braking systems require a high degree of precision.
If the measured runout exceeds the specified limit, it indicates an issue that requires correction—such as improper installation, accumulated debris, or a warped component.
Acceptable Brake Disc Runout Specifications
Brake disc runout must remain within very strict limits (tolerances), as braking systems rely on precise and uniform contact between the brake pads and the rotor.
Runout is measured in thousandths of an inch, and even a slight deviation from the acceptable limit can lead to noticeable problems.
Most vehicle manufacturers establish strict limits to ensure smooth braking, minimize vibration, and protect brake components from uneven wear.
Understanding these limits helps you determine whether your rotor is in good condition or requires attention.
Accurate measurement and proper comparison against specifications are essential for maintaining safe and reliable braking performance.
1. General Range
For most vehicles, acceptable brake disc runout typically falls between approximately 0.001 and 0.005 inches, although the exact value may vary depending on the vehicle’s design, rotor size, and manufacturer standards.
Smaller and more precise braking systems often have stricter limits, while slightly looser tolerances may be acceptable in larger systems.
These values may seem minuscule, but a difference of even a few thousandths of an inch can be felt as vibration or pulsation during braking.
This occurs because the brake pads react to every minute movement of the rotor as it rotates.
Staying within this limit ensures that the rotor spins smoothly and maintains consistent contact with the pads—a critical factor for stable and predictable braking.
2. The Importance of Consulting the Vehicle Service Manual
Every vehicle is designed with its own specific limits (tolerances); for this reason, consulting the service manual is absolutely essential when measuring brake disc runout.
The manual provides precise acceptable limits specific to your particular vehicle, along with any additional instructions regarding measurement or installation procedures.
Relying solely on generic values can lead to erroneous conclusions, as what is acceptable for one vehicle may not be acceptable for another.
By adhering to the manufacturer’s specifications, you ensure that your measurements are both accurate and relevant.
This helps you avoid unnecessary repairs while also ensuring that any genuine issues are correctly identified and rectified.
3. What happens if the runout exceeds the limit?
When brake disc runout exceeds the recommended limits, it begins to affect the braking system in several noticeable and detrimental ways.
The most common consequence is brake pedal pulsation, wherein the driver experiences repetitive vibrations while braking.
This occurs because, as the rotor rotates, its uneven surface repeatedly pushes the brake pads inward and outward.
Over time, excessive runout causes the brake pads to wear unevenly as well, thereby reducing their lifespan and potentially leading to even more complex braking-related issues.
Furthermore, this can result in variations in rotor thickness—known as DTV (Disc Thickness Variation)—which can exacerbate the problem, even if the initial runout condition has changed.
Braking efficiency may also be compromised, potentially resulting in increased stopping distances and reduced vehicle control, particularly during sudden braking maneuvers.
If left unaddressed, excessive runout can necessitate frequent repairs and incur increased costs; this is because, if the root cause of the problem is not resolved, even newly installed components may suffer from premature wear.
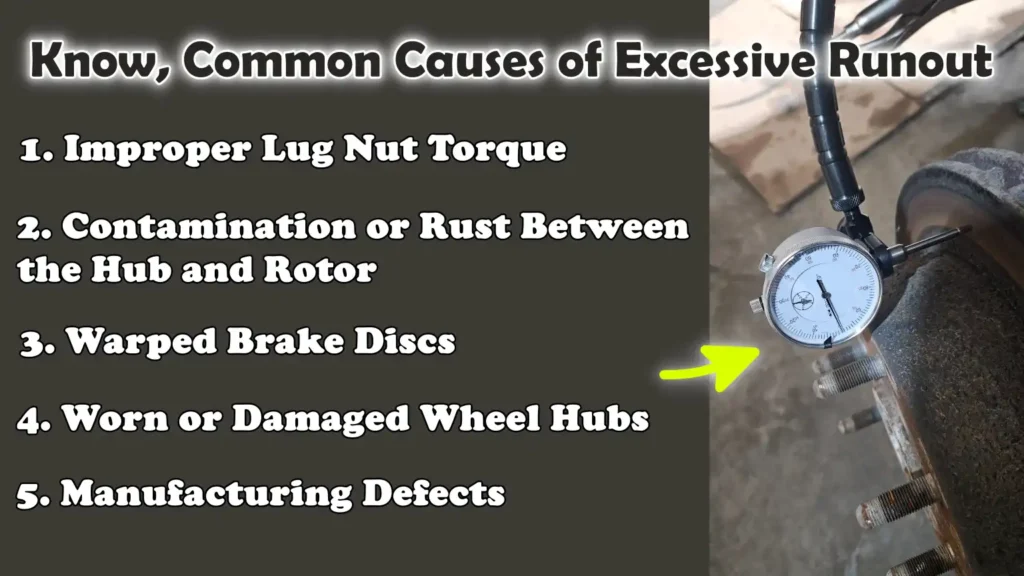
Know, Common Causes of Excessive Runout
Excessive runout in brake discs is typically not caused by a single factor, but rather by a combination of several minor issues.
These issues affect how the rotor seats against the hub and how it rotates.
Because braking systems require such high precision, even the slightest irregularity in installation, surface condition, or component wear can result in measurable deviations.
Identifying the root cause is crucial; if an underlying issue persists, simply replacing the rotor will not resolve the problem.
Identifying and rectifying these causes ensures precise measurements, smooth braking, and extended component lifespan.
1. Improper Lug Nut Torque
Improper lug nut torque is one of the most common causes of brake disc runout, particularly following wheel or brake service.
When lug nuts are tightened unevenly—or without adhering to proper torque specifications—they exert uneven pressure on the rotor.
This can cause the rotor to warp slightly or prevent it from seating perfectly flush against the hub.
Even a minor discrepancy in tightening force can result in measurable runout, as the rotor is forced to seat at a slightly skewed angle.
Over time, this uneven pressure can lead to permanent warping or uneven wear.
Using a torque wrench and tightening the lug nuts in the correct sequence helps prevent this issue and ensures that the rotor remains properly aligned.
2. Contamination or Rust Between the Hub and Rotor
For precise alignment, the contact surface between the hub and the rotor must be completely clean and flat.
Any dirt, rust, or debris trapped between these surfaces can create a minute gap, causing the rotor to seat unevenly.
Even a thin layer of rust can disrupt the alignment so significantly that runout becomes clearly visible.
This is a very common issue in vehicles exposed to moisture or road debris, where rust tends to accumulate over time.
Since the rotor relies on full contact with the hub, any obstruction can affect its rotational dynamics.
To avoid inaccurate runout readings and ensure the vehicle operates smoothly, it is crucial to thoroughly clean both surfaces prior to installation.
3. Warped Brake Discs
Warped brake discs are a direct cause of runout—a condition in which the shape of the rotor itself becomes uneven or distorted.
This can occur due to repeated exposure to extreme heat during braking—particularly when the vehicle is under heavy use or when sudden, forceful braking is required.
When the rotor heats up and cools down unevenly, different sections of the metal expand and contract at varying rates, resulting in a slight distortion.
This distortion causes the rotor to wobble as it spins, creating “runout,” which can be felt as vibration or pulsation.
In many cases, a warped rotor requires resurfacing or replacement, as the disc surface is no longer perfectly flat.
4. Worn or Damaged Wheel Hubs
The wheel hub is the surface upon which the rotor rests, and its condition plays a critical role in maintaining proper alignment.
If the hub is worn, warped, or damaged, it can induce movement that directly affects the rotor.
Even if the rotor itself is perfectly flat, a defective hub can cause it to rotate unevenly.
Worn wheel bearings can also exacerbate this issue, as they allow for a slight amount of play or movement within the hub assembly.
Diagnosing such a problem is often difficult because the rotor may appear completely normal to the naked eye; nevertheless, the runout issue persists even after proper cleaning and installation.
When excessive runout cannot be resolved through standard methods, it becomes imperative to inspect the condition of the hub and bearings.
5. Manufacturing Defects
In some instances, minor defects may remain in the brake discs following the manufacturing process.
Although most rotors are manufactured to very strict tolerances, imperfections can still exist—particularly in lower-quality or improperly handled parts.
These defects may include uneven thickness, slight imbalance, or surface irregularities, all of which can cause runout issues to persist even after the component has been correctly installed.
This is why runout can sometimes be detected even in brand-new rotors.
Checking for runout after installation ensures that the component meets acceptable standards.
If excessive runout is detected in a new rotor despite proper installation, it will likely need to be replaced with a higher-quality component.
How to Fix Brake Disc Runout
Correcting brake disc runout requires a meticulous, step-by-step approach, as this issue is often caused not by the rotor itself, but rather by the way the rotor seats against the hub.
Since runout is measured in very minute increments, even minor adjustments can make a significant difference in braking smoothness and performance.
The goal is to eliminate the source of any uneven mounting, ensure proper alignment, and verify that all related components are in good condition.
Starting with the simplest measures and progressing toward more advanced solutions helps avoid unnecessary repairs and ensures that the root cause of the problem is properly addressed.
1. Clean and Reinstall
Cleaning and reinstalling the rotor is often the first and most effective step, as dirt, rust, and debris are very common causes of runout.
Remove the rotor and thoroughly clean both the hub surface and the back of the rotor using a wire brush or a similar tool.
The surfaces must be completely smooth and free of any deposits to ensure that the rotor seats properly.
After cleaning, reinstall the rotor and secure it using the lug nuts, tightening them evenly with a torque wrench.
Correct and uniform torque is critical, as uneven tightening can induce artificial runout.
In many cases, this simple step can significantly reduce or completely eliminate the problem.
2. Index the Rotor
Indexing the rotor involves changing its position on the hub to find a better alignment.
Since both the rotor and the hub may contain very minute imperfections, rotating the rotor to a different position can sometimes help to offset these variations.
To do this, remove the rotor, rotate it by one or two lug positions, and securely reinstall it.
Then, measure the runout again.
This process may need to be repeated a few times until the lowest possible runout reading is achieved.
This method is simple yet effective and is often employed when the runout is slightly above the acceptable limit.
3. Resurface the Rotor
Resurfacing—also known as machining—is used when uneven wear or minor deformation is visible on the rotor’s surface, provided that it remains thick enough to be reused.
A brake lathe is used to remove a very thin layer of material from the rotor’s surface, thereby restoring it to a flat and smooth condition.
If performed correctly, this process can rectify deficiencies in both runout and thickness.
However, resurfacing should only be undertaken if the rotor meets the minimum thickness specifications prescribed by the manufacturer.
Removing excessive material can weaken the rotor and negatively impact its heat dissipation capabilities; therefore, taking precise measurements before adopting this remedy is crucial.
4. Replace the Rotor
Replacing the rotor becomes necessary when the runout exceeds the service limit and cannot be corrected through cleaning, indexing, or resurfacing.
This often occurs when the rotor is severely warped or damaged, or when its thickness falls below the minimum limit due to wear or machining.
Installing a new rotor provides a fresh, precisely machined surface; however, proper installation is essential to prevent the recurrence of the same problem.
Even after installing new rotors, it is crucial to continuously monitor their runout, as issues can still arise due to improper installation or a hidden underlying problem within the hub assembly.
Opting for high-quality replacement rotors also ensures superior durability and performance.
5. Inspect the Hub Assembly
If runout persists even after addressing rotor-related issues, the problem may lie within the hub assembly.
It is essential that the wheel hub be perfectly flat and stable, as it directly supports the rotor.
Any defects, corrosion, or surface irregularities on the hub can compromise alignment.
Furthermore, worn or loose wheel bearings can introduce slight play within the hub, leading to runout issues during rotation.
Inspecting the hub for defects, assessing the condition of the bearings, and ensuring a proper fit are essential steps in resolving persistent runout problems.
Correcting hub-related issues ensures that the rotor seats correctly and rotates smoothly without any unwanted movement.
Know, The Common Mistakes to Avoid During Checkup of Brake Disc Runout
When checking for brake disc runout (the wobbling of the disc while rotating), minor errors can lead to completely inaccurate results and necessitate unnecessary repairs.
Since runout is measured in very minute increments, even a slight error in the setup or procedure can make a perfectly good rotor appear defective, or conversely, mask a genuine underlying issue.
Many problems related to brake vibration are misdiagnosed precisely because proper procedures were not followed during the measurement process.
By avoiding these common mistakes, you can obtain accurate measurements, identify the true root cause of the problem, and ensure that your braking system operates safely and smoothly.
1. Failing to Clean the Hub Surface
One of the most common and critical errors is failing to clean the hub surface before installing the rotor.
Over time, dirt, rust, and debris can accumulate, rendering the mounting surface uneven.
Even a very thin layer of rust can prevent the rotor from seating flush against the hub, resulting in inaccurate runout readings.
This can create the false impression that the rotor itself is warped, whereas the actual problem lies in the debris trapped between the two surfaces.
For accurate measurements and proper alignment, it is essential to thoroughly clean both the hub and the back face of the rotor until they are smooth and flat.
2. Improperly Positioning the Dial Indicator
Incorrectly positioning the dial indicator can lead to inaccurate or inconsistent readings.
The tip of the indicator must make contact with the rotor surface at the correct angle—typically straight on and perpendicular to the front face of the rotor.
If the tip of the probe is positioned at an angle, or placed on a rough or worn section of the rotor, the reading may not accurately reflect the rotor’s true runout.
Furthermore, the magnetic base must be attached to a solid and stable component to ensure it remains stationary while measurements are being taken.
Even the slightest movement of the instrument can be misinterpreted as rotor runout, potentially leading to erroneous conclusions.
3. Ignoring Torque Specifications
Another common error is failing to apply the correct torque (tightening force) when fastening lug nuts.
Many individuals tighten lug nuts merely by feel, which frequently results in uneven pressure being exerted on the rotor.
This uneven force can cause the rotor to warp slightly or fail to seat perfectly against the hub, thereby creating artificial runout.
Utilizing a torque wrench and adhering to the specified tightening sequence ensures uniform pressure and proper alignment.
Skipping this step can lead to inaccurate measurements and, over time, may even result in severe runout issues.
4. Taking Measurements on Uneven Surfaces
Attempting to measure runout while the vehicle is situated on an uneven or unstable surface compromises both safety and accuracy.
If the vehicle is not level or properly supported, the hub and rotor cannot settle into their natural, stable positions.
This can lead to slight shifting or movement during rotation, which subsequently affects the readings obtained from the dial indicator.
Working in a stable and level environment ensures that the rotor rotates without obstruction and that the measurements accurately reflect the true condition of the braking system.
5. Ignoring Manufacturer-Specified Tolerance Limits
Disregarding the runout limits established by the manufacturer can lead to incorrect decisions regarding repairs or part replacements.
Tolerance limits vary for every vehicle, depending on its specific design and the requirements of its braking system.
A runout value that might be considered acceptable for one vehicle could exceed the specified limit for another.
Relying solely on generic values without consulting the service manual may result in unnecessary part replacements or cause you to overlook an underlying issue.
Always comparing your measurements against the correct specifications ensures that your diagnosis is accurate and appropriate for that specific vehicle.
Read More:
- How to Prevent Brake Fluid Boiling
- How to Diagnose Brake Fluid Boiling
- How to Fix Brake Pedal Sinking Slowly
- How to Check Brake Pad Wear Sensor
- How to Measure Brake Pad Thickness Without Removing Wheel
- How to Replace Brake Pads
- How to Replace Brake Rotors
- How to Bleed Car Brakes
Know, The Pro Tips for Accurate Measurement
Obtaining precise readings for brake disc runout requires meticulous attention to detail and careful execution.
Since runout values are typically very small, even a minor error in setup or handling can lead to inaccurate results.
Adopting the proven techniques utilized by experienced technicians ensures that your measurements accurately reflect the rotor’s true condition, rather than being skewed by external factors.
Accurate measurement not only aids in correctly diagnosing the problem but also prevents unnecessary repairs and enhances overall braking performance.
1. Take Measurements at Multiple Points on the Rotor
Measuring runout at several locations around the rotor provides a more comprehensive and reliable assessment of its condition.
The level of deviation may not be uniform across the entire rotor surface, particularly if wear is uneven or if there is slight warping.
By inspecting various points along the rotor’s circumference, you can determine whether the runout is consistent or localized to a specific section.
This helps identify whether the issue lies within the rotor itself or is related to how it seats against the hub.
Taking multiple readings minimizes the risk of overlooking a localized defect and improves the overall accuracy of the measurement.
2. Always Tighten Lug Nuts Uniformly
For accurate measurements, it is crucial to tighten the lug nuts uniformly and correctly, as this directly impacts how the rotor seats against the hub.
If the nuts are not tightened evenly, the rotor may shift slightly out of position, leading to inaccurate runout readings.
Using a torque wrench and following the correct tightening sequence ensures that uniform pressure is applied across all mounting points.
This ensures that the rotor remains flat and stable while measurements are being taken.
Consistent torque not only enhances accuracy but also prevents long-term issues such as rotor distortion and uneven wear.
3. Use High-Quality Measuring Instruments
The accuracy of your results depends significantly on the quality of the instruments you employ.
A high-quality dial indicator equipped with a stable magnetic base delivers precise and consistent readings—a critical requirement when measuring minute variations, such as runout.
Conversely, low-quality or worn-out tools can yield inaccurate or unreliable readings, potentially leading to a misdiagnosis of the problem.
High-quality instruments are engineered to maintain stability and remain steady, even in the presence of minute vibrations, while measurements are being taken.
Investing in reliable tools ensures that your measurements are both trustworthy and repeatable.
4. Check Runout After Remounting the Wheel
Re-checking the runout after remounting the wheel helps ensure that everything remains properly seated and aligned under normal operating conditions.
The act of mounting the wheel exerts additional pressure, which can cause slight shifts in how the rotor seats against the hub.
This final verification step ensures that the rotor remains within acceptable tolerances even after the entire assembly process has been completed.
If the runout measurement changes significantly after the wheel is remounted, it may indicate underlying issues—such as uneven torque application or improper seating.
Verifying measurements at this stage guarantees that the braking system will function smoothly and effectively during actual driving conditions.
Know, The Symptoms Shows That You Should Check for Runout
Brake disc runout often provides clear warning signs before evolving into a serious problem; recognizing these symptoms early allows you to rectify the issue before it causes further damage.
Since runout affects the uniformity with which brake pads make contact with the rotor, it generates irregular movement and pressure within the braking system.
This uneven contact is the root cause of vibrations, noise, and abnormal wear.
Many drivers mistake these signs for normal brake wear or assume they simply need new parts; however, in many cases, the underlying cause is excessive runout.
Paying attention to these symptoms and checking for runout at the right time can save money, enhance safety, and restore smooth braking performance.
Additionally, brake discs actually plays a central role in vehicle safety, that actually handles the majority of braking energy during the operation, also the research shows that even small geometric deviation sucha s: runout that can reduce the braking efficiency, as it makes the regular inspection and accurate measurement essential to maintain safe stopping performance as well.[¹]
1. Steering Wheel Vibration During Braking
One of the most obvious signs of brake disc runout is a vibration felt in the steering wheel during braking.
This occurs because the front brake rotors are linked to the steering system, and any uneven rotation creates a pulsating effect that travels through the suspension up to the steering wheel.
This vibration may initially manifest as a mild tremor, but it can intensify over time—as the runout worsens or the rotor wears unevenly.
This symptom is particularly pronounced at high speeds or during moderate to heavy braking.
It serves as a strong indication that the rotor is not rotating uniformly and requires a runout inspection.
2. Pulsation in the Brake Pedal
A pulsation felt in the brake pedal is another common symptom that points directly to irregular movement of the rotor.
When a rotor exhibits runout, it pushes the brake pads inward and outward as it rotates, causing repeated fluctuations in pressure within the braking system.
This variation in pressure is perceived as a pulsating or vibrating sensation when the brake pedal is depressed.
While this symptom may initially seem mild, it can become progressively more pronounced over time.
This symptom not only compromises ride comfort but also erodes the driver’s confidence in the braking system, making it crucial to identify and resolve the underlying runout issue.
3. Uneven Brake Pad Wear
Brake disc runout can lead to uneven brake pad wear, as the contact between the pads and the rotor becomes inconsistent.
When the rotor wobbles, certain sections of the pads are subjected to greater pressure than others, resulting in accelerated wear in those specific areas.
Over time, this results in uneven pad surfaces, which can diminish braking efficiency and generate increased vibration or noise.
Uneven pad wear is frequently observed during inspections, serving as a clear indication that the rotor may not be rotating true.
In such instances, checking for “runout” helps confirm whether rotor misalignment is, in fact, the root cause of the problem.
4. Noise During Braking
Any unusual noise occurring during braking may also be linked to brake disc runout, particularly when accompanied by uneven brake pad wear.
As the rotor deviates from its true axis, its contact with the brake pads becomes irregular, potentially generating sounds such as rubbing, squealing, or light grinding noises.
These sounds may occur intermittently—sometimes audible, sometimes fading—depending on the vehicle’s speed and the amount of braking pressure applied.
While there can be various causes for such noise, if it is accompanied by a sensation of vibration or pulsation, it often points to runout or another issue related to the rotor.
Identifying and correcting runout can help eliminate these sounds and restore a smooth, quiet braking experience.
Know, When to Go to the Mechanic
Checking for brake disc runout can often be performed at home; however, there are situations where seeking professional assistance is the safer and more reliable option.
Braking systems are critical to vehicle safety, and even a minor error during inspection or repair can compromise the vehicle’s stopping capability.
If the process seems confusing, the results are inconclusive, or a deeper mechanical issue is suspected, it is best to rely on a trained technician equipped with the appropriate experience and tools.
Professionals possess modern equipment, precision measuring instruments, and comprehensive service data, enabling them to accurately diagnose problems and resolve them correctly on the first attempt.
1. Lack of Proper Tools
Accurate runout measurement depends heavily on the use of the correct tools—specifically, a high-quality dial indicator and a stable mounting setup.
If these tools are unavailable, measuring the minute variations that define runout becomes extremely difficult.
Relying on guesswork or using improper tools can lead to erroneous results—such as replacing parts that are not actually defective, or overlooking a genuine underlying mechanical issue.
A professional workshop is equipped with calibrated instruments designed for precision work, ensuring that measurements are both accurate and reliable.
Seeking assistance in such situations can help avoid wasted time and unnecessary expenses.
2. Inconsistent Measurements
If your measurements fluctuate with every check, or if they fail to reveal a discernible pattern, it indicates a potential issue with either the setup itself or the braking system.
Inconsistent measurements can stem from improperly positioned tools, an unstable mounting setup, uneven torque application, or hidden mechanical faults.
This makes it difficult to determine whether the rotor truly falls outside the tolerances established by the manufacturer.
Professionals are trained to identify the causes of constantly fluctuating results and can repeat measurements under controlled conditions to obtain accurate data.
Enlisting the help of an expert ensures that the problem is diagnosed based on precise and repeatable measurements.
3. Suspected Issues with the Hub or Suspension
When excessive runout persists even after cleaning, proper installation, and rotor resurfacing, the problem may lie deeper within the hub or suspension system.
Issues such as a warped hub, worn wheel bearings, or improperly installed suspension components can create movements that affect the rotor’s alignment.
These problems are more complex and often require specialized tools and expertise to diagnose and repair.
Continuing to drive with these issues can lead to further damage and compromise braking safety.
A professional technician can thoroughly inspect the hub assembly and associated components, pinpoint the root cause of the problem, and perform the necessary repairs to restore the vehicle’s functionality.
Conclusion – How to Check Brake Disc Runout
So, now you can understand in the braking systems: the accuracy is literally everything and that’s why when you understand the runout then it literally separates a temporary fix from the lasting solution as well.
Even a slight deviation in the rotor can trigger a host of noticeable issues, such as brake pedal pulsation, steering wheel vibration, uneven brake pad wear, and diminished braking efficiency.
Crucially, most brake-related problems stemming from runout do not manifest abruptly; through proper diagnostic procedures, they can be accurately measured, identified, and subsequently rectified.
By utilizing precision tools, cleaning mounting surfaces, and mastering the correct techniques for checking runout—including the application of proper torque specifications—you can pinpoint the true root cause of brake issues, rather than relying on guesswork or engaging in unnecessary parts replacement.
Investing the time to measure and correct runout not only enhances the overall braking experience but also extends the lifespan of critical components such as rotors and brake pads.
This helps you avoid repetitive repairs, saves money over time, and—most importantly—ensures safe driving under all conditions.
Whether the issue stems from minor dirt accumulation on the hub, improper component tightening, or a deeper mechanical fault, adhering to a systematic diagnostic process allows you to resolve the problem effectively.
Now, that’s all from this guide about How to Check Brake Disc Runout, also you can ask questions below.
Frequently Asked Questions
FAQ 1: In simple terms, what is brake disc runout?
Answer: Brake disc runout refers to a condition where the brake rotor does not spin perfectly straight; instead, it exhibits a slight side-to-side wobble while rotating. This movement is extremely subtle—typically measured in thousandths of an inch—yet it can significantly impact the smooth operation of your brakes. When the rotor is not perfectly flat, the brake pads cannot apply pressure evenly, leading to vibrations, uneven wear, and discomfort during braking.
FAQ 2: What causes brake disc runout?
Answer: Brake disc runout is typically caused by improper installation, dirt or rust trapped between the hub and the rotor, uneven tightening of lug nuts, or thermal distortion resulting from heat exposure over time. In some cases, worn wheel hubs or bearings can also create the movement that leads to runout. Even brand-new rotors can exhibit runout if they are not installed correctly or if the hub surface is not clean and flat.
FAQ 3: How can I tell if my brake discs have runout?
Answer: You can often identify the symptoms while driving. Common signs include a vibrating steering wheel during braking, a pulsating brake pedal, uneven wear on the brake pads, or strange noises when applying the brakes. These symptoms usually develop gradually and become more pronounced over time. The only definitive way to confirm runout is to measure it using a dial indicator.
FAQ 4: How can you check for brake disc runout at home?
Answer: To check for brake disc runout, you must lift the vehicle, remove the wheel, clean the surfaces of both the rotor and the hub, and securely remount the rotor. Next, you position a dial indicator against the surface of the rotor. By slowly rotating the rotor and observing the movement displayed on the dial, you can measure the extent of its lateral deviation. The difference between the maximum and minimum readings indicates the total runout.
FAQ 5: How much brake disc runout is considered acceptable?
Answer: For most vehicles, the acceptable limit for runout falls between approximately 0.001 and 0.005 inches; however, this range may vary depending on the manufacturer and the specific vehicle model. It is always best to consult the service manual for precise specifications. Keeping runout within this limit ensures smooth braking performance and prevents issues such as vibration or uneven wear.
FAQ 6: Can brake disc runout resolve itself over time?
Answer: Brake disc runout does not resolve itself; rather, if left unaddressed, the problem typically worsens. As the rotor continues to spin unevenly, it causes uneven wear on the brake pads and can also lead to variations in the rotor’s thickness. This exacerbates the issue, making it even more difficult to rectify later on. To prevent further damage, it is crucial to identify the problem and have it repaired as soon as possible.
FAQ 7: Are brake disc runout and a “warped rotor” the same thing?
Answer: Brake disc runout and a warped rotor are closely related concepts, but they are not exactly the same. Runout refers to the lateral (side-to-side) movement of the rotor, whereas a warped rotor refers to a disc that has actually become distorted—typically due to excessive heat or pressure. Over time, runout can actually cause the rotor to warp, as uneven contact leads to uneven wear and heat distribution.
FAQ 8: Can I still drive my car if the brake disc has runout?
Answer: If the runout is minimal, you may continue driving; however, it is not advisable to ignore it. Even a slight irregularity can compromise the smoothness of braking and accelerate the wear of brake components. If the runout is excessive, it can adversely affect the vehicle’s stopping capability and safety. It is always best to have the issue inspected and repaired before it becomes more severe.
References:
[1] BRAKE DISCS: A TECHNOLOGICAL REVIEW FROM ITS ANALYSIS AND ASSESSMENT
https://www.researchgate.net/publication/335780107_BRAKE_DISCS_A_TECHNOLOGICAL_REVIEW_FROM_ITS_ANALYSIS_AND_ASSESSMENT

Hello Folks, Dean Shali here to help you out to solve the problems with your lovely vehicle, as i have lots of experience and knowledge about automotive industry as i woks directly with the customers and repair vehicles and i love to help the people to keep their cars safe and running smoothly.