Written By: Dean Shali
Fact Checked By: Sabré Cook
Reviewed By: Tamara Warren
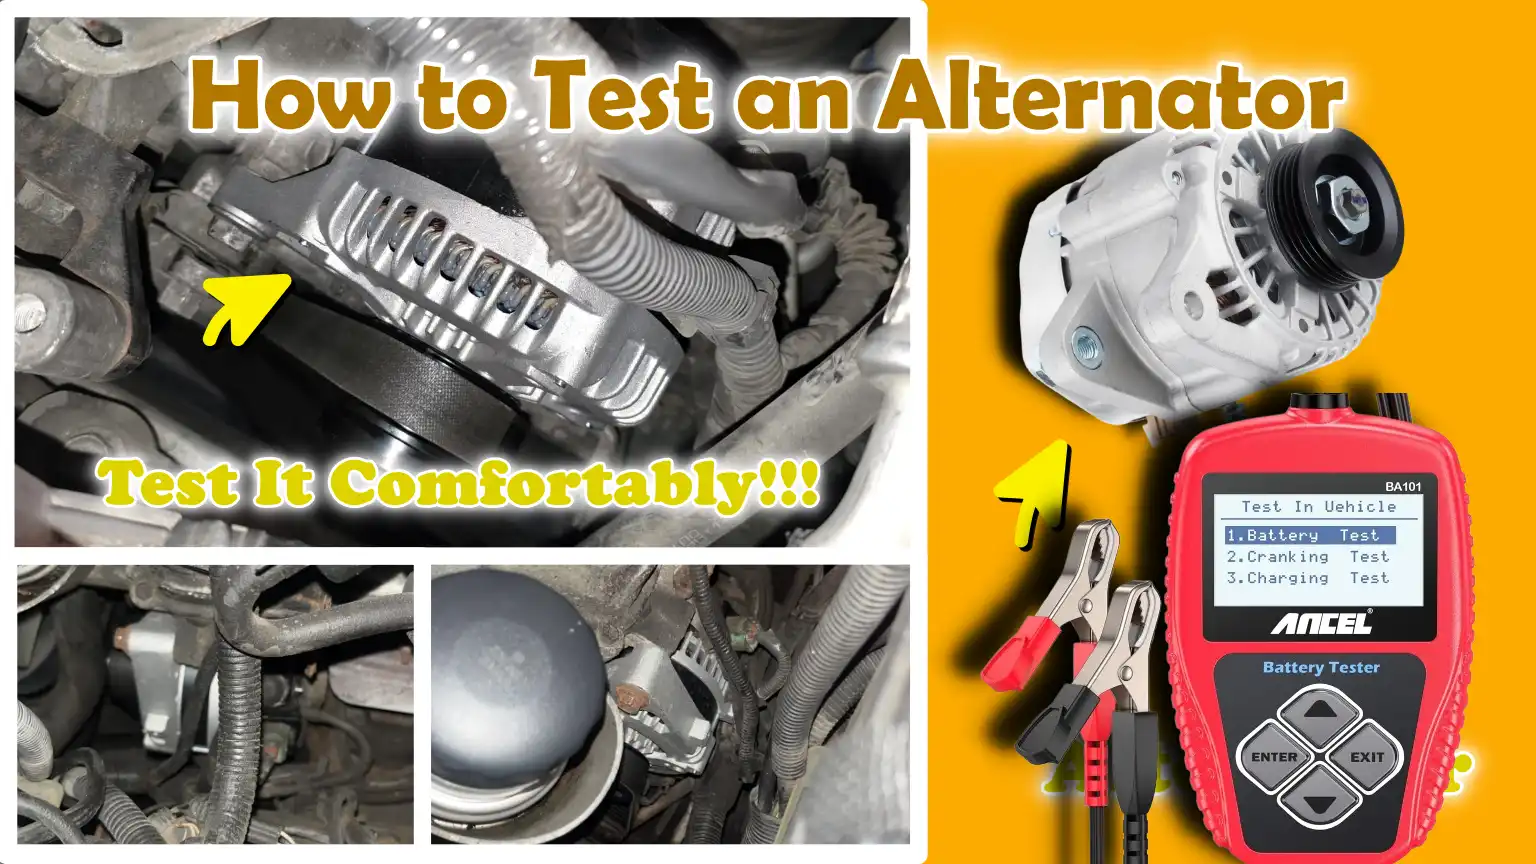
Actually, many battery related problems literally starts with the weak or failing alternator, that’s why you need to know if it is in properly working or not.
Actually, the work of the alternator is: it converts the all the mechanical energy from the engine into the useful electrical energy that can be used to charge the battery and power the systems such as: headlights, power windows, engine control units, dashboard electronics and off course there’s infotainment systems are also covered.
Also, there’s automotive experts that shows that the healthy alternator typically produces between 13.5 and 14.7 volts of electricity when the engine is running, which is actually necessary to maintain the prooper battery charge and really stable electrical performance as well.
Now, understand this when the alternator begins to fail; then you can clearly notice somethings such as: there could be dim headlights, flickering dashboard lights, strange noises can be heard from the engine area or battery freuquently dies now-a-days.
This is the reason: we have the proper guide on How to Test an Alternator, so that you easily identify whether electrical problems are actually caused by the alternator, the battery or another part of your vehicle’s charging system.
At First, Understand What Does An Alternator Do?
The alternator is a vital part of a vehicle’s electrical and charging system because it generates the electricity needed to power many of the car’s vital parts when the engine is running.
Modern vehicles rely heavily on electricity to operate systems like headlights, dashboard instruments, infotainment systems, sensors and the engine control module.
When the engine starts, the battery provides the initial power needed to crank the engine.
Once the engine is running, the alternator takes over power generation to ensure the battery doesn’t lose its charge.
In most vehicles, a properly functioning alternator produces power between 13.5 and 14.7 volts, which is the ideal voltage range needed to power the vehicle’s electronics and recharge the battery.
If the alternator fails, the vehicle will gradually lose power because the battery alone cannot power the entire electrical system.
Therefore, an alternator is essential for maintaining a stable power supply and ensuring reliable operation during everyday driving.
1. Main Functions of the Alternator
It Converts Mechanical Energy into Electrical Energy
One of the main functions of the alternator is to convert mechanical energy from the engine into electrical energy that can be used by the vehicle.
This process begins when the engine turns a drive belt attached to the alternator pulley.
As the pulley rotates, it spins the parts inside the alternator at very high speeds.
Inside the alternator, a magnetic field passes through a coil of wire, generating an electrical current through a process called electromagnetic induction.
This process allows the alternator to continuously generate electricity while the engine is running.
The generated electrical power is then supplied to the vehicle’s electrical system so that essential parts can function properly without relying solely on the battery.
It Powers the Vehicle’s Electronics
Another important role of the alternator is to provide electrical power to the many electronic systems used in modern vehicles.
Modern cars have a variety of electrical parts that require constant power to function properly.
These include headlights, interior lighting, power windows, air conditioning systems, audio systems, navigation units, sensors and computer-driven engine management systems.
In newer vehicles, advanced safety technologies like parking sensors, cameras, stability control systems and driver assistance features also rely on a consistent power supply.
The alternator ensures that all these systems receive consistent power while the engine is running.
Without this alternator power supply, the battery would drain quickly and many electronic systems would stop functioning properly.
It Charges the car battery when the engine is running
The alternator also plays a vital role in keeping the car battery fully charged.
When a vehicle starts, the battery provides enough power to power the starter motor and start the engine.
This starting process consumes a significant amount of battery power.
Once the engine is running, the alternator begins generating electricity and returns some of this power back to the battery.
This process recharges the battery and restores the energy used during engine start-up.
By continuously charging the battery while the engine is running, the alternator ensures that the battery is ready for the next engine start and maintains a stable voltage level.
Without this charging process, the battery will gradually lose its charge and eventually fail to start the vehicle.
2. Main Parts of an Alternator
Rotor
The rotor is a rotating part within the alternator that plays a crucial role in generating electricity.
When the engine drives the alternator pulley via the drive belt, it rotates rapidly.
The rotor creates a magnetic field that rotates within the alternator as it rotates.
This rotating magnetic field is important because it interacts with the stationary coils of wire in another part of the alternator, called the stator.
As the magnetic field passes through these coils, electrical current is generated.
The speed at which the rotor rotates directly affects how much electricity the alternator can generate.
Stator
The stator is the stationary part of the alternator that surrounds the rotor.
It contains multiple coils of copper wire carefully positioned to capture the energy generated by the rotor’s rotating magnetic field.
When the rotor rotates and its magnetic field passes through these coils, it creates alternating current (AC) electricity.
The stator plays a crucial role in the alternator as it generates most of the electricity used to power the vehicle’s systems.
Without the stator coils, the alternator would not be able to generate the electricity needed to power the vehicle’s electronics.
Voltage Regulator
The voltage regulator is responsible for controlling the amount of electrical voltage generated by the alternator.
Because the engine speed varies during driving, the alternator can sometimes produce more power than the vehicle’s electrical system needs.
The voltage regulator prevents excess voltage from reaching the battery and other electrical components.
It carefully maintains the output voltage within a safe range, which in most vehicles is typically between 13.5 and 14.7 volts.
By regulating voltage, this component protects sensitive electronics and helps maintain a stable electrical system within the vehicle.
Rectifier
The rectifier is another essential part of the alternator as it converts the electrical current generated by the stator into a form usable by the vehicle.
The electricity generated within the alternator is alternating current (AC), but most vehicles’ electrical systems and batteries require direct current (DC).
The rectifier contains a set of diodes that convert AC electricity to DC electricity.
Once converted, the electricity can safely charge the battery and power the vehicle’s electrical system.
If the rectifier fails, the alternator will not be able to deliver the correct electrical current, which can lead to charging problems and electrical malfunctions.
Several Signs That Tells Your Alternator In Question
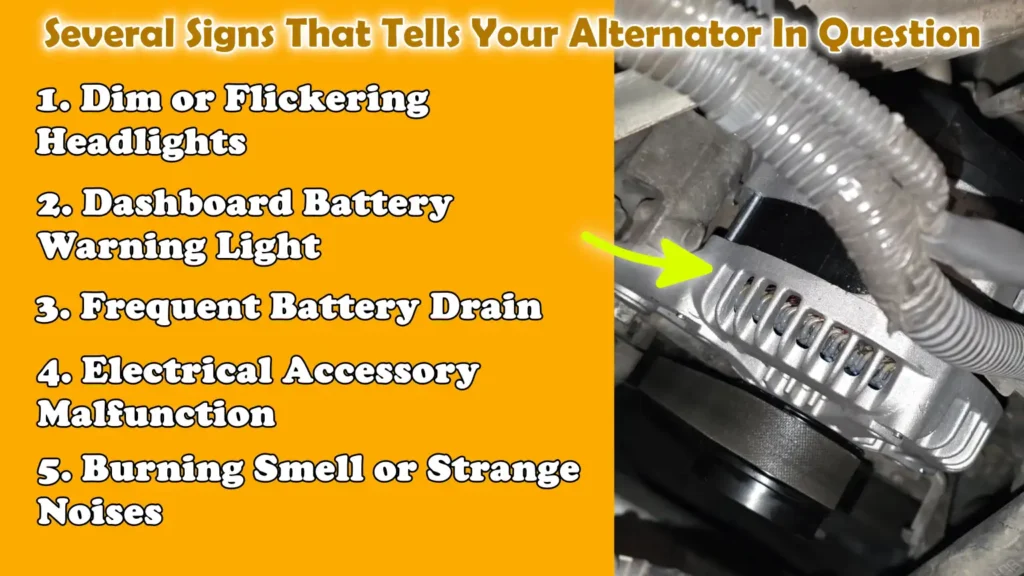
The alternator is responsible for supplying power to the vehicle and keeping the battery charged when the engine is running.
When the alternator begins to fail, the vehicle’s electrical system often displays several warning signs before the problem becomes serious.
Recognizing these early symptoms is crucial because a bad alternator can completely drain the battery, preventing the vehicle from starting or running.
In most vehicles, the alternator typically produces approximately 13.5 to 14.7 volts of power when the engine is running.
If the alternator cannot maintain this voltage level, power loss will occur in the electrical system.
This loss can affect the lighting system, dashboard indicators, electronic accessories and other electrical components.
Drivers who understand the common warning signs of a bad alternator can identify the problem early and test the charging system before it suddenly fails or requires more expensive repairs.
1. Dim or Flickering Headlights
Dim or flickering headlights are one of the most common and visible signs of a failing alternator.
Headlights require a steady supply of electricity to maintain consistent brightness.
When the alternator is working properly, it provides enough power to keep the headlights bright and stable while the engine is running.
However, if the alternator begins to weaken, it may struggle to provide consistent power.
This can cause the headlights to appear dimmer than usual, or they may flicker while driving.
In some cases, drivers may notice that the headlights become brighter as the engine speeds up and dim when the vehicle is idling.
This change in brightness often occurs because the alternator is unable to maintain a steady voltage output.
As headlights are easy to see while driving, changes in brightness can be an early warning sign that the vehicle’s charging system may need to be checked.
2. Dashboard Battery Warning Light
Most modern vehicles have a dashboard warning light that indicates problems with the charging system.
This light often appears as a battery symbol and illuminates when the vehicle’s electrical system detects a problem with the alternator or charging process.
The warning light may illuminate if the alternator isn’t generating enough voltage, the drive belt is slipping, or there’s a problem with the voltage regulator.
Although many drivers assume this light indicates a battery problem, it often indicates a problem with the charging system, which typically includes the alternator.
When this warning light appears while the engine is running, it’s important to have the vehicle’s electrical system checked as soon as possible.
Ignoring the warning light can drain the battery and cause power outages while driving.
3. Frequent Battery Drain
A battery that repeatedly loses charge or suddenly drains may also be a sign of a bad alternator.
After the engine starts, the battery relies on the alternator to recharge.
When the alternator isn’t working properly, it can’t send enough electrical current back to the battery to restore the energy used during engine start.
Over time, this weakens the battery because it doesn’t receive enough charging power.
This can make it difficult to start the vehicle, specially after it’s been parked for several hours.
When this problem occurs, many drivers mistakenly replace the battery, but if the alternator is the real cause, even a new battery can quickly lose charge.
Testing the alternator can help determine whether the battery is failing or the charging system isn’t delivering enough power.
4. Electrical Accessory Malfunction
Modern vehicles have many electrical accessories that rely on the alternator for power when the engine is running.
These accessories include systems like the radio, infotainment display, power windows, interior lighting, air conditioning controls and various electronic sensors used in the engine.
If the alternator begins to malfunction, it may not be able to generate enough electricity to power all of these systems simultaneously.
This can cause some accessories to operate slowly, temporarily stop working, or behave strangely.
For example, power windows may operate more slowly than usual, dashboard lights may appear dim, or electronic displays may flash.
These electrical problems often occur because the alternator is unable to provide consistent voltage to the vehicle’s electrical network.
When several electronic parts begin to operate strangely at the same time, it is often a sure sign that the alternator needs to be tested.
5. Burning Smell or Strange Noises
A burning smell or strange noises coming from the engine area can also indicate a problem with the alternator.
The alternator contains moving parts such as bearings, internal coils and pulleys connected to the engine’s drive belt.
If these parts are worn or damaged, they may produce strange noises when the engine is running, such as grinding, rattling, or squealing.
In some cases, overheating of electrical components inside the alternator can cause a burning smell, which may sound like hot wires or melted rubber.
This smell can occur when internal wiring is damaged or the alternator is overworking due to an electrical fault.
Strange noises or a burning smell should never be ignored, as they could indicate a serious mechanical or electrical problem that could lead to alternator failure.
Recognizing these signs early and inspecting the alternator can prevent further damage to the vehicle’s electrical system.
Tools
| Tool | Why It Is Needed | How to Use It |
|---|---|---|
| Multimeter | This tool is essential because it allows you to measure the voltage generated by the alternator and battery. A properly functioning alternator typically produces around 13.5 to 14.7 volts when the engine is running. If the reading is low or unstable, it may indicate that the alternator is not charging properly. | To use a multimeter, set the device to DC voltage mode. Connect the red probe to the positive terminal of the battery and the black probe to the negative terminal. First, turn off the engine and check the battery voltage, which should typically be around 12.4 to 12.7 volts. Then, start the engine and measure the voltage again. If the voltage rises to around 13.5 to 14.7 volts, the alternator is working properly. |
| Voltmeter | A voltmeter is used to check whether the alternator is providing enough power to charge the battery and support the vehicle’s electrical system. This helps quickly identify charging problems and confirm whether the electrical system voltage is within the normal operating range. | To use a voltmeter, connect the positive lead to the positive terminal of the battery and the negative lead to the negative terminal. Start the engine and observe the voltage reading. A properly functioning alternator should provide a voltage reading higher than the battery’s resting voltage, which is typically between 13.5 and 14.7 volts when the engine is running. |
| Safety Gloves | Gloves are essential because the engine area contains many hot surfaces, metal edges and moving parts. They help protect your hands when working near the battery, alternator belt, or engine parts. They also reduce the risk of minor injuries and keep your hands clean during the inspection process. | Before testing the alternator, wear safety gloves to protect your hands. Keep your hands away from moving parts like belts and pulleys when the engine is running. Gloves provide greater protection when connecting testing probes or handling tools around the engine compartment. |
| Safety Glasses | Eye protection is essential because the engine bay may contain dirt, debris and sometimes residual battery acid. During inspection or testing, small particles may be accidentally dropped or thrown, specially if tools slip or parts become dislodged. Safety glasses help prevent eye injuries when working around the vehicle. | Wear safety glasses before starting the alternator test and keep them on throughout the inspection process. They protect your eyes when checking battery terminals, connecting measuring tools, or working near moving engine parts. |
| Basic Hand Tools (Optional) | These tools may be needed if you need to inspect or tighten the alternator mounting bolts, adjust the alternator belt, or remove covers that obstruct access to the alternator. While they are not always required for voltage testing, they are helpful for a complete inspection of the charging system. | Use basic hand tools only when the engine is off. They can be used to check the tightness of alternator bolts, inspect the condition of belts, or remove parts that obstruct access to the alternator during testing or maintenance. |
Ensure Safety
Testing an alternator involves working near the vehicle’s battery, electrical wiring and moving engine parts.
Therefore, it’s crucial to take proper safety precautions before beginning any inspection or diagnostic test.
A car’s electrical system can generate high voltages and currents and the engine area also contains belts, pulleys and hot parts that can cause injury if handled carelessly.
Taking a few simple safety steps helps protect both the tester and the vehicle.
Many automotive technicians emphasize that careful preparation before testing prevents accidents and provides more accurate results.
By understanding and following basic safety precautions, even novices can safely inspect and test alternators, reducing the risk of electric shock, burns, or mechanical injuries.
1. Turn off the engine before the initial inspection
Before beginning any inspection of the alternator or electrical system, it’s crucial to completely shut off the engine.
When the engine is running, many parts within the engine compartment move at very high speeds, including belts, pulleys and cooling fans.
Inspecting parts with the engine off allows you to safely inspect the alternator belt, wiring connections and battery terminals without the risk of touching moving parts.
This also gives you the opportunity to check the alternator for loose wires, worn insulation, or signs of overheating.
Furthermore, shutting off the engine prevents accidental electrical short circuits while connecting testing tools.
Once the initial inspection is complete and everything appears safe, the engine can be restarted for voltage testing, if necessary.
2. Avoid touching moving engine parts
When testing, it’s crucial to stay away from moving engine parts while the engine is running.
The alternator is connected to the engine by a drive belt that rotates continuously.
This belt can rotate thousands of times per minute and contact with it can cause serious injury.
Other nearby parts, such as pulleys, cooling fans and rotating shafts, also move rapidly when the engine is running.
Therefore, hands, tools, loose clothing and hair should always be kept at a safe distance from these parts.
Professional mechanics often position themselves carefully so they can measure voltage at the battery terminals without getting close to moving parts.
Maintaining a safe distance from these parts reduces the risk of injury while testing the alternator.
3. Wear Protective Gear
Wearing appropriate protective gear is an important safety measure when working around a vehicle’s electrical and mechanical systems.
Protective gear like gloves and safety glasses helps prevent injuries when inspecting the engine compartment.
Gloves protect hands from sharp metal edges, hot engine surfaces and dirt around the battery or alternator.
Safety glasses protect eyes from dust, dirt and small particles that may accidentally fall or bounce during inspection.
In some cases, battery terminals can become corroded or dirty, which can cause skin or eye irritation if touched directly.
Wearing protective gear adds another layer of safety and helps you perform the inspection with greater comfort and confidence.
4. Ensure the Battery Terminals are Secure
Before testing the alternator, it’s important to check that the battery terminals are clean, tight and properly connected.
Battery terminals are the main connection points through which electricity flows between the battery and the rest of the vehicle’s electrical system.
If these terminals are loose, rusted, or worn, they can obstruct the flow of electricity and cause symptoms similar to alternator failure.
For example, loose terminals can cause lights to flicker, degrade electrical performance, or make the vehicle difficult to start.
Ensuring that the terminals are secure guarantees accurate voltage readings during alternator testing.
Clean and properly tightened connections allow electricity to flow smoothly through the charging system, allowing technicians and vehicle owners to accurately determine whether the alternator is functioning properly.
How to Test an Alternator with a The Help of Multimeter
Testing the alternator with a multimeter is the most accurate and common way to check if your vehicle’s charging system is functioning properly.
A multimeter allows you to measure electrical voltage directly from the battery terminals, helping to determine if the alternator is producing enough power to run the vehicle’s electrical system and recharge the battery.
Most modern vehicles rely on a stable electrical supply to power components like headlights, sensors, the engine control module, the infotainment system and safety features.
If the alternator doesn’t produce the correct voltage, these systems may malfunction or the battery may slowly lose its charge.
A digital multimeter is a handy tool that can quickly determine if the charging system is functioning properly.
By comparing voltage readings with the engine off and running, it’s possible to determine if the alternator is properly charging the battery.
Automotive technicians highly recommend this testing method because it’s simple, reliable and produces clear numerical results, making diagnosis easier.
1. Set the multimeter to DC voltage
The first step in testing the alternator is to set the multimeter to measure DC voltage.
The vehicle’s electrical systems operate on direct current, so the multimeter should be set to DC voltage mode rather than AC voltage or resistance.
Most digital multimeters have a symbol for DC voltage, usually marked with a straight line and a dashed line below it.
Choosing the correct setting ensures the device measures voltage accurately.
Once the multimeter is set correctly, place the red probe on the positive battery terminal and the black probe on the negative battery terminal.
Using the correct measurement mode is crucial, as incorrect settings can result in inaccurate readings and unreliable test results.
2. Check Battery Voltage – Engine Off
After setting the multimeter to DC voltage, the next step is to check the battery voltage with the engine off.
This reading helps determine the battery’s resting voltage before the alternator charges it.
To check, place the multimeter’s red probe on the positive battery terminal and the black probe on the negative terminal.
A healthy, fully charged car battery typically reads between 12.4 and 12.7 volts with the engine off.
This measurement indicates the electrical energy stored in the battery.
If the reading is significantly below this range, it may indicate a weak or slightly discharged battery.
Knowing the battery’s starting voltage is important because it allows for a clear comparison between engine running and the power generated by the alternator.
3. Start the Engine
After checking the battery voltage with the engine off, the next step is to start the vehicle’s engine.
When the engine starts, the alternator begins to rotate, driven by a drive belt connected to the engine.
As the alternator rotates, it generates electricity through electromagnetic induction and begins supplying power to the vehicle’s electrical system.
It also begins to return electrical current to the battery to recharge the energy used during engine start-up.
Let the engine run for a while to allow the charging system to stabilize.
During this time, the alternator should begin to increase the electrical voltage in the system above the battery’s resting level.
4. Measure the voltage again
After the engine has run for a while, use the multimeter again to measure the voltage at the battery terminals.
Connect the red probe to the positive terminal and the black probe to the negative terminal.
When the alternator is functioning properly, the voltage reading should increase compared to the battery’s resting voltage.
This increase occurs because the alternator is actively generating electricity and sending it to the vehicle’s electrical system.
The multimeter display will show the charging voltage from the alternator, which helps determine whether the alternator is operating within the normal range needed to maintain a battery charge and power the vehicle’s electronics.
5. Interpret the results
The final step is to understand the voltage readings to determine if the alternator is functioning properly.
With the engine off, a healthy battery typically shows a voltage reading between approximately 12.4 and 12.7 volts.
When the engine is running, the alternator in most vehicles should increase this voltage to approximately 13.7 to 14.7 volts.
This increase indicates that the alternator is properly generating power and charging the battery.
If the voltage remains near the battery’s resting voltage or drops when the engine is running, it may indicate that the alternator is not generating enough power.
Excessively high voltage readings may also indicate problems with the voltage regulator.
Understanding these voltage ranges helps vehicle owners identify whether the alternator and charging system are functioning properly or need further inspection and repair.
How to Test an Alternator Without Using Multimeter
While a multimeter is the most effective way to test an alternator, there are several practical methods drivers can use to check the charging system without specialized tools.
These simple checks rely on how the vehicle’s electrical system functions when the engine is running.
Because the alternator supplies power to most of the vehicle’s components after the engine starts, alternator problems often manifest as changes in light brightness, warning lights on the dashboard, or reduced performance of electrical accessories.
These symptoms occur when the alternator is unable to provide enough power to meet the vehicle’s needs.
While these methods cannot measure accurate voltage levels, they can help drivers identify early warning signs of charging system problems.
Many mechanics use these quick checks during the initial inspection to help determine whether a more in-depth electrical test is necessary.
1. Headlight Test
The headlight test is the easiest way to check how well the alternator is supplying power to the vehicle.
Headlights require a consistent and steady flow of electricity to maintain consistent brightness.
When the alternator is working properly, it produces enough power to keep the headlights bright and stable while the engine is running.
To perform this test, start the vehicle and turn on the headlights while the engine is idling.
After the headlights are on, gently press the accelerator to increase engine speed.
If the alternator is functioning normally, the headlights will remain fairly consistent, although they may become slightly brighter as the engine speed increases.
However, if the headlights become significantly brighter or dimmer as the engine speed changes, it could be a sign that the alternator is struggling to maintain a stable voltage output.
Flickering or unstable headlight brightness often occurs when the alternator is unable to consistently supply power to the vehicle’s lighting system.
2. Dashboard Warning Light Check
Most modern vehicles have a battery or charging system warning light on the dashboard to alert drivers to potential electrical problems.
This light typically appears as a battery-shaped symbol and is connected to the vehicle’s charging system monitoring system.
When the engine starts, the light may illuminate briefly and then turn off when the alternator begins generating power.
If the alternator is faulty, the warning light may flash or appear intermittently while driving.
This behavior often indicates that the charging system is not generating the required voltage.
Drivers should pay close attention to this light as it could be an early warning sign that the alternator is failing or another part of the charging system is malfunctioning.
Ignoring the warning light can eventually drain the battery and cause power loss while driving.
3. Electrical Load Test
Another effective way to check alternator performance without any special tools is an electrical load test.
This test involves turning on various electrical accessories in the vehicle to increase the power demand.
Start the engine and let it idle, then turn on electrical components such as the air conditioning system, radio, interior lights and headlights.
These accessories put an additional electrical load on the alternator.
A good alternator should provide enough power to power these systems without any significant performance changes.
If the alternator is weak or failing, the increased power demand can cause problems such as dimming lights, slow operation of power windows, or reduced performance of electronic systems.
In some cases, the vehicle’s systems try to compensate for the increased electrical load, so the engine’s idle speed may also change slightly.
Observing how the vehicle performs under high power demands can provide helpful clues about the condition of the alternator and the entire charging system.
How to Use a Professional Tester Test the Alternator
The most reliable way to determine if your vehicle’s charging system is functioning properly is to have the alternator tested by a professional tester.
Professional testing equipment is designed to measure multiple electrical factors simultaneously, including voltage output, charging current, battery condition and voltage regulator performance.
Unlike simple visual checks or basic voltage measurements, these testers can simulate real driving conditions and apply electrical loads to the system to see how the alternator performs under stress.
Modern vehicles contain numerous electronic systems, such as the engine control unit, sensors, safety systems, infotainment systems and climate control modules, all of which rely on stable electrical power.
Due to this complexity, professional testing equipment can help identify hidden charging problems that may not be apparent during a basic inspection.
Automotive technicians often use these testers during routine diagnostics because they can quickly confirm whether the alternator is functioning properly or whether other components of the charging system are causing electrical problems.
1. Using an Alternator Tester at an Auto Repair Shop
Auto repair shops typically use specialized alternator testers to check the performance of a vehicle’s charging system.
These machines are designed to connect directly to the battery terminals and analyze how the alternator performs when the engine is running.
The tester measures important factors such as charging voltage, electrical current output and voltage stability under different electrical loads.
Many professional testers can also check the condition of the voltage regulator and detect problems with the alternator’s internal components, such as diodes and rectifiers.
During the test, the technician may increase engine speed or turn on various electrical accessories to see how the alternator responds when the vehicle requires more electrical power.
A healthy alternator should maintain stable voltage levels under these conditions and continue to charge the battery effectively.
Professional alternator testing is specially useful when electrical symptoms are unclear or when the vehicle has multiple electrical problems that require careful investigation.
2. Visit an Auto Parts Store for Free Testing
Many auto parts stores offer free alternator and battery testing services for customers who want to check their vehicle’s charging system.
These stores typically have portable electronic testers that connect to the battery and quickly analyze the alternator’s performance while the engine is running.
The testing process typically takes only a few minutes and results in a printed or digital report that shows whether the alternator is charging properly.
These reports often include information about battery health, charging voltage levels and the condition of the overall system.
Free testing services are helpful for drivers who suspect an electrical problem but don’t have professional diagnostic tools at home.
By visiting an auto parts store, drivers can quickly inspect their vehicle’s charging system and determine if further inspection or alternator replacement is needed.
This option provides an easy and inexpensive way to confirm a charging system problem before resorting to repairs or costly part replacement.
How to Identify a Bad Alternator and a Bad Battery
Understanding the difference between a bad alternator and a bad battery is crucial, as both components are closely linked to the vehicle’s electrical and charging systems.
Many drivers confuse these two problems because they often present similar symptoms, such as difficulty starting, dim lights, or electrical failure.
However, the battery and alternator perform very different functions.
The battery stores electrical energy and provides the power needed to start the engine, while the alternator generates electricity and keeps the battery charged when the engine is running.
In most vehicles, a healthy battery has a resting voltage of approximately 12.4 to 12.7 volts when the engine is off.
When the engine starts and the alternator begins charging, the system voltage typically rises to approximately 13.7 to 14.7 volts.
If the alternator fails, the battery will gradually lose its charge because it is no longer receiving electrical power.
On the other hand, if the battery itself is weak or damaged, it may not be able to store enough energy to start the engine, even if the alternator is working properly.
By observing certain symptoms and understanding how these two parts work, it’s easy to identify whether the problem is with the battery or the alternator.
1. Symptoms that Commonly Indicate a Bad Battery
A bad battery usually causes problems starting the vehicle.
One of the most common symptoms is a slow or weak cranking of the engine when you turn the ignition key or press the start button.
This occurs because the battery doesn’t have enough stored electrical energy to properly power the starter motor.
Another common symptom is a clicking sound when trying to start the engine, which occurs when the starter motor isn’t receiving enough power.
Batteries can also lose their ability to hold a charge over time, specially after years of use.
Most car batteries last three to five years, depending on the weather, driving habits and maintenance.
Extreme temperatures, frequent short trips and leaving lights or electronics on with the engine off can all reduce battery life.
If the battery is the primary issue, the vehicle may start normally after a jump start, but if the battery can’t store enough energy, the problem may return later.
2. Symptoms that Commonly Indicate a Bad Alternator
When an alternator is failing, symptoms often appear not only when the vehicle is running but also when starting it.
A common sign is dim or flickering headlights because the alternator isn’t consistently powering the lighting system.
Drivers may also notice dashboard lights dimming or electronic accessories like power windows, infotainment screens, or climate control systems acting strangely.
Another important warning sign is a battery warning light that appears on the dashboard when the engine is running.
This light typically indicates that the charging system isn’t generating enough voltage to maintain a battery charge.
In some cases, the vehicle may start normally but then stall while driving because the battery’s stored energy is depleted.
Strange noises from the alternator area, such as grinding or scratching sounds, can also indicate a malfunction in internal components.
Because the alternator is responsible for continuously generating electricity, any malfunction in this part can immediately affect many of the vehicle’s electrical systems.
3. Simple Checks That Help Identify the Problem
Several simple checks can help determine whether the problem is with the battery or the alternator.
One common method is to measure the voltage at the battery terminals using a multimeter.
If the engine is off and the battery voltage is significantly below about 12 volts, the battery may be weak or discharged.
If the engine starts but the voltage doesn’t rise above the normal charging range of about 13.7 to 14.7 volts, the alternator may not be charging the battery properly.
Another important thing to pay attention to is how the vehicle behaves after a jump start.
If the vehicle starts after a jump start but quickly loses power or stalls after a short run, the alternator may not be producing enough electricity to keep the battery charged.
However, if the vehicle runs normally after a jump start and continues to start properly, the battery may have been temporarily discharged rather than damaged.
Understanding these differences can help drivers identify the root cause of the problem and avoid replacing the wrong component.
What are Some Common Alternator Problems That You Needs to Be Aware Of
The alternator is a durable component, but like any mechanical or electrical device, it can develop problems over time due to wear, heat, vibration and prolonged use.
Because the alternator operates continuously when the engine is running, its internal components are subjected to constant movement and electrical stress.
Over thousands of miles of driving, certain parts of the alternator can gradually wear out or deteriorate.
When this happens, the alternator cannot generate the electricity needed to keep the battery charged or support the vehicle’s electrical system.
Many alternator failures are caused by common problems that affect the internal electrical components or the mechanical components that help the alternator rotate.
Understanding these common problems can help vehicle owners recognize early warning signs, perform proper testing and prevent unexpected problems.
1. Worn Brushes
Alternator brushes are small carbon parts that help transfer electrical current within the alternator.
These brushes are in contact with a rotating part called the rotor, keeping electricity flowing through the alternator’s circuits.
Because the brushes are constantly in contact with a moving surface when the alternator is running, they gradually wear out over time.
In many vehicles, brushes wear out due to prolonged use, which can occur after many years or thousands of miles of driving.
When brushes become too small or worn, they cannot properly contact the rotor.
This can disrupt the flow of electricity within the alternator and reduce its power generation capacity.
This can cause the charging system to become unstable, leading to problems such as dim lights, low battery charge, or intermittent power.
2. Bad Voltage Regulator
The voltage regulator is responsible for controlling the electrical voltage the alternator sends to the vehicle’s electrical system and battery.
Because the alternator can produce varying levels of power depending on engine speed, the voltage regulator keeps the output within a safe and stable range.
In most vehicles, the normal charging voltage should be between 13.5 and 14.7 volts when the engine is running.
If the voltage regulator malfunctions, the alternator may produce either too low or too high a voltage.
Low voltage can prevent the battery from charging properly, leading to frequent discharges and trouble starting.
Excessive voltage can also be dangerous as it can damage sensitive electronic components such as sensors, control modules and infotainment systems.
Therefore, a bad voltage regulator can cause numerous electrical problems throughout the vehicle.
3. Bad Diodes
Inside the alternator, diodes play a vital role in converting electrical current.
The electricity generated by the alternator is initially produced as alternating current, but the vehicle’s electrical system and battery require direct current to function properly.
Diodes are electronic components that convert this alternating current into direct current for use in the vehicle’s electrical system.
If one or more of these diodes fail, the alternator may become unstable or produce less power.
This can cause symptoms such as flickering lights, a weak battery charge, electrical problems in the audio system, or a drained battery when the vehicle is parked.
Bad diodes can cause the alternator to generate excessive heat, which can shorten the life of other internal components.
4. Loose or Worn Belt
The alternator relies on a drive belt connected to the engine to turn its pulleys and generate power.
This belt is usually part of the engine’s serpentine belt system, which powers several accessories such as the alternator, power steering pump and air conditioning compressor.
If the belt is loose, worn, torn, or damaged, the alternator cannot rotate at the correct speed.
When the belt slips or fails to maintain the correct tension, the alternator cannot produce enough electricity to properly charge the battery.
Drivers may notice dim headlights, illuminated battery warning lights on the dashboard, or hear squealing noises from the engine area.
Regular belt inspections are important because replacing a worn belt is often easier and more cost-effective than repairing a completely failed charging system.
Read More:
What To Do if the Alternator Fails the Test
If testing reveals a faulty alternator, immediate action is essential to prevent further problems with the vehicle’s electrical system.
The alternator is responsible for generating electricity and keeping the battery charged when the engine is running.
When it fails, the battery becomes the vehicle’s sole power source and can only support the vehicle for a short time before completely discharging.
This situation can cause the vehicle to stall while driving, engine failure and failure of various electronic systems.
Fortunately, after confirming alternator problems, drivers can take several practical steps.
These steps can help determine whether the problem is temporary, caused by a small component like the drive belt, or a completely failed alternator that requires replacement.
1. Recharge the Battery
The first step after diagnosing alternator problems is to recharge the vehicle’s battery.
When the alternator stops working properly, the battery gradually loses its stored electrical energy as it continues to power the vehicle without being recharged.
As battery voltage drops, vehicle lights may dim, electronic accessories may slow down, or the engine may have trouble starting.
Recharging the battery with a battery charger may temporarily restore power and restart the vehicle.
However, it’s important to understand that if the alternator is still faulty, simply recharging the battery won’t fix the problem.
The battery will lose its charge again after driving.
Recharging the battery is primarily useful for temporarily restoring power while diagnosing the charging system or preparing the vehicle for repairs.
2. Check the Alternator Belt
Another important step is to check the alternator belt, which is responsible for rotating the alternator pulley and generating electricity.
In most vehicles, the alternator is driven by a serpentine belt that connects various engine accessories.
If this belt is loose, torn, worn, or damaged, the alternator may not rotate at the correct speed.
When the belt slips or loses tension, the alternator cannot generate enough electricity to charge the battery.
Drivers may also hear a squealing sound from the engine area when the belt slips.
Carefully checking the condition of the belt can sometimes reveal simple causes of charging system problems.
If the belt is visibly worn, broken, or loose, replacing it may restore proper functioning without replacing the alternator.
3. Replace a Bad Alternator
If testing confirms that the alternator itself is defective or no longer provides the correct voltage, it may be necessary to replace the alternator.
Over time, internal components such as brushes, bearings, voltage regulators and diodes can deteriorate due to heat, vibration and continuous operation.
When these parts wear out, the alternator can no longer deliver enough power to meet the vehicle’s needs.
Replacing a faulty alternator restores the charging system’s ability to supply power to the vehicle and properly charge the battery.
After installing a new alternator, the charging voltage should return to its normal operating range, which is typically around 13.5 to 14.7 volts when the engine is running.
Installing a reliable replacement alternator helps ensure that all electrical systems function properly and reduces the risk of sudden battery failure.
4. Seek the help of a professional mechanic
In some cases, alternator problems can be difficult to diagnose because the charging system involves many interconnected parts, such as wiring, fuses, voltage regulators and the vehicle’s electronic control system.
If the cause of the problem is unclear or multiple electrical symptoms appear simultaneously, it may be best to seek professional help.
Automotive technicians have specialized diagnostic equipment that can analyze the entire charging system and identify hidden problems that may not be detected during basic testing.
A professional inspection can confirm whether the alternator, battery, wiring, or other electrical components are responsible for the problem.
Seeking expert help ensures a proper repair and prevents unnecessary replacement of parts that are still working properly.
How to Extend The Life of the Alternator
Alternators are designed to last for many years, but their lifespan can vary depending on driving habits, vehicle maintenance and environmental conditions.
In most vehicles, alternators typically last approximately 80,000 to 150,000 miles, although some can last longer if properly maintained.
Because the alternator operates every time the engine is running, it is subjected to constant mechanical movement and electrical load.
Heat, vibration, worn parts and poor maintenance can gradually reduce its performance.
Fortunately, some simple maintenance methods can help extend alternator life and prevent premature failure.
By maintaining connected parts like the battery and drive belts, reducing unnecessary electrical stress and performing regular vehicle inspections, drivers can ensure the alternator continues to provide reliable electrical power to the vehicle’s systems.
So, when you test the alternator’s efficiency then it really helps you to determine how effectively the device actually converts the mechanical energy from the engine into the electrical power. And even laboratory studies also shows that the measuring the voltage, current and mechanical input power literally allows the you to calculate the alternator’s efficiency and detect for any potential mechanical or electrical faults as well.[¹]
1. Keep the Battery in Good Condition
One of the most important ways to protect your alternator is to maintain it.
The alternator and battery work together as part of the vehicle’s charging system.
The battery stores electrical energy and provides the power needed to start the engine, while the alternator generates electricity to recharge the battery and run the vehicle’s electrical system while driving.
If the battery is weakened, damaged, or not charging properly, the alternator may have to work harder to recharge it.
This increased workload can increase heat and electrical stress inside the alternator, shortening its life.
Regularly checking the battery voltage, ensuring the terminals are clean and tight and replacing old batteries when necessary can help reduce strain on the alternator and keep the charging system functioning properly.
2. Avoid Excessive Electrical Load
Modern vehicles are equipped with numerous electrical features, such as air conditioning systems, heated seats, infotainment screens, navigation systems, lighting systems and advanced driver assistance technology.
Although the alternator is designed to power these systems, running too many electrical accessories for extended periods of time can put heavy demands on the charging system.
Excessive electrical load forces the alternator to generate more current, which increases internal heat and mechanical stress.
Over time, this increased workload can accelerate the wear of internal components such as bearings, brushes and diodes.
Drivers can help extend the life of the alternator by turning off unnecessary electrical accessories when not needed and avoiding prolonged use of high-power electronics when the vehicle is idling.
3. Maintain Proper Belt Tension
The alternator relies on a drive belt, commonly known as a serpentine belt, to rotate its pulleys and generate electricity.
This belt connects the alternator to the engine’s crankshaft so that it rotates whenever the engine is running.
If the belt is loose, worn, or damaged, the alternator may not rotate at the correct speed.
Belt slippage can significantly reduce the alternator’s power output, leading to poor battery charging and electrical performance issues.
Furthermore, a loose belt can cause friction and heat, which can damage both the belt and the alternator pulley.
Regularly checking the belt’s condition and tension helps ensure the alternator is functioning properly.
Replacing worn belts and maintaining proper belt tension ensures the alternator rotates smoothly and delivers consistent power.
4. Regular Vehicle Inspection
Regular vehicle inspections play a vital role in detecting potential alternator problems before they become serious.
During regular maintenance checks, mechanics often inspect the condition of the charging system, battery connections, electrical wiring and alternator belt.
These inspections can reveal early signs of wear, such as loose connections around the alternator, faulty wiring, strange noises, or signs of overheating.
Early detection of these problems allows repairs to be made before major damage occurs to the alternator.
Regular inspections also help ensure that the entire electrical system remains in good condition, reducing unnecessary strain on the alternator.
By maintaining a regular inspection schedule and fixing minor problems early, drivers can significantly extend the life of the alternator and maintain reliable vehicle performance.
Conclusion – How to Test an Alternator
Actually, a healthy alternator quietly powers the dozens of electrical systems every time whenever you drive.
When the engine is running, it generates electricity, powers many essential components like the headlights, sensors, dashboard systems and infotainment unit and also recharges the battery.
When the alternator is functioning properly, the vehicle receives consistent power, allowing all electronic systems to function smoothly and reliably.
However, when the alternator begins to fail, drivers may notice warning signs such as dim lights, strange electrical accessories, a battery warning light on the dashboard, or the battery repeatedly running out of charge.
It’s crucial to recognize these symptoms early, as a faulty alternator can eventually drain the battery completely and cause a vehicle to suddenly fail.
Testing an alternator isn’t as difficult as many drivers think.
Using a simple tool like a multimeter or observing basic electrical symptoms can help determine if the alternator is generating the correct voltage and properly charging the battery.
Methods such as voltage testing, headlight observation, electrical load checks and professional diagnostic testing can help determine the health of the charging system.
Understanding these testing methods can help vehicle owners diagnose common electrical problems with greater confidence and avoid unnecessary part replacement.
Now, that’s all from this one and you can ask more related questions in the comment box and you can see if there’s answer in the FAQ’s section as well.
Frequently Asked Questions
Q1. What is the easiest way to test an alternator?
Answer: The easiest and most reliable way to test an alternator is to use a digital multimeter to measure the voltage at the car battery terminals. When the engine is off, a healthy car battery typically shows a voltage reading between approximately 12.4 and 12.7 volts. After starting the engine, the alternator should begin generating electricity and charging the battery. At this point, in most vehicles, the voltage should rise to approximately 13.7 to 14.7 volts. This increase in voltage indicates that the alternator is functioning properly and powering the vehicle. If the voltage does not rise or remains close to the battery’s resting voltage, the alternator may not be charging properly and further testing is required.
Q2. Can you test an alternator without a multimeter?
Answer: Yes, it is possible to perform a basic alternator check without using a multimeter by observing certain electrical behaviors in the vehicle. One simple way is to turn on the headlights with the engine running and then increase the engine speed slightly. If the headlights become brighter as the engine speed increases, it means the alternator is spinning faster and producing more power. Another way is to turn on various electrical accessories, such as the air conditioning system, interior lights and radio. If the lights dim significantly or electrical components operate strangely while these systems are in use, it could be a sign that the alternator is having trouble delivering enough power.
Q3. How do you know if the alternator isn’t charging the battery?
Answer: A common way to diagnose charging problems is to measure the battery voltage with the engine running. If the alternator is working properly, the voltage reading should rise above the battery’s resting voltage and remain within the normal charging range of approximately 13.5 to 14.7 volts. If the voltage remains around 12 volts even after the engine is started, it means the alternator isn’t producing enough electricity to charge the battery. Drivers may also notice symptoms such as dimming headlights, malfunctioning electrical accessories, or a battery warning light on the dashboard. These signs typically indicate that the charging system isn’t functioning properly.
Q4. What are common signs of a bad alternator?
Answer: A bad alternator often causes several warning signs related to the vehicle’s electrical system. One of the most noticeable symptoms is dimming or flickering headlights, which occurs when the alternator can’t provide a consistent electrical output. Drivers may also notice a battery warning light on the dashboard while driving. Other common signs include slow or malfunctioning electrical accessories, such as power windows, the infotainment system, or the climate control unit. In some cases, the vehicle may start normally but suddenly stall while driving because the battery has lost stored energy after the alternator stops charging. Strange noises coming from the engine area or a burning smell near the alternator may also indicate internal problems with the alternator.
Q5. How long does an alternator typically last?
Answer: In most vehicles, an alternator typically lasts approximately 80,000 to 150,000 miles, although this lifespan can vary depending on driving conditions, vehicle design and maintenance practices. Alternators operate every time the engine is running, so their internal components are constantly exposed to heat, vibration and electrical stress. Over time, parts like brushes, bearings and voltage regulators can gradually wear out. Extreme temperatures, heavy traffic, or driving with many electrical accessories can put excessive load on the alternator, shortening its lifespan. Regular vehicle inspections and proper maintenance of connected parts like the battery and drive belts can help extend the life of the alternator.
Q6. Can a car run with a bad alternator?
Answer: A car with a bad alternator can run for a short time, but it won’t last long. When the alternator stops generating electricity, the battery becomes the vehicle’s sole power source. The battery can power essential systems like the ignition, fuel injection and dashboard electronics for a while, but eventually, its charge will be depleted. When the battery is completely drained, the car will stall and won’t start until the battery is recharged and the alternator problem is fixed. Therefore, it’s important to repair alternator problems as soon as possible to avoid unexpected breakdowns.
References:
[1] Research of the alternator on the stand-efficiency aspect Research of the alternator on the stand-efficiency aspect
http://researchgate.net/publication/328335686_Research_of_the_alternator_on_the_stand-efficiency_aspect_Research_of_the_alternator_on_the_stand-efficiency_aspect

Hello Folks, Dean Shali here to help you out to solve the problems with your lovely vehicle, as i have lots of experience and knowledge about automotive industry as i woks directly with the customers and repair vehicles and i love to help the people to keep their cars safe and running smoothly.