Written By: Dean Shali
Fact Checked By: Sabré Cook
Reviewed By: Tamara Warren
The “Starter Solenoid” actually acts as the main gatekeeper between your battery power and engine cranking process.
So, that is the power electrical component that quietly decides whether your engine comes to life or stays silent there.
The starter solenoid works like a heavy-duty electrical switch that literally connects the battery power to the starter motor, that’s how it allows the engine to crank.
But, whenever it begins to fail, then there’s subtle signs such as: hearing single click with no engine movement at all, repeated clicking sounds, dimming dashboard lights or just complete silence when starting.
These symptoms basically points to the weak internal contacts, worn-out coil or poor electrical connection inside the solenoid.
As well as, in the modern vehicles: the starter system actually draws a very high current, often more than the 100 amps, so even with the small fault in the solenoid it can completely stop that starting process as well.
And, that’s why many drivers mistakenly replaces the battery or starter motor first, thinks that are worn-out or not working properly, even though the solenoid is often comes forward as the real cause of this activity.
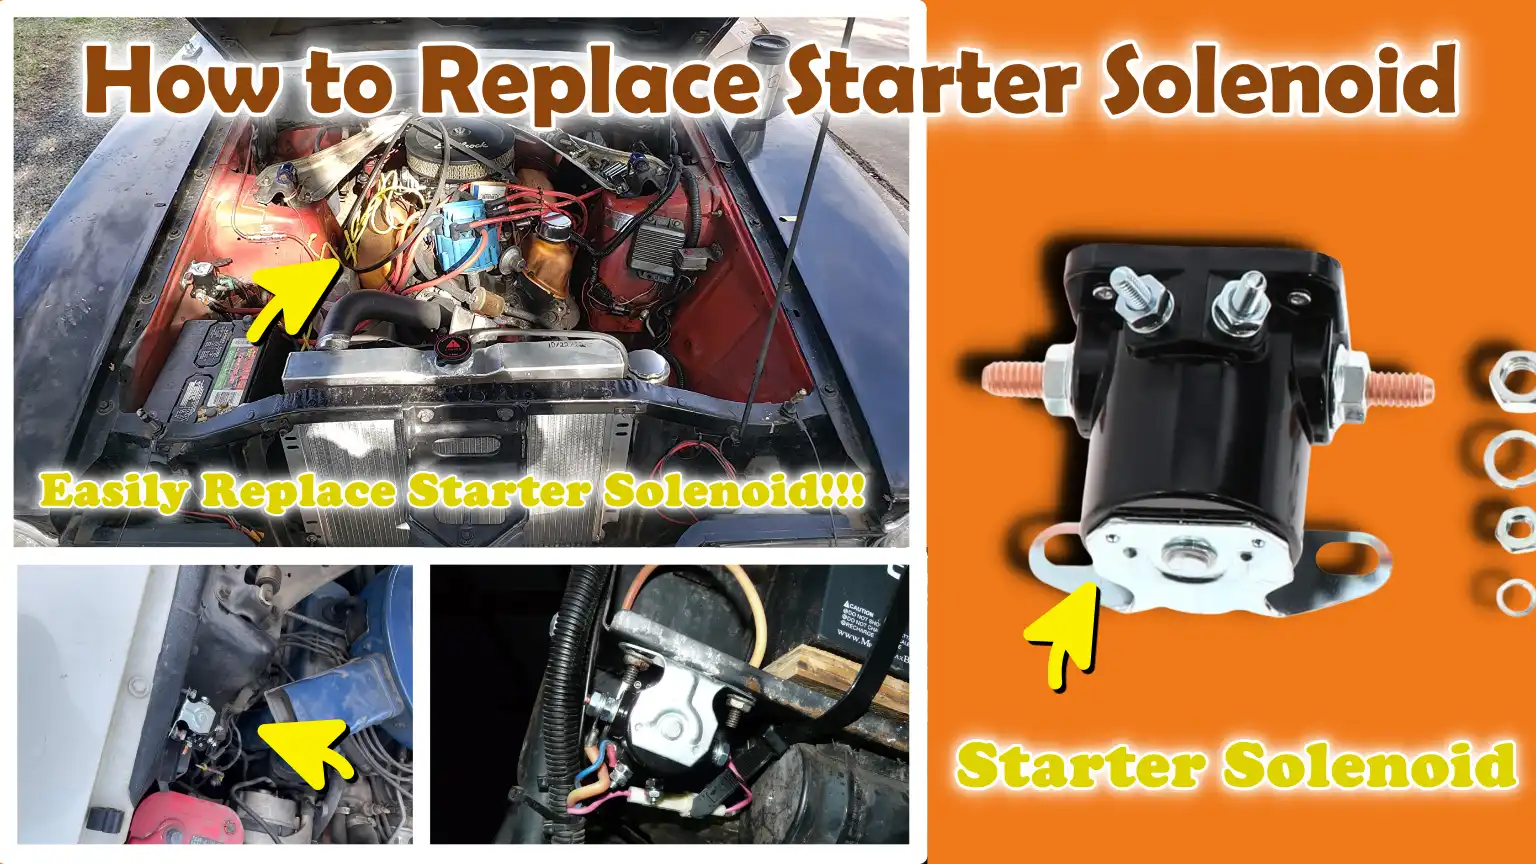
Now, in this guide you’ll learn How to Replace Starter Solenoid so that you can bring the vehicle back to the reliable starting condition effortlessly and safely.
How to Be Safe While Replacing Starter Solenoid
1. Disconnecting the Battery – Negative Terminal First
Before you touch any part of the starter system, the first and most critical step is to disconnect the battery.
Always remove the negative terminal first, as this breaks the circuit and minimizes the risk of sparks or accidental short circuits.
The starter system carries a very high current; if it is accidentally grounded, it can instantly damage tools or wiring.
Disconnecting the battery ensures that no electrical current is flowing while you are working, thereby protecting both you and the vehicle’s electrical system from harm.
2. Avoiding Electric Shocks and Short Circuits
Although a car battery operates at only 12 volts, it can deliver extremely high amperage, making short circuits very dangerous.
If a metal tool simultaneously touches a live terminal and a grounded part of the vehicle, it can result in a sudden, severe electrical surge, potentially causing sparks, burns, or damage to the wiring.
To prevent this, ensure that your tools are dry, insulated whenever possible and never place them directly on top of the battery terminals.
Keeping the workspace clean and tidy and removing loose metal objects such as rings or watches, also significantly reduces the risk of hazards.
3. Working on a Cold Engine
Before beginning any work on the starter system, it is essential to allow the engine to cool down completely.
After driving the vehicle, engine components such as: the exhaust manifold and the starter housing, as it can become extremely hot, posing a risk of burns if touched.
A cool engine not only makes the job safer but also more comfortable, allowing you to handle bolts, wires and connectors without the risk of injury.
Waiting for the engine to cool down also mitigates the hazards associated with working in the cramped and hazardous conditions often created by heat-induced expansion.
4. Using Jack Stands When Working Under the Vehicle
If you need to get underneath the vehicle to access the starter solenoid, proper support is absolutely essential.
Never rely solely on a hydraulic jack, as its pressure can gradually decrease over time.
Jack stands provide a stable and secure foundation, ensuring that the vehicle remains firmly in place while you are working underneath it.
Position them on solid, level ground and verify that the vehicle is properly supported before beginning any repair work.
This step is critically important, as it prevents the vehicle from accidentally slipping, an incident that could result in serious injury during repairs.
Tools
| Tools | How to Use It | Why It Is Needed |
|---|---|---|
| Socket and Ratchet Set | Use this tool to tighten and loosen the starter and solenoid. | Most starter assemblies are attached by tightly fastened bolts that cannot be removed by hand; therefore, this tool is essential for their removal and installation. |
| Wrenches | Use a fixed or adjustable wrench to loosen battery terminals and fasteners located in hard-to-reach areas. | These tools help access tight spaces where socket tools may not fit properly. |
| Screwdrivers – Flathead and Phillips | Use a flathead screwdriver to pry open clips and a Phillips screwdriver to remove small screws securing covers or electrical connectors. | Many covers, connectors and small mounting points surrounding the starter system are fastened with screws rather than bolts. |
| Jack and Jack Stands – If Needed | Use a jack to lift the vehicle and use jack stands to safely support it before working underneath. | In some vehicles, the starter is mounted on the underside; therefore, safely lifting the vehicle is necessary to access it. |
| Multimeter – Optional But Helpful | Use this device to check the battery voltage and to verify whether power is reaching the starter solenoid. | This helps determine whether the solenoid itself is faulty or if the problem lies with the battery or wiring. |
| Replacement Starter Solenoid – Or Starter Assembly If Integrated | Replace the old unit with the new one and correctly reconnect all wires and bolts. | This constitutes the core of the repair process, ensuring that the engine can start properly. |
| Safety Gloves and Goggles | Wear gloves when handling metal parts and wear safety goggles when working near the battery or wiring. | During the repair process, this protective gear provides protection against burns, electrical sparks, dirt and sharp edges. |
Now, Let’s Understand About the Location of the Starter Solenoid
1. Solenoid Mounted on the Starter Motor vs Separately Mounted Solenoid
In most modern vehicles, the starter solenoid is mounted directly onto the starter motor itself, forming a single integrated unit.
In this design, the solenoid acts as an electrical switch that engages the starter gear with the engine’s flywheel while simultaneously directing high current to spin the motor.
However, in some older vehicles and certain trucks, the solenoid is not attached to the starter motor but is instead mounted separately within the engine bay.
This is referred to as a ‘remote-mounted solenoid’.
It performs the same function but is positioned at a slight distance from the starter to minimize heat exposure and to allow for easier inspection or replacement.
It is crucial to identify which type of solenoid is installed in your vehicle, as this determines how you will access and replace the component.
2. Common Locations Based on Vehicle Type – Front-Wheel Drive, Rear-Wheel Drive, Trucks/SUVs
The exact location of the starter solenoid depends heavily on the specific layout of the vehicle.
In Front-Wheel Drive (FWD) cars, the starter and solenoid are typically situated near the lower section of the engine, close to the transmission area, and are often positioned toward the front or side of the engine bay.
To access this component, you may need to reach up from underneath the vehicle.
In Rear-Wheel Drive (RWD) vehicles, the starter is generally found near the rear of the engine, where it connects to the transmission bell housing; depending on the specific engine design, accessing this component may sometimes be easier from either above or below the vehicle.
In trucks and SUVs, due to the larger engine size and frame structure, the solenoid is often situated deeper within the engine bay and positioned further toward the rear; consequently, properly accessing this component typically requires lifting the vehicle.
These distinctions are crucial, as they determine the specific tools and procedures required to replace the solenoid.
3. How to Visually Identify a Solenoid
A starter solenoid can typically be identified as a small, round, or square component that is either directly attached to the starter motor or mounted in its immediate vicinity.
Generally, it features connection points for attaching thick battery cables, as well as at least one thinner wire responsible for transmitting the ignition signal.
One of its most easily recognizable features is a small metal plunger or terminal area, which facilitates the transmission of electrical current to the starter motor when the system is activated.
It is often located near heavy-gauge wiring, as it must handle a substantial surge of electrical current during the engine-starting process.
If you trace the thick cable leading directly from the battery, it will typically lead you to the solenoid or the starter assembly.
Understanding its physical configuration and wiring connections is essential, as this helps prevent any confusion regarding nearby sensors or other electrical components located within the engine bay.
How to Identify the Problem Before Replacement
1. Checking the Battery Condition
Before assuming that the starter solenoid is faulty, the first step is always to check the condition of the battery, as a weak battery can exhibit symptoms identical to those of a defective solenoid.
A healthy car battery should typically maintain a voltage of approximately 12.
6 volts when the engine is off; a voltage significantly lower than this may cause the engine to start sluggishly, or fail to start at all.
When the ignition key is turned, the battery must be capable of delivering a strong current despite the electrical load (demand), as a battery that displays normal voltage during idle periods may still fail to perform when called upon.
Corroded terminals or loose battery connections can also disrupt the flow of electricity, leading to the erroneous assumption that the solenoid has failed, whereas the actual issue lies in the battery’s insufficient output.
2. Checking the Starter Relay and Fuse
Once you have confirmed that the battery is in good condition, the next step is to inspect the starter relay and its associated fuse.
The starter relay functions as a small electrical switch that sends a signal to the solenoid; if this relay fails, the solenoid will not receive the command to activate.
Furthermore, if a fuse within the starting circuit has blown, the entire system may cease to function.
These components are typically housed within a fuse box, which is usually located either under the hood or inside the vehicle’s cabin.
As these parts are inexpensive and easy to replace, they should always be checked at the very beginning of the diagnostic process to avoid unnecessarily replacing larger components, such as the starter motor or solenoid.
3. Confirming Symptoms of a Faulty Solenoid
Once you have checked the basic electrical components, you can focus on specific symptoms that directly indicate a failing starter solenoid.
Common symptoms include a loud “click” sound when turning the key, even if the engine fails to start, repeated clicking noises, or complete silence, even if the dashboard lights illuminate normally.
In some cases, the starter may function intermittently, sometimes cranking the engine and at other times failing to do so.
These symptoms typically indicate that the internal contacts within the solenoid have worn out, or that it is failing to properly engage the starter motor.
Heat damage and prolonged electrical wear are common causes of this malfunction.
4. Performing Basic Electrical Checks with a Multimeter
A multimeter is an invaluable tool for accurately assessing the operational status of a solenoid.
By measuring the voltage across the solenoid’s terminals, you can determine whether power is reaching the solenoid when the ignition key is turned.
If the solenoid is receiving the correct voltage but fails to activate the starter, it is a definitive sign of an internal fault.
You can also check for voltage drops within the circuit; this helps identify poor connections or wiring issues that may be hindering the solenoid’s proper operation.
This step eliminates the need for guesswork and confirms whether a specific component truly requires replacement, thereby saving both time and money during the repair process.
How to Remove Starter Solenoid
1. Disconnect the Battery
Before beginning any work on the starter system, the first and most critical step is to disconnect the battery to prevent electrical hazards.
The starter circuit draws a very high current directly from the battery; if a tool accidentally comes into contact with a live terminal, it can result in sparks, a short circuit, or damaged wiring.
To safely interrupt the electrical circuit, always disconnect the negative terminal first; this ensures that no live current is flowing through the starter system while you are working.
This step protects both you and the vehicle’s electrical components from serious damage.
2. Access the Starter Assembly
Once the battery has been safely disconnected, the next step is to access the starter assembly; depending on the vehicle’s design, this may be located in a confined or hidden area.
In some vehicles, you may need to remove engine covers, air intake pipes, or plastic shields to gain clear access to the starter.
These components are typically secured by simple clips or bolts and should be removed carefully, without applying excessive force.
In cases where the starter is located underneath the vehicle, it is essential to safely lift the vehicle using a jack and properly support it with jack stands.
This provides a safe workspace and eliminates the risk of the vehicle shifting while you are working underneath it.
3. Disconnect Electrical Connections
Once proper access has been established, the next step is to disconnect all electrical connections attached to the starter or solenoid.
The main power cable is typically a thick wire connected directly to the battery; it should be carefully removed using an appropriately sized wrench, taking care not to damage the terminal.
Additionally, there is typically a small ignition trigger wire that sends the signal to activate the solenoid; this, too, must be gently disconnected without damaging the connector.
It is crucial to label or memorize the position of each wire during removal, as incorrect wiring during reinstallation can lead to a “no-start” condition or other electrical malfunctions.
4. Remove the Starter Motor – If the Solenoid is Integrated
In many modern vehicles, the solenoid is built directly into the starter motor itself; therefore, it is necessary to remove the entire starter assembly first.
This involves locating and loosening the bolts that secure the starter in place; due to engine vibration and heat, these bolts are often seated very tightly.
A socket and ratchet may be required to properly loosen these bolts.
Once the bolts have been removed, the starter unit should be carefully extracted from its mounting location and held steady to prevent damage to surrounding wires or components.
As starter motors can be heavy and situated in awkward positions, it is essential to handle them with slow, controlled movements during removal.
5. Detach the Solenoid – If Replaceable Separately
In vehicles where the solenoid is a separately replaceable component, the final step is to detach it from the starter assembly.
This involves removing the solenoid’s mounting screws, which firmly hold it in position.
These screws are often small but seated very tightly, making it crucial to use the correct screwdriver or socket to avoid damaging them.
After loosening the mounting points, any plunger or linkage connecting the solenoid to the starter motor must be carefully disengaged.
This internal linkage is crucial because it connects directly to the starter gear and attempting to force it apart can result in damage.
Once disconnected, the faulty solenoid can be completely removed, clearing the way for the installation of a new unit.
How to Install a New Starter Solenoid
1. Positioning the New Solenoid
When installing a new starter solenoid, the first step is to position it in the exact location from which you removed the old one.
Proper positioning is critical, as the solenoid must align perfectly with the starter motor and its electrical terminals to function correctly.
If it is even slightly misaligned, it can lead to issues such as poor contact, weak starting, or the starter failing to operate at all.
The solenoid must sit firmly and flush against its mounting surface, without any gaps, to ensure stability and proper alignment for both mechanical movement and electrical connections.
2. Reconnecting the Linkage or Plunger – If Applicable
In some starter designs, particularly those where the solenoid is separate from the motor, there is a small internal linkage or plunger that connects the solenoid’s movement to the starter gear.
This component must be reconnected with great care, as it serves to push the starter gear forward to engage with the engine’s flywheel.
If it is not installed correctly, the starter may produce a distinct “click” sound, but the engine will fail to start.
The plunger should move freely and without obstruction, returning to its normal resting position so that it can fully engage when the solenoid is activated.
3. Tightening the Mounting Screws/Bolts
Once the solenoid and all associated linkages are correctly positioned, the next step is to secure them using the appropriate mounting screws or bolts.
These fasteners hold the solenoid firmly in place, ensuring that it does not come loose due to vibration while the engine is running.
It is essential to tighten them evenly and securely; However, care must be taken not to overtighten them, as applying excessive force can damage the housing or strip the threads.
A stable mounting guarantees proper alignment and longevity, particularly because the starter system must withstand the intense vibrations generated every time the engine is started.
4. Securely Reconnecting Electrical Terminals
The final step of the installation process involves reconnecting all electrical terminals to the new solenoid.
The main power cable must be firmly attached, as it transmits high-amperage current directly from the battery to the starter motor.
The smaller ignition wire must also be securely connected, as it transmits the signal that activates the solenoid.
Loose connections at this stage can lead to issues such as weak starting, intermittent operation, or the starter failing to engage at all.
To ensure that the electrical flow remains strong and consistent every time the ignition is turned on, it is essential that all terminals are clean, properly seated and securely tightened.
How to Reinstall the Starter Assembly
1. Mounting the Starter Back onto the Engine Block
Once the new solenoid or starter unit is ready, the next step is to carefully position the starter assembly back onto the engine block in its original location.
This task requires very steady hands, as it is crucial that the starter aligns perfectly with the mounting holes and the engine flywheel area.
If it does not seat correctly, the starter gear will not engage easily, which may result in grinding noises or prevent the engine from starting.
Proper alignment ensures that the electrical and mechanical connection between the starter and the engine functions exactly as designed, without placing undue stress on any components.
2. Tightening the Bolts to the Correct Torque
Once the starter is properly seated, the mounting bolts should be inserted and securely tightened.
These bolts serve to firmly anchor the starter to the engine block; this is critical because, every time the engine starts, the starter is subjected to significant torque and vibration.
The bolts must be tightened firmly and evenly, but not excessively, as overtightening can strip the bolt threads or crack the mounting surface.
Using the precise torque specifications recommended by the vehicle manufacturer ensures long-term stability and eliminates the risk of the bolts loosening or the alignment shifting during repeated engine starts.
3. Reconnecting Battery Cables and Wiring Harness
Once the starter is fully installed, the final step is to reconnect all the electrical wiring and battery cables that were previously removed.
The main battery cable must be securely connected, as it carries the entire electrical load required to power the starter motor.
The smaller wiring harness or ignition trigger wire must also be firmly reconnected to ensure that the solenoid receives the correct signal for activation.
Once all connections are in place, the negative battery terminal is reconnected to restore power to the system.
At this stage, a final check ensures that all wires are properly connected and that no connections remain loose, a step absolutely essential for safely and reliably starting the engine.
How to Test the Installation of New Starter Solenoid
1. Reconnecting the Battery
Once all components are installed and secured, the first step in the testing process is to reconnect the battery so that the electrical system can be reactivated.
This task must be performed with care, connect the positive terminal first, followed by the negative terminal, to ensure a stable and secure connection.
A correctly connected battery restores power to the starter circuit, providing the solenoid and starter motor with the electrical current necessary to crank the engine.
Before proceeding to the next step, it is essential to verify that the terminals are tight and free of corrosion to ensure an uninterrupted flow of power during testing.
2. Starting the Engine to Confirm Proper Connections
After reconnecting the battery, the ignition key or start button is used to verify whether the starter system has been connected correctly.
A properly installed solenoid should immediately engage the starter motor, allowing the engine to crank smoothly and start within a few seconds.
This step confirms that the electrical signal originating from the ignition switch is reaching the solenoid and that the solenoid is effectively transmitting power to the starter motor.
A vigorous and uninterrupted engine start serves as the best initial indication that the installation has been successful.
3. Checking for Issues Such as Clicking, Grinding, or Failure to Start
During the initial attempt to start the engine, it is crucial to listen and watch carefully for any unusual sounds or behaviors.
If a “clicking” sound is heard but the engine fails to crank, this may indicate loose electrical connections or an incorrectly wired solenoid.
A grinding sound may suggest that the starter gear is not engaging properly with the engine’s flywheel; immediate inspection may be required to prevent potential damage.
If complete silence prevails or no response is received, it often indicates a wiring issue, loose connections, or improper installation.
Identifying these signs early on can prevent further damage to the starter system and ensure that the repair work has been executed correctly.
4. Verifying Consistent Performance
Once the engine has successfully started for the first time, the final step involves testing the system multiple times to ensure that it operates correctly and consistently.
The engine should start easily every time, without any delay, hesitation, or unusual noises.
Consistent and proper operation indicates that the solenoid is functioning correctly, despite the repetitive electrical load, and that all connections are secure.
This step is crucial, as certain issues only manifest after the engine has been started multiple times, particularly as heat builds up and electrical demands increase.
If the system continues to operate reliably after several test runs, it signifies that the installation has been successfully completed and the starter system is fully repaired and operational.
Know, Common Mistakes While Replacing the Starter Solenoid
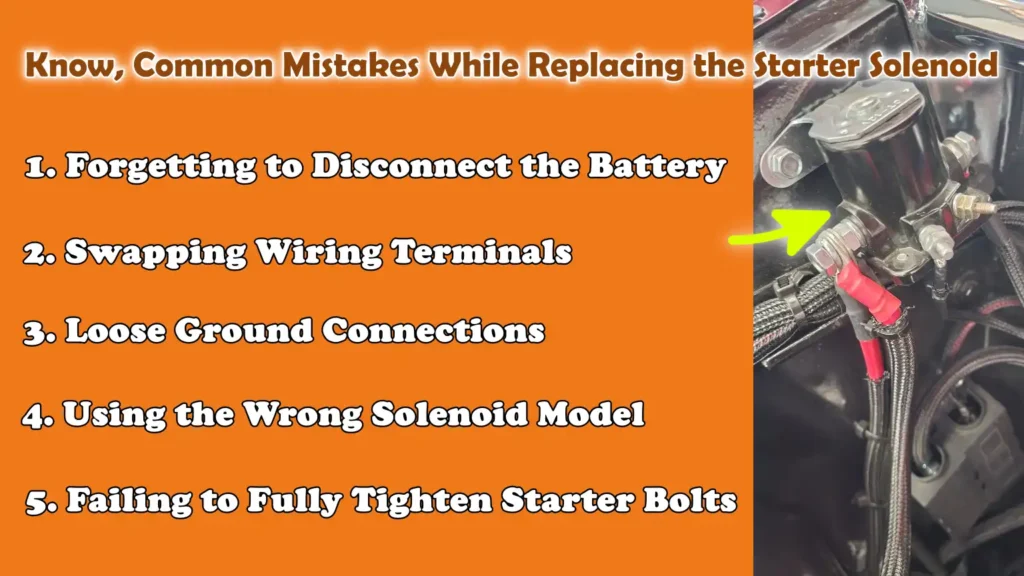
1. Forgetting to Disconnect the Battery
One of the most serious mistakes made when replacing a starter solenoid is forgetting to disconnect the battery before beginning the work.
The starter system draws a significant amount of power directly from the battery; if a tool accidentally comes into contact with a ‘live’ terminal (one carrying current), it can result in sparks, a short circuit, or damage to sensitive wiring.
This step is crucial, as it safeguards both the person performing the repair and the vehicle’s electrical system.
To completely break the circuit and ensure that no ‘live’ current is flowing through the system while you are working, always disconnect the negative terminal first.
2. Swapping Wiring Terminals
Another common mistake is incorrectly reconnecting the wires after removing the old solenoid.
The starter system typically consists of a thick main power cable and a thinner ignition trigger wire; if these are swapped, the engine will fail to start, or the electrical system could even sustain damage.
As these wires can look similar within the cramped confines of the engine bay, it is essential that you either memorize their original positions or clearly label them as you remove them.
Correct placement ensures that the solenoid receives the proper signals and effectively delivers power to the starter motor.
3. Loose Ground Connections
A common cause of starting difficulties following installation is a poor or loose ground connection.
The starter system relies on a robust ground path to complete the electrical circuit; if the ground connection is weak, the solenoid may emit an audible “click,” but the starter motor will fail to engage fully.
This often occurs when mounting surfaces are dirty or corroded, or when components have not been tightened correctly.
To ensure a smooth flow of electricity and reliable engine starting, it is essential to verify that all metal-to-metal contact points are clean and that all connections are securely tightened.
4. Using the Wrong Solenoid Model
Installing the wrong solenoid model is another common error that can lead to immediate malfunction or long-term damage.
Even if the component appears visually identical, slight differences in voltage ratings, mounting designs, or connector types can prevent it from functioning correctly.
Using the specific part number designated for a particular vehicle ensures proper alignment, electrical compatibility and safe operation under load.
To avoid repetitive repairs and unnecessary expenses, always verify compatibility prior to installation.
5. Failing to Fully Tighten Starter Bolts
Failure to fully tighten the starter mounting bolts can result in serious mechanical and electrical issues.
When the starter motor begins to spin to crank the engine, it generates a significant amount of torque; if not securely fastened, it may vibrate, shift out of position, or lose its proper alignment with the flywheel.
This can lead to grinding noises, damage to the flywheel teeth, or, over time, the complete failure of the starter unit itself.
Proper tightening guarantees stability, correct alignment and longevity for the entire starting system.
Read More:
What are the Post-Replacement Issues and Their Solutions
1. The Engine Still Won’t Start
If the engine fails to start even after replacing the starter solenoid, the problem may not lie with the solenoid itself, but rather with another component of the starting system.
In many cases, a weak battery, poor battery connections, or corroded terminals prevent the necessary electrical current from reaching the starter motor.
It is also possible that the ignition switch or starter relay is failing to send the correct signal.
At this stage, it is crucial to first carefully re-examine the electrical supply, as the starter system requires a strong and consistent flow of electricity to function properly.
2. The Starter Still Makes a ‘Clicking’ Sound
If you hear a ‘clicking’ sound but the engine does not crank (begin to turn over), it generally indicates that the solenoid is receiving power, but the starter motor is not rotating.
This can be caused by low battery voltage, worn internal components within the starter motor, or poor grounding.
Occasionally, the solenoid engages correctly, but the starter fails to draw the necessary amperage (electrical power) required to turn the engine over.
A repeated ‘clicking’ sound is a definitive sign that electrical power is present, but it lacks the necessary strength to complete the starting process.
This situation often points to issues related to the electrical supply rather than a fault with the new solenoid itself.
3. Electrical System Issues
If, after replacing the solenoid, various electrical components begin to behave erratically such as: dimming lights, slow cranking, or intermittent starting, the problem may be related to the wiring or grounding connections.
Loose connections, faulty cables, or corroded contact points can disrupt the flow of electricity throughout the entire system.
The starter requires a substantial amount of power and even the slightest interruption in the circuit can lead to significant performance issues.
In such instances, checking for tight cable connections, cleaning contact points and ensuring proper grounding are essential steps to restore the engine to normal operation.
4. When to Re-inspect the Wiring or Replace the Starter Motor
If all connections are secure, the battery is in good condition and the solenoid is also new, yet the problem persists, it becomes necessary to conduct a more thorough re-inspection of the wiring system.
Check the cables for hidden defects, loose terminals, or weak ground connections, issues that may not be apparent at first glance.
If it is confirmed that the wiring is entirely sound, yet the problem remains, the fault likely lies within the starter motor itself.
Over time, wear and tear on the internal components of the starter motor can cause it to cease functioning properly, even if the solenoid is operating correctly; in such cases, replacing the starter motor becomes the final and necessary course of action.
How to Maintain & Prevent Future Malfunctions of Starter Solenoid
As well as, there’s research that shows that starter solenoids operates under the heavy electrical stress every time a vehicle starts, as it gradually wears down the internal contact points, basically this wear is one of the most common reasons behind clicking sounds and no-start conditions in vehicles, that’s why solenoid replacement actually restore reliable engine starting performance as well.[¹]
1. Keeping Battery Terminals Clean
The most crucial method for avoiding starter solenoid issues is to keep the battery terminals clean and free of corrosion.
Over time, a white or green powdery residue can accumulate on the battery posts, increasing electrical resistance and reducing the amount of power reaching the starter system.
As the solenoid relies on a strong, clean flow of electricity to function correctly, even slight resistance can lead to problems such as weak cranking or a failure to start the engine.
Regular cleaning, using an appropriate terminal cleaner or corrosion-removing solution, ensures a robust electrical connection, allowing the engine to start smoothly every time.
2. Regularly Inspecting Starter Connections
The starter system relies on several electrical connections that must remain tight and secure at all times.
Due to the vibrations experienced during daily driving, these connections can gradually loosen over time, particularly around the starter motor and solenoid terminals.
Loose or corroded connections can impede the flow of electricity and cause intermittent starting issues, which are often difficult to diagnose.
Regularly inspecting these connections ensures that all wires remain firmly attached, corrosion-free and properly seated in their respective positions; this maintains consistent system performance and reduces the risk of sudden starter failure.
3. Avoiding Excessive Cranking
Attempting to start the engine repeatedly or for prolonged periods places excessive strain on both the starter solenoid and the starter motor.
Each time you turn the key, the system draws a massive surge of electricity, generating heat within its internal components.
If repeated cranking attempts are made without brief pauses in between, heat can accumulate and damage the internal components of the solenoid, potentially leading to its premature failure.
It is advisable to take a short break between each attempt to start the engine; this allows the electrical system time to cool down and prevents unnecessary strain on the starter components.
4. Checking the Condition of the Charging System
A healthy charging system is crucial for the long-term reliability of the starter solenoid.
When the engine is running, the alternator is responsible for keeping the battery charged; if the alternator is weak or failing, the battery will be unable to store sufficient power to start the engine the next time.
A low battery charge places an additional burden on both the solenoid and the starter motor, accelerating their wear and tear over time.
Regular checks of the charging voltage ensure that the battery remains in good condition and that the starter system receives a consistent power supply; this helps prevent sudden starting issues and extends the lifespan of all components within the associated systems.
Conclusion – How to Replace Starter Solenoid
Yes, it is true that even as small as starter solenoid can decide whether your engine wakes up or stays complete silent every time you turn on the key.
Every time you start your vehicle, it functions as a primary electrical switch, connecting the battery to the starter motor and facilitating the ignition of the engine.
When a malfunction occurs within it, the consequences are often sudden and frustrating, manifesting as clicking sounds, a failure of the ignition system to engage, or the vehicle failing to start properly.
However, as outlined in this guide, many of these issues can be accurately diagnosed and resolved; rather than relying on guesswork or blindly replacing parts, one should adopt a clear and systematic approach.
Understanding how the solenoid operates, its physical location and its interconnections with the battery, relays and starter motor makes the repair process significantly more precise and effective.
Thoroughly inspecting a component before replacing it helps avoid unnecessary expenses, while proper removal and installation techniques ensure that the new solenoid functions correctly.
Now, that’s all from this guide and you can comment for more info.
Frequently Asked Questions
FAQ 1: What is the function of a starter solenoid in a car?
Answer: The starter solenoid is an essential electrical switch within a vehicle’s starting system. Its primary function is to connect the battery’s power to the starter motor when you turn the ignition key or press the start button. It also assists in engaging the starter gear with the engine’s flywheel, thereby initiating the engine cranking process. If the solenoid is not functioning correctly, the starter motor will not receive full power and the engine will fail to start, even if the battery is in good condition.
FAQ 2: What are the common symptoms of a failing starter solenoid?
Answer: A failing starter solenoid typically exhibits clear warning signs. The most common symptom is a distinct “clicking” sound when you attempt to start the car, yet the engine itself fails to crank. In some instances, there may be complete silence, even though the dashboard lights illuminate. Some vehicles may experience intermittent starting issues, starting sometimes but not others; this is referred to as “intermittent starting.” These symptoms generally indicate that the solenoid is failing to properly transmit power to the starter motor.
FAQ 3: Can a bad solenoid drain the battery?
Answer: A faulty starter solenoid typically does not drain the battery on its own while the car is turned off. However, if it becomes stuck or remains partially engaged, it can create an electrical fault that may gradually drain the battery. In most cases, repeatedly attempting to start a car with a bad solenoid can rapidly deplete the battery’s charge, as the starter system consumes a significant amount of power during each failed attempt.
FAQ 4: How long does a starter solenoid last?
Answer: A starter solenoid can last for many years, often ranging from 80,000 to 150,000 miles, depending on your driving habits and the overall condition of the vehicle. Its lifespan is determined by how frequently the engine is started, the quality of the electrical connections and the condition of the battery and charging system. Frequent short trips, a deteriorating battery and repeated attempts to start the engine can all reduce its lifespan over time.
FAQ 5: Can I replace the starter solenoid myself?
Answer: Yes, in many vehicles, you can replace the starter solenoid yourself, provided you possess some basic mechanical knowledge and have the right tools. The process typically involves disconnecting the battery, accessing the starter assembly, removing the electrical connections and installing the new solenoid. However, the layout of some vehicles can be quite complex; in such cases, seeking professional assistance may be safer and faster specially if the starter is difficult to access.
FAQ 6: What happens if I ignore a faulty starter solenoid?
Answer: If a faulty starter solenoid is not replaced, the vehicle may eventually stop starting altogether. This issue often begins with intermittent starting difficulties and gradually worsens over time. Ignoring this problem can also place excessive strain on the battery and starter motor, potentially leading to even more expensive repairs down the road. In some instances, the vehicle could suddenly leave you stranded on the road.
FAQ 7: Is a “clicking” sound always an indication of a faulty solenoid?
Answer: A “clicking” sound is a definitive sign of a problem with either the solenoid or the starter; However, this is not always solely due to the solenoid. Similar symptoms can also be caused by a weak battery, faulty electrical connections, or a defective starter motor. Therefore, it is crucial to conduct a thorough inspection before replacing any component to accurately pinpoint the root cause of the problem.
References:
[1] Analysis of Automobile Starter Solenoid Switch for Improved Life
https://www.researchgate.net/publication/274714758_Analysis_of_Automobile_Starter_Solenoid_Switch_for_Improved_Life

Hello Folks, Dean Shali here to help you out to solve the problems with your lovely vehicle, as i have lots of experience and knowledge about automotive industry as i woks directly with the customers and repair vehicles and i love to help the people to keep their cars safe and running smoothly.