Written By: Dean Shali
Fact Checked By: Sabré Cook
Reviewed By: Tamara Warren
It is true that: properly working brake booster actually reduces the effort needed to stop your car by several times, that makes the driving way more safer and really comfortable.
So, basically it reduces the amount of force you need to press the brake pedal and it works by using the engine vacuum in terms to multiply your input, which literally allows you to stop the vehicle smoothly and with very less effort.
And, whenever the brake booster starts to fail, then the first signs are usually feeling hard brake pedal, longer stopping distances or having unusual noises such as: hissing sounds.
Additionally, in some of the cases it can even affect the engine performance because of the vacuum leaks.
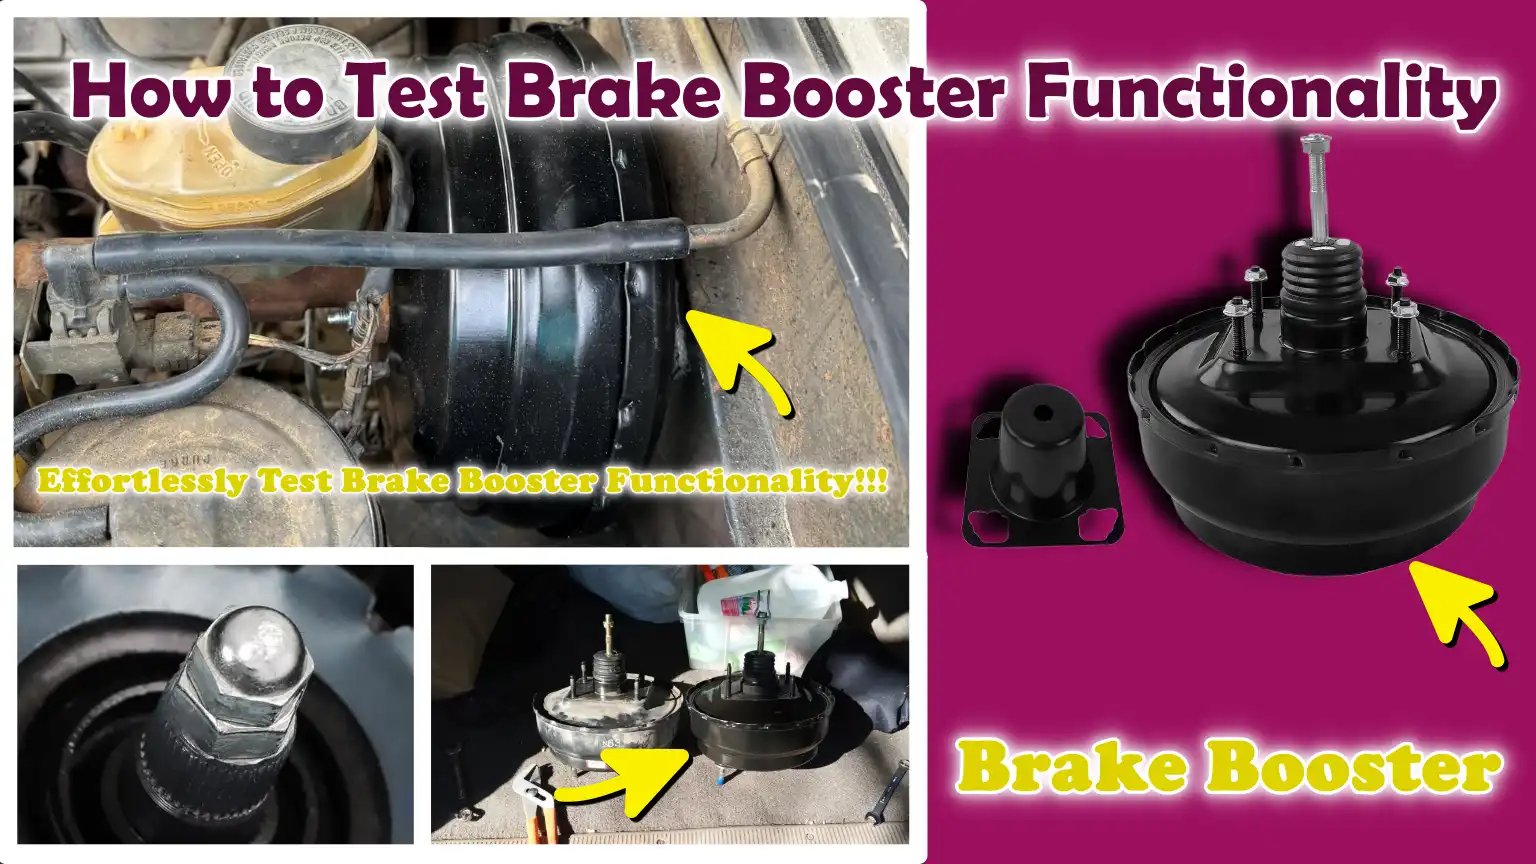
Now, in this guide you’ll learn How to Test Brake Booster Functionality so that you can test it and quickly identify the problem way more early so that you can avoid expensive repairs as well.
So, Why is it Really Important to Check the Functionality of the Brake Booster?
1. Prevents Issues Associated with a Stiff Brake Pedal
A stiff brake pedal is one of the most common and easily recognizable symptoms of a failing brake booster.
When the booster is functioning correctly, it utilizes engine vacuum to multiply the force applied by your foot, making the pedal feel soft and easy to depress.
If the booster fails, this additional assistance is lost and you are forced to exert significantly more pressure on the pedal to slow the vehicle down.
This can be dangerous, particularly in sudden braking situations where an immediate response is required.
By regularly checking the brake booster, you can identify this issue in time and avoid the risk of struggling to bring your vehicle to a halt.
2. Ensures Adequate Braking Force and Safety
The brake booster plays a crucial role in ensuring that your vehicle comes to a stop smoothly and effectively.
Without it, even if you apply heavy pressure to the brake pedal, sufficient braking force may not be generated to bring the vehicle to a safe stop.
This can result in increased stopping distances and reduced vehicle control, particularly at high speeds or in heavy traffic.
Checking the booster confirms that the system is providing the correct level of assistance, thereby ensuring that your braking remains consistent and reliable.
This directly enhances the safety of both the driver and other road users.
3. Helps Detect Vacuum Leaks Early
Brake boosters rely on engine vacuum to perform their function and even a minor leak in the vacuum system can compromise their effectiveness.
These leaks may occur in the hoses, connections, or the internal components of the booster itself.
Early symptoms may include a faint “hissing” sound, rough engine idling, or a reduction in braking assistance.
By inspecting the brake booster, you can detect these leaks before they escalate into more serious problems.
Timely repair of a minor vacuum leak is far easier and less expensive than dealing with a complete failure of the entire braking system later on.
4. Prevents Increased Stopping Distances
The most significant risk associated with a failing brake booster is an increase in the vehicle’s stopping distance.
When the booster fails to provide adequate assistance, the brakes take longer to respond and significantly more force is required to slow the vehicle down.
In emergency situations, where every second counts, this delay can make a critical difference.
Regular inspections ensure that your braking system is operating at its full potential, helping you maintain shorter and more predictable stopping distances.
This not only keeps your vehicle safe but also reduces the risk of road accidents.
Know, About The Common Signs of a Failing Brake Booster
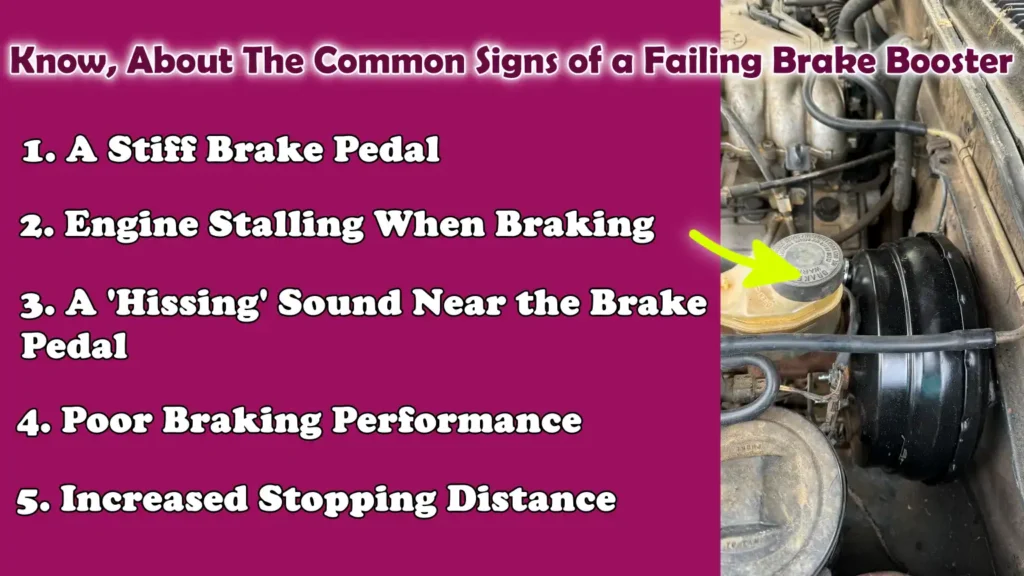
1. A Stiff Brake Pedal
A stiff brake pedal is typically the first and clearest indication that the brake booster is not functioning correctly.
When the booster is working properly, it utilizes engine vacuum to provide ease and smoothness when the brake pedal is depressed.
If it fails, this additional assistance is lost and the pedal becomes stiff and difficult to push.
This means you must exert significantly more force with your foot to slow down or bring the vehicle to a stop.
This change may occur suddenly or gradually; either way, it serves as a clear warning that the braking system is not receiving the support it requires.
2. Engine Stalling When Braking
If your engine stalls, or feels as though it is about to stall, when you press the brake pedal, this can be a strong indication of an issue with the brake booster.
This occurs because the booster is connected to the engine’s vacuum system.
If a leak or internal malfunction develops, it can disrupt the delicate air-fuel balance within the engine.
Consequently, engine power may diminish, or the engine may stall, particularly when braking at low speeds or while the vehicle is idling (stationary).
This symptom not only compromises braking performance but also indicates that the engine itself is being adversely affected by the issue.
3. A ‘Hissing’ Sound Near the Brake Pedal
A distinct ‘hissing’ sound emanating from the vicinity of the brake pedal often signals a vacuum leak within the brake booster or its associated hoses.
The booster relies on a sealed vacuum pressure to function correctly; Consequently, air escapes through any leak, thereby diminishing the system’s overall effectiveness.
This sound may be audible when you press or release the brake pedal and over time, it may become louder.
Although this may initially seem like a minor issue, if left unaddressed, a vacuum leak can quickly and significantly compromise braking performance.
4. Poor Braking Performance
When the brake booster begins to fail, the vehicle’s overall braking performance becomes weaker and less consistent.
You may notice that the vehicle does not decelerate as rapidly as it used to, regardless of how much force you apply to the pedal.
The brakes may feel less responsive and bringing the vehicle to a complete stop may require more time and physical effort.
This diminished performance can be particularly dangerous in heavy traffic or emergency situations, where rapid and reliable braking is critical.
5. Increased Stopping Distance
One of the most serious symptoms of a failing brake booster is an increase in stopping distance.
Because the booster is unable to provide the necessary assistance, it takes longer for the brakes to apply full force; this means the vehicle requires a greater distance to come to a complete halt.
This delay may not always be clearly perceptible during normal driving, but it becomes acutely apparent during sudden braking maneuvers.
An increased stopping distance significantly heightens the risk of accidents; therefore, it is imperative that any issues related to the brake booster be diagnosed and repaired as soon as possible.
Tools
| Tool/Material | Why It Is Needed | How to Use It |
|---|---|---|
| No Special Tools Required – Basic Test | Many tests on the brake booster can be performed without any tools, as the system’s functionality can be assessed simply by observing the reaction of the brake pedal and the engine. This makes it easier for beginners to conduct diagnostic checks right at home. | You can perform some basic tests as follows: With the engine off, press the brake pedal; then, while keeping the pedal depressed, start the engine. By observing how the pedal reacts, you can determine whether or not the booster is functioning correctly. |
| Flashlight – For Inspection | Using a flashlight allows you to clearly view the brake booster assembly, vacuum hoses and connections, specially within the dimly lit environment of the engine bay. This helps in identifying cracks, loose fittings, or any other visible signs of damage. | Use a flashlight to inspect the area surrounding the brake booster and vacuum lines. Look closely for cracks, worn rubber hoses, or loose connections, as these can lead to vacuum leaks. |
| Safety Gloves | Safety gloves protect your hands from dirt, sharp edges and hot engine components, particularly when you are working around the braking system. Additionally, they provide a better grip when handling various parts. | Put on your gloves before opening the hood and beginning your inspection. Ensure that the gloves fit your hands well so that you can maintain tactile sensitivity and handle parts with precision. |
| Vacuum Gauge | With the aid of a vacuum gauge, you can measure the amount of vacuum pressure reaching the brake booster. This measurement is crucial, as maintaining the correct vacuum level is essential for the booster to function effectively. | Connect the vacuum gauge to the vacuum line leading to the brake booster. Start the engine and observe the reading displayed on the gauge. To determine whether the system is functioning correctly, compare this reading against normal vacuum levels. |
| Hand Vacuum Pump | By using a hand vacuum pump, you can manually generate and test the vacuum pressure within the booster and hoses. This helps verify whether the booster is capable of properly maintaining the vacuum. | Disconnect the vacuum hose from the booster and attach the pump in its place. Generate vacuum pressure using the pump and observe whether the pressure remains stable. If the pressure drops rapidly, there may be a vacuum leak somewhere, or an internal fault within the booster. |
How to Ensure Safety Before Testing Brake Booster
1. Park the Vehicle on Level Ground
Before beginning the brake booster testing process, it is crucial that you park your vehicle on a level and uniform surface.
This ensures that the vehicle remains stable and will not suddenly roll away while you are working.
When a vehicle is parked on an incline, even the slightest movement can cause it to shift, a situation that can be dangerous whether you are inside the vehicle or standing nearby.
A level surface ensures that the brake system can be tested safely and that any feedback received from the pedal is accurate, rather than being influenced by the vehicle’s positioning.
2. Turn Off the Engine Before Starting the Test
Most basic brake booster tests begin with the engine turned off, as this allows you to deplete the vacuum stored within the system and observe how the pedal functions without any assistance.
Turning off the engine also reduces the risk of injury from moving parts while you are inspecting or testing components.
This establishes a clear baseline, allowing you to understand how the brake pedal feels without the aid of the booster.
This step is essential for comparing how the pedal’s feel changes once the engine is restarted.
3. Engage the Parking Brake
Engaging the parking brake adds an additional layer of safety, ensuring that the vehicle remains firmly anchored in place throughout the entire testing process.
Even if the vehicle is already in ‘Park’ or ‘Neutral’ gear, the parking brake serves as a backup mechanism to prevent any unintended movement.
This becomes particularly important when you are repeatedly depressing the brake pedal or restarting the engine during the testing procedure.
A properly engaged parking brake allows you to focus your full attention on the testing procedure without the worry that the vehicle might drift.
4. Place the Vehicle in ‘Neutral’ or ‘Park’ Gear
Placing the vehicle in ‘Neutral’ or ‘Park’ gear ensures that the engine is not engaged with the wheels in a manner that would cause the vehicle to move forward or backward during testing.
This is crucial, as certain tests require you to start the engine or repeatedly depress the brake pedal.
If the vehicle were left in an active gear, even a minor error could cause it to lurch suddenly and forcefully, either forward or backward.
By placing it in ‘Neutral’ or ‘Park,’ you create a safe environment that allows you to conduct all testing with complete control and confidence.
How to Test Brake Booster Functionality – All Working Methods
Pedal Test – Engine Off/On: Method 1
Press the Brake Pedal Several Times with the Engine Off
To begin, turn off the engine and then repeatedly press the brake pedal in a steady rhythm.
When the brake booster is functioning correctly, it stores vacuum pressure generated by the engine, making the pedal feel softer and easier to depress.
Each time you press the pedal with the engine off, you are utilizing this stored vacuum.
After pressing it a few times, you will notice that the pedal becomes stiff and increasingly difficult to push down.
This is a normal and essential step, as it depletes all the stored braking assistance, thereby allowing you to properly test the booster in the subsequent step.
Keep the Pedal Depressed and Start the Engine
Once the pedal has become stiff, keep it held down with consistent pressure.
With your foot remaining in the same position, start the engine.
When the engine starts, it generates fresh vacuum pressure; a properly functioning brake booster immediately utilizes this vacuum to amplify your braking force.
This step is crucial, as it demonstrates how quickly and effectively the booster responds once the engine is running again.
Ensure that the pressure applied by your foot remains constant so that you can clearly perceive any changes in the pedal’s movement.
Observe the Pedal’s Movement
As soon as the engine starts, pay close attention to how the brake pedal behaves.
If the brake booster is functioning correctly, the pedal should automatically sink slightly downward and feel softer under your foot.
This change indicates that the booster is receiving vacuum pressure and is actively assisting in reducing the physical effort required to depress the pedal.
If there is no movement and the pedal remains stiff, it generally indicates that the booster is not functioning properly or that there is a vacuum leak somewhere in the system.
This simple method serves as a quick and reliable way to assess the overall condition of the brake booster.
Vacuum Retention Test: Method 2
Run the Engine for a Few Minutes
To begin, start the engine and let it run for a few minutes while the vehicle remains stationary.
This allows the brake booster to build up the necessary vacuum pressure required for proper operation.
The longer the engine runs, the more stable and complete the vacuum supply inside the booster becomes.
This step ensures that you are starting the test with a fully charged system, allowing you to accurately determine how well the system retains vacuum after the engine is turned off.
Turn Off the Engine
After allowing the engine to run for a short period, turn it off while the vehicle remains stationary.
When the engine shuts down, the vacuum supply ceases; however, a properly functioning brake booster should retain a certain amount of stored vacuum within itself.
It is this stored vacuum that enables you to press the brake pedal a few times with ease, even after the engine has been turned off.
Turning off the engine at this stage allows you to verify whether the booster is capable of effectively retaining that vacuum.
Press the Brake Pedal Repeatedly
With the engine turned off, begin pressing the brake pedal slowly and repeatedly.
For the first few presses, the pedal should feel soft and easy to depress, as the stored vacuum is still providing assistance.
As you continue to press, the vacuum inside the booster will gradually deplete and the pedal will progressively become stiffer and more difficult to depress.
This transition is normal and demonstrates how the stored vacuum is being utilized with each press.
Check How Many Easy Presses Are Possible
Pay close attention to how many times you are able to press the brake pedal with ease before it becomes stiff.
A properly functioning brake booster typically allows for the pedal to be pressed easily two to four times after the engine has been switched off.
If the pedal becomes stiff immediately, or after just a single press, it may indicate that the booster is failing to maintain vacuum effectively, or that there is a leak in the system.
This test helps you determine whether the booster can generate and sustain vacuum pressure, which is essential for consistent and safe braking performance.
Listening for Vacuum Leaks: Method 3
Press the Brake Pedal While the Engine is Running
Start the engine and allow the vehicle to idle normally while stationary.
Then, slowly press the brake pedal several times and observe how the system responds.
When the brake booster is functioning correctly, the pedal should feel smooth and quiet when pressed, as the vacuum pressure remains sealed within the system.
It is crucial to keep the engine running during this test, as this maintains a continuous supply of vacuum, which helps in detecting any abnormal changes that occur when the pedal is pressed.
Listen for a Hissing Sound
As you press and release the brake pedal, listen carefully for any hissing sounds or sounds of escaping air coming from the area around the brake pedal or from under the hood.
A properly functioning brake booster system should not produce any unusual noises during normal operation.
If you hear a hissing sound, it typically indicates that air is leaking from somewhere within the vacuum system.
This could be caused by a cracked hose, a loose connection, or a worn-out seal inside the brake booster.
Even a minor leak can compromise the system’s ability to assist with braking.
Locate the Potential Vacuum Leak
Once you hear a hissing sound, try to pinpoint its source by observing exactly where and when it occurs.
If the sound is audible inside the cabin near the brake pedal, the leak may be located within the booster unit itself.
If the sound is louder under the hood, it may be originating from a vacuum hose or connection.
Vacuum leaks reduce the necessary pressure required for effective braking, which can cause the brake pedal to become stiff and compromise braking performance.
Promptly detecting and repairing these leaks ensures safe and reliable braking and prevents the development of more serious issues over time.
Road Test Evaluation: Method 4
Drive the Vehicle Safely
After completing the basic static tests, carefully drive the vehicle for a short period in a safe location such as: a quiet road or an empty parking lot.
This step gives you the opportunity to experience how the brake booster performs in actual driving conditions, where factors such as speed, vehicle weight and momentum influence braking performance.
Ensure that you drive at slow to moderate speeds and maintain a safe distance from other vehicles.
Testing in a controlled environment allows you to focus on the vehicle’s braking behavior without any distractions or safety risks.
Pay Attention to the Effort Required for Braking
While driving, specifically when slowing down or bringing the vehicle to a stop, pay close attention to the amount of physical effort required to depress the brake pedal.
In a properly functioning system, the pedal should feel smooth and only light to moderate pressure should be necessary to effectively reduce the vehicle’s speed.
If you feel that you have to press the pedal significantly harder than usual, or if you find yourself exerting more physical force to achieve the same braking result, it could be an indication that the brake booster is not providing adequate assistance.
This change in the required effort is often the clearest sign of a potential issue, one that may not have been fully apparent during the static tests.
Check for Delayed Response or Stiffness
As you continue driving, also observe how quickly the brakes respond after the pedal is depressed.
A properly functioning brake booster helps the brakes engage almost instantly, providing a consistent and predictable braking experience.
If there is a noticeable delay before the vehicle begins to slow down, or if the pedal feels stiff and unresponsive, it may point to insufficient vacuum assistance or a deteriorating booster unit.
These symptoms may become even more pronounced during frequent stops or when braking at higher speeds.
Identifying delayed response or stiffness during a road test helps confirm whether the brake booster is functioning correctly under real-world conditions, thereby ensuring that your braking system remains safe and reliable.
How to Check the Brake Booster Using a Vacuum Gauge
1. Connect the Vacuum Gauge to the Booster Line
To begin this check, locate the vacuum hose that connects the engine to the brake booster.
This hose is typically a thick rubber line attached to the booster at the rear of the engine bay.
Carefully disconnect this hose and attach a vacuum gauge to it; ensure the connection is secure so that no air leaks occur during the test.
A tight connection is crucial, as even a small gap can result in an inaccurate reading.
Once the gauge is connected, start the engine and let it idle (without accelerating) so that the system can build up normal vacuum pressure.
2. Measure the Vacuum Pressure Level
With the engine running, observe the reading on the vacuum gauge.
In most vehicles, a healthy engine vacuum typically displays a reading between 18 and 22 inches of mercury at idle, although this may vary slightly depending on the type and condition of the engine.
This is the pressure that the brake booster utilizes to assist with braking.
If the reading is significantly low, it may indicate an issue with the engine’s vacuum supply such as: a leak or poor engine performance.
A steady and consistent reading indicates that the system is supplying a constant vacuum pressure to the booster.
3. Compare the Reading to the Normal Range
After checking the vacuum level, compare the reading against the normal range recommended for your specific vehicle.
If the vacuum falls within the expected range, yet the braking assistance still feels weak, the problem may lie within the brake booster itself.
Conversely, if the reading is lower than normal or fluctuates erratically, it may indicate a leak in the vacuum hose, a faulty check valve, or a problem within the engine’s vacuum system.
Comparing these readings helps you determine whether the issue lies with the booster or the vacuum supply, enabling you to take appropriate steps to rectify the problem and restore proper braking performance.
How to Identify Vacuum Line or Check Valve Problems
1. Check the Vacuum Hose for Cracks
The vacuum hose serves as the primary conduit for transmitting vacuum pressure from the engine to the brake booster; therefore, it is crucial that it remains in good condition to function correctly.
Over time, due to engine heat, dirt and general wear and tear, the rubber hose may harden, become brittle, or develop cracks.
Even a minor crack or a loose connection can allow air to infiltrate the system, thereby reducing the vacuum pressure necessary for proper brake assistance.
To inspect the hose, carefully examine its entire length for any signs of damage, soft spots, or loose connections.
Gently flex the hose to check for cracks, as some damage may not be visible while the hose remains straight.
A damaged hose should be replaced immediately to restore proper braking performance.
2. Check the One-Way Check Valve
The check valve is a small yet critical component situated within the vacuum line, typically located near the brake booster.
Its function is to allow vacuum pressure to flow from the engine to the booster while simultaneously preventing air from flowing back toward the engine.
This mechanism helps the booster maintain vacuum pressure, even when the engine is turned off.
To test the check valve, remove it from the hose and attempt to blow air through both ends.
Air should flow in only one direction.
If air flows easily in both directions, or if it is completely blocked in both directions, the valve is defective and requires replacement.
A faulty check valve can deplete accumulated vacuum pressure, potentially leading to reduced braking effectiveness.
3. Verify the Correct Direction of Airflow
Ensuring the correct direction of airflow within the vacuum system is crucial for the proper functioning of the brake booster.
The vacuum must always flow from the engine toward the booster, rather than in the opposite direction.
If the hose is connected incorrectly or the check valve is installed in the wrong orientation, the booster will not receive, or be able to maintain, the vacuum pressure it requires.
This can result in a stiff brake pedal and compromised braking performance.
To verify the correct airflow, check the markings on the check valve; these markings typically indicate the proper direction of flow.
Ensure that all connections are secure and properly seated so that the system can maintain consistent and reliable vacuum pressure for safe braking.
Read More:
- How to Lubricate Brake Caliper Pins Properly
- How to Rebuild Brake Caliper at Home
- How to Check Brake Caliper Piston Movement
- How to Resurface Brake Rotors at Home
- How to Fix Brake Rotor Runout
- How to Check Brake Disc Runout
- How to Prevent Brake Fluid Boiling
- How to Diagnose Brake Fluid Boiling
- How to Fix Brake Pedal Sinking Slowly
- How to Check Brake Pad Wear Sensor
- How to Measure Brake Pad Thickness Without Removing Wheel
- How to Replace Brake Pads
What Normal vs Faulty Results Look Like
1. Normal Results
The Pedal Drops Slightly When the Engine Starts
When the brake booster is functioning correctly, one of the clearest indicators is how the brake pedal responds when you start the engine.
After pumping the pedal a few times with the engine off (to bleed off any residual vacuum), you should keep the pedal depressed while starting the engine.
As soon as the engine fires up, the booster receives fresh vacuum pressure and utilizes it to assist your braking effort.
This causes the pedal to drop slightly on its own, without requiring any additional pressure from your foot.
This slight movement is a definitive sign that the booster is operating correctly and effectively utilizing vacuum pressure to support the braking system.
The Pedal Feels Smooth and Light
A properly functioning brake booster makes the act of depressing the brake pedal feel smooth and effortless during normal driving.
You should not need to exert excessive force to slow the vehicle down or bring it to a complete stop.
The pedal should respond immediately and consistently, ensuring a balanced and controlled braking experience.
This smooth feel stems from the booster, which uses vacuum pressure to multiply your input, thereby reducing the physical effort required to generate strong braking force.
A light and steady pedal feel is a clear indication that the system is performing as intended and that the booster is providing the appropriate level of assistance.
2. Faulty Results
No Pedal Movement
If the brake pedal does not move at all when the engine starts, it typically indicates that the brake booster is either not receiving adequate vacuum pressure or is unable to utilize it effectively.
In this situation, the booster provides no assistance and the system relies entirely on the mechanical force applied by your foot.
This lack of movement serves as a strong warning sign that there may be a vacuum leak, a malfunction within the booster, or an issue with the vacuum supply.
Immediate inspection is required, as the braking system is not operating at its full potential.
A Stiff Pedal
A stiff brake pedal is one of the most noticeable and serious indicators of a faulty brake booster.
When the booster fails, the pedal becomes rigid and requires significantly more effort to depress.
This occurs because the vacuum assist, which typically reduces the physical effort required, is no longer available.
Consequently, bringing the vehicle to a halt becomes more difficult, particularly during sudden braking maneuvers.
A stiff pedal not only makes driving uncomfortable but also increases the risk of accidents due to delayed braking response and reduced effectiveness.
Loss of Vacuum Assist
A loss of vacuum assist signals that the brake booster is no longer able to utilize engine vacuum to aid in braking.
This can be caused by a leak in the vacuum hose, a defective check valve, or an internal malfunction within the booster itself.
Without this assistance, the braking system loses a significant portion of its effective capacity, resulting in increased stopping distances and reduced vehicle control.
This condition often manifests alongside other symptoms, such as hissing sounds, poor braking performance, or a stiff pedal.
Identifying and rectifying the root cause of the vacuum loss is crucial for restoring safe and reliable braking functionality.
Can You Drive with a Faulty Brake Booster?
1. The Risks Involved
In some cases, it is possible to drive with a faulty brake booster; however, it is unsafe and should not be ignored.
The braking system will still function, as it relies on hydraulic braking components, but without the booster, you will lack the extra assistance that makes braking easier and more effective.
This means that your stopping capability is compromised, particularly in situations where rapid and forceful braking is required.
A faulty booster can also lead to other issues; for instance, a vacuum leak could result in engine performance problems.
Over time, continuing to drive in this condition places excessive strain on other brake components, potentially leading to further damage and increased repair costs.
2. Increased Effort Required for Braking
When the brake booster is not functioning, depressing the brake pedal becomes significantly more difficult.
This means that even for routine braking, you must exert considerably more physical force with your foot.
During daily driving, this can quickly become fatiguing and uncomfortable, specially in heavy traffic where frequent stopping is necessary.
More importantly, this increased physical effort required for braking can slow down your reaction time in situations where you need to come to a sudden stop.
Even though the brakes may still be operational, the absence of the booster renders them less effective and more difficult to control, thereby compromising overall driving safety.
3. Danger in Emergency Situations
The greatest risk associated with driving with a faulty brake booster emerges during emergency situations.
When you need to stop quickly to avoid an accident, every moment counts.
Without a properly functioning brake booster, the increased physical effort required for braking, combined with a delayed response, as it can extend the vehicle’s stopping distance and cause significant delays in bringing the vehicle to a complete halt.
Avoiding a collision can become extremely difficult, particularly at high speeds or in heavy traffic conditions.
During emergency braking, a properly functioning brake booster can make a crucial difference; therefore, driving with a faulty brake booster can expose both you and others to serious risk.
When to Replace the Brake Booster
1. Signs of Complete Failure
The brake booster should be replaced when clear signs of its complete failure become apparent and testing confirms that it is no longer providing proper assistance.
One of the most critical indicators is a consistently stiff brake pedal, even after the engine has started, suggesting that the booster is completely unable to utilize vacuum pressure.
Other signs include a persistent, unceasing “hissing” sound (resembling escaping air); the engine repeatedly stalling when the brake pedal is depressed; and a sudden increase in the vehicle’s stopping distance.
In some instances, testing may reveal that the booster is failing to hold a vacuum, indicating that it is unable to properly store or utilize pressure.
These symptoms suggest that the internal components of the booster have failed or worn out; therefore, replacement remains the safest and most reliable course of action.
2. Cost vs Repair: Making the Decision
In most situations, repairing a brake booster is not a practical option, as it is a sealed unit with internal components that are difficult to access or replace individually.
While minor issues such as: a cracked vacuum hose or a faulty check valve, as it can often be fixed at a low cost, if the booster itself has failed, it typically requires complete replacement.
The cost of a new brake booster varies depending on the vehicle model; however, replacing the unit is generally more cost-effective and safer than attempting to repair it.
Opting for replacement ensures that the braking system is fully restored to proper working order, thereby preventing recurring issues that may arise from incomplete repairs.
3. The Importance of Timely Replacement
Replacing a faulty brake booster in a timely manner is crucial for maintaining safe and reliable braking performance.
Delaying this replacement can exacerbate symptoms such as: increased stopping distances, a brake pedal that feels excessively stiff and reduced vehicle control during braking.
Over time, the additional force required to bring the vehicle to a halt can place undue stress on other brake components, potentially leading to further damage down the line.
Timely replacement not only restores smooth and effective braking performance but also protects you, your passengers and other road users from unnecessary hazards.
Taking immediate action at the very first signs of failure ensures that your vehicle remains safe to operate under all driving conditions.
How to Maintain the Brake Booster Performance
Also, there’s scientific research on the vacuum brake booster systems that explains that these components are really essential for proper operation of hydraulic braking systems in the passenger vehicles, so the laboratory testing also shows that the booster performance that can vary depends on the operating conditions: which makes these regular testing necessary, that’s why understanding about how the booster behaves under different loads that helps you to identify the issues early and ensures consistent braking performance as well.[¹]
1. Regular Inspection of Vacuum Lines
The vacuum lines connected to the brake booster are critical components, as they carry the pressure that facilitates the smooth operation of your brakes.
Over time, due to engine heat, dirt and general wear and tear, these rubber hoses can deteriorate.
Small cracks, loose connections, or hardened rubber can allow air to leak into the system, thereby reducing the vacuum pressure necessary for proper braking assistance.
Regularly inspecting these lines allows you to detect issues early, before they negatively impact braking performance.
During an inspection, look for any visible signs of damage, listen for any unusual noises and ensure that all connections are tight and securely fastened.
Keeping the vacuum lines in good condition ensures that the brake booster receives a consistent and reliable supply of vacuum pressure.
2. Check the Condition of the Brake Fluid
Although the brake booster operates using vacuum pressure, its performance ultimately depends on the overall health of the braking system, which includes the brake fluid.
Clean and properly maintained brake fluid helps to effectively transmit force from the brake pedal to the brakes themselves.
If the fluid becomes old, contaminated, or absorbs moisture, it can compromise braking performance and cause the pedal to feel inconsistent.
Sometimes, this is mistakenly attributed to a problem with the booster unit itself.
Regularly checking the level and condition of the brake fluid ensures that the entire system is functioning correctly.
Replacing old fluid at the recommended intervals keeps the braking system responsive and assists the booster in facilitating smooth braking.
3. Avoid Hard Braking Habits
Your driving habits have a direct impact on the longevity of your brake booster and braking system.
Hard braking such as: bringing the vehicle to a sudden, abrupt halt or repeatedly applying excessive force to the brake pedal, places undue stress on the booster and other components.
This constant strain can accelerate wear and tear, potentially leading to diminished performance over time.
Braking smoothly and with control allows the system to operate within its normal parameters, helping to maintain consistent vacuum pressure and reducing unnecessary stress on the booster.
By avoiding hard braking habits and adopting a smoother driving style, you can extend the lifespan of your brake booster and ensure that your braking system continues to function safely and effectively.
Conclusion – How to Test Brake Booster Functionality
Basically, a few minutes of testing today actually prevents really dangerous braking situations and costly repairs in the future.
By utilizing engine vacuum to amplify braking force, the brake booster plays a pivotal role in reducing the physical effort required to bring your car to a halt.
When it begins to fail, you may observe several warning signs, such as a stiffening brake pedal, diminished braking responsiveness, the emergence of unusual noises, or an increase in stopping distance.
These symptoms should never be ignored, as they directly impact your ability to safely control and stop the vehicle.
By following a step-by-step series of diagnostic procedures such as: pedal checks, vacuum retention tests, listening for vacuum leaks and utilizing a vacuum gauge, you can quickly determine whether your brake booster is functioning correctly.
These simple checks enable you to detect issues in their early stages, before they escalate into serious safety hazards or necessitate costly repairs.
Furthermore, maintaining this system through regular inspections of vacuum lines, proper brake fluid care and safe driving habits ensures that your brake booster continues to operate efficiently over time.
Ultimately, a properly functioning brake booster is not merely a matter of comfort; it is a matter of safety and confidence while driving.
Dedicating a few minutes to inspecting and maintaining this component can make a significant difference in how your vehicle responds, whether during routine daily driving or in emergency situations.
Now, that’s it from this guide about How to Test Brake Booster Functionality, also you can ask all the related questions below.
Frequently Asked Questions
FAQ 1: How do I know if my brake booster is bad?
Answer: You can identify a potentially faulty brake booster if the brake pedal feels very stiff and is difficult to depress, or if the car takes longer than usual to come to a stop. Other common symptoms include a “hissing” sound (resembling escaping air) when the brake pedal is pressed and the engine stalling or running poorly when the brakes are applied. A simple test involves turning off the engine and pumping the brake pedal until it becomes stiff; then, while keeping the pedal depressed, start the engine. If the pedal does not sink slightly, the booster may not be functioning correctly.
FAQ 2: Can a bad brake booster affect engine performance?
Answer: Yes, a faulty brake booster can impact engine performance because it is connected to the engine’s vacuum system. If there is a leak inside the booster or within the vacuum lines, it can disrupt the air-fuel mixture entering the engine. This can lead to issues such as rough idling, sluggish acceleration, or the engine stalling when the brake pedal is pressed. Repairing the booster or fixing the vacuum leak typically restores the engine to normal operation.
FAQ 3: Is it safe to drive with a bad brake booster?
Answer: Although it is technically possible to drive with a faulty brake booster, it is not safe and should be avoided. The brakes will still function even without the booster, but you will have to exert significantly more physical force on the brake pedal to slow down or stop the vehicle. This increased physical effort can slow down your reaction time, specially in emergency situations, and increase the risk of an accident. For safe driving, it is always best to have this issue repaired as soon as possible.
FAQ 4: How long does a brake booster typically last?
Answer: A brake booster can last for many years, often between 80,000 and 150,000 miles, depending on driving conditions and maintenance. General wear and tear, heat generated by the engine and driving habits can all impact its lifespan. If the vacuum lines are properly maintained and the entire system is kept in good condition, the booster can last even longer. However, once clear signs of failure begin to appear, it should be inspected and, if necessary, replaced.
FAQ 5: Can I check a brake booster at home without any tools?
Answer: Yes, you can check a brake booster at home without any specialized tools using a few simple methods. A common method involves turning off the engine and pumping the brake pedal several times until it becomes firm; then, while keeping the pedal depressed, start the engine. If the pedal drops slightly, it indicates that the booster is functioning correctly. You can also listen for “hissing” sounds, which signal an air leak, or pay attention to how the pedal feels during normal driving. These basic checks are easy to perform and can quickly help you determine whether or not there is a problem.
FAQ 6: Why do brake boosters fail?
Answer: A brake booster can fail for several reasons, including vacuum leaks, internal seal deterioration, or the wear and tear of components over time. Cracks in the vacuum hoses or a faulty check valve can also compromise the vacuum pressure necessary for proper operation. In some cases, the booster may simply weaken due to heat and age, causing it to lose its ability to assist with braking. Regular inspections and maintenance can help prevent these issues.
FAQ 7: How much does it cost to replace a brake booster?
Answer: The cost of replacing a brake booster can vary depending on the type of vehicle and the associated labor charges. On average, the total cost can range from moderate to high, covering the expense of both parts and labor. Although it may seem expensive, replacing a faulty booster is crucial for safety and helps prevent further damage to the braking system. Generally, replacing the booster is considered more reliable than attempting to repair it.
FAQ 8: Can vacuum leaks cause braking problems?
Answer: Yes, vacuum leaks can directly lead to braking problems, as the brake booster relies on vacuum pressure to assist with braking. If there is a leak in the hoses, connections, or within the booster itself, the system will not receive sufficient vacuum. This can cause the brake pedal to feel stiff, reduce braking performance and require a longer distance to bring the vehicle to a stop. Repairing the leak restores proper pressure and improves braking efficiency.
FAQ 9: Why does my brake pedal sometimes feel stiff?
Answer: The brake pedal may feel stiff when the brake booster is not receiving sufficient vacuum pressure. This can be caused by a leak, a faulty check valve, or an internal defect within the booster. This sensation may also occur temporarily when the engine is turned off and the stored vacuum has dissipated. If the pedal remains stiff even when the engine is running, it should be inspected immediately.
References:
[1] Research of the vacuum brake booster working process
https://www.researchgate.net/publication/379057268_Research_of_the_vacuum_brake_booster_working_process

Hello Folks, Dean Shali here to help you out to solve the problems with your lovely vehicle, as i have lots of experience and knowledge about automotive industry as i woks directly with the customers and repair vehicles and i love to help the people to keep their cars safe and running smoothly.