Written By: Dean Shali
Fact Checked By: Sabré Cook
Reviewed By: Tamara Warren
Basically, brake pads does wear down a “LITTLE BIT” every time you goes for drive, but most of the drivers never ever checks them until it’s too late to be maintain.
As, over the period of time: this friction material gradually wears down every time you press that brake pedal, which means that the brake pad thickness is constantly decreasing with normal driving as well.
Plus, most of the new brake pads start at around 10 to 12 millimeters thick, but once they wear down to about 3 millimeters or less, then their ability to stop the vehicle safely is significantly compromised and reduced.
Not only this, there’s studies in automotive maintenance that consistently shows that that worn out brake pads can increase the stopping distance and that leads to overheating, which may damage the expensive parts such as: brake rotors as well.
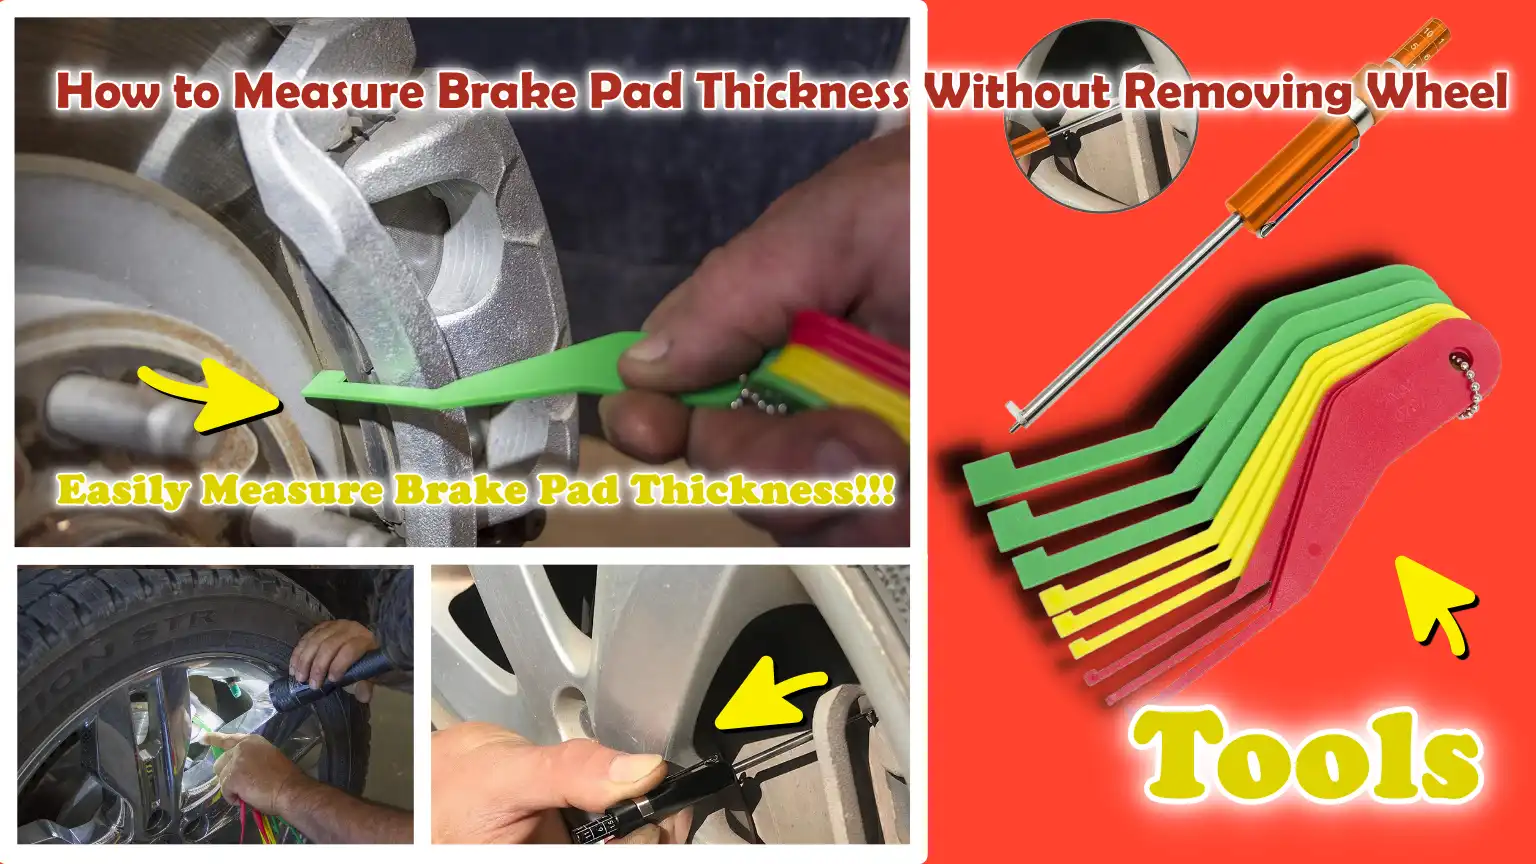
Now, in this guide you’ll learn How to Measure Brake Pad Thickness Without Removing Wheel, so that you can estimate the brake pad thickness, spot early warning signs and take action before small wear turns into a serious hazard.
What is Brake Pad Thickness and Why Does It Matter?
Brake pad thickness refers to the amount of friction-generating material remaining on the brake pad; this is the component that contacts the brake rotor to slow down your vehicle.
Every time you apply the brakes, a small amount of this material wears away due to heat and friction, a completely normal process.
As the thickness diminishes, the braking system has less material available to generate the friction necessary to safely bring the vehicle to a halt; this can result in increased stopping distances and reduced vehicle control.
Maintaining adequate brake pad thickness is crucial, as it directly impacts how quickly and safely your vehicle can stop, particularly during emergency braking situations or while driving at high speeds.
1. Definition of Brake Pad Thickness
Specifically, brake pad thickness refers solely to the thickness of the friction-generating material itself, excluding the metal backing plate that holds it in place.
Understanding this distinction is important because the backing plate contributes nothing to the vehicle’s stopping power and should never come into contact with the rotor.
A new brake pad typically features approximately 10 to 12 millimeters of friction material, this is the layer that gradually wears down over time.
When inspecting your brakes, it is essential to focus specifically on the visible friction layer; this layer is typically darker in color and softer to the touch than the shiny metal backing plate situated behind it.
2. Minimum Thickness Required for Safety
The minimum thickness generally considered safe for brake pads is approximately 3 millimeters.
At this stage, very little friction material remains on the pads to ensure effective braking and their immediate replacement is strongly advised.
Many automotive experts and manufacturers suggest that brake pads should be inspected when their thickness has worn down to approximately 4 to 5 millimeters; this is because this marks the point where wear accelerates rapidly and performance begins to deteriorate.
If the thickness drops below 3 millimeters, the risk of diminished braking performance, increased stopping distances and damage to other components rises significantly.
In severe cases, the friction material may wear away completely, causing the metal backing plate to grind against the rotor; this situation is both dangerous and costly to repair.
3. How Thickness Affects Braking Efficiency and Heat Dissipation
The thickness of brake pads plays a crucial role in both braking efficiency and thermal management.
Thicker brake pads contain a greater volume of material, which absorbs and dissipates the heat generated during braking.
This helps prevent issues such as brake overheating and “brake fade” (a reduction in braking power).
As the pads become thinner, they lose this capacity, leading to a rapid accumulation of heat.
This can adversely affect braking performance, particularly during frequent or heavy braking such as: when driving on steep inclines or in heavy traffic.
Thinner pads also tend to wear out more quickly, as they possess less material to withstand the operational pressures and heat generated during use.
Simply put, thicker brake pads provide more robust and consistent braking, whereas thinner pads struggle to function effectively.
If these are not replaced at the right time, driving the vehicle can become unsafe.
Know, The Common Signs of Worn Brake Pads

Brake pads do not wear out suddenly; over time, the friction material gradually thins down, providing clear indications of this process.
Recognizing these signs in a timely manner can help you avoid increased stopping distances, unsafe driving conditions and costly damage to other brake components such as: the rotors.
Most modern brake systems are designed to alert drivers when brake pads begin to wear low, typically through audible sounds, tactile vibrations and dashboard indicators.
Paying attention to these changes in your vehicle’s behavior is the easiest way to determine when it is time to inspect or replace your brake pads.
1. Squealing or Grinding Sounds
The most common sign of worn brake pads is a loud, high-pitched squealing sound that occurs when you press the brake pedal.
This sound is often caused by a small metal “wear indicator” embedded within the brake pad; as the friction material wears thin, this indicator generates an audible warning.
If this squealing sound is ignored, it may eventually escalate into a harsh grinding noise, a far more serious warning sign.
A grinding sound typically indicates that the friction material has completely worn away and the metal backing plate is now rubbing directly against the brake rotor.
This not only compromises braking effectiveness but can also rapidly damage the rotor, potentially leading to expensive repairs down the line.
2. Reduced Braking Efficiency
As brake pads wear down, their ability to generate the necessary friction diminishes, directly impacting your car’s stopping performance.
You may notice that it takes longer for the vehicle to come to a complete stop, or that you have to press the brake pedal much harder than usual to achieve the same stopping power.
This reduction in braking efficiency is a clear indication that the brake pads are no longer thick enough to function effectively.
In emergency situations, this delay in stopping can prove dangerous; therefore, it is crucial to address this issue as soon as possible.
3. Vibration While Braking
Experiencing vibrations or jolts while braking can also be a sign of worn brake pads, particularly if the pads have not worn down evenly.
When the pad material becomes excessively thin or damaged, it fails to maintain uniform contact with the rotor; consequently, you may feel a pulsating vibration through the brake pedal or the steering wheel.
In some instances, this issue may also be linked to rotor-related problems caused by driving with worn brake pads for an extended period.
These vibrations serve as a signal that the braking system is not functioning correctly and requires inspection to prevent further damage.
4. Brake Warning Light – If Available
Many modern vehicles feature a brake warning light on their dashboard.
This light illuminates when a fault occurs within the braking system such as: worn brake pads.
The light is triggered by sensors that monitor the thickness of the brake pads or the overall operational status of the braking system.
However, the illumination of this warning light does not always indicate that the brake pads are completely worn out, but it certainly signals that something requires attention.
Ignoring this warning could jeopardize your safety and lead to even more serious brake-related issues; therefore, it is best to have the braking system inspected as soon as this light turns on.
Tools
| Tool Name | Why It Is Needed | How to Use It Properly |
|---|---|---|
| Flashlight or Inspection Light | A flashlight helps you see clearly inside the wheel, where the brake caliper and pads are located. Without proper lighting, it is very difficult to distinguish between the brake pads, the rotor and other components. Good lighting is essential because the brake pads are situated in a dark, confined space behind the wheel. | Turn on the flashlight and shine it directly onto the brake caliper through the spokes of the wheel. Focus the beam on the area where the pad makes contact with the rotor. Adjust the angle of the light slightly until you can clearly see the thickness of the friction material. |
| Brake Pad Thickness Gauge or Ruler | This tool allows you to measure the actual thickness of the brake pads with greater precision, rather than simply making a visual estimate. The brake pad gauge is designed to fit into tight spaces, although a small ruler or scale can also serve this purpose if the area is easily accessible. This provides you with a more accurate assessment of whether your pads are safe for continued use or if they require replacement. | Carefully insert the gauge or scale into the space adjacent to the brake pad; do not force it. Measure only the thickness of the friction material; do not include the metal backing plate in your measurement. Compare your measurement against the standard thickness guidelines, for instance, a 3 mm threshold typically indicates that the pads need to be replaced. |
| Mirror – Optional for Better Viewing Angle | A mirror is useful for inspecting areas that are difficult to view directly, particularly the inner brake pad, which often wears down faster than the outer pad. Without a mirror, you could easily overlook significant wear on the inner pad. | Hold a small mirror behind or beneath the brake caliper and angle it in such a way that you can view the inner pad. Use a flashlight in conjunction with the mirror to ensure a clear view. Continue adjusting the mirror until you obtain a clear reflection of the brake pad’s thickness. |
| Smartphone Camera – Modern Workaround | A smartphone camera allows you to capture photos or videos of tight spaces that are not easily accessible to the naked eye. This is particularly useful for inspecting the inner brake pads or for closely examining specific details. | Activate your phone’s camera and position it near the opening in the wheel. Aim the camera toward the brake caliper and record a short video or take a few photos. Afterward, review the video or photos to check the pad thickness and look for signs of wear. You can also zoom in for a clearer view. |
Where to Look: Understand the Location of Brake Pads
If you wish to check the thickness of your brake pads without removing the wheel, it is crucial to understand exactly where they are situated.
Brake pads are housed inside the brake caliper; this caliper is mounted along the edge of the brake rotor.
The brake rotor is a flat metal disc that rotates in tandem with your wheel.
As the caliper is positioned directly behind the wheel, you can typically catch a glimpse of a portion of it through the wheel’s holes or spokes.
Knowing precisely where to look eliminates confusion between different components and makes your inspection both faster and more accurate.
1. The Location of the Brake Caliper Behind the Wheel
The brake caliper is the primary component you need to locate, as it is the system responsible for holding the brake pads in place.
It is typically mounted near the upper or outer edge of the brake rotor and resembles a solid metal housing that partially encircles the rotor.
When you peer through the spokes of the wheel, you will see the shiny surface of the rotor, to which the caliper is attached.
Inside this caliper, the brake pads exert pressure on the rotor whenever you apply the brakes.
By focusing on this specific component, you can identify the edge of the brake pad and begin to assess its thickness.
2. Visibility of Outer vs Inner Brake Pads
Every caliper contains two brake pads, one on the outer side of the rotor and one on the inner side.
The outer brake pad is the one situated closest to the wheel, making it generally easier to inspect without having to remove any components.
The inner brake pad is located on the back side of the rotor, facing toward the vehicle, and, consequently, is slightly more difficult to view directly.
In most quick inspections, only the outer pad is clearly visible; while this is helpful, it is not always sufficient to conduct a thorough assessment.
To get a better estimate of wear, you may need to adjust your viewing angle or use a mirror or a phone camera to inspect the inner pad.
3. Why do inner pads often wear out faster?
Due to the design and mechanics of the braking system, inner brake pads often wear out faster than their outer counterparts, particularly in vehicles equipped with “floating calipers.”
When you depress the brake pedal, the caliper first presses the inner pad against the rotor, after which the outer pad applies pressure.
This means that, over time, the inner pad may be subjected to slightly greater pressure and friction.
Furthermore, dirt, heat and reduced airflow can have a more pronounced effect on the inner pad, leading to uneven wear.
Therefore, assuming that everything is in good order simply by observing the outer pad can sometimes create a false sense of security.
To ensure that early signs of excessive wear are not overlooked, it is crucial to inspect the condition of the inner pads, or, at the very least, to pay close attention to their status.
How to Measure Brake Pad Thickness Without Removing Wheel – Easy & Effective Method
Measuring brake pad thickness without removing the wheel is a simple and practical method that allows you to quickly assess the condition of your brakes.
While it may not be as precise as a comprehensive inspection performed with the wheel removed, it is highly useful for detecting early signs of wear and determining whether further inspection or replacement is necessary.
The key is to follow each step carefully, ensure adequate lighting and focus your attention specifically on the brake pad’s friction material, rather than on the metal backing plate or surrounding components.
1. Park and Secure Your Vehicle
To begin, park your vehicle on a level and stable surface to ensure it remains stationary while you inspect the brakes.
Engage the parking brake to secure the vehicle, specially if you are on a slight incline.
For better access, turn the front wheels outward; this creates more clearance for viewing through the wheel and provides a clear angle to observe the brake components.
This simple step improves visibility and makes the inspection process both easier and safer.
2. Locate the Brake Caliper
Look through the wheel openings or spokes to locate the brake caliper, the component responsible for holding the brake pads in place.
The caliper is typically mounted near the edge of the brake rotor and appears as a solid metal housing.
Once you have identified it, adjust your position to ensure you have a clear, direct view of the caliper assembly.
Standing in the correct spot helps prevent any confusion between the brake pads, the rotor and other surrounding components.
3. Illuminate the Area
Use a flashlight or an inspection light to see clearly inside the caliper, as this area is often dark and difficult to view using only natural light.
Direct the beam of light onto the brake pad and focus on the friction material; this is the component that makes contact with the rotor.
It is crucial to ensure that you do not mistake the metal backing plate for the friction material, as the backing plate does not wear down in the same manner.
Proper lighting is essential for an accurate visual inspection.
4. Visually Estimate the Thickness
Once the brake pad becomes clearly visible, visually estimate the thickness of the friction material.
To make a rough estimate, you can compare it to a familiar object such as: the thickness of a coin.
For instance, if the pad appears very thin, approximately 3 millimeters, it is likely time to replace it.
Additionally, check for any built-in wear indicators; these often take the form of small metal tabs designed to make contact with the rotor once the pad has worn down to a specific limit.
This step provides immediate insight into the condition of the pads.
5. Use a Gauge or Tool – If Available
If there is sufficient clearance, you can use a “brake pad thickness gauge” or a small measuring tool to obtain a more precise measurement of the pad’s thickness.
Carefully insert the tool into the space immediately adjacent to the brake pad; do not force it and ensure that it does not come into contact with any moving parts.
Measure only the friction material (the wear layer) and compare the results against the established safety standards for minimum thickness.
This method is more accurate than a mere visual estimate and helps you determine with certainty whether the pads need to be replaced.
6. Inspect the Inner Pad – If Possible
Inspecting the inner brake pad can be somewhat challenging, as it is located on the back side of the rotor, facing toward the vehicle.
If possible, use a small mirror or your smartphone’s camera to view this area.
Take photos or videos and examine them carefully to assess the thickness of the inner pad.
Keep in mind that visibility may not be perfect and the view obtained using this method may not always be entirely clear.
Nevertheless, even a cursory inspection can help you determine whether the pad has worn evenly, or if the inner pad has become significantly thinner than the outer pad, a common issue.
Understand, The Brake Pad Thickness Chart – Quick Reference
| Brake Pad Thickness | Condition Level | Why It Matters | What You Should Do |
|---|---|---|---|
| 12 mm | New Pads | At this thickness, the friction material on the brake pads remains completely intact and in ample supply; this means the vehicle’s stopping power is at its peak and heat is being managed effectively. These pads neither overheat excessively nor wear down rapidly, even under repeated braking. | No action is required. This represents the optimal condition. Simply continue driving your vehicle as usual and monitor the pads during your regular maintenance checks. |
| 8–10 mm | Good Condition | The pads have experienced some wear, yet their braking performance remains robust. There is still sufficient friction material remaining to safely handle the heat generated during daily driving and braking. | It is safe to continue using the pads. Keep checking them at regular intervals to monitor the progression of wear over time. Immediate replacement is not necessary. |
| 5–7 mm | Monitor Closely | At this stage, the brake pads are approximately half-worn. Braking remains effective; however, beyond this point, the remaining friction material will begin to wear down more rapidly. The pads’ capacity to dissipate heat also begins to diminish slightly. | Begin checking the pads more frequently. Plan to replace them soon, specially if you drive often or regularly navigate heavy traffic. |
| 3–4 mm | Replace Soon | The pads have become excessively thin and braking performance may begin to deteriorate. Due to a lack of sufficient friction material to generate stopping power and manage heat, the vehicle’s stopping distance may increase, thereby heightening safety risks. | Schedule a time to replace the pads as soon as possible. Do not delay, as continued driving will accelerate pad wear even further and could damage the brake rotor. |
| Less than 3 mm | Replace Immediately | This indicates a critical stage where braking becomes unsafe. The friction material is almost completely worn away and there is a significant risk that the metal backing plate will come into contact with the rotor, potentially causing a grinding noise and severe damage. | Have the brake pads replaced immediately. Do not continue driving unless absolutely necessary, as this poses a dangerous risk of brake failure and could result in substantial repair costs. |
How Accurate is Measuring Without Removing the Wheel?
Measuring brake pad thickness without removing the wheel is a useful and practical method, but it is important to understand its level of accuracy.
This method relies primarily on visual inspection, meaning the results depend on how clearly you can see the brake pads and how accurately you can estimate their thickness.
In many cases, it provides a good general indication of whether the pads are in a safe condition or if the time for replacement is approaching.
However, it does not provide information as precise as that obtained by removing the wheel and directly measuring both pads using proper tools.
Factors such as poor lighting, cramped spaces and limited viewing angles can affect the accuracy of your inspection.
It is best to use this method as a quick check to detect wear, rather than as a definitive or detailed assessment of the brake’s condition.
1. Advantages: Fast, convenient, no tools required
The biggest advantage of this method is its speed and ease.
You can inspect your brake pads in just a few minutes without lifting the vehicle or removing the wheel.
In many cases, you simply need a flashlight, or even natural light, to see the pads clearly.
This makes it very convenient for routine checks, specially for those who wish to frequently monitor the condition of their brakes without visiting a mechanic.
It also requires less physical effort and saves time, thereby encouraging the habit of frequent inspections and helping to detect potential problems before they become serious.
2. Disadvantages: Limited visibility, uncertainty regarding the inner pad
The main limitation of this method is that you typically cannot clearly see the inner brake pad.
As the inner pad is located on the back side of the rotor, it is often not directly visible.
This point is crucial because inner pads can wear out faster than outer pads, particularly in certain brake system designs.
If you inspect only the outer pads, you might assume that your brakes are in good condition, even if the inner pads have already worn down excessively.
Furthermore, due to the confined space behind the wheel, determining the precise thickness of the pads can be difficult; consequently, assessments are often based on mere estimation rather than accurate measurement.
3. When is this method sufficient, and when is it not?
This method is adequate when you wish to perform a quick safety check or when you are looking for obvious signs of wear such as: severely worn pads or visible damage.
It is also useful for routine monitoring between service intervals to ensure that your brake pads are not wearing down too rapidly.
However, if you suspect uneven pad wear, hear unusual noises, feel vibrations, or notice a decline in braking performance, this method is insufficient.
In such situations, a comprehensive inspection, which includes removing the wheel, is essential to properly examine both the inner and outer pads.
For the most accurate results and complete safety, this quick method should be utilized solely as a preliminary step, rather than as a substitute for a thorough brake inspection.
When Should You Remove the Wheel?
While checking brake pad thickness without removing the wheel is useful for a quick, rough estimate, there are several situations where removing the wheel becomes essential for a safe and accurate inspection.
A thorough inspection allows you to clearly view both the outer and inner brake pads, measure their precise thickness and examine other critical components such as the rotors, calipers and brake hardware.
This is crucial because certain brake-related issues cannot be detected merely by glancing through the wheel spokes.
Removing the wheel provides the opportunity for a comprehensive examination, enabling you to identify problems in their early stages, before they compromise braking performance or cause costly damage.
1. Symptoms of Uneven Braking
If you notice that your vehicle does not come to a stop smoothly, or if it pulls slightly to one side when braking, this may indicate uneven wear on the brake pads.
Uneven wear occurs when one pad is thinner than the other, or when the caliper is not applying uniform pressure.
This issue cannot be properly confirmed without removing the wheel, as you need to clearly view both pads and their contact points with the rotor.
A thorough inspection helps you pinpoint the root cause of the problem and prevents further imbalances in braking performance.
2. Suspected Inner Pad Wear
During a quick visual check, it is often difficult to see the inner brake pads; however, due to the mechanics of how the braking system applies pressure, these pads frequently wear down faster than the outer pads.
If you suspect that the inner pad may be thinner than the outer pad, the only reliable method for an accurate assessment is to remove the wheel.
This is crucial because relying solely on the condition of the outer pad can give you a false sense of security.
A worn inner pad can compromise braking efficiency and if left unaddressed, it may lead to direct metal-to-metal contact with the rotor.
3. High-Performance or Heavy-Duty Vehicles
Vehicles used for high-performance driving, towing, or hauling heavy loads place increased stress on the braking system.
This heightened pressure causes brake pads to wear down more rapidly and generates excessive heat.
In such scenarios, a superficial visual inspection is insufficient to ensure safety.
Removing the wheels allows you to conduct a detailed examination of the pad thickness, heat-related damage and the overall condition of the brakes.
This ensures consistent braking performance, even under demanding conditions.
4. Regular and Comprehensive Brake Inspections
Even if no obvious symptoms are apparent, it is essential to have a comprehensive brake inspection performed at regular intervals.
During routine maintenance, removing the wheels allows you to accurately measure brake pad thickness, assess the uniformity of wear and inspect the rotor surfaces for any signs of damage or uneven wear.
Such inspections facilitate the timely detection of minor issues, ensuring that your braking system remains reliable over the long term.
Conducting regular and comprehensive inspections is a vital component of safe vehicle maintenance and helps extend the lifespan of brake components.
Read More:
Know, The Common Mistakes to Avoid During Measuring Brake Pad Thickness Without Removing Wheel
When measuring brake pad thickness without removing the wheel, minor errors can lead to inaccurate conclusions regarding the condition of your brakes.
These mistakes are common because the space behind the wheel is extremely confined, visibility is limited and, at a quick glance, various components can appear deceptively similar.
Understanding these challenges allows you to avoid erroneous readings, prevent unnecessary repairs and ensure that you do not overlook any critical wear.
A cautious and informed approach enhances the reliability of your inspection and empowers you to make better decisions regarding brake maintenance.
1. Measuring the Backing Plate Instead of the Pad
One of the most common errors is mistaking the metal backing plate for the actual brake pad friction material.
The backing plate serves as a solid metal base that holds the friction-generating material in place; unlike the pad itself, it does not wear down.
If you inadvertently measure this metal component, the brake pad may appear significantly thicker than it actually is.
This can lead to the misconception that your brakes are in good condition, when in reality, they may be worn out.
To avoid this, always focus your attention on the friction material, typically a dark-colored, softer layer that sits directly against the rotor.
2. Overlooking the Inner Brake Pad
Another major mistake is inspecting only the outer brake pad while neglecting the inner one.
Although the outer pad is easier to see, the inner pad is equally critical and, due to the mechanics of how the braking system applies pressure, often wears down at a faster rate.
If the inner brake pad becomes excessively thin, it can adversely affect braking performance, even if the outer pad still appears to be in good condition.
Without inspecting the inner pad, or at the very least, paying close attention to it, you may miss the early signs of uneven wear.
This can lead to sudden operational issues while driving and compromise safety.
3. Relying on Estimation in Low Light
In low-light conditions, accurately determining the actual thickness of brake pads can be extremely difficult.
Shadows, dust and limited clearance can obscure critical details, causing you to either overestimate or underestimate the amount of remaining friction material.
Relying on estimation in dim lighting increases the likelihood of errors and can lead to incorrect decisions regarding whether or not the pads need replacement.
Using a bright, focused light source allows you to clearly distinguish between the pads, rotors and other components, making your inspection significantly more accurate.
4. Mistaking the Rotor Edge for Pad Thickness
The brake rotor, a shiny metal disc, sits in very close proximity to the brake pads and is sometimes mistakenly perceived as being part of the pad itself.
Some individuals, particularly when viewing from an angle, inadvertently gauge the thickness of the rotor’s edge instead of assessing the actual thickness of the brake pad.
This visual confusion can result in completely inaccurate measurements and lead to a misunderstanding of the brake system’s true condition.
To avoid this, always identify the rotor first and then observe the brake pad situated alongside it; the pad will appear as a distinct layer positioned between the caliper and the surface of the rotor.
Know, The Safety Tips
Checking brake pad thickness without removing the wheel is generally safe; however, it still involves working in close proximity to critical moving parts and components that can become extremely hot while the vehicle is in operation.
Adopting a few simple safety precautions helps prevent burns, injuries and accidental damage to your vehicle.
Many brake components are made of metal and can retain heat for a considerable time, even after the vehicle has come to a stop.
Furthermore, the space behind the wheel is quite confined, which increases the risk of pinching your fingers or sustaining scratches.
By adhering to proper safety protocols, you can complete the inspection quickly while ensuring your personal safety.
1. Never Touch Hot Brakes
During normal driving, brake components can become extremely hot as they generate friction to slow the vehicle down.
Even after you have stopped driving, this heat can persist within the brake rotors, calipers and pads for several minutes.
Touching these components too soon can result in burns or cause discomfort.
It is always best to wait for the brakes to cool down completely before beginning your inspection.
An easy way to stay safe is to allow the vehicle sufficient time to cool off, specially after long journeys or driving in heavy traffic.
2. Avoid Reaching into Tight Spaces
The area behind the wheel and surrounding the brake caliper is very confined; reaching your hand into this space can result in cuts, pinched fingers, or your hand becoming trapped between components.
The brake assembly is not designed to accommodate manual access in this manner and attempting to force your hand into small openings can be dangerous.
Rather than attempting to directly touch or feel the brake pads, it is safer to inspect them visually using your eyes, a flashlight, or tools.
Keeping your hands out of these confined spaces significantly reduces the risk of injury.
3. Ensure Proper Lighting and Correct Positioning
Proper lighting and correct body positioning are crucial for both safety and accuracy.
Without adequate illumination, you may fail to correctly identify components or overlook critical signs of wear and tear.
Using a bright flashlight allows you to clearly view the brake pads and surrounding parts without having to get too close.
Maintaining the correct posture such as: standing at a safe angle rather than directly beneath the vehicle, also helps you maintain your balance and avoid physical strain.
Spending a few extra seconds to arrange for good lighting and get into a comfortable position makes the inspection process both safer and more effective.
How Often Should Brake Pad Thickness Be Checked?
Regularly checking brake pad thickness is an essential part of basic vehicle maintenance, as brake pads gradually wear down over time with normal use.
The rate of this wear depends on factors such as your driving habits, traffic conditions, road types and the weight of the vehicle.
For instance, frequent stop-and-go driving in the city causes brake pads to wear out faster than driving on highways, where brake usage is minimal.
By checking brake pad thickness at appropriate intervals, you can identify early signs of wear, maintain the vehicle’s ability to stop safely and avoid sudden repairs or damage to other brake components (such as rotors).
Also, there’s literally a research that shows that increased braking pressure and speed directly accelerate wear; that clearly means that drivers who frequently brake in traffic or drive at the higher speeds may experience faster pad thinning, that’s why regularly check up of brake pad thickness is really important, even without removing the wheel as you can detect early and prevent safety hazard during drive as well.[¹]
1. Every 10,000–15,000 miles
A common and widely accepted recommendation is to check brake pad thickness every 10,000 to 15,000 miles.
This timeframe allows you to monitor the condition of the brake pads before they reach a critical level of wear.
As most brake pads have an initial thickness of approximately 10 to 12 millimeters, performing regular checks within this interval helps you determine how quickly the pads are wearing down.
If you drive in heavy traffic, navigate hilly terrain, or frequently haul heavy loads, it is advisable to check your brake pads more often, as such conditions place greater stress on the brakes and accelerate their wear rate.
2. During tire rotation
Tire rotation (swapping the position of the tires) is another excellent opportunity to check brake pad thickness, as the vehicle’s wheels are often removed or repositioned during this process.
Even if you aren’t removing the wheels yourself, this presents a natural maintenance opportunity where the braking system is easily accessible.
Checking your brake pads during a tire rotation ensures that the wear status of both your tires and brakes is monitored simultaneously, thereby enhancing your vehicle’s overall safety and performance.
Furthermore, doing so allows you to maintain a regular vehicle maintenance routine without expending any additional time.
3. Before Long Journeys
Before embarking on a long journey, checking the thickness of your brake pads is always a prudent step.
Long trips often involve higher speeds, varying road conditions and increased brake usage, particularly on highways or steep inclines.
If your brake pads are already worn down, they may be unable to adequately withstand the additional heat and pressure generated during braking, which could compromise your vehicle’s stopping capability.
A quick check before setting off provides peace of mind that your brakes are functioning correctly, helping you avoid any unexpected issues that might arise during your journey.
Know, Difference Between Professional Inspection vs DIY Inspection
Periodically checking the thickness of your brake pads yourself is an excellent way to stay informed about the condition of your vehicle; however, it is crucial to understand the distinction between a mere visual check and a comprehensive professional inspection.
A DIY inspection performed without removing the wheels helps you identify obvious issues such as: severely worn pads or visible damage, but it does not provide a complete overview of the entire braking system.
A professional inspection involves removing the wheels to precisely measure the thickness of both the inner and outer brake pads, while also conducting an in-depth examination of other components, such as the brake rotors, caliper movement and the condition of the brake fluid.
Knowing when you can rely on a visual inspection and when to seek the assistance of an expert not only ensures your safety but also helps you avoid unnecessary expenses.
1. When You Can Rely on a Visual Inspection
You can rely on a visual inspection when you are performing routine daily checks on your vehicle and the brake pads appear clearly thick and in good condition.
If the outer brake pads appear to have a substantial amount of friction material remaining, typically well over 5 millimeters, and you do not observe any warning signs, such as strange noises, vibrations, or a reduction in braking efficiency, then a simple visual check is sufficient for the time being.
This method is excellent for monitoring your vehicle between scheduled service appointments and helps you track the rate at which your brake pads are wearing down over time.
Nevertheless, it is crucial to conduct regular checks and avoid relying solely on visual inspections over the long term.
2. When to Visit a Mechanic
You should visit a mechanic whenever you notice symptoms of any brake-related issues, or when a visual inspection fails to provide clear information.
Symptoms such as strange noises coming from the brakes, grinding sounds, vibrations, or an increased stopping distance indicate that your braking system requires a comprehensive inspection.
It is also essential to seek professional assistance if you suspect uneven wear on the brake pads, particularly regarding the inner pads, which are difficult to inspect without removing the wheels.
A mechanic can safely remove the wheels to accurately measure the thickness of the brake pads and inspect the entire braking system to ensure everything is functioning correctly.
This process minimizes the risk of overlooking hidden issues that could potentially compromise your safety.
3. Typical Inspection Costs in the U.S.
In the United States, a standard brake inspection is often quite affordable; in many cases, service centers even perform them free of charge as part of a vehicle’s regular maintenance service.
On average, a basic brake inspection may cost between $20 and $50, although this cost can vary depending on the service provider and the location.
A more detailed inspection, which involves removing the wheels to examine the entire system, may be slightly more expensive, specially when performed in conjunction with other services.
While there is certainly a cost involved, a professional inspection can save you from incurring significantly larger expenses in the future.
This is because it identifies issues such as: worn brake pads or damaged rotors, at an early stage, before they escalate into serious problems requiring major repairs.
Conclusion – How to Measure Brake Pad Thickness Without Removing Wheel
So, now you have clearly understand how to check the brake pad condition and it is really easy but very important as well that can prevent serious problems on the road.
Measuring brake pad thickness without removing the wheels is the easiest way to stay informed about your vehicle’s safety; it requires no specialized tools or mechanical expertise.
While this method may not yield absolutely precise measurements, it serves as a reliable and practical way to identify early signs of wear and determine when further inspection is warranted.
Brake pads naturally wear down over time and even a reduction of a few millimeters in thickness can impact how quickly and safely your car comes to a stop.
By learning where to look, what to watch for and how to avoid common pitfalls, you can make this quick check both accurate and effective.
It is also essential to understand the limitations of this method.
A visual inspection is ideal for routine checks and early detection, but it cannot replace a comprehensive examination in which both the inner and outer pads are measured directly.
Supplementing regular visual inspections with occasional professional checks strikes the perfect balance between convenience and accuracy.
So, that’s all about this guide on How to Measure Brake Pad Thickness Without Removing Wheel, also you can ask related questions below.
Frequently Asked Questions
FAQ 1: Can you check brake pads without removing the wheel?
Yes, you can check brake pads without removing the wheel. To do this, you can locate the brake caliper by looking through the spokes of the wheel. Inside the caliper, you can view the outer brake pad and estimate its thickness using a flashlight or natural light. This method is quick and useful for routine checks; however, as it primarily reveals only the outer pad, it does not provide a complete picture of the overall brake wear.
FAQ 2: What is the minimum safe thickness for brake pads?
The minimum safe thickness for brake pads is generally around 3 millimeters. At this level, the friction material becomes very thin and may no longer be capable of delivering robust braking performance. Most experts recommend replacing brake pads before they reach this limit, typically when their thickness is around 4 to 5 millimeters, to ensure safety and prevent damage to other components, such as the brake rotors.
FAQ 3: How can I tell if my brake pads are worn out without removing the wheel?
You can look out for several common signs, such as squealing or grinding noises, reduced braking power, or vibrations felt while applying the brakes. You can also inspect the brake pads by looking through the wheel spokes to estimate how much friction material remains. If the pad appears very thin or is situated very close to the metal backing plate, it is likely worn out and requires attention.
FAQ 4: Do inner brake pads wear out faster than outer pads?
Yes, inner brake pads often wear out faster than outer pads, particularly in vehicles with specific brake system designs. This occurs because the braking force is applied in a slightly different manner, potentially subjecting the inner pads to greater pressure and heat. As inspecting the inner pads without removing the wheel is difficult, it is crucial to remain aware of this possibility and not rely solely on the condition of the outer pads.
FAQ 5: Is it safe to drive with 4 mm thick brake pads?
Driving with 4-millimeter thick brake pads is generally safe for a short period; however, it indicates that the pads have reached the very end of their service life. At this stage, braking performance may begin to diminish and, depending on driving conditions, the pads could wear down rapidly. Rather than waiting until the pads become excessively thin, it is best to plan for their replacement in the near future.
FAQ 6: How accurate is it to measure brake pad thickness without removing the wheel?
Measuring brake pads without removing the wheel provides a reasonably accurate and quick estimate, though it is not as precise as a full inspection. You can get a good general idea of whether the pads are thick, moderately worn, or thin; however, determining their exact thickness or inspecting the inner pads is more difficult. For complete accuracy, it is always best to remove the wheel and measure both pads directly.
FAQ 7: What tools do I need to check brake pad thickness without removing the wheel?
Generally, you will only need a flashlight to get a clear view inside the wheel assembly. For greater accuracy, provided there is sufficient clearance, you can use a brake pad thickness gauge or a small ruler. A mirror or even a smartphone camera can also help you view areas that are difficult to see directly, particularly the inner brake pads.
FAQ 8: How often should I check the thickness of my brake pads?
It is a good idea to check your brake pad thickness every 10,000 to 15,000 miles, or during routine maintenance procedures such as tire rotations. You should also inspect them before embarking on long trips, or if you notice any warning signs such as: strange noises or a reduction in braking effectiveness. Regular checks help you detect wear early on and avoid sudden, unexpected problems.
FAQ 9: What happens if I ignore worn-out brake pads?
If worn-out brake pads are ignored, the friction material can wear away completely, causing the metal backing plate to come into direct contact with the brake rotor. This results in grinding noises, reduced stopping power and severe damage to the rotor, repairs for which can be quite expensive. It can also increase stopping distances and make driving unsafe, particularly in emergency situations.
FAQ 10: When should I get a professional brake inspection?
You should seek a professional inspection if you notice any unusual symptoms such as: noises, vibrations, or a decrease in braking performance, or if you are unsure about the accuracy of your own inspection. A mechanic can remove the wheels to take precise measurements of both the inner and outer pads and can inspect the entire braking system to ensure that everything is functioning correctly.
References:
[1] Experimental Investigation of Friction and Wear in Automotive Brake Pads: The Role of Load and Speed
https://www.researchgate.net/publication/395600749_Experimental_Investigation_of_Friction_and_Wear_in_Automotive_Brake_Pads_The_Role_of_Load_and_Speed

Hello Folks, Dean Shali here to help you out to solve the problems with your lovely vehicle, as i have lots of experience and knowledge about automotive industry as i woks directly with the customers and repair vehicles and i love to help the people to keep their cars safe and running smoothly.