Written By: Dean Shali
Fact Checked By: Sabré Cook
Reviewed By: Tamara Warren
Basically, engine compression is one of the most important indicators of your car’s engine health, as it literally measures how well each cylinder that can compress the air and fuel before ignition, which directly affects the power, fuel efficiency and overall performance as well.
Not only this, if there’s low compression that can cause a variety of problems that includes rough idling, misfires, reduced acceleration, increased fuel consumption and even engine damage if left unchecked way.
And, yes it is true that checking engine compression at the home is a simple, cost-effective way to diagnose these issues before they turn into the expensive repairs.
So, in this guide you’ll learn How to Check Engine Compression at Home, so that you can maintain your car’s performance and also it helps you to increase the engine’s lifespan and prevents unexpected breakdowns as well.
Know, Benefits of Checking Engine Compression at Home
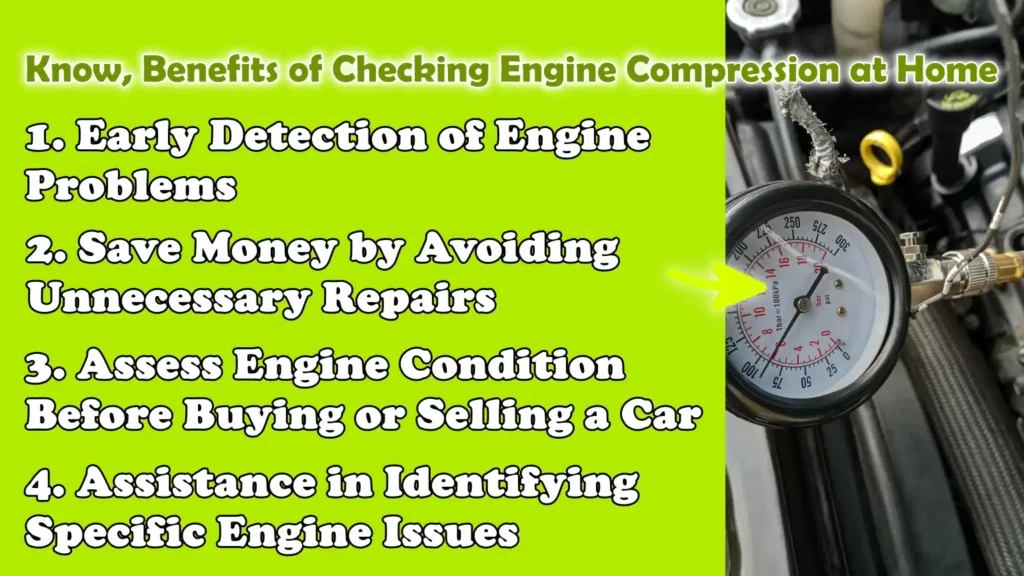
1. Early Detection of Engine Problems
Checking engine compression at home allows car owners to identify potential issues within the cylinders before they escalate into serious problems.
Engine issues such as worn piston rings, leaking valves, or a faulty head gasket, all of which reduce internal cylinder pressure and negatively impact engine performance, as it can be detected early.
Low compression can lead to rough idling, misfires, reduced acceleration and increased fuel consumption.
By measuring compression levels in a timely manner, you can identify these issues while they are still repairable, thereby avoiding costly repairs or total engine failure.
2. Save Money by Avoiding Unnecessary Repairs
Many engine problems go undetected until it is too late, necessitating expensive repairs or part replacements that could have potentially been avoided earlier on.
Performing a compression test at home provides clear insight into the engine’s condition, helping you determine whether a problem is minor or major.
This means you spend money on repairs only when it is truly necessary.
Early detection of low compression prevents wasteful spending on unnecessary part replacements and enables you to maintain your engine more precisely, ultimately saving you both time and money.
3. Assess Engine Condition Before Buying or Selling a Car
If you are purchasing a used car or selling your own vehicle, knowing the engine’s compression levels can provide crucial insight into its overall condition.
A car with consistent compression across all cylinders is generally considered to be in good condition; conversely, inconsistent or low compression readings may indicate a hidden internal issue.
This information empowers buyers to negotiate a fair price and gives sellers the confidence to provide accurate details about the vehicle.
Performing a compression check at home provides you with reliable data regarding the true condition of the engine, thereby helping you avoid potential future complications.
4. Assistance in Identifying Specific Engine Issues
Engine performance issues can stem from various causes, such as fuel supply problems, ignition system malfunctions, or wear and tear on engine components.
Measuring compression helps verify whether the engine cylinders are functioning correctly, making it easier to pinpoint the actual root cause of the problem.
If the compression levels are normal, the issue likely lies elsewhere.
Conversely, if the compression is low, it directly indicates that the cylinders are worn, the valves are leaking, or there is a fault with the gasket.
This precise diagnostic method makes identifying the problem faster and more accurate, allowing you to address the actual root cause, rather than merely making educated guesses, which ultimately enhances the engine’s reliability and performance.
Tools
| Tool / Equipment | Why It Is Needed | How to Use It |
|---|---|---|
| Compression Gauge – Manual or Digital | This tool measures the internal pressure within each cylinder to assess the engine’s health. Accurate readings reveal whether the cylinders are worn or if there are any leaks. | Thread the gauge into the spark plug hole, crank the engine and read the pressure displayed on the dial or digital screen. Record the reading for each cylinder. |
| Spark Plug Socket and Ratchet | This tool facilitates the safe removal of spark plugs without causing any damage. It is essential for gaining access to the cylinders for testing purposes. | Attach the socket to a ratchet, carefully remove each spark plug and set them aside in the exact order in which they were removed. Reinstall them once the testing is complete. |
| Wrench Set | This tool assists in removing components or covers that may obstruct access to the spark plugs or the engine itself. | Select the correct wrench size for the bolts or nuts, gently loosen them and organize them for easy reassembly. |
| Screwdriver Set | This tool is used to remove small parts, clips, or connectors that may hinder access to the spark plugs or engine components. | Select the appropriate type of screwdriver (flathead or Phillips), gently remove the screws and store them in a safe place. |
| Protective Gloves and Safety Glasses | This provides protection for the hands against hot components and sharp edges, while shielding the eyes from debris or fluids. | Wear gloves and safety goggles throughout the entire procedure to prevent burns, cuts, or eye injuries. |
| Optional: Remote Starter or Helper | This makes it easier to crank the engine during a compression test, particularly with larger engines. | One person can crank the engine while a second person monitors the compression gauge, thereby ensuring accurate readings. |
How to Ensure Safety By Taking Precautions
1. Ensure that the Car is in ‘Park’ or ‘Neutral’ and the Handbrake is Engaged
Before beginning any compression test, it is essential to ensure that your vehicle is completely secure.
For cars with automatic transmissions, place the vehicle in ‘Park’; for cars with manual transmissions, place it in ‘Neutral’.
Always engage the handbrake.
This ensures that while you are working on the engine, the car does not suddenly roll forward or backward, an occurrence that could result in serious injury or damage.
Taking this simple step guarantees your safety throughout the entire testing process.
2. Disconnect the Ignition Coils or Fuel System to Prevent the Engine From Starting
During a compression test, the engine needs to be cranked (turned over) without actually combusting fuel.
If the ignition system or fuel supply remains active, the engine could suddenly start, potentially leading to dangerous accidents.
Disconnecting the ignition coils or fuel system ensures that the engine rotates solely for testing purposes, thereby eliminating the risk of sparks, fire, or the engine running uncontrollably.
This step is crucial for the safety of both you and your vehicle.
3. Avoid Touching Hot Engine Components
Engine components can remain extremely hot for several minutes even after the engine has been switched off.
Touching the cylinder head, exhaust manifold, or other metal parts of the engine poses a risk of severe burns.
Always allow the engine components to cool down to a safe temperature before touching them.
Wearing gloves can also help reduce the risk of injury.
Exercising caution around hot surfaces is the simplest, yet most critical, way to prevent accidents during a compression test.
4. Work in a Well-Ventilated Area
During engine testing, smoke, gases, or fumes may be emitted, which can be harmful if inhaled in excessive quantities.
Conducting a compression test in a well-ventilated area such as: outdoors or in a garage with open doors and windows, ensures that these fumes dissipate safely.
Proper ventilation protects your lungs and minimizes the risk of accidentally inhaling toxic gases or experiencing dizziness, thereby making the testing process safer and more comfortable.
How to Prepare the Engine
1. Warm the Engine to Normal Operating Temperature
Before checking the engine’s compression, it is crucial to warm the engine to its normal operating temperature.
A warm engine provides a more accurate compression reading because the heat causes metal components to expand slightly, thereby simulating actual driving conditions.
Cold engines may yield lower readings that do not accurately reflect the true condition of the cylinders.
Run the engine for a few minutes until it reaches its normal operating temperature; this ensures that the test results are reliable and accurate.
2. Turn Off the Ignition and Allow the Engine to Cool Down Briefly
Once the engine has warmed up, turn off the ignition and allow the engine to cool down for a few minutes.
This step ensures that all moving parts have come to a complete stop and any residual pressure has dissipated, making it safe to work around the engine.
It also prevents the engine from accidentally starting during the testing process, a situation that could be hazardous if spark plugs or a compression gauge are installed.
Waiting a short while after running the engine ensures the safety of both the tester and the vehicle.
3. Carefully Remove the Spark Plugs
The next step is to carefully remove all spark plugs from the engine.
Removing the spark plugs is necessary to allow the compression gauge to be connected to each cylinder.
Using the correct socket and ratchet, loosen and remove each plug without damaging its threads or electrodes.
Keeping track of the original location of each spark plug is essential for reinstalling them later.
Careful removal prevents personal injury and ensures that the engine components remain in good condition.
4. Disable Fuel Injection or Ignition to Prevent Combustion
To perform a compression test safely, it is essential to disable either the fuel injection system or the ignition system.
This prevents fuel from entering the cylinders and stops the engine from starting while cranking, thereby eliminating the risk of sparks, fire, or sudden engine movement.
By preventing combustion, you can safely rotate the engine, whether using the starter or with the assistance of a helper, allowing the compression gauge to capture accurate readings without any hazard.
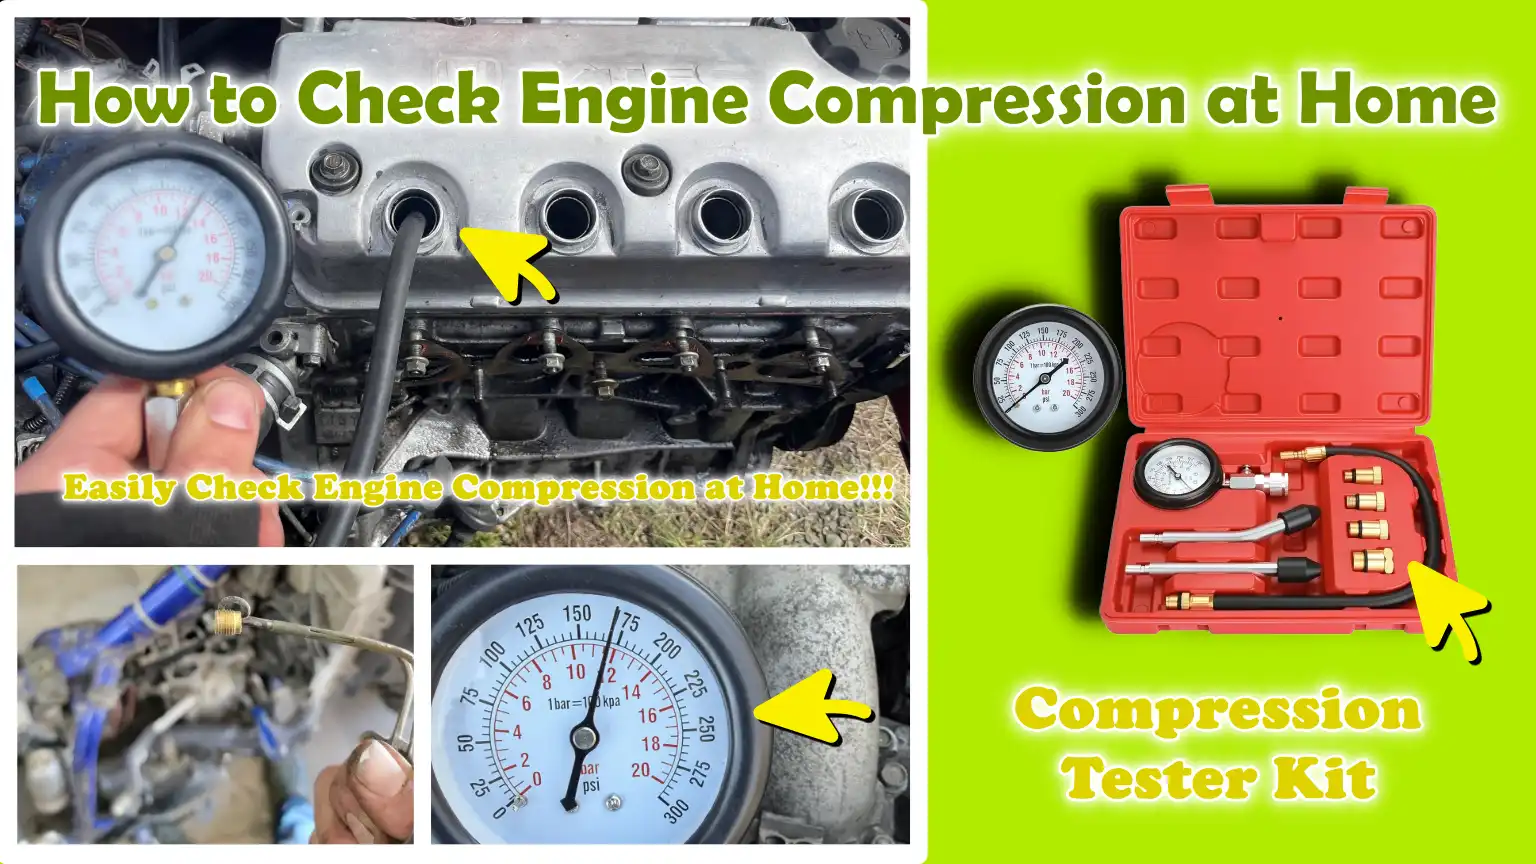
How to Check Engine Compression at Home – Beginner Friendly & Working Method
1. Connect the Compression Gauge to the First Cylinder
Begin the compression test by carefully inserting the compression gauge into the spark plug hole of the first cylinder.
Ensure that the gauge is securely tightened within the hole to prevent air leakage, as any form of leakage can result in inaccurate readings.
A secure connection allows the gauge to accurately measure the actual pressure generated inside the cylinder when the engine is cranked.
Establishing a proper connection is crucial for obtaining reliable results and performing the test safely.
2. Crank the Engine 4 – 6 Times Until the Gauge Needle Stabilizes
Once the compression gauge is firmly in place, crank the engine, either by using the starter motor or with the assistance of a helper, while ensuring that both the ignition and fuel systems are disabled.
Crank the engine approximately four to six times until the gauge needle stabilizes and stops rising.
This allows the cylinder to reach its maximum compression level.
Cranking the engine this number of times ensures that the reading reflects the cylinder’s full capacity to compress air, thereby providing an accurate assessment of the engine’s condition.
3. Record the Compression Reading
After the gauge needle has stabilized, carefully record the reading displayed on the gauge.
This figure indicates the maximum pressure that the cylinder is capable of generating during compression.
Maintaining accurate records is essential, as it enables you to compare the readings across different cylinders and identify any anomalies.
Documenting the values for each individual cylinder aids in conducting a precise analysis of the engine’s overall health.
4. Repeat This Process for All Cylinders
Repeat the compression test for all remaining cylinders in exactly the same manner: attach the gauge, crank the engine and record the reading.
Consistency in the testing process ensures that the data for each cylinder is accurate and comparable.
Testing all cylinders provides a comprehensive overview of the engine’s condition, helping to identify specific areas where wear or defects may be present.
5. Compare the Readings Against the Manufacturer’s Specifications
Once the readings for all cylinders have been recorded, compare them against the specifications provided by the vehicle manufacturer.
Cylinders with readings significantly lower than the specified values may indicate worn piston rings, leaking valves, or a faulty head gasket.
If a significant discrepancy is observed between the readings of individual cylinders, it suggests the presence of uneven wear or another internal mechanical issue.
By comparing your results against official standards, you can accurately assess the engine’s condition and make informed decisions regarding future maintenance or repairs.
How to Interpret Compression Test Results
Along with this, there’s academic studies that confirms that the compression stroke itself is a critical indicator of engine health and tracking changes in the compression pressure over the time can reveal the issues with the piston rings, valves or other internal components that makes the compression test a valuable non-invasive diagnostic tool as well.[¹]
1. Normal Compression Values and Acceptable Limits
Compression readings vary depending on the make and model of your engine; however, most gasoline engines typically show readings between 120 and 200 pounds per square inch (psi) per cylinder.
It is normal to have slight variations between cylinders, which typically fall within a range of 10 to 15 percent of one another.
Readings that consistently fall within this range indicate that the engine cylinders are sealing properly and functioning as designed.
Understanding what constitutes a normal reading helps you identify potential problems before they cause major damage or negatively impact engine performance.
2. Causes of Low Compression: Worn Piston Rings, Leaking Valves, Blown Head Gasket
Low compression readings can be an indication of specific mechanical issues within the engine.
Worn piston rings allow air and fuel to leak into the crankcase, thereby reducing cylinder pressure.
Leaking intake or exhaust valves fail to seal properly during the compression stroke, which also results in a loss of pressure.
A blown head gasket, whether located between cylinders or between a cylinder and a coolant passage, as it can cause a sudden drop in compression and lead to engine overheating.
Identifying these root causes helps determine whether repairs can be performed at home or if professional assistance is required to prevent further damage to the engine.
3. The Difference Between Wet and Dry Compression Tests
A dry compression test measures cylinder pressure without the use of oil, revealing how effectively the engine seals under normal operating conditions.
In a wet compression test, a small amount of engine oil is introduced into the cylinder prior to testing.
If compression increases significantly during the wet test, it typically indicates worn piston rings, as the oil temporarily seals the gaps and restores pressure.
The difference between the results of the wet and dry tests provides crucial diagnostic clues, helping you determine whether the low compression issue stems from the rings, valves, or head gasket.
Read More:
- How to Fix Engine Oil Dilution
- How to Detect Engine Oil Contamination
- How to Flush Engine Oil System
- How to Change Transmission Fluid
- How to Check Transmission Fluid
- How to Check Coolant Level
How to Solve Low Compression Issues
1. How to Confirm Cylinder Problems Using a Wet Compression Test
A wet compression test is a useful method for identifying the cause of low compression within a cylinder.
To perform this test, introduce a small amount of engine oil (typically about a teaspoon) into the cylinder through the spark plug hole; then, crank the engine again and observe the pressure reading.
If the compression improves significantly compared to the dry test, it usually indicates that the piston rings are worn, as the oil temporarily seals the gaps and helps the cylinder retain pressure.
If the reading does not improve, the problem likely lies with the valves or the head gasket.
This test provides a simple and effective way to accurately pinpoint the cause of low compression without having to disassemble the entire engine.
2. Indicators Pointing to Specific Problems
Different compression issues present distinct symptoms that can aid in identifying the root cause.
Worn piston rings often result in low compression across all cylinders and may lead to blue smoke emitting from the exhaust, increased oil consumption and reduced engine power.
Leaking valves typically affect individual cylinders and can result in misfires, rough idling, or uneven acceleration.
A blown head gasket often causes very low compression in one or more cylinders and may be accompanied by coolant loss, white smoke from the exhaust, or engine overheating.
Recognizing these patterns enables car owners to make informed decisions regarding repairs or further diagnostic testing.
3. When Professional Assistance Is Recommended
While basic compression testing and troubleshooting can be performed at home, certain issues require professional attention.
Repairing issues such as blown head gaskets, severe valve damage, or excessive cylinder wear typically requires specialized tools and expertise.
Attempting to perform these repairs without proper knowledge can lead to further engine damage and increased costs.
If diagnostic test results indicate very low readings, or if symptoms point to severe internal damage, it is safest to consult a professional mechanic for an accurate diagnosis and repair.
Seeking expert assistance ensures that the engine is repaired correctly and remains reliable for the long term.
How to Maintain Engine In Future
1. Regular Engine Inspections to Maintain Compression
Frequent engine inspections are crucial to ensure that your cylinders maintain proper compression over time.
Regular checks help detect minor issues such as: leaking valves, worn piston rings, or minor gasket defects, before they escalate into major mechanical failures.
Paying attention to unusual noises, changes in fuel efficiency, or rough idling can also serve as early indicators of declining compression.
By continuously monitoring the engine’s condition, you can take immediate corrective measures, thereby preserving cylinder integrity and optimizing engine performance.
2. The Importance of Timely Oil Changes and Proper Engine Care
Oil plays a vital role in protecting the engine’s internal components such as: pistons, rings and cylinder walls.
Timely oil changes ensure that the engine remains properly lubricated, thereby reducing friction and wear, factors that can lead to a loss of compression.
Using high-quality oil recommended by the vehicle manufacturer helps keep the engine clean, prevents the buildup of harmful deposits and protects seals and gaskets.
In addition to oil changes, regular maintenance such as: cleaning air filters, checking coolant levels and ensuring proper ignition timing, also contributes significantly to maintaining healthy compression levels over the long term.
3. Preventive Measures to Extend Engine Lifespan
Adopting preventive measures can significantly extend your engine’s lifespan and help maintain compression.
Avoiding aggressive driving, allowing the engine to warm up slightly before driving at high speeds and promptly addressing minor mechanical issues can effectively prevent premature wear and tear.
Using high-quality parts, maintaining the cooling system and avoiding prolonged engine operation at excessive temperatures also contribute to preserving the health of the cylinders.
Preventive maintenance not only maintains compression but also improves fuel efficiency, reduces emissions and minimizes the risk of sudden breakdowns, thereby ensuring that your engine continues to operate reliably for years to come.
Conclusion – How to Check Engine Compression at Home
Now, you have understood that a simple compression test today that can prevent surprises on the road tomorrow, that keeps the both your engine and your pocket healthy.
Checking compression at home is not merely a simple test; it is a powerful diagnostic tool that helps identify potential engine problems in their early stages, whether they involve worn piston rings, leaking valves, or a failing head gasket.
Conducting regular compression tests, alongside proper engine care, timely oil changes and preventive maintenance, ensures that your cylinders remain in good condition and that your engine operates at its full potential.
By learning to interpret compression readings and take appropriate action, you can avoid costly repairs, improve fuel efficiency and extend the lifespan of your vehicle.
Now, that’s it from this guide about How to Check Engine Compression at Home, now if you still have questions: just comment down below.
Frequently Asked Questions
FAQ 1: What is engine compression and why is it important?
Engine compression refers to the pressure generated inside each cylinder when the piston pushes the air-fuel mixture upward just before ignition. Proper compression is crucial because it determines how efficiently your engine burns fuel and how much power it generates. Low compression can lead to a variety of issues, such as rough idling, misfires, reduced acceleration, increased fuel consumption and, over time, potential damage to the engine. Checking your compression helps you assess the overall health of your engine and allows you to prevent serious problems before they occur.
FAQ 2: How can I tell if my car has low compression?
Symptoms of low compression include rough idling, strange noises coming from the engine, sluggish acceleration, difficulty starting the car and increased fuel consumption. Sometimes, you may also notice blue smoke emitting from the exhaust or experience issues with the engine overheating. These symptoms typically indicate that one or more cylinders are not sealing properly, which is a condition that can be caused by worn piston rings, leaking valves, or a faulty head gasket. A compression test is the most reliable method for confirming whether or not these issues are present.
FAQ 3: Can I check engine compression at home without any specialized skills?
Yes, you can check engine compression at home using a compression gauge, a spark plug socket and a few common tools. You do not need extensive mechanical knowledge to perform this task; However, adhering to proper safety measures is absolutely crucial such as: disabling the ignition or fuel system and ensuring that the engine is turned off and has completely cooled down before commencing any work on it. With the aid of a step-by-step guide, anyone can safely perform this test and obtain accurate readings.
FAQ 4: What tools will I need for a compression test?
The essential tools include a compression gauge (manual or digital), a spark plug socket and ratchet, a wrench set and if necessary: a screwdriver set. For safety purposes, safety gloves and safety goggles are also required. If desired, having an assistant present or using a remote starter can make the process of cranking the engine even easier. With these tools, you can safely remove the spark plugs, install the gauge, crank the engine and record accurate readings.
FAQ 5: What is the difference between a wet and a dry compression test?
In a dry compression test, the cylinder pressure is measured without adding any additives; this reveals the condition of the engine’s sealing under normal operating conditions. In a wet compression test, a small amount of engine oil is introduced into the cylinder before performing the test. If the pressure increases during the wet test, it typically indicates that the piston rings are worn, as the oil temporarily seals the gaps. If there is no change in the readings, the issue likely lies with the valves or the head gasket. Together, these two tests help pinpoint the true cause of low compression.
FAQ 6: How often should I check the engine compression?
It is advisable to check the engine compression whenever you notice any performance issues such as: misfires, rough idling, or a loss of power. Regular checks can also be performed as part of a preventive maintenance routine, specially if your car has high mileage or if you are purchasing a used vehicle. Frequent inspections allow for the early detection of issues, thereby saving money and preventing the need for major repairs.
FAQ 7: What does a low compression reading mean?
A low compression reading typically indicates that a cylinder is not sealing properly. This can be caused by worn piston rings, leaks in the intake or exhaust valves, or a faulty head gasket. A very low reading in a single cylinder suggests that the problem is isolated to that specific component, whereas low readings across all cylinders often point to general engine wear or a lack of lubrication. Understanding these readings helps you determine whether you can resolve the issue yourself at home or if you require professional assistance.
FAQ 8: Can low compression be fixed at home?
Some minor issues such as: carbon buildup on valves or temporary sealing problems, as it can be resolved at home through basic maintenance. However, serious issues such as: worn piston rings, damaged valves, or a blown head gasket, typically require professional repair. It is crucial that you do not attempt complex repairs on the engine’s internal components without the proper knowledge, as doing so could cause further damage to the engine and increase repair costs.
References:
[1] Experimental investigation to develop a methodology for estimating the compression condition of DI Diesel engines
https://www.sciencedirect.com/science/article/abs/pii/S0196890405000828

Hello Folks, Dean Shali here to help you out to solve the problems with your lovely vehicle, as i have lots of experience and knowledge about automotive industry as i woks directly with the customers and repair vehicles and i love to help the people to keep their cars safe and running smoothly.