Written By: Dean Shali
Fact Checked By: Sabré Cook
Reviewed By: Tamara Warren
Basically, that “YELLOW” harmless looking thing on your headlights is not dirt at all, it is literally damage that is done by blocking the clear sight of your journey and become dangerous one in nighttime.
As, now-a-days car headlights are made from the polycarbonate plastic, which is actually strong and lightweight material but they naturally vulnerable to the UV radiation, oxidation and otehr environmental exposure as well.
As a result, over the period of time because of sunlight and UV rays, they literally breaks down the outer protective layer, that causes headlights to turn yellow, cloudy or hazy; and that baldly reduces the light output you get.
Even, there’s studies and automotive safety data that suggest that the severely oxidized headlights can actually cut down the brightness by up to 70% to 80% which is quiet concerning, as it directly affects how far and how clearly you can see at night.
That’s why, we have come up with this easy to fix guide about How to Polish Car Headlights so that you can remove that oxidized layer and restore clarity to keep them clear for months to come.
Know, Why Do Headlights Become Cloudy?
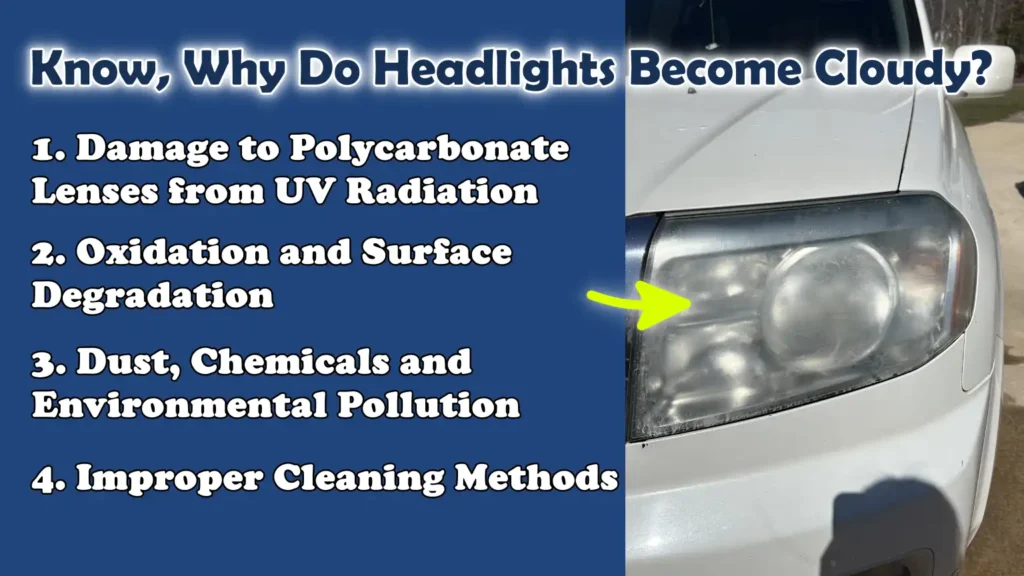
1. Damage to Polycarbonate Lenses from UV Radiation
The headlights on most modern cars are made of polycarbonate plastic.
Although this plastic is lightweight and durable, it is highly sensitive to ultraviolet (UV) rays emitted by the sun.
Over time, prolonged exposure to UV radiation causes the outer surface of the lens to deteriorate.
This chemical reaction causes the plastic to become cloudy or yellow, reducing the amount of light passing through it and dimming the brightness of your headlights.
2. Oxidation and Surface Degradation
Oxidation is a natural chemical process in which the headlight surface reacts with oxygen present in the air.
This process gradually degrades the plastic, causing the surface to become rough and cloudy.
As a result, light scatters rather than shining directly forward.
The oxidation process often accelerates when headlights are exposed to heat, pollution and moisture.
This weakens the lens material, making it necessary to polish the lens in order to restore its clarity.
3. Dust, Chemicals and Environmental Pollution
Road dust, dirt, acid rain and chemical residues, whether from car washes or nearby industrial areas, as it can adhere to the headlight surface and gradually damage the plastic.
Over time, these pollutants can create deep scratches or stains on the lens, resulting in permanent marks or cloudiness.
Even a small amount of dirt, if left uncleaned for months, can significantly cloud the headlights, making it difficult to see clearly at night.
4. Improper Cleaning Methods
Many drivers inadvertently cause further damage to their headlights by using improper cleaning techniques or harsh chemicals.
Rough cloths, household cleaners not designed for automotive plastics, or using a pressure washer too close to the lens can cause scratches and abrasions on the headlight surface.
These scratches accelerate the accumulation of dirt and the oxidation process, causing the headlights to become hazy even faster and reducing their overall lifespan.
Real Benefits of Polishing Car Headlights?
1. Improved Visibility and Safety at Night
Polishing headlights restores the clarity of the lenses, allowing the light emitted by your bulbs to project outward without obstruction.
When headlights become hazy or yellowed, they can reduce light output by up to 70 percent, making it difficult to see the road, pedestrians and obstacles at night.
Clear headlights help you see further ahead and react more quickly to potential hazards, thereby directly enhancing driving safety in low-light conditions as well as during adverse weather such as rain or fog.
2. Enhanced Vehicle Appearance and Resale Value
Hazy or yellowed headlights make a car look old and poorly maintained, even if its paintwork and body are in excellent condition.
Polishing the headlights can instantly improve the vehicle’s overall appearance, making it look clean and well-cared-for.
This improvement is clearly visible to potential buyers and can boost the car’s resale value, as it signals that the vehicle has been properly maintained, a crucial factor that many buyers consider when purchasing a car.
3. Cost Savings Compared to Headlight Replacement
Replacing headlights can be an expensive undertaking, particularly for modern cars, where the cost of a single headlight assembly can run into hundreds of dollars.
Polishing headlights offers a simple and affordable alternative, allowing you to restore the lenses to a near-new condition without the need for replacement.
By investing a little time and using inexpensive supplies for polishing, you can save a significant amount of money compared to purchasing brand-new headlight units.
4. Enhanced Lighting Performance
Hazy or oxidized headlights scatter light, thereby diminishing the intensity and focus of the beam.
Polished headlights properly focus the light beam, ensuring that both your high and low beams function efficiently.
This enhanced lighting performance improves driving comfort and visibility, reduces glare for oncoming traffic and allows your headlights to perform exactly as the manufacturer intended, making night driving and long-distance journeys safer and more effective.
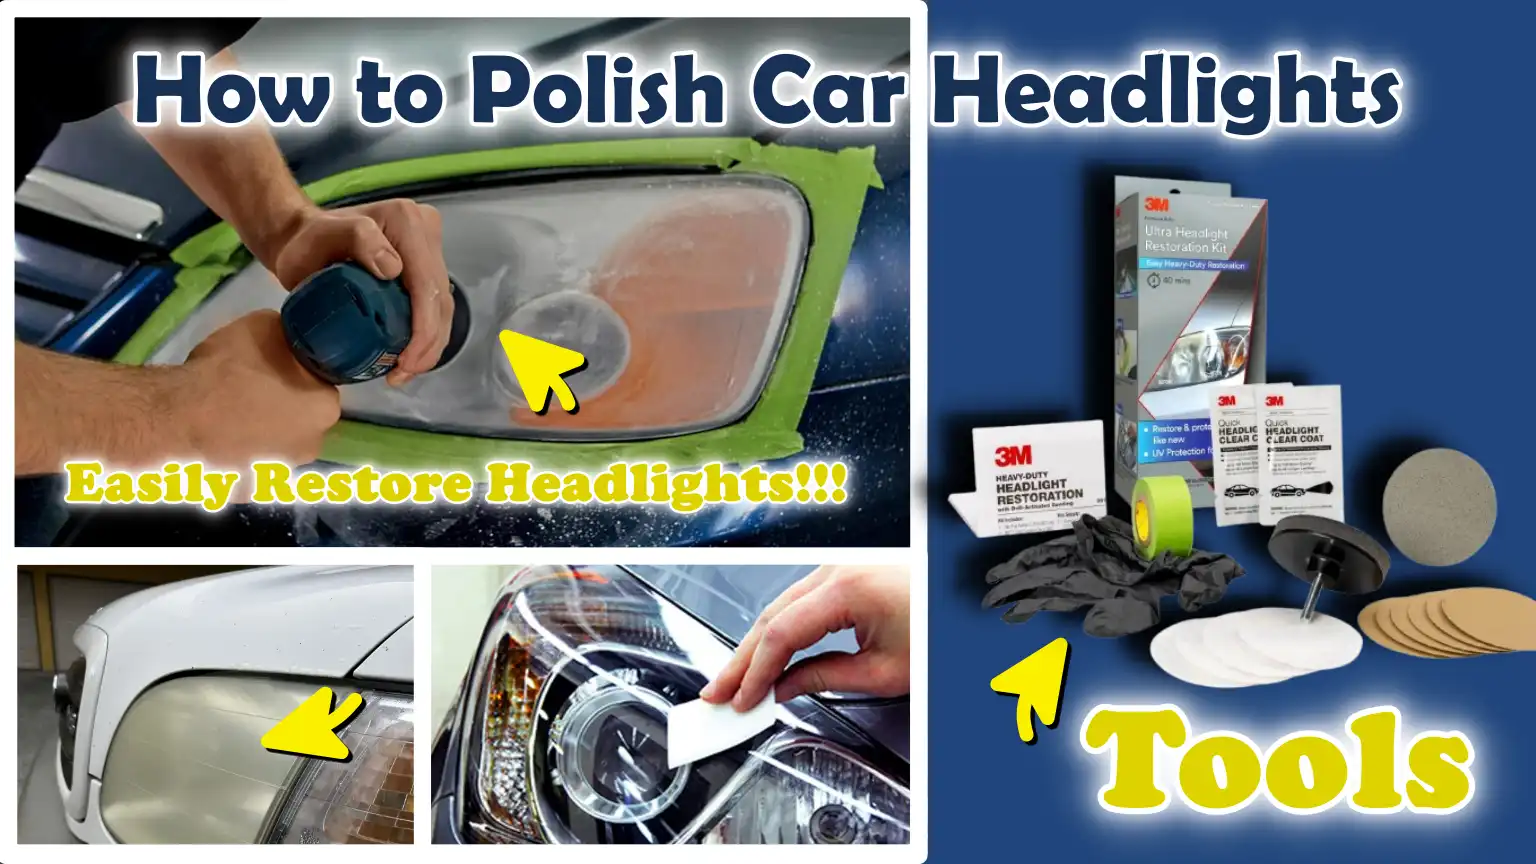
Tools
| Tool / Material | Purpose / Why It’s Needed | How to Use It |
|---|---|---|
| Microfiber Cloths | Soft, non-abrasive cloths are essential for cleaning the headlight surface without scratching it, applying polishing compound and buffing. | Use them to wipe away dust before sanding, to apply polish using circular motions and to buff the surface until it is clean. If a cloth becomes excessively dirty, wash it or replace it. |
| Masking Tape | This protects the car’s paintwork and surrounding components from accidental scratches or damage during polishing and sanding. | Before sanding or polishing, apply this tape along the edges of the headlight to create a protective barrier. Carefully remove it once the polishing process is complete. |
| Sandpaper (800–3000 grit) | This removes oxidation, yellowing and the rough outer layer from the headlight lens. Different grit levels are used sequentially to achieve a smooth finish. | In cases of heavy oxidation, start with 800–1000 grit, then move to 1500–2000 grit and finally use 2500–3000 grit to smooth the surface. Keep the sandpaper wet while sanding to prevent scratching. |
| Headlight Polishing Compound | This is a specialized scratch-removal compound that eliminates minor scratches and restores the headlight’s clarity. | Apply a small amount of the compound directly onto the headlight surface or onto a polishing pad. Buff the area using circular motions, either by hand or with a drill attachment, until the surface becomes clear and smooth. |
| UV Sealant / Clear Coat | This protects the headlight from future damage caused by UV rays, oxidation and yellowing. This helps maintain the results of the polishing for an extended period. | After cleaning, apply a thin, uniform layer of this product onto the polished lens. Allow it to dry according to the product instructions (typically 30–60 minutes or longer). |
| Water Spray Bottle | This keeps the headlight surface and sandpaper wet during sanding, thereby preventing scratches and excessive heat buildup. | Spray lightly while sanding. Always maintain a thin layer of water between the sandpaper and the headlight surface. |
| Optional: Electric Drill with Polishing Pad | This accelerates the polishing process, ensures uniform pressure and delivers excellent results on stubborn oxidation. | Attach the polishing pad to a drill, apply polish to the pad or the lens and work in a circular motion at a slow speed. Do not use high speeds to avoid damage caused by heat. |
Methods to Restore The Headlights
1. Do-It-Yourself (DIY) Methods
Many drivers use common household items to restore their headlights such as: toothpaste or a mixture of baking soda and vinegar.
Toothpaste contains mild abrasive particles that can remove light oxidation and surface grime, while the baking soda and vinegar mixture can break down certain types of stains and hazy buildup.
These methods are simple and inexpensive and they can temporarily improve the appearance of headlights.
However, they do have limitations, as they cannot remove deep-seated oxidation or provide long-term protection; furthermore, results may vary depending on the severity of the damage to the headlights.
DIY methods are best suited as a quick, stopgap solution for mild haziness, or as a temporary measure before opting for professional restoration services.
2. Professional Restoration Kits
Professional headlight restoration kits are designed to offer a more reliable solution compared to DIY methods.
These kits typically include sanding pads of various grits, polishing compounds, microfiber cloths and sometimes a UV sealant or protective coating.
These kits allow drivers to follow a step-by-step process similar to professional techniques, resulting in more consistent outcomes and longer-lasting clarity for the headlights.
They prove to be an excellent option when headlights exhibit moderate oxidation or scratches, situations where DIY methods are insufficient, yet professional services are not strictly necessary.
3. Professional Services
When headlights have sustained severe damage, have become heavily yellowed, or have developed cracks, professional restoration services offer the most effective solution.
These services fully restore lenses and maximize their light output by utilizing specialized tools, compounds and UV-protective coatings.
Professional services are typically more expensive than DIY methods or kits; however, they deliver superior-quality results and long-lasting protection, while also saving the car owner time and effort.
Opting for a professional service is recommended when headlights exhibit severe damage or multiple layers of oxidation, or when the objective is to achieve absolutely precise, showroom-quality results.
How to Properly Polish Car Headlights
1. Clean the Headlights
The first step in polishing headlights is to remove all the dirt, grime and road debris accumulated on their surface.
To begin, thoroughly wash the headlights using a mild car shampoo and water.
Any dirt or dust remaining on the surface can cause scratches during sanding or polishing, so it is crucial to ensure that the lenses are completely clean.
Use a soft microfiber cloth to gently wipe away any lingering dirt particles and allow the surface to dry before proceeding to the next step.
2. Mask Off Surrounding Areas
Headlights are often situated close to the car’s painted body panels and accidental contact with sandpaper or polishing compounds can damage the vehicle’s paintwork.
To prevent this, apply masking tape around the edges of each headlight to cover the adjacent paint, trim and bumper areas.
Proper masking ensures that only the lens remains exposed for sanding and polishing, thereby protecting the vehicle from scratches and chemical damage.
2. Wet Sand the Headlights
Wet sanding removes the layer of oxidation and yellowing that has accumulated on the headlight lenses.
Begin by using a lower-grit sandpaper (typically between 800 and 1000) to remove heavy oxidation or deep scratches.
Gradually progress to finer-grit sandpaper (such as 2000 to 3000) to smooth out the surface.
While sanding, always keep both the sandpaper and the headlight surface wet to prevent excessive heat buildup, minimize friction and avoid creating new scratches.
For consistent results, sand the entire lens evenly.
4. Apply Polishing Compound
Once sanding is complete, use a polishing compound to restore the headlight’s shine and clarity.
Apply a small amount of the compound to a clean microfiber cloth or polishing pad.
Rub it onto the headlight using circular motions and applying light pressure until the surface appears clear and smooth.
Polishing removes fine sanding marks, refines the lens surface and enhances light transmission, making the headlights look almost brand new.
5. Wash and Dry
After polishing, it is crucial to remove all remaining compound from the lens.
Rinse the headlight thoroughly with clean water, then gently wipe it dry using a soft microfiber cloth.
Keeping the surface completely clean ensures that no dirt or residue remains, thereby preparing the lens for the application of a protective UV sealant.
6. Apply UV Sealant
Applying a UV sealant or clear coat is an essential step to prevent the headlights from oxidizing again.
This sealant creates a protective shield against damage caused by sunlight, road debris and environmental factors.
Apply a thin, even layer to the polished lens and allow it to dry according to the product instructions, typically for 30 to 60 minutes.
Proper UV protection preserves the results of your polishing efforts over the long term, keeping the headlights clear and bright for months or even years to come.
How Long Does Headlight Polishing Last?
1. General Duration
The results of headlight polishing can last anywhere from three months to over a year, depending on the method used and the condition of the headlights prior to restoration.
Mild oxidation and slight haziness can often be completely removed in a single polishing session, remaining clear for several months; whereas severely yellowed or heavily oxidized headlights may require more frequent touch-ups.
Professional polishing and restoration services often yield the longest-lasting results; if proper protective measures are applied, headlights can sometimes remain clear for 12 months or even longer.
2. Factors Affecting How Long Headlights Stay Clear
Several factors influence how long polished headlights remain clear.
Prolonged exposure to direct sunlight and UV rays can accelerate the oxidation process, while repeated exposure to rain, dust, road salt and chemicals can erode the headlights’ protective layer.
Improper cleaning methods such as: using abrasive cloths or harsh detergents, as it can also diminish the effectiveness of the polishing treatment.
Furthermore, headlights made from lower-quality polycarbonate plastic may degrade more rapidly, meaning that even well-polished lenses can quickly lose their clarity.
3. The Importance of UV Protection
Applying a UV sealant or clear coat is crucial for extending the lifespan of polished headlights.
This sealant creates a protective shield that blocks harmful UV rays, the primary cause of headlight yellowing and haziness.
Without UV protection, the benefits of polishing can fade within just a few weeks, causing the headlights to become hazy or yellow once again.
Regular maintenance, which includes cleaning as needed and reapplying UV protection, ensures that the headlights remain as bright, clear and effective as possible, thereby improving nighttime visibility and overall driving safety.
Know, Common Mistakes to Avoid While Polishing Car Headlights
1. Skipping Sanding Steps
Many people attempt to polish their headlights without completing the proper sanding process; the result is an uneven surface and unsatisfactory outcomes.
To remove oxidation, yellowing and scratches, it is crucial to sand gradually using various sandpaper grits (levels of coarseness).
Skipping steps, or using only very fine-grit sandpaper, fails to address deep scratches; this renders the polishing ineffective, causing the headlights to appear blotchy or hazy rather than clear.
2. Failing to Apply a UV Sealant
Failing to apply a UV sealant after polishing is one of the most common mistakes.
This protective layer is essential, as the UV rays emitted by sunlight are the primary cause of headlight yellowing and hazing.
Without this protection, the headlight surface will re-oxidize very rapidly and all the time and effort invested in polishing can go to waste within just a few weeks.
3. Using the Wrong Sandpaper Grit
Using sandpaper with an excessively coarse grit can scratch the headlight lens and cause permanent damage, whereas using sandpaper with an excessively fine grit prevents the complete removal of oxidation and fails to restore the headlight’s clarity.
Selecting the correct sequence of sandpaper grits, typically starting with 800–1000 grit and progressing up to 2000–3000 grit, is vital for a safe and effective restoration.
Choosing the wrong grit often leads to inconsistent results and reduced light output.
4. Applying Excessive Pressure
Applying too much force while sanding or polishing can lead to scratches, cracks, or even heat-induced damage to the plastic lens.
Excessive pressure renders the polishing compound less effective, as it creates uneven patches on the surface.
Applying moderate and uniform pressure allows the abrasives to perform optimally, removing oxidation without damaging the headlight surface.
5. Ignoring Deep Cracks or Internal Damage
Polishing cannot repair internal damage, deep cracks, or severe yellowing that has penetrated deep into the lens material.
Attempting to polish such headlights may temporarily improve their external appearance, but it will neither restore proper light output nor ensure long-lasting clarity.
It is crucial to thoroughly inspect the headlights before beginning the work; if the damage is extensive, replacing the headlight should be considered, as polishing alone cannot guarantee safe driving conditions.
Basic Difference Between The DIY vs Professional Headlight Restoration
1. Cost Comparison
A primary difference between DIY and professional headlight restoration is the cost.
DIY methods, whether performed using household items or a professional kit, are generally inexpensive; the materials involved often cost less than twenty dollars.
On the other hand, professional restoration services can range from fifty to two hundred dollars per vehicle, depending on the severity of the headlight damage and the service provider.
While DIY is budget-friendly, professional services require a higher upfront investment; however, they can save money in the long run because their results are more durable and long-lasting.
2. Time and Effort Required
DIY headlight restoration requires a significant amount of time and physical effort.
The process involves washing, sanding, polishing and applying a UV sealant to the headlights, tasks that can take anywhere from one to two hours per headlight.
Professional services are much faster, as they utilize specialized equipment and trained technicians to complete the job efficiently; they often finish restoring both headlights in less than an hour.
For car owners who prioritize convenience and minimal effort, professional restoration is a practical option.
3. Quality of Results
There is a difference in the quality of results obtained from DIY versus professional restoration.
DIY methods can yield satisfactory results, particularly for headlights with mild oxidation or yellowing, but the finish may lack uniformity or deteriorate over time and it is often less effective at protecting against damage caused by UV rays.
Professional restoration delivers a more uniform and long-lasting finish, restoring the headlights to a clarity that closely resembles their original factory condition.
Professionals also have access to high-quality polishing compounds and protective coatings that are typically not included in kits available to the general public.
4. When to Choose Which Option
The choice between DIY and professional restoration depends on the condition of the headlights, your budget and your expectations regarding the results.
DIY is suitable for headlights exhibiting mild oxidation or yellowing, for those with a limited budget, or for car owners who prefer to handle their vehicle’s maintenance themselves.
Professional services are recommended for headlights with severe oxidation, deep scratches, or extensive yellowing, or when maximum clarity and durability are required.
Ultimately, this decision should be made by taking into account the severity of the headlight damage, the time available, the budget and the type of results you desire.
How to Keep Headlights Clean In Future
1. Regular Cleaning
Keeping headlights clean is the easiest and most effective way to maintain their clarity.
If left uncleaned, dust, dirt and road grime can gradually scratch their surface and diminish their shine.
Regularly washing the headlights with a mild car shampoo and water removes these particles before they can cause any permanent damage.
Avoid using harsh chemicals or abrasive cloths, as these can accelerate the oxidation process and damage the lenses.
Regular cleaning ensures that the headlights remain bright and reduces the need for frequent polishing.
2. Applying a Protective Coating
After polishing, applying a protective coating such as: a UV sealant or clear coat, is crucial for extending the lifespan of your headlights.
These coatings block harmful ultraviolet (UV) rays, which are the primary cause of headlight yellowing and oxidation.
Reapplying this protective layer periodically, typically every six months to a year, helps maintain the headlights’ clarity over the long term and ensures optimal illumination for safe night driving.
3. Parking in Shaded Areas
Exposure to direct sunlight accelerates the oxidation and yellowing of headlights due to ultraviolet rays.
Whenever possible, park your vehicle in shaded areas, garages, or covered parking spaces to minimize the effects of sun exposure.
Limiting exposure to UV rays slows down the degradation process of the polycarbonate lenses, helping polished headlights remain clear for a longer period.
Even a small amount of shade can significantly reduce the rate at which headlights yellow over time.
4. Using Headlight Protective Film
Headlight protective films are transparent, adhesive layers designed to shield the lenses from dust, road debris and ultraviolet rays.
These films provide an additional protective barrier that prevents scratches and slows down the oxidation process.
Applying a high-quality film offers long-term protection, enhancing the effectiveness of UV sealants and polishing, and reduces the need for headlight maintenance.
Protective films are particularly beneficial for vehicles frequently driven on highways, rough roads, or in adverse weather conditions.
When to Replace Headlights Instead of Polishing Them
Not only this, there’s research on the headlights peformance and that shows that in low-visibility environments such as: fog, even small differences in the light transmission literally changes how quickly drivers actually spot the obstacles or pedestrians ahead, as 2023 experimental study actually found out that there’s significant difference in detection times between the halogen, xenon and LED headlights under the foggy conditions, that’s why it is really iportant to restore the maximum light clarity as it actually matters for the real-world safety on the road.[¹]
1. Deep Cracks or Internal Haze
If headlights have deep cracks or if the inner layers of the lens have become hazy, simply polishing them will not restore their clarity or effectiveness.
Cracks allow moisture and dirt to penetrate inside, potentially leading to permanent haziness, corrosion of internal components and reduced light output.
Internal haziness occurs when moisture accumulates inside the headlight, a problem that cannot be resolved by polishing the outer surface.
In such cases, replacing the entire headlight assembly is essential to ensure clear visibility and safe driving.
2. Severe Yellowing That Cannot Be Restored
Headlights that have become severely yellowed or discolored due to prolonged exposure to UV rays and oxidation may not respond to polishing.
When the discoloration permeates deep into the polycarbonate plastic, attempts to polish the surface may yield only a superficial shine but will not restore the proper level of light output.
Severely yellowed headlights scatter light, reduce beam intensity and create glare that can dazzle oncoming drivers.
Replacing these headlights ensures that your vehicle meets safety standards and provides adequate illumination for night driving.
3. Compromised Structural Integrity
Over time, continuous exposure to sunlight, heat generated by the bulbs and environmental elements can cause headlights to become weak or brittle.
When the lens material begins to degrade, warp, or show signs of structural weakness, polishing cannot restore its structural integrity.
Weak headlights can easily break, allow water to seep in, or fail to maintain proper alignment, all of which compromise both safety and performance.
In such cases, replacing the headlights is the safest option to ensure the continued functionality and reliability of your vehicle’s lighting system.
Read More:
Conclusion – How to Polish Car Headlights
The “HEADLIGHTS” are never been a doubt about usefulness of this feature at all, as it is literally critical safety tool that deserves as much attention as your vehicle’s brakes or tires does.
Hazy or yellowed headlights can significantly diminish light output, scatter light beams and increase glare, directly impacting your ability to see the road and react to hazards at night.
By following the correct, step-by-step polishing procedure, utilizing the right tools and materials and applying UV protection, you can restore the clarity and brightness of your headlights, extend their lifespan and save money compared to a complete headlight replacement.
Regular maintenance, including cleaning and the periodic reapplication of protective coatings, ensures long-lasting results and prevents future deterioration.
Understanding when polishing is no longer sufficient, and replacing the headlights when necessary, safeguards both your personal safety and your vehicle’s value.
Now, if you still have confusion related to this guide on How to Polish Car Headlights, just ask question below.
Frequently Asked Questions
FAQ 1: Why do car headlights become cloudy or yellow?
Car headlights are typically made of polycarbonate plastic, which is lightweight and durable but sensitive to sunlight. Over time, ultraviolet (UV) rays from the sun degrade the outer layer of the lens, causing it to turn yellow or cloudy. Dirt, chemicals, road debris and improper cleaning habits can also contribute to headlight clouding. Even moisture or condensation inside the headlight housing can make the headlights appear hazy. All these factors combine to reduce light intensity, making your headlights less effective at night.
FAQ 2: Can I polish my headlights myself?
Yes, you can polish your headlights yourself using household remedies, professional kits, or simple DIY techniques. For mild clouding or yellowing, toothpaste or a solution of baking soda and vinegar can sometimes effectively clean the headlights. However, using a proper headlight restoration kit which includes sanding pads, polishing compounds and microfiber cloths, usually yields far superior results. It is essential to follow the instructions carefully, use the correct sandpaper grit and apply a UV sealant at the end to prevent the headlights from becoming cloudy again.
FAQ 3: How long does headlight polishing last?
How long headlight polishing lasts depends on the method used and how well the headlights are maintained. Simple DIY polishing may last anywhere from three to six months, whereas professional restoration or the application of proper UV protection can keep the headlights looking clear for a year or longer. Exposure to direct sunlight, rain, road salt and environmental chemicals can reduce the lifespan of polished headlights. Regular cleaning and the periodic application of a UV sealant will help maintain the headlights’ clarity for a longer period.
FAQ 4: What tools will I need to polish my headlights?
To effectively polish your headlights, you will need a few essential tools. Microfiber cloths are used to clean and buff the headlight surface without causing scratches. Masking tape protects the surrounding paintwork while you are working. Sandpaper of various grits (typically ranging from 800 to 3000) removes accumulated grime from the headlights and smooths out the lens. A polishing compound restores the headlights’ shine, while a UV sealant protects them from future damage. Some optional tools are also available such as: an electric drill fitted with a polishing pad which can help achieve faster and more uniform results. A water spray bottle is also essential for keeping the surface wet during the sanding process.
FAQ 5: When should I replace my headlights instead of polishing them?
Headlights should be replaced if they exhibit deep cracks, internal condensation or fogging, irreparable yellowing, or structural defects. Polishing only addresses surface-level issues; it cannot repair internal damage or restore lenses that are severely deteriorated. Driving with defective headlights can impair visibility and pose a safety risk; therefore, if polishing fails to restore the headlights to a clear and bright condition, replacement becomes necessary.
FAQ 6: Are professional headlight restoration services superior to DIY (Do-It-Yourself) methods?
Professional headlight restoration services typically deliver faster, easier and longer-lasting results compared to DIY methods. Professionals utilize high-quality tools, polishing compounds and UV-protective coatings to restore headlights to a like-new clarity. DIY methods are suitable for minor haziness or slight yellowing and are also more budget-friendly; however, they do not always yield consistent results and are generally not long-lasting. The choice between the two depends on the severity of the damage, your budget and how long you want the results to endure.
FAQ 7: How should I care for my headlights after polishing?
After polishing, headlights can be maintained by regularly cleaning them with a mild car shampoo and water to remove dust and grime. Applying a UV-protective coating or clear sealant helps prevent yellowing and oxidation caused by sunlight. Parking your vehicle in shaded areas or a garage minimizes exposure to sunlight, while an optional headlight protection film serves as an extra protective shield against scratches and environmental damage. Proper care ensures that headlights remain clear for an extended period, thereby enhancing safety while driving at night.
References:
[1] Performance investigation of different headlights used in vehicles under foggy conditions
https://www.nature.com/articles/s41598-023-31883-3

Hello Folks, Dean Shali here to help you out to solve the problems with your lovely vehicle, as i have lots of experience and knowledge about automotive industry as i woks directly with the customers and repair vehicles and i love to help the people to keep their cars safe and running smoothly.