Written By: Dean Shali
Fact Checked By: Sabré Cook
Reviewed By: Tamara Warren
Now, if you vehicle is getting all kinds of scratches, swirl marks or anything which is not pleasing to eyes and your car paint, then the there’s high possibility of having used “WRONG WASHING METHOD”.
So, it seems like a simple task: as you can just go and wash your car, but the actual truth is too harsh than this, literally most of the paint damage actually happens during the improper washing not while driving.
As, there’s tiny dust particles, road grime and brake dust available on the vehicle’s paint, that literally acts like the sandpaper when you rub your vehicle’s surface and that’s how you end of creating fine scratches known as “SWIRL MARKS”.
And, following ugly cleaning method for the longer period of time can lead you to have, vehicle full of marks, dull in shine, reduced clarity and even lowers your car’s resale value as well.
Even, there’s studies and detailing experts that consistently shows that using the wrong tools such as: sponges, harsh soaps or single bucket method can significantly increases the surface damage.
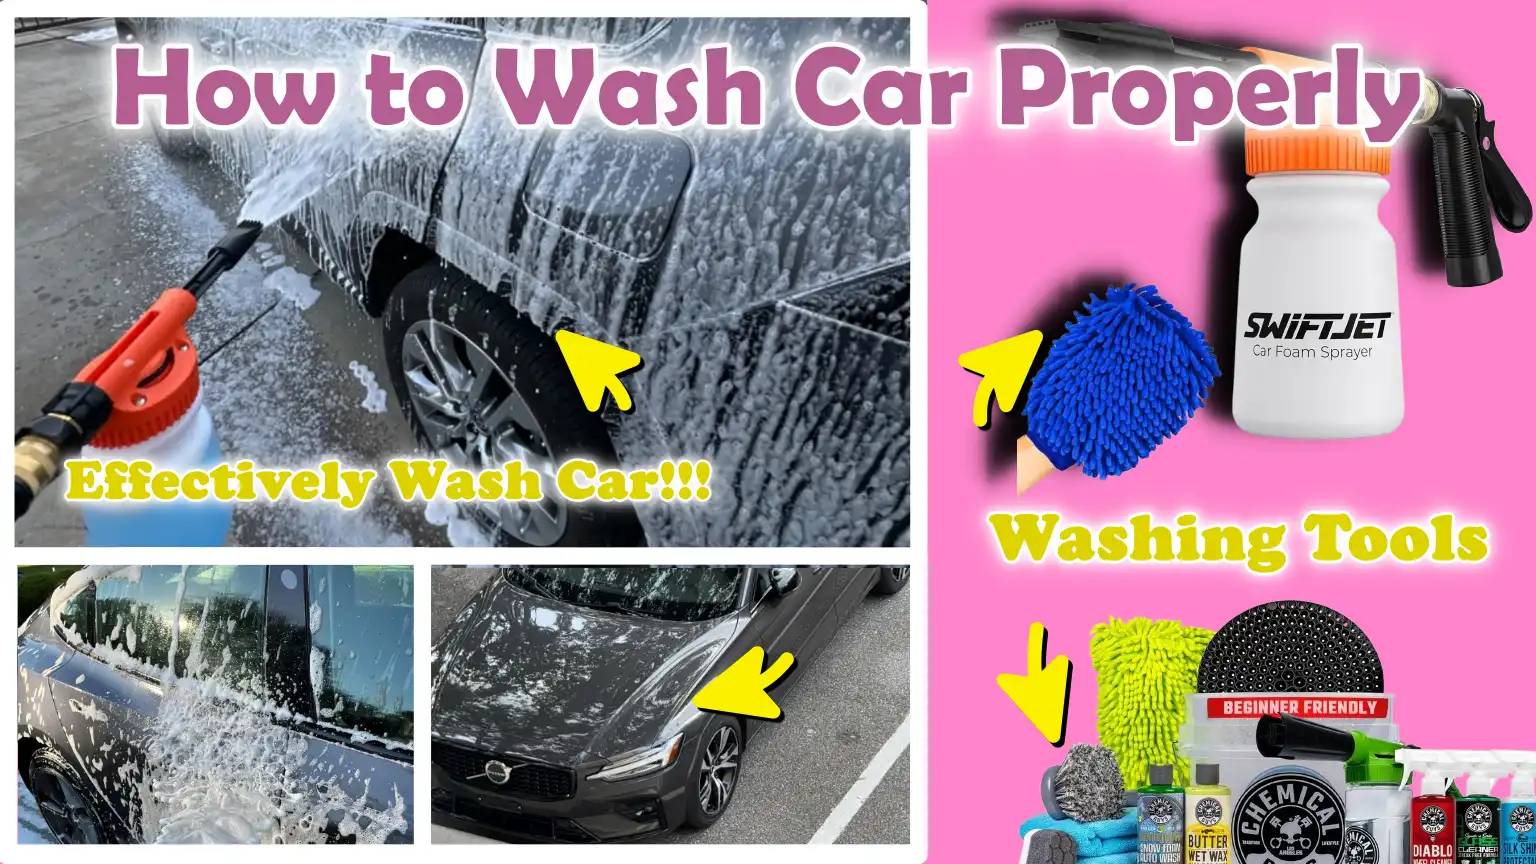
So, in this guide you’ll learn more pleasing method on How to Wash Car Properly, so that you can have better looking vehicle everytime you wash it.
Tools
| Tool / Supply | How to Use It | Why It’s Needed |
|---|---|---|
| Car wash soap – pH-balanced | Mix it with water according to the instructions provided on the label. Use a wash mitt (glove) to apply it to the car. | It protects the paint and clear coat, preventing damage caused by the harsh chemicals often found in dish soap or household cleaners. |
| Two buckets – wash + rinse | Keep soapy water in one bucket and use a second bucket to rinse the mitt after each pass over the car’s surface. | This prevents dirt and grit from accumulating on your mitt, thereby protecting the paint from scratches and swirl marks. |
| Microfiber wash mitt | Dip the mitt into the soapy water and gently wipe the car from top to bottom. Rinse the mitt frequently. | It is soft and highly absorbent, effectively removing dirt without scratching the paint surface. |
| Soft brushes – wheels & tires | Use a specialized brush to scrub and clean the tires and rims. Rinse the brush frequently. | It safely removes brake dust, dirt and grime, protecting the paint from damage caused by abrasive particles. |
| Hose or pressure washer | Rinse the car with water both before and after washing; use gentle pressure when spraying near painted surfaces. | It loosens dirt and debris, helping to prevent scratches, and serves to thoroughly remove any soap residue. |
| Drying towels – microfiber or chamois | Pat or gently glide it over the surface after washing. Avoid scrubbing vigorously. | It absorbs water without scratching the surface, thereby preventing water spots and streaks. |
| Foam cannon – optional | Connect it to a pressure washer or garden hose and spray a layer of foam onto the car before washing. | It pre-soaks the surface, gently lifting away dirt; this minimizes direct contact between the paintwork and abrasive particles, serving as a safer alternative to direct scrubbing. |
| Grit guard – optional | Place it at the bottom of the bucket; rub your wash mitt against it to dislodge dirt before re-dipping it into the clean water. | It traps dirt and grit at the very bottom of the bucket, preventing these contaminants from adhering to the surface and scratching the paintwork. |
| Wheel cleaner – optional | Spray it onto the wheels and rims; scrub clean with a brush; and then rinse thoroughly with water. | It effectively removes brake dust and grime that ordinary soap cannot tackle, while also providing protection against rust. |
How to Choose the Right Place and Time
1. Avoid Direct Sunlight
Washing your car in direct sunlight might seem convenient, but it can lead to serious problems.
When the car’s surface is hot, water and soap dry out very quickly, leaving behind water spots and soap residue.
These spots are often difficult to remove and over time, they can dull the paint’s shine.
Hot surfaces also reduce the effectiveness of soaps and waxes, making it difficult to clean the car thoroughly and achieve a smooth, glossy finish.
2. The Best Time: Early Morning or Late Afternoon
The best time to wash a car is either in the early morning or in the late afternoon.
During these times, the sun is lower in the sky and temperatures are cooler, ensuring that water and soap do not dry out too rapidly.
This allows you to work meticulously, ensuring that every part of the car is thoroughly cleaned without any streaks, spots, or soap residue.
3. Use a Shady Spot If Possible
If washing your car in the early morning or late afternoon isn’t feasible, always try to park the car in a shady spot.
Shade protects the paint from harsh UV rays and slows down the drying process.
This gives you more time to properly wash and dry the car, thereby reducing the risk of scratches or water spots forming on the surface.
4. Why Hot Surfaces Damage Paint During Washing
Hot surfaces can exacerbate minor imperfections already present in the paint, making them appear much more prominent.
Rapidly drying water and soap can deposit minerals that penetrate deep into the paint’s top layer (the clear coat), resulting in permanent stains.
Furthermore, rubbing a hot surface increases the likelihood of scratches, as dirt and dust particles adhere more readily to the paint and cause damage during the rubbing process.
By washing your car on a cool surface and under proper lighting, you protect the paint, preserve its shine and make the washing process significantly safer and more effective.
Know, What To Do Before Washing the Car – The First Essential Step
1. Removes Loose Dirt and Debris
Before applying any soap or scrubbing with a wash mitt, it is crucial to thoroughly rinse your car with water.
This step helps remove loose dirt, dust and small particles that have accumulated on the surface from driving or outdoor parking.
If these particles are not removed beforehand, they can act like sandpaper during the washing process, causing tiny scratches and swirl marks on the paintwork.
Proper pre-washing ensures that most of the loose debris is washed away before the wash mitt or sponge even comes into contact with the surface.
2. Prevents Scratches During Contact Washing
Pre-washing the car significantly reduces the risk of scratching during the washing process.
When you rub an unrinsed car with a wash mitt or sponge, any residual dirt remaining on the surface can abrade against the paint.
This friction causes fine scratches and, over time, dulls the car’s shine.
By pre-washing, you create a clean surface that is safer to touch, allowing the soap and mitt to glide easily over the paint without causing any damage.
3. Use Gentle Water Pressure
While pre-washing is essential, using gentle water pressure is equally important.
The intense stream from a pressure washer, if held too close to the surface, as it can strip away paint or drive dirt deeper into fine crevices.
Using a hose with moderate pressure or a pressure washer on a low setting allows the water to remove dirt without damaging the paint or seals.
Start from the top of the car and work your way down, allowing gravity to assist in clearing debris from the surface.
Proper pre-washing lays the foundation for a safe and effective car wash, minimizing the risk of damage and leaving the car looking cleaner and shinier.
At First, You Should Start by Cleaning the Wheels and Tires
1. Why Should You Clean the Wheels Before the Car Body?
Wheels and tires are often the dirtiest parts of a car, as they accumulate brake dust, road grime and mud.
If you wash the car body first and then clean the wheels, dirt and brake dust can splash or drip onto the car’s freshly cleaned paintwork.
This can render all your hard work futile and if this grime comes into contact with your wash mitt, it can even cause scratches on the car’s surface.
Cleaning the wheels first ensures that no heavy dirt contaminates the clean parts of the car, thereby protecting the paint and preserving the vehicle’s shine.
2. Use Separate Tools for the Wheels
It is crucial to use brushes, mitts and sponges specifically designed for wheels and tires.
The grime accumulated on wheels is often tougher and more abrasive than ordinary dirt; it consists of tiny metal particles shed from brake pads mixed with coarse road debris.
Using separate tools prevents ‘cross-contamination’, meaning you avoid transferring this abrasive grime onto the car body’s delicate paintwork.
With the help of specialized tools, you can thoroughly clean even tight corners and crevices without causing any damage to other surfaces of the car.
3. Remove Brake Dust and Grime
If brake dust is allowed to sit on the wheels for too long, it can cause significant damage.
Thoroughly cleaning it off using a wheel cleaner and a soft-bristled brush helps prevent issues such as surface damage, discoloration, or pitting on alloy and chrome finishes.
Carefully scrubbing the tires and rims ensures that all stubborn grime is removed, thereby enhancing both the aesthetic appeal and the longevity of the wheels.
4. Tip: After cleaning the wheels, do not reuse the same soiled wash mitt on the car’s paintwork
Once you have finished cleaning the wheels, never use the same mitt or brush to wash the car’s body.
Even the slightest trace of brake dust or grit can inflict scratches and swirl marks on the paint.
Always use a clean, soft microfiber wash mitt when washing the car’s body.
Adopting this practice safeguards your paintwork, preserves the car’s shine and delivers a professional-quality finish.
Use the Two-Bucket Washing Method
With Bucket 1: Clean Soapy Water
The first bucket contains water mixed with car-washing soap.
This soapy solution is used to clean the car’s surface and remove dirt accumulated on the paintwork.
Using a separate bucket for the soapy water ensures that your wash mitt remains as clean as possible while you apply the soap evenly across the car.
The soap helps break down grease, road grime and other impurities, without damaging the car’s protective top layer (clear coat), making it easier to wash away the dirt safely.
Use Bucket 2: Rinse Water
The second bucket contains only clean water and is used to rinse the wash mitt after every pass over the car’s surface.
This step removes dirt, dust and gritty particles from the mitt before it is dipped back into the soapy bucket.
Rinsing the mitt between each use prevents dirt from being transferred back onto the car’s surface, a common cause of swirl marks and scratches.
By keeping the mitt clean, you ensure that the washing process remains both safer and more effective.
3. How This Minimizes Swirl Marks and Scratches
Using two separate buckets significantly reduces the risk of swirl marks and scratches, as it prevents abrasive dirt particles from coming back into contact with the paint.
When dirt becomes trapped in a mitt that has not been properly rinsed, it can rub against the surface during washing, leading to fine scratches.
The two-bucket method ensures that dirt is continuously removed, allowing the wash mitt to glide effortlessly across the car’s surface, resulting in a safe, glossy finish.
4. Use a Grit Guard for Better Results
A Grit Guard is a simple mesh insert placed at the bottom of the wash bucket.
It traps dirt and particles, keeping them submerged and away from the wash mitt.
This further prevents abrasive debris from being transferred back onto the car’s surface during the washing process.
Using a Grit Guard in conjunction with the two-bucket method maximizes paint protection, minimizes the risk of scratches and helps maintain a smooth, glossy finish after every wash.
How to Wash the Car from Top to Bottom
1. Start from the Roof, Then Windows, Then Hood, Then Sides, Then Lower Panels
When washing your car, it is crucial to follow a top-to-bottom sequence.
Begin with the roof, then clean the windows, hood and sides and finally, clean the lower panels.
This order prevents dirt and grime, which typically accumulate most heavily on the lower sections, from spreading to areas that have already been cleaned.
Washing from top to bottom ensures a more effective and thorough cleaning, while also reducing the risk of dirt particles scratching the paintwork.
2. Move Your Hand in Straight Lines – Avoid Circular Motions
Moving your hand in straight lines with a microfiber mitt or sponge is safer for your car’s paint than using circular motions.
Rubbing in circles can create swirl marks on the paint specially on dark-colored cars, where scratches and imperfections are more visible.
Moving your hand in a straight line removes dirt from the surface more effectively, minimizes friction and helps preserve the clear coat that protects the paint.
3. Rinse Your Wash Mitt Frequently in a Clean Bucket
While washing your car, it is essential to frequently rinse your wash mitt in a separate bucket of clean water.
Doing so dislodges the dirt and grime trapped within the mitt, allowing you to return it to the bucket of soapy water without contaminating it with debris.
If you skip this step, dirt can remain trapped in the mitt; when you subsequently rub it against the paint, it can cause scratches.
Frequent rinsing keeps the mitt clean and ensures that every stroke is both safe and effective.
4. Focus on the Heaviest-Soiled Areas Last
The lower sections of the car, particularly the wheel arches and rocker panels, typically accumulate the most dirt, mud and road grime.
By cleaning these areas last, you prevent dirt from spreading onto surfaces that have already been cleaned, thereby also reducing the risk of scratches.
Cleaning the heavily soiled areas after the rest of the car ensures a uniform and glossy finish across the entire surface.
How to Rinse It Thoroughly
1. Remove All Soap Residue
After washing the car, it is crucial to rinse away all traces of soap completely.
Any soap residue left on the surface can leave streaks, diminish the shine and, over time, even damage the clear coat.
Soap residue can also attract dust and dirt, causing the car to look dirty again very quickly.
A thorough rinse ensures that the car is completely clean and ready for the subsequent detailing steps, such as drying or waxing.
2. Start from the Top and Work Your Way Down
When rinsing, always begin with the upper sections of the car and work your way down toward the lower panels.
Gravity assists in carrying the soap and water downward, ensuring that dirt and cleaning products are washed away effectively.
This method prevents streaking and avoids leaving concentrated soap spots on the upper surfaces, making the rinsing process more efficient and safer for the paintwork.
3. Ensure Soap Does Not Dry on the Surface
Allowing soap to dry on the car can lead to water spots and mineral deposits; these are difficult to remove and, if left for too long, can leave deep etch marks in the paint.
Rinse each section thoroughly and dry it immediately afterward, or continue rinsing all sections before the soap has a chance to dry.
Keeping the surface wet throughout the rinsing process is essential for protecting the paint and achieving a smooth, streak-free finish that enhances the car’s aesthetic appeal.
Now, Easily Dry the Car
1. Use Microfiber Drying Towels
After washing, it is crucial to dry the car using soft microfiber towels rather than ordinary cloths or old rags.
Microfiber absorbs a significant amount of water, remains gentle on the paintwork and minimizes the risk of scratching the surface.
It effectively absorbs residual water droplets, ensuring the paint remains smooth and spotless.
Using the right towels ensures that the car retains its shine and that its clear coat remains undamaged.
2. Pat-Drying vs Drag-Drying (Avoid Vigorous Rubbing)
When drying the car, the best approach is to either pat the surface dry or gently drag the microfiber towel across the panels, rather than rubbing vigorously.
Rubbing too hard can cause minor scratches, specially if small dust particles remain on the surface.
Pat-drying or gently dragging the towel allows for safe water absorption while preserving the paint’s smoothness and luster.
3. Preventing Water Spots and Streaks
Residual water on the surface can evaporate quickly, leaving behind spots or streaks caused by minerals present in the water.
These water spots are difficult to remove and, over time, can dull the car’s finish.
Thoroughly drying the car immediately after washing mitigates this risk, keeping the paint surface clean, shiny and protected.
4. Optional: Use an Air Blower for Crevices
You can use an air blower to expel water from hard-to-reach areas, such as door edges, mirrors, grilles and around the trim.
This prevents moisture from accumulating in tight spaces, thereby eliminating the risk of rust or water spots.
Using an air blower in conjunction with microfiber towels ensures that the car dries completely, remains protected and is ready for any additional detailing tasks, such as waxing or sealing.
How to Apply Wax or Sealant – Optional, but Recommended
1. Enhances Shine and Protection
Applying car wax or a paint sealant after washing the car boosts its luster and imparts a smooth, glossy finish.
Wax fills in tiny imperfections present in the clear coat, creating a uniform surface that reflects light more evenly.
Sealants, which are synthetic products, offer similar protection, but their effects last longer.
Both wax and sealants act as a protective shield over the paint, keeping the car looking fresh and shiny for an extended period.
2. Helps Repel Dirt and Water
A layer of wax or sealant renders the car’s surface hydrophobic, meaning water droplets bead up and slide off easily.
Consequently, dirt, dust and other contaminants also slide off rather than adhering to the paint.
By repelling water and dirt, waxing or sealing reduces the need for frequent car washes, prevents water spots and protects the paint from environmental damage caused by UV rays, acid rain and bird droppings.
3. Frequency: Every 2–3 Months
For optimal protection, it is recommended to apply wax or sealant every two to three months.
Natural waxes may require more frequent application, whereas synthetic sealants tend to last longer.
Regular application ensures that the protective shield remains effective, the paint stays safeguarded against contaminants and the car’s glossy appearance is consistently maintained over time.
Adopting a regular schedule for waxing or sealing is the most effective way to preserve your car’s finish and extend its lifespan.
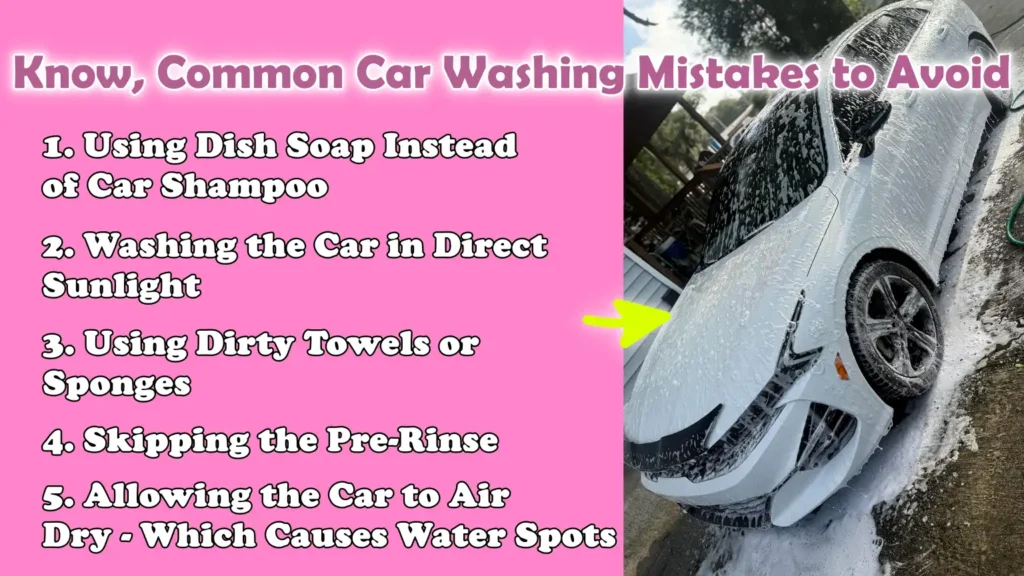
Know, Common Car Washing Mistakes to Avoid
Plus, there’s scientific research that shows that washing liquids and methods actually influences the surface properties of automotive paint such as: roughness and gloss, also there’s study in Materials that shows that appropriate wash solutions literally reduces surface roughness and helped to maintain the reflection quality after the repeated cleaning cycles, that clearly shows that proper washing techniques protect paint finish and visual quality over the time as well.[¹]
1. Using Dish Soap Instead of Car Shampoo
Many people mistakenly use dish soap or household cleaners to wash their cars, believing that this will result in a more thorough cleaning.
Dish soap is far too harsh for car paint, as it strips away the paint’s natural oils and protective wax layers, leaving the topcoat (clear coat) completely unprotected.
This can cause the paint to fade, diminish its shine and even lead to long-term damage.
Therefore, it is crucial to use a proper car shampoo, as it is specifically formulated to effectively clean the vehicle without harming the paint or its protective layers.
2. Washing the Car in Direct Sunlight
Washing your car in direct sunlight might seem convenient, but it often causes more harm than good.
The sun’s heat causes water and soap to dry out very quickly, leaving behind streaks and water spots on the vehicle’s surface.
Cleaning products also become less effective on hot surfaces and the risk of scratching the paint increases significantly.
Choosing a shaded area or washing the car during the cooler parts of the day prevents these issues, ensuring the car remains both safe and spotless.
3. Using Dirty Towels or Sponges
Reusing dirty towels or sponges is a common mistake that can lead to scratches and swirl marks on the paintwork.
Dirt or dust particles trapped within the towel or sponge act like sandpaper when rubbed against the car’s surface.
Always use clean microfiber towels or wash mitts and rinse them frequently to remove any accumulated dust particles.
Keeping your cleaning tools clean protects the paint and ensures that the car’s surface remains smooth and glossy.
4. Skipping the Pre-Rinse
Failing to pre-rinse the car before washing can be highly detrimental.
Any loose dirt, dust, or debris remaining on the car’s surface can rub against the paint during the washing process, potentially causing scratches.
Pre-rinsing removes the majority of this grime, making the washing process safer and significantly reducing the risk of scratching.
Proper washing techniques are essential for keeping the car’s surface clean and scratch-free.
5. Allowing the Car to Air Dry – Which Causes Water Spots
Allowing the car to air dry naturally after washing can result in water spots and mineral deposits forming on the paint.
These spots are difficult to remove and, over time, can diminish the paint’s luster.
Using a microfiber towel immediately after washing, or employing a gentle drying method, prevents water spots, keeps the paint smooth and delivers a glossy, professional-quality finish.
Read More:
- How to Fix Backup Camera Not Working
- How to Fix Bluetooth Not Working in Car
- How to Update Car Infotainment System
- How to Fix Speedometer Not Working
How Often Should You Wash Your Car?
1. General Rule: Every 1–2 Weeks
A good rule of thumb for washing your car is to do so once every one to two weeks.
Regular cleaning removes dirt, dust and other debris before they can damage the paint or clear coat.
Consistent washing also maintains the car’s appearance and luster and prevents the accumulation of harmful substances such as: road salt or bird droppings, that can cause long-term damage.
2. Factor: Weather Conditions
Weather plays a significant role in how often you should wash your car.
After heavy rain, snowfall, or storms, it is essential to clean the car immediately to remove mud, road salt, or other grime.
In dusty or windy weather, a layer of dust particles can settle on the paint; if left unattended for too long, these particles can scratch the surface.
Adjusting your washing frequency based on weather conditions ensures that the paint remains protected and looks clean.
3. Factor: Driving Environment
Where and how you drive also influences how often your car needs to be washed.
City driving exposes the car to more dust, pollution and brake dust, while highway driving can lead to an accumulation of grime, insects and other road debris.
Driving on rough or rural roads results in the buildup of mud, sand and other dirt, which requires immediate cleaning.
Understanding your driving environment helps you determine when an extra wash is needed to protect the paint and prevent damage.
4. Factor: Parking – Garage vs Outdoors
Where you park your car affects how quickly it gets dirty.
Cars parked outdoors are more susceptible to the effects of sun, rain, dust and tree sap; consequently, they may require more frequent washing.
Vehicles kept in a garage or covered space remain shielded from various weather hazards, allowing for longer intervals between washes.
Taking parking conditions into account ensures that your car is cleaned at appropriate intervals, thereby preserving the quality of its paintwork and maintaining its overall condition.
Know, The Pro Tips for a Pro-Level Finish
1. Use a Foam Cannon for Pre-Soaking
A foam cannon is a tool that attaches to a pressure washer or hose to spray a thick layer of foam onto the car before washing.
This foam adheres to the surface and gently lifts dirt, dust and other impurities away from the paint.
Pre-soaking with a foam cannon reduces friction when using a wash mitt, thereby minimizing the risk of scratches and swirl marks.
It also allows the soap to work more effectively, making the washing process gentler and safer for the car’s finish.
2. Clay Bar Treatment for Deep Cleaning
Even after washing, tiny particles such as: brake dust, industrial fallout and environmental contaminants, as it can remain embedded in the paint.
A clay bar treatment removes these embedded impurities without damaging the clear coat.
Regular use of a clay bar restores surface smoothness, enhances gloss and prepares the surface for waxing or sealing.
This professional technique ensures that the paint is thoroughly clean, even at a microscopic level, giving the car a brilliant, flawless appearance.
3. Use a Detailing Spray After Drying
After drying the car, applying a detailing spray enhances gloss and smoothness, while also removing minor water spots or fingerprints.
Detailing sprays are formulated to add an extra layer of protection and give the surface a more brilliant shine.
They are easy to use and boost the performance of waxes or sealants, helping to maintain the car’s showroom-fresh look in the time between full washes.
Regular use of a detailing spray ensures that the paintwork always looks fresh, clean and professionally maintained.
5. Clean Windows Separately for a Flawless Finish
Once the main car-washing process is complete, the windows and mirrors should be cleaned using a specialized glass cleaner and a microfiber towel.
Cleaning the glass separately ensures that no soap residue or water spots remain, elements that can obstruct vision and compromise visibility.
Proper window cleaning enhances safety and gives the car a neat, gleaming appearance, delivering a pro-level finish that elevates both the aesthetics and functionality of the vehicle.
Conclusion – How to Wash Car Properly
Literally, having clean and shining car is visual statement, that shows how you care your vehicle, even with this method you can avoid swirl marks as well.
By adopting the right techniques such as: choosing the appropriate location and time, pre-rinsing, using specialized tools for the wheels, employing the two-bucket washing method, washing from top to bottom, rinsing thoroughly, drying carefully and optionally applying wax or sealant, you can prevent scratches, swirl marks, water spots and other common forms of wear and tear.
Regular and meticulous washing also safeguards the car against environmental hazards such as: road salt, brake dust, bird droppings and UV rays, which can gradually degrade the paint’s luster.
Incorporating professional-grade tips such as: utilizing foam cannons, clay bar treatments, detailing sprays and proper glass-cleaning methods, further enhances the shine, allowing you to achieve a showroom-quality finish right at home.
Now, that’s all from this guide from How to Wash Car Properly, even you can ask related questions in the comment section below.
Frequently Asked Questions
FAQ 1: How often should I wash my car?
It is advisable to wash your car every one to two weeks. Regular washing removes dust, dirt and other contaminants before they can damage the paintwork. The frequency of washing may depend on the weather, driving conditions and where you park your vehicle. Cars exposed to heavy rain, snow, road salt, or dust may require more frequent cleaning, while vehicles kept in a garage may need to be washed less often. Regular washing helps maintain the shine, prevents scratches and extends the lifespan of the paint.
FAQ 2: Can I use dish soap instead of car shampoo?
No, dish soap is not suitable for car paint. Dish soaps are designed to strip grease and oil from dishes, which means they will also strip away the natural oils and protective wax from your car. This can leave the paint looking dull, dry and more susceptible to scratches. Car shampoos are specifically formulated to clean effectively without damaging the clear coat, ensuring that the paint remains smooth, glossy and protected.
FAQ 3: Why is it important to pre-rinse my car?
Pre-rinsing removes loose dirt, dust and debris from the surface before you begin washing. If you skip this step, these particles can scratch the paint when you use a wash mitt or sponge. Pre-rinsing ensures that most of the dirt is safely washed away, thereby minimizing friction and preventing swirl marks and scratches on your car during the washing process.
FAQ 4: Why should I wash the wheels before the car body?
Wheels and tires are the dirtiest parts of a car, often caked with brake dust, mud and road grime. Cleaning them first prevents dirt from spreading to areas that have already been cleaned. Using separate tools for the wheels also ensures that brake dust or grit does not scratch the paintwork. Washing the wheels first keeps the entire car cleaner and safer, while also minimizing the risk of damage to the bodywork.
FAQ 5: What is the two-bucket washing method and why is it important?
The two-bucket method involves using one bucket filled with soapy water and a second bucket filled with clean water. After using your wash mitt on the car, you rinse it in the second bucket to remove dirt and debris and then dip it back into the soapy water. This method significantly reduces the risk of scratches and swirl marks, as dirt is not reapplied to the paint surface. Using a grit guard in the wash bucket further enhances this process by trapping dirt at the bottom of the bucket.
FAQ 6: Why should I wash the car from top to bottom?
Starting from the top and washing downwards ensures that dirt and water from the upper sections do not run down onto surfaces you have already cleaned. This prevents water spots and reduces the likelihood of dirt being reapplied to the paint. Washing from top to bottom makes the process more efficient and safer, leaving the car looking absolutely spotless, swirl-free and gleaming.
FAQ 7: Is drying the car really necessary?
Properly drying the car is absolutely essential. Allowing a car to air-dry causes the water to evaporate; however, this leaves behind water spots and mineral deposits, which can dull the paint’s shine and become difficult to remove later. Using soft microfiber towels or a chamois cloth to dry the surface immediately after washing prevents water spots and streaks, keeping the paint surface smooth and glossy. Air blowers can also be used to dry tight spaces, such as around mirrors and grilles.
FAQ 8: Should I use wax or a sealant on my car?
Applying wax or a sealant is a matter of personal preference, but it is highly recommended. Wax adds shine to the car and creates a protective layer that helps repel dirt, water and minor contaminants. Sealants are synthetic products that offer benefits similar to wax, but their protection lasts for a longer duration. Applying these products every two to three months keeps the paint surface smooth and glossy, while also protecting it from environmental damage such as UV rays, acid rain and road grime.
FAQ 9: What common mistakes should be avoided when washing a car?
Common mistakes include using dishwashing soap instead of car shampoo, washing the car in direct sunlight, reusing dirty towels or sponges, failing to pre-rinse the car and allowing the car to air-dry. These errors can lead to issues such as scratches, swirl marks, water spots and paint fading. Following proper techniques, using the right tools and paying attention to every detail ensures a clean, safe and professional-quality car wash.
References:
[1] Influence of Reclaimed Water on the Visual Quality of Automotive Coating
https://pmc.ncbi.nlm.nih.gov/articles/PMC11547185/

Hello Folks, Dean Shali here to help you out to solve the problems with your lovely vehicle, as i have lots of experience and knowledge about automotive industry as i woks directly with the customers and repair vehicles and i love to help the people to keep their cars safe and running smoothly.