Written By: Dean Shali
Fact Checked By: Sabré Cook
Reviewed By: Tamara Warren
Sometimes, ignition relay problem actually looks like having major engine failure, but in reality that is just a tiny switch that losing its ability to pass power and that’s all you have to fix.
The “IGNITION RELAY” is the tiny electrical switch and it is the part of your vehicle’s control system and it is used to safely manage the flow of the power from the battery to the starter circuit.
Yes, even though it is small and inexpensive thing, but the failure can completely stop a car from starting at all, that’s the reason that it gets confusion as these symptoms looks very similar to the weak battery or having a faulty starter motor as well.
In fact, most of the time drivers literally spends unnecessary money to replace that larger parts when the real issue is just a worn out or burnt out relay contact inside the fuse box.
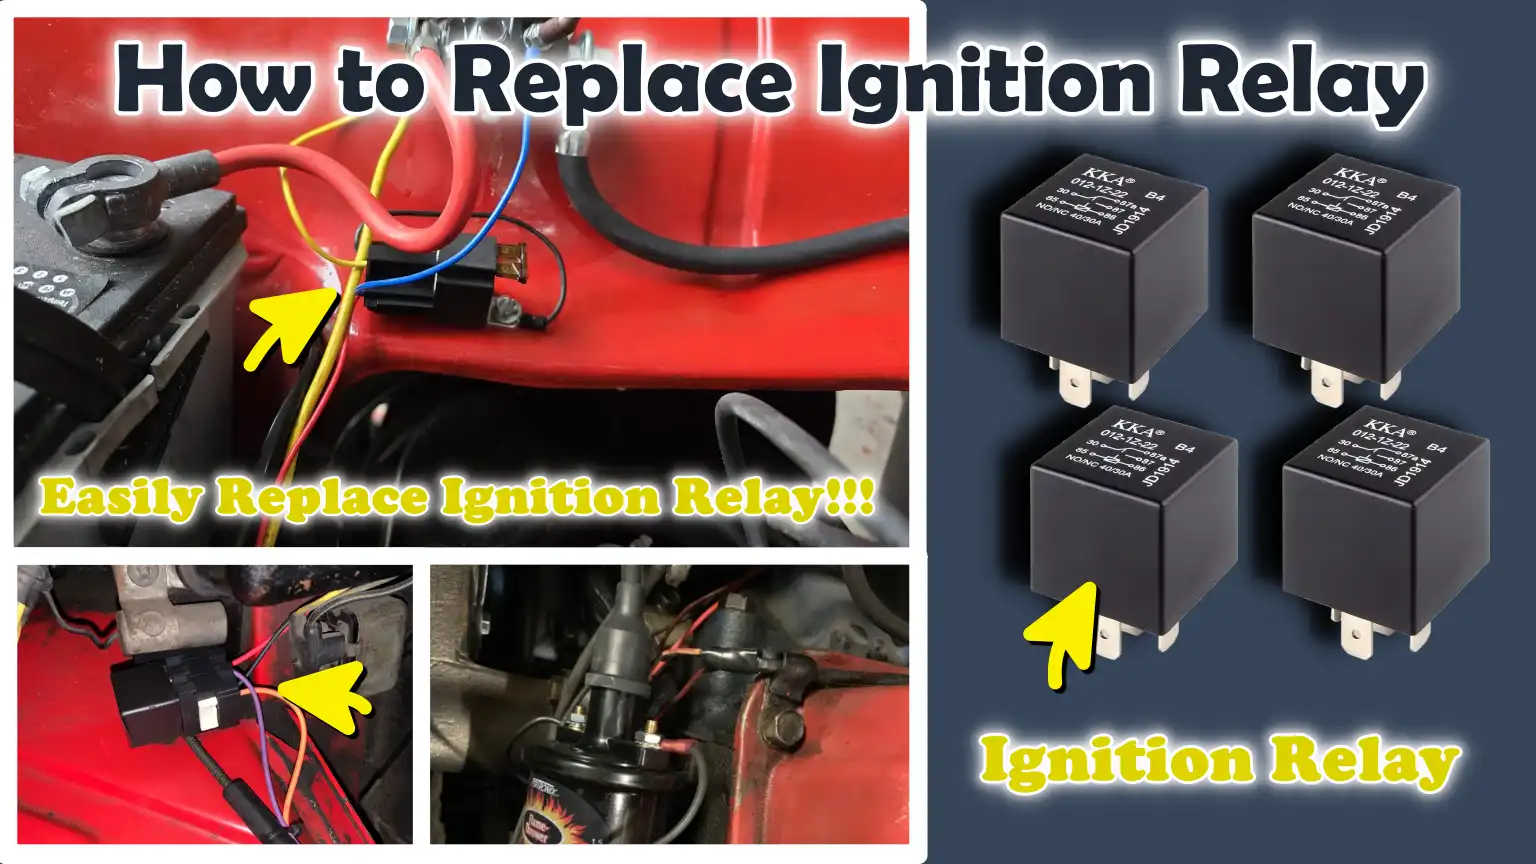
Now, that’s the proper guide about How to Replace Ignition Relay so that you can easily recognize the warning signs and understand how the system works, so that you can safely replace the ignition relay without any problem.
Now, Let’s Understand About the Ignition Relay System
1. What is an Ignition Relay and How Does It Work?
An ignition relay is a small electrical switch that controls the flow of electricity within your vehicle’s starting system.
It utilizes a low-power signal received from the ignition switch to activate an internal coil.
Once activated, it completes the circuit, allowing a higher current to flow to major systems, such as the starter circuit.
This prevents the ignition switch from having to handle heavy electrical loads and enhances the overall reliability of the system.
Without this relay, the ignition system would degrade very rapidly due to the direct flow of excessive current.
2. The Difference Between the Ignition Relay, Starter Relay and Ignition Switch
The ignition switch is the component you turn or press to start the car and it initiates the initial electrical signal.
The ignition relay receives that signal and helps manage the distribution of power to various ignition circuits.
The starter relay is the component that sends power directly to the starter motor to crank the engine.
Simply put, the ignition switch issues the command, the ignition relay manages the signal and the starter relay delivers the power required to start the engine.
Each component performs a distinct function; however, a malfunction in any one of them can result in similar starting-related issues.
3. Where is the Ignition Relay Typically Located in Most Vehicles? – Fuse Box, Engine Bay, Under the Dashboard
In most vehicles, the ignition relay is housed inside a fuse box.
It is typically located either in the engine bay, often near the battery, or inside the cabin, underneath the dashboard.
In some cars, it may also be situated within a side panel near the driver’s footwell.
This relay is a small plug-in component, which is often marked on the fuse box cover or referenced in the diagram provided in the owner’s manual.
Its location may vary across different models; therefore, checking the label on the fuse box is the quickest and most accurate way to locate it.
Know, The Signs That You Need to Replace the Ignition Relay
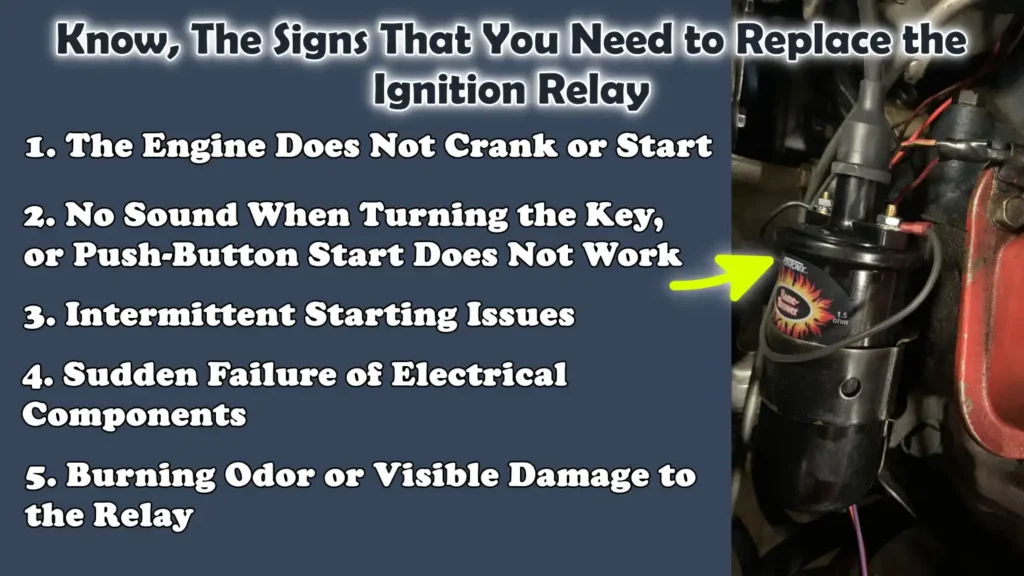
1. The Engine Does Not Crank or Start
The most common sign of a faulty ignition relay is that the engine does not crank at all.
You may turn the key or press the start button, but nothing happens because the relay is failing to send power to the starter circuit.
This often appears to be a serious engine issue; however, in many cases, the relay simply fails to close the internal switch required to allow electrical current to flow.
When this occurs, the vehicle remains completely silent or unresponsive when you attempt to start it.
2. No Sound When Turning the Key, or Push-Button Start Does Not Work
A properly functioning starting system typically produces at least a distinct “click” sound or the sound of the engine cranking.
If you hear no sound whatsoever while attempting to start the car, it may be an indication that the ignition relay is not engaging.
In vehicles equipped with a push-button start, the system may fail to respond entirely, or the dashboard lights may illuminate, but the engine itself does not turn over.
This happens because the relay fails to send the necessary activation signal to initiate the starting process.
3. Intermittent Starting Issues
Occasionally, a faulty ignition relay does not stop working completely but instead becomes unreliable.
Consequently, the car may start successfully at times, while failing to start at others, often appearing to follow no discernible pattern.
Heat generated within the relay, or wear on its internal contacts, can cause intermittent interruptions in the connection, which may fail completely at any moment.
This type of issue can be particularly frustrating because the vehicle may start normally after sitting idle for a while, yet present difficulties when you attempt to restart it later.
4. Sudden Failure of Electrical Components
A faulty ignition relay can also impact other electrical systems within the vehicle.
You may notice flickering dashboard lights, the radio resetting, or certain accessories suddenly ceasing to function.
This occurs because the relay is responsible for delivering stable electrical signals to various parts of the ignition circuit.
When it begins to fail, the electrical current becomes unstable and erratic, leading to peculiar electrical malfunctions.
5. Burning Odor or Visible Damage to the Relay
In more severe cases, a faulty ignition relay may emit a faint burning odor or display clear signs of overheating.
Excessive heat accumulation within the relay can cause its plastic casing to appear melted, discolored, or warped.
This typically indicates that its internal contacts have been subjected to excessive load or have become completely worn out.
If you observe these signs, the relay should be replaced immediately to prevent any further electrical issues or damage to surrounding components.
Tools
| Tools or Materials | Why It Is Needed | How to Use It |
|---|---|---|
| New Ignition Relay – OEM or Compatible Replacement | This is the primary component that replaces a faulty relay and restores the normal flow of electricity within the ignition system. | First, match the part number of the old relay or consult the diagram provided on the fuse box. Then, firmly insert the new relay into the same slot until it seats properly. |
| Owner’s Manual or Fuse Box Diagram | This helps you identify the precise location of the ignition relay, thereby preventing you from accidentally removing the wrong component. | Before touching anything, consult the vehicle’s owner’s manual or the diagram on the fuse box cover to locate the relay specifically labeled for the ignition or starter system. |
| Needle-Nose Pliers or Relay Puller | This tool is used to safely extract the old relay from tight slots within the fuse box, ensuring that no damage is caused to surrounding components. | Grasp the relay gently and pull it straight out, without twisting, to prevent bending its metal pins. |
| Gloves and Safety Glasses | These protect your hands and eyes from accidental contact with electricity, dirt, or the sharp edges often found inside the fuse box. | Put them on before you begin working and keep them on until the relay replacement process is complete. |
| Multimeter – Optional for Testing | This helps verify whether the relay is receiving power and confirms that it is functioning correctly before you proceed with a replacement. | Set the multimeter to voltage or continuity mode and test the relay’s terminals in accordance with the vehicle’s specific wiring guide. |
Take Safety Precautions Before Starting Work
1. Disconnecting the Battery – Negative Terminal First
Before beginning work on the ignition relay, the most critical safety step is to disconnect the vehicle’s battery.
To minimize the risk of an electrical short circuit, always remove the negative terminal first.
This halts the flow of current through the system, thereby helping to protect both you and the vehicle’s sensitive electronics.
If the battery remains connected, accidental contact between a tool and an unintended metal point could result in sudden sparks or damage.
2. Ensuring the Ignition is Turned Off
Before commencing any work, ensure that the ignition is completely turned off, or that the push-button start system has been fully deactivated.
This guarantees that no electrical signals within the starting system are active while you are handling the relay.
Even minor signals within the system can trigger unintended electrical activity; therefore, confirming a complete “off” status helps prevent sudden starts or malfunctions.
3. Avoiding Moisture or Metal Contact Near the Fuse Box
Throughout this entire process, the area surrounding the fuse box must remain dry and clean.
Moisture can lead to short circuits or corrosion, potentially compromising electrical connections.
Furthermore, avoid placing metal tools or loose objects near the fuse box while working, as accidental contact could generate sparks or damage delicate terminals.
Maintaining a controlled and tidy work environment helps mitigate the risk of electrical faults.
4. Handling the Relay with Care to Prevent Terminal Damage
The relay features small metal pins that connect it to its socket; if handled roughly or carelessly, these pins can bend or break.
When removing or installing a relay, it should always be pulled straight outward or pushed straight inward; it should not be twisted or forced.
Careful handling ensures that the terminals remain properly aligned and prevents damage to the sockets inside the fuse box.
This helps maintain a strong and stable electrical connection after replacement.
How to Locate the Ignition Relay
1. Consulting the Diagram on the Fuse Box Cover
The first and easiest method for locating the ignition relay is to consult the diagram printed on the fuse box cover.
Most modern vehicles feature a clear map that indicates the specific location of every relay and fuse.
This diagram allows you to quickly identify which slot controls the ignition system without having to rely on guesswork.
It is crucial to read the labels carefully; while different relays may appear identical in appearance, they perform distinct functions within the vehicle’s electrical system.
2. Using the Vehicle Owner’s Manual
If the fuse box cover does not provide complete information, the vehicle owner’s manual serves as the next reliable resource.
The manual typically contains a detailed chart of fuses and relays, pinpointing the exact location of the ignition relay.
It may also include diagrams for both the engine bay fuse box and the interior fuse panel.
This helps prevent confusion, particularly in vehicles equipped with multiple fuse boxes or complex electrical layouts.
3. Common Locations in the Engine Bay and Interior Fuse Panels
In most vehicles, the ignition relay is situated in one of two primary locations.
In many cars, it is housed within the engine bay fuse box, typically located near the battery, as this provides direct access to high-current circuits.
In other vehicles, it is located inside the cabin, beneath the dashboard, often near the steering column or within the driver-side footwell.
Some models may also feature a secondary fuse panel hidden behind a side access panel.
Knowing these common locations makes the task of finding the relay significantly faster and easier.
4. Correctly Identifying Markings on the Relay
The relays housed within the fuse box often appear identical; therefore, correctly identifying the specific relay is crucial.
Typically, depending on the manufacturer, the ignition relay bears markings such as ‘Ignition,’ ‘IGN,’ or ‘Start’.
Do not confuse this with the starter relay or accessory relay, as these control distinct systems.
Carefully cross-referencing the relay’s position with the diagram ensures that you are working on the correct component, thereby preventing the unnecessary removal of other parts.
How to Remove an Old Ignition Relay
1. Safely Opening the Fuse Box
To begin the process of removing the ignition relay, first carefully open the fuse box cover, avoiding the use of excessive force.
Most fuse boxes feature clips or tabs that hold the cover in place; therefore, gently lift or unlatch it to open.
Before opening the fuse box, it is crucial to ensure that the ignition is turned off and the battery is disconnected.
This minimizes the risk of electrical short circuits and maintains system safety while you are working around sensitive electrical components.
2. Identifying the Correct Relay
Once the fuse box is open, the next step is to correctly identify the ignition relay.
To locate its exact position, refer to the diagram printed on the fuse box cover or consult your vehicle’s owner’s manual.
The relays inside the box often look similar, so careful identification is essential to avoid removing the wrong relay.
Depending on the vehicle model, the ignition relay may be labeled “IGN” or “Ignition”.
Double-checking your identification before removing the relay helps prevent unnecessary damage or confusion.
3. Pulling the Relay Straight Out Without Twisting
After confirming the correct relay, grasp it firmly using your fingers or a specialized relay removal tool.
Pull the relay straight upward or outward, depending on its orientation, and strictly avoid twisting or rocking it.
Twisting can bend the metal pins and damage the socket located inside the fuse box.
A steady, straight pull is the best method for safely removing the relay.
If the relay feels stuck, gently wiggling it while pulling straight out may help to loosen it; This should not require excessive force.
4. Inspecting the Relay Socket for Corrosion or Defects
After removing the relay, carefully inspect the socket where it was seated.
Check the metal terminals for signs of corrosion, dirt accumulation, or burn marks.
These signs may indicate overheating or a poor electrical connection, which could necessitate cleaning or further repairs.
The socket should appear clean and dry and its terminals should be straight and free from any damage.
Inspecting this component ensures that a robust and reliable connection is established when the new relay is installed.
How to Install a New Ignition Relay
1. Aligning the Pins Correctly with the Socket
Before installing the new ignition relay, carefully align its metal pins with the corresponding socket located inside the fuse box.
Every relay has a specific pin layout; therefore, it must match the shape and orientation of the socket precisely.
Correct alignment is crucial, as forcing the relay in the wrong direction can bend the pins or damage the electrical contacts.
Before inserting the relay, take a moment to compare the new relay with the old one to ensure that their orientations are identical.
2. Firmly Pressing the Relay into Place
Once the pins are correctly aligned, press the relay into the socket using gentle and even pressure.
When the pins are aligned correctly, the relay should slide in easily without any obstruction.
A firm push is usually sufficient to seat it fully into its designated spot.
This step ensures that the internal contacts are properly connected, thereby maintaining a stable flow of electricity within the ignition system.
3. Seating It Securely, Without Force
After inserting the relay, verify that it is seated securely and does not feel loose.
It should sit flush inside the fuse box and be aligned with the other surrounding relays.
If it does not slide in easily, do not force it, as doing so can damage both the relay and the socket.
Instead, remove it and re-align the pins correctly before attempting to insert it again.
When seated correctly, it should feel natural and very little pressure should be required to lock it into place.
4. Double-Checking for Proper Placement
Finally, to ensure that the relay has been inserted into the correct slot, consult the fuse box diagram or the vehicle’s owner’s manual.
This confirms that no errors occurred during the installation process.
A visual inspection helps verify that the relay is fully seated and correctly positioned.
Proper placement is crucial, as even a minor error can prevent the ignition system from functioning correctly.
How to Reconnect the Power and Test It
1. Reconnecting the Battery
After installing the new ignition relay, the first step is to reconnect the vehicle’s battery.
To safely restore the proper flow of electricity, always connect the positive terminal first, followed by the negative terminal.
Ensure that the terminals are connected firmly and securely so that no connections remain loose.
A stable battery connection is crucial, as even slight looseness after the repair can lead to difficulties in starting the vehicle or interruptions in the power supply.
2. Turning the Ignition Key or Pressing the Start Button
Once the battery is reconnected, get inside the vehicle and turn the ignition key or press the start button, exactly as you normally would.
This action sends a signal through the ignition system, thereby activating the newly installed relay.
If the relay is functioning correctly, the system should respond smoothly and without any hesitation.
It is important to perform this step calmly and observe how the vehicle responds during the starting process.
3. Checking the Engine’s Response
Pay close attention to how the engine responds when you attempt to start it.
With a properly functioning ignition relay, the engine should crank immediately and start up without any delay.
If the relay replacement was successful, you should notice a distinct improvement compared to the previous “no-start” or “weak start” conditions.
Any delays, repetitive clicking sounds, or a complete lack of response could indicate another underlying issue that requires further investigation.
4. Verifying the Proper Functioning of Electrical Components
After confirming that the engine has started correctly, inspect the vehicle’s other electrical systems to ensure that everything is functioning normally.
This includes dashboard lights, the radio, power windows and other such components that rely on continuous ignition power.
All components should operate smoothly, without any flickering or electrical fluctuations.
This final check confirms that the ignition relay has been installed correctly and that the vehicle’s electrical system is stable and fully restored.
Read More:
How to Solve If the Problem Persists
1. Checking Battery Condition and Voltage
If the engine still fails to start even after replacing the ignition relay, the first step is to check the condition of the battery.
A weak or discharged battery can exhibit symptoms that closely resemble those of a faulty relay.
The battery must possess sufficient voltage to power the starter system; if the voltage is too low, the starter motor will be unable to function correctly.
In many instances, corrosion on the battery terminals or an aging battery can also impede the flow of electricity; therefore, both the battery’s voltage level and its physical condition should be carefully inspected.
2. Checking the Starter Motor and Starter Relay
If the battery is in good condition, the next step is to inspect the starter motor and the starter relay.
The starter motor is responsible for cranking (starting) the engine; if it is worn out or defective, the engine will not start, even if the ignition relay is functioning properly.
The starter relay should also be checked, as it works in conjunction with the ignition system.
A malfunction in either of these components can lead to issues such as the engine failing to start; therefore, a thorough inspection is crucial before proceeding to replace other parts.
3. Checking Fuses Related to the Ignition System
Fuses serve to protect your vehicle’s electrical circuits; a blown (faulty) fuse can interrupt the flow of electricity to the ignition system.
If replacing the ignition relay does not resolve the issue, it is essential to check all relevant fuses located within the fuse box.
A defective fuse may appear burnt or broken internally, thereby preventing power from reaching the relay or the starter circuit.
Replacing a blown fuse is often a simple solution; however, it requires a careful examination of the fuse diagram to correctly identify the specific fuse in question.
4. Checking Wiring and Ground Connections
If all major components are functioning correctly yet the problem persists, the wiring and ground connections should be inspected.
Loose, damaged, or corroded wires can interrupt the electrical signals necessary to start the engine.
Ground connections are particularly critical, as they complete the vehicle’s electrical circuits.
If a ground point is weak or corroded, it can lead to intermittent starting issues or a complete cessation of electrical flow.
Ensuring that all wiring and grounding points are clean, secure and intact helps restore proper electrical flow throughout the entire system.
Know, Some Common Mistakes While Replacing the Ignition Relay to Avoid
Plus, there’s research that shows that vibration actually increases the electrical contact resistance inside the relays, that leads to the intermittent failures or complete the switching loss in automotive systems, as this is really important for ignition relays as even small contact instability that can prevent the proper power delivery to the starter circuit, as engineers actually uses vibration testing to ensure the relays that can survive real-world driving conditions without failures as well.[¹]
1. Installing the Wrong Type of Relay
One of the most common mistakes is using the wrong type of ignition relay for the vehicle.
Even if a relay looks identical on the outside, its internal ratings or pin layout may differ, characteristics that might not be compatible with your car’s electrical system.
Installing the wrong relay can lead to starting difficulties, electrical malfunctions, or even damage to other components.
Therefore, it is crucial to always double-check the part number or refer to the specific specifications outlined in the vehicle’s owner’s manual.
2. Failing to Disconnect the Battery Before Replacing the Relay
Failing to disconnect the battery before replacing an ignition relay is a significant safety oversight.
Even when the engine is turned off, electrical current continues to flow through the ignition system; working on the system without cutting the power can result in short circuits or accidental sparks.
This can also cause damage to the sensitive electronic components found in modern vehicles.
Disconnecting the battery first creates a safe working environment, thereby protecting both you and your vehicle.
3. Forcing the Relay into the Socket
Another common mistake is attempting to force a relay into the socket when it does not fit easily.
The relay’s pins and the socket are designed to align in a specific configuration; if you face resistance, it indicates that the relay is not positioned correctly.
Forcing it in can bend the pins, damage the socket, or result in a loose connection, any of which can lead to recurring issues with starting the vehicle.
When installed correctly, the relay should slide into the socket easily with very light pressure.
4. Ignoring Rusted or Damaged Terminals
Many people overlook the condition of the relay socket when replacing a component.
Rust, dirt accumulation, or burnt terminals can prevent proper electrical contact, even if the new relay itself is functioning correctly.
Ignoring these signs can lead to recurring starting issues or cause the new relay to fail prematurely.
Cleaning or repairing the socket before installing the relay ensures a robust and stable connection, thereby guaranteeing reliable engine starting.
Know, Cost and Time Estimates
1. Average Cost of Replacing an Ignition Relay
The cost of replacing an ignition relay is typically lower than many other car repairs, as the component itself is small and simple.
In most cases, the relay is an inexpensive part; however, the total cost may depend on the vehicle model and whether you choose an OEM part or a compatible aftermarket alternative.
For some vehicles, the cost may be slightly higher due to design differences or the presence of an integrated fuse box system.
Overall, this is generally considered one of the most affordable repairs within a vehicle’s starting system.
2. Time Required for DIY Replacement – Typically 10 to 30 Minutes
Replacing an ignition relay is usually a quick task, provided you already know its exact location.
In most vehicles, the process of locating, removing and installing the relay takes approximately 10 to 30 minutes.
The time required depends primarily on how easily accessible the fuse box is and how clearly the relay is labeled.
If the fuse box is very crowded or located in a hard-to-reach area, the process may take a little longer; nevertheless, it remains one of the quickest electrical repairs you can perform yourself.
3. When to Seek Professional Help
Although replacing an ignition relay is a straightforward task, there are certain situations where seeking professional assistance is advisable.
If the vehicle still fails to start after replacing the relay, or if you feel unsure about identifying the correct replacement part, a mechanic can perform a proper electrical diagnostic on the vehicle.
If clear signs of faulty wiring are visible, if fuses are blowing repeatedly, or if there is evidence of corrosion inside the fuse box, it is advisable to seek professional assistance.
In such situations, the problem may not be limited solely to the relay but could run much deeper; in these instances, having the vehicle inspected by an expert can help you avoid unnecessary parts replacements and prevent further damage to the vehicle.
Conclusion – How to Replace Ignition Relay
Now, you have clearly understood that ignition relay are smallest components that can literally controls the biggest outcomes in the car’s performance.
It functions as a control switch, safely regulating the flow of electricity between the battery, the ignition switch and the starter system.
When it begins to fail, its symptoms are often mistakenly attributed to more serious issues such as: a weak battery or a faulty starter motor; therefore, having a proper understanding of this component and thoroughly inspecting it is absolutely essential.
In many cases, drivers face problems such as a “no-crank” condition (the engine failing to turn over), intermittent starting, or a complete ignition failure, and the root cause is often that the relay is no longer able to properly handle or transmit the electrical current.
Replacing an ignition relay is often considered one of the simplest tasks in automotive maintenance.
With the right tools, proper component identification and adherence to basic safety guidelines, the entire process can typically be completed in a very short time, requiring no specialized or advanced mechanical skills.
However, success in this task depends on your attention to detail such as: selecting the correct type of relay, ensuring it is securely seated and checking the fuse box for any signs of damage or corrosion.
So, that’s all about this one and you can ask questions with the help of comment section.
Frequently Asked Questions
FAQ 1: What is an ignition relay and what does it do?
Answer: An ignition relay is a small electrical switch that controls the flow of electricity within your vehicle’s starting system. It activates when you turn the key or press the start button, allowing power from the battery to reach essential components, such as the starter circuit. Its primary function is to safely handle high electrical loads, thereby protecting the ignition switch itself from damage. If the ignition relay is not functioning correctly, the engine may fail to start at all, even if the battery is in good condition.
FAQ 2: What are the signs of a failing ignition relay?
Answer: A failing ignition relay often exhibits clear warning signs, such as the engine failing to crank, receiving no response when turning the key, or the vehicle failing to start whatsoever. In some instances, the vehicle may start intermittently, starting sometimes but not others; this is referred to as an “intermittent starting issue.” You may also notice certain electrical irregularities, such as flickering dashboard lights or a sudden loss of power. In severe cases, you might detect a burning odor or observe visible damage within the fuse box area.
FAQ 3: Can a faulty ignition relay completely prevent a vehicle from starting?
Answer: Yes, a faulty ignition relay can indeed completely prevent a vehicle from starting. This occurs because the relay is responsible for delivering power to the starter system. If it fails internally, the electrical signal never reaches the starter motor. Consequently, the engine will neither crank nor make any sound of attempting to start, even if the battery and other systems are functioning correctly.
FAQ 4: Where is the ignition relay typically located in most vehicles?
Answer: In most vehicles, the ignition relay is housed inside a fuse box. This fuse box is usually situated either in the engine bay (near the battery) or inside the vehicle, beneath the dashboard. Some vehicles may also feature additional fuse panels located in side compartments. The exact location can vary depending on the specific vehicle model; therefore, the most reliable method for locating it is to consult the fuse box diagram or the owner’s manual.
FAQ 5: How do I know if I have replaced the correct relay?
Answer: To ensure that you have replaced the correct relay, you should always cross-reference the component with the fuse box diagram or the owner’s manual before removing anything. After installing the relay, start the vehicle to test it and observe whether the previous issues persist. If the engine starts normally and the electrical systems function correctly, it generally indicates that the correct relay has been replaced. If the problem persists, it may be an indication that a different component is causing the issue.
FAQ 6: Will I need any special tools to replace the ignition relay?
Answer: In most cases, you will not require any special tools to replace the ignition relay. Common tools such as: needle-nose pliers or a relay removal tool, as it can assist in safely extracting the old relay. The most essential item for this task is a new replacement relay. Some individuals also use a multimeter to check for electrical continuity (current flow), although this is not strictly necessary. The most critical aspect of this process is correctly identifying the component and handling it safely.
References:
[1] Vibration Analysis and Electrical Contact Resistance Assessment for Automotive Relays
https://www.researchgate.net/publication/379293351_Vibration_Analysis_and_Electrical_Contact_Resistance_Assessment_for_Automotive_Relays

Hello Folks, Dean Shali here to help you out to solve the problems with your lovely vehicle, as i have lots of experience and knowledge about automotive industry as i woks directly with the customers and repair vehicles and i love to help the people to keep their cars safe and running smoothly.