Written By: Dean Shali
Fact Checked By: Sabré Cook
Reviewed By: Tamara Warren
If the parking brake is not fully releasing then it can waste the fuel and also damaged your wheels without any additional warning.
This is really serious problem, as it can be ignored for months, sometimes even years; which is known as Parking Brake Dragging.
Basically, this happens when the parking brake does not fully release, that can literally cause the brake pads or shoes or shoes to stay slightly pressed against the wheel.
So, even this small contact creates the constant friction; which can lead to the overheating, reduced fuel efficiency, uneven brake wear and in some worst cases: it damages the wheel bearings and brake components over time.
Also, in real-world automotive service data; the brake drag is often linked to common issues such as: corroded cables, weak return springs, misadjusted brake systems or dirt and rust buildup inside the mechanisms.
Plus, what really horrifies is that it often develops slowly, so drivers actually adapt without any notice of the performance loss.
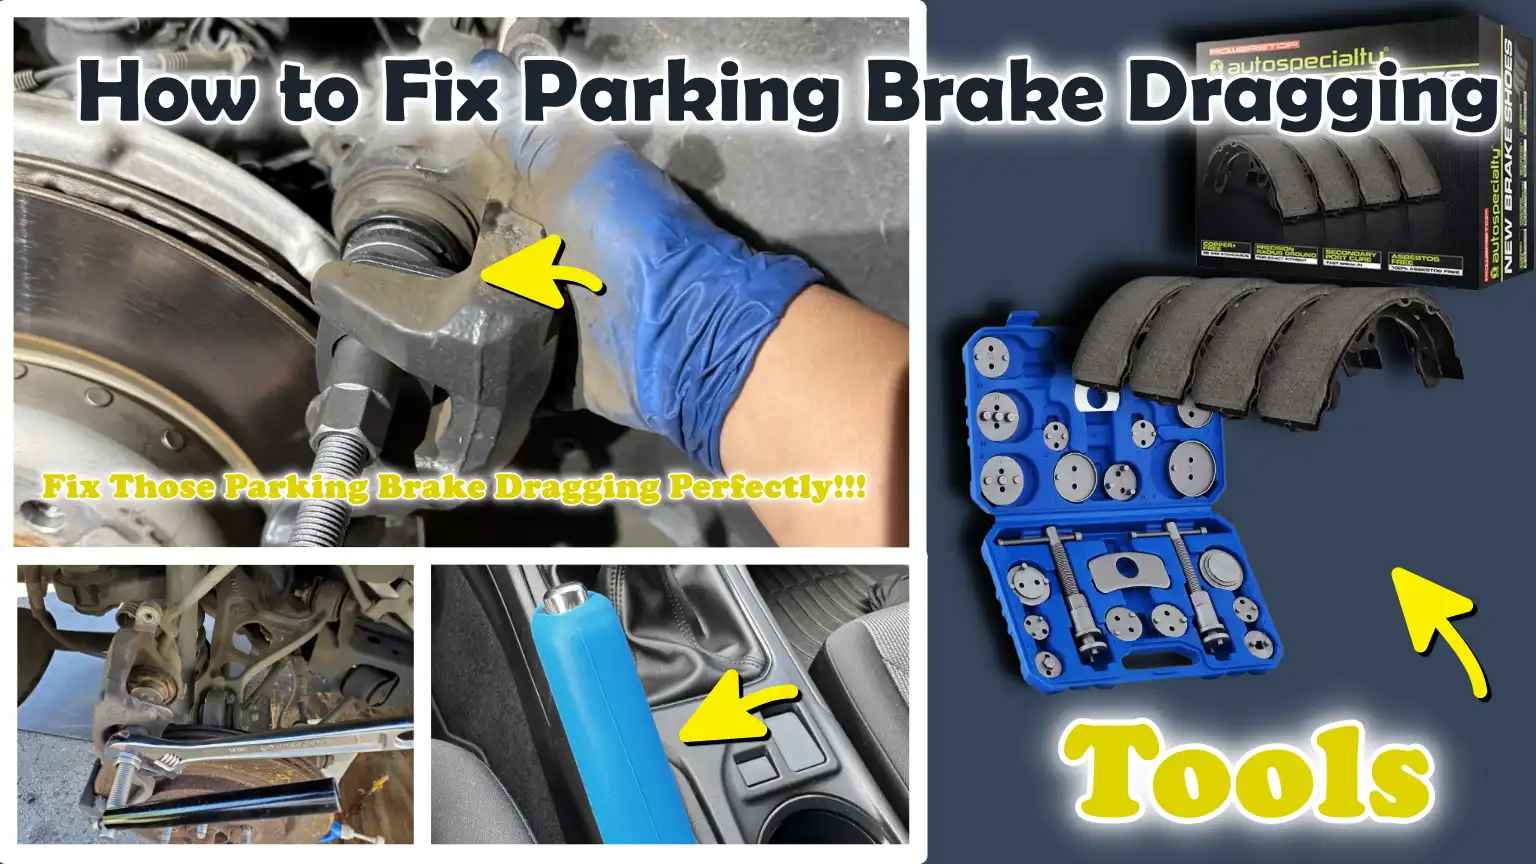
So, in this guide you’ll learn How to Fix Parking Brake Dragging so that you can restore the proper balance, efficiency and safety to a system as well.
Now, Let’s Understand How the Parking Brake Actually Works?
The parking brake is a simple yet vital component of your vehicle’s braking system.
It is designed to keep the vehicle stationary while it is parked.
It operates independently of the main hydraulic braking system, the system you engage by pressing the brake pedal.
Rather than utilizing fluid pressure, it employs a mechanical system, meaning it relies on physical components such as cables, levers and springs.
When you pull the parking brake lever or depress the pedal, it creates tension in a metal cable that runs from the cabin to the rear wheels.
This tension forces the brake components to press firmly against the wheel or rotor, thereby locking the wheel in place and preventing it from moving.
When you release the parking brake, this tension should be completely relieved, allowing the wheels to rotate freely once again.
If any part of this system fails to disengage fully, even slightly, it can result in continuous friction, leading to brake drag, excessive heat generation and reduced performance while driving.
1. The Basic Functioning of a Cable-Operated Parking Brake
In most vehicles, the parking brake operates via a cable-operated system.
When you engage the parking brake, a lever or pedal pulls on a steel cable that runs along the underside of the vehicle.
This cable is connected to the braking mechanism located at the rear wheels.
As the cable tightens, it presses the brake shoes (located inside the drums) or brake pads (located inside the calipers) firmly against the rotating surface.
This action generates friction and locks the wheel, thereby preventing the vehicle from rolling forward or backward.
When you release the parking brake, the cable should go completely slack and internal springs pull the brake components back to their original positions.
This process of ‘releasing’ is just as crucial as the process of ‘engaging’ the brake.
If the cable becomes rusted, stretched, or gets stuck due to dirt or moisture, it may fail to return fully to its original position; consequently, the brake components remain partially engaged, creating a ‘drag’ while driving.
2. Drum vs Disc Parking Brake Systems
Parking brake systems primarily fall into two categories, drum-based and disc-based, and both operate in slightly different ways.
In a drum parking brake system, brake shoes are situated inside a circular drum attached to the wheel.
When the parking brake is applied, the brake shoes expand outward and exert pressure against the inner surface of the drum, thereby bringing the wheel to a halt.
This system is simple and effective, particularly for keeping a parked vehicle stationary.
In disc brake systems, the mechanism differs slightly.
Some vehicles utilize the rear disc brake calipers themselves to engage the parking brake, while others feature a small drum brake built directly into the disc rotor, often referred to as a “drum-in-hat” design.
In both instances, the objective remains the same: to generate the necessary friction to prevent the wheel from rotating.
However, disc systems are more susceptible to the effects of dust and moisture; if not properly maintained, the likelihood of components seizing or wearing out prematurely increases.
3. The Role of Cables, Calipers and Return Springs
Every component within a parking brake system performs a specific function and even a minor fault in a single component can compromise the overall efficiency of the entire system.
The function of the cable is to transmit force from the lever or pedal to the braking system and it must operate smoothly and without obstruction.
If it becomes stuck due to rust or damage, it will be unable to function correctly.
Calipers or brake shoes are the components that actually generate friction by applying pressure to the rotor or drum; therefore, they must be able to move freely to ensure that the brakes engage and disengage properly.
When the parking brake is released, return springs play a crucial role in restoring the brake components to their original position.
These springs ensure that once you cease using the parking brake, no residual pressure remains within the braking system.
If the springs weaken or break, or if a caliper jams due to an accumulation of dust or rust, the brakes will not fully disengage, resulting in continuous contact and constant brake wear.
Understand About Common Causes of Parking Brake Dragging
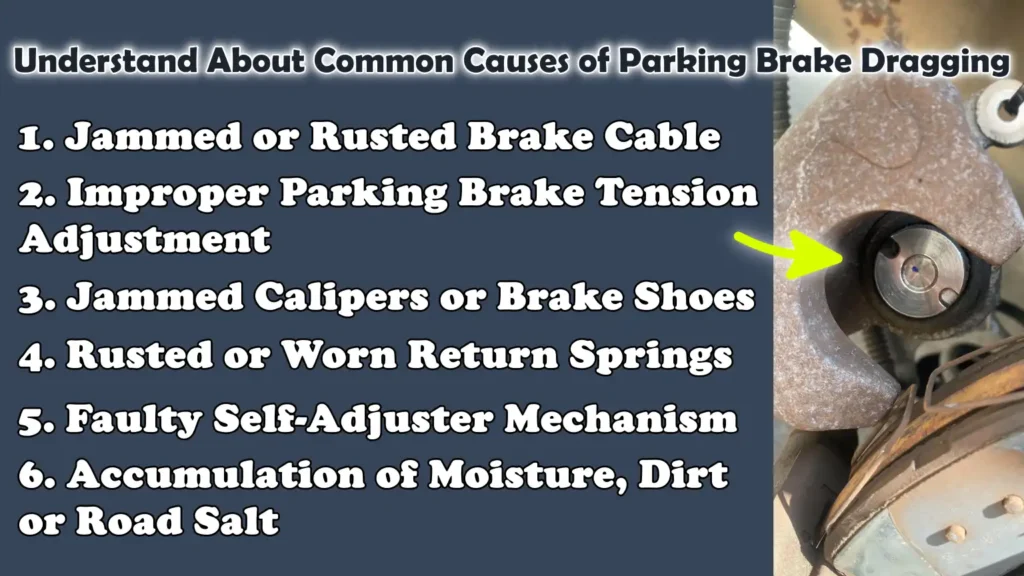
Parking brake dragging typically occurs when one or more components of the system fail to return to their fully disengaged position.
Even a slight residual pressure can keep the brake pads or shoes pressing lightly against the wheel, resulting in continuous friction while driving.
Over time, this friction generates heat, reduces fuel efficiency and causes uneven wear on the brake components.
The root causes are often mechanical in nature and develop gradually, which is why many drivers fail to detect the problem in its early stages.
Understanding these causes helps you identify the issue early on and resolve it before it escalates into a major malfunction.
1. Jammed or Rusted Brake Cable
The most common cause of parking brake dragging is a faulty brake cable.
This cable runs along the underside of the vehicle, exposing it to water, dust and varying weather conditions; this increases the risk of rust and deterioration over time.
When rust accumulates inside the cable’s housing (sheath), it prevents the cable from retracting smoothly after the parking brake is released.
Consequently, the cable remains slightly taut, causing the brakes to remain partially engaged even while the vehicle is in motion.
In cold or wet weather, moisture can freeze or cause internal stiffness, further exacerbating the problem.
A jammed cable often results in continuous dragging on one or both of the rear wheels.
2. Improper Parking Brake Tension Adjustment
The parking brake system requires a precise amount of tension to function correctly.
If the brakes are adjusted too tightly, the cable will not fully disengage when released, causing pressure to persist on the brake components.
This can occur following an incorrect manual adjustment or due to general wear and tear within the system over time.
Conversely, if the brakes have been recently serviced and adjusted incorrectly, they may begin to malfunction immediately.
Proper adjustment ensures that the parking brake holds the vehicle firmly in place when engaged and fully disengages when not in use.
Even a slight misalignment can result in constant contact between the brake components and the wheel.
3. Jammed Calipers or Brake Shoes
In disc brake systems, the calipers, or in drum systems, the brake shoes, must be able to move freely to engage and disengage correctly.
Over time, these components can jam or seize due to the accumulation of dust, rust, or a lack of lubrication.
In disc systems, the caliper pistons or sliding pins may fail to retract fully, causing the brake pads to remain in slight contact with the rotor.
In drum systems, the brake shoes may fail to retract properly after the brakes have been applied.
This sticking action generates constant friction and heat, which not only causes the brakes to seize but also accelerates component wear and degrades braking performance.
4. Rusted or Worn Return Springs
Return springs are small yet critical components that assist in pulling the brake shoes or mechanism back to their resting position after the parking brake has been released.
If these springs become weak, stretched, rusted, or broken, they lose their ability to fully retract the brake components.
This means that the brakes may remain partially engaged even when the system is supposed to be fully disengaged.
As these springs are under constant tension and exposed to adverse weather conditions, they can deteriorate over time without any obvious warning, until the brakes begin to seize.
5. Faulty Self-Adjuster Mechanism
Many vehicles feature a self-adjusting mechanism that automatically maintains the correct clearance between the brake shoes and the drum, or adjusts the parking brake system over time.
If this mechanism malfunctions or seizes, it may over-tighten the brakes or fail to release them properly.
Dirt, rust, or wear and tear can prevent the adjuster from moving freely, resulting in excessive contact between the brake components.
When the system becomes over-adjusted, constant friction can occur even during normal driving, causing the brakes to seize and overheat.
6. Accumulation of Moisture, Dirt or Road Salt
Environmental factors play a significant role in parking brake issues.
Moisture from rain, mud, or car washes can infiltrate the brake system and lead to corrosion.
Dirt and debris can accumulate around moving parts, hindering their smooth operation.
In regions where road salt is used, the risk of corrosion increases significantly, as salt accelerates the rusting process on metal components.
Over time, this accumulation can affect cables, springs, calipers and adjusters, causing them to seize or restricting their movement.
This gradual obstruction often results in the brakes remaining partially engaged, and eventually seizing without any immediate warning.
How to Diagnose the Problem
To diagnose a dragging parking brake, you must carefully observe how the vehicle behaves both while driving and when stationary.
The objective is to determine whether the brakes are failing to fully disengage and to identify which specific component of the system is causing the issue.
This process does not always require highly advanced tools, but it does demand close attention to detail and safe handling of the vehicle.
By observing heat levels, physical movement and mechanical responses, you can narrow down the problem to a specific area such as: the cables, calipers, or adjustment mechanisms.
1. Visual Inspection of Brake Components
A visual inspection is the first and most critical step, as many issues can be identified without having to disassemble any parts.
Begin by examining the rear brake assemblies, including the cables, calipers and any exposed hardware.
Check to see if the brake cables appear damaged, corroded, or unevenly tensioned on either side.
Look for signs of rust, dirt accumulation, or broken components around the calipers or drum assemblies.
If you notice any fluid leaks, torn rubber boots, or excessive corrosion on moving parts, it may indicate that these components are unable to move freely.
A thorough visual inspection often reveals whether the system is physically binding or has become worn out.
2. Check Wheel Temperatures After a Short Drive
Heat is a definitive indicator of a dragging brake, as friction inevitably generates heat.
After driving the vehicle for a short distance, without applying the brakes forcefully, carefully check the temperature of each wheel.
You can do this by holding your hand close to the wheel’s surface; if the wheel feels excessively hot, do not touch it directly.
If one wheel feels significantly hotter than the others, it generally indicates that the brake components on that specific wheel remain in contact with one another, thereby generating friction.
In some instances, both rear wheels may become hot; this could signal a centralized issue, such as excessive cable tension or a problem related to the brake adjustment.
3. Jacking Up the Vehicle and Checking Wheel Rotation
Safely lifting the vehicle allows you to directly verify whether the wheels are rotating freely.
Once the vehicle is securely supported on jack stands, attempt to spin each rear wheel by hand.
If the brake system is functioning correctly, the wheel should spin easily, with only a slight amount of resistance felt due to the normal contact between the brake components.
If the wheel is difficult to turn, stops abruptly, or emits grinding or scraping sounds, it indicates that the brake is sticking.
It is beneficial to compare the wheels on both sides, as a discrepancy in resistance levels may point to a specific issue with one particular wheel.
4. Checking the Movement of the Parking Brake Lever
The movement of the parking brake lever (or pedal) can provide useful clues regarding the condition of the system.
When engaging the parking brake, it should engage firmly after traveling a specific distance, feeling neither too loose nor excessively tight.
If the lever feels extremely tight after moving only a short distance, it may indicate that the cable has been overtightened or is failing to release completely.
Conversely, if it feels excessively loose, the system’s adjustment may have shifted, or the components may be worn out.
Upon releasing the brake, the lever should return fully to its original resting position.
If it does not retract properly or feels stuck, this could indicate a problem with the cable or its internal mechanism.
5. Identifying Whether One or Both Wheels Are Stuck
Understanding whether one wheel or both are affected helps in quickly pinpointing the root cause of the problem.
If only one rear wheel is sticking, the issue is typically confined to that specific side such as: a stuck caliper, a jammed section of the cable, or a faulty spring.
If both rear wheels are sticking simultaneously, the problem is most likely linked to the central system such as: an improper cable adjustment, a jammed main cable, or an issue with the parking brake lever mechanism.
This comparative analysis minimizes the need for guesswork and helps you focus on the most probable cause of the problem.
How to Ensure Safety Before Repairing Parking Brake Drag
Working on a parking brake system may seem straightforward, but it involves lifting the vehicle and handling components that control wheel movement; therefore, safety is paramount.
Even a minor error such as: the vehicle suddenly rolling away or slipping off a jack, as it can result in serious injury.
Before commencing any repairs, you must ensure that the vehicle is stable, properly supported and that you are protected from dust, debris and sharp components.
Taking a few extra minutes to establish a safe working environment not only safeguards your well-being but also enables you to perform the work with greater confidence and precision.
1. Parking on a Level Surface
Always begin by parking the vehicle on a level and solid surface.
This is crucial because uneven ground can cause the vehicle to shift or roll, particularly while you are working on the braking system.
A level surface ensures that the vehicle’s weight is distributed evenly, thereby minimizing the risk of the vehicle moving if the parking brake needs to be disengaged during inspection or repair.
Hard surfaces, such as concrete, are ideal as they provide superior traction for tools like jacks and jack stands, whereas soft or loose ground can render the vehicle unstable.
2. Use of Wheel Chocks
Wheel chocks are simple blocks placed against the tires to prevent the vehicle from rolling.
These are particularly important when you are working on the rear brakes, as the repair process may require you to release the parking brake.
By placing chocks both in front of and behind the front wheels, you create a physical barrier that securely holds the vehicle in place, even if other systems were to fail.
This adds an extra layer of safety and helps prevent sudden movements while you are working underneath or alongside the vehicle.
3. Wearing Gloves and Eye Protection
Protective gear is often overlooked, yet it plays a crucial role in keeping you safe.
Dust, rust particles and debris can accumulate within the brake system, potentially causing irritation to your skin or eyes.
Wearing gloves protects your hands from sharp edges, hot surfaces and accumulated grime, while also providing a better grip on tools and parts.
Eye protection is equally vital, as small particles can fall or become airborne while you are cleaning or inspecting brake components.
Simple safety gear can prevent injuries that might otherwise interrupt your work or lead to long-term complications.
4. Ensuring the Vehicle is Fully Supported on Jack Stands
A car jack is useful for lifting a vehicle, but it is not designed to safely support the vehicle’s weight for extended periods.
Once the vehicle has been lifted, it is essential to support it using sturdy, correctly positioned jack stands.
These stands are designed to securely hold the vehicle in place and minimize the risk of a sudden collapse.
To maintain the vehicle’s stability, position them beneath solid sections of the frame or at the designated support points.
Never rely solely on the jack, as hydraulic failures or shifts in weight could cause the vehicle to fall without warning.
With proper support in place, you can safely inspect, repair and test the brake system without facing any unnecessary risks.
How to Fix Parking Brake Dragging – Beginner Friendly Steps
Fixing a dragging parking brake requires a meticulous and systematic approach, as this issue can stem from the interplay of several interconnected components.
The primary objective is to ensure that every part of the parking brake system moves freely and returns completely to its resting position after use.
This involves inspecting the cables, brake components and adjustment mechanisms.
By adopting a clear, step-by-step methodology, you can eliminate the source of constant friction, prevent heat buildup and restore the wheels’ ability to rotate freely.
Each step focuses on a specific part of the system and even minor adjustments can make a significant difference in the vehicle’s performance.
1. Loosening a Stuck Cable
A stuck cable is one of the most common causes of a dragging brake and should be the first item to be inspected.
Begin by examining the entire length of the cable located underneath the vehicle.
Look for any kinks in the cable, cracks in the outer casing, or signs of rust and dirt accumulation.
These issues can impede the cable’s movement and prevent it from fully retracting to its original position when the brake is released.
If the cable feels stiff or does not move freely, it may be partially seized internally.
In some cases, applying a suitable lubricant can resolve minor stiffness and restore the cable’s mobility.
However, if the cable is heavily corroded, damaged, or fails to retract properly even after lubrication, the safest and most effective solution is to replace it entirely, thereby permanently resolving the issue of a stuck brake.
2. Adjusting Parking Brake Tension
For the parking brake to function correctly, it is crucial that its tension is set to the precise level.
To adjust this, you must first locate the adjustment point; this is often found inside the vehicle near the parking brake lever, or underneath the vehicle along the cable assembly.
This adjuster controls how taut the cable becomes when the brake is applied.
If the cable is excessively tight, it will be unable to fully disengage, resulting in continuous friction between the brake components and the wheel.
Conversely, if it is too loose, the parking brake may fail to securely hold the vehicle in place.
The correct setting allows for a small amount of ‘free play’ (slack); this means the cable remains loose when the brake is not engaged, yet grips firmly when the brake is applied.
Maintaining this balance ensures that the system operates efficiently and without unnecessary friction.
3. Cleaning and Lubricating Components
Brake components are constantly exposed to dust, moisture and grime, which can negatively impact their movement over time.
Cleaning these components is essential for their proper functioning.
First, remove any visible dust and accumulated debris from areas such as the caliper sliders, brackets and contact points.
Any rust present should be carefully cleaned away, as it can impede movement and cause components to seize.
Following the cleaning process, applying a brake-safe lubricant to moving parts ensures that they slide smoothly and return to their proper resting positions.
Using the correct type of lubricant is crucial, specifically one capable of withstanding high temperatures without damaging rubber components.
Proper cleaning and lubrication minimize friction and binding, thereby ensuring that the system functions exactly as intended.
4. Repairing or Replacing Brake Components
If cleaning and adjustment procedures fail to resolve the issue, it may be necessary to repair or replace worn or damaged components.
Brake pads or shoes that have worn unevenly may remain in constant contact with the rotor or drum, leading to brake dragging.
Replacing these components restores uniform pressure and re-establishes the correct operating clearance required for effective performance.
Calipers that are seized or fail to retract properly may require repair or replacement, particularly if the piston or sliding mechanism is compromised.
Broken or weakened return springs must also be replaced, as they are responsible for retracting the brake components after use.
Addressing these specific components directly eliminates the root cause of the problem, thereby restoring normal brake functionality.
5. Resetting the Self-Adjusting Mechanism
Many parking brake systems incorporate a ‘self-adjusting’ mechanism.
This mechanism is designed to ensure that the brake components remain properly positioned over time, even as they experience wear.
If this mechanism becomes stuck or dislodged, it can exert excessive pressure on the brake drum or rotor.
‘Resetting’ this mechanism involves returning it to its correct starting position so that it can resume proper operation.
Although the specific procedure may vary slightly between drum and disc systems, the primary objective remains the same: to ensure that the appropriate clearance is maintained between the brake components when the parking brake is released.
Proper alignment guarantees that the brakes function effectively when needed and fully disengage thereafter, thereby preventing continuous friction or drag.
What are the Post-Repair Testing You Need to Do
Once repairs are complete, testing is the most critical step to ensure that the parking brake system is now functioning correctly.
Even if all components have been cleaned, adjusted, or replaced, it remains essential to test the system under real-world conditions to detect any residual drag.
Proper testing helps you verify that the wheels spin freely when the parking brake is released and lock securely when it is engaged.
It also aids in identifying minor issues that may not have been immediately apparent during the repair process such as: slight drag, uneven braking, or excessive heat buildup.
Taking the time to conduct thorough testing can prevent future damage and ensures that the vehicle is safe to drive.
1. Wheel Spin Test
The wheel spin test is a simple and straightforward method to check whether the brakes are fully disengaging.
After safely lifting and supporting the vehicle, manually spin each rear wheel.
A properly functioning brake system will allow the wheel to spin freely, with only a minimal, normal amount of drag felt from the brake components.
The wheel should continue to spin for a while rather than coming to an immediate halt.
If you face significant resistance, hear grinding or rubbing noises, or notice that spinning one wheel is more difficult than the other, it may indicate that the brake is still dragging.
Comparing both sides is helpful, as any discrepancy in rotational freedom could point to a lingering issue within a specific component.
2. Low-Speed Road Test
Once you have verified that the wheels are rotating freely, the next step is to carefully conduct a low-speed road test.
Drive the vehicle slowly in a safe area and pay close attention to how it handles.
The vehicle should move forward with ease, without feeling heavy or sluggish.
Acceleration should feel normal and there should be no pulling to either side.
During this test, gently engage and release the parking brake to ensure that it engages and disengages properly.
If the vehicle feels sluggish, struggles to move, or does not coast freely when you lift your foot off the accelerator, it may indicate that certain brake components are not fully disengaging.
3. Checking for Excessive Heat or Drag
Heat is a clear indicator of friction; therefore, it is essential to check for excessive heat after driving the vehicle for a short period.
After driving for a few minutes, without applying the brakes forcefully, stop the vehicle and carefully check the temperature near each wheel.
In a properly repaired system, the wheels should feel uniformly warm, but no single wheel should be excessively hot.
If one wheel feels significantly hotter than the others, it often indicates that the brake components on that side are still dragging.
You should also watch out for any burning odors, which can be a sign of continuous friction.
In addition to heat, pay attention to any signs of drag while driving such as: a diminished ability for the vehicle to coast freely, or a sensation that something is pulling the vehicle backward.
These signs help determine whether the repair was successful or if further adjustments are still required.
How to Prevent & Maintain Parking Brake In Perfect Manner
Preventing wear and tear on the parking brake is far easier and more cost-effective than repairing it after it has failed.
The parking brake system operates in a harsh environment, where it is constantly exposed to heat, dust, water and road debris.
Over time, these conditions can gradually compromise the ability of its components to move freely and disengage properly.
Simple, regular maintenance helps keep all components functioning correctly, reduces the risk of corrosion and ensures that the brake releases completely every time.
When the system is properly maintained, it not only enhances safety but also extends the lifespan of the brake components and ensures that the vehicle continues to operate smoothly without any unnecessary interruptions.
As well as, there’s research that shows that brake drag significantly increases the vehicle’s driving resistance, as it even accelerates the brake wear, shortens the component lifespan and also it can seriously endanger the driving safety if not corrected at the right time. Also, the study identifies that the piston sliding resistance as the key cause of dragging, specially under the repeated braking conditions, so this is why is becomes really important to fix those issues as early as possible otherwise it can increase the resistance, damage the components and that directly affects the vehicle safety as well.[¹]
1. Regular Brake Inspections
Regular inspection of the brake system is one of the most effective ways to prevent wear and tear on the parking brake.
By periodically checking the condition of the cables, calipers, brake shoes and other components, you can identify early signs of wear, corrosion, or damage before they escalate into major problems.
A quick visual inspection can reveal cracks in the cable housing, dust accumulation, or uneven wear on the brake components.
Catching these issues early allows for simple remedies such as: cleaning or minor adjustments, thereby avoiding the need for major repairs later on.
Regular inspections also ensure that all moving parts are functioning correctly and disengaging fully after use.
2. Keeping the Cable Lubricated
For the system to function properly, the parking brake cable must be able to move freely and without obstruction within its housing.
Over time, exposure to dust and moisture can cause the cable to dry out or lead to friction within its internal components.
Applying the appropriate lubricant to the exposed sections of the cable, and ensuring that its protective sheathing remains intact, facilitates smooth movement.
Proper lubrication reduces the likelihood of the cable sticking or failing to return to its original position after the brake is released.
It also helps protect the cable from corrosion, particularly in environments where exposure to moisture or water is common.
3. Preventing the Accumulation of Water and Mud
Water, mud and grime are major contributors to brake system issues, as they can seep into tiny crevices and accumulate around moving parts.
When moisture becomes trapped inside, it leads to corrosion, which hinders the movement of components and causes them to seize up.
Over time, accumulated mud and debris can also harden, thereby disrupting the normal operation of the cables, springs and calipers.
To prevent this, it is crucial to keep the vehicle’s underbody and the areas surrounding the wheels as clean as possible.
Washing the vehicle after driving on muddy or dirty roads, and allowing it to dry thoroughly, helps prevent the buildup of grime and protects the brake system from long-term damage.
4. Periodic Inspection of Brake Adjustments
Over time, brake components naturally undergo wear and tear, which can affect the adjustment of the parking brake system.
Periodically checking the brake adjustment ensures that the system maintains the proper balance between engaging and disengaging the brakes.
If the adjustment becomes excessively tight, it can lead to constant friction and drag; Conversely, if the adjustment becomes too loose, the brakes’ ability to function effectively may be compromised.
Checking and correcting this balance at regular intervals maintains the proper clearance between brake components and prevents unnecessary contact.
This simple step ensures that the parking brake engages effectively when needed and releases completely when not in use.
Know, Common Mistakes About Parking Brake Drag So That You Can Avoid Them
Many instances of a stuck parking brake are not caused by a major mechanical failure, but rather by an accumulation of minor errors.
These mistakes often occur during adjustments, routine maintenance, or daily driving habits.
As the parking brake system is mechanical, even minor errors can prevent components from fully disengaging, leading to constant friction and heat generation.
By avoiding these common mistakes, you can prevent the premature deterioration of the brake system, enhance your driving experience and minimize the risk of costly repairs.
1. Overtightening the Parking Brake
One of the most common mistakes is overtightening the parking brake during adjustment.
When the cable tension is excessive, the brake components remain partially engaged even after the lever or pedal has been released.
The result is constant contact between the brake pads or shoes and the rotating surface.
Many people overtighten the system under the assumption that it will improve its holding capacity; however, in reality, this prevents the brakes from fully disengaging and accelerates their rate of wear.
Proper adjustment always involves a small amount of “free play” (slack) to ensure that the system can fully disengage when not in use.
2. Ignoring Minor Signs of Sticking
People often overlook minor warning signs because, initially, they do not appear serious.
These signs may include a faint burning odor, a reduced ability to move the vehicle forward without acceleration, or the vehicle feeling heavier than usual.
Over time, this minor sticking worsens, generating excessive heat, causing rapid brake wear and potentially damaging surrounding components.
Ignoring early symptoms allows the problem to gradually escalate, making subsequent repairs more difficult and expensive.
By paying attention to minor changes felt while driving, you can detect issues early on and prevent long-term damage.
3. Using the Wrong Lubricant
Not all lubricants are suitable for brake systems; using the wrong type of lubricant can do more harm than good.
Some commonly used oils cannot withstand high temperatures and may break down, leaving behind residues that attract dust and dirt.
Other oils can damage rubber seals or protective coatings, leading to accelerated component wear and allowing moisture to ingress.
Brake components require specialized, high-temperature-resistant and brake-safe lubricants that maintain their effectiveness even under extreme heat and pressure.
Using the correct product ensures smooth component movement without compromising the system’s safety or durability.
4. Failing to Replace Worn Cables in a Timely Manner
Due to constant use and exposure to harsh conditions, brake cables inevitably wear out over time.
When a cable becomes stretched, frayed, or corroded, it may fail to fully retract to its original position after the parking brake is released.
Many people attempt to extend the life of a worn cable by repeatedly adjusting it; however, this merely masks the underlying problem for a short while.
A compromised cable cannot function correctly and ultimately leads to continuous brake drag.
Replacing worn cables in a timely manner ensures reliable vehicle operation and prevents issues such as the need for frequent adjustments or the failure of the brakes to fully disengage.
Read More:
- How to Adjust Parking Brake Cable
- How to Check Parking Brake Cable Tension
- How to Fix Brakes Dragging While Driving
- How to Diagnose Brake Dragging Issue
- How to Fix Internal Master Cylinder Leak
- How to Test Brake Master Cylinder Pressure
- How to Replace Brake Booster
- How to Fix Brake Booster Vacuum Leak
- How to Test Brake Booster Functionality
- How to Lubricate Brake Caliper Pins Properly
- How to Rebuild Brake Caliper at Home
- How to Check Brake Caliper Piston Movement
- How to Resurface Brake Rotors at Home
- How to Fix Brake Rotor Runout
Understand, When You Should Go to the Professional Mechanic
While many issues related to a stuck parking brake can be diagnosed and resolved using common tools and careful procedures, there are situations where the problem is too severe to be fixed through standard repairs and requires professional assistance.
The braking system is directly linked to vehicle safety; any malfunction that is not fully understood or properly repaired can pose serious risks while driving.
If the issue involves internal damage, severe corrosion, or recurring malfunctions even after repairs, it is safer to have the system inspected by a trained technician.
Professionals possess the necessary tools and expertise to measure brake force, inspect hidden components and ensure that the entire system functions correctly under actual driving conditions.
1. Severely Seized Calipers
A severely seized caliper is a condition in which the caliper piston or sliding mechanism becomes completely stuck and cannot move freely.
This typically occurs due to heavy corrosion, an accumulation of dirt and debris, or internal damage to the seals.
When this happens, the brake pad remains firmly pressed against the rotor, generating constant friction and heat.
In many cases, such a significant problem cannot be resolved merely through simple cleaning or lubrication, as the internal components have already sustained damage.
A professional mechanic can properly inspect the caliper, determine whether it can be rebuilt and, if necessary, replace it to restore safe braking performance.
2. Internal Component Failure
Some components of the parking brake system are not easily visible without disassembling the brake assembly.
These components include internal springs, adjusters and small mechanical linkages that govern how the brake engages and disengages.
If any of these parts break or become dislodged, the system cannot function correctly, potentially leading to a persistent issue of the brakes sticking.
Attempting to resolve these problems without proper knowledge carries the risk of incorrect reassembly or causing further damage to the components.
A professional possesses the appropriate tools and technical expertise to safely dismantle the assembly, replace defective parts and ensure that everything is correctly connected and functioning exactly as designed.
3. Persistent Brake Sticking Even After DIY Repairs
If the parking brake continues to stick even after you have cleaned, adjusted, or replaced the visible components, it is a clear indication that the underlying issue is far more complex or has been misdiagnosed.
Persistent brake dragging can stem from hidden issues, such as internal defects within the cable, imbalances in the adjustment mechanism, or simultaneous mechanical failures across multiple components.
Continuing to drive the vehicle or repeatedly attempting repairs without a definitive solution can accelerate component wear and pose a serious safety risk.
In such situations, having the vehicle inspected by a professional expert, utilizing precise diagnostic methods, helps pinpoint the true root cause of the problem, thereby ensuring that the repairs performed are comprehensive and reliable.
Conclusion – How to Fix Parking Brake Dragging
A dragging parking brake is a problem that often begins as a minor annoyance, but if left unaddressed, it can gradually degrade the entire driving experience.
What starts initially as a slight drag or mild heat buildup can evolve into constant friction; this leads to reduced fuel efficiency, uneven wear on brake components and, over time, unnecessary strain on the vehicle.
The key point to understand is that the parking brake system is responsible not only for keeping the vehicle stationary when parked but also for fully disengaging (releasing) when the vehicle is in motion.
Even a slight malfunction in the brake release mechanism can result in continuous contact within the braking system, generating heat, causing damage and diminishing performance.
By understanding how the system operates, recognizing early warning signs and following the correct step-by-step repair procedure, most issues related to a dragging parking brake can be effectively resolved.
Simple remedies such as: checking cable movement, ensuring proper adjustment, cleaning components and replacing worn parts, as it can restore the system to proper working order.
Regular maintenance is equally crucial, as it helps prevent the recurrence of this issue and ensures that all components function smoothly and without obstruction.
Post-repair inspection is also essential, as it confirms that the problem has been completely resolved and that the vehicle is safe to drive.
If the system still exhibits signs of dragging or excessive heat, these symptoms should not be ignored, as they indicate that further investigation is required.
So, that’s all about this guide on How to Fix Parking Brake Dragging, even you can ask more questions below.
Frequently Asked Questions
FAQ 1: What is parking brake dragging and why does it happen?
Answer: Parking brake dragging occurs when the parking brake fails to fully disengage even after being released. This means that while you are driving, the brake pads or shoes remain in slight contact with the wheels. This is typically caused by issues such as a stuck or corroded cable, improper brake adjustment, dirty or seized brake components, or a weak return spring. As the system is mechanical, any component that cannot move freely can leave the brake partially engaged, resulting in constant friction and heat generation.
FAQ 2: How can I tell if my parking brake is dragging?
Answer: There are several signs that can help you identify this problem. You may notice that your car feels heavier than usual while driving, or that it does not coast freely when you take your foot off the accelerator. In some cases, the accumulation of heat may cause a burning smell to emanate from the wheels. You may also find that, after driving for a short while, a specific wheel feels significantly hotter than the others. These symptoms usually develop gradually, so it is crucial to pay close attention to even minor changes in how your car feels and handles.
FAQ 3: Is it safe to drive with a dragging parking brake?
Answer: Driving with a dragging parking brake is not safe, specially over long distances. The constant friction generates heat, which can damage brake components, reduce braking effectiveness and, in severe cases, even lead to brake failure. It can also negatively impact fuel efficiency and place additional strain on the engine. Even if the car remains drivable, continuing to operate the vehicle without addressing the root cause can lead to even more severe and costly damage over time.
FAQ 4: Can a dragging parking brake affect fuel economy?
Answer: Yes, it can have a significant impact on fuel economy. When the brakes are dragging, the engine has to work harder to propel the car forward because there is constant resistance acting against the wheels. This increased effort leads to higher fuel consumption, even under normal driving conditions. Over time, this can result in a substantial decline in mileage, particularly if the dragging issue is severe or affects multiple wheels.
FAQ 5: Why do parking brake cables get stuck?
Answer: Parking brake cables typically get stuck due to rust, dirt accumulation, or moisture ingress within the cable housing. As the cable is located underneath the vehicle, it is exposed to water, mud and external weather elements, which can cause it to rust over time. When rust accumulates inside the cable, it hinders its ability to move freely, making it difficult for the cable to return to its original position after the brake has been released.
FAQ 6: Can I fix a stuck parking brake myself?
Answer: In many cases, yes, if the problem is minor and you possess some basic tools, you can fix a stuck parking brake yourself. Tasks such as cleaning the brake components, applying lubricant to moving parts and adjusting the cable tension often resolve the issue. However, if the problem involves extensive rust, internal mechanical failure, or components that require disassembly, it is safer to seek professional assistance. Proper repair is crucial, as the braking system directly impacts your safety.
FAQ 7: How much does it cost to repair a stuck parking brake?
Answer: The cost can vary depending on the root cause of the problem. If the issue is minor such as: a system cleaning or a minor adjustment, the cost is typically low. However, if components such as the brake cable, caliper, or brake shoes need to be replaced, the cost can increase. Labor charges are also determined based on the complexity of the repair work. Rather than delaying the issue until major components are damaged, it is always more economical to have it fixed right at the outset.
FAQ 8: Why does only one wheel sometimes get stuck?
Answer: When only one wheel gets stuck, it usually indicates that the problem is limited to that specific side of the vehicle. This can occur due to a seized caliper, corrosion in a section of the brake cable, or a faulty return spring on that particular wheel. As each wheel operates with its own distinct set of components, a malfunction in a specific part affects only that individual wheel. When diagnosing the issue, comparing the components on both sides of the vehicle can help pinpoint the exact location of the fault.
References:
[1] Piston Retraction-Induced Braking Drag Mechanism of Commercial Vehicle Disc Brake Under Dynamic Working Conditions
https://www.researchgate.net/publication/401769405_Piston_Retraction-Induced_Braking_Drag_Mechanism_of_Commercial_Vehicle_Disc_Brake_Under_Dynamic_Working_Conditions

Hello Folks, Dean Shali here to help you out to solve the problems with your lovely vehicle, as i have lots of experience and knowledge about automotive industry as i woks directly with the customers and repair vehicles and i love to help the people to keep their cars safe and running smoothly.