Written By: Dean Shali
Fact Checked By: Sabré Cook
Reviewed By: Tamara Warren
It is necessary that a parked car should stay exactly where you leave it, but you need to understand that many vehicles slowly lose that ability because of the something as simple as “PARKING BRAKE CABLE TENSION”.
Basically, the parking brake systems works by pulling that cable which presses the rear brakes, that’s how it holds the wheels in place even on the slopes.
But, whenever that cable is TOO LOOSE, then the brake just cannot apply enough force and the car may roll without any kind of warning.
Also, if it is TOO TIGHT, then the brakes may stay partially engaged that causes the heat buildup, faster wear and reduces the fuel efficiency as well.
Along with this, you need to understand that: this problem usually develops really slow, but it gives clear warning signs such as: extra lever clicks, weak holding power or dragging wheels.
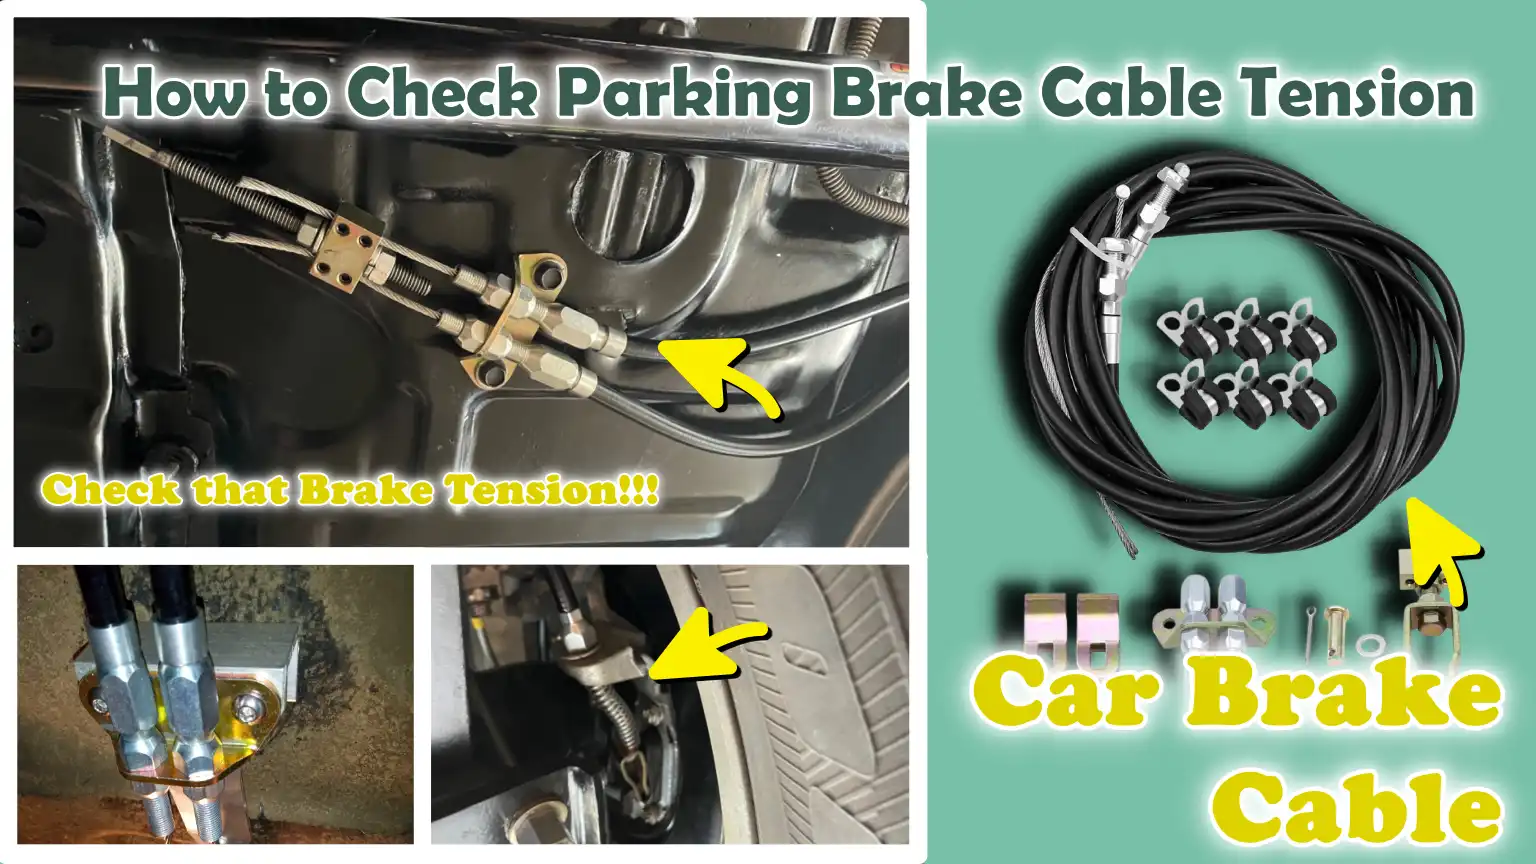
Now, with this guide you’ll learn How to Check Parking Brake Cable Tension in quick way without any advanced tools or deep mechanical knowledge.
Know, What is a Parking Brake Cable and How Does It Work?
A parking brake cable is a strong, flexible steel wire that connects your parking brake lever or pedal to the rear braking system; its sole function is to keep the vehicle stationary when it is parked.
Unlike standard hydraulic brakes, which rely on the pressure of brake fluid, the parking brake utilizes a completely mechanical system; this means that even if the hydraulic system were to fail, the parking brake would continue to function.
When you engage the parking brake, the cable tightens and exerts direct force on the rear brakes, causing them to lock in place and preventing the wheels from moving.
This simple design is one of the reasons why the parking brake is considered an essential safety backup system.
In many vehicles, particularly those equipped with rear disc brakes, the parking brake may activate a small drum brake located inside the rotor (often referred to as a “drum-in-hat” system), which is specifically designed to hold a stationary vehicle in place, rather than to bring a moving vehicle to a stop.
1. Basics of the Parking Brake System
The parking brake system is designed to prevent your vehicle from rolling away while parked specially on inclines or uneven surfaces.
It typically consists of a lever or pedal located inside the cabin, a line of cables running beneath the vehicle and mechanical components situated within the rear brakes.
When you engage the parking brake, force is applied via the lever or pedal, causing the cable system to tighten.
This tension activates the rear brake mechanism, causing the brake shoes or pads to press against a surface to generate friction, thereby locking the wheels in place.
As it is a mechanical system, it does not rely on engine power or brake fluid, ensuring that it remains a reliable backup even in the event of a failure in the primary braking system.
However, over time, due to dirt, corrosion, or general wear and tear, the cable may stretch slightly or seize up, which can compromise the system’s ability to function correctly.
2. The Role of the Cable in Engaging the Rear Brakes
The cable plays a direct and crucial role in transmitting force from your hand or foot to the rear brakes.
When you pull the parking brake lever, the cable tightens and pulls on a linkage or lever located inside the rear brake assembly.
This movement causes the brake shoes to press firmly outward against a drum, or the pads to clamp tightly onto a rotor, generating sufficient friction to bring the wheels to a halt.
The amount of tension in the cable determines the braking force applied, thereby keeping the vehicle stationary.
If the cable is too loose, the brakes will not engage properly and the vehicle may roll away.
Conversely, if it is too tight, the brakes may remain partially engaged even after being released; this creates drag, generates excessive heat and causes premature wear of the brake components.
Therefore, maintaining the correct tension in the cable is essential for both safety and the longevity of the braking system.
3. Differences Between Manual and Electronic Parking Brakes
Manual parking brakes are operated via a hand lever or a foot pedal and rely on a physical cable system to engage the rear brakes.
The driver directly controls the applied force; this system is simple, reliable and relatively easy to inspect or repair.
Electronic parking brakes, on the other hand, utilize electric motors controlled by a button rather than a lever.
When activated, this system automatically utilizes sensors and actuators to apply the brakes.
Although the designs of certain electronic systems still incorporate cables, their control and adjustment are executed electronically rather than manually.
Electronic systems often feature capabilities such as automatic brake application when the vehicle is parked and automatic release while driving; however, they can be more complex and may require diagnostic tools for maintenance.
Both systems share the same objective, to securely hold the vehicle stationary, yet they differ in their methods of force application and control.
Know, Common Symptoms of Improper Parking Brake Cable Tension
The tension of the parking brake cable directly impacts how securely your vehicle remains stationary when parked, as well as how efficiently your brakes function when released.
When the tension is not set correctly, the system is unable to engage or disengage the rear brakes as intended.
This issue typically develops gradually, meaning your vehicle will provide clear warning signs before the situation becomes hazardous.
Drivers often notice changes in the feel of the brake lever, the vehicle’s behavior on inclines, or the way the vehicle handles while driving.
It is crucial to identify these symptoms early on, as ignoring them can lead to safety risks such as: unintended vehicle movement, as well as mechanical issues, such as brake overheating and accelerated component wear.
1. Excessive Loose Cable
When the parking brake cable is excessively loose, it fails to exert sufficient pressure on the rear brake components to securely hold the vehicle in place.
One of the most common indicators is that when the vehicle is parked on an incline, it may still drift slightly forward or backward, even after the parking brake has been fully engaged.
This occurs because the brake shoes or pads are not pressing firmly against the braking surface.
Another clear symptom is excessive lever travel; this becomes evident when you have to pull the parking brake lever significantly higher than usual, or depress the pedal significantly lower, before the brakes engage.
This excessive movement signals that there is slack in the cable, preventing it from effectively activating the brakes.
Reduced holding capacity is also a major concern; the brakes may appear to be engaged, yet the vehicle does not feel stable or secure.
Over time, this situation can deteriorate further as the cable becomes excessively stretched or internal components wear out, rendering the brakes less reliable precisely when they are needed most.
2. Excessive Cable Tension
When the parking brake cable is excessively tight, the problem shifts from weak braking to constant and unwanted braking.
In this scenario, the rear brakes fail to fully disengage even after the parking brake has been released.
This creates a condition known as “dragging brakes,” wherein the brake pads or shoes remain in light contact with the drums or rotors while the vehicle is in motion.
This constant friction generates heat, which can damage brake components and compromise overall braking efficiency.
Another noteworthy consequence is increased fuel consumption, as the engine is forced to work harder to overcome the resistance generated by the dragging brakes.
Drivers may also perceive that the vehicle is not moving forward with ease, or that it slows down much more rapidly than usual when coasting (moving forward without the accelerator being depressed).
Premature brake wear is a serious consequence of this issue, as the constant contact causes brake components to wear out at an accelerated rate.
If left unaddressed, this problem can necessitate costly repairs and may even lead to brake failure due to overheating or component breakdown.
Tools
| Tools | Why It Is Needed | How to Use It Properly |
|---|---|---|
| Jack and Jack Stands | These are used to lift the vehicle and to securely support it in place while inspecting the rear wheels and the parking brake system. The jack lifts the vehicle, but the stands keep it stable. This is crucial, as working underneath a vehicle without proper support can be dangerous. | Position the jack beneath the designated lifting points on the vehicle and slowly raise it. Once lifted, place the jack stands beneath sturdy frame points and lower the vehicle onto them. Never work underneath a vehicle while it is supported solely by the jack. |
| Wheel Chocks | These prevent the vehicle from rolling while you are working on it. Even the slightest movement can be hazardous, particularly when you are checking the brake tension. | Firmly place wheel chocks (blocks) both in front of and behind the wheels that remain in contact with the ground. This ensures that the vehicle remains stationary when you lift the rear section. |
| Flashlight | This helps you clearly see the parking brake cable, specially underneath the vehicle where lighting is typically poor. Adequate lighting allows you to easily identify any looseness, wear and tear, or corrosion in the cable. | Use a flashlight to inspect the underside of the vehicle, paying particular attention to the cable’s routing and connection points. Move the flashlight around to carefully examine everything from various angles. |
| Gloves | Gloves protect your hands from dirt, sharp edges, heat and rust. Additionally, they provide a better grip when handling tools or parts. | Put on your gloves before beginning the inspection. Ensure that they fit properly in your hands, so that you can easily feel small parts and maintain control over them. |
How to Check Parking Brake Cable Tension – Easy & Accurate Method
Checking the tension of the parking brake cable is a practical method for determining whether your vehicle can remain securely stationary and if the rear brakes are functioning correctly without any unnecessary drag.
The objective is to ensure that when the brake is applied, the cable exerts sufficient force to hold the vehicle in place and when the brake is released, it disengages completely.
This process involves simple visual inspection, performing a few basic physical tests and careful examination.
If the tension is incorrect, most vehicles will exhibit clear warning signs such as: unusual movement of the brake lever or a sensation of resistance in the wheels.
By following these steps in the correct sequence, you can accurately determine whether the cable is too loose, too tight, or functioning exactly as it should.
1. Park and Secure the Vehicle
To begin, park the vehicle on a level and stable surface to prevent any unintended movement during the inspection.
Firmly place “wheel chocks” (blocks designed to prevent wheels from rolling) in front of the wheels that will remain in contact with the ground; this ensures that even if the parking brake is accidentally released during the inspection, the vehicle will not roll forward or backward.
Ensure that if the vehicle has an automatic transmission, it is set to “Park” mode; and if it has a manual transmission, it is engaged in either first gear or reverse gear.
This adds an additional layer of safety, as the vehicle’s drivetrain (the system connecting the engine to the wheels) also assists in securely holding the vehicle in place.
Adhering to these precautions is crucial, as even a slight shift in the vehicle’s position can compromise your inspection and pose a safety risk.
2. Locate the Parking Brake Cable
The parking brake cable is typically situated along the underside of the vehicle, running from the front control area to the rear wheels.
It is often a thick, coated metal cable that splits into two sections near the rear axle, with one cable extending to each wheel.
Common connection points include an “equalizer bracket” and “linkage” located near the center of the vehicle, as well as the points where the cable connects to the rear brake assemblies.
Tracing the cable helps you understand how braking force is transmitted and identifies specific areas where issues such as looseness, corrosion, or wear and tear are most likely to occur.
Having a clear visual of the cable’s routing also makes it easier to inspect its condition in subsequent steps.
3. Check the Movement/Travel of the Parking Brake Lever or Pedal
Operate the parking brake lever or pedal, paying close attention to the distance it travels before fully engaging.
Most vehicles have a specific “normal range” for the lever or pedal, often measured in “clicks” in the case of a hand lever, which indicates that the cable tension is set correctly.
If the lever travels a significant distance with very little resistance, it generally implies that the cable is loose and is not applying sufficient force to the brakes.
Conversely, if the movement is minimal and the lever becomes stiff almost immediately, it may be an indication that the cable is overtightened or is binding slightly.
This step provides you with an initial assessment of the cable’s condition without requiring you to look underneath the vehicle.
4. Lift the Rear Wheels
Carefully lift the rear of the vehicle by positioning the jack at the designated lifting points; these points are typically located along the vehicle’s frame or near the suspension mounting points.
Once the vehicle is raised, use jack stands to provide sturdy support, ensuring the vehicle remains stable while you work.
Proper lifting is crucial, as you will be inspecting the movement of the wheels; any instability could compromise both safety and accuracy.
By ensuring the vehicle is securely supported, you can freely rotate the rear wheels and observe how the braking system functions.
5. Rotate the Rear Wheels
After fully disengaging the parking brake, manually rotate each rear wheel to assess how freely it spins.
The wheels should rotate smoothly without any obstruction, indicating that the brakes have fully released.
Next, engage the parking brake and attempt to rotate the wheels again.
At this point, the wheels should either come to a complete stop or exhibit significant resistance, depending on how firmly the brake has been applied.
Comparing these two scenarios helps you determine whether the cable is providing the correct amount of tension.
If the wheels continue to spin freely even after the brake is applied, the cable may be too loose.
Conversely, if the wheels remain difficult to rotate even after the brake is released, the cable may be too tight or failing to disengage properly.
6. Manually Inspect the Cable Tension
Visually and manually inspect the entire length of the parking brake cable to assess its condition and tension.
A properly adjusted cable should feel taut when the brake is applied, exhibiting very little slack, but should not remain tight once the brake is released.
Carefully look for signs of corrosion, as this can cause the cable to bind; additionally, check for broken or frayed strands, which can compromise the structural integrity of the cable.
Furthermore, inspect areas where the cable might snag, particularly spots where accumulated dirt or external damage could obstruct its free movement.
These external inspections are crucial because, even if the brake appears to be functioning, a damaged or binding cable can ultimately lead to brake malfunction or sudden brake failure.
How to Measure the Correct Tension of the Parking Brake
Measuring the correct tension of the parking brake cable involves ensuring that the system exerts sufficient force to securely hold the vehicle, while also fully disengaging to prevent brake drag (friction).
A properly adjusted parking brake should have a consistent feel, operate within the normal specified range and demonstrate a clear difference in wheel rotation when the brake is applied versus when it is released.
This process does not require complex tools, as most of the assessment relies on the feel of the lever or pedal, the manufacturer’s specifications and the reaction of the rear wheels during testing.
When all three of these checks yield positive results, you can be confident that the cable tension is correctly set and that the system is functioning safely and effectively.
1. Understanding the Correct Number of Lever Clicks and the Normal Range
The number of clicks you feel or hear while pulling the parking brake lever is the simplest and most reliable method for checking the cable tension.
In most vehicles equipped with a manual handbrake, the normal range typically falls between five and eight clicks from the fully disengaged position to the fully engaged position; however, this may vary slightly depending on the specific design of the vehicle.
If the lever travels significantly beyond this range before becoming firm, it often indicates that there is excessive slack in the cable and that it is not applying sufficient force to the rear brakes.
Conversely, if the lever becomes firm after very few clicks, it may be a sign that the cable is overtightened or is preventing the brakes from fully disengaging.
The most critical factor is a balanced feel, the lever should move smoothly, become firm within the normal operating range and feel neither too loose nor too tight.
2. Manufacturer Recommendations and General Guidelines
Vehicle manufacturers provide specific instructions for adjusting the parking brake, as every braking system is designed with meticulous precision.
These recommendations are typically found in the ‘Owner’s Manual’ or ‘Service Manual’; they may include details such as the correct number of clicks for the lever, the travel distance of the pedal, or the stopping power required to hold the vehicle stationary on a specific incline.
Adhering to these instructions is crucial, as they are predicated on the design of the brake components, the length of the cables and the overall architecture of the system.
While general parameters can be helpful, the manufacturer’s specific instructions provide the most accurate guidance for your particular vehicle.
In many instances, proper adjustment also depends on the condition of related components such as: brake shoes, pads and internal mechanisms; this implies that checking cable tension should always be conducted in conjunction with an assessment of the overall condition of the entire braking system.
3. Standards for Checking Wheel Rotation Resistance
By checking for resistance in wheel rotation, you can practically and physically verify whether the parking brake cable tension is correct.
When the parking brake is fully disengaged, the rear wheels should spin freely without any significant resistance; this indicates that the brakes are not binding.
When the parking brake is engaged, the wheels should either come to a complete halt or require considerable force to rotate, depending on the degree to which the brake has been applied.
This clear distinction between free rotation and firm resistance is a primary indicator of correct cable tension.
If the wheels continue to spin freely even after the brake has been applied, it is likely that the cable is too loose.
Conversely, if the wheels remain difficult to turn even after the brake has been disengaged, the cable may be overtightened or failing to release properly.
These simple checks, without any guesswork, help confirm that the system is functioning exactly as intended.
How to Adjust Parking Brake Cable Tension
Adjusting the tension of the parking brake cable is a precise task that ensures your vehicle remains secure when parked and that the brakes release completely while driving.
The objective is to achieve a balanced setting where the parking brake engages firmly within its normal operating range and releases fully without any obstruction.
Over time, the cable may stretch slightly and brake components may wear down, altering the system’s performance.
Proper adjustment restores the correct balance between holding power and smooth operation.
This process should always be performed gradually and incrementally, as even a slight change in cable length can significantly impact brake performance and safety.
1. Locate the Adjustment Point
The adjustment point for the parking brake cable is typically located underneath the vehicle, along the cable line, or inside the cabin near the base of the parking brake lever or pedal.
Many vehicles feature an equalizer system, where a single front cable splits into two rear cables, and this serves as a common location for adjustment.
The adjuster usually resembles a threaded rod fitted with a nut, which can be turned to alter the cable tension.
Locating this specific point is crucial, as it allows you to control the amount of force transmitted to the rear brakes.
A clear view of the adjuster also enables you to inspect for rust, accumulated dirt, or any damage that could hinder the system’s proper functioning.
2. Tightening the Cable
Tightening the cable becomes necessary when the parking brake feels loose, requires an excessive number of clicks to engage, or fails to securely hold the vehicle on an incline.
To tighten it, the adjustment nut is rotated in the direction that shortens the cable length and increases the tension.
This ensures that when the lever or pedal is engaged, the rear brakes activate more promptly.
Adjustments should be made gradually; the nut should be turned in small increments and frequent checks should be performed to prevent the cable from becoming overtightened.
A cable with the correct tension will minimize excessive travel of the lever or pedal and enhance braking force, without causing the system to bind or allowing the brakes to drag even after being released.
3. Loosening the Cable
Loosening the cable becomes necessary when the parking brake feels excessively tight, engages too abruptly, or if the rear brakes continue to drag even after being released.
In such instances, the adjustment nut is rotated in the opposite direction to increase the cable length and reduce the tension.
This allows the brake components to return fully to their resting position once the parking brake is disengaged.
The loosening process should also be carried out in small increments, as excessive slack can rapidly compromise the vehicle’s ability to stop effectively.
The objective is to eliminate unnecessary drag while simultaneously maintaining the specific tension required for the parking brake to function correctly.
4. Post-Adjustment Verification
Following any adjustment, it is crucial to repeat the entire verification process to ensure that the cable tension is correct.
This involves checking the travel of the lever or pedal to ensure it falls within the normal operating range; additionally, the rear wheels should be rotated to confirm that they spin freely when the brakes are released and come to an effective halt when the brakes are applied.
This verification step ensures that the adjustment has successfully improved the system’s performance without inadvertently creating any new issues.
This also ensures that both components of the rear brakes are functioning uniformly, a crucial factor for the vehicle’s stability.
Taking the time to re-check after every stage of adjustment is the most effective way to achieve accurate and safe results.
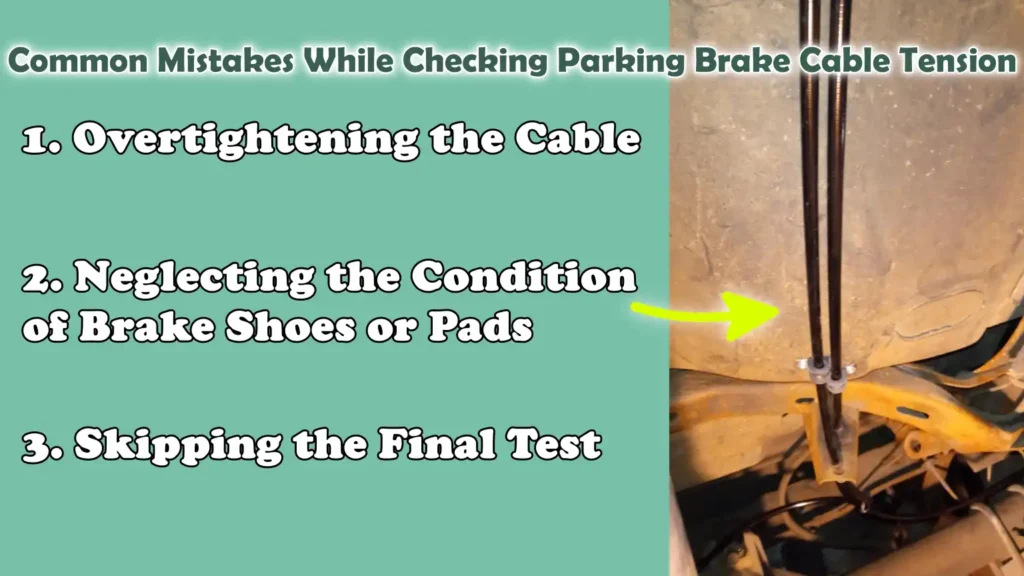
Common Mistakes While Checking Parking Brake Cable Tension
When working on the tension of a parking brake cable, minor errors can lead to serious safety issues or unnecessary damage to brake components.
Although the system may appear simple on the surface, it relies on a precise balance between cable tension and the condition of the brakes.
Many problems arise not from a lack of effort, but from misunderstandings such as: adjusting the cable without first inspecting the brakes, or failing to properly verify the results after making adjustments.
Understanding these common mistakes allows you to avoid adverse outcomes and ensures that the parking brake functions reliably in real-world conditions, particularly on inclines or when the vehicle is parked for extended periods.
Not onlly this, there’s study that found out that parking brake effectiveness issues were identified in thousands of vehicles, even dataset reports 14,594 vehicles are actually experiencing parking brake-related defects in a single year, plus these failures often realted to the poor maintenance, worn out components or improper adjustments as well: that includes incorrect cable tension as well. But, when you regularly check the cable tension then it can help you to prevent these defects and ensure that the braking system continues to work as expected.[¹]
1. Overtightening the Cable
Overtightening the parking brake cable is one of the most common errors; this often occurs when someone attempts to quickly fix loose or weak brakes.
When the cable is tightened excessively, the rear brakes fail to fully disengage (release), even after the parking brake has been deactivated.
The result is constant friction between the brake components and the rotating parts, which generates heat.
Excessive heat can degrade braking performance, accelerate the wear rate of brake pads or shoes and, in some cases, negatively impact adjacent components such as: wheel bearings.
It can also make the vehicle feel sluggish and less smooth to drive, as the wheels are unable to rotate freely.
A properly adjusted cable should fully disengage when the brake is released; therefore, the task of tightening the cable should always be performed gradually and with frequent verification.
2. Neglecting the Condition of Brake Shoes or Pads
Another common mistake is focusing solely on the cables while neglecting the condition of the brake shoes or pads.
The parking brake system relies not only on cable tension but also on the thickness and condition of the friction material.
If the brake shoes or pads are worn, glazed, or have uneven surfaces, even a perfectly adjusted cable will be unable to provide a strong braking grip.
In fact, worn components often lead drivers to overtighten the cable in an attempt to compensate for the deficiency, which can create new problems such as “brake drag.”
A proper inspection must always include an examination of the brake surfaces; before adjusting the cable, one must ensure that these components are in good condition and properly installed.
This approach ensures that the system functions exactly as it was designed to, rather than forcing one component to compensate for the shortcomings of another.
3. Skipping the Final Test
Skipping the final test after adjusting the parking brake cable is a mistake that can allow underlying issues to go undetected.
Even if everything appears correct during the adjustment process, the system’s actual performance can only be verified through testing.
This involves checking the movement of the lever or pedal, ensuring it feels balanced and falls within the normal operating range, and verifying that the rear wheels lock and unlock correctly when the brake is applied and released.
Without this step, issues such as uneven tension, partial brake drag, or reduced holding capacity may persist.
The final check is crucial because it confirms that all parts of the system are functioning correctly together and that the adjustments have enhanced security rather than creating a new threat.
Read More:
- How to Fix Brakes Dragging While Driving
- How to Diagnose Brake Dragging Issue
- How to Fix Internal Master Cylinder Leak
- How to Test Brake Master Cylinder Pressure
- How to Replace Brake Booster
- How to Fix Brake Booster Vacuum Leak
- How to Test Brake Booster Functionality
- How to Lubricate Brake Caliper Pins Properly
- How to Rebuild Brake Caliper at Home
- How to Check Brake Caliper Piston Movement
- How to Resurface Brake Rotors at Home
- How to Fix Brake Rotor Runout
- How to Check Brake Disc Runout
- How to Prevent Brake Fluid Boiling
Understand, When to Replace the Parking Brake Cable?
The parking brake cable is designed to last for many years; however, it is a component that can weaken over time due to constant use, exposure to dust and water and temperature fluctuations.
Replacing the cable becomes necessary when it no longer moves freely or when it fails to maintain proper tension even after adjustment.
A deteriorating cable can reduce the effectiveness of the parking brake or leave the brake partially engaged; both of these situations can pose a safety risk.
It is crucial to recognize when the cable needs replacement, as a worn-out cable cannot be fully restored merely by adjustment and delaying its replacement can lead to more serious problems within the braking system.
1. Signs of Malfunction or Wear
Clear signs of a faulty cable are often evident in how the parking brake feels and operates.
If the brake lever or pedal suddenly feels unusual, either excessively loose or unusually stiff, it may indicate internal wear or damage within the cable assembly.
If the cable does not retract easily when the brake is released, the brakes may remain partially engaged; conversely, if the cable has stretched excessively, it will be unable to exert the necessary pressure to engage the brakes effectively.
In some instances, the parking brake may cease to function entirely on one side of the vehicle, resulting in an uneven distribution of stopping power.
These symptoms generally indicate that the internal strands of the cable are weakening or that the cable housing (sheath) has deteriorated; in such cases, simple adjustment will not resolve the underlying issue.
2. Rust, Broken Strands, or Seized Cables
A visual inspection often reveals clear signs indicating that a cable requires replacement.
Rusting is a common issue, as cables are constantly exposed to moisture and the harsh environment of the road; over time, rust accumulation can cause the cable to stiffen or seize within its housing.
Fraying, where individual steel strands begin to snap and separate, is another serious concern; this compromises the structural integrity of the cable and significantly increases the risk of sudden failure.
If a cable operates intermittently, meaning it moves with difficulty or in a jerky manner, it typically signals that internal corrosion or accumulated debris is preventing it from functioning correctly.
These conditions not only degrade brake performance but can also render the braking process unreliable; in such instances, replacing the cable is the safest course of action.
3. Cost vs Safety – Which Should Take Priority?
When deciding whether to replace a parking brake cable, safety should always take precedence over cost.
Although replacing a cable entails some expense, this cost is typically far lower than the repair costs associated with major damage resulting from brake failure or excessive wear.
A properly functioning parking brake is essential for preventing vehicle movement when parked, particularly on inclines or in congested areas.
Neglecting a worn or damaged cable can lead to situations where the vehicle cannot be securely immobilized, thereby increasing the risk of accidents or property damage.
Replacing cables on time ensures reliable vehicle performance, prevents unnecessary strain on other brake components and provides the peace of mind that whenever you park your vehicle, it will remain securely in place.
Conclusion – How to Check Parking Brake Cable Tension
Now, you have definitely understood the fact that: having a properly working parking brake is really important safety systems in any vehicle and the performance literally depends on the correct tension of the cable.
When the cable is properly balanced, the brake engages firmly, securely holding the vehicle in place; conversely, when released, it disengages completely, allowing the vehicle to move freely.
When this does not happen, the system provides clear warning signs such as: a failure to securely hold the vehicle, excessive slack in the lever, or the brake sticking, signals that should never be ignored.
The key point is that parking brake issues rarely arise suddenly.
They develop gradually, giving you the opportunity to identify and resolve them in a timely manner through simple inspections and minor adjustments.
Understanding how this system operates, knowing what constitutes its normal behavior and following a systematic inspection process help you maintain control over your vehicle’s safety without the need for specialized tools.
Furthermore, it is essential to recognize the extent to which you can repair the brake system yourself.
If the cable shows signs of deterioration such as: rust, fraying, or sticking, replacing it is the only reliable solution.
So, that’s it from this guide on How to Check Parking Brake Cable Tension, even now you can ask related questions below.
Frequently Asked Questions
FAQ 1: How many clicks should the parking brake have?
Answer: Most vehicles are designed so that the parking brake engages fully within a specific number of clicks; typically, for hand-lever systems, this number falls between five and eight. This range indicates that the cable possesses the correct amount of tension, allowing it to apply the appropriate pressure to the brakes, being neither too loose nor too tight. If the lever travels too far before feeling firm, it often implies that the cable is loose and unable to engage the brake with full force. Conversely, if it feels tight after just a few clicks, the cable may be overtightened or failing to release properly. This exact number can vary depending on the specific vehicle model; therefore, it is always best to compare your current experience against your vehicle’s normal operation or to consult the manufacturer’s instructions.
FAQ 2: Can I drive with a loose parking brake cable?
Answer: Yes, technically you can drive with a loose parking brake cable, as the primary braking system relies on hydraulic pressure and will continue to function normally. However, ignoring this issue is not safe. A loose cable means the parking brake will be unable to securely hold the vehicle in place when parked, particularly on inclines or uneven terrain, thereby increasing the risk of the vehicle rolling away unexpectedly. Over time, this problem may worsen as the cable stretches further or other components wear out. To ensure complete safety and maintain full control over your vehicle, it is always advisable to have this issue repaired as soon as possible.
FAQ 3: Why does my parking brake feel so stiff or difficult to pull?
Answer: A stiff parking brake is often caused by excessive tension in the cable, or by internal obstructions resulting from rust, dirt accumulation, or a lack of regular use. As the cable runs along the underside of the vehicle, it is exposed to moisture and road grime, which can lead to corrosion over time. This makes it difficult for the cable to move freely. In some cases, internal components within the rear brake system may also become stiff or worn out, further exacerbating the stiffness. If the brake feels unusually stiff when applied, or if it does not release easily, it is crucial to inspect the cable and its associated components to prevent further damage or a complete seizure of the brake system.
FAQ 4: How often should I check the tension of the parking brake cable?
Answer: The tension of the parking brake cable does not require daily attention, but it should certainly be checked regularly as part of your vehicle’s general maintenance routine. It is a good practice to inspect it every six months or during your regular service appointments specially if you frequently park on inclines or make heavy use of the parking brake. You should also check it whenever you notice a change in the brake’s feel such as: excessive travel in the lever, reduced holding power, or any unusual resistance. Regular inspections help identify minor issues early on, before they escalate into major problems.
FAQ 5: What happens if the parking brake cable is too tight?
Answer: If the cable is excessively tight, the rear brakes may not fully disengage when the parking brake is released. This causes the brakes to drag slightly while driving, creating constant friction. Over time, this generates excessive heat, which can cause the brake pads or shoes to wear out much faster than normal. This can also lead to increased fuel consumption, as the engine is forced to work harder to propel the vehicle forward. In more severe cases, excessive heat can damage brake components and compromise the overall braking efficiency. Proper adjustment is crucial to ensure that the brakes engage only when needed and disengage completely when they are not required.
FAQ 6: What happens if the parking brake cable is too loose?
Answer: When the cable is excessively loose, the parking brake cannot generate the necessary pressure to securely hold the vehicle in place. This is often indicated by excessive travel in the lever when the parking brake is applied, or by a noticeable lack of braking force. If the vehicle is parked on an incline, it may drift slightly, even if the brakes appear to be engaged. This condition diminishes the reliability of the parking brake and increases the risk of the vehicle rolling away unintentionally. Although the main service brakes will continue to function for driving, the parking brake will fail to provide the safety for which it was designed; therefore, adjusting it becomes essential.
References:
[1] Identification of the Mechanical Failure Factors with Potential Influencing Road Accidents in Ecuador
https://pmc.ncbi.nlm.nih.gov/articles/PMC9266056/

Hello Folks, Dean Shali here to help you out to solve the problems with your lovely vehicle, as i have lots of experience and knowledge about automotive industry as i woks directly with the customers and repair vehicles and i love to help the people to keep their cars safe and running smoothly.