Written By: Dean Shali
Fact Checked By: Sabré Cook
Reviewed By: Tamara Warren
It is 100% true that your vehicle’s braking system depends on consistent hydraulic pressure, in terms to safely slow down and stop your car, plus the master cylinder is the actual component that is solely responsible to create and maintain that pressure every time you hit that brake pedal.
But, the thing is: if the internal master cylinder leaks then the brake fluid doesn’t escape outside where you can see it, but instead of this: it just bypasses the worn seals inside the cylinder, that literally reduces the pressure and weakens the braking performance without showing any obvious warning.
That’s the reason that many drivers actually experiences a soft or slowly sinking brake pedal even though there are no visible leaks under the car at all.
Along with this, over the period of time: this hidden issue can increase stopping distance, reduces the control during the emergency braking and in severe cases: it could lead to the complete brake failure as well.
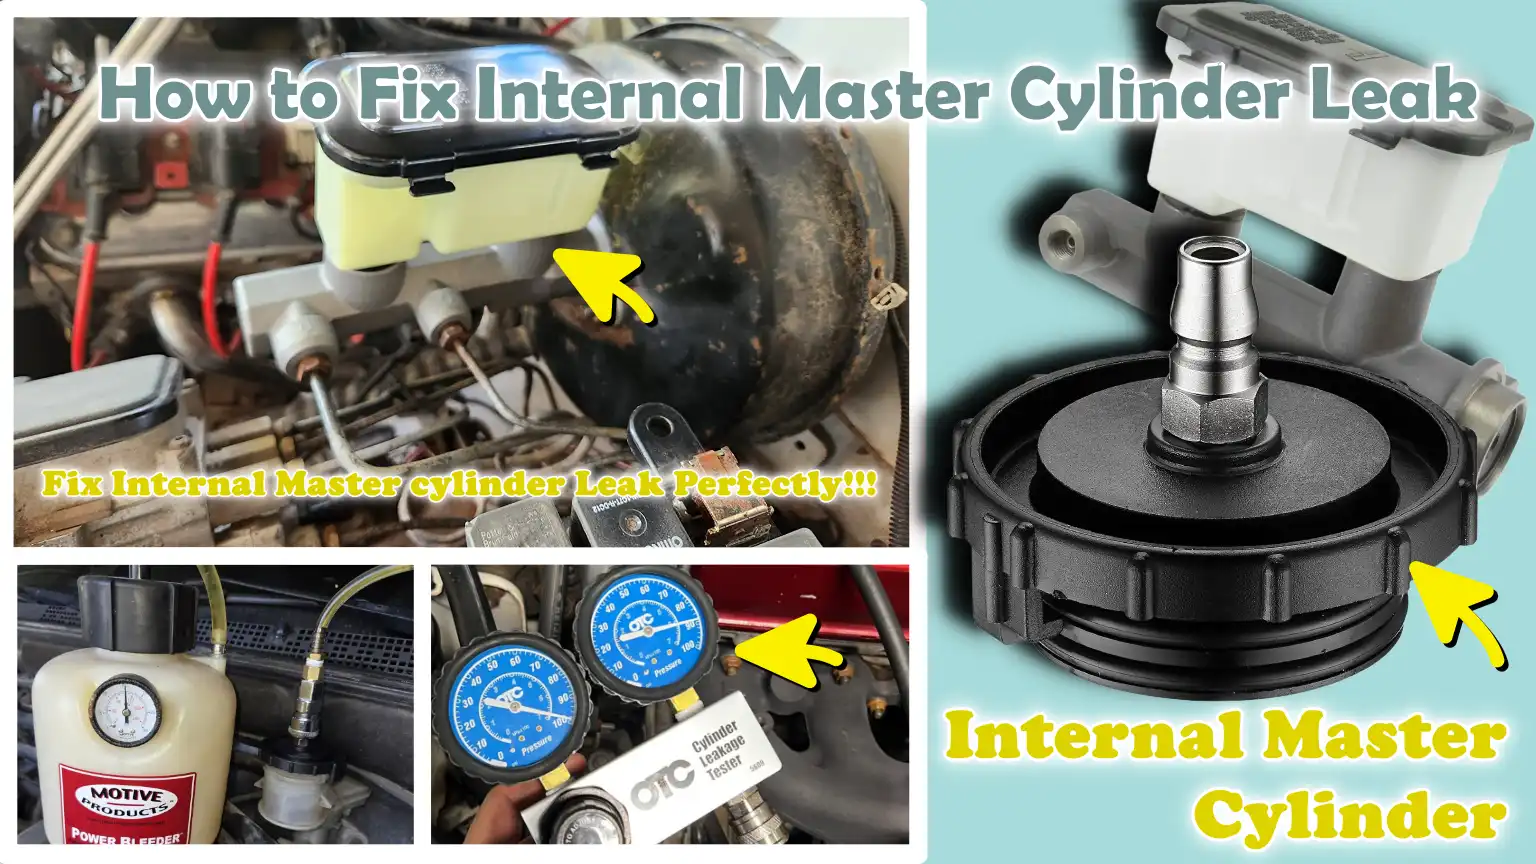
Now, in this guide you’ll learn How to Fix Internal Master Cylinder Leak so that you can identify the leak with simple tests and know the real cause behind it so that you can follow the clear process to fix that thing.
Know, The Signs of an Internal Master Cylinder Leak
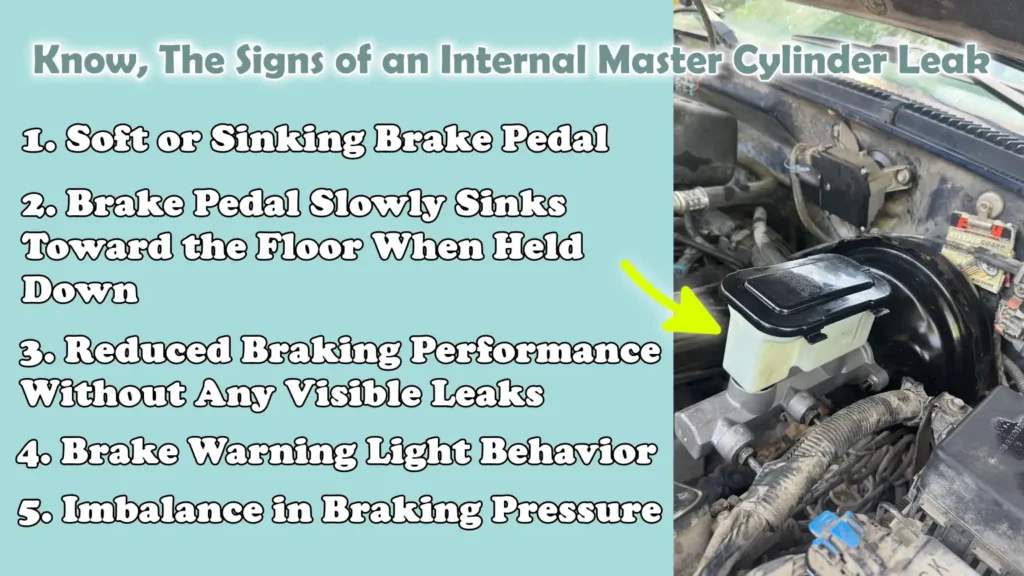
1. Soft or Sinking Brake Pedal
One of the earliest and most noticeable signs of an internal master cylinder leak is a soft or spongy brake pedal.
When you depress the pedal, it may travel downward more easily than usual and might fail to provide the firm resistance you are accustomed to.
This occurs because the internal seals within the master cylinder have worn out or deteriorated, allowing brake fluid to bypass them instead of building the necessary pressure.
As hydraulic pressure is what forces the brake pads against the rotors, any reduction in this pressure diminishes the effectiveness of your brake response.
Even if the brake fluid level appears normal and no external leaks are visible, braking power has already been compromised; this can result in increased stopping distances and reduced overall vehicle control.
2. Brake Pedal Slowly Sinks Toward the Floor When Held Down
Another clear indication of an internal leak becomes apparent when you hold the brake pedal down such as: while waiting at a traffic light, and it gradually begins to sink toward the floor.
In a properly functioning system, the pedal should remain stationary once depressed.
However, if the master cylinder’s internal seals are failing, pressure cannot be maintained and fluid begins to leak internally.
Consequently, the pedal’s position gradually drops, even though no external fluid leaks are visible.
This symptom is particularly significant because it highlights the system’s inability to maintain pressure over time, a capability that is absolutely essential for safe and consistent braking in real-world driving conditions.
3. Reduced Braking Performance Without Any Visible Leaks
An internal master cylinder leak often results in diminished braking performance, even if there are no visible signs of fluid leaking on the exterior of the vehicle.
You may notice that it takes longer for the vehicle to come to a complete stop, or that you have to apply significantly more force to the brake pedal than before.
This occurs because the braking system fails to generate the necessary hydraulic pressure required to fully engage the brakes.
Many drivers mistakenly assume that their brakes are functioning correctly simply because they do not observe any fluid leaking underneath the vehicle; however, internal leaks remain hidden, yet they can severely compromise braking effectiveness.
This makes the problem particularly dangerous, as it often goes unnoticed until braking performance has already deteriorated to a critical level.
4. Brake Warning Light Behavior
In some instances, a malfunction within the internal master cylinder may cause the brake warning light on the dashboard to illuminate or behave erratically.
This can happen when internal sensors within the braking system are triggered by a pressure imbalance, or when slight fluctuations in fluid levels occur due to internal fluid displacement.
However, it is crucial to understand that the warning light does not always illuminate when an internal leak is present; this means you cannot rely solely on this indicator to detect the problem.
If this light appears in conjunction with other symptoms such as: a “soft” or spongy brake pedal, it should be taken seriously.
It serves as a clear indication that the braking system requires immediate inspection.
5. Imbalance in Braking Pressure
An imbalance in braking pressure is another common symptom, characterized by brakes that occasionally feel excessively stiff and, at other times, weak.
This erratic response stems from unstable pressure levels within the master cylinder.
This instability is typically caused by worn-out seals, which are unable to maintain a consistent flow of hydraulic force.
Consequently, the behavior of the braking system can become unpredictable, particularly in stop-and-go traffic or during sudden braking situations.
This imbalance not only compromises driving comfort but also significantly diminishes vehicle safety, as you cannot fully rely on the brakes to perform with complete consistency every time the pedal is depressed.
Know, The Causes of Internal Master Cylinder Failure
1. Worn or Damaged Rubber Seals – Primary and Secondary Seals
The most common cause of an internal master cylinder leak is worn or damaged rubber seals located inside the unit.
These seals are responsible for maintaining brake fluid under pressure and ensuring that it is properly transmitted throughout the braking system.
Over time, due to constant use, heat and pressure, these seals can harden, crack, or lose their elasticity.
When this occurs, instead of being pushed forward, the brake fluid may bypass the seals, resulting in a loss of hydraulic pressure.
Because this malfunction occurs within the cylinder itself, no external leaks are visible; however, braking performance gradually becomes weaker and less reliable.
2. Contaminated Brake Fluid – Moisture, Dirt
Brake fluid is designed to operate within a clean and closed system; however, over time, it naturally absorbs moisture from the air.
This moisture reduces the fluid’s effectiveness and can lead to internal damage.
Dust, rust particles, or dirt may also enter the system due to poor maintenance or during repairs.
Contaminated fluid can accelerate the wear of internal seals and create microscopic scratches inside the master cylinder bore.
Although these minor imperfections may seem insignificant, they allow fluid to bypass the seals, leading to a loss of pressure and an internal leak.
Regular fluid replacement is essential to prevent such damage.
3. Corrosion Inside the Cylinder Bore
The internal surface of the master cylinder, known as the bore, must remain smooth for the seals to function correctly.
When moisture infiltrates the brake fluid, it can initiate the process of rust and corrosion formation within the cylinder bore.
Even slight corrosion can roughen the surface, potentially damaging the rubber seals that slide back and forth during braking.
Over time, this wear and tear accumulates, causing the brake fluid to begin leaking internally.
Once corrosion has taken hold inside the bore, the master cylinder struggles to maintain proper pressure; in most cases, replacing the unit rather than attempting a repair is the only viable solution.
4. Brake Fluid Overheating
Brake fluid operates at high temperatures, particularly during heavy braking or when driving on long, steep inclines.
If the fluid overheats, it can degrade and lose its ability to effectively withstand pressure.
Excessive heat can also damage the internal seals, causing them to soften or lose their original shape.
When seals lose their proper form, they fail to create a tight seal against the cylinder walls, resulting in internal fluid leakage.
Overheating can also cause tiny air bubbles to form within the fluid, further diminishing braking efficiency and causing the brake pedal to feel soft or inconsistent.
5. Wear and Tear Due to Age and Mileage
Like most mechanical components, the master cylinder naturally wears out over time due to constant use.
Every time you depress the brake pedal, the internal piston and seals move, generating friction that leads to gradual wear.
After years of service or accumulating high mileage, the internal components lose their original structural integrity and operational efficiency.
Even in the absence of contamination or excessive heat, seals can weaken, and the cylinder bore may experience minor wear, simply due to the natural aging process.
This gradual deterioration eventually leads to internal leaks, a loss of pressure and diminished braking performance; therefore, replacement remains the most reliable long-term solution.
Is It Safe to Drive with an Internal Master Cylinder Leak?
1. Why Braking Becomes Unreliable
Driving with an internal master cylinder leak is unsafe because the braking system can no longer maintain consistent hydraulic pressure.
When you depress the brake pedal, the master cylinder is supposed to transmit uniform fluid pressure to all wheels; however, due to worn internal seals, the fluid leaks internally instead of building the necessary pressure.
Consequently, the pedal may feel soft or inconsistent and the braking force may vary with every application.
At times, the brakes may feel normal, while at other times they may feel weak, making the vehicle’s behavior unpredictable.
Such inconsistency undermines the driver’s confidence and control, particularly in situations where smooth and precise braking is required.
2. The Risk of Total Brake Failure
The most serious hazard associated with an internal master cylinder leak is the potential for total brake failure.
As the internal seals continue to wear, the loss of pressure escalates until the system becomes incapable of generating the force required to effectively stop the vehicle.
In severe cases, the brake pedal may sink completely to the floor, leaving little to no stopping power.
Because this issue originates internally, it can worsen without any external warning signs, making it potentially more dangerous than a visible external leak.
If left unaddressed, the braking system could fail abruptly, leaving very little time to react and significantly increasing the likelihood of a serious accident.
3. Emergency Situations and the Impact on Stopping Distance
In emergency situations, strong and immediate braking is critical; however, an internal master cylinder leak can significantly increase the vehicle’s stopping distance.
Because the system is unable to rapidly build up full pressure, the brakes respond sluggishly and with reduced force, precisely at the moment when you need them most.
This delay can add several extra meters to the vehicle’s stopping distance, a difference that could mean the distinction between avoiding a collision and crashing into an obstacle.
In high-speed traffic or sudden-braking situations, such compromised performance places both the driver and others at risk.
Reliable brakes are paramount for safety and even a minor internal leak can significantly diminish the system’s ability to respond effectively during critical moments.
Tools
| Tool/Material | Why It Is Needed | How to Use It Properly |
|---|---|---|
| Brake Fluid – DOT 3, DOT 4 | It generates the necessary force to bring the car to a halt and facilitates the smooth operation of the system. | Always use the specific type of fluid recommended on your car’s reservoir cap or in the owner’s manual. Pour it carefully into the reservoir; unless specifically instructed otherwise, never mix different types of fluids. |
| Line Wrench – Flare Nut Wrench | It protects the soft fittings attached to the brake lines from damage, fittings that are prone to rounding off. | Seat it firmly onto the brake line nut and turn it gently. For superior control, it grips more sides of the nut compared to a standard wrench. |
| Socket Set and Ratchet | This tool is required to detach the master cylinder from the brake booster and other components. | Select the correct socket size, attach it to a ratchet and turn it steadily to loosen or tighten the bolt. |
| Brake Bleeder Kit or Vacuum Pump | The presence of air within the system reduces braking power and causes the brake pedal to feel spongy (soft) when depressed. | Connect this tool to the brake bleeder valve and pump until all the air and old fluid have been expelled and clean fluid begins to flow. |
| Bench Bleeding Kit | It ensures that no air remains trapped inside the master cylinder, as trapped air can compromise braking performance. | Connect the tubes to the cylinder ports and slowly actuate the piston until air bubbles are no longer visible in the fluid. |
| Safety Gloves and Goggles | Brake fluid is corrosive and can cause damage to skin, eyes and painted surfaces. | Before beginning work, wear gloves and safety goggles to protect yourself from contact with brake fluid and debris. |
| Shop Towels and Drain Pan | This prevents fluid from spilling and protects surrounding surfaces from potential damage caused by brake fluid. | Place a drain pan beneath the work area and immediately wipe up any spilled fluid with towels to prevent damage. |
How to Detect Internal Leaks in the Master Cylinder
1. Brake Pedal Hold Test
The Brake Pedal Hold Test is one of the easiest and most effective methods for checking for internal leaks within the master cylinder.
To perform this test, whether the engine is off or running, firmly press down on the brake pedal with your foot and then maintain consistent pressure for several seconds.
In a properly functioning braking system, the pedal should remain firm and hold its position without moving.
If, despite maintaining pressure, the pedal slowly begins to sink toward the floor, it is a definitive indication that brake fluid is leaking past the internal seals of the master cylinder.
This internal leak suggests that the system is unable to properly maintain pressure, even if no external fluid leaks are visible.
To obtain accurate results, it is crucial to press the pedal with steady and consistent pressure, as sudden or uneven pressure can lead to false readings.
This test helps detect a loss of pressure within the system, which is a primary indicator of a failing master cylinder.
2. Isolating the Master Cylinder
Isolating the master cylinder is a more advanced technique used to determine whether a loss of pressure is occurring within the cylinder itself or elsewhere in the braking system.
This procedure involves temporarily plugging or capping the brake lines connected to the master cylinder, thereby preventing fluid from flowing into the rest of the braking system.
Once the lines are blocked, press the brake pedal again and observe how it feels.
If the pedal becomes firm and does not sink, it indicates that the problem likely lies elsewhere in the braking system such as: a leak or the presence of air within the lines.
However, if the pedal still feels loose or spongy, or continues to sink, even after the lines have been blocked off, this confirms that the problem actually lies within the master cylinder itself.
This method works because it isolates the internal pressure within the cylinder, thereby making it easier to detect a faulty internal seal.
This procedure must be performed with care to ensure that no air enters the lines and that no damage is inflicted upon them; nevertheless, it remains an excellent and reliable method for confirming the presence of an internal leak.
How to Fix Internal Master Cylinder Leak – Easy & Effective Fix
1. Prepare the Vehicle
To begin, park the vehicle on a level and stable surface to ensure it remains stationary while you work.
A level surface prevents the brake fluid from distributing unevenly within the system.
Turn off the engine and allow the vehicle to cool down specially if it has been driven recently, as brake components can become hot during operation.
Disconnecting the battery is an optional but beneficial safety precaution, as it helps prevent any sudden electrical activity while working within the engine bay.
Before handling the master cylinder, wipe down the surrounding area with a cloth to remove any dust or debris.
This step is crucial because even tiny particles can enter the brake system and damage internal components or seals.
Keeping the workspace clean safeguards the system and makes the repair process safer and more effective.
2. Drain the Brake Fluid
Before removing the master cylinder, it is essential to reduce the volume of brake fluid inside the reservoir to prevent it from spilling over.
You can use a simple suction tool or a turkey baster to carefully extract the fluid and transfer it into a secure container.
Brake fluid can damage paint and other surfaces; therefore, removing excess fluid minimizes the risk of accidental damage.
Work slowly and take care to ensure that the fluid does not drip onto surrounding components.
This step also helps keep the system clean during the removal process and makes the master cylinder easier to handle.
Always dispose of the extracted fluid properly and avoid reusing old or contaminated fluid, as doing so can negatively impact the performance of the braking system.
3. Disconnect the Brake Lines
Next, disconnect the brake lines attached to the master cylinder.
It is essential to use a line wrench for this task, as it is specifically designed to firmly grip brake line fittings without slipping or causing damage.
Ordinary wrenches can round off these soft metal fittings, making them difficult to remove or reuse.
Turn the fittings slowly and carefully to loosen them; once removed, immediately cover or cap the open ends of the brake lines.
This prevents dust, air, or moisture from entering the system, which could lead to further complications.
Keeping the lines sealed and clean is crucial for maintaining proper brake performance once the repairs are complete.
4. Remove the Master Cylinder
Once the brake lines have been disconnected, you can remove the master cylinder from the brake booster.
This is typically accomplished by removing a few mounting bolts using a socket and ratchet.
After removing the bolts, gently pull the master cylinder away from the booster to separate the two components.
Handle it with care to avoid spilling any residual brake fluid.
Keep the unit as upright as possible during removal to minimize leakage.
Removing the master cylinder correctly ensures that no damage is inflicted upon surrounding components and makes the installation of a new or rebuilt unit much easier.
5. Decide – Rebuild or Replace
After removing the master cylinder, you must decide whether to rebuild it or replace it.
Rebuilding involves replacing the internal seals and cleaning the internal components; However, this is a viable option only if the inner surface of the cylinder, known as the “bore”, is smooth and free from any rust or damage.
If the bore is worn, scratched, or corroded, a rebuild will not be a reliable solution, as the new seals will be unable to create a proper seal.
In most cases, replacing the master cylinder is the superior and more reliable option, particularly for long-term safety.
A new unit ensures correct pressure and consistent braking, while also minimizing the likelihood of recurring malfunctions.
How to Rebuild the Master Cylinder – Optional
1. Disassembling the Cylinder
Rebuilding the master cylinder begins with carefully disassembling it to gain access to its internal components.
First, remove the retaining clips or snap rings that hold the internal piston and spring in place.
These components are typically under some tension, so remove them gradually to avoid any sudden movement.
Once the clips are removed, gently extract the piston, spring and seals in the exact order in which they were installed.
It is crucial to note the correct sequence and position of each part, as they must be reinstalled in the same manner for the system to function correctly.
After disassembly, closely inspect the inner surface of the cylinder, known as the ‘bore.’
The bore should be smooth and free of rust, scratches, or pitting.
Even minor imperfections can prevent the new seals from seating properly, potentially leading to internal leaks.
If the bore is damaged, rebuilding is not recommended; in such cases, replacing the entire unit is the safer option.
2. Replacing Internal Seals
Once the cylinder has been disassembled and inspected, the next step is to replace the internal rubber seals.
To do this, use a ‘rebuild kit’ specifically designed for your master cylinder model.
These seals are responsible for generating the hydraulic pressure necessary for braking, so it is essential that they be in perfect condition.
Over time and due to exposure to heat, old seals often harden, crack, or wear out, rendering them ineffective.
Before installing the new seals, apply a small amount of fresh, clean brake fluid to them.
This lubricant facilitates the seals sliding easily into place and protects them from damage during installation.
Carefully install each seal in the correct location and orientation, as improper installation will prevent the system from generating pressure.
To successfully rebuild the system, it is crucial to use the correct parts and handle them with care.
3. Careful Reassembly
After installing the new seals, reassemble the master cylinder.
To do this, insert the piston, spring and other components back into the bore in the exact order in which they were removed.
Pay close attention to the orientation of each part, as even a minor error can adversely affect the system’s functionality.
While inserting the components, ensure that they move freely back and forth without binding or sticking.
Smooth movement of the parts indicates that the seals have been installed correctly and that the bore is in good condition.
Once all components are in their respective positions, securely fasten the retaining clip or snap ring to ensure that the entire assembly remains firmly in place.
Proper reassembly is critical, as the master cylinder is required to consistently generate and maintain hydraulic pressure.
Avoiding haste during this stage ensures that the repaired unit operates safely and reliably once it is reinstalled in the vehicle.
How to Install a New or Rebuilt Master Cylinder
1. Bench Bleeding the Master Cylinder
Before installing a new or rebuilt master cylinder, it is crucial to purge any trapped air from within it; this process is known as bench bleeding.
The presence of air inside the master cylinder prevents proper hydraulic pressure from building up, resulting in a spongy brake pedal feel after installation and compromising overall braking performance.
Bench bleeding is performed before mounting the unit onto the vehicle to ensure that the internal passages are completely filled with brake fluid.
To do this, connect the bleeding tubes provided in the kit to the outlet ports and insert their open ends back into the reservoir.
Fill the reservoir with the correct brake fluid, then use a tool or rod to slowly push the piston inward and release it repeatedly.
As you do this, air bubbles will emerge from the tubes.
Continue this process until no further bubbles appear and only clear fluid is seen circulating.
It is essential to actuate the piston slowly, as rapid movement can generate additional air bubbles.
This step ensures that the master cylinder is fully primed and ready to generate proper pressure once installed.
2. Mounting the Master Cylinder
Following the bench bleeding process, the master cylinder can be mounted onto the brake booster.
Carefully position the cylinder to ensure it aligns correctly with the booster pushrod, as misalignment can negatively impact braking performance or damage internal components.
Gently slide the master cylinder into place without forcing it, ensuring that it sits flush against the mounting surface.
Finally, secure the unit using the correct bolts and tighten them evenly.
It is crucial to adhere to the torque specifications recommended for your vehicle, as overtightening can damage the mounting points, while undertightening may lead to looseness or leaks.
Proper mounting ensures that the force applied to the brake pedal is efficiently converted into hydraulic pressure without any loss or misalignment.
3. Reconnecting Brake Lines
Once the master cylinder is securely mounted, reconnect the brake lines to their respective ports.
Initially, tighten the fittings by hand to prevent cross-threading; cross-threading can damage the threads and result in leaks.
After hand-tightening, use a line wrench to properly secure the fittings.
It is essential to avoid overtightening, as excessive force can strip the fittings or damage the sealing surfaces.
Once all lines are connected, inspect the area around each connection point to check for any fluid leaks.
A clean and dry connection indicates that the seal has seated correctly.
Exercising caution during this step ensures that the brake system remains sealed and capable of maintaining the necessary pressure for safe and consistent braking.
How to Bleed the Brake System
1. The Importance of Bleeding Air from Brake Lines
Bleeding the brake system is a crucial step after replacing or repairing the master cylinder, as any air trapped inside the brake lines can significantly compromise braking performance.
Unlike brake fluid, which is a liquid and incompressible, air is easily compressible.
This means that when you depress the brake pedal, instead of transmitting full pressure to the brakes, a portion of that force is wasted simply compressing the air bubbles.
The result is a pedal that feels soft or spongy and a weakened braking response.
Even a small amount of trapped air can affect the brake pedal feel and overall braking efficiency, particularly during sudden or emergency braking situations.
Purging all trapped air ensures that the hydraulic system functions exactly as designed, delivering strong and uniform pressure to every wheel for safe and reliable braking.
2. The Bleeding Sequence – Typically RR, RL, FR, FL
The order in which you bleed the brakes is critical, as it ensures that air is efficiently purged from the entire system.
Most vehicles follow a sequence that begins with the wheel located farthest from the master cylinder and progresses toward the wheel closest to it.
This is typically performed in the following order: Rear Right (RR), Rear Left (RL), Front Right (FR) and Front Left (FL).
Following this sequence helps expel air in a controlled manner, preventing it from flowing back into sections of the system that have already been bled.
If this sequence is not followed correctly, air may remain trapped in certain lines, potentially leading to uneven braking or a soft brake pedal.
Always consult your vehicle’s owner’s manual to determine the correct sequence, as different systems may vary slightly; however, the general principle of starting at the point furthest from the master cylinder remains consistent.
3. Manual vs Vacuum Bleeding Methods
There are several methods for purging air from a brake system, the two most common being manual bleeding and vacuum bleeding.
Manual bleeding typically requires two people: one person depresses the brake pedal, while the other opens and closes the bleeder valve located at each wheel.
This method is simple and effective, but it requires precise coordination to ensure that air does not get drawn back into the system.
Vacuum bleeding, on the other hand, utilizes a specialized tool to draw brake fluid, along with any trapped air, out through the bleeder valve; this method does not require a second person.
This approach is often faster and easier for beginners, as it offers greater control and minimizes the potential for errors.
When performed correctly, both methods can be highly effective; the most critical aspect is to continue the process until clear, bubble-free fluid flows from every bleeder valve, thereby ensuring that the system is completely free of air.
How to Verify the Verification
1. Pedal Feel Test
Once the repairs are complete, the first and most crucial check is the pedal feel test.
Sit in the driver’s seat and firmly depress the brake pedal several times.
The pedal should feel firm and consistent, not soft or spongy.
When you hold the pedal down, it should remain in that position rather than slowly sinking toward the floor.
A firm pedal indicates that the system is generating and maintaining proper hydraulic pressure.
If the pedal still feels soft or continues to sink, it may be a sign that air is trapped in the lines or that the repairs were not completed correctly.
This simple check provides an immediate and clear indication of whether or not the braking system is functioning properly.
2. Engine Off vs Engine On Test
Checking the brakes with the engine off, and subsequently with the engine running, helps ensure that both the hydraulic system and the brake booster are functioning correctly.
With the engine off, pump the brake pedal a few times to release any residual vacuum, then hold the pedal down.
It should feel firm and should not sink.
Next, while keeping your foot on the pedal, start the engine.
You should feel the pedal sink slightly; this indicates that the brake booster is providing proper assistance.
However, even after this initial movement, the pedal should remain firm and steady.
If the pedal continues to sink or feels weak, it could be a sign of a pressure issue within the system or a problem with the master cylinder.
3. Low-Speed Road Test
Once the basic checks are complete, carefully conduct a low-speed road test in a safe, open area.
Begin by driving slowly and applying the brakes gently to observe how the vehicle responds.
The brakes should engage smoothly and bring the vehicle to a controlled stop without requiring excessive force.
Gradually increase your speed slightly and perform another test to ensure that braking performance remains consistent.
Pay close attention to how the pedal feels while driving; it should feel firm and responsive.
During this check, avoid driving at high speeds until you are fully confident that the braking system is functioning correctly.
4. Checking for Leaks and Pressure Stability
After testing the brakes, inspect the entire system for any signs of fluid leaks.
Check around the master cylinder, brake lines and connection points to ensure that everything is dry and properly sealed.
Even a minor leak can gradually reduce pressure over time, thereby diminishing braking effectiveness.
In addition to checking for leaks, keep an eye on the brake pedal while driving for a short period to ensure that pressure remains stable.
The pedal’s feel and position should not change, even with repeated use.
Stable pressure and a leak-free system confirm that the repair work was executed correctly and that the vehicle is safe to drive.
Know, The Common Mistakes During Fixing the Internal Master Cylinder Leak
1. Skipping Bench Bleeding
One of the most common and critical mistakes is skipping the bench bleeding process before installing the master cylinder.
Bench bleeding expels air trapped inside the cylinder; if this step is omitted, the air remains trapped and subsequently enters the brake lines after installation.
The result is a soft or spongy brake pedal, even if all other steps were executed correctly.
Many people attempt to rectify this by bleeding the brakes at the wheels, but once the master cylinder is installed, expelling the air trapped inside it becomes extremely difficult.
This can compromise braking performance and necessitate repeated rework.
Taking a few extra minutes to perform a proper bench bleed ensures that the system starts with solid hydraulic pressure, thereby preventing unnecessary issues in the future.
2. Using the Wrong Type of Brake Fluid
Using the incorrect type of brake fluid can ruin the entire braking system.
Brake fluids such as: DOT 3 and DOT 4, are formulated with specific properties, including distinct boiling points and compatibility with rubber seals.
If the wrong fluid is used, the seals inside the master cylinder and other components may swell, deteriorate, or rupture over time.
This can lead to issues such as internal leaks, a loss of hydraulic pressure and potentially, total brake failure.
Mixing different types of fluids without verifying their compatibility can also degrade performance and contaminate the system.
To ensure proper operation and longevity, always use the specific type of brake fluid recommended for your vehicle.
3. Allowing Contaminants into the Brake System
The brake system is highly sensitive to dirt, dust and moisture; Even very small particles can cause serious damage.
Allowing dirt to enter the system during repairs can lead to scratches on internal surfaces such as: cylinder bores, or damage to rubber seals.
This results in problems such as leaks, loss of pressure and uneven braking.
Open brake lines and exposed components are particularly vulnerable; therefore, it is crucial to keep everything clean and covered throughout the entire repair process.
Using clean tools, wiping down surfaces and sealing open lines helps protect the system.
Maintaining cleanliness is one of the most critical steps to ensure that repairs last and that the brakes function correctly.
4. Overtightening Brake Line Fittings
Overtightening brake line fittings is a mistake that can cause more harm than good.
Brake line fittings are made of relatively soft metal and are designed to seal properly when subjected to the correct amount of force.
Applying excessive force can strip the threads, deform the fitting, or crack the connection point, leading to leaks.
Once damaged, a fitting may fail to seal properly even after being retightened, resulting in fluid leakage and pressure-related issues.
It is essential to tighten fittings firmly, but not excessively, and to use the appropriate tools, such as a line wrench, to ensure a secure connection.
5. Ignoring Deteriorated Brake Fluid
Ignoring old or deteriorated brake fluid can lead to recurring problems within the brake system, even after repair work has been completed.
Over time, brake fluid absorbs moisture, which lowers its boiling point and can lead to internal corrosion.
Degraded fluid may also contain dust or debris, which can damage seals and internal surfaces.
If the fluid appears dark or dirty, or if it has not been replaced for a long time, it should be completely drained during repairs and replaced with fresh fluid.
Using fresh and clean brake fluid protects the master cylinder and other components, maintains proper pressure and improves overall braking performance.
How to Prevent Future Master Cylinder Leaks
1. Regularly Changing Brake Fluid
Changing brake fluid at the proper intervals is the most effective way to prevent future leaks in the master cylinder.
Over time, brake fluid absorbs moisture from the air, even if the system is completely sealed.
This moisture degrades the fluid’s performance and can lead to rust formation and damage within the master cylinder.
Rust corrodes the smooth internal surfaces and causes wear on the rubber seals, eventually leading to internal leaks.
Regularly changing the fluid flushes out moisture and contaminants, keeps the system clean and helps maintain proper hydraulic pressure.
Fresh fluid also protects internal components and ensures that the braking system operates smoothly and safely.
2. Using High-Quality Brake Fluid
Using high-quality brake fluid is essential for the long-term health of the master cylinder and the entire braking system.
High-quality fluid is formulated to withstand high temperatures and maintain stable performance even under pressure.
It also contains additives that help prevent rust and protect rubber seals from degradation.
Poor-quality or incorrect fluid can degrade quickly, lose its effectiveness and accelerate the wear and tear of internal components.
Always choose the specific type of fluid recommended for your vehicle and avoid mixing different types of fluids unless they are compatible with one another.
Using the correct fluid ensures robust braking performance and minimizes the likelihood of internal leaks.
3. Regularly Inspecting Braking System Components
Regular inspection of braking system components allows for the detection of minor issues before they escalate into major problems.
Checking parts such as the master cylinder, brake lines and fluid reservoir can reveal early signs of wear, contamination, or malfunction.
Even if internal leaks are not visible, external indicators such as: a change in fluid color, irregularities in pedal feel, or subtle changes in performance, as it can signal that something is amiss.
Timely detection enables you to address issues before they compromise safety or necessitate more costly repairs.
Regular inspections also help ensure that all components are working in unison and that consistent pressure is maintained throughout the entire system.
4. Preventing Brake Overheating
Excessive heat is one of the primary factors that can damage brake fluid and the internal components of the master cylinder.
During heavy braking such as: when driving on steep inclines or stopping frequently in heavy traffic, significant heat is generated within the braking system.
If the brake fluid overheats, it can degrade and lose its ability to withstand pressure.
High temperatures can also weaken or damage the rubber seals located inside the master cylinder, thereby increasing the likelihood of internal leaks over time.
Driving gently, avoiding sudden hard braking and allowing the brakes to cool down when necessary can help prevent overheating.
Proper heat management helps extend the lifespan of the master cylinder and ensures the continued reliability of the braking system.
Read More:
- How to Test Brake Master Cylinder Pressure
- How to Replace Brake Booster
- How to Fix Brake Booster Vacuum Leak
- How to Test Brake Booster Functionality
- How to Lubricate Brake Caliper Pins Properly
- How to Rebuild Brake Caliper at Home
- How to Check Brake Caliper Piston Movement
- How to Resurface Brake Rotors at Home
- How to Fix Brake Rotor Runout
- How to Check Brake Disc Runout
- How to Prevent Brake Fluid Boiling
Estimated, Cost of Fixing an Internal Master Cylinder Leak
As well as, there’s research that clearly shows that a large percentage of vehicle defects are actually related to braking problems and leaks being a major contributor, so whenever the internal seals fails or the cylinder surface becomes damaged, then the system cannot build proper pressure; which literally increases stopping distance and reduces the safety as well, that’s why you need to identify and fix the internal master cylinder leaks in early time so that reliable braking performance can be intact.[¹]
1. Average Cost of Replacement Parts
The price of a replacement master cylinder can vary depending on the vehicle type, brand and component quality; however, for most common passenger vehicles, it falls within a reasonable price range.
For many cars, the cost of a new master cylinder typically ranges from $50 to $200 USD, whereas premium or performance vehicles may incur higher costs due to their more advanced braking systems.
Rebuilt units are generally less expensive, but they may not always offer the same long-term reliability as a brand-new part.
The cost also depends on whether the master cylinder includes additional components, such as a fluid reservoir or sensors.
Choosing a high-quality part is crucial, as the master cylinder directly impacts braking safety; a low-quality unit could fail prematurely or suffer from inconsistent performance.
2. Estimated Labor Costs
Labor costs are another significant factor when repairing an internal master cylinder leak, particularly if the work is performed at a professional workshop.
On average, labor charges can range from $100 to $300 USD, depending on the complexity of the vehicle and the time required to complete the job.
Replacing a master cylinder typically takes one to two hours; however, if additional work is required such as: bleeding the brake system or dealing with rusted or stubborn components, the time required may increase.
In some vehicles, where engine bay space is limited or which feature advanced braking systems, more time and specialized expertise may be needed, potentially driving up labor costs.
Professional repair ensures that the installation and testing are performed correctly, which is essential for safety.
3. DIY vs Professional Repair – A Comparison
The choice between performing repairs yourself (DIY) and opting for professional service depends on your experience, the tools at your disposal and your level of confidence.
DIY repairs can result in significant cost savings, as you only have to pay for parts and basic supplies; however, this approach requires meticulous attention to detail and a comprehensive understanding of the braking system.
Mistakes such as: improper bleeding, contamination, or incorrect installation, as it can compromise braking performance or pose a safety risk.
On the other hand, professional repairs come at a higher cost, but they offer expert knowledge, specialized tools and greater reliability.
Technicians adhere to proper procedures, utilize correct torque settings and ensure that the system is thoroughly inspected before returning the vehicle to its owner.
For critical components like the master cylinder, many individuals opt for professional repair for the sake of peace of mind, while experienced enthusiasts may prefer the DIY route to minimize costs.
Understand, When to Replace Instead of Repair
1. Severe Damage or Corrosion to the Bore
Replacing the master cylinder is the best option when its inner surface, known as the “bore”, has become damaged or corroded.
For the rubber seals to properly maintain hydraulic pressure, the bore must be extremely smooth.
If there are scratches, rust, or pitting inside, new seals will not seat correctly and brake fluid will continue to leak internally.
Corrosion typically occurs when moisture accumulates in old brake fluid, causing the metal surface to gradually deteriorate.
Once the bore is no longer smooth, attempting to rebuild the unit does not provide a reliable solution to the problem.
In such cases, installing a new master cylinder ensures proper sealing, consistent pressure and safe braking performance.
2. High-Mileage Vehicles
In high-mileage vehicles, brake components naturally wear out due to years of continuous use.
Inside the master cylinder, the piston and seals move every time the brake pedal is depressed, leading to gradual wear and tear over time.
Even if the damage is not visibly apparent, the internal components may have already lost their original shape and structural integrity.
Rebuilding the unit may offer only a short-term solution, as other internal components may have already reached the end of their service life.
For high-mileage vehicles, replacing the master cylinder is generally a superior long-term solution, as it restores full functionality and minimizes the risk of future failure.
3. Recurring Brake Problems
If you continue to experience brake-related issues such as: a spongy brake pedal, loss of pressure, or inconsistent braking performance, even after repairs, it is often a clear indication that the master cylinder should be replaced rather than rebuilt.
Recurring issues indicate that the internal components are no longer reliable and may continue to fail even after repairs.
Repeatedly fixing the same problem can be both expensive and time-consuming and it also increases safety risks.
A new master cylinder provides a fresh and stable system, eliminating the root cause of recurring issues and ensuring consistency in overall braking performance.
4. Cost-Benefit Analysis
When choosing between repair and replacement, it is crucial to consider both the total cost and the long-term value.
Rebuilding a master cylinder may initially seem cheaper, but it requires time, effort and meticulous workmanship; furthermore, if the internal condition is not fully restored, it may not last very long.
If the repair proves unsuccessful, you may end up spending even more money and time to have the problem fixed again.
While the upfront cost of a new master cylinder is typically higher, it offers superior reliability, greater longevity and enhanced safety.
In most cases, specially when wear and tear or damage is clearly visible, replacing the unit rather than opting for repeated repairs is more cost-effective and provides greater peace of mind.
Conclusion – How to Fix Internal Master Cylinder Leak
So, when you fix an internal master cylinder leak is not just about repairing it, as it is to restore the proper control and confidence on the road.
As the master cylinder is responsible for generating and maintaining hydraulic pressure, even a minor defect in its internal seals can result in a spongy brake pedal, increased stopping distances and unreliable braking performance.
In this comprehensive guide, you have learned how to identify the symptoms of the problem, pinpoint its root cause and take the appropriate steps to diagnose and safely resolve the issue.
The key to a successful repair lies not merely in replacing parts, but in executing every step correctly, including keeping the system clean, using the proper brake fluid and thoroughly bleeding the brake lines to completely purge any trapped air.
Whether you choose to rebuild the master cylinder or replace it entirely, prioritizing precision and safety throughout the entire process ensures that your braking system functions exactly as it should.
Also, you can comment down below for more information related to this guide.
Frequently Asked Questions
FAQ 1: What is an internal leak in a master cylinder?
Answer: An internal leak in a master cylinder occurs when brake fluid, instead of passing through the internal seals to reach the brakes, remains trapped inside the cylinder itself. When you press the brake pedal, the piston and rubber seals located inside the master cylinder work together to generate hydraulic pressure. If these seals become worn or damaged, they fail to contain the fluid effectively, resulting in a loss of pressure within the system. This compromises braking performance, even if there are no visible signs of fluid leaking from the vehicle externally. It is a hidden issue that directly impacts your vehicle’s ability to come to a safe stop.
FAQ 2: How can I tell if my master cylinder has an internal leak?
Answer: The most common indication is that when you press and hold the brake pedal, it gradually begins to sink toward the floor. Typically, the pedal should remain firm and steady in one position; however, if it slowly drifts downward, it signifies that pressure is being lost within the system. You may also notice that the pedal feels soft or spongy when depressed; you might feel as though it takes longer to bring the vehicle to a stop, or that the overall braking response has become inconsistent. These symptoms arise because worn internal seals prevent the system from maintaining a consistent level of hydraulic pressure.
FAQ 3: Can a master cylinder fail without any external leaks?
Answer: Yes, a master cylinder can indeed fail without any external leaks, as the root cause of the problem lies within its internal components. The brake fluid remains contained within the system, but due to worn seals, it is unable to flow in the correct direction. As no fluid leakage is visible on the exterior of the vehicle, many people assume that everything is functioning correctly; however, in reality, the hydraulic pressure within the brake system is steadily diminishing. For this very reason, internal leaks prove to be extremely dangerous; they are difficult to detect until braking performance has deteriorated significantly.
FAQ 4: Why does the brake pedal begin to sink when an internal leak occurs?
Answer: The brake pedal begins to sink because the system fails to maintain hydraulic pressure. When you depress the pedal, pressure should be applied to the fluid, causing it to flow forward and engage the brakes at the wheels. However, if the internal seals within the master cylinder have worn out, the fluid bypasses these seals and begins to flow in the wrong direction. Consequently, the pressure gradually drops; as you continue to hold the pedal down, it slowly sinks toward the floorboard. This is a clear indication that the internal components of the system are not sealing properly.
FAQ 5: Is it safe to drive a vehicle with an internal leak in the master cylinder?
Answer: It is absolutely unsafe to drive a vehicle with this issue, as the reliability of the braking system cannot be guaranteed. Although the vehicle will eventually come to a stop, it will take longer to do so and you will have to exert significantly more force. In sudden or emergency situations, the brakes may not engage quickly enough, thereby increasing the risk of an accident. Over time, this condition may worsen, potentially leading to a complete brake failure; therefore, it should be repaired as soon as possible.
FAQ 6: Can I fix an internal leak in the master cylinder without replacing the entire unit?
Answer: In some cases, this issue can be resolved by rebuilding the master cylinder and replacing its internal seals. However, this method is effective only if the inner surface of the cylinder is smooth and undamaged. If there is internal corrosion, pitting, or excessive wear, simply rebuilding the unit will not provide a reliable or long-lasting solution. In most situations, replacing the master cylinder is the superior and safer option, as it guarantees proper pressure and longevity.
FAQ 7: Why do internal leaks occur in a master cylinder?
Answer: The primary causes include worn-out rubber seals, degraded brake fluid, moisture accumulation and general wear and tear over time. Brake fluid absorbs moisture, which can lead to corrosion inside the cylinder. Dust or debris can also damage the seals and internal surfaces. Over time, the heat and pressure generated by repeated braking cause the seals to lose their integrity and elasticity, resulting in internal leaks within the unit.
References:
[1] Analysis of failure of Brakes due to leakages of cylinder through CFD
https://www.iosrjournals.org/iosr-jmce/papers/vol8-issue1/A0810111.pdf

Hello Folks, Dean Shali here to help you out to solve the problems with your lovely vehicle, as i have lots of experience and knowledge about automotive industry as i woks directly with the customers and repair vehicles and i love to help the people to keep their cars safe and running smoothly.