Written By: Dean Shali
Fact Checked By: Sabré Cook
Reviewed By: Tamara Warren
Basically, brake problems often starts inside the “MASTER CYLINDER”, not at the wheels.
Because, braking system in a vehicle literally works using the HYDRAULIC PRESSURE and the master cylinder is the part that actually creates that needed pressure every time you press that damn brake pedal.
Plus, when you apply the pedal, then the brake fluid is what actually pushed through the sealed lines to the brake calipers or wheel cylinders; which then presses the brake pads or shoes against the rotors or drums that’s how it slow the vehicle down.
Additionally, for this process to work in safe and effective way every-time; the pressure must stay strong, stable and really balanced way across all wheels.
But, if the master cylinder itself cannot maintain the proper pressure, as even a small drop can lead to the soft pedal, longer stopping distance and have to deal with uneven braking.
As well as, in some of the cases: the internal seal wear or air in the system can cause the pressure loss without any visible leaks; that literally makes the problem way more harder to notice until the braking performance becomes totally shit.
That’s why, we have come up with this guide about How to Test Brake Master Cylinder Pressure so that you can test the brake master cylinder pressure and know by the true condition of your braking system.
Why is it Important to Check the Brake Master Cylinder Pressure?
1. Ensures Safe and Responsive Braking Performance
The pressure generated by the brake master cylinder is, in essence, the force required to bring your vehicle to a halt.
Therefore, if there is any deficiency in this pressure, your brakes will not function as intended.
When the pressure is robust and consistent, the brake pads exert firm pressure on the rotors, ensuring that whenever you depress the brake pedal, the vehicle stops, every time, exactly as you desire and just as quickly.
Conversely, if the pressure is low or inconsistent, the vehicle may take longer to stop or fail to respond immediately, particularly in sudden braking situations.
Checking the pressure helps verify that the braking force is being effectively transmitted to all wheels.
This is crucial for maintaining vehicle control, minimizing stopping distances and ensuring the safety of both the driver and passengers on the road.
2. Detects Internal Seal Defects Early
Inside the master cylinder, there are rubber seals designed to contain high-pressure brake fluid and distribute it throughout the entire system.
Over time, due to exposure to heat and the accumulation of contaminants within the fluid, these seals may wear down, crack, or deteriorate.
When this occurs, pressure can leak internally within the cylinder, rather than reaching the brakes, even if there are no visible external fluid leaks.
Such hidden defects are difficult to detect without proper diagnostic testing.
By performing a pressure check, you can identify early signs of seal wear before the issue escalates into a major safety hazard.
This allows you to repair or replace the master cylinder at the appropriate time, thereby preventing sudden and unexpected brake-related failures.
3. Prevents the Brake Pedal from Sinking or Feeling Loose
If the brake pedal feels soft or loose when depressed, or if it gradually sinks toward the floor, it is often an indication that the system is failing to maintain proper pressure.
This can be caused by air trapped in the brake lines, fluid leaks, or internal defects within the master cylinder.
When pressure is not maintained, the force applied by your foot does not fully reach the brakes, resulting in reduced braking effectiveness and a pedal that feels loose or unstable.
Checking the pressure helps ensure that the master cylinder is maintaining the correct level of pressure.
Furthermore, it assists you in identifying the root cause of the problem, enabling you to restore the pedal to a firm and reliable condition.
4. Helps Prevent Total Brake System Failure
A brake system typically does not fail suddenly or without warning.
It often begins with a slight drop in pressure, which gradually worsens over time.
If these early warning signs are ignored, the master cylinder may eventually fail to generate the pressure required to apply the brakes; this can lead to a dangerous situation where the vehicle is unable to stop properly.
Regular pressure checks help detect these issues before they escalate to a critical level, as they reveal whether the system is losing its capacity or balance.
By identifying and rectifying pressure-related issues in a timely manner, you can avoid major breakdowns, minimize repair costs and ensure that your braking system continues to function reliably under all driving conditions.
Understand, Signs of Low or Uneven Master Cylinder Pressure
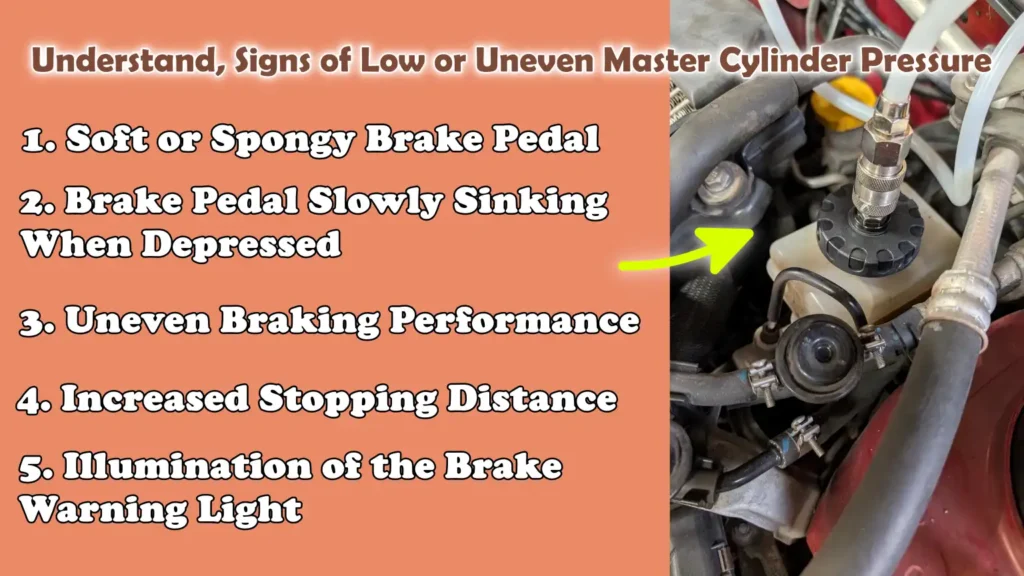
1. Soft or Spongy Brake Pedal
A soft or spongy brake pedal is one of the earliest and most common signs that the master cylinder is failing to maintain proper pressure.
When you depress the pedal, it should feel firm and steady; however, if it feels soft or requires being pushed down further than usual, it indicates that hydraulic pressure is not building up or being sustained correctly.
This is often caused by air trapped in the brake lines, worn internal seals, or brake fluid that has absorbed moisture over time.
As brake fluid is designed to be incompressible, any softness in the pedal usually signals that something is compromising the system’s ability to effectively transmit force, which directly impacts braking performance and control.
2. Brake Pedal Slowly Sinking When Depressed
If you press and hold the brake pedal and notice it slowly sinking toward the floor, without you lifting your foot, it is a definitive sign of internal pressure loss within the master cylinder.
This condition is typically caused by worn or defective seals, which allow brake fluid to leak internally rather than maintaining pressure within the system.
Even if no external leaks are visible, the pressure fails to remain where it is needed.
This can lead to a gradual loss of braking power over time and can be particularly dangerous when stopping in traffic or on an incline, as the vehicle may suddenly begin to drift forward.
3. Uneven Braking Performance
Uneven braking occurs when pressure is not distributed equally across all wheels; this can happen when the master cylinder is not functioning correctly or when there is a blockage or imbalance within the brake lines.
In a properly functioning system, all wheels should receive balanced pressure to ensure that the vehicle comes to a stop in a straight line.
If the pressure is uneven, you may feel the vehicle pulling to one side while braking, or you may notice irregularities in the way it comes to a halt.
This not only compromises vehicle control but also causes uneven wear on the brake pads and other components, potentially leading to further maintenance issues over time.
4. Increased Stopping Distance
An increase in stopping distance means that it is taking your vehicle longer than usual to come to a complete stop, a symptom often associated with insufficient hydraulic pressure within the braking system.
When the master cylinder fails to generate adequate pressure, the brake pads cannot press against the rotors with sufficient force, thereby reducing the friction necessary to rapidly decelerate the vehicle.
This issue may not always be immediately apparent, but it becomes significantly more noticeable during sudden stops or while traveling at high speeds.
A reduction in braking capability increases the risk of accidents; therefore, it is crucial to identify and resolve any pressure-related issues as quickly as possible.
5. Illumination of the Brake Warning Light
The brake warning light on your dashboard may illuminate when the system detects an issue related to pressure, fluid levels, or overall brake performance.
Although this light can be triggered by various factors, low or uneven pressure within the master cylinder is a potential cause that should not be overlooked.
Modern vehicles are often equipped with sensors that constantly monitor the condition of the braking system; if the pressure drops below a safe threshold or becomes unbalanced, the system alerts the driver.
Even if the brakes appear to be functioning normally, this warning serves as an indication that an internal fault exists; Therefore, a proper investigation is required to identify and rectify the problem before it becomes more serious.
Tools
| Tool/Item | Why It Is Needed | How to Use It Properly |
|---|---|---|
| Wrench Set | It is used to loosen and tighten brake line fittings and master cylinder connections without causing any damage. | Select the correct wrench size that fits the nut precisely; turn it gently to prevent rounding the edges and always maintain consistent pressure. |
| Screwdrivers | It assists in removing clips, covers, or reservoir caps from the area surrounding the master cylinder. | Use the appropriate tool such as: a flathead or Phillips screwdriver, apply light pressure and ensure the tool does not slip to prevent any damage. |
| Clean Cloth or Rag | It keeps the workspace clean and prevents dirt from entering the brake system, which could lead to damage. | Wipe down the area surrounding the master cylinder before opening it and immediately clean up any brake fluid spills. |
| Brake Pressure Gauge Kit | It measures the actual hydraulic pressure generated by the master cylinder, which is essential for accurate testing. | Connect the gauge to the brake line using the correct fittings, depress the brake pedal and carefully observe the pressure reading. |
| Line Adapters and Fittings | It ensures a secure and leak-proof connection between the pressure gauge and the brake lines. | Select the correct adapter size, tighten it properly (avoid overtightening) and check for leaks before beginning the test. |
| Brake Fluid – For Topping Up | It maintains the correct fluid level, which is crucial for accurate pressure readings and safe braking performance. | Use the recommended type of fluid, fill it to the correct level mark and avoid overfilling or allowing contaminants to enter the reservoir. |
| Gloves | It protects your hands from brake fluid, which can be harmful to the skin and is difficult to clean up. | Put these on before beginning work and keep them on while handling brake fluid or brake components. |
| Safety Glasses | This protects your eyes from splashes of brake fluid and particles of dirt during testing. | Keep this on throughout the entire process, specially when disconnecting lines or working under pressure. |
How to Ensure Safety Before Testing Brake Master Cylinder Pressure
1. Park the Vehicle on Level Ground
Before initiating any brake pressure test, it is crucial to park the vehicle on a level and uniform surface to ensure it remains stable and does not shift unexpectedly.
A level surface ensures that the brake fluid within the system is distributed evenly, allowing you to obtain more accurate pressure readings during testing.
If the vehicle is parked on a slope or uneven terrain, it may roll slightly or its weight may shift to one side, which can compromise both safety and the accuracy of your test results.
Working around the engine bay in a stable position also becomes easier, as it eliminates the risk of losing your balance or placing undue stress on the brake components.
2. Engage the Parking Brake
Engaging the parking brake adds an extra layer of safety by locking the rear wheels and preventing the vehicle from moving while you are working on it.
Even if the vehicle appears stationary, slight movement may occur during testing as you repeatedly depress the brake pedal.
The parking brake ensures that the vehicle remains firmly anchored in place at all times, thereby minimizing the risk of accidents or injury.
This is particularly important when working alone, as you may not be able to react quickly enough should the vehicle begin to roll.
3. Turn Off the Engine
The engine should always be turned off before performing a brake master cylinder pressure test, as keeping the engine running can activate the brake booster, which alters the manner in which pressure is applied within the system.
By conducting the test with the engine off, you can measure the actual hydraulic pressure generated by the master cylinder without any external assistance.
This results in more accurate and consistent readings.
This also mitigates risks associated with the engine’s moving parts, heat and vibration, factors that could otherwise render the testing process unsafe or compromise its accuracy.
4. Clean the Area Surrounding the Master Cylinder to Prevent Contamination
Before opening the reservoir or disconnecting any brake lines, the area surrounding the master cylinder should be thoroughly cleaned.
If the surrounding area is not clean, dirt, dust, or minute particles can easily enter the brake system; even the slightest trace of contamination can damage internal seals or clog fluid passages.
This can lead to compromised pressure performance or result in brake-related issues over time.
Wiping down the surrounding area with a clean cloth ensures that the brake fluid remains clean and that the system continues to function correctly following the testing process.
5. Never Allow Brake Fluid to Come into Contact with Painted Surfaces
Brake fluid is highly corrosive to painted surfaces; if it comes into contact with paint, it can rapidly degrade your vehicle’s finish.
Even a single spilled drop of fluid can cause permanent staining or lead to the paint peeling over time.
During testing, particularly when lines are opened or connections are loosened, there is often a risk of fluid leaking or dripping.
Therefore, it is crucial to handle brake fluid with extreme care, immediately wipe up any spills with a clean cloth and prevent it from accumulating on painted parts.
Protecting the vehicle’s surface not only preserves its aesthetic appeal but also helps avoid unnecessary repair costs.
How to Test Brake Master Cylinder Pressure – Easy Guide
1. Locate the Master Cylinder
The brake master cylinder is typically mounted on the firewall, directly in front of the driver, and is connected to the brake booster.
This is the primary component responsible for generating hydraulic pressure when the brake pedal is depressed.
Correctly identifying this component is crucial, as all testing procedures will be performed from this location.
Typically, it features a fluid reservoir situated on top, with metal brake lines extending outward from it.
Before touching anything, take a moment to observe how the lines are connected and ensure that the surrounding area is clean; this will enhance the accuracy of your work and help prevent contaminants from entering the system.
2. Check the Brake Fluid Level
Before conducting a pressure test, always check the brake fluid level in the reservoir, as a low fluid level can result in inaccurate readings and may also indicate an underlying internal issue.
The fluid level should reach the designated marks, typically labeled “Minimum” and “Maximum” directly on the reservoir.
If the level is low, it may suggest a leak somewhere in the system or indicate that certain brake components have worn out.
Maintaining the correct fluid level is essential, as the braking system relies entirely on the fluid to generate force; even a slight deficiency in fluid volume can negatively impact the system’s ability to build and maintain pressure during testing.
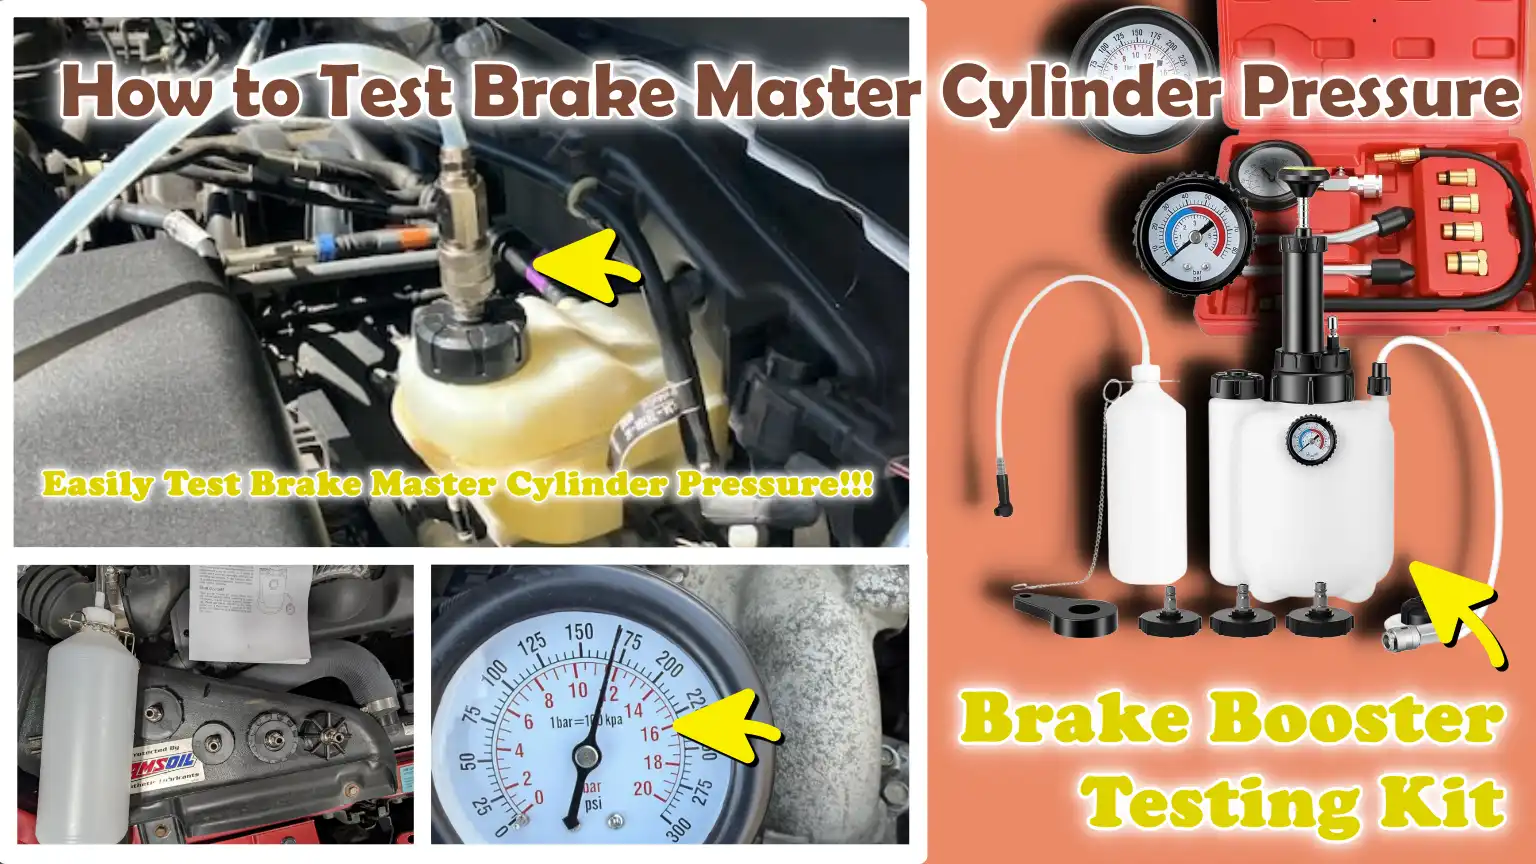
3. Connect the Brake Pressure Gauge
To accurately measure the actual pressure, it is necessary to connect a brake pressure gauge to the master cylinder via the brake lines.
Carefully loosen and disconnect one of the brake lines from the master cylinder, taking special care to ensure that the fitting is not damaged during this process.
Next, using the appropriate adapter, securely attach the pressure gauge so that it fits snugly and creates a leak-free seal.
Establishing a robust connection is crucial, as any leaks could result in pressure loss and yield inaccurate readings.
Once installed, double-check all fittings before proceeding to the next step to ensure they are properly sealed.
4. Depress the Brake Pedal
Once the gauge is securely connected, slowly depress the brake pedal, applying steady and consistent force.
The objective is to simulate normal braking conditions without applying sudden or uneven pressure.
As you depress the pedal, carefully observe the reading displayed on the gauge.
A properly functioning master cylinder will rapidly build pressure and maintain a stable pressure level for as long as the pedal remains depressed.
If the pressure builds slowly, feels weak, or fails to reach the expected level, it may indicate internal wear within the system or another internal issue.
5. Compare Pressure Readings
Once you have obtained a reading, it is essential to compare the pressure across different circuits such as: the front and rear brake lines (where applicable).
A balanced system should deliver uniform pressure across all circuits.
You should also compare your readings against the pressure range specified by the manufacturer for your specific vehicle, as different systems may operate at varying pressure levels.
Uneven readings, or readings falling below the expected level, may point to issues such as internal leaks, clogged lines, or an uneven distribution of braking force.
6. Check for Pressure Drop
After reaching a steady pressure level, firmly depress and hold the brake pedal while carefully monitoring the gauge for any drop in pressure over time.
In a properly functioning system, the pressure should remain constant without any decline.
If the pressure gradually decreases while the pedal is held down, it typically indicates an internal leak within the master cylinder, often caused by worn seals that allow brake fluid to bypass the piston.
This step is crucial because it uncovers hidden issues that might not manifest during normal driving but, if left unaddressed, could lead to serious braking-related problems.
Know, The Normal Brake Master Cylinder Pressure Range
1. Common PSI Range for Most Vehicles
Brake master cylinder pressure is typically measured in pounds per square inch (PSI).
In most passenger vehicles, when the brake pedal is depressed with light to moderate force, the normal braking pressure generally falls between 800 PSI and 1,500 PSI.
Pressure will be lower during light braking, while it may increase during hard braking, depending on the specific design of the system.
This pressure firmly presses the brake pads or shoes against the rotating components, thereby slowing the vehicle down.
If the pressure is too low, the brakes will feel weak and the vehicle will take longer to come to a stop.
If pressure builds up slowly or fails to reach this standard range, it may indicate internal wear, trapped air within the system, or fluid-related issues; all of which compromise braking efficiency.
2. Differences Between Disc and Drum Systems
Brake systems that utilize a combination of disc brakes and drum brakes operate in slightly different ways.
This distinction affects how pressure is applied and distributed within the system.
Disc brake systems generally require higher and more immediate pressure, as they rely on calipers to press the pads directly against the rotors.
This process demands significant force to effectively bring the vehicle to a halt.
Drum brake systems, which are often installed on the rear wheels of many vehicles, as it can operate effectively at somewhat lower pressure levels.
These systems sometimes incorporate additional components, such as return springs and self-adjusting mechanisms.
Due to these differences, in vehicles featuring a combination of front disc brakes and rear drum brakes, the pressure balance between the distinct hydraulic circuits may vary slightly.
Nevertheless, for safe and reliable braking, it is essential that the entire system remains balanced and delivers consistent performance.
3. The Importance of Manufacturer’s Instructions
While understanding general pressure ranges is helpful, the most accurate and reliable information is always derived from the instructions provided by the vehicle’s manufacturer.
Each vehicle is engineered with a specific braking system design in mind.
This involves variations in master cylinder size, brake line layout and component types, all of which play a crucial role in determining the correct pressure range.
Adhering to the values specified by the manufacturer ensures that you are accurately assessing the system.
This prevents you from mistaking normal operating conditions for a malfunction, while simultaneously ensuring that you do not overlook any genuine issues.
Following the correct instructions also maintains proper brake balance, safety and performance, precisely as envisioned during the vehicle’s original design phase.
How to Interpret the Test Results
1. Normal Pressure – The System is Functioning Correctly
When you depress the pedal, if the brake pressure rises rapidly and then remains constant without dropping, it is a definitive indication that the master cylinder and the entire braking system are functioning properly.
This means that the internal seals are maintaining pressure, the brake fluid is flowing correctly and the force applied by your foot is being effectively transmitted to the brakes at each wheel.
Stable and consistent pressure also suggests that there is no trapped air within the system, nor are there any hidden leaks that could compromise performance.
In this scenario, you will feel firmness in the pedal, the braking response will be predictable and stopping distances will remain normal, all of which are essential for safe driving.
2. Low Pressure – Internal Leakage or Worn Seals
If you apply firm pressure to the brake pedal, yet the pressure remains lower than expected, it typically points to an issue within the master cylinder, most often, the seals have become worn or damaged.
These seals are responsible for maintaining the brake fluid under pressure; when they wear out, the fluid bypasses the seals instead of flowing forward through the brake lines.
The result is a reduction in the total hydraulic force reaching the brakes.
Low pressure can also be caused by minor leaks elsewhere in the system or by degraded brake fluid, both of which negatively impact performance.
In this situation, braking power is often diminished, the pedal feels soft or spongy and stopping distances increase; therefore, it is crucial to address this issue as soon as possible.
3. Uneven Pressure – Distribution Issues or Blocked Lines
An imbalance in pressure between different brake circuits (such as the front and rear brakes) indicates that braking force is not being distributed uniformly throughout the system.
This can occur if there is a blockage in one of the brake lines, if the proportioning valve is malfunctioning, or if an internal issue within the master cylinder prevents pressure from flowing evenly.
When pressure is uneven, certain wheels may receive greater braking force than others; this can cause the vehicle to pull to one side during braking or compromise stability while coming to a stop.
Over time, this imbalance can also lead to uneven wear on brake components and a reduction in overall braking efficiency.
4. Pressure Drop – Internal Bypass Failure
If you depress the brake pedal and pressure builds normally, but then gradually begins to diminish while you keep the pedal depressed, it is a clear indication of an internal bypass failure within the master cylinder.
In this scenario, the internal seals are no longer able to effectively contain the fluid; instead of maintaining pressure within the brake lines, the fluid leaks back internally into the cylinder itself.
This issue is often not externally visible, as there may be no external fluid leaks.
This loss of pressure typically causes the brake pedal to slowly sink toward the floor; if left unaddressed, this can prove extremely dangerous, as it compromises the system’s ability to sustain braking force over time.
Know, The Common Issues Identified During Testing
Not only this, there’s studies that shows that even small errors in the pressure estimation can effect the braking control and vehicle stability as well, so this is why you need to test brake cylinder pressure regularly, as it ensures the system is delivering the precise and reliable braking force in real driving conditions.[¹]
1. Worn Master Cylinder Seals
Inside the master cylinder are rubber seals that generate and maintain hydraulic pressure every time you depress the brake pedal.
Over time, these seals are exposed to heat, pressure and brake fluid, which can cause them to harden, crack, or wear out.
When the seals deteriorate, they can no longer effectively maintain pressure; consequently, instead of being pushed forward through the brake lines, the brake fluid leaks internally within the cylinder itself.
This often leads to issues such as a loss of pressure, a soft pedal feel, or the pedal slowly sinking toward the floor when held down.
It is crucial to understand that, in such cases, no external fluid leaks may be visible; this is why pressure testing is invaluable for detecting the problem before braking performance degrades to an unsafe level.
2. Trapped Air in the System
Brake systems are designed to operate using fluid, not air, because brake fluid is incompressible, whereas air is compressible.
If air enters the brake lines due to improper bleeding, leaks, or low fluid levels, it creates air pockets that compromise the system’s ability to generate robust pressure.
When you depress the brake pedal, a portion of the applied force is expended on compressing the trapped air rather than being transmitted to the brakes.
Consequently, the pedal feels spongy or soft when depressed and overall braking efficiency is reduced.
During pressure testing, the presence of air in the system may cause pressure readings to be unstable or inconsistent, clearly indicating that the system requires proper bleeding to restore full braking performance.
3. Contamination of Brake Fluid
To function correctly, it is essential that brake fluid remains clean and free from moisture, dirt and other impurities.
Over time, brake fluid can absorb moisture from the air, particularly if the system is not properly sealed.
This diminishes its effectiveness and can lower its boiling point, creating a risk of reduced braking performance during heavy use.
Dirt or debris present in the fluid can damage internal components, such as seals and may also clog the intricate passageways within the system.
If contaminated fluid is not replaced, it can result in erratic pressure readings, poor braking response and, in the long run, damage to the system itself.
Regular inspections and timely fluid replacement are crucial for maintaining proper pressure levels and ensuring the overall health of the system.
4. Faulty Brake Lines
Brake lines transport pressurized fluid from the master cylinder to the brakes located at each wheel; therefore, any defect in these lines can directly impact the supply of pressure.
Over time, exposure to moisture, road debris and general aging can cause brake lines to develop cracks, corrosion, or leaks.
Even a minor leak can lead to a significant drop in pressure, resulting in weak or uneven braking.
In some instances, a partially clogged or kinked line can restrict fluid flow, creating an imbalance in pressure distribution among the wheels.
During inspections, faulty lines can often be identified by low or unstable pressure readings.
Keeping brake lines in good condition is absolutely essential for maintaining proper pressure levels and ensuring safe braking performance.
What to Do If Brake Pressure Drops
1. Bleed the Brake System
When brake pressure drops, one of the first and most effective steps is to bleed the brake system to expel any trapped air.
Air present within the brake lines compromises the system’s ability to generate proper pressure because, unlike brake fluid, air is compressible.
This can cause the brake pedal to feel spongy (soft) and result in reduced braking performance.
Bleeding the system expels these air bubbles, allowing fresh brake fluid to take their place and enabling the system to effectively build pressure once again.
It is crucial to follow the correct bleeding sequence for your specific vehicle, typically starting with the wheel farthest from the master cylinder, to ensure that all air is completely removed and the system returns to normal operation.
2. Check for Leaks
A loss of brake pressure is often caused by a fluid leak anywhere within the braking system, including the master cylinder, brake lines, hoses, or wheel components.
Even a minor leak can deplete the volume of fluid necessary to generate proper pressure, thereby negatively impacting braking performance.
Carefully inspect all visible components, particularly around joints and fittings, to detect any signs of moisture, fluid drips, or stains.
Additionally, check the level of the brake fluid reservoir; if the fluid level is dropping without any apparent cause, it is often an indication of a leak.
Identifying and immediately repairing a leak is critical, as a continuous loss of fluid will lead to a gradual decline in pressure and could ultimately result in total brake failure.
3. Replace the Master Cylinder if Necessary
If proper pressure is not restored even after bleeding the system and repairing any leaks, the master cylinder itself may be defective and require replacement.
Due to worn or damaged internal seals, the master cylinder may fail to maintain pressure, even if all other components of the system are functioning correctly.
Such a malfunction is often confirmed when pressure builds but fails to remain steady, or when the brake pedal slowly sinks toward the floor while being held down.
Replacing the master cylinder restores the system’s ability to consistently generate and maintain pressure, a capability that is absolutely essential for safe and reliable braking.
4. Re-check After Repairs
Upon the completion of any repair work, it is crucial to re-check the brake master cylinder pressure to ensure that the original issue has been fully resolved.
This re-check verifies that the system is now generating and maintaining the correct pressure and that no new problems were inadvertently introduced during the repair process.
It also provides the assurance that the brakes will perform exactly as expected under actual driving conditions.
Skipping this step can allow hidden issues to go unnoticed; therefore, always verify the results to ensure that the braking system is safe and functioning properly.
Read More:
- How to Replace Brake Booster
- How to Fix Brake Booster Vacuum Leak
- How to Test Brake Booster Functionality
- How to Lubricate Brake Caliper Pins Properly
- How to Rebuild Brake Caliper at Home
- How to Check Brake Caliper Piston Movement
- How to Resurface Brake Rotors at Home
- How to Fix Brake Rotor Runout
- How to Check Brake Disc Runout
- How to Prevent Brake Fluid Boiling
Follow, the Pro Tips for Accurate Pressure Testing
1. Use a Calibrated Pressure Gauge
A calibrated pressure gauge is essential for obtaining accurate and reliable readings, as even a minor error in measurement can lead to an incorrect diagnosis.
Over time, gauges can lose their accuracy due to wear and tear, internal defects, or improper handling; this means that the numbers you observe may not accurately reflect the actual brake pressure.
Using a properly calibrated gauge ensures that the pressure values are precise and dependable.
This helps you clearly understand whether the master cylinder is operating within the correct range or if there is a genuine issue that requires attention.
Always handle the gauge with care and store it properly to ensure it continues to provide accurate results in future tests.
2. Test with the Engine Off and On for Comparison
Testing brake pressure in both “engine off” and “engine on” conditions provides you with a more comprehensive understanding of how the system performs under varying circumstances.
When the engine is off, you are measuring only the pure hydraulic pressure generated by the master cylinder, without any external assistance.
When the engine is running, the brake booster applies additional force, altering the pedal feel and the manner in which pressure is applied.
Comparing the two results helps you identify whether the issue lies with the master cylinder, the booster, or another component of the system.
This simple comparison can prevent misdiagnosis and provide you with a clearer picture of the overall brake performance.
3. Repeat the Test Multiple Times
Repeating the pressure test several times is crucial, as it helps ensure that your readings are consistent and have not been skewed by minor errors or sudden fluctuations in conditions.
A single test alone does not always reveal the complete picture specially if there is air in the system, minor fluctuations in fluid levels, or inconsistent pedal pressure.
By performing multiple tests, you can identify patterns and verify whether the pressure remains consistent each time.
Consistent readings typically indicate a healthy system, whereas fluctuating or unstable readings may point to an underlying internal issue that requires further investigation.
4. Prevent Air from Entering the System
One of the most common errors during pressure testing is inadvertently introducing air into the brake system while connecting or disconnecting lines.
The presence of air within the system compromises its ability to generate proper pressure, which can lead to inaccurate test results and make it even more difficult to pinpoint the actual problem.
To avoid this, always ensure that all connections are secure; exercise caution when disconnecting lines and minimize the time the system is exposed to open air.
If air does enter, it is absolutely essential to expel it by “bleeding” the system before proceeding with accurate testing.
Keeping the system sealed and air-free ensures that your pressure readings accurately reflect the true condition of the master cylinder and the braking system.
Know, The Common Mistakes of Testing Brake Master Cylinder Pressure
1. Failing to Check Fluid Levels
One of the most common mistakes made during brake pressure testing is failing to check the brake fluid level before beginning.
The entire braking system relies on having sufficient fluid to generate and transmit pressure; even a slight drop in the fluid level can result in inaccurate readings.
If the fluid level falls below the designated mark, air can enter the system, leading to reduced pressure and causing the brake pedal to feel spongy or unstable when depressed.
This may lead you to suspect a major malfunction in the master cylinder, when in reality, the issue is simply a low fluid level.
Always ensure that the reservoir is filled to the correct level so that the test accurately reflects the true condition of the system.
2. Using the Wrong Adapter
Using an incorrect adapter when connecting a pressure gauge can compromise the seal, cause fluid leaks, or even damage the brake line fittings.
Brake systems are designed with specific thread sizes and types; attempting to force an adapter that does not match the system can result in inaccurate pressure readings during testing or lead to fluid leakage.
Loose or improperly connected fittings allow pressure to escape, creating the false impression that the master cylinder is weak, even when it is actually functioning correctly.
Selecting the appropriate adapter ensures a tight and secure connection, allowing you to accurately measure pressure without any interference caused by the connection itself.
3. Failing to Properly Tighten Fittings
If the fittings are not tightened correctly, the system will fail to maintain pressure during testing, resulting in inaccurately low readings and unreliable results.
Loose fittings can lead to brake fluid leaks or allow air to enter the system, both of which compromise the effectiveness of the test.
Furthermore, overtightening fittings can damage the threads or the fittings themselves, potentially leading to major issues within the brake system down the road.
The correct approach is to tighten all connections firmly, yet carefully; ensure they are secure enough to prevent fluid leakage, but avoid applying excessive force that risks causing damage.
4. Ignoring Manufacturer’s Instructions
Disregarding the manufacturer’s instructions is a serious error, as every vehicle’s braking system is designed to operate within a specific pressure range.
Relying solely on generic pressure values can yield misleading results, either a genuine problem may be overlooked, or a non-existent issue may be assumed to be present, even while the system is actually functioning exactly as intended.
The manufacturer’s instructions take into account the precise design of the master cylinder, brake lines and brake components; therefore, they provide the most accurate reference for diagnostic purposes.
Adhering to these guidelines ensures that your test results are meaningful, enabling you to make sound repair decisions based on accurate information.
Conclusion – How to Test Brake Master Cylinder Pressure
Now, you have understood that brake safety is not about what you feel, but it is about what the system can truly deliver under the pressure and the smartest way to maintain the braking performance is to measure it not just assumption works everyday.
Many issues within the braking system such as: worn seals, trapped air, or minor leaks, develop gradually and are often overlooked during routine visual inspections.
By checking the pressure, you can identify these hidden problems before they compromise braking power or create unsafe driving conditions.
A properly functioning master cylinder builds pressure rapidly, distributes it evenly and maintains it consistently without any degradation; any deviation from this behavior is a clear indication that something requires attention.
Regular checks not only enhance safety but also help you avoid costly repairs by catching problems before they become severe.
Now, you can comment down below for more information about this guide.
Frequently Asked Questions
FAQ 1: What is the normal brake master cylinder pressure?
Answer: In most passenger vehicles, during light to moderate braking, the normal brake master cylinder pressure typically ranges between approximately 800 PSI and 1,500 PSI. The exact figure depends on the type of braking system, the vehicle’s design and how firmly the brake pedal is depressed. Light braking generates lower pressure, while emergency braking can generate significantly higher pressure. Most importantly, when you depress the pedal, the pressure should build rapidly and remain steady. Always compare your readings against the manufacturer’s specified specifications, as they provide the most accurate range for your specific vehicle.
FAQ 2: Can I check brake master cylinder pressure without a gauge?
Answer: While one can gauge the condition of the brakes by observing the “feel” of the pedal without a gauge, you cannot accurately measure the actual pressure without a proper brake pressure gauge. A firm pedal usually indicates good pressure, whereas a soft or sinking pedal may signal a problem; however, these indications are not always reliable. Many internal issues such as: worn seals or minor pressure leaks, as it cannot be confirmed without measuring the pressure. Using a gauge provides clear and precise results, allowing you to accurately diagnose the problem rather than relying on guesswork.
FAQ 3: Why does brake master cylinder pressure drop?
Answer: There can be several reasons for a drop in brake master cylinder pressure, most of which originate within the braking system itself. The most common cause is worn or damaged seals inside the master cylinder; this allows brake fluid to leak internally, resulting in a loss of pressure. Air trapped within the brake lines can also cause a drop in pressure, as air compresses itself rather than effectively transmitting the braking force. Other causes include brake fluid leaks, degraded or old brake fluid and faulty brake lines. In some cases, an improper bleeding procedure or loose fittings can also affect pressure. Accurate diagnosis and inspection are required to pinpoint the exact cause.
FAQ 4: How do I know if my master cylinder is failing?
Answer: If you know what signs to look for, a failing master cylinder often provides clear warnings. Common symptoms include the brake pedal becoming soft or spongy (yielding), the pedal slowly sinking toward the floor when depressed and reduced braking effectiveness. You may feel that the brakes are not engaging properly, or you might notice that it takes longer for the vehicle to come to a stop. In some instances, no external fluid leaks are visible, as the issue is occurring internally within the cylinder itself. The most reliable method to confirm a master cylinder failure is to check the pressure and verify that it is building correctly and remains stable.
FAQ 5: How often should I check the brake master cylinder pressure?
Answer: Under normal operating conditions, it is not necessary to check the brake master cylinder pressure very frequently; however, you should definitely check it whenever you notice any change in how the brakes function. If the brake pedal feels unusual, the brakes become less effective, or any warning signs appear, immediate inspection is required. It is also a good practice to check the pressure during major brake system repairs or when replacing critical components. Regular checks ensure that the system is functioning correctly and help prevent sudden, unexpected failures.
FAQ 6: Can low pressure lead to brake failure?
Answer: Yes, if a low brake pressure issue is left unaddressed, it can lead to severe braking problems, potentially resulting in complete brake failure. The braking system relies on strong hydraulic pressure to exert force on the wheels; If this pressure is insufficient, the brakes may fail to function correctly. Low pressure can result in increased stopping distances, reduced vehicle control and a brake pedal that feels spongy or unresponsive. If the pressure drops too low, the vehicle may fail to stop even when necessary, creating a hazardous situation. Therefore, it is crucial to identify and resolve pressure-related issues in a timely manner.
FAQ 7: Is it safe to drive with low brake pressure?
Answer: Driving with low brake pressure is unsafe, as it directly compromises your ability to stop the vehicle quickly and reliably. Even if the brakes appear to be working initially, low pressure can delay response times and increase stopping distances, particularly in emergency situations. Over time, this issue may worsen, increasing the risk of sudden brake failure. If you suspect that your brake pressure is low, it is best to refrain from driving until the problem has been properly diagnosed and repaired.
References:
[1] Brake Pressure Estimation of the Integrated Braking System Considering Vehicle Dynamics
https://www.researchgate.net/publication/365315407_Brake_Pressure_Estimation_of_the_Integrated_Braking_System_Considering_Vehicle_Dynamics

Hello Folks, Dean Shali here to help you out to solve the problems with your lovely vehicle, as i have lots of experience and knowledge about automotive industry as i woks directly with the customers and repair vehicles and i love to help the people to keep their cars safe and running smoothly.