Written By: Dean Shali
Fact Checked By: Sabré Cook
Reviewed By: Tamara Warren
Because, Car Paint is actually exposed to the harsh elements such as: “UV- Rays”, road dust, bird droppings, tree sap and moisture on the atmosphere, that all can eat your vehicle’s paint shine one-by-one.
That’s why, you needed to add wax so that it can add another protective later and protect your vehicle’s clear coat like a “BIG GOOD BROTHER”.
Literally, wax acts as a thin protective layer over the paint, that helps to block the UV damage, reduces oxidation and even creates a smooth surface that repels the water, dirt and other contaminants as well.
Additionally, there’s studies that shows that well-waxed surface can significantly reduces the paint deterioration and maintain the gloss for the logner period of time.
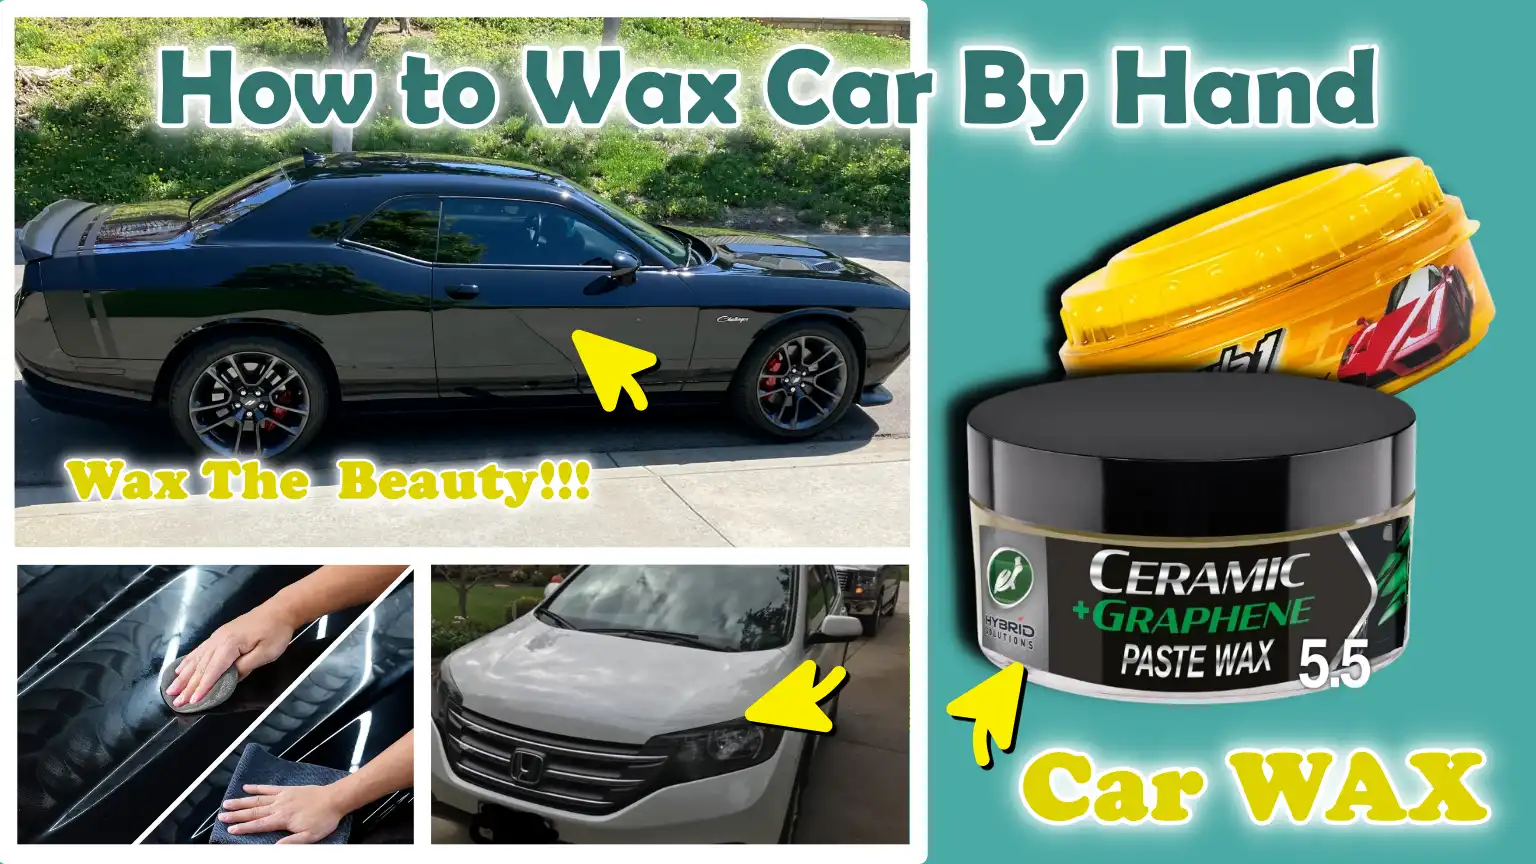
So, in this guide you’ll learn How to Wax Car By Hand, as hand wax gives you better control over pressure and coverage, that actually reduces the risk of getting swirl marks that can sometimes happen with the machine application as well.
Know, The Ultimate Benefits of Hand-Waxing Your Car
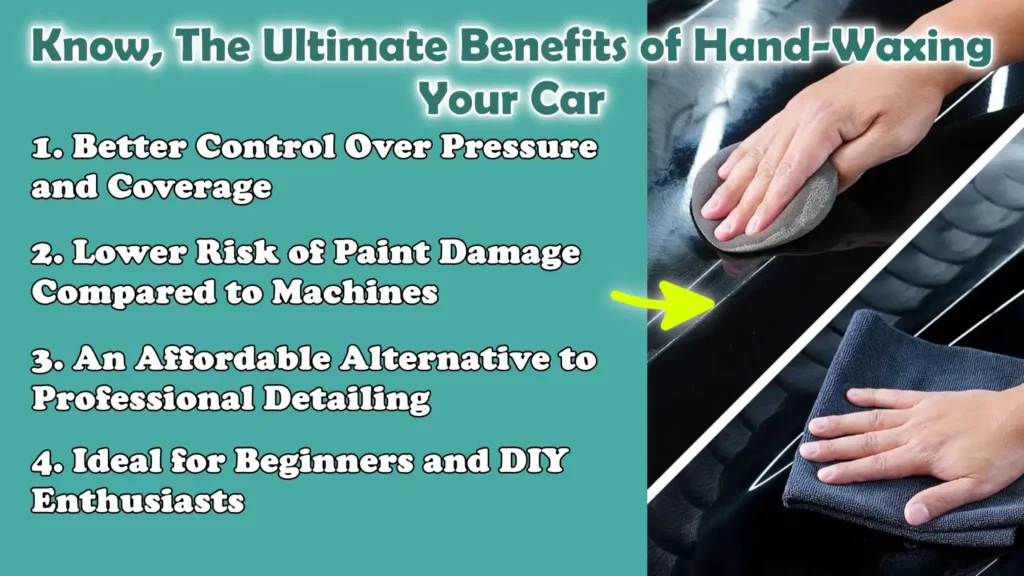
1. Better Control Over Pressure and Coverage
Hand-waxing your car gives you direct control over the amount of pressure you apply and how evenly the wax spreads across the surface.
This is crucial because modern car paint features a thin “clear coat” (protective layer), which can be damaged by excessive force or improper wax application.
When you use your hands along with a soft applicator pad, you can feel the surface and adjust your technique to suit the specific needs of the paint, whether you are working on smooth areas like the hood or tight spots such as door handles and edges.
This level of control allows you to apply thin, uniform layers of wax, a technique professionals specifically recommend to ensure proper “bonding” and long-lasting protection.
It also ensures that no spots are missed or receive excessive wax, resulting in a consistent shine across the vehicle and an overall superb finish.
2. Lower Risk of Paint Damage Compared to Machines
Although using machines like polishers or buffers can be effective, they also carry a higher risk of causing damage if not operated correctly, specially for beginners.
Excessive speed, excessive pressure, or the selection of an incorrect pad can result in “swirl marks” or “holograms” (hazy streaks) on the paint; in severe cases, the clear coat can even burn through.
Hand-waxing significantly mitigates these risks because the process is gentler and slower, allowing you to work safely without generating excessive heat or friction.
As your hands move with control and precision, the likelihood of accidentally causing damage is significantly reduced.
For this reason, hand-waxing emerges as a safe option for maintaining the health of your car’s paint, particularly if you are working on a brand-new vehicle or one with a delicate finish.
3. An Affordable Alternative to Professional Detailing
Professional car detailing services can yield excellent results, but they often come with a hefty price tag, specially if performed on a regular basis.
Hand-waxing your car at home offers a far more economical way to achieve the same protective benefits and a brilliant shine.
With just a few basic supplies such as: high-quality wax, applicator pads and microfiber towels, you can preserve your car’s appearance without spending a fortune.
Over time, this approach can save you a considerable amount of money while simultaneously protecting the paint, thereby minimizing the need for costly paint repairs or restoration work.
It also affords you the convenience of waxing your car at your own leisure; rather than being tied to a fixed appointment, you can wax your vehicle whenever the need arises.
4. Ideal for Beginners and DIY Enthusiasts
Hand-waxing is one of the simplest and most beginner-friendly methods of car care available.
Consequently, it is the perfect choice for anyone looking to maintain their vehicle without requiring specialized skills or expensive equipment.
The process is remarkably straightforward, requires no technical expertise and allows you to learn at your own pace.
Because you are performing the task with your own hands, you can pay close attention to how the wax interacts with the surface, determine the precise amount of wax to apply and gain an intuitive understanding of how to achieve the finest possible finish.
This kind of hands-on learning experience boosts your self-confidence and helps you refine your technique over time.
For DIY enthusiasts, it is a deeply satisfying experience, as they can witness firsthand how their own hard work transforms a lifeless and dull surface into a smooth and glossy finish.
What are the Types of Car Wax – Choose the Right Wax
Choosing the right type of car wax is crucial, as each formula is designed for a specific purpose, level of protection and finish.
Car wax does not merely provide shine; it also acts as a protective shield over the clear coat.
It helps mitigate damage caused by sunlight, moisture, dust and pollution.
The three most common types of car wax are: natural Carnauba wax, synthetic wax (also known as paint sealant) and spray wax.
Each type of wax possesses its own unique characteristics, durability levels and application methods.
Understanding how they function will help you select the best option based on your car’s condition, your local environment and the amount of time you are willing to dedicate to car care.
1. Natural Carnauba Wax
Natural Carnauba wax is derived from the leaves of the Carnauba palm tree.
It is renowned for its deep, luxurious and warm luster, which truly accentuates the car paint’s original color.
It is particularly popular for dark-colored cars, as it delivers a deep, highly reflective, almost “wet-look”, finish that makes the paint truly stand out.
Carnauba wax creates a smooth surface that causes water droplets to bead up and slide off easily.
This also helps prevent dust and dirt from accumulating on the paintwork.
However, being a natural product, it tends to wear off more quickly than synthetic waxes.
Depending on weather conditions and usage, it typically lasts anywhere from a few weeks to a few months.
This makes it the ideal choice for car owners who prioritize aesthetics and are willing to apply wax periodically to maintain that exquisite finish.
2. Synthetic Wax – Sealant
Synthetic wax (often referred to as paint sealant) is formulated using specialized chemical compounds.
It is designed to provide long-lasting protection and durability.
Unlike natural waxes, it bonds more strongly with the painted surface.
This enables it to withstand heat, UV rays, rain and environmental contaminants more effectively.
Consequently, it is an excellent choice for cars that are frequently exposed to harsh weather conditions such as: intense sunlight, heavy rain, or extreme temperatures.
Synthetic wax typically lasts for several months.
Therefore, it is ideal for those seeking long-term protection who prefer not to wax their vehicles frequently.
Although it may not replicate the warm glow of Carnauba wax, it delivers a clean, glossy finish combined with exceptional durability.
It serves as a more practical option for daily-driven vehicles.
3. Spray Wax
Spray wax is designed for quick and easy application, making it a convenient option for maintaining your car’s shine between full waxing sessions.
It can be applied in a very short time, often immediately after washing the car, and serves to enhance gloss while adding a light layer of protection.
Spray wax is extremely user-friendly and does not require the same level of effort or meticulousness as paste or liquid waxes; for this reason, it is perfect for beginners or for performing quick touch-ups.
However, it does not offer the same level of strength or protection as natural or synthetic waxes; therefore, it should not be relied upon as the primary layer of protection.
Instead, it functions best as a maintenance product, extending the lifespan of the existing wax layer and keeping the car looking fresh and glossy at all times.
Tools
| Tool / Material | Why It Is Needed | How to Use It Properly |
|---|---|---|
| Car Wash Soap – pH-balanced | This soap is formulated specifically for cars; it does not strip away the car’s wax layer, nor does it cause any damage to the ‘clear coat’ (the protective top layer). Common household detergents are often too harsh; over time, they can strip away the car’s protective layer, causing the paint to fade. | Dilute the soap in water according to the instructions. Use it when washing the car, prior to applying wax, to thoroughly remove dust, dirt and grease. Always rinse the car thoroughly to ensure no soap residue remains on the surface. |
| Microfiber Wash Mitt | The microfiber mitt (glove) is extremely soft and is designed to lift dirt away from the surface rather than dragging it across the paint; this helps prevent scratches and swirl marks on the car. | Dip the mitt into the soapy water and wash the car using gentle, straight-line strokes. Rinse the mitt frequently, before washing the next section of the car, to dislodge any trapped dirt. |
| Bucket – Two-Bucket Method | Using the ‘Two-Bucket Method’ significantly reduces the risk of scratching your car. One bucket contains clean, soapy water, while the second bucket is used to rinse dirt off the mitt. | Fill one bucket with soapy water and the other with clean water. After wiping the mitt across the car’s surface, rinse it in the bucket of clean water before dipping it back into the soapy water bucket. |
| Drying Towels – Microfiber | Microfiber drying towels absorb water very quickly and safely, ensuring that no scratches are inflicted on the paintwork. Properly drying the car prevents water spots, which can mar the shine of the wax. | After washing the car, gently place the towel on the car’s surface and slowly glide it across to absorb the water. To avoid leaving marks on the car, do not rub the towel too vigorously. |
| Foam or Microfiber Applicator Pads | These pads help apply the wax in a thin, even layer, a crucial step that ensures the wax sets correctly and provides the car with a smooth, glossy finish. They also help minimize wax wastage. | Apply a small amount of wax to the pad and, using light pressure, slowly spread it over small sections of the car’s painted surface. To ensure the wax is applied completely and uniformly, work on only one panel (section) of the car at a time. |
| Soft Microfiber Buffing Cloths | These cloths are used to remove dried wax and to bring out the final shine of the car’s surface without causing any scratches. These cloths are essential for achieving a smooth and highly glossy finish on the car. | As soon as the wax begins to look hazy, gently rub (buff) the surface with a clean cloth. To prevent wax buildup and achieve a streak-free shine, keep flipping the cloth to use a clean section repeatedly. |
| Quality Car Wax – Paste or Liquid | Wax creates a protective layer over the paint that helps block UV rays, repel water and prevent dirt accumulation, while also enhancing the shine. | Apply a thin layer of wax using an applicator pad. Allow it to sit until a slight haze forms, then wipe it off with a microfiber cloth. For best results, follow the instructions provided on the product label. |
What are the Pre-Waxing Preparation You Need to Do
Proper preparation is one of the most critical aspects of waxing, as the wax requires a clean and smooth surface to adhere correctly.
If the surface is not adequately prepared, the wax will not bond effectively and the resulting finish may lack uniformity or shine.
Many people assume that simply applying wax is sufficient to achieve a glossy finish; however, in reality, the outcome depends largely on how thoroughly the car was cleaned and prepared beforehand.
Dirt, dust, oil and other invisible contaminants can prevent the wax from bonding with the paint, thereby diminishing both the wax’s protective properties and its luster.
Investing time in properly preparing the car ensures that the wax spreads evenly, bonds securely and delivers a smooth, glossy and long-lasting finish.
1. Thoroughly Wash the Car
Thoroughly washing the car is the first and most essential step before applying any wax, as it removes loose dirt, dust, road grime and other surface contaminants.
If these particles are not removed, they can become trapped between the applicator and the paint during the waxing process, potentially causing minor scratches or swirl marks.
Using a proper car wash soap is crucial, as these products are formulated to clean the surface without causing damage, thereby preserving the clear coat and any existing protective layers.
When washing, it is best to clean the car in sections and rinse frequently to prevent dirt from drying and caking onto the surface.
A properly washed car should feel clean to the touch and show no visible signs of dust or grime, thereby establishing an excellent foundation for the waxing process.
2. Thoroughly Dry the Car
After washing, it is crucial to thoroughly dry the car before applying wax, as any residual water left on the surface can interfere with how the wax adheres to the paint.
Even small water droplets can dilute the wax or prevent it from spreading evenly, potentially resulting in streaks or a blotchy finish.
Furthermore, when water is allowed to air-dry naturally, it often leaves behind mineral deposits, creating water spots that can be difficult to remove later.
Using a clean microfiber drying towel helps safely absorb the water without scratching the paint.
Before proceeding to the next step, the surface should feel completely dry and smooth to the touch, ensuring that the wax can be applied evenly and effectively.
3. Optional: Clay Bar Treatment
A clay bar treatment is an additional step that helps remove deep-seated contaminants that cannot be eliminated through a standard wash.
These contaminants may include industrial fallout, brake dust, tree sap residue and other tiny particles that accumulate on the paint over time.
Even if the car appears clean, running your hand over the surface may reveal a slightly rough texture; this indicates the presence of embedded dirt or particles.
By using a clay bar, you can gently extract these particles from the paint, leaving the surface exceptionally smooth.
This smoothness is essential because it allows the wax to spread more uniformly and bond more effectively with the surface, resulting in enhanced shine and long-lasting protection for the car.
Although this step is entirely optional, it is highly recommended if you wish to achieve a truly professional-quality finish for your vehicle.
4. Work in the Right Environment
The environment in which you apply wax to your car has a significant impact on the final result; this is because temperature and sunlight directly influence how the wax behaves on the surface.
Wax should always be applied in a shaded area or inside a garage, where the car’s surface remains cool.
When wax is exposed to direct sunlight, it can dry out very quickly, making it difficult to spread evenly and subsequently buff off; this can result in streaks or spots on the car, leading to an uneven shine.
On a cool surface, the wax sets at the proper rate, allowing it to bond effectively with the surface and provide the car with a smooth finish.
Working in the right environment not only simplifies the entire process but also ensures a clean, uniform and truly professional-looking result.
How to Wax Car By Hand – Quick & Quality Finish
Hand-waxing a car is a straightforward task, but doing it correctly requires attention to detail and the use of proper technique.
The goal is to apply a thin, uniform layer of wax that adheres well to the paint and then to remove it at precisely the right moment to achieve a smooth, glossy finish.
Many people make the mistake of rushing or using excessive product, resulting in uneven shine, unsightly streaks and wasted effort.
When executed correctly, hand-waxing enhances the car’s aesthetic appeal, creates a protective shield against sunlight and dust and makes future cleaning significantly easier.
Carefully following each step yields excellent results, provides long-lasting protection and delivers a professional-quality finish without causing any damage to the paintwork.
1. Apply Wax to the Applicator Pad
The first step is to apply a small amount of wax to a clean foam or microfiber applicator pad.
Using a minimal amount of wax is crucial, as wax performs best when applied in thin layers; applying too much wax does not improve protection or shine.
In fact, using excessive wax makes it more difficult to spread evenly and subsequently remove.
A thin layer allows the wax to bond properly with the paint surface and dry uniformly.
Gently press the applicator pad into the wax and spread it slightly across the pad before applying it to the car, ensuring even distribution.
This prevents the formation of thick clumps of wax and facilitates a smooth start to the application process.
2. Apply Wax in Small Sections
Wax should always be applied in small sections, rather than over the entire car all at once.
By working on individual sections (panels) of the car such as: the hood, doors and roof, you gain better control over the application process and ensure that the wax is applied evenly.
This method also prevents the wax from drying out excessively before you are ready to remove it.
When applying wax, use a light touch and employ small circular motions or a “cross-hatch” pattern (moving the applicator in intersecting straight lines).
These techniques ensure that the wax spreads uniformly across the surface, covering the entire area without missing any spots.
Maintaining a thin, even layer of wax on each section is the most crucial aspect of achieving a consistent shine across the entire car.
3. Allow the Wax to Dry Slightly
After applying wax to a specific section of the car, it is essential to allow it some time to dry slightly and form a light, hazy film on the surface.
This step is critical because it allows the wax to bond with the paint and create a protective layer.
The time required for this process may vary depending on the type of wax, temperature and humidity levels, but it typically takes a few minutes.
An easy way to check if the wax is ready is to lightly run your finger across the surface; if it leaves a clear streak without smearing, the wax is ready to be removed.
Allowing the wax to set properly ensures that it functions effectively and delivers the desired shine and protection.
4. Wipe Off the Wax
Once the wax has set, it should be removed using a clean, soft microfiber towel.
Gently wipe the surface to remove the dried wax and reveal the shine underneath.
Only light pressure is required, as pressing too hard can cause scratches or diminish the smoothness of the finish.
As you wipe, regularly flip the towel to a clean side to ensure that residual wax is not simply spread back onto the surface.
This is the step where the final luster emerges; therefore, by taking your time and utilizing clean sections of the cloth, you will achieve a clean, streak-free finish that appears both glossy and smooth.
5. Repeat This Process Across the Entire Vehicle
This same process should be repeated across the entire vehicle, working on one section at a time to maintain uniformity.
This approach guarantees that every part of the car receives equal coverage and protection.
Consistency is crucial, as applying wax unevenly can result in disparities in shine and durability across different panels.
By following the exact same steps for each section, you create a uniform layer of wax that enhances the car’s overall aesthetic appeal.
Once completed, the entire surface should feel smooth, appear glossy and effectively repel water droplets, indicating that the wax has been applied correctly and effectively.
Some Pro Tips for Better Results
Achieving excellent results from waxing requires more than just following basic steps; it also necessitates the use of proper techniques to maximize the impact of the wax on the paintwork.
Small details such as: the amount of wax applied, the cleanliness of your towels and the motion of your hands, as it can make a significant difference in the final finish.
These pro tips are based on professional detailing methods and are designed to help keep your vehicle’s surface smooth, glossy and protected for a longer duration.
Furthermore, they help you avoid common mistakes that could compromise the quality of your work.
1. Apply Thin, Even Layers of Wax
Applying thin, even layers of wax is one of the most critical techniques for achieving a high-quality finish.
Wax is formulated to adhere to the surface as a very thin film; therefore, applying an excessive amount of wax does not enhance protection or shine.
In fact, thick layers of wax prevent it from drying evenly, which can lead to streaks on the paint and make the buffing process significantly more difficult.
A thin layer of wax allows it to set properly and spread uniformly across the paint, resulting in a smoother and glossier surface.
This also minimizes wax wastage and makes the entire process faster and more efficient.
2. Use Multiple Clean Towels
Using clean microfiber towels is absolutely essential, as any dust or grit trapped within the fabric can scratch the paint during the buffing process.
During waxing, residual wax particles accumulate rapidly on the towel; consequently, continuously using the same section of the towel may merely spread the wax across the surface rather than effectively removing it.
Using several clean towels, or repeatedly flipping a single towel to utilize its clean sections, ensures that the surface remains clean and free of streaks.
This technique not only enhances the final shine but also protects the paintwork from the minor scratches often caused by dirty or wax-laden cloths.
3. Perform the ‘Swipe Test’ to Check if the Wax is Ready for Buffing
Knowing the precise moment to remove the wax is crucial for both its aesthetic appeal and its protective efficacy.
If the wax is removed too soon, it may merely spread across the surface rather than bonding properly with the paint.
Conversely, if left on for too long, it can become difficult to remove and may leave behind unsightly marks.
An easy and effective method to determine whether the wax is ready is the ‘Swipe Test.’
Lightly run your finger across the waxed surface; if your finger leaves a clean, clear streak without smearing the wax, it indicates that the wax is now ready to be buffed off.
This quick, on-the-spot test helps ensure that the wax has fully set, thereby yielding the best possible results.
4. Apply Wax in Straight Lines for Modern Clear Coats
Modern vehicles feature a clear coat layer designed to protect the underlying paintwork.
However, if not handled with care, this layer can easily sustain fine scratches and swirl marks.
When applying wax, using straight, linear strokes, rather than circular motions, minimizes the visibility of any minor marks that might inadvertently be created during the process.
Applying wax in straight lines also creates a uniform pattern that aligns more naturally with the contours and flow of the vehicle’s body panels.
Professionals often recommend this practice, as it helps maintain the vehicle’s pristine, like-new appearance over time.
5. Avoid Applying Wax to Plastic Trim Unless the Product Is Specifically Formulated to Be Safe for That Surface
Many types of waxes are not designed for use on plastic or rubber trim.
If applied to these surfaces, they can leave behind white stains or wax residue that is difficult to remove.
These marks can make the trim appear faded or blotchy, thereby diminishing the vehicle’s overall aesthetic appeal.
When applying wax, it is crucial to either completely avoid these areas or use a product that is clearly labeled as safe for use on trim.
Exercising caution around edges and trim components ensures a cleaner waxing process and reduces the effort required to remove residual wax later on.
Know, Common Mistakes to Avoid During Waxing Your Car By Hand
Applying car wax by hand can yield excellent results; however, minor errors can diminish the shine, reduce the duration of protection and even cause damage to the paint over time.
Many of these mistakes occur because people rush through the process or do not fully understand how wax interacts with the surface.
Car wax is designed to create a thin, uniform protective layer; anything that interferes with this process can lead to streaking, an uneven finish, or reduced durability.
By understanding these common mistakes, and the reasons behind them, you can avoid them and achieve a smoother, longer-lasting and more professional-looking result.
1. Applying Too Much Wax
One of the most common mistakes is using an excessive amount of wax, under the assumption that it will provide greater shine or superior protection.
In reality, wax is designed to work in very thin layers and applying too much only creates problems.
Thick layers fail to adhere properly to the paint and take longer to dry, making the buffing process more difficult and potentially leaving streaks or a hazy residue on the surface.
Applying too much wax also results in uneven coverage and wastes product.
A single thin, uniform layer is all that is needed to create a robust protective shield and deliver a clean, glossy finish.
2. Applying Wax in Direct Sunlight
Applying car wax in direct sunlight or on a hot surface can negatively impact the entire process.
The heat causes the wax to dry out too quickly, often before it can be spread evenly across the paint surface.
Consequently, the wax fails to set uniformly and removing it becomes extremely difficult, potentially leaving visible streaks or marks on the surface.
In some cases, wax can harden so excessively on a painted surface that removing it requires a significant amount of effort.
Working in a shaded area or on a cool surface allows the wax to set at the proper rate, ensuring better adhesion and a more uniform finish.
3. Skipping the Washing Step
Skipping the washing step before applying wax is a major mistake, as dirt, dust and impurities remain trapped on the surface.
When wax is applied to a dirty car, these particles can become lodged between the applicator and the paint, potentially causing fine scratches or swirl marks.
Furthermore, wax cannot adhere properly to a dirty surface, thereby reducing its effectiveness and durability.
A clean surface is essential for both protection and aesthetics; therefore, thoroughly washing the car before applying wax is a critical step that should never be overlooked.
4. Using Dirty Towels or Applicators
Using dirty or contaminated towels and applicator pads can cause damage, even if the rest of the process has been executed correctly.
Dust particles trapped within the fabric can act as abrasives, potentially inflicting fine scratches on the clear coat during the waxing or buffing process.
Overused towels may merely spread around old wax residue rather than removing it, resulting in streaks and a diminished shine.
Using clean, high-quality microfiber towels, and regularly rotating to a clean section of the towel, helps keep the surface smooth and scratch-free, while also enhancing the final luster.
5. Improper Buffing
Improper buffing is another common issue that negatively impacts the car’s final appearance.
If the wax is not removed evenly or completely, it may leave behind a hazy or cloudy appearance rather than a clear shine.
Buffing with excessive pressure can also cause scratches, whereas buffing too lightly may fail to remove the residual wax entirely.
The correct technique involves using a clean microfiber towel and gently wiping the surface until it becomes clear and glossy.
Proper buffing reveals the true finish of the wax and ensures that the protective layer appears smooth, uniform and well-polished.
Know, How Often Should You Wax Your Car?
It is crucial to know how frequently you should wax your car, as wax does not last forever; its protective layer gradually wears away due to sunlight, heat, rain, washing and daily driving.
Wax acts as a barrier between your car’s clear coat and damaging elements such as: UV rays, dust and moisture.
However, over time, this layer becomes thinner and less effective.
If waxing is performed too infrequently, the paint remains exposed, increasing the likelihood of it fading or losing its smooth, glossy finish.
Conversely, timely waxing ensures continuous protection, makes surface cleaning easier and preserves the vehicle’s overall aesthetic appeal for the long term.
1. General Recommendation: Every 2–3 Months
For most cars, waxing every two to three months is a practical and effective approach.
This timeframe aligns with the average durability of many common wax products, particularly natural waxes, which tend to wear off more quickly.
Adhering to this schedule ensures that the protective layer remains active and performs its function effectively.
It also helps maintain a consistent level of shine and smoothness across the surface.
Adopting such a routine ensures that the paint is never left exposed for extended periods, thereby reducing the need for more labor-intensive corrective work in the future.
2. Depends on Weather and Driving Conditions
The optimal timing for waxing can depend on where and how the car is used.
Cars that are regularly exposed to intense sunlight, high temperatures, heavy rainfall, or environmental pollution may require more frequent waxing, as these conditions accelerate the degradation of the wax layer.
For instance, constant exposure to UV rays can weaken the protective layer, while frequent driving on dusty or dirty roads can cause it to wear down due to abrasion and washing.
Conversely, for vehicles that are garaged and driven infrequently, the protective wax coating may last for a much longer duration.
Understanding your local environment and driving habits helps you effectively determine your waxing schedule, thereby ensuring that optimal protection is maintained at all times.
3. Signs That Your Car Needs Waxing
There are several clear indicators suggesting that your car is in need of a fresh coat of wax.
The most easily recognizable sign appears when water no longer beads up into small droplets on the surface, but instead spreads out or pools flatly; this indicates that the protective layer has deteriorated.
Another sign becomes apparent when the paintwork looks dull or lifeless, even after washing, or when its glossy finish has faded.
The surface may also feel slightly rough to the touch rather than smooth.
These changes signal that the wax is no longer providing effective protection and applying a fresh coat will help restore the shine, enhance water-repelling capabilities and shield the paintwork from future damage.
Difference Between Hand Wax vs Machine Wax
Hand waxing and machine waxing are two common methods for protecting and enhancing a car’s paintwork; however, they differ in terms of application techniques, the physical effort required and the results achieved.
Hand waxing is performed manually using an applicator pad.
This method provides complete control over pressure, speed and coverage, making it safer and easier to manage, specially for beginners.
On the other hand, machine waxing utilizes an electric polisher or buffer, which can cover large areas quickly and reduce physical exertion.
However, to avoid damaging the paint, a proper understanding of speed settings, pad types and technique is essential.
When executed correctly, both methods can provide excellent protection and shine.
Ultimately, the choice depends on your level of experience, the time available and the current condition of your car’s paint.
1. Comparison of Effort, Results and Safety
In terms of effort, hand waxing requires more physical labor, as you manually apply and remove the wax panel by panel, a task that can be time-consuming.
Machine waxing alleviates this physical strain by leveraging the mechanical motion of the machine, thereby accelerating the waxing process, particularly on larger vehicles.
Regarding results, both methods can deliver a smooth, glossy finish.
However, when used correctly, machine waxing can sometimes create a more uniform layer of wax; conversely, hand waxing allows for greater precision and attention to detail on smaller or intricate areas.
In terms of safety, hand waxing holds the advantage, as it generates less heat and friction.
This significantly reduces the risk of swirl marks, holograms, or damage to the paint’s clear coat.
By their very nature, machines can generate heat and exert pressure.
If not properly controlled, these tools can damage the paint surface, specially when operated by an inexperienced individual.
2. When should you choose hand waxing over machine polishing?
If you are looking for a safe, controlled and beginner-friendly method to protect your car’s paint, hand waxing is the superior choice.
It is ideal for routine maintenance, new vehicles and situations where the paint is already in good condition and does not require major correction.
Hand waxing also works effectively on small sections, edges and tight spaces where using machines might be difficult.
This method is particularly useful when you do not have access to professional-grade equipment, or simply wish to adopt a straightforward, low-risk approach.
Machine polishing or waxing is generally more appropriate when you need to save time on large surfaces or address more severe paint-related issues; however, for most car owners who wish to keep their vehicle safe and shiny without taking any risks, hand waxing remains the most practical and reliable option.
How Long Does Car Wax Last?
Car wax does not last forever, as it is a thin protective layer that gradually wears away due to exposure to sunlight, heat, rain, washing and the car’s daily usage.
Its primary function is to safeguard the clear coat and maintain its luster; however, over time, this layer weakens and becomes less effective.
The longevity of the wax depends on the type of product used, the quality of its application and the daily conditions the vehicle face.
Understanding how long different types of waxes last helps you maintain an appropriate schedule, ensuring that your car’s paint remains protected and always looks shiny and attractive.
1. Carnauba: 4–8 Weeks
Carnauba wax is a natural product known for its deep, warm glow, but it does not last as long as synthetic alternatives.
On average, it provides protection for approximately four to eight weeks, depending on weather conditions and usage.
This is because natural waxes tend to break down more rapidly when exposed to heat, sunlight and water.
Although it may require more frequent application, many car owners still prefer it for its rich texture and smooth finish.
Regular use of Carnauba wax can still provide effective protection, provided it is applied consistently within this timeframe.
2. Synthetic: 3–6 Months
Synthetic wax, also known as paint sealant, is engineered to last significantly longer due to its advanced chemical composition.
It typically provides protection for three to six months, making it a more durable option for long-term use.
Synthetic wax forms a strong bond with the painted surface, enabling it to withstand UV rays, moisture and environmental contaminants much more effectively.
This is particularly beneficial for cars or vehicles that are driven daily or are frequently exposed to harsh weather conditions.
Although its luster may appear slightly different compared to natural wax, its superior durability makes it a practical choice for maintaining protection even with less frequent application.
3. Factors Affecting Durability
The actual durability of car wax can vary significantly depending on several key factors.
Environmental conditions play a major role, as intense sunlight, high temperatures, rain and pollution can rapidly degrade the wax layer.
Frequent washing, specially with harsh detergents or soaps not designed for automotive use, as it can strip away the wax prematurely.
Driving conditions such as: traveling on dusty roads or exposure to dirt, grit and debris, as it can wear down the protective layer due to constant abrasion.
Furthermore, the method of application matters; thin, uniform layers of wax applied to a properly cleaned surface tend to last longer than thick or uneven layers.
Proper maintenance, including gentle washing and avoiding harsh chemicals, as it can help extend the lifespan of the wax, thereby keeping your car protected for a longer period.
Read More:
- How to Wash Car Properly
- How to Fix Backup Camera Not Working
- How to Fix Bluetooth Not Working in Car
- How to Update Car Infotainment System
- How to Fix Speedometer Not Working
How to Maintain Car Wax After Applying It
Proper maintenance after waxing your car is crucial, as it ensures that the protective layer remains intact for a longer duration and that the paint retains its smooth, glossy finish.
Wax creates a barrier that repels water, dust and harmful contaminants; however, if the car is not cared for correctly, this layer can degrade rapidly.
Adopting a few simple habits such as: using the right cleaning products and proper washing techniques, as it can make a significant difference in prolonging the effectiveness of the wax.
Good maintenance not only preserves the shine but also reduces the need for frequent re-waxing and helps protect the paint against long-term damage.
Plus, there’s even scientific research about the waxing and that shows that: waxing is not just about to shine the vehicle but is also provide protection to it and according to the study published in the journal Polymers: the wax coatings actually helps to shield the car paint from the UV rays, acid rain and oxidation and it still reduces the buildup of the dirt and other contaminants as well. That’s how it literally confirms that by doing regular waxing you can preserve both the appearance of your vehicle and durability of your car’s exterior very efficiently.[¹]
1. Use a Mild Car Shampoo
Using a mild car shampoo is essential, as it is specifically formulated to clean the surface without stripping away the wax layer.
These shampoos are balanced to effectively remove dust and grime while leaving the protective coating undisturbed.
Harsh or aggressive cleaners can quickly degrade the wax, thereby diminishing its ability to protect the paintwork.
Washing your car with an appropriate car shampoo helps maintain the smooth finish achieved through waxing, ensuring that the car’s surface looks fresh and clean after every wash.
2. Avoid Harsh Detergents
Household detergents and aggressive cleaning agents are unsuitable for cars, as they are designed to cut through grease and heavy grime, which also means they can completely strip the wax off the paint surface.
Using such products leaves the surface unprotected, thereby increasing the risk of the paint fading and deteriorating.
Over time, the repeated use of harsh detergents can significantly reduce the lifespan of your wax coating and negatively impact the car’s overall appearance.
Using only products specifically formulated for cars ensures that the wax layer remains intact and continues to provide protection.
3. Use Spray Wax for Touch-Ups
Spray wax is a handy product you can use to maintain your car’s shine in between full waxing sessions.
It adds a light layer of protection and helps refresh the glossy finish without requiring excessive time or effort.
After washing and drying the car, applying a light coat of spray wax improves water beading and restores a smooth feel to the surface.
While it cannot replace a full waxing treatment, it helps extend the life of the existing wax and keeps the car looking well-maintained.
4. Proper Washing Techniques for Enhanced Protection
The way you wash your car also influences how long the wax lasts.
Gentle washing techniques help prevent the wax from stripping away prematurely and protect the paintwork from scratches.
Using a soft microfiber mitt, washing in straight lines and rinsing frequently to remove dirt are all essential practices.
Avoiding excessive pressure and preventing dirt buildup on washing tools helps keep the car’s surface clean and smooth.
Proper drying with a microfiber towel prevents water spots and helps preserve the wax layer.
Consistent and careful washing ensures that the protective benefits provided by the wax last as long as possible, keeping your car looking its absolute best.
Conclusion – How to Wax Car By Hand
So, if you follow the mentioned technique then you’ll be able to make sure to apply that thin layer of wax and that successfully shield your vehicle against all the bad elements of nature.
Hand-waxing your car is one of the most practical and effective ways to protect its paintwork, keeping it clean, smooth and glossy.
This guide demonstrates that superior results are achieved not merely through expensive products, but rather through proper preparation, correct technique and consistent maintenance.
A car’s paint is constantly exposed to sunlight, dust, moisture and pollution, factors that gradually degrade its quality over time.
A properly applied layer of wax acts as a protective shield, minimizing this damage, allowing water and dust to slide off easily and preserving the luster of the clear coat.
The real difference lies in the meticulousness with which each step is executed, from washing and drying the car to applying thin layers of wax and buffing at just the right moment.
Small details such as: using clean towels, working in the right environment and avoiding common mistakes, as it can significantly enhance both the appearance and durability of the wax finish.
So, that’s all from this guide from How to Wax Car By Hand, now comment if you still have confusion.
Frequently Asked Questions
FAQ 1: What is the correct way to apply car wax by hand?
The correct way to apply car wax by hand is to first thoroughly wash and dry the vehicle to ensure that no dirt or dust remains on its surface. Next, take a small amount of wax on a soft applicator pad and spread it evenly in a thin layer over one section of the car at a time. Allow the wax to sit for a few minutes until a slight hazy film forms on the surface; this indicates that the wax has properly bonded with the paint. Once the wax is ready, gently remove it by buffing with a clean microfiber cloth, leaving the car’s surface smooth and glossy. Carefully following this process ensures that the wax is applied evenly, provides excellent protection and helps maintain the car’s shine for an extended period.
FAQ 2: How long should I let the wax sit on the car before buffing it off?
Generally, the wax should be allowed to sit on the car’s surface for a few minutes, although the exact duration depends on the type of wax used and the ambient temperature. Most wax products are ready to be removed when they begin to appear slightly hazy or dull. An easy way to check this is to lightly run your finger over the waxed surface. If the wax lifts off easily without smearing, it means it is time to buff it off. Leaving the wax on for too long can make it difficult to remove, whereas removing it too soon may reduce its effectiveness.
FAQ 3: Can I apply wax to my car without polishing it first?
Yes, you can apply wax to your car without polishing it first, especially if the car’s paint is already in good condition. The primary purpose of car wax is to provide protection and enhance shine, whereas polish is used to correct deeper imperfections in the paint (such as scratches or oxidation). If your car has no obvious or visible flaws, simply applying wax is sufficient to enhance its aesthetics and safeguard its paintwork. However, if the car’s surface feels rough or appears dull even after washing, using a polish or a ‘clay bar’ before applying wax will yield superior results.
FAQ 4: How do I know if my car needs waxing?
There are several clear indicators that suggest your car requires waxing. The most easily identifiable sign becomes apparent when you pour water over the car; instead of forming small beads, the water spreads out across the entire surface. Another sign is when the car’s paint begins to look dull or starts to lose its smooth, glossy texture. You may also notice that dust and dirt are adhering to the car’s surface much more easily than before. These changes indicate that the protective layer of wax on the paint has worn off and now needs to be reapplied.
FAQ 5: Is waxing by hand better than waxing with a machine?
Waxing by hand is generally safer and offers greater control, especially for beginners. It allows you to apply the wax carefully without generating excessive heat or pressure, thereby minimizing the risk of damaging the paint. For larger surfaces, machine waxing can be faster and more efficient; however, it requires proper knowledge and technique to avoid leaving swirl marks or producing uneven results. For most car owners, waxing by hand remains a reliable, low-risk method that consistently delivers excellent results.
FAQ 6: How often should I wax my car for the best results?
For most vehicles, waxing every two to three months is an excellent way to maintain both protection and shine. However, this frequency may depend on how often the car is used and the conditions it is exposed to. Cars frequently subjected to intense sunlight, dust, or frequent washing may require more frequent waxing, whereas cars kept in a garage may not need it quite as often. Regular waxing ensures that a consistent protective layer is maintained and that the paint retains a fresh appearance.
FAQ 7: Can waxing remove scratches from my car?
Wax does not remove scratches; however, it can make very light surface marks less visible by slightly filling them in and enhancing the overall shine. For deep scratches or clearly visible swirl marks, polishing or paint correction is required. Wax is primarily used as a protective layer after the surface has been cleaned and corrected, rather than as a remedy for damage.
FAQ 8: What happens if I apply too much wax?
Applying too much wax does not improve protection; in fact, it can create problems. Thick layers are difficult to spread evenly and take longer to dry, making the buffing process significantly more difficult. This can result in streaking, an uneven finish and wasted wax. Wax works best when applied in thin, even layers, allowing it to bond properly with the paint and provide a smooth finish.
References:
[1] Development of Car Coating Materials over the Past Decade for Paint Protection Applications – An Overview on the Different Types of Paint Protections
https://www.mdpi.com/2073-4360/17/23/3114

Hello Folks, Dean Shali here to help you out to solve the problems with your lovely vehicle, as i have lots of experience and knowledge about automotive industry as i woks directly with the customers and repair vehicles and i love to help the people to keep their cars safe and running smoothly.