Written By: Dean Shali
Fact Checked By: Sabré Cook
Reviewed By: Tamara Warren
Most of the time: battery problems are not actually the battery problems at all, but the result of having the corroded cables that literally prevents electrical power from reaching where it needs to go flawlessly.
But, whenever you turn on the key and hearing nothing or having slow crank or a clicking sound, then most of the time drivers suspects then there’s dead battery issue happening with them, a failing starter or having something major kind of electrical problems that costs hell lot of dollars.
Surprisingly, in many cases: the real issues is far simpler then those horrific looking things such as: corrosion on the battery cables as well.
Basically, every electrical system in your vehicle literally depends on the clean and really efficient path for electricity to travel from the battery to the starter, alternator and several hundreds of the electronic components as well.
That’s why, even with a small amount of corrosion: it can have power to create the resistance that restrict the electrical flow, reduces the battery performance and actually causes symptoms that mimics much more serious mechanical failures as well.
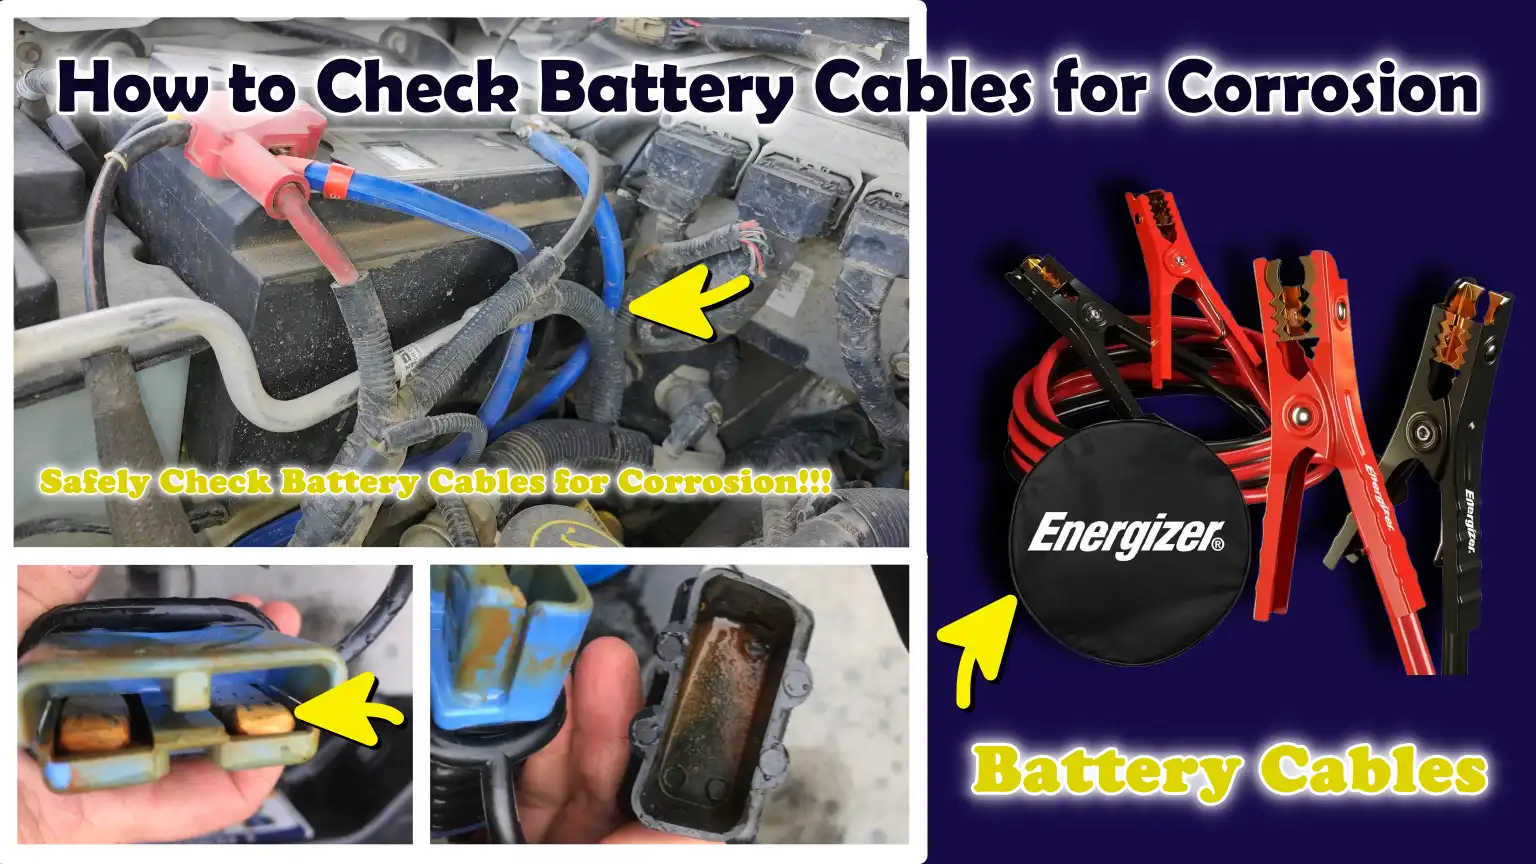
Which is why, we have come up with this guide specifically about How to Check Battery Cables for Corrosion, so that you can comfortably fix that thing and detect it as soon as possible.
So, Why Is It Important to Check for Corrosion on Battery Cables?
Battery cables serve as the primary conduits that transmit electrical power from the battery to the starter, alternator and other vehicle components.
When corrosion accumulates on the terminals or cable ends, it creates a blockage that impedes the flow of electricity.
Even a small amount of corrosion can negatively impact the vehicle’s starting behavior, charging efficiency and overall reliability.
Regular inspections allow for the early detection of issues, enabling you to maintain robust electrical connections and avoid costly repairs in the future.
1. Prevents Starting Issues
Starting a vehicle’s engine requires a powerful surge of electrical current.
Corroded battery cables can obstruct a portion of this power, making it difficult for the starter motor to function correctly.
This can result in slow cranking, clicking sounds, difficulty starting the vehicle, or a complete failure to start.
Checking for corrosion ensures that the starter receives the necessary power to reliably crank the engine.
2. Maintains Optimal Battery Performance
Battery performance relies on clean and efficient electrical connections.
When corrosion builds up on battery cables, it increases electrical resistance, forcing the battery to work harder.
This can diminish charging efficiency and make the battery appear weaker than it actually is.
Regular inspections ensure a consistent flow of electricity, thereby maintaining optimal and reliable battery performance.
3. Protects Electrical Components
Modern vehicles rely on numerous electronic systems that require a stable voltage supply to function properly.
Corroded battery cables can lead to voltage drops and irregularities in power flow, potentially causing dim lights, triggering warning indicators, causing sensor malfunctions, or leading to other electrical issues.
Keeping battery connections clean protects these components and ensures that the vehicle continues to operate reliably.
4. Extends Battery Lifespan
Corrosion can interfere with the battery’s ability to charge and discharge effectively.
Over time, this added strain can diminish the battery’s capacity and shorten its overall lifespan.
By regularly inspecting battery cables and addressing corrosion issues early on, you help the battery operate under optimal conditions and can extend its service life.
5. Reduces the Risk of Sudden Vehicle Breakdown
Corrosion on battery cables often develops gradually and may not initially present any obvious symptoms.
However, as the corrosion progresses, it can suddenly prevent essential power from reaching critical vehicle systems.
Regular inspections allow these issues to be detected before they become severe, thereby reducing the likelihood of sudden starting failures or roadside breakdowns.
Know, Common Causes of Battery Cable Corrosion
Battery cable corrosion is typically the result of chemical reactions, environmental factors, or general wear and tear that occurs over time.
Corrosion often manifests as a white, blue, or green powdery substance around the battery terminals and cable ends; however, this damage can also spread inside the cable itself, where it remains hidden from view.
Understanding the root causes of corrosion helps vehicle owners prevent electrical issues, improve battery performance and avoid sudden difficulties in starting their vehicles.
By promptly identifying the source of the corrosion, it becomes much easier to maintain clean and reliable battery connections.
1. Battery Acid Leaks
Battery acid leakage is one of the most common causes of corrosion on battery cables.
Even a small amount of acid leaking from the battery casing, terminal seals, or vent caps can react with the metal terminals and cable ends.
It is this chemical reaction that produces the powdery substance often observed around battery connections.
Over time, this corrosion can spread and increase electrical resistance, thereby impeding the flow of electricity between the battery and the vehicle’s electrical system.
If corrosion persists or recurs even after cleaning, the underlying cause may well be a leaking battery.
2. Overcharging
Overcharging causes the battery to release excessive gases during the charging process, which accelerates the rate of corrosion.
These gases contain chemicals that react with surrounding metal surfaces, leading to the accumulation of corrosion around the terminals.
Overcharging typically occurs when there is a fault within the vehicle’s charging system such as: a malfunctioning voltage regulator or alternator.
In addition to causing corrosion, overcharging can generate excessive heat and reduce the battery’s lifespan; therefore, it is crucial to address any issues related to the charging system as soon as they are detected.
3. Exposure to Moisture
Moisture is another major contributor to corrosion in battery cables.
Rainwater, atmospheric humidity, road spray and even routine engine washing can create moisture around battery connections.
When moisture combines with dust, salt, or battery residue, it creates conditions that accelerate the corrosion process on metal surfaces.
Vehicles operated in coastal regions or in areas where road salt is used often experience accelerated corrosion; this occurs because salt increases the conductivity of moisture, thereby further intensifying the corrosion process.
4. Age-Related Wear and Tear
As batteries and battery cables age, the materials used in their construction naturally begin to degrade.
Rubber insulation can become hard and brittle, protective coatings may wear away and metal components become increasingly susceptible to corrosion.
Older battery cables are also more prone to hidden corrosion beneath the insulation, where moisture and grime can become trapped.
As a vehicle ages, regular inspections become even more critical, as corrosion-related issues tend to become more prevalent over time.
5. Poor Terminal Sealing
Battery terminals are designed to establish a secure connection that keeps dirt and contaminants away from critical contact surfaces.
If a terminal connection is loose, improperly installed, or has compromised sealing, moisture, dust and battery gases can easily infiltrate the connection area.
Such contact increases the likelihood of corrosion occurring around the terminals and cable ends.
Ensuring that the terminals are properly tightened and secure can significantly reduce the risk of future corrosion-related issues.
6. Extreme Temperature Fluctuations
Frequent changes in temperature can lead to the formation of moisture (condensation) around battery connections, potentially causing corrosion in the battery cables.
When temperatures fluctuate repeatedly, moisture can accumulate on metal surfaces and become trapped within tiny crevices surrounding the terminals.
Excessive heat can also accelerate the battery’s venting process, while extreme cold can cause materials to contract and expand.
Over time, these conditions can compromise protective layers and create an environment conducive to corrosion.
Vehicles operated in harsh weather conditions often require more frequent battery inspections to detect corrosion before it becomes severe.
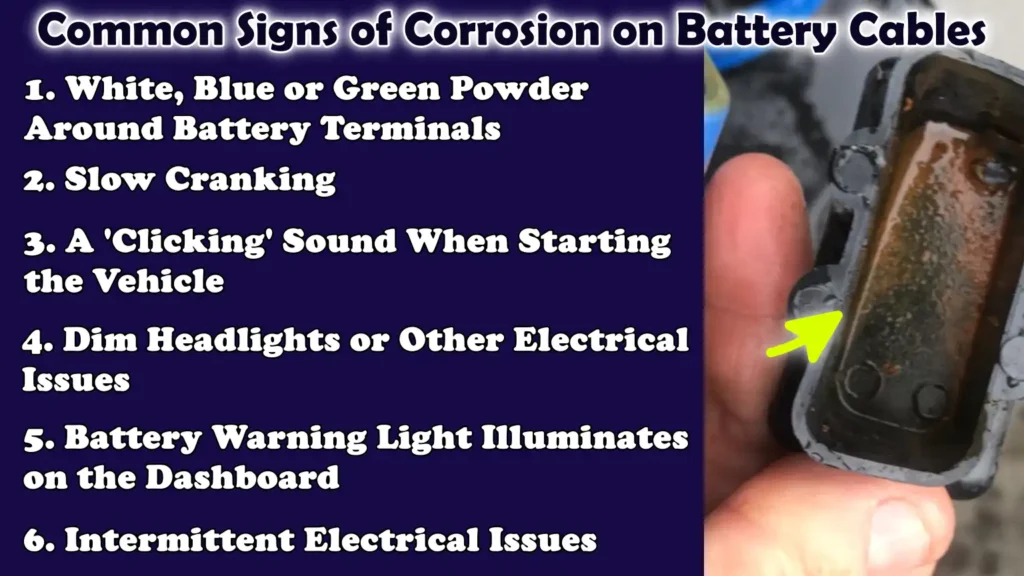
Common Signs of Corrosion on Battery Cables
Corrosion on battery cables often develops gradually; consequently, many drivers do not notice it until electrical issues begin to surface.
Corrosion creates resistance that impedes the flow of electricity between the battery and the vehicle’s electrical system.
As this resistance increases, the battery, starter, alternator and other electrical components fail to receive the power necessary to function correctly.
Identifying these warning signs in a timely manner can help prevent issues such as difficulty starting the vehicle, charging problems and sudden breakdowns.
The symptoms listed below are some common indicators that corrosion on your battery cables is negatively impacting your vehicle.
1. White, Blue or Green Powder Around Battery Terminals
One of the easiest signs to identify is the appearance of a powdery substance around the battery terminals or cable ends.
This buildup is typically white, blue, or green in color, depending on the type of metal used and the specific chemical reaction taking place at the time.
This corrosion occurs when battery acid fumes, moisture and metal surfaces come into contact and react with one another over time.
Although this buildup may appear minor, it can compromise the electrical connection between the battery and the cables.
Any visible corrosion should be inspected, as it often signals that the connection has begun to deteriorate.
2. Slow Cranking
Slow cranking, meaning the engine turns over very sluggishly, is a common symptom of corrosion on battery cables.
When you turn the key or press the start button, the starter motor requires a significant amount of electrical power to turn over the engine.
Corrosion within the connections increases electrical resistance, making it difficult for the necessary current to reach the starter motor.
Consequently, the engine may crank more sluggishly than usual, particularly in cold weather, when the demand for power from the battery is at its peak.
Many people mistakenly assume that the battery itself has weakened, whereas the actual issue is that corrosion on the battery cables is impeding the flow of electricity.
3. A ‘Clicking’ Sound When Starting the Vehicle
If you hear a rapid, repetitive ‘click-click’ sound, or even just a single ‘click’, while attempting to start your vehicle, it is possible that corrosion on the battery cables is preventing the necessary electrical current from reaching the starter motor.
The starter relay may be engaging, but the starter motor is failing to receive the amperage required to crank the engine.
This symptom typically manifests when corrosion has advanced to the point where it creates significant resistance within the electrical circuit.
While similar symptoms can also indicate a weak battery, it is always essential to inspect the battery cable connections for corrosion when troubleshooting this issue.
4. Dim Headlights or Other Electrical Issues
Corrosion on the battery cables affects not only the vehicle’s starting system but can also impact various other components.
As the entire electrical system relies on a consistent power supply, excessive resistance can cause headlights to shine more dimly than usual; this can also adversely affect the performance of interior lights, power windows, the infotainment system and numerous other electronic devices.
Electrical components may malfunction or operate sluggishly because they are not receiving the necessary voltage to function correctly.
These issues often become more apparent when multiple electrical devices are being used simultaneously.
5. Battery Warning Light Illuminates on the Dashboard
An illuminated battery warning light on the dashboard can sometimes be linked to corrosion on the battery cables.
When corrosion interferes with the operation of the charging system, the battery fails to charge properly, even if the alternator is functioning correctly.
The vehicle’s monitoring system may trigger the warning light upon detecting abnormal voltage levels.
While this light can signal a variety of issues within the charging system, corrosion on the battery cables is one of the simpler problems that should be investigated before resorting to the replacement of major components.
6. Intermittent Electrical Issues
One of the most frustrating signs of corrosion on battery cables is intermittent electrical system performance.
The vehicle might start perfectly fine one day, yet struggle to start the next.
Lights may flicker, electronic devices might suddenly reset, or warning messages may appear and vanish without any apparent cause.
Corrosion can render electrical connections unstable; they may function for a time, only to fail due to vehicle movement, temperature fluctuations, or vibrations experienced while driving.
As these issues occur sporadically, they are often difficult to diagnose unless the battery cables are carefully inspected for signs of corrosion and damage.
Tools
| Tools | Why It Is Needed | How to Use It |
|---|---|---|
| Safety Glasses | Battery corrosion may break off into small fragments during inspection or cleaning. A small amount of battery acid may also leak, potentially causing eye irritation or injury. | Wear safety goggles before opening the battery compartment and keep them on throughout the entire inspection process. |
| Protective Gloves | Corrosion contains chemical compounds that can cause skin irritation. Gloves also protect your hands from dirt, grease and the sharp metal edges often found around batteries. | Put on gloves before touching the battery terminals, cables, or accumulated corrosion. After the inspection, remove the soiled gloves and dispose of them properly. |
| Flashlight | Battery corrosion often forms in hidden areas, such as beneath cable connections, around terminal clamps, or near the battery tray. Good lighting helps identify issues that might otherwise go unnoticed. | Shine a flashlight on the battery terminals, cable ends and surrounding components. Pay particular attention to shadowy areas or spots that are difficult to see. |
| Battery Terminal Brush | Corrosion can obscure critical details and make it difficult to assess the condition of the battery terminals and cable connections. A terminal brush helps remove accumulated corrosion and expose clean metal surfaces. | Gently brush the corrosion away from the battery posts and terminal clamps. Avoid applying excessive force, as this could damage the connections. |
| Multimeter – Optional | A visual inspection alone may not reveal all internal issues. A multimeter can help detect voltage drops and electrical resistance caused by corrosion hidden within the cables. | Set the multimeter to measure voltage and perform a battery or voltage drop test in accordance with the vehicle manufacturer’s recommendations. |
| Clean Rag or Paper Towels | Dirt, moisture and rust residue can interfere with the inspection process. Wiping the surfaces with a clean cloth helps facilitate the inspection and makes it easier to identify rust. | Wipe down the battery terminals, cable insulation and surrounding components, both before and after the inspection, to remove loose dirt and rust residue. |
So, Where Are the Battery Cables Located?
Before checking battery cables for corrosion, it is essential to know the location of the battery and its associated cables.
Battery cables serve as the primary electrical pathway, connecting the battery to the starter motor, alternator, vehicle chassis and the entire electrical system.
Whenever the engine is started or an electrical component is utilized, electricity flows through these cables.
Although battery cables are present in every vehicle, their exact location, as well as the location of the battery itself, as it can vary depending on the specific design of the vehicle.
Knowing the location of these cables makes it easier to inspect them for corrosion, loose connections, damage, or wear and tear.
1. Location of the Positive Battery Cable
The positive battery cable connects to the battery’s positive terminal, which typically bears a plus (+) sign and is often covered by a red protective cap.
This cable transmits power from the battery to the starter motor, fuse box and other major electrical components.
Because it carries a heavy electrical load, the positive cable is generally thicker than many of the other wires found in the vehicle.
When checking for corrosion, trace the positive cable from the battery terminal toward the starter and power distribution components; pay particular attention to the connection points, as these are the areas most susceptible to corrosion.
2. Location of the Negative Battery Cable
The negative battery cable connects to the battery’s negative terminal, which bears a minus (-) sign and can often be identified by a black cable or a black terminal cover.
Unlike the positive cable, the negative cable is typically connected directly to the vehicle’s chassis or engine block, thereby establishing a ground connection for the electrical system.
This grounding path is crucial, as it completes the electrical circuit necessary for the flow of electricity.
Corrosion can form at both the battery terminals and the ground connection points; therefore, when inspecting the battery cables, these two areas must be examined with great care.
3. Battery Locations in Different Vehicles
Although the battery is located under the hood in many vehicles, manufacturers sometimes place it elsewhere to ensure proper weight distribution, conserve space within the engine bay, or enhance the vehicle’s overall design aesthetics.
Knowing the battery’s location is the first step in locating and inspecting the battery cables.
Under the Hood
The most common location for the battery is under the hood, situated toward the front of the engine compartment.
In this configuration, accessing the battery is typically easy and both battery cables can often be visually inspected without the need to remove any interior panels or cargo area covers.
Most trucks, SUVs and many passenger vehicles house their batteries in this manner, as it simplifies maintenance and servicing tasks.
In the Trunk
Some vehicles, particularly luxury cars, performance vehicles and certain electric or hybrid models, house the battery inside the trunk.
This placement helps improve the vehicle’s balance by distributing its weight more evenly between the front and rear sections.
If the battery is located in the trunk, the battery cables may be quite long and may run underneath the vehicle or beneath interior panels before reaching the engine compartment.
It is essential to check for corrosion at both battery terminals, as well as at all points where the cables connect or terminate.
Under the Rear Seats
In some vehicles, the battery is situated beneath the rear seat.
Manufacturers utilize this location to shield the battery from engine heat and to make more efficient use of the available space.
To access the battery, it is typically necessary to lift or remove a section of the rear seat cushion.
Once the battery becomes visible, its positive and negative cables can be inspected in exactly the same manner as those of any other battery.
As this area is often hidden from view, any corrosion on the battery may go undetected if it is not inspected regularly.
How to Check Battery Cables for Corrosion – Easy Steps
Checking for corrosion on battery cables is a simple yet essential task.
It allows you to detect starting difficulties, charging issues and electrical malfunctions before they escalate into major problems.
Corrosion creates resistance, which impedes the flow of electricity between the battery and the vehicle’s electrical system.
Even a small amount of corrosion can impact the vehicle’s performance, while severe corrosion may prevent the vehicle from starting at all.
A thorough visual inspection enables you to identify visible corrosion, hidden damage, loose connections and worn-out components that may require cleaning or replacement.
1. Open the Hood and Locate the Battery
To begin, park the vehicle in a safe location, turn off the engine and open the hood.
Locate the battery and identify its positive and negative terminals.
The positive terminal typically bears a plus (+) sign and is often covered by a red cap, whereas the negative terminal features a minus (-) sign and may have a black cap.
Before focusing on the cables, take a moment to assess the overall condition of the battery itself.
Check the battery casing for cracks, leaking fluid, bulges, or excessive dirt accumulation.
A faulty battery can also contribute to corrosion, so any issues related to the battery should be addressed before proceeding with further inspections.
2. Perform a Visual Inspection
The quickest way to detect corrosion on battery cables is often through a visual inspection.
Carefully examine the battery terminals and the surrounding areas for any powdery deposits, typically white, blue, or green in color.
This buildup forms when chemicals inside the battery react with metal components; it is one of the most common signs of corrosion.
Inspect the terminal clamps to ensure they appear clean and are free of any heavy deposits.
Additionally, examine the battery posts to which the terminal clamps are attached.
Corrosion on the posts can weaken the electrical connection and disrupt the flow of electricity between the battery and the cables.
3. Inspect the Cable Ends
Next, inspect the ends of the cables where they connect to the battery terminals.
These connection points are particularly susceptible to corrosion, as they are in direct contact with gases emitted by the battery, as well as moisture and dirt.
Look for signs of discoloration around the metal connectors; this may appear as green, blue, white, or light brown deposits.
Pay close attention to corrosion-like deposits or flaky layers, as these may indicate long-standing corrosion issues.
The metal surfaces should appear solid and intact.
If there is excessive buildup or severe damage, simple cleaning may not be sufficient to resolve the problem.
4. Inspect the Cable Insulation
The outer insulation protects the metal conductor housed inside the battery cable from moisture, dirt and external damage.
Carefully inspect the entire visible length of each cable.
Look for cracks, splits, cuts, or worn-out sections that could allow contaminants to enter.
Check for swelling or unusual bulges in the insulation, which may indicate hidden corrosion underneath.
Also, examine any sections of the cables that appear melted or damaged by heat.
Compromised insulation can allow moisture to reach the conductor, thereby accelerating the corrosion process within the cable.
5. Check for Hidden Corrosion Beneath the Insulation
Not all corrosion is visible from the outside.
In many cases, corrosion develops beneath the insulation and gradually spreads along the metal conductor.
Gently feel the cables near both battery terminals and their connection points.
Soft spots, bulges, or roughness may indicate hidden corrosion beneath the insulation.
Pay particular attention to the first few inches of the cable closest to the battery terminals, as this is often where hidden corrosion begins to form.
Internal corrosion can compromise the cable’s ability to conduct electricity, even if it appears largely normal from the outside.
6. Check the Ground Cable Connection
The battery’s negative cable connects to a ground point located on the vehicle’s chassis, the engine block, or both.
This ground connection is critical, as it completes the electrical circuit utilized by the entire vehicle.
Follow the negative cable to its grounding location and carefully inspect the connection.
Check the tightness of the mounting bolt and look for signs of corrosion.
Inspect the area surrounding the grounding point for rust, oxidation, accumulated dirt, or loose nuts and bolts.
A poor ground connection can manifest symptoms similar to corrosion at the battery terminals, including difficulty starting the vehicle and various electrical malfunctions.
7. Check for Loose Connections
Even if there is little to no corrosion present, loose battery cable connections can still create obstructions and compromise electrical performance.
Carefully inspect every terminal connection to ensure that nothing is loose or shifting.
The terminal clamps should fit firmly around the battery posts so that they do not move or rotate easily.
Check the cable ends and connectors for any signs of damage, bending, cracking, or excessive wear.
A loose or faulty connection can prevent the battery from delivering power effectively, potentially leading to intermittent electrical issues.
8. Use a Flashlight for Close Inspection
A flashlight allows you to spot corrosion and damage that might be difficult to see under normal lighting conditions.
Shine the light from various angles onto the battery terminals, cable ends and connection points.
Inspect the undersides of the terminal clamps, as corrosion often accumulates in areas that are not directly visible.
Use the flashlight to examine tight spaces, crevices and the points where the cables enter their insulation.
A close inspection can reveal early signs of corrosion, before the problem becomes severe enough to cause difficulties in starting the vehicle or charging the battery.
How to Check for Corrosion in Battery Cables Using a Multimeter
While surface corrosion may be visible to the naked eye, corrosion hidden inside battery cables often goes undetected.
In many cases, a cable may appear clean on the outside, while corrosion is slowly spreading beneath the insulation, thereby increasing electrical resistance.
This hidden resistance can reduce the amount of power reaching the starter motor and other electrical components.
A multimeter helps identify these issues through a process called “voltage drop testing”.
Unlike checking the battery’s normal voltage, voltage drop testing measures how much power is being wasted as current flows through the cable.
It is one of the most accurate methods for detecting excessive resistance caused by corrosion, loose connections, damaged cable strands, or worn terminals.
Plus, battery cable corrosion does more than just creating the visible buildup around the terminals, as there’s literally the research that shows that corrosion can increase the electrical resistance inside the conductive materials: that’s how it makes harder for electrical current to travel efficiently, as in the vehicle: this can very much reduce the amount of power reaching the starter motor and other electrical components, that may contributes to the slow cranking, voltage drops and electrical performance issues as well, so having regular battery cable inspection literally helps you to identify the corrosion way before resistance actually becomes some kind of dangerous thing for your vehicle to operate smoothly.[¹]
1. Understanding Voltage Drop Testing
Voltage drop testing measures the difference in voltage between two points while electrical current is flowing through a circuit.
Every electrical cable generates a small amount of resistance; however, in battery cables that are in good condition, the voltage loss should be minimal.
When corrosion is present, resistance increases and as electricity flows through the cable, a greater amount of voltage is wasted.
This wasted voltage reduces the amount of power available to the starter motor and the vehicle’s electrical system.
By measuring the voltage drop while cranking the engine, you can determine whether the battery cables are efficiently delivering current or if corrosion is impeding the flow of electricity.
2. Checking the Positive Battery Cable
To check the positive battery cable, set your multimeter to DC voltage.
Connect the red probe to the positive terminal of the battery and the black probe to the positive connection point on the starter motor.
Ask someone to attempt to start the engine while you simultaneously monitor the meter readings.
As soon as the engine cranks, the multimeter will display the amount of voltage being lost through the positive cable and its connections.
A low reading indicates that the cable is efficiently conducting current, whereas a high reading signals that excessive resistance is being generated due to corrosion, loose terminals, faulty connectors, or internal damage within the cable.
This diagnostic check helps identify issues that might not be readily apparent during a simple visual inspection.
3. Testing the Negative Battery Cable
The procedure for testing the negative battery cable is similar.
Place the red probe on the starter housing or the engine block and connect the black probe to the negative terminal of the battery.
Ask someone to crank the engine while you keep an eye on the multimeter readings.
This test measures voltage loss through the ground circuit, a component just as critical as the positive cable.
Corrosion at the ground connection, rust at mounting points, loose bolts, or a faulty ground cable, all these factors can increase resistance and degrade the performance of the electrical system.
A poor ground connection often leads to slow engine cranking, intermittent electrical issues and difficult-to-diagnose starting problems.
4. Understanding the Impact of Voltage Drop
The objective of voltage drop testing is to detect excessive resistance.
A low reading generally indicates that the connections are sound and current is flowing correctly.
If the voltage drop is higher than expected, it implies that a portion of the battery’s power is being dissipated before it reaches its intended destination.
One of the most common causes of excessive voltage drop is corrosion; however, loose connections, faulty terminals, broken wires and poor grounding points can yield similar results.
If an excessive voltage drop is detected, carefully inspect the cables, terminals and connection points to identify the root cause of the resistance.
5. Standards for Acceptable Voltage Drop
For most passenger vehicles, the voltage drop across the positive battery cable while cranking the engine should generally be less than 0.2 volts.
Similarly, the voltage drop across the negative battery cable should generally remain below 0.2 volts.
When both sections of the circuit are tested simultaneously, the total voltage drop while cranking the engine should generally remain under 0.5 volts.
Readings exceeding these values often indicate the presence of excessive resistance somewhere within the circuit.
Although precise standards may vary depending on the manufacturer and vehicle design, these guidelines serve as an excellent starting point for detecting corrosion and connection-related issues in battery cables.
Consistently low voltage drop readings are a definitive indication that the battery cables and their connections are in good condition.
Read More:
Conclusion – How to Check Battery Cables for Corrosion
Basically, the health of your vehicle’s electrical system actually depends on something many drivers rarely inspect and that is the Battery Cable Connections, so whenever these connections remains clean and corrosion-free, then the electricity can effectively and flow efficiently to the components that keeps your vehicle running every day.
Although corrosion often begins as a small amount of white, blue, or green residue around the battery terminals, it can gradually create electrical resistance that disrupts the flow of current throughout the entire vehicle.
As this resistance increases, drivers may face issues such as slow engine cranking, clicking sounds during startup, dim headlights, charging difficulties, illuminated warning lights and intermittent electrical malfunctions.
Because these symptoms are often mistakenly attributed to a faulty battery, starter, or alternator, corrosion on battery cables frequently goes unnoticed until it triggers a more serious issue regarding the vehicle’s reliability.
By learning to inspect battery terminals, cable ends, insulation, ground connections and the hidden areas where corrosion typically accumulates, you can identify potential problems before they negatively impact the vehicle’s performance.
Using a flashlight for close-up inspection and performing a voltage drop test with a multimeter can help you gain an even better understanding of the cables’ condition.
Furthermore, these steps can reveal hidden resistance that is not visible from the outside.
And, that’s all about this guide and you can ask related questions as well.
Frequently Asked Questions
FAQ 1: How do I check for corrosion on battery cables?
Answer: To check for corrosion on battery cables, first locate the battery and inspect both the positive and negative cable connections. Look for white, blue, or green powdery deposits around the terminals, cable ends and battery posts. Check the cable insulation for cracks, swelling, or other signs of damage. Pay particular attention to the points where the cables connect to the battery, as corrosion typically begins there. For a thorough inspection, use a flashlight to view hidden areas and consider performing a voltage drop test with a multimeter to detect internal corrosion that may not be visible from the outside.
FAQ 2: What does corrosion on battery cables look like?
Answer: Corrosion on battery cables typically appears as a powdery or flaky substance around the battery terminals and cable ends. Its color is usually white, blue, or green, depending on the chemical reactions involved. In some cases, corrosion may manifest as a dull brown film or rust-like deposit on metal surfaces. Severe corrosion can also spread beneath the cable insulation and may not be visible without close examination. Any unusual deposits around the battery connections should be investigated, as they can negatively impact electrical performance.
FAQ 3: Can corroded battery cables prevent a car from starting?
Answer: Yes, corroded battery cables can indeed prevent a car from starting. Corrosion creates electrical resistance, which impedes the flow of current from the battery to the starter motor. Even if the battery is fully charged, excessive corrosion can significantly reduce the power reaching the starter. As a result, the starter may crank slowly, produce a clicking sound, experience intermittent starting issues, or the vehicle may fail to start altogether. In many cases, simply cleaning or replacing a faulty battery cable is enough to restore the vehicle’s normal starting performance.
FAQ 4: Can corrosion occur inside the battery cables?
Answer: Yes, corrosion can indeed occur inside the battery cables, even if it is not visible from the outside. Moisture, battery acid fumes and dirt can penetrate damaged or aging cable insulation, leading to the deterioration of the internal metal conductor. Internal corrosion often increases electrical resistance and reduces the cable’s ability to conduct current efficiently. Signs of hidden corrosion may include swelling of the insulation, soft spots near the cable ends, anomalies detected during voltage drop tests, or recurring electrical issues despite the terminals appearing clean.
FAQ 5: How often should battery cables be inspected?
Answer: Battery cables should typically be inspected during the vehicle’s regular maintenance schedule, or at least every few months. Many technicians recommend checking battery connections during oil changes or before embarking on a long road trip. More frequent inspections may be necessary for vehicles operated in high-humidity environments, areas where road salt is used, regions with extreme temperature fluctuations, or vehicles subjected to frequent stop-and-go driving. Regular inspections help detect corrosion before it becomes severe enough to cause electrical malfunctions or starting difficulties.
FAQ 6: Why do battery cables deteriorate?
Answer: Common causes of battery cable deterioration include: exposure to battery acid fumes, minor acid leaks, moisture intrusion, overcharging, aging components and poor terminal sealing. Collectively, these factors trigger a chemical reaction that gradually corrodes the metal surfaces of the battery terminals and cable ends. External environmental conditions such as: road salt, humidity and temperature fluctuations, as it can further accelerate this deterioration process. Understanding the root causes of corrosion helps in implementing preventive measures, thereby preventing its recurrence after cleaning.
FAQ 7: Can a corroded battery cable be cleaned instead of being replaced?
Answer: In many cases, if the corrosion is limited solely to the surface and the cable itself remains in good condition, the battery cable can indeed be cleaned. Cleaning removes the layers of corrosion, thereby improving the electrical contact between the battery and the cable connection. However, if the corrosion has penetrated deep into the cable, damaged the conductor, weakened the connector, or is causing a significant voltage drop, replacing the cable is often the more prudent long-term solution. Ultimately, the severity of the damage determines whether cleaning or replacing the cable is the more effective approach.
References:
[1] Copper Wire Resistance Corrosion Test for Assessing Copper Compatibility of E-Thermal Fluids for Battery Electric Vehicles (BEVs)
https://www.mdpi.com/2313-0105/10/8/285

Hello Folks, Dean Shali here to help you out to solve the problems with your lovely vehicle, as i have lots of experience and knowledge about automotive industry as i woks directly with the customers and repair vehicles and i love to help the people to keep their cars safe and running smoothly.