Written By: Dean Shali
Fact Checked By: Sabré Cook
Reviewed By: Tamara Warren
Just understand this: literally it is the “Coolant” that keeps your engine from overheating and if there’s even a small leak happens there then it can actually disrupt the balancing temperature power.
Coolant Leak is actually the serious issue that can gradually harm your engine if you left it as it is.
Basically, the cooling system in a vehicle literally works tirelessly to maintain that sweet spot of temperature for your engine by circulating that coolant through the radiator, water pump and hoses as well.
So, whenever there is a possible leak in the coolant, then the engine can overheat that unfortunately leads to the several problems such as: blown head gaskets, warped cylinder heads and even it can fail the engine in some cases.
Additionally, you can notice coolant leaks as a small puddles under your car, low reservoir levels is the indicator as well, sweet-smelling fluid or even if you’re feeling that your cabin is loosing heating capability.
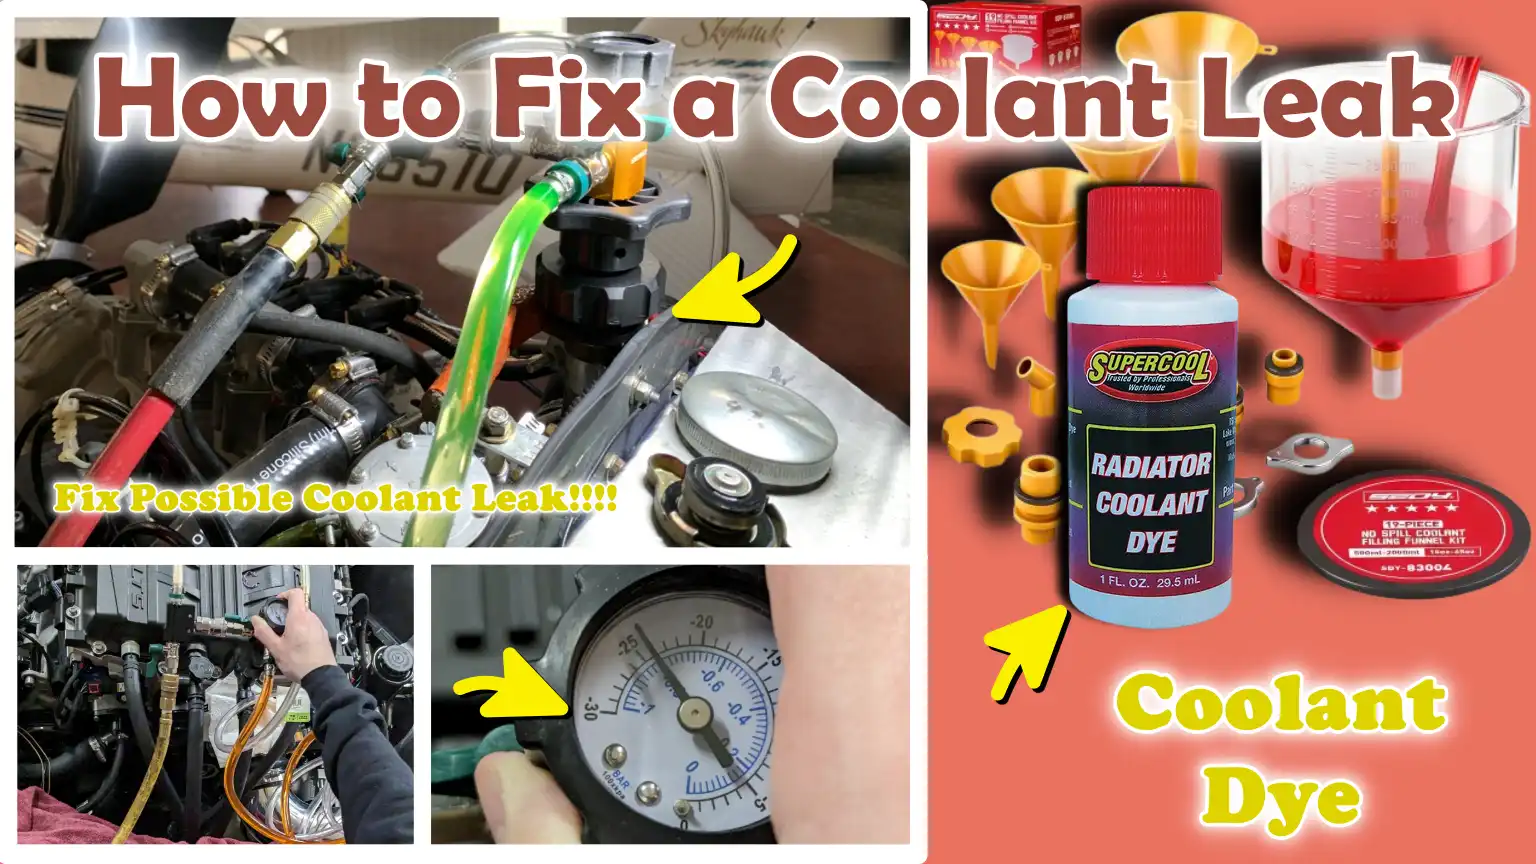
That’s why, we have come up with this guide about How to Fix a Coolant Leak, so that you can ensure your engine runs smoothly, after detecting and fixing that coolant leak problem in quick manner.
Now, Let’s Understand All About Your Car’s Cooling System
Your car’s cooling system is designed to maintain the engine at a safe and stable temperature, ensuring it does not overheat or sustain any damage.
When the engine runs, it generates a tremendous amount of heat; without proper cooling, metal components can expand, warp, or even fail completely.
The cooling system manages this heat using a specialized fluid called ‘coolant’; it absorbs heat from the engine and dissipates it through the radiator.
A properly functioning cooling system not only protects the engine but also improves fuel efficiency, performance and the overall lifespan of the vehicle.
Even a minor issue within this system such as: a leak or a blockage, as it disrupt the thermal balance and lead to serious mechanical problems over time.
1. Overview of Cooling System Components
The cooling system consists of several essential components that work together to regulate the engine’s temperature.
The radiator is a large metal unit typically located at the front of the car; it cools the hot coolant by circulating air through a series of thin fins.
Hoses are flexible pipes that transport coolant between the various parts of the system; it is crucial that they remain sturdy and leak-free to ensure a consistent flow of coolant.
The water pump is responsible for circulating the coolant between the engine and the radiator, thereby maintaining a continuous flow.
The thermostat functions as a temperature-controlled valve; it opens and closes to regulate the flow of coolant based on the engine’s heat levels.
The coolant reservoir (also known as the ‘overflow tank’) stores excess coolant and helps maintain the correct coolant level within the system.
Each of these components plays a crucial role; if any one of them malfunctions, the engine may overheat or a coolant leak could occur.
2. How Coolant Circulates and Prevents Engine Overheating
Coolant circulates within the engine in a continuous loop; it absorbs heat and carries it away from the engine, thereby preventing it from overheating.
When the engine is started, the thermostat remains closed to allow the engine to warm up quickly.
As soon as the engine reaches its optimal operating temperature, the thermostat opens, allowing the coolant to flow toward the radiator.
The water pump continuously circulates the coolant, while the radiator cools it down with the help of incoming outside air.
This cooled fluid then flows back into the engine to absorb more heat and this cycle continues without interruption.
This continuous flow ensures that the engine remains within a safe temperature range at all times, thereby preventing issues such as the warping of metal components or engine damage.
If the coolant level drops due to a leak, this cycle is disrupted and the engine can overheat very rapidly.
3. Types of Coolants and Their Differences
Various types of coolants are used in vehicles, but the most common are ethylene glycol-based and propylene glycol-based coolants.
Ethylene glycol-based coolants are widely used because they are highly effective at absorbing heat and lowering the fluid’s freezing point, making them suitable for use in both hot and cold weather conditions.
However, it is toxic and must be handled with extreme caution.
Propylene glycol coolant is considered a safer alternative because it poses less risk to humans and animals, although it does not transfer heat as efficiently as ethylene glycol.
Typically, both types of coolants are mixed with water and contain additives that prevent rust, corrosion and deposits within the cooling system.
It is crucial to use only the specific type of coolant recommended by the manufacturer, as using the wrong type can compromise cooling performance and, over time, damage the engine’s internal components.
How to Identify About The Coolant Leaks
Detecting a coolant leak early is one of the most crucial steps in protecting your engine from serious damage.
Coolant leaks are often minor and can easily go unnoticed; however, even a slight depletion of coolant can disrupt the engine’s thermal balance.
A properly functioning cooling system is sealed, meaning that under normal operating conditions, the coolant level should never drop.
If you observe a drop in coolant levels, detect an unusual odor, or notice signs of overheating, it typically indicates a leak somewhere within the system.
By carefully inspecting your vehicle using simple methods and basic tools, you can identify the problem before it becomes costly or dangerous.
1. Visual Inspection Tips
The easiest and most effective method for detecting a coolant leak is a visual inspection, this requires no specialized equipment.
The first thing you should check is the ground beneath your vehicle after it has been parked for some time.
Coolant leaks often leave small puddles behind which, depending on the type of coolant used, are typically green, orange, pink, or blue in color.
You should also open the hood and carefully inspect the hoses, radiator, water pump housing and coolant reservoir for any visible signs of leaks.
Look closely for cracks, loose connections, or wet spots.
In many cases, coolant may dry up and leave behind a chalky or crusty residue, which is a clear indication of a past or slow leak.
Discoloration around joints and connections can also reveal where coolant has been seeping out over time.
2. Clues from Scent and Texture
Coolant possesses a very distinct, sweet odor, making it easy to detect even if the leak itself is not clearly visible.
If you detect a sweet scent emanating from the engine compartment or the interior of your vehicle, it could be a strong indication of a coolant leak.
In some instances, leaking coolant may feel slightly oily or slippery to the touch, although it is thinner in consistency than engine oil.
You should exercise caution during your inspection and avoid direct contact, as coolant can be harmful.
These sensory cues, based on smell and touch, are particularly useful when leaks are minor or hidden in locations that are difficult to inspect visually.
3. Checking the Coolant Level in the Reservoir
The coolant reservoir provides a simple method for monitoring the coolant level within your system.
Most vehicle reservoirs feature clear markings on their sides indicating the minimum and maximum acceptable coolant levels.
Once the engine has completely cooled down, you can check to ensure that the coolant level falls within this safe operating range.
If the coolant level consistently drops over time without any apparent cause, it is a definitive sign that there is a leak somewhere within the system.
Regularly checking the reservoir allows you to detect issues early, before they lead to engine overheating or cause damage to the engine itself.
4. Using Tools to Detect Leaks
When leaks cannot be easily identified through a standard visual inspection, specialized tools can be employed to pinpoint the exact location of the leak with greater precision.
Pressure testing is a common method involving the use of a tool to pressurize the cooling system while the engine is turned off.
This causes coolant to seep out through any weak or compromised components, thereby making the leak easier to detect.
Another effective technique involves using a UV dye kit; this entails adding a special dye to the coolant and using a UV light to identify the source of the leak.
When light shines on this dye, it begins to glow, clearly revealing the source of the coolant leak.
These tools are particularly useful for detecting hidden leaks and can save you time by quickly identifying the problem.
Know, The Common Causes of Coolant Leaks
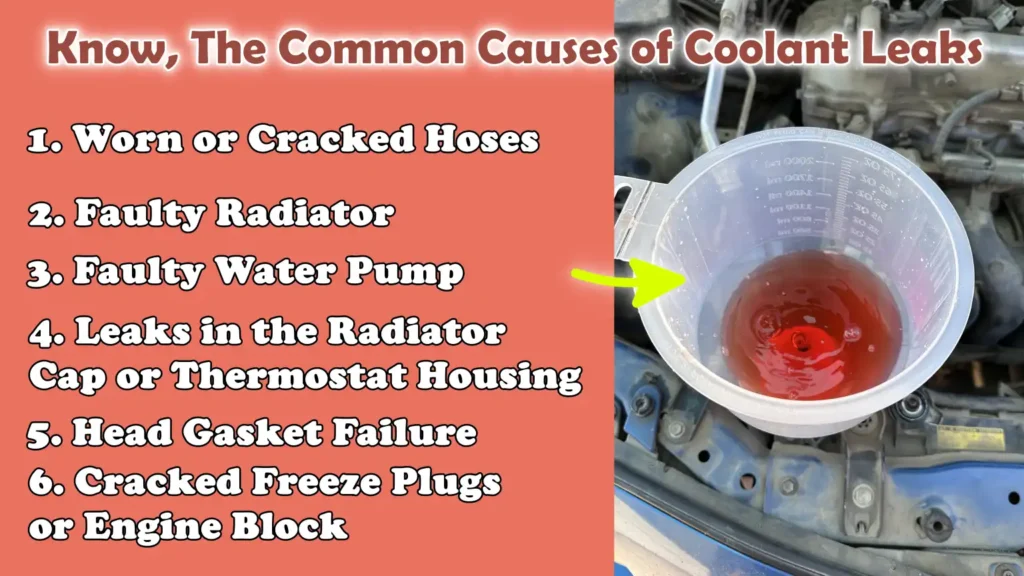
Coolant can leak for a variety of reasons; however, most of these causes are related to wear and tear, heat and pressure within the cooling system.
Over time, engine heat and constant circulation place stress on components such as hoses, seals and metal parts.
As these components age, they may weaken, develop cracks, or deteriorate, allowing coolant to escape.
Understanding the common causes of coolant leaks helps you identify the problem early and take appropriate action before the engine overheats or sustains serious damage.
1. Worn or Cracked Hoses
Hoses transport coolant between the engine, radiator and other components and they are subjected to high temperatures and pressure every time you drive.
Over time, due to heat and aging, rubber hoses can become hard, brittle, or soft.
They may develop small cracks or pinholes, particularly near connection points where pressure is highest.
Even a small crack can gradually lead to a coolant leak and compromise the system’s efficiency.
Regular inspections are crucial because hose damage is often minor initially; however, if a hose bursts while driving, it can result in a sudden and massive coolant leak.
2. Faulty Radiator
The radiator plays a vital role in keeping the engine cool; however, if it malfunctions, it can also become a source of leaks.
Radiators are constructed from thin metal and small tubes that can deteriorate over time, specially if old or contaminated coolant has been used.
Road debris, vibrations, or minor accidents can also inflict external damage on the radiator, leading to cracks or punctures.
When a radiator leaks, the coolant is unable to cool the engine effectively and the engine temperature can rise rapidly.
Even minor leaks in the radiator should be taken seriously, as they can expand significantly under pressure.
3. Faulty Water Pump
The water pump is responsible for circulating coolant throughout the entire system; it features seals that retain the coolant within the pump assembly while it rotates.
Over time, these seals can wear out, causing coolant to leak from the pump housing.
Other symptoms of a failing water pump may also manifest, such as the emission of unusual noises or visible coolant leaks around the front of the engine.
Since the pump is critical for coolant circulation, a leak in this component not only results in a loss of coolant but also reduces the flow rate necessary to keep the engine cool.
4. Leaks in the Radiator Cap or Thermostat Housing
The radiator cap and thermostat housing are small, yet vital, components of the cooling system.
The radiator cap maintains the correct pressure within the system, facilitating smooth coolant circulation and raising its boiling point.
If the cap is worn out or fails to seal properly, coolant may leak out or boil over.
The thermostat housing, which houses the thermostat, as it also develop leaks due to a worn gasket or cracks in the housing itself.
These leaks are often overlooked; however, they can lead to a gradual loss of coolant and result in engine overheating.
5. Head Gasket Failure
The head gasket serves as a critical seal between the engine block and the cylinder head, keeping the coolant, oil and combustion gases separated.
When a head gasket fails, coolant can leak either into the engine’s interior or outward.
This is a serious issue that can result in white smoke emitting from the exhaust, engine overheating and a reduction in engine power.
Head gasket failure is often caused by prolonged engine overheating or excessive strain placed on the engine; therefore, immediate attention is crucial to prevent severe damage to the engine.
6. Cracked Freeze Plugs or Engine Block
Freeze plugs, also known as expansion plugs, are installed in the engine block to protect the engine from damage caused by freezing coolant.
Over time, these plugs can deteriorate and begin to leak.
In more severe cases, sudden temperature fluctuations or a lack of proper maintenance can cause cracks to form within the engine block itself.
These cracks allow coolant to escape and repairing them is often difficult.
Leaks originating from freeze plugs or the engine block typically indicate a larger underlying internal issue and professional assistance may be required to resolve the problem effectively.
What are the Safety Precautions
Extreme caution is required when working on a car’s cooling system, as the coolant operates under high temperatures and pressure.
When the engine is running, the coolant can become extremely hot, often reaching its boiling point, and the system remains under pressure to enhance its operational efficiency.
Opening any part of the system without taking proper precautions can result in a sudden release of hot steam or fluid, posing a risk of severe burns or injury.
Furthermore, coolant contains chemicals that can be harmful if they come into contact with the skin, are inhaled, or are ingested.
Adhering to basic safety precautions not only protects you from injury but also ensures that the repair process is completed in a safe and controlled manner.
1. Allowing the Engine to Cool Down Before Inspection
Before checking for coolant leaks, it is absolutely essential to allow the engine to cool down completely.
A hot engine keeps the coolant under pressure; opening the radiator cap or reservoir while the engine is still hot can cause hot fluid or steam to erupt forcefully.
This poses a risk of severe burns within a matter of seconds.
Waiting at least thirty minutes to an hour after turning off the engine allows both the temperature and pressure to drop to safe levels.
You can also carefully touch the hood to verify whether the engine has cooled down sufficiently.
Taking this simple step significantly reduces the risk of accidents during the inspection process.
2. Wearing Gloves and Safety Goggles
Wearing protective gear such as: gloves and safety goggles, is a crucial part of working with coolant.
Coolant contains chemicals, such as ethylene glycol, that can cause irritation to the skin and eyes.
Gloves help prevent direct contact and protect your hands from both chemicals and the sharp edges often found within the engine bay.
Safety goggles shield your eyes from sudden splashes, particularly when you are inspecting hoses or opening reservoirs.
Even a minuscule amount of coolant entering the eyes can cause irritation or injury; therefore, you should always wear appropriate safety gear when checking for leaks or performing repairs.
3. Proper Disposal of Coolant
Coolant is toxic and it is crucial to handle and dispose of it with care to protect people, animals and the environment from harm.
It has a sweet scent that can attract pets, yet ingesting even a small amount can be dangerous.
Spilled coolant should be cleaned up immediately and used coolant must never be poured onto the ground, into drains, or into standard trash bins.
Instead, it should be collected in a clean container and transported to an appropriate recycling or disposal facility.
Many service centers and recycling centers safely accept used coolant.
Proper disposal not only safeguards the environment but also ensures that you are adhering to safe and responsible practices while maintaining your vehicle.
How to Fix a Coolant Leak – Quick But for Temporary
Temporary measures for coolant leaks come in handy when you need a quick solution to immediately halt overheating and keep your car running until it can be properly repaired.
These methods are not permanent and should be utilized only for short-term situations such as: reaching a nearby workshop or avoiding a roadside breakdown.
Coolant leaks often worsen over time, as the system operates under pressure and high temperatures; consequently, even a minor leak can quickly escalate into a major problem.
Temporary measures help to slow down or minimize the leak, maintain coolant levels and protect the engine from sudden overheating, but they cannot serve as a substitute for a complete repair.
1. Using Radiator Stop-Leak Products
Radiator stop-leak products are specially formulated liquids or powders designed to be poured directly into the cooling system to seal minor leaks from the inside.
These products circulate along with the coolant and when they face a crack or a small puncture, particularly within the radiator or in the case of minor gasket leaks, they form a seal.
They are easy to use and can provide a quick fix when the leak is not severe.
However, they are most effective only for small leaks and may not work on larger cracks or broken components.
In some instances, excessive use or the use of low-quality products can clog the narrow internal passages of the radiator or heater core, thereby reducing cooling efficiency.
For this reason, they should be used with caution and strictly as a temporary measure only.
2. Tightening Clamps or Replacing Hose Clips
Many coolant leaks occur at connection points where hoses (pipes) attach to the radiator, engine, or reservoir.
These joints are secured using clamps or clips, which can loosen over time due to heat, vibration and regular use.
Often, simply tightening a loose clamp is sufficient to immediately stop a minor leak.
If a clamp is damaged, corroded, or unable to maintain a proper grip, replacing it with a new one effectively reseals the joint.
This is one of the simplest and most effective temporary measures, particularly when the hose itself remains in good condition.
Regular inspection and maintenance of these joints can also help prevent future leaks.
3. Applying Temporary Sealants
Temporary sealants are used to externally repair (patch) small cracks or gaps found in hoses, radiator surfaces, or joints.
Typically, these sealants are applied directly to the leak site after thoroughly cleaning and drying the surface.
They form a protective layer that prevents coolant from escaping and can withstand moderate levels of heat and pressure.
While effective for small external leaks, these sealants are not suitable for high-pressure areas or cases involving extensive damage.
Over time, heat and vibration can weaken this seal, increasing the likelihood of the leak recurring.
For this reason, sealants should be strictly viewed as a short-term solution, they serve their purpose only until the damaged component can be properly repaired or replaced.
How to Fix a Coolant Leak – Permanent Repairs
Permanent repairs represent the correct and long-lasting method for fixing coolant leaks and protecting your engine from severe damage.
Unlike temporary measures, these solutions involve repairing or replacing the actual defective components within the cooling system to ensure that the leak does not recur.
Since the cooling system operates under conditions of extreme heat and pressure, even a minor defect in a component, if not properly addressed, as it lead to major system failures later on.
Performing permanent repairs not only halts coolant loss but also restores proper temperature regulation, improves engine performance and prevents costly breakdowns in the future.
1. Replacing Defective Hoses
Defective hoses are one of the most common causes of coolant leaks and replacing them is a simple yet highly effective permanent solution.
Due to constant exposure to heat and pressure, hoses can weaken, develop cracks, or swell.
When replacing hoses, it is crucial to select the correct size and type of hose for your specific vehicle to ensure a proper fit and longevity.
New hoses provide a robust and secure conduit for coolant flow; when installed with properly tightened clamps, they effectively prevent future leaks.
Regularly replacing aging hoses can also help prevent sudden breakdowns while driving.
2. Repairing or Replacing the Radiator
If the radiator is leaking due to corrosion, cracks, or physical damage, it may require either repair or complete replacement, depending on the severity of the issue.
Minor leaks in metal radiators can sometimes be repaired using professional techniques; However, radiators featuring plastic tanks are often replaced as a complete unit.
A properly functioning radiator is crucial, as it absorbs heat from the coolant before the fluid circulates back into the engine.
Installing a new or repaired radiator ensures efficient cooling, maintains stable engine temperatures and preserves long-term reliability.
3. Repairing or Replacing the Water Pump
The water pump plays a vital role in circulating coolant between the engine and the radiator; if a leak occurs, it must be addressed immediately.
A leak in the water pump often indicates that its internal seals or bearings have worn out.
In most cases, since it is a sealed component, replacing the water pump entirely is the best solution rather than attempting to repair it.
A new water pump restores proper coolant flow, prevents the engine from overheating and ensures that the cooling system operates exactly as designed.
Ignoring a faulty water pump can lead to rapid engine overheating and result in severe damage.
4. Repairing Leaks in the Coolant Reservoir
Over time, heat, pressure fluctuations, or the aging of plastic materials can cause cracks or leaks to develop in the coolant reservoir.
If the damage is minor, it can sometimes be repaired using a strong sealant; however, in most instances, replacing the reservoir is the more reliable solution.
A properly sealed reservoir helps maintain the correct coolant level and accommodates the expansion and contraction of the coolant as the engine heats up and cools down.
Repairing or replacing a leaking reservoir ensures that the cooling system remains balanced and that coolant levels do not gradually deplete.
5. Replacing the Thermostat or Radiator Cap When Faulty
Although the thermostat and radiator cap may appear to be minor components, they have a profound impact on the functioning of the cooling system.
A faulty thermostat can become stuck, halting the flow of coolant; this can lead to engine overheating and increased pressure, thereby creating a risk of leaks.
An old or defective radiator cap may fail to maintain proper pressure, potentially causing coolant to leak out or boil over.
Replacing these components is generally a simple and inexpensive task, yet it can significantly enhance the efficiency and reliability of the cooling system.
Ensuring that both components remain in good condition helps maintain a stable engine temperature and prevents future leaks.
6. Repairing Head Gasket Leaks
Compared to other coolant leakage issues, a head gasket leak is a far more serious and complex problem.
The head gasket seals the space between the engine block and the cylinder head; when it fails, coolant can leak either internally into the engine or externally.
This can result in engine overheating, white smoke emitting from the exhaust and a loss of engine power.
Repairing a head gasket typically requires disassembling major engine components, which is why this task is often performed by professionals.
Proper repair restores the engine’s seal and prevents further damage; however, delaying this repair can lead to catastrophic engine failure and incur extremely high repair costs.
Read More:
- How to Check Coolant Level
- How to Fix Car Overheating
- How to Flush a Radiator
- How to Diagnose Wheel Bearing Noise
- How to Reduce Road Noise in a Car
How to Refill & Bleed the Cooling System
Refilling and bleeding the cooling system after repairing a coolant leak is a crucial step, as it ensures that the system operates correctly and safely.
When coolant levels drop or a component is replaced, air can enter the system; this trapped air can obstruct the proper flow of coolant.
This can lead to issues such as uneven cooling, engine overheating and improper heater function.
A properly refilled and bled system allows coolant to flow without obstruction, maintains a consistent engine temperature and protects internal engine components from heat-related damage.
Taking the time to perform this procedure correctly helps prevent future problems and contributes to optimal engine performance.
1. Using the Correct Coolant Mixture
Using the correct coolant mixture is essential for proper engine cooling and long-term protection.
Most vehicles require a mixture of coolant and distilled water, typically in a 50:50 ratio, which strikes the right balance between heat absorption and freeze protection.
Coolant also contains additives that prevent corrosion, rust and sediment buildup within the cooling system.
Using the wrong type of coolant or mixing incompatible types can reduce its effectiveness and potentially damage components such as the radiator or water pump.
Always follow the vehicle manufacturer’s recommendations to ensure that the cooling system performs exactly as intended in both hot and cold weather conditions.
2. How to Refill the Cooling System Without Trapping Air Bubbles
When refilling the cooling system, it is crucial to proceed slowly and carefully to prevent air from becoming trapped inside the system.
After ensuring that the engine has completely cooled down, coolant should be poured gradually into the radiator or reservoir tank, allowing sufficient time for it to settle and fill every component of the system.
Filling it too rapidly can lead to the formation of air pockets, particularly in areas such as the engine block or heater core.
In some vehicles, you may need to slightly elevate the front end of the vehicle or open specific valves to assist in purging the air.
Working in a slow and steady manner throughout the refilling process ensures that the coolant reaches every component of the system and that no air remains trapped anywhere.
3. Steps to Bleed Air from the System for Optimal Performance
Bleeding the cooling system expels any trapped air, thereby ensuring an unobstructed flow of coolant.
After refilling, the engine is typically started and allowed to reach its normal operating temperature; this causes the thermostat to open, allowing the coolant to begin circulating freely.
As the engine warms up, any trapped air rises toward the highest points in the system and escapes through the radiator or via bleed valves (if present).
During this process, you may observe air bubbles escaping, which is a normal occurrence.
The coolant level should be monitored closely and if it drops, it should be topped up to the proper level.
Once the air bubbles cease to appear and the engine temperature remains stable, it indicates that the system has been successfully “bled.”
This process ensures efficient cooling and stable engine performance, while also reducing the risk of engine overheating in the future.
What are the Post-Repair Testing Procedures
Testing your car after fixing a coolant leak is a crucial step to ensure that the problem has been completely resolved and that the engine is safe to operate.
Even after repairs, minor issues such as: loose connections, trapped air, or incomplete seals, as it lead to coolant loss or engine overheating.
The purpose of testing is to verify that the cooling system is functioning correctly under normal operating conditions.
A thorough inspection helps prevent future malfunctions, protects the engine from heat-related damage and confirms that all repairs have been executed properly.
Spending a few extra minutes testing the system can save you from costly problems down the road.
1. Starting the Engine and Monitoring Temperature
Once the repairs are complete and the coolant has been refilled, the engine should be started and allowed to run until it reaches its normal operating temperature.
As the engine warms up, the thermostat opens and coolant begins to circulate throughout the entire system.
During this process, it is essential to keep a close watch on the temperature gauge located on the dashboard.
The temperature should rise gradually and then stabilize within the normal operating range.
If the temperature continues to rise steadily or enters the “overheating” zone, it may indicate that a problem still persists such as: trapped air, low coolant levels, or a faulty component.
Keeping a keen eye on the temperature helps ensure that the cooling system is functioning correctly.
2. Checking for Persistent Leaks
While the engine is running, you should carefully inspect all the areas where repairs were performed to ensure that there are no signs of persistent leaks.
Inspect the areas surrounding the hoses, clamps, radiator, water pump components and coolant reservoir for any wet spots, dripping fluids, or fresh stains.
It is also helpful to check underneath the car again to see if any new puddles are forming.
Sometimes, leaks only become apparent when the system is under pressure; therefore, performing this step after the engine has warmed up is crucial.
If a leak is detected, it indicates that repairs or adjustments may be required before resuming regular operation of the vehicle.
3. Ensuring Proper Coolant Flow and Preventing Overheating
Proper coolant circulation is essential for keeping the engine cool and protecting it from damage.
While the engine is running, you should feel a steady flow of heat from the car’s interior heater; this signals that the coolant is circulating correctly through the heater core.
The radiator fan should also activate as needed, helping to regulate the temperature.
There should be no unusual noises, no sudden spikes in temperature and no warning lights illuminated on the dashboard.
When the engine maintains a stable temperature without overheating, and no leaks are visible anywhere, it confirms that the cooling system is functioning properly.
This final check provides the assurance that your repairs were successful and that your vehicle is safe to drive.
How to Maintain Coolant & Prevent Future Leaks
Preventing a coolant leak is far easier and less expensive than repairing the damage after a leak has occurred.
The cooling system operates under constant heat and pressure; therefore, regular maintenance is essential to keep all components in good working order.
Minor issues such as: low coolant levels, weakened hoses, or accumulated debris, as it gradually escalate into major problems if left unaddressed.
By adopting simple maintenance practices, you can ensure that your cooling system functions properly, prevents overheating and extends the lifespan of your engine.
Regular care also enhances reliability and reduces the likelihood of sudden mechanical breakdowns.
Additionally, there’s scientific research that clearly shows that the coolant literally plays a major role in engine efficiency and fuel consumption as well, as when the cooling system is not working properly due tot he leaks and anything, then the engine itself operates at the higher temperatures, which unfortunately increases the fuel usage and emissions as well. That’s why it is always recommended to fix coolant leaks that actually helps you to maintain the optimal engine temperature and it eventually improves the both performance and the fuel efficiency of your vehicle as well.[¹]
1. Regular Inspection of Coolant Level and Condition
Regularly checking your coolant level helps you identify potential issues before they become critical.
Coolant reservoirs typically feature clear markings indicating the correct level; when the engine is cold, the level should always remain within the specified range.
Beyond the level, the condition of the coolant is equally important.
Healthy coolant is typically brightly colored and free of dirt or particulate matter.
If it appears rusty, cloudy, or contains visible debris, it may no longer be capable of adequately protecting the system.
Old or degraded coolant can cause corrosion within the radiator and engine, thereby increasing the risk of leaks over time.
Keeping your coolant clean and at the proper level is the simplest way to prevent damage.
2. Periodic Inspection of Hoses and Clamps
Hoses and clamps are common points where leaks frequently occur; therefore, they should be inspected on a regular basis.
Over time, due to heat and general wear and tear, hoses can become brittle, cracked, or soft.
Clamps can become loose or worn out, leading to the formation of tiny cracks through which coolant may leak.
By inspecting these components, you can detect early signs of damage such as: cracks, bulges, or loose connections.
Replacing a weakened hose or tightening a clamp is a simple task that can prevent much larger problems down the road.
Regular inspections ensure that the cooling system remains sealed and functions correctly.
3. Timely Replacement of Old or Worn Components
Every component of the cooling system has a finite lifespan and replacing worn-out parts in a timely manner is crucial for preventing leaks.
Components such as hoses, thermostats, water pumps and radiator caps can deteriorate due to constant use.
Waiting until a part fails completely can result in a sudden loss of coolant and lead to engine overheating.
Adhering to the manufacturer’s recommended service schedule ensures that these parts are replaced before they cause any issues.
Replacing components proactively not only reduces the risk of leaks but also improves the engine’s overall performance and reliability.
4. Keeping the Radiator and Cooling System Clean
In a clean cooling system, coolant flows without obstruction and dissipates heat effectively.
Over time, dirt, rust and mineral deposits can accumulate inside the radiator and other components, diminishing their capacity to cool the engine.
This buildup can also create blockages and increase internal pressure, thereby heightening the likelihood of leaks.
Flushing the cooling system at regular intervals removes old coolant and debris, keeping the system clean and efficient.
Keeping the radiator and cooling system clean prevents rust, improves cooling performance and reduces the likelihood of future leaks.
Understand, When It Is Wise Thing to Go to The Professional
While many coolant leak issues can be resolved using common tools and careful inspection, there are situations where seeking professional assistance is the safest and most reliable option.
Modern cooling systems can be quite complex and diagnosing or repairing certain problems without the right tools and expertise is not easy.
Ignoring serious issues or attempting complex repairs without proper knowledge can cause further damage to the vehicle, increase costs, or create safety hazards.
Knowing when to stop and consult a trained mechanic helps protect your engine, saves time and ensures that repairs are performed correctly.
1. Leaks Persisting After Attempting DIY Repairs
If a coolant leak persists even after attempting common remedies such as: tightening clamps, applying sealants, or replacing minor components, it is a clear indication that the underlying problem may be far more serious than it appears.
Persistent leaks may be caused by hidden cracks, internal damage, or pressure-related issues that are difficult to detect without specialized tools.
A professional mechanic can conduct a thorough inspection using pressure testing and other diagnostic methods to pinpoint the true source of the leak.
Addressing the root cause of the problem is crucial, as repeated coolant loss can lead to engine overheating and subsequent damage.
2. Complex Issues, Such as a Blown Head Gasket or Cracked Engine Block
Some coolant leak issues stem from serious internal engine malfunctions, such as a blown head gasket or a cracked engine block.
Symptoms of these problems often include white smoke emitting from the exhaust, engine oil taking on a milky appearance, a loss of engine power, or persistent engine overheating.
Resolving these issues often necessitates dismantling key engine components, taking precise measurements and utilizing specialized tools.
Attempting such repairs without proper training can exacerbate the damage.
Professional technicians possess the requisite experience and tools to execute these complex repairs safely and effectively, thereby ensuring that the engine is restored to proper working order.
3. Uncertainty Regarding Safety or Repair Skills
If you harbor any doubts or uncertainties regarding any stage of the inspection or repair process, it is always advisable to seek professional assistance.
Working on a cooling system involves exposure to hot fluids, high pressure and chemicals; if not handled correctly, this can pose serious hazards.
Furthermore, a lack of appropriate tools or technical expertise can result in improper repairs, increasing the likelihood of subsequent malfunctions.
A qualified mechanic can perform this work safely, adhere to the correct procedures and ensure that all components are properly installed and thoroughly inspected.
In such situations, seeking professional help helps mitigate risks and provides you with the confidence that your vehicle is in a safe and roadworthy condition.
Conclusion – How to Fix a Coolant Leak
Now, you have understood that how much engine has dependency on a healthy cooling system, that’s why even a tiny leak can make a big difference over the period of time and that’s why you need to fix those things in the first priority.
The cooling system plays a pivotal role in maintaining a stable engine temperature and even a minor leak can disrupt this equilibrium, potentially leading to severe issues such as overheating, component warping, or complete engine failure.
By understanding how the system functions, recognizing early warning signs and taking the appropriate steps to address leaks, you can avoid costly repairs and ensure that your vehicle continues to operate without interruption.
Regular inspections and maintenance are the key to preventing future problems.
Simple habits such as: checking coolant levels, inspecting hoses and using the correct coolant mixture, as it make a significant difference in the health of your engine.
When repairs become necessary, making a prudent choice between temporary fixes and permanent solutions helps ensure both safety and reliability.
Now, that’s all about this guide on How to Fix a Coolant Leak, but still you can ask all the remaining questions that are not been solved so far now.
Frequently Asked Questions
FAQ 1: What are the most common signs of a coolant leak?
If you look closely, the most common signs of a coolant leak are easy to spot. After parking your car, you may notice a small puddle of green, orange, or pink liquid underneath it. A sweet smell emanating from the engine compartment is also a sure sign, as coolant has a distinct odor. You may also observe that the engine temperature is rising higher than normal, or that a warning light has illuminated on the dashboard. In some cases, the car’s heater may stop working due to improper coolant circulation within the system. A low coolant level in the reservoir without any apparent cause, as it is another definitive indication that there is a leak somewhere in the system.
FAQ 2: Is it safe to drive a car with a coolant leak?
It is not safe to drive a car with a coolant leak, even if the leak appears minor at first. The cooling system is responsible for regulating the engine’s temperature; if coolant levels are low, the engine can overheat very rapidly. Overheating can cause severe damage to critical engine components such as: the cylinder head, head gasket, or the entire engine assembly. In extreme cases, the engine may fail completely. If you discover a coolant leak, it is best to have it repaired as soon as possible, or to refrain from driving the vehicle until the issue has been resolved.
FAQ 3: How can I determine where the coolant is leaking from?
To locate a coolant leak, the first step is typically a visual inspection. You should check for any puddles or accumulated liquid underneath the vehicle, and look for wet spots, stains, or dried residue around the hoses, radiator, or water pump within the engine compartment. Sometimes, the leak may not be immediately visible; Therefore, regularly checking the coolant level allows you to detect problems early on. If a leak is difficult to pinpoint, tools such as a pressure tester or a UV dye kit can help identify the exact location, as they make the leak much more visible. These methods are often employed when the leak is minor or not visible to the naked eye.
FAQ 4: Can I fix a coolant leak myself at home?
Yes, if you possess some basic tools and a bit of technical know-how, you can resolve many minor coolant leak issues right at home. Minor issues such as: loose hose clamps, small cracks in hoses, or a faulty radiator cap, as it can often be easily repaired or replaced. In emergency situations, temporary solutions like radiator stop-leak products can also prove useful. However, more serious problems such as: a leaking radiator, a failed water pump, or a blown head gasket, as it may require the assistance of a professional. It is crucial to recognize your limitations and avoid attempting complex repairs if you are not confident in your abilities.
FAQ 5: How much does it cost to fix a coolant leak?
The cost of repairing a coolant leak varies depending on the root cause of the problem. Simple tasks, such as tightening a clamp or replacing a hose, typically do not cost very much. Replacing components like the radiator, water pump, or thermostat can be more expensive, as the cost covers both the parts and the labor (mechanic’s fees). In more severe cases such as: a blown head gasket repair costs can be quite substantial, as they involve major engine repairs. It is almost always cheaper to address the problem early on rather than waiting for it to worsen.
FAQ 6: What happens if I ignore a coolant leak?
Ignoring a coolant leak can lead to severe engine damage over time. As the coolant level drops, the engine fails to maintain a safe operating temperature, causing it to overheat. Persistent overheating can warp metal components, damage the head gasket, and degrade engine performance. In extreme cases, the engine may suffer catastrophic failure and cease to function entirely. This can also result in a sudden breakdown while driving, posing a significant safety risk. Addressing the leak early on helps avoid these hazards and ensures that your vehicle continues to run without interruption.
FAQ 7: How long does it take to fix a coolant leak?
The time required to fix a coolant leak depends on the nature of the problem. Simple tasks such as: tightening a clamp or replacing a hose, that are often completed in less than an hour. Replacing components like the radiator or water pump may take a few hours, depending on the specific vehicle model. More complex repairs such as: fixing a head gasket, that can take a full day or longer, as they involve extensive labor. Accurate diagnosis of the problem saves time and ensures that the repair is executed correctly.
References:
[1] A Study of Fuel Economy and Exhaust Emission according to Engine Coolant and Oil Temperature
https://www.researchgate.net/publication/270672337_A_Study_of_Fuel_Economy_and_Exhaust_Emission_according_to_Engine_Coolant_and_Oil_Temperature

Hello Folks, Dean Shali here to help you out to solve the problems with your lovely vehicle, as i have lots of experience and knowledge about automotive industry as i woks directly with the customers and repair vehicles and i love to help the people to keep their cars safe and running smoothly.