Written By: Dean Shali
Fact Checked By: Sabré Cook
Reviewed By: Tamara Warren
It is 100% true that: Electrical faults are literally behind many car breakdowns, but when you understand how you can fix them at home with just using your day-today tools, then it won’t scare you again.
So, if your vehicle fails to start at all or behaves unpredictably such as: having affected headlights and dashboard indicators to the ignition system and essential sensors errors, then it becomes annoyance and safety hazards as well.
As, now-a-days modern cars literally relies on electricity that’s why even a small issues such as: dead battery, blown out fuse or loose wire connection can actually cause major inconvenience or safety risks as well.
Plus, there’s studies that shows that the faulty alternators and batteries alone account for nearly 25% of the roadside breakdowns worldwide.
Not only this,t here’s common electrical issues are available such as: having corroded wires, malfunctioning starters or short circuits that can even lead to the flickering of lights, having unusual clicking sounds from anywhere in your car or a total loss of power.
So, just understand how everything works and How to Fix Car Electrical Problems, as in this guide we have includes easy to follow instructions for identifying the symptoms, the exact problem and fixes for them as well.
Now, Let’s Understand Your Car’s Electrical System
1. Basic Components of a Car’s Electrical System
Every car relies on specific electrical components that work together to power and control the vehicle.
The battery stores electrical energy, providing the initial power required to start the engine, as well as supplying power to operate the system when the engine is turned off.
When the engine is running, the alternator generates electricity and keeps the battery charged, while also powering the lights, sensors and various electronic components.
The starter motor draws power from the battery to crank the engine and bring it to life.
Fuses protect the system when excessive current flows through a circuit; they interrupt the circuit, thereby preventing damage or the risk of fire.
Relays act as switches, utilizing a small amount of electricity to control high-power circuits.
The wiring connects all these components, allowing electricity to flow throughout the vehicle, while sensors monitor various conditions such as: temperature, speed and airflow, to ensure the engine operates correctly.
If any of these components fail or become compromised, it can impact the entire system, leading to issues such as dimming lights, the activation of warning indicators, or the car failing to start.
2. How Electricity Flows in a Car
Electricity in a car travels along a specific pathway; however, for everything to function correctly, it is essential that this flow remains stable.
When you turn the ignition key or press the start button, the battery sends electrical power to the starter motor, which then cranks the engine.
Once the engine has started, the alternator takes over, generating electricity that it distributes, via the wiring harness, to various systems, such as the headlights, dashboard instruments and the engine control unit.
Current flows within a closed circuit, meaning it originates from a power source, passes through various components and returns to the battery via a ground connection.
If this flow is interrupted at any point, due to a broken wire, a loose connection, or a faulty component, the system will fail to function correctly.
Even minor interruptions can manifest as symptoms such as flickering lights or a sluggish engine; these serve as early warning signs that something is amiss within the electrical circuit.
3. Common Causes of Electrical Problems
Electrical issues in a car typically arise over time due to general wear and tear and environmental factors.
Corrosion is one of the most common culprits, particularly on battery terminals and connectors, where moisture and dirt create resistance, thereby impeding the flow of electricity.
Normal wear and tear can weaken wires, compromise their insulation, or degrade connectors, negatively impacting the vehicle’s overall performance.
A short circuit occurs when electrical current deviates onto an unintended path, often caused by faulty wiring or exposed metal components.
This can result in blown fuses or even damage to various components.
Loose or poor connections constitute another common issue, as they reduce the efficiency of electrical flow and can give rise to intermittent problems that are notoriously difficult to diagnose.
In some instances, aging components such as: the battery or alternator, simply reach the end of their service life and cease to function, leading to recurring malfunctions.
Understanding these root causes enables you to identify problems early on and resolve them before they escalate into serious or costly issues.
4. Safety Precautions Before Commencing Electrical Work
When working on a car’s electrical system, prioritizing safety is mandatory, as electricity, even at low voltages, as it can cause damage or injury if not handled properly.
Before beginning any work, always ensure that the engine is turned off and the ignition key has been removed to prevent the electrical system from being accidentally activated.
Disconnecting the battery, specifically its negative terminal, is a crucial step to avoid short circuits or sparks.
Using the correct tools, such as insulated pliers and gloves, reduces the risk of electric shock or burns.
Working in a dry and well-lit environment is also essential, as moisture can increase the risk of electrical hazards and make it difficult to see small components.
Never replace a fuse with one that has a higher amperage rating, as this can generate excessive heat or lead to a fire.
Adhering to these precautions ensures that you can safely diagnose, identify and repair electrical issues without causing further damage to your vehicle or compromising your personal safety.
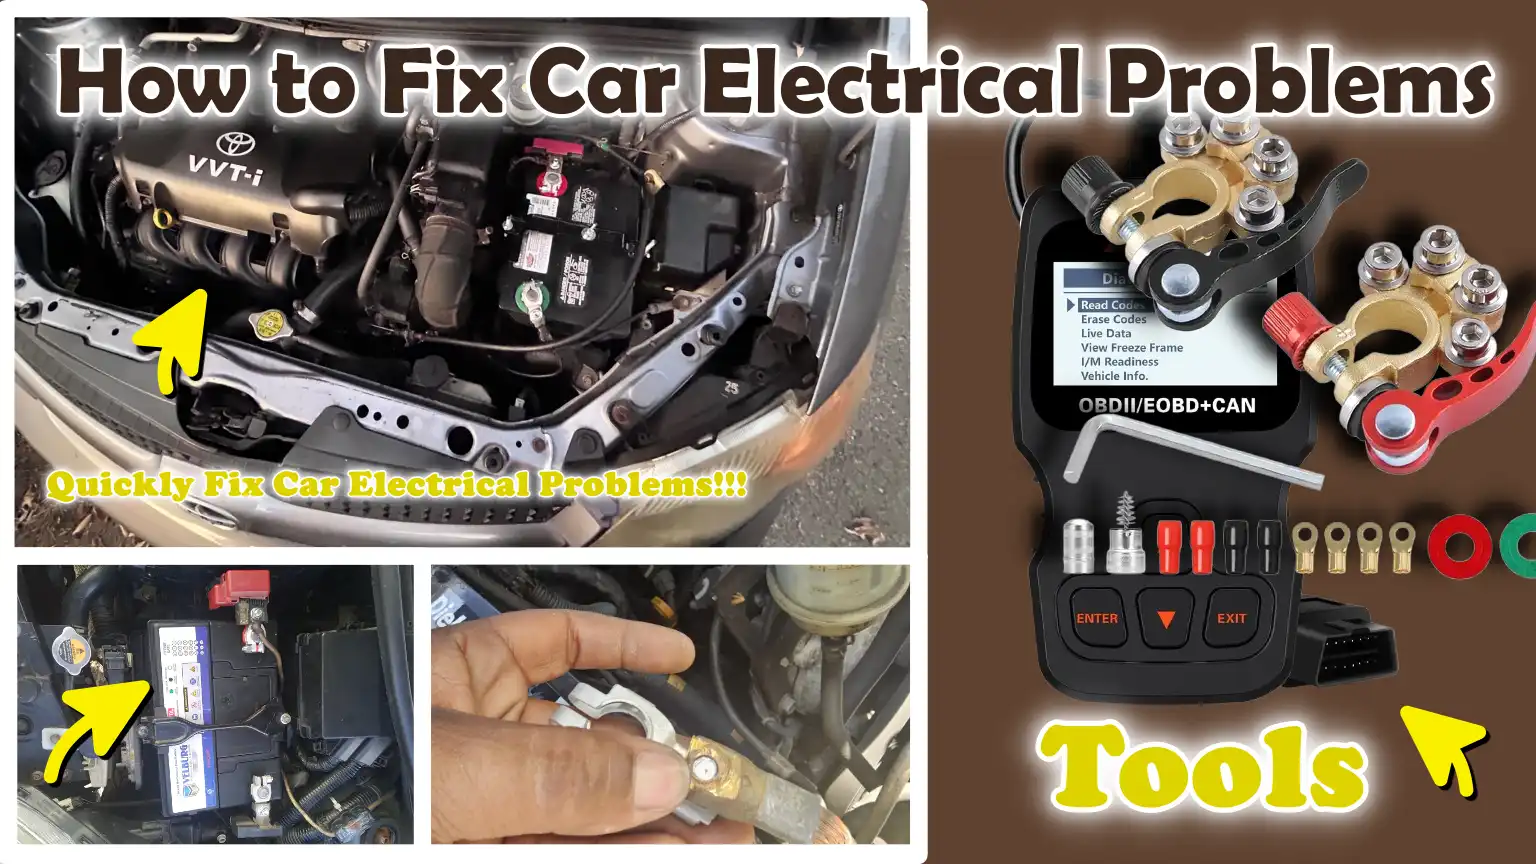
Tools
| Tool Name | Why It Is Needed | How to Use It |
|---|---|---|
| Multimeter / Voltmeter | This is the most essential tool for assessing the “electrical health” (electrical condition) of a system. It helps in measuring voltage, resistance and continuity. You can use it to pinpoint where power is being lost by checking components such as the battery, alternator, wires and connections. | To check the battery’s power, set the device to voltage mode; place the red probe on the positive terminal and the black probe on the negative terminal. To check for continuity, switch modes and touch both ends of a wire to determine whether current is flowing through it. If a reading appears, it indicates that the wire is intact. |
| Test Light | This tool provides an immediate indication of whether or not power is present in a specific wire or circuit. It is faster than a multimeter for initial diagnostics and is particularly useful for beginners. | Clip the test light to a metal ground surface and touch its tip to a wire or fuse. If the light illuminates, it indicates that power is present. If it does not light up, it means either that there is no power or that there is a fault somewhere within the circuit. |
| Circuit Tester | This tool helps in detecting breaks, faults, or weak points within a circuit. It is particularly useful when you suspect a problem but cannot identify it through visual inspection alone. | Connect the tester to the circuit and trace the path of the wiring. Check at various points along the entire length of the wire. When the signal ceases, you can pinpoint the exact location of the problem. |
| Wire Strippers | These tools are used to safely remove the insulation (outer layer) from wires without causing damage to the internal metal conductor. This process is crucial for creating clean, secure and reliable electrical connections. | Insert the wire into the designated slot on the tool, apply gentle pressure and pull to strip away the outer layer of insulation. Ensure that the internal strands of the wire are not severed. |
| Crimpers | A crimper is used to securely fasten wires to connectors. A proper connection ensures the correct flow of electricity and prevents issues associated with loose connections. | Insert the wire into the connector, position it correctly within the crimping tool and squeeze firmly. This action securely locks the wire in place, preventing it from coming loose. |
| Electrical Tape | This is used to insulate exposed wires and protect connections from moisture, dust and short circuits. It also helps keep the wiring organized. | Wrap the tape tightly around the exposed or repaired section. Ensure that no gaps remain, thereby guaranteeing that the wire is completely protected. |
| Safety Gloves | Gloves protect your hands from cuts, burns and accidental contact with electrical components. They are particularly important when working near batteries or faulty wiring. | Put them on before beginning any task. Ensure that they fit properly so that you can handle tools effectively without them slipping. |
| Eye Protection | When working on electrical components, this protects your eyes from sparks, dust, or small debris. Even a small spark can cause injury. | Put on safety goggles before starting work and keep them on while inspecting or repairing any electrical components. |
Common Car Electrical Problems and How to Fix Them
1. Faulty or Weak Battery
A faulty or weak battery is one of the most common electrical problems in any car and it typically presents clear symptoms, such as the engine failing to start, slow cranking, or dim headlights and interior lights.
This occurs because the battery lacks sufficient energy to power the starter motor and other electrical components.
To diagnose this, you can use a multimeter to measure the battery’s voltage; a healthy battery typically registers around 12.
6 volts when the car is turned off.
If the voltage is low, it may simply need to be recharged.
Dirty or corroded battery terminals can also obstruct the flow of electricity; therefore, cleaning them with a brush and ensuring that the connections are securely tightened often restores proper functionality.
If the battery fails a load test or repeatedly discharges, replacing it is the best course of action.
Jump-starting the car allows you to drive it for a short while, but if the battery is old or worn out, this does not resolve the underlying problem.
2. Faulty Alternator
The alternator plays a crucial role; it generates electricity while the engine is running and keeps the battery charged.
When it malfunctions, the battery begins to discharge rapidly and you may observe a warning light illuminated on the dashboard, dimming headlights, or erratic behavior within the electrical system.
In some instances, the car may start normally, but power output may diminish while driving.
To test the alternator, you can use a multimeter to check the voltage while the engine is running; it should typically fall between 13.5 and 14.5 volts.
If the reading is significantly too low or too high, the alternator may not be regulating the voltage correctly.
A loose belt, worn internal components, or faulty wiring can also adversely affect its performance.
Addressing minor issues such as: adjusting belt tension, as it can be helpful; however, in most cases, replacing a defective alternator is necessary to ensure a consistent power supply and prevent recurring battery failures.
3. Blown Fuses and Faulty Relays
Fuses and relays are safety and control devices designed to protect the electrical system and regulate the flow of power to various components.
When a fuse blows, it interrupts the power supply to a specific component; this can cause features such as headlights, power windows, or the radio to suddenly stop working.
The fuse box is typically located under the dashboard or within the engine bay and each fuse is clearly labeled for easy identification.
A blown fuse can be identified by a visible break in the metal strip located inside it.
Replacing a faulty fuse with one of the same rating usually restores the system to working order; however, if the replacement fuse blows again, it indicates a more serious underlying issue such as: a short circuit or an excessive electrical load on the system.
Relays can also degrade over time, leading to intermittent issues where components function sporadically, working at times and failing at others.
To prevent recurring fuse failures, it is essential to identify and resolve the root cause such as: faulty wiring or a defective component that is drawing excessive current.
4. Wiring Issues
Diagnosing wiring issues can often be challenging, yet they remain a major cause of electrical malfunctions in vehicles.
Over time, exposure to heat, vibration and moisture can cause wires to fray, break, or corrode.
Loose connections can disrupt the flow of electricity, causing the system to function intermittently, working correctly at times and shutting down completely at others.
Carefully inspecting the wiring harness, checking for any signs of physical damage, discoloration of wires, or loose connectors, is a crucial step in diagnosing the problem.
Wire repair often involves stripping the insulation, reconnecting the wire using the appropriate connector and wrapping it with electrical tape or heat-shrink tubing for protection.
In more severe cases, it may be necessary to completely replace the faulty component.
Properly repaired wiring ensures a steady flow of electricity and prevents future issues such as short circuits or component failure.
5. Faulty Lights and Electrical Accessories
Problems related to lights and accessories are often the first visible signs of an electrical malfunction.
Headlights may dim, flicker, or stop working entirely; meanwhile, interior lights or dashboard indicators may behave erratically.
These issues can stem from faulty bulbs, defective switches, or poor wiring connections.
Checking the bulbs first is an easy initial step, as they naturally wear out over time.
If the bulbs are intact, the next step is to inspect the switches and wiring to ensure that power is reaching that specific component.
Loose connections or corrosion can lead to voltage drops and negatively impact performance.
Resolving these issues may require replacing bulbs, tightening connections, or repairing damaged wiring.
Ensuring that all lights and accessories function correctly is crucial, not only for convenience but, more importantly, for safety specially when driving at night or in low-light conditions.
6. Starter Motor Issues
The function of the starter motor is to crank the engine when starting the vehicle; if it fails, the vehicle will not start at all.
A common symptom is a distinct “clicking” sound heard when the ignition key is turned.
This often indicates that the starter is not receiving sufficient power or is failing to engage properly.
To diagnose the starter circuit, the battery, wiring and connections are inspected to confirm that adequate voltage is reaching the motor.
If the battery and connections are in good condition, the starter motor itself may have failed internally.
Heat, age and repeated use can cause its internal components to wear out over time.
In such cases, replacing the starter motor often becomes necessary to ensure that the engine can be reliably started once again.
Conducting a proper diagnosis is crucial, as similar symptoms can also stem from battery or wiring issues; repairing the correct component ensures that the problem does not recur.
How to Effectively Use Diagnostic Tools
1. Using a Multimeter to Check Voltage, Resistance and Continuity
The multimeter is one of the most effective and reliable tools for diagnosing electrical issues in a car, as it provides precise readings of voltage, resistance and continuity, helping you understand exactly what is happening within a circuit.
To check voltage, you place the probes on the positive and negative terminals of a component (such as the battery); a healthy battery typically reads approximately 12.
6 volts when the engine is off and a higher reading when the engine is running, confirming proper charging.
Resistance is measured to determine how much a component is impeding the flow of electricity; high resistance often indicates a fault, corrosion, or wear in that specific part.
Continuity testing is used to verify whether electricity can flow through a specific wire or circuit; if there is no continuity, it means the electrical path has been interrupted somewhere along the way.
By learning to interpret these readings correctly, you can quickly identify a weak battery, faulty wiring, or defective components without resorting to guesswork, thereby saving time and avoiding the unnecessary replacement of parts.
2. Using a Test Light for Quick Circuit Checks
A test light is a simple and rapid tool used to determine whether electricity is present in a circuit; it is particularly useful for performing quick checks in situations where detailed measurements are not required.
It operates as follows: you attach its clip to a metal ground point and touch its probe tip to the wire or fuse you wish to test; if the light illuminates, it indicates that electricity is successfully reaching that specific point.
This tool is particularly useful for checking fuses, switches and power wires in systems such as headlights or interior lighting.
Although it does not provide precise voltage readings like a multimeter, it clearly indicates whether or not power is present; often, this is all that is needed to quickly pinpoint a fault.
If a light fails to illuminate where it is expected to, it signals an underlying issue such as: a blown fuse, a broken wire, or a loose connection, enabling you to troubleshoot the problem systematically.
3. Using Onboard Diagnostic (OBD-II) Scanners to Read Error Codes
Modern vehicles are equipped with an onboard computer system that continuously monitors engine and electrical performance; with the aid of an OBD-II scanner, you can access this system and retrieve the error codes stored within it whenever a malfunction occurs.
When a problem arises, the system records a specific code and may illuminate a warning light on the dashboard; this helps you identify the issue with greater precision.
By connecting the scanner to the vehicle’s diagnostic port, typically located beneath the dashboard, you can retrieve these codes and determine exactly which specific system or component has been affected.
Each code corresponds to a particular issue such as: a faulty sensor, an engine misfire, or an electrical malfunction, and this information allows you to focus your investigation on the exact source of the problem, rather than having to blindly inspect every component.
While the scanner itself does not resolve the issue, it provides clear direction and minimizes the need for guesswork; this makes diagnosing and repairing problems significantly easier and more efficient, particularly in modern cars featuring complex electrical systems.
How to Fix Car Electrical Problems – Effectively Solve It
1. Identify the Symptoms
The first and most crucial step in resolving any electrical issue in a car is to clearly identify the symptoms, as every problem presents specific warning signs that point to its root cause.
These signs may include the car failing to start, dim or flickering lights, the illumination of warning lights on the dashboard, or the malfunction of specific components such as power windows or the radio.
Paying close attention to when the problem occurs, for instance, only when starting a cold engine or while driving, greatly aids the diagnostic process.
Clearly understanding the symptoms eliminates the need for guesswork, allowing you to focus your attention on the specific section of the electrical system most likely to be at fault.
2. Check the Battery and Connections First
The battery serves as the car’s primary source of electrical power; therefore, you should always inspect the battery before examining more complex components.
A weak or discharged battery can be the underlying cause of numerous electrical issues, ranging from a failure to start to an insufficient power supply for other vehicle systems.
Using a multimeter to test the battery’s voltage reveals its overall condition, while checking the terminals for corrosion or looseness ensures that the connections are secure.
Even a thin layer of corrosion can impede the flow of electricity, resulting in diminished performance.
Tight and clean connections facilitate an uninterrupted flow of current, which is essential for the proper functioning of the entire electrical system.
3. Inspect Fuses and Relays
Fuses and relays act as protective devices and controllers within the electrical system; when these components fail, specific parts of the car cease to function.
A blown fuse interrupts the power supply to prevent damage, which can cause specific systems such as: lights or other accessories, to suddenly stop functioning.
Inspecting the fuse box and identifying any faulty fuse elements allows for a quick diagnosis of the problem.
Relays, which control high-power circuits, as it can degrade over time and cause intermittent issues.
Checking and replacing a faulty fuse or relay is a simple yet effective method that often restores the system to proper working order without the need for further repairs.
4. Inspect Wiring and Switches
Wiring and switches serve as the pathways and control points of an electrical system; any damage or malfunction at these points can disrupt the flow of electricity.
Due to heat, vibration, or age, wires can become loose, frayed, or damaged, leading to intermittent operation or complete system failure.
Carefully examining the wiring harness and checking for any visible damage helps pinpoint the problematic components.
Switches, which control the operation of various features, as it can also fail internally and stop transmitting signals.
Inspecting these components ensures that power is reaching the correct parts without interruption.
5. Check Essential Components
If the initial inspection does not resolve the issue, the next step is to check essential components such as the alternator, starter motor and sensors.
The alternator must generate the necessary voltage to keep the battery charged while the engine is running; if it fails, the battery will quickly lose its charge.
The starter motor requires a specific current to crank the engine; any deficiency in this component will prevent the car from starting.
Sensors play a crucial role in modern vehicles by transmitting data to control systems; a faulty sensor can hinder the vehicle’s proper operation.
Testing these components helps determine whether they are functioning correctly or if they require repair.
6. Repair or Replace Faulty Components
Once a faulty component has been identified, the next step is to resolve the issue by repairing or replacing that specific part.
Minor issues such as: loose connections or minor wiring faults, as it can often be repaired, whereas worn-out components like batteries, alternators, or starters typically require replacement.
Employing the correct repair techniques ensures that the problem does not recur and that the electrical system remains stable.
Selecting the appropriate replacement parts and installing them correctly is crucial for ensuring the vehicle’s long-term reliability.
7. Retesting the System to Confirm the Repair
Upon completion of repairs, it is crucial to retest the system to ensure that the issue has been fully resolved.
This step confirms that all components are functioning correctly and that no residual faults remain.
Checking voltage levels, starting the engine and testing the affected systems such as: lights or accessories, helps verify the success of the repair.
Retesting also ensures that no new problems have arisen during the process.
A thorough and final inspection provides the assurance that the vehicle’s electrical system is operating safely and efficiently.
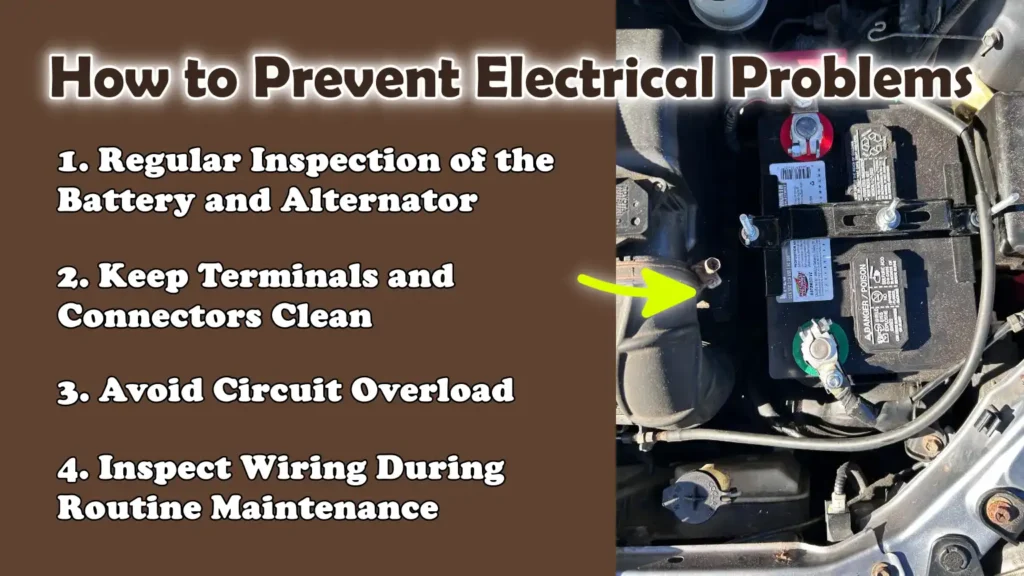
How to Prevent Electrical Problems
Additionally, the research also shows that battery failure is actually one of the most critical electrical issues in vehicle, as it is the leading cause of breakdowns globally, so this literally shows how important it is to regularly check the battery health, voltage levels and terminal connections as well. So, when you identify the early signs sucha s: slow starting or dim lights, then you can easily prevent from sudden failures and costly roadside emergencies as well.[¹]
1. Regular Inspection of the Battery and Alternator
Regularly inspecting the battery and alternator is the most effective way to prevent electrical problems in a car, as these two components are primarily responsible for supplying and regulating electrical power.
A healthy battery should maintain a consistent charge, typically around 12.
6 volts when the engine is off, and when the engine is running, the alternator should maintain a higher voltage level to keep the battery charged.
Over time, batteries lose their capacity to store energy and the efficiency of the alternator may diminish due to wear and tear on its internal components.
By inspecting them at regular intervals, you can detect early signs of malfunction, such as low voltage or charging instability.
Timely replacement of a weak battery or repairing an alternator issue can prevent sudden breakdowns, starting difficulties and damage to other electrical components.
2. Keep Terminals and Connectors Clean
Clean terminals and connectors are essential for the smooth flow of electricity, as even a small amount of dirt or corrosion can increase resistance and reduce power supply.
Battery terminals are particularly susceptible to corrosion; this often manifests as a white or green powdery buildup that obstructs proper electrical contact.
Such buildup can lead to problems such as delayed engine starting, dimming lights, or a complete failure of the electrical system.
By regularly cleaning the terminals and ensuring they are securely fastened, you enable electricity to flow without interruption.
Connectors located throughout the vehicle should also be inspected for dirt, moisture, or corrosion, as these factors can weaken electrical signals and cause system malfunctions.
Maintaining clean and secure connections improves the vehicle’s overall performance and reduces the risk of sudden electrical failures.
3. Avoid Circuit Overload
Every electrical circuit in a car is designed to handle a specific amount of current; exceeding this limit can generate excessive heat, blow fuses, or even damage wiring and components.
Circuit overload often occurs when too many accessories are used simultaneously or when aftermarket devices are installed without proper planning.
High-power-consuming devices such as: auxiliary lights, sound systems, or chargers, as it can place undue strain on the system if not connected correctly.
When a circuit becomes overloaded, fuses blow to protect the system; however, repeated overloading can lead to long-term damage.
Understanding the limitations of your vehicle’s electrical system and using accessories within safe limits helps maintain system stability and prevents costly repairs.
4. Inspect Wiring During Routine Maintenance
Wiring delivers power to every part of the car and its condition directly determines how efficiently the system operates.
Over time, exposure to heat, vibration, or sharp edges can degrade wires, leading to cracked insulation, exposed metal conductors, or loose connections.
These issues can result in short circuits, power loss, or the sudden failure of electrical components.
Regularly inspecting the wiring during routine maintenance helps identify early signs of deterioration before they escalate into serious problems.
Checking for damaged insulation, loose connectors, or signs of burning ensures that the electrical system remains safe and reliable.
Timely repair of minor issues helps prevent major malfunctions and ensures that the vehicle continues to run smoothly.
Read More:
- How to Pass a Car Emissions Test
- How to Fix Rotten Egg Smell in Car
- How to Diagnose a Bad Catalytic Converter
- How to Replace a Muffler
- How to Fix an Exhaust Leak
When to Consult an Mechanic?
1. Complex Issues Related to the ECU or Sensors
Modern vehicles rely heavily on highly advanced electronic control systems; the Engine Control Unit, often referred to as the ECU, acts as a central computer that manages engine performance, fuel injection, ignition timing and various electrical functions.
When issues stem from the ECU or the vehicle’s numerous sensors, diagnosing them can be challenging, as these systems depend on precise data and seamless coordination between various vehicle components.
Even a minor malfunction in a single sensor can disrupt the entire system, leading to compromised vehicle performance, illuminated warning lights, or erratic vehicle behavior.
Resolving these issues often requires specialized diagnostic tools and software to interpret detailed data and conduct accurate testing.
Attempting to fix such problems without the proper expertise can result in incorrect repairs or even further damage; therefore, professional technicians are best equipped to handle these complex systems safely and effectively.
2. Recurring Electrical Faults Despite Initial Diagnostics
If an electrical issue persists, or recurs, even after you have performed basic checks and repairs, it is a clear indication that the root cause of the problem has not yet been fully identified.
Recurring faults may be attributed to hidden wiring defects, internal electrical malfunctions, or components that fail only under specific operating conditions, while appearing to function normally during standard inspections.
For instance, if a fuse blows repeatedly or a battery frequently drains, it could signal a larger underlying issue such as: a short circuit or a “parasitic drain” (unnecessary power consumption), which is difficult to identify without advanced diagnostic tools.
Professionals employ systematic testing methods and specialized equipment to accurately pinpoint the root cause of these complex problems.
Seeking expert assistance at this stage helps prevent wasted time, the need for repeated parts replacements and escalating repair costs.
3. Safety Hazards: Such as Sparks, Smoke, or Battery Leaks
Electrical issues manifesting as sparks, rising smoke, or battery leaks must always be treated with the utmost seriousness, as they indicate a significant risk of damage or injury.
Sparks can result from short circuits or loose connections; if left unaddressed, they can quickly escalate into a fire.
Smoke often signals overheating wires or components, indicating that the system is under excessive strain and at risk of total failure.
Battery leakage also poses a hazard, as batteries contain chemicals that can damage equipment and cause injury to the skin or eyes.
It is imperative to address such situations immediately and one should not attempt to repair them without proper safety precautions and expertise.
Professional technicians possess the necessary tools and safety gear to handle these hazards safely, ensuring that the issue is resolved without causing further damage.
Conclusion – How to Fix Car Electrical Problems
So, from now you have clearly understood the value of silent power flow and most of the car breakdowns gives warning signs early as we have mentioned them so that you can easily recognize them and save time and expensive repairs as well.
Every electrical system in a car functions as an interconnected network: the battery supplies power, the alternator maintains it and wires and components distribute it to various parts of the vehicle.
When even a minor part of this system malfunctions, it can impact the entire car; this is why early detection of a problem is so crucial.
By recognizing common symptoms such as: dimming lights, slow engine cranking, illuminated warning indicators, or malfunctioning accessories, you can quickly pinpoint the root cause of the issue.
Utilizing common tools like a multimeter or a test light allows you to accurately check voltages, connections and circuits, thereby minimizing guesswork and saving you both time and money.
Regular maintenance plays a vital role in preventing electrical faults; simple tasks such as: keeping battery terminals clean, periodically inspecting wiring and avoiding overloading circuits, as it can significantly extend the lifespan of your vehicle’s electrical system.
When troubleshooting, it is also essential to adopt a systematic, step-by-step approach, starting with the battery and progressing toward more complex components, to ensure that no critical element is overlooked.
Furthermore, recognizing your own limitations is equally important, particularly when dealing with modern systems, recurring faults, or potential safety hazards.
In such instances, seeking professional assistance ensures an accurate diagnosis and helps prevent further damage.
That’s all from this guide about How to Fix Car Electrical Problems, if you still have questions just comment that down below.
Frequently Asked Questions
FAQ 1: What are the most common electrical problems in a car?
The most common electrical problems in a car include a completely dead or weak battery, a failing alternator, blown fuses, wiring faults and issues related to the starter motor. These problems often present clear warning signs, such as the car failing to start, dim or flickering lights, warning lights illuminating on the dashboard, or accessories like power windows and the radio failing to function properly. In many cases, the issue is minor such as: a loose connection or slight corrosion but if ignored, it can escalate into a major and more costly problem. Understanding these common issues helps you identify the root cause of the trouble and take appropriate action in a timely manner.
FAQ 2: How can I determine whether my car’s battery is completely dead or merely weak?
A completely dead battery typically means that the car will not start at all; when you turn the key or press the start button, you will hear absolutely no sound. On the other hand, if the battery is merely weak, the car might start, but very sluggishly; you may also notice dim headlights or other electrical systems failing to function correctly. You can assess the battery’s condition by checking its voltage using a multimeter. With the engine turned off, a healthy battery typically registers a voltage of approximately 12.6 volts. If the reading is significantly lower than this, the battery may need to be recharged or replaced. If the battery is still serviceable, cleaning its terminals and tightening the connections can also help improve its performance.
FAQ 3: What are the signs of a failing alternator?
A faulty alternator often exhibits the following symptoms: rapid battery discharge, dim or flickering headlights, illuminated dashboard warning lights, or erratic behavior of the electrical system. In some cases, the car may start normally, but power output begins to drop while driving because the alternator is unable to supply sufficient electricity. You can confirm this by starting the engine and measuring the voltage; this reading should typically fall between 13.5 and 14.5 volts. If the reading is significantly low or unstable, the alternator may not be functioning correctly and may require repair or replacement.
FAQ 4: Why do my car’s fuses keep blowing?
If your car’s fuses blow repeatedly, it indicates an underlying issue within the electrical system such as: a short circuit or an excessive flow of current through the circuit. Fuses are designed to interrupt the connection when a fault occurs; therefore, frequent fuse blowing is not the primary problem itself, but rather a warning signal. This can be caused by faulty wiring, defective components, or the installation of accessories that draw more power than the circuit is designed to handle. Simply replacing the fuse will not provide a permanent solution to this issue. To prevent this problem from recurring, you must identify and resolve the root cause.
FAQ 5: How can I tell if a specific wire in my car is faulty?
To determine whether a particular wire is defective, you should first look for obvious visual cues, such as cracks, cuts, exposed wire strands, or burn marks on the insulation. These are all definitive signs that the wire is not functioning properly. You can also use a multimeter to check for wire ‘continuity’ (i.e., the flow of electricity through the wire). If the multimeter shows no continuity, it indicates that the wire is broken somewhere along its length. Loose wire ends or corrosion on them can also cause problems; therefore, it is crucial to carefully inspect both the wire and its connection points.
FAQ 6: Can I fix car electrical problems at home?
Yes, provided you have the right tools and follow the correct procedures, you can fix many minor car electrical problems right at home. Tasks such as cleaning battery terminals, replacing a blown fuse, tightening loose connections, or replacing a battery are relatively simple and can be performed by most people themselves. However, for more complex issues involving the alternator, starter motor, or electronic control systems, you may need to seek the assistance of a professional. It is essential to recognize your limitations and always adhere to safety protocols when working on electrical components.
FAQ 7: What tools will I need to diagnose car electrical problems?
The most essential tools for diagnosing car electrical problems include a multimeter, a test light and some common hand tools (such as wire strippers and crimpers). A multimeter allows you to measure voltage, resistance and continuity all of which are vital for understanding how electricity is flowing through the system. A test light enables you to quickly determine whether or not power is present in a specific circuit. With the aid of these tools, you can accurately pinpoint the root cause of a problem rather than relying on guesswork.
References:
[1] Breakdown (vehicle)
https://en.wikipedia.org/wiki/Breakdown_%28vehicle%29

Hello Folks, Dean Shali here to help you out to solve the problems with your lovely vehicle, as i have lots of experience and knowledge about automotive industry as i woks directly with the customers and repair vehicles and i love to help the people to keep their cars safe and running smoothly.