Written By: Dean Shali
Fact Checked By: Sabré Cook
Reviewed By: Tamara Warren
In literal way: your car battery is the “HEART” of your vehicle’s electrical system, as it actually powers everything from the starter motor to the lights, infotainment system and even safety features as well.
So, if there’s a healthy battery then it typically maintains a voltage of around 12.6 to 12.8 volts when it is fully charges, while a reading below 12.4 volts can indicate their partial discharge of it and below 12 volts it may signal of failing or having completely dead battery.
And, if you are noticing something unusual such as: sudden car no-starts, dim headlights or slow engine cranking then these are the early warning signs that your battery is actually struggling to give proper power.
So, in this guide you’ll learn How to Check Car Battery Voltage with Multimeter, so that you can understand by checking your battery voltage in simple, accurate way to prevent unexpected breakdowns and extend the lifespan of your battery as well.
Tools
| Tool / Item | What It Is | How to Use It |
|---|---|---|
| Digital Multimeter | A small device that measures electrical properties, including voltage, current and resistance. | Set it to DC voltage, connect the red probe to the positive terminal of the battery and the black probe to the negative terminal, then read the voltage. |
| Protective Gloves – Optional | Gloves made of rubber or another non-conductive material. | Put them on before touching the battery terminals. |
| Safety Glasses – Optional | Protective eyewear for eye safety. | Wear this while working near the battery. |
| Battery Terminal Cleaner – Optional | A small brush or tool for cleaning the battery terminals. | Gently scrub away any corrosion or dirt from the terminals. |
How to Make Sure You Stay On The Safe Side
1. Ensure the Car is Turned Off
Before you begin checking your battery’s voltage, it is absolutely essential to ensure that the car is completely turned off.
This means the ignition must be switched off and no electrical systems such as: lights, the radio, or air conditioning, should be running.
If the car is running or even partially powered on, your multimeter may provide inaccurate readings and sparks could fly, creating a hazardous situation.
Keeping the car turned off protects both you and the vehicle from sudden electrical shocks or short circuits.
2. Avoid Wearing Metal Jewelry
Metal objects such as: rings, bracelets, or watches, as it can conduct electricity.
When working near battery terminals, wearing metal jewelry significantly increases the risk of causing a short circuit.
Even the slightest contact between a metal ring and the battery terminals can generate sparks or pose a risk of burns.
Removing all metal jewelry before you begin working creates a safer environment and helps prevent accidental damage to the battery or the multimeter.
3. Work in a Well-Ventilated Area
Car batteries contain acid that can emit harmful fumes, particularly if the battery is damaged or has been overcharged.
Working in a well-ventilated area allows these fumes to dissipate quickly, thereby reducing the risk of inhaling hazardous gases.
Proper ventilation ensures that no explosive gases accumulate in the surrounding area while you are testing the battery.
4. Keep the Multimeter Away from Water or Moisture
Electricity and water do not mix.
Exposing your multimeter to water or moisture can damage the device, result in inaccurate readings, or even cause an electric shock.
Before you begin testing, always ensure that your hands, your tools and the battery area itself are dry.
Keeping a multimeter dry extends its lifespan and ensures that it continues to provide accurate measurements over time.
Let’s Understand About Your Car Battery
1. What is a 12V Lead-Acid Battery?
Most cars utilize a 12-volt lead-acid battery to power the engine starter, lights and other electrical systems.
This battery consists of lead plates submerged in a liquid electrolyte composed of sulfuric acid and water.
When the battery generates electricity, a chemical reaction occurs between the lead plates and the electrolyte, producing the power necessary to start the car and operate its electrical components.
Lead-acid batteries are widely used because they are reliable, cost-effective and capable of delivering the high current required to start an engine.
2. Voltage Levels: Fully Charged, Partially Charged and Dead Batteries
A fully charged 12-volt battery typically registers a voltage between 12.6 and 12.8 volts.
When the voltage drops to approximately 12.2 to 12.5 volts, the battery is only partially charged and may require recharging soon.
A battery reading below 12 volts indicates that the battery is discharged, or nearly dead, and may be unable to start the car.
Understanding these voltage levels helps drivers identify potential battery-related issues before they lead to a vehicle breakdown; therefore, regular checks are an essential part of car maintenance.
3. Why Doesn’t Voltage Alone Indicate Battery Health?
Although measuring voltage is the simplest method for checking a battery, it does not always reveal the battery’s complete condition.
A battery’s voltage reading may appear normal, yet the battery could be weak and unable to deliver sufficient current when placed under load.
For a more accurate assessment, a “load test” can be performed to determine how the battery performs while powering the car’s electrical system.
This optional test provides better insight into the battery’s true health and its ability to reliably start the engine.
How to Set Up the Multimeter
1. Turning On the Multimeter
The first step in testing your car battery is to turn on the multimeter.
Most digital multimeters feature a power button or a dial used to activate the device.
It is crucial to ensure that the multimeter is properly powered on; if the device is off or incorrectly configured, it will not provide accurate readings.
An active multimeter displays a clear digital reading that accurately indicates the voltage, information that is essential for assessing the condition of your battery.
2. Setting to DC Voltage
Car batteries generate Direct Current (DC), which flows in a single direction.
Therefore, the multimeter must be set to measure DC voltage, which is typically indicated by a “V” followed by a straight line.
Selecting the correct measurement mode is vital; if the multimeter is set to AC voltage (which is used for household electricity), the readings will be incorrect and the device could even sustain damage.
Choosing the DC voltage setting ensures that the measurement accurately reflects the battery’s power output.
3. Ensuring the Correct Voltage Range
Most car batteries produce approximately 12 volts; therefore, to obtain an accurate reading, the multimeter’s voltage range must be set to a value higher than the battery’s estimated voltage.
For most digital multimeters, setting the range to 20 volts DC is the optimal choice.
Using the correct range allows the multimeter to read the voltage clearly and accurately, without displaying any overload warnings or erratic fluctuations.
This step ensures that the measurement is both safe and precise, helping you determine whether the battery is fully charged, partially charged, or beginning to fail.
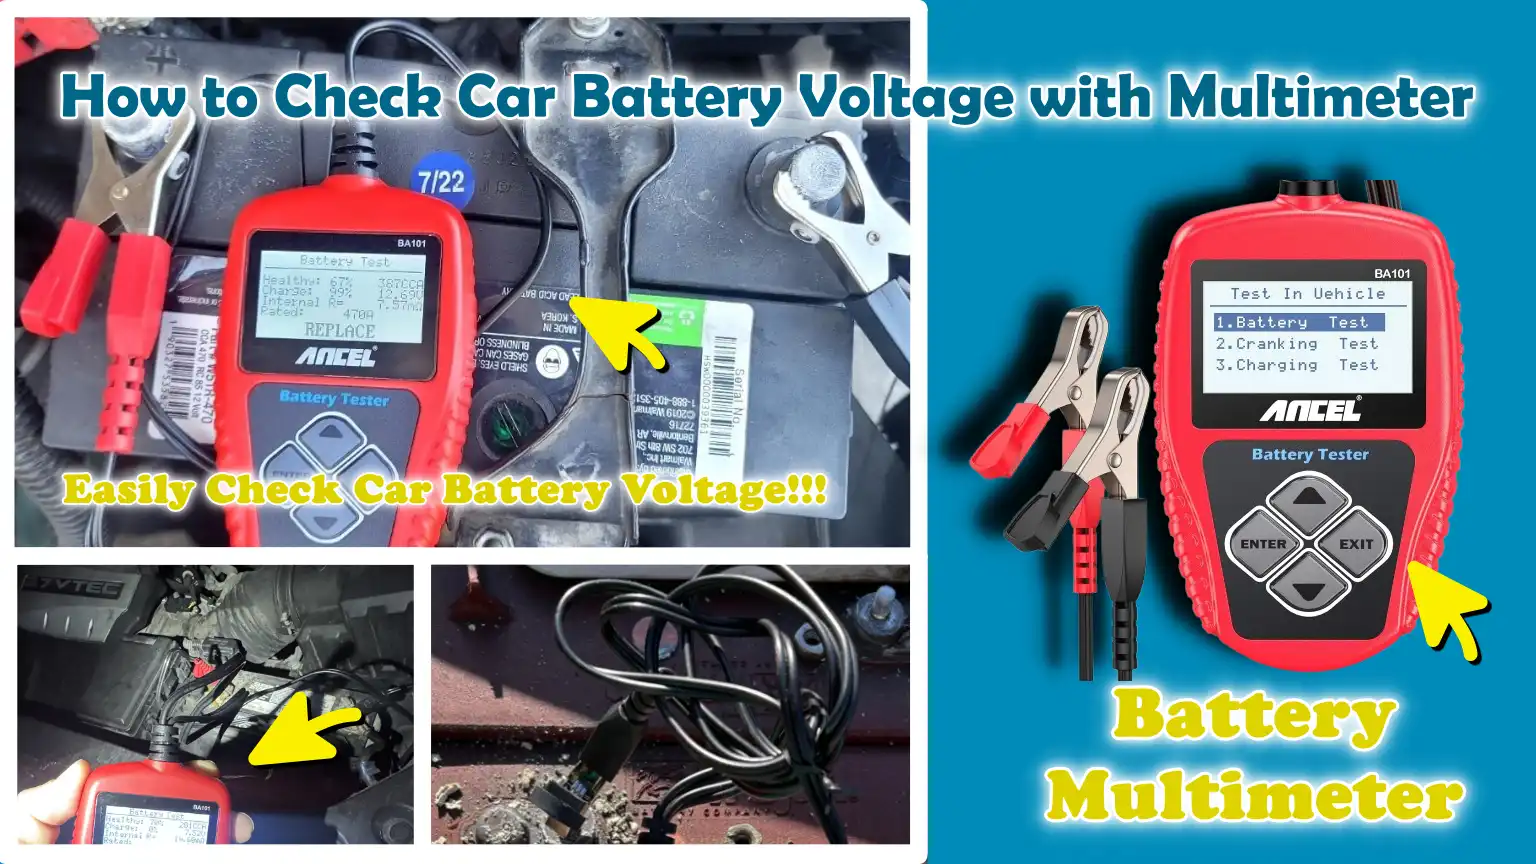
How to Check The Battery Voltage
1. Locating the Battery Terminals
The first step in checking your car battery’s voltage is to locate the battery terminals.
Most car batteries have two terminals: a positive terminal marked with a plus sign (usually covered by a red cap) and a negative terminal marked with a minus sign (usually covered in black).
Correctly identifying the terminals is crucial, as connecting the multimeter probes to the wrong terminals can result in inaccurate readings and may even damage the battery or the multimeter.
Knowing the precise location of these terminals ensures a safe and accurate measurement.
2. Connecting the Multimeter Probes
Once the terminals have been identified, carefully connect the multimeter probes.
The red probe should be connected to the positive terminal and the black probe to the negative terminal.
This is essential because reversing the connections can result in a negative reading, which may confuse beginners regarding the battery’s condition.
Ensure that the probes are firmly attached to the metal parts of the terminals and do not slip, as loose connections can cause the readings to fluctuate or be inaccurate.
3. Viewing the Voltage Reading on the Multimeter
Once the probes are properly connected, look at the multimeter’s digital display to view the voltage reading.
A fully charged battery typically reads between 12.6 and 12.8 volts; a partially charged battery reads between 12.2 and 12.5 volts; and a battery reading below 12 volts may be discharged or on the verge of failure.
An accurate voltage reading allows you to assess the battery’s current condition and determine whether it can reliably start the car.
4. Comparing with Standard Values
After noting the voltage, compare the readings against standard battery voltage levels to assess the condition of the battery.
Understanding these standards helps you determine whether the battery is in good condition, requires charging, or needs to be replaced.
Comparing the measured value against standard limits helps prevent misdiagnosis and ensures that your vehicle remains reliable.
Thus, regularly checking the voltage in this manner is a simple yet effective way to avoid sudden battery failure.
Now, Let’s Understand About the Results
1. Fully Charged, Normal, or Needs Charging
After measuring your car battery’s voltage, the first step is to understand what the reading signifies.
A fully charged 12-volt battery typically registers a reading between 12.6 and 12.8 volts, indicating that it is in excellent condition and ready to reliably start the car.
A reading between 12.2 and 12.5 volts suggests that the battery is partially charged and may require recharging soon to avoid potential starting difficulties.
When the voltage drops below 12 volts, the battery is considered discharged or weak and may struggle to start the engine.
Knowing these ranges helps you take timely action before a minor issue escalates into a major malfunction.
2. Signs of a Failing Battery
Even if a battery displays a normal voltage reading, it may still be failing if it fails to maintain its charge under load.
Signs of a failing battery include consistently low voltage readings even after charging, slow engine cranking, dim headlights, or recurring minor electrical issues within the vehicle.
These symptoms suggest that the battery’s internal plates or electrolyte may be deteriorating.
Recognizing these early warning signs allows you to take immediate action and avoid getting stranded on the road due to a sudden battery failure.
3. When to Consult an Expert or Replace the Battery
If the battery consistently shows low voltage, fails to start the car, or continues to exhibit various warning signs even after charging, it is time to consult an expert or consider replacing the battery.
A specialist can conduct a more thorough examination such as: a “load test”, to determine whether the battery can perform reliably under normal operating conditions.
Replacing a deteriorating battery not only restores the car’s ability to start reliably but also safeguards its electrical system against damage caused by voltage fluctuations.
Taking timely action ensures that your vehicle remains safe, dependable and always ready to drive.
How to Test While the Car is Running
1. How the Alternator Affects Voltage Readings
When the car’s engine is running, the battery is no longer the sole source of power; instead, the alternator generates electricity, powering the car’s electrical system and recharging the battery.
The alternator increases the voltage within the system, which may cause multimeter readings to appear higher than those taken when the car was turned off.
Understanding this effect is crucial, as it helps distinguish between battery-related issues and problems with the charging system.
Measuring voltage while the engine is running reveals whether both the battery and the alternator are functioning correctly.
2. Normal Alternator Output
A properly functioning alternator typically generates a voltage between 13.7 and 14.7 volts while the engine is running.
This range ensures that the battery receives sufficient charge to remain fully charged, while simultaneously supplying power to all of the car’s electrical components.
If the voltage falls within this range, it indicates that the alternator is performing its duty efficiently and maintaining a proper electrical balance.
Checking this output is a simple way to determine whether your car’s charging system is working correctly.
3. What Abnormal Readings Indicate
If voltage readings fall outside the normal range of 13.7 to 14.7 volts, it may signal potential problems within the charging system.
A reading below 13.7 volts could mean that the alternator is undercharging, which may lead to the battery gradually discharging and cause difficulties in starting the car.
Conversely, a reading above 14.7 volts could indicate that the alternator is overcharging, which can cause damage to the battery and other electrical components.
By detecting abnormal readings early, you can resolve alternator or wiring issues before they escalate into more serious malfunctions; this ensures that your vehicle remains reliable and safe to drive.
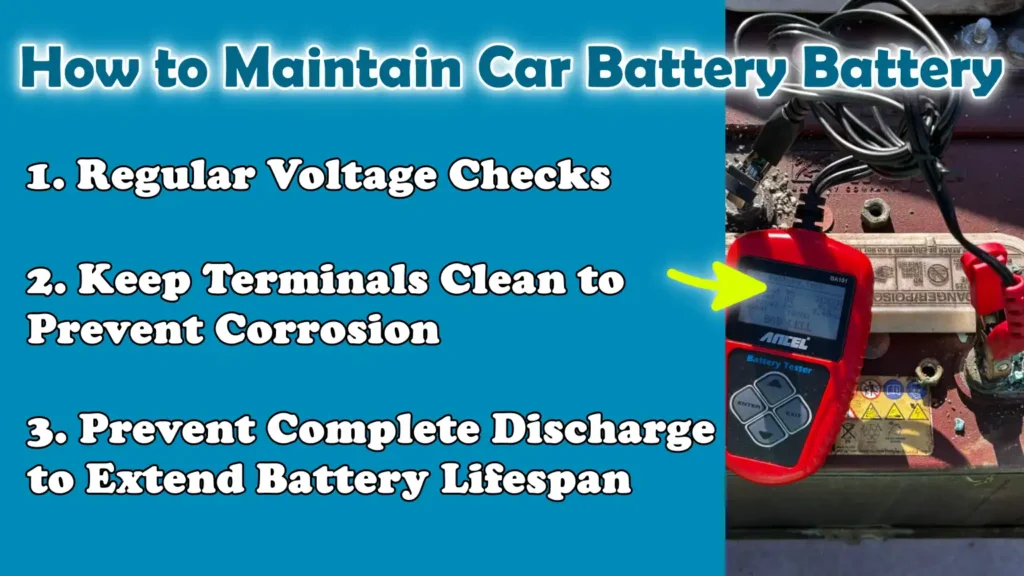
How to Maintain Car Battery Battery
Also, there’s research that shows that even simple voltage measurements at the battery can act as an early warning tool for any broader vehicle electrical issues, specially if it is related to the engine starting ability and charging performance as well, so this actually supports that the use of a multimeter as reliable first diagnostic step for maintaining car battery health.[¹]
1. Regular Voltage Checks
The most effective way to keep your car battery healthy is to check its voltage regularly, ideally every few months.
Regular checks allow you to identify minor voltage drops before they escalate into serious problems; otherwise, you risk getting stranded on the road.
By periodically monitoring the battery’s voltage, you can determine whether it is fully charged, slowly discharging, or showing early signs of deterioration.
This simple habit enables you to take preventive measures such as: recharging the battery or having it serviced, thereby extending its lifespan and ensuring reliable vehicle performance.
2. Keep Terminals Clean to Prevent Corrosion
Corrosion, dust, or rust can accumulate on battery terminals, potentially disrupting the connection between the battery and the car’s electrical system.
Periodically cleaning the terminals with a battery terminal cleaner or a brush ensures a proper flow of electricity and prevents voltage drops.
Corrosion buildup can lead to difficulties in starting the car, inaccurate voltage readings and even a reduced battery lifespan.
Keeping the terminals clean is a simple yet highly effective method for maintaining battery health and avoiding sudden malfunctions.
3. Prevent Complete Discharge to Extend Battery Lifespan
Allowing a car battery to discharge completely on a frequent basis can significantly shorten its lifespan.
Complete discharge places excessive strain on the battery’s plates and electrolyte, diminishing its capacity and ultimately leading to premature failure.
To maximize your battery’s lifespan, prioritize recharging it immediately whenever its voltage drops below the normal operating range.
Furthermore, when the car’s engine is turned off, do not leave the lights, electronic gadgets, or other accessories switched on.
Maintaining an adequate charge level in the battery ensures that it continues to function effectively and reliably for a long time.
Read More:
- How to Check Parasitic Battery Drain
- How to Replace a Starter Motor
- How to Check Car Battery Health with a Multimeter
- How to Fix Car Not Starting
Conclusion – How to Check Car Battery Voltage with Multimeter
Maintaining a battery health is really important by measuring the correct voltage, cleaning its terminals and monitoring charge levels that can literally save you from big headaches and long waits in journey as well.
By understanding how to measure voltage, interpret readings and monitor changes over time, you can identify early signs of battery failure, prevent sudden breakdowns and avoid costly repairs or towing services.
Regular maintenance such as: cleaning the terminals, preventing the battery from fully discharging and testing it while the engine is running, helps extend the battery’s lifespan and ensures consistent, optimal electrical performance.
Knowing when to recharge, service, or replace your battery empowers you to maintain full control over your vehicle’s health and protects you from potential issues on the road.
Now, that’s all from this guide from How to Check Car Battery Voltage with Multimeter, even you can ask more questions in the comment section below.
Frequently Asked Questions
FAQ 1: What is the normal voltage of a car battery?
The voltage of a fully charged 12-volt car battery typically ranges between 12.6 and 12.8 volts when the engine is turned off. If the voltage drops to between 12.2 and 12.5 volts, the battery is partially charged and may require recharging soon. When the voltage falls below 12 volts, it indicates that the battery is discharged or weak, which may make it difficult to start the car. Regularly checking the voltage helps you monitor the battery’s condition and can prevent you from getting stranded unexpectedly.
FAQ 2: How can I safely measure my car battery’s voltage?
To safely measure the battery’s voltage, first ensure that the car is turned off and remove any metal jewelry to avoid short circuits. If you have safety gloves and safety goggles, put them on. Set your multimeter to DC voltage: typically around 20 volts and connect the red probe to the positive terminal and the black probe to the negative terminal. Read the voltage displayed on the multimeter and compare it against standard values to assess the battery’s condition.
FAQ 3: Why is my battery’s voltage still low after charging?
If your battery’s voltage remains low even after charging, it could be a sign that the battery is failing. This can happen if the battery plates are worn out, the electrolyte level is low, or the battery is unable to hold a charge under load. In some cases, the alternator may not be charging the battery properly. If this occurs repeatedly, it is best to have both the battery and the charging system inspected by a professional.
FAQ 4: Can I check my car battery’s voltage while the engine is running?
Yes, you can check the voltage while the engine is running, but the reading will also include the alternator’s output. A healthy alternator typically outputs between 13.7 and 14.7 volts, indicating that it is properly charging the battery while simultaneously powering the car’s electrical system. Voltage readings falling outside this range may signal issues with the alternator or wiring; problems that should be rectified to prevent damage to the battery or the electrical system.
FAQ 5: How often should I check my car battery’s voltage?
It is a good idea to check your car battery’s voltage every few months, specially before embarking on long trips or during periods of adverse weather conditions. Regular checks allow you to detect minor drops in voltage before they escalate into major problems. By keeping a close watch on your battery, you can recharge it when necessary and avoid situations where the car suddenly refuses to start; this also extends the battery’s lifespan and ensures that your car always starts reliably.
FAQ 6: What are the signs of a failing car battery?
A failing battery often exhibits several warning signs, such as slow engine cranking, dim headlights, flickering dashboard lights, or electrical components failing to function correctly. Consistently low voltage readings, even after charging or recurring instances where the car fails to start are also clear indications that the battery is nearing the end of its useful life. By recognizing these signs early, you can take the necessary proactive steps such as: charging, servicing, or replacing the battery to avoid getting stranded on the road.
FAQ 7: Do I need any special tools to check my car battery’s voltage?
You will need just one essential tool: a digital multimeter. These devices are both affordable and easy to use. Although wearing gloves and safety glasses for protection is not strictly mandatory, it is highly recommended from a safety perspective. If signs of corrosion are visible on the battery terminals, a ‘battery terminal cleaner’ can be used to clean them; corrosion can lead to inaccurate voltage readings. This task does not require any specialized skills; simply follow the appropriate safety guidelines and carefully read the instructions provided with the multimeter that is all you need to accurately check your battery’s voltage.
FAQ 8: What should I do if my battery voltage is low?
If your battery voltage is low, the first step you can take is to attempt to recharge it using a ‘car battery charger.’ Do not forget to thoroughly clean the terminals to ensure a proper connection and prevent any voltage drop. If the battery voltage remains low even after charging, or if it repeatedly discharges, it may be time to replace it. Regularly checking the voltage and properly maintaining your battery can help you avoid sudden malfunctions and extend the lifespan of your battery.
References:
[1] Voltage Signals Measured Directly at the Battery and via On-Board Diagnostics: A Comparison
https://www.mdpi.com/2624-8921/5/2/35

Hello Folks, Dean Shali here to help you out to solve the problems with your lovely vehicle, as i have lots of experience and knowledge about automotive industry as i woks directly with the customers and repair vehicles and i love to help the people to keep their cars safe and running smoothly.